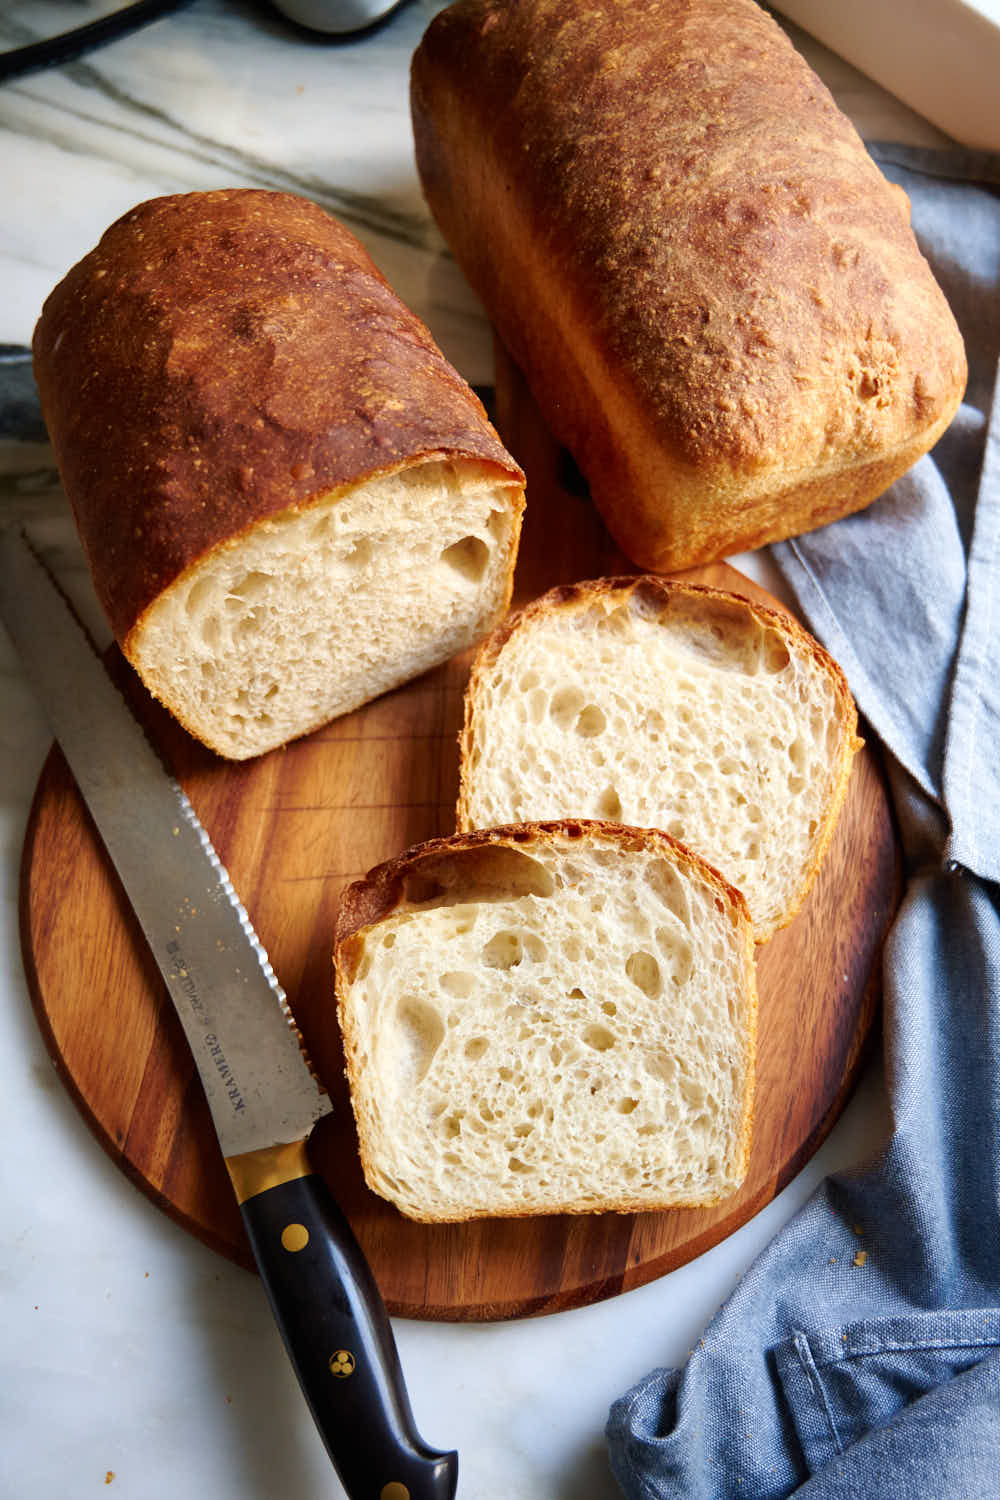
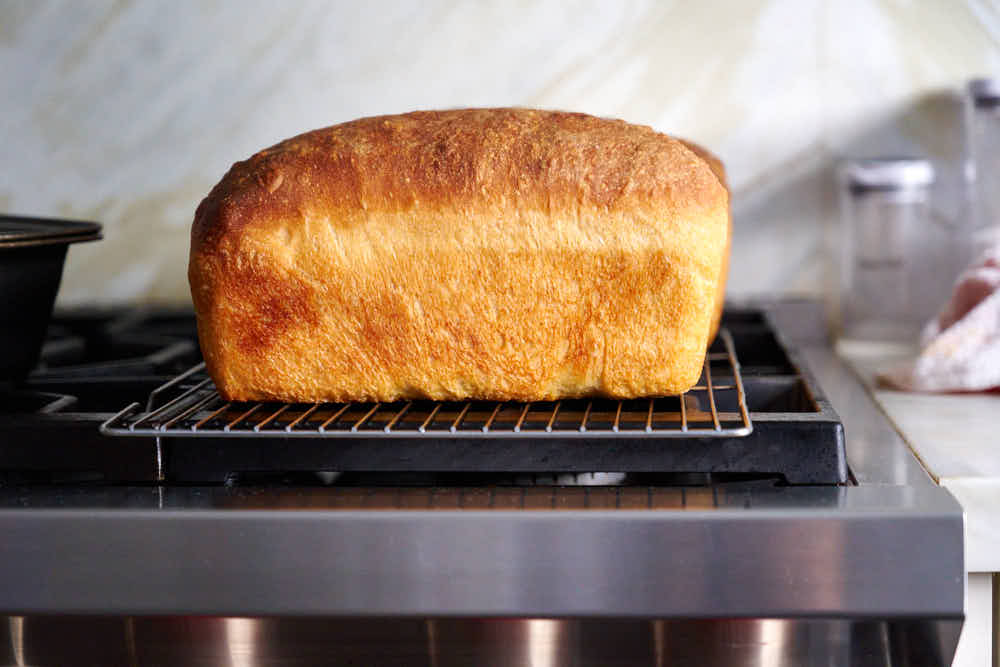
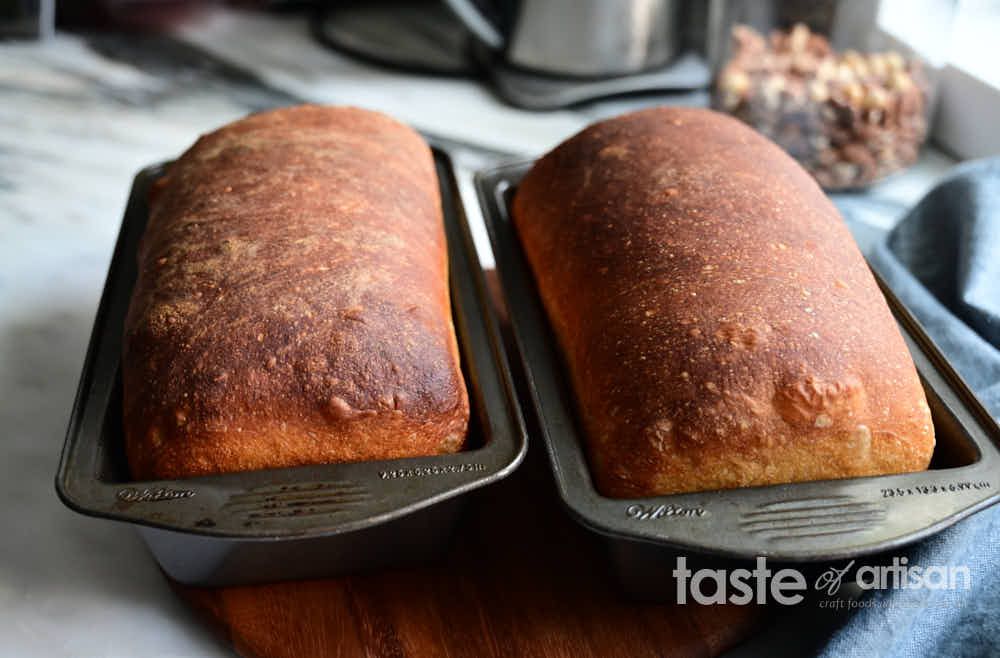
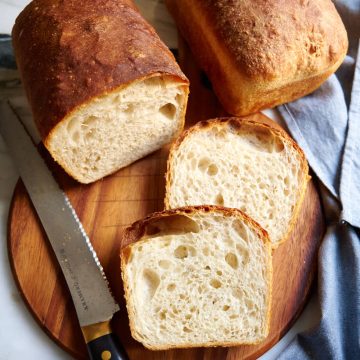
I developed this pan bread recipe for my teenage kids so that they can bake tasty and flavorful bread easily, quickly, and fail-proof when I don't have the time for baking. We ended up liking it so much that this has become our new favorite bread. It's very flavorful, soft, and airy inside, with big holes, and a nice golden brown, thin, and crispy crust.
How is this pan bread recipe different?
There are so many fantastic bread recipes out there but many require skill, experience, and time commitment. On the other hand, this pan bread recipe is simple, straightforward, and quick to make. You really don't need much baking experience to be successful with it. It's a cross between my No-Knead Bread and No-Knead Sourdough Bread; it's as quick to make as the no-knead bread but with the robust flavor of the sourdough bread.
Baking this bread in a 9" x 5" bread pan eliminated the stress associated with dough shaping, scoring, and transferring to the oven for novice bakers. There is also no need to own or deal with baking stones, cloches, or hot cast iron cookers. This recipe is as easy as it gets for the big flavor your get from this bread and let me tell you, this bread is extraordinarily good.
I think its taste rivals my favorite French baguettes. The crumb is very similar - open, airy, and with big beautiful holes.
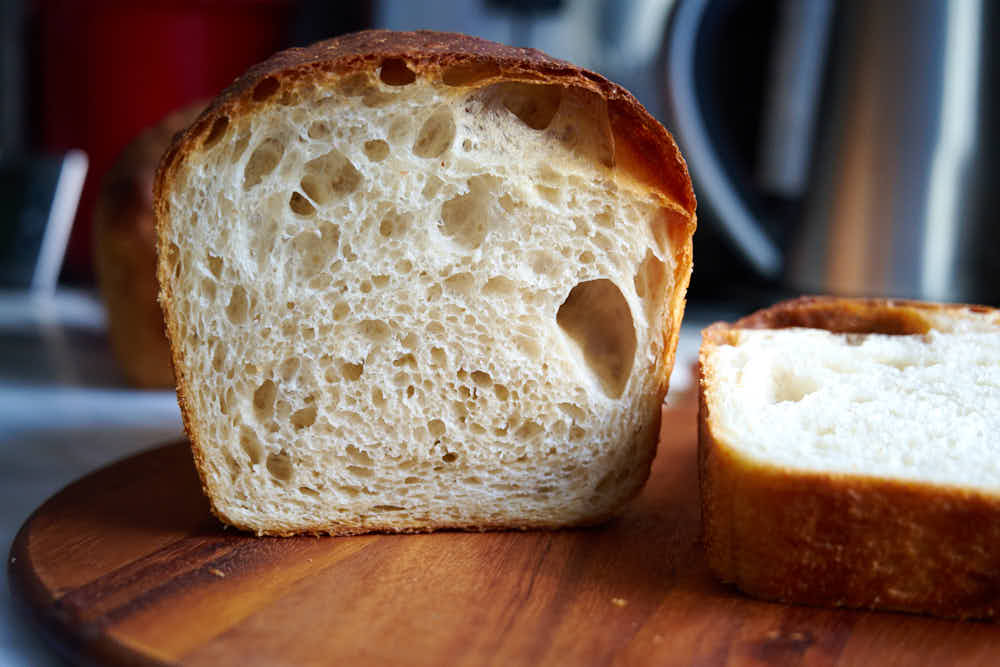
While the shape of the bread is different, the crust has similar wonderful qualities - thin and crispy. It has outstanding texture when straight from the oven. Since we bake this bread in well-buttered pans, the crust absorbs all that butter, making it exceptionally crisp and flavorful.
I can eat this bread like I do baguettes - without anything, or with just a little bit of butter or cream cheese, or with some homemade strawberry jam... It's just as addictive as my baguettes. Even without adding honey to the dough as I do with baguettes. I may try that though... or add a little bit of liquid malt extract for a touch of sweetness and nuttiness.
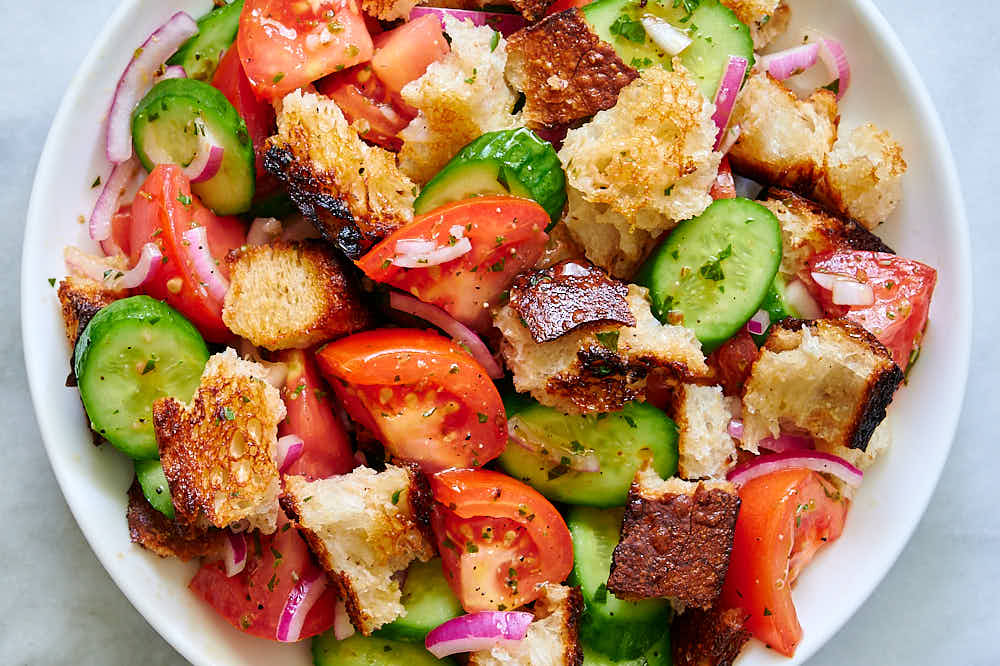
When this bread cools down the crust softens up while the crumb remains soft and moist. It has very good keeping qualities and stays soft, fresh, and very tasty for a few days. It makes excellent sandwich bread. Toast it or grill it, tear it into pieces, and make Panzanella (bread salad) with it. Now is the best time to make it. Delicious!
Using sourdough discard in this recipe
Another great thing about this recipe is that it uses sourdough starter discard. Rather than throwing my sourdough starter away, I use it to make delicious baked goodies like cinnamon rolls, English muffins, biscuits, and this bread. It's used in this recipe for flavor, not for leavening but the bread tastes like very mild sourdough bread anyway.
How is this bread made?
The process is very simple and takes about 5-6 hours from start to finish. This is another strong point of this bread. We often start making this bead around noon and have it ready for dinner.
Mixing the dough
Combine the ingredients together by hand in a large bowl. When adding yeast and salt, put them on the opposite sides to minimize their contact. Make sure to use warm water to expedite fermentation. We use 85F (29C) water.
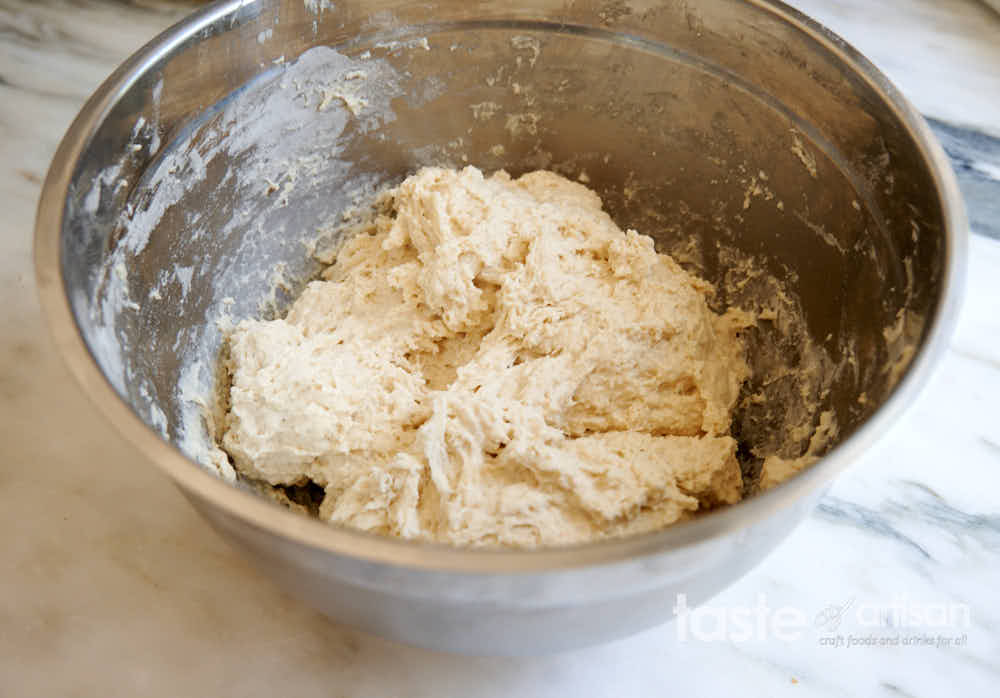
Let the flour hydrate for 3o minutes. There is no need to use a stand mixer to make bread. Mixing bread dough in a stand mixer ruins gluten structure, creating a crumbly structure with tiny holes. It will look like grocery store bread.
Stretch and folds
Next, perform three 'stretch and folds' (I go into detail on how to do that in my Artisan Sourdough Bread post) to give the dough strength and wait until it doubles in size. For this bread, space stretch and folds about 20 minutes apart.
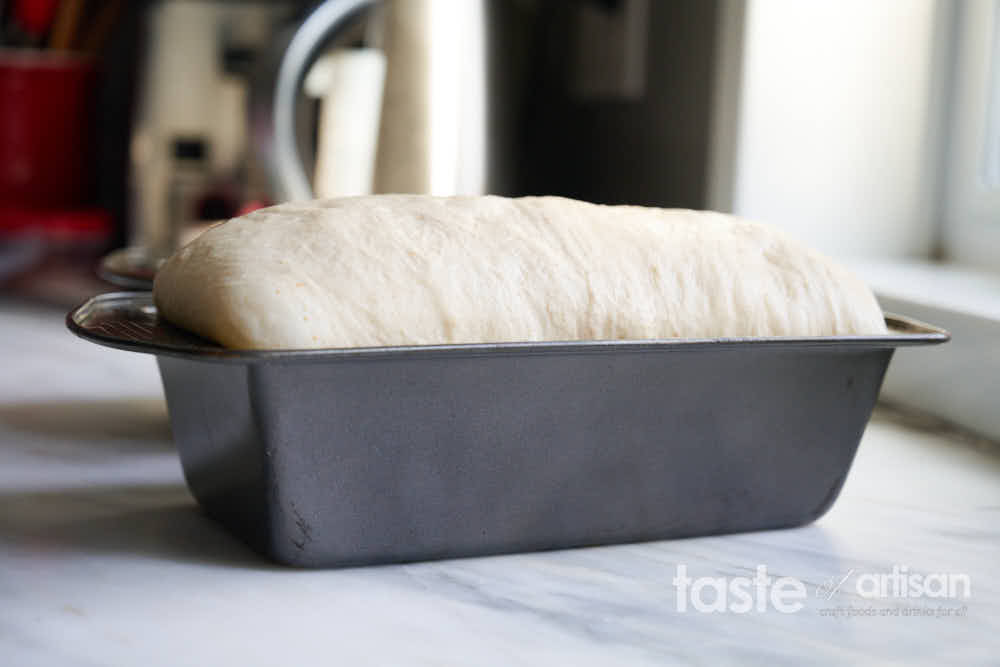
Shaping and proofing
After that, divide the dough into two equal pieces, shape it into logs, and place the logs seam side down into well-buttered bread pans. Wait until the dough about doubles in size again.
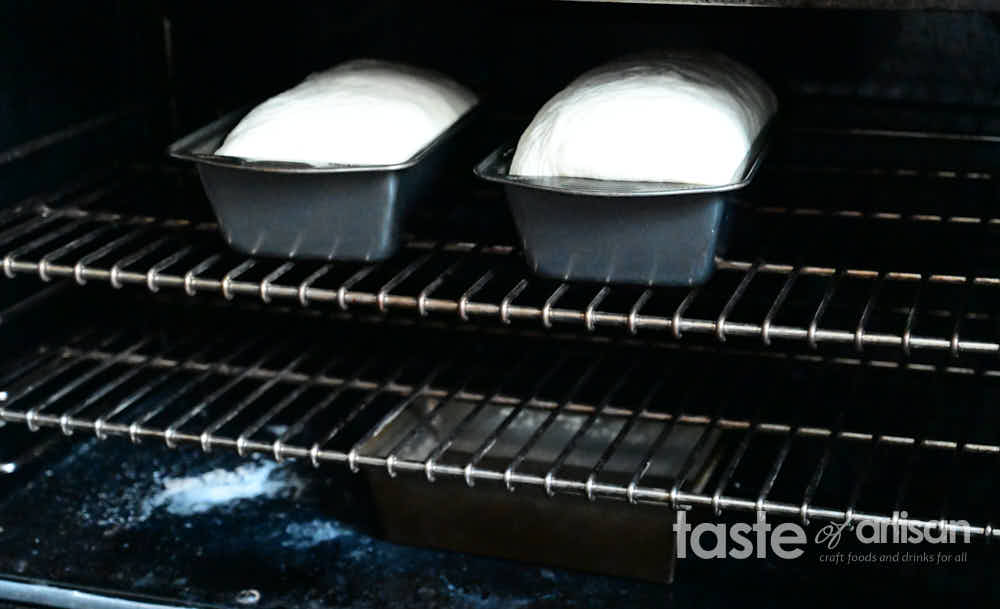
Baking
Next, place in the preheated oven and bake for 20 minutes with a pan filled with hot water and 25-30 minutes without a water pan. The baking temperature for this bread is 425F (220C) for the first 20 minutes and 400F (205C) for the rest of the baking. To make sure that enough steam is produced during the first 20 minutes of baking, place the water pan on the bottom of the oven, closest to the heat source.
Resting
It's often recommended to let bread rest for an hour before slicing. Not with this one. While this bread is very good cooled down, it's even better hot out of the oven. Don't worry, it won't be gummy like some bread tends to be when hot.
I like slicing this bread right after it comes out of the oven, just like my French baguettes, smearing some butter on it, and spending the next 15-20 minutes in heaven. It will be hot so handle it with oven mitts and use a good sharp bread knife to make nice cuts.
Storing this bread
This bread has very good keeping qualities. Let it cool completely, then wrap tightly in plastic wrap. It will stay fresh and soft for a few days.
Enjoy!
Ingredients
- 800 g bread flour (King Arthur brand recommended)
- 576 g water at 85F (29C)
- 200 g sourdough starter sourdough discard
- 16 g kosher salt
- 3 g instant yeast (SAF Gold recommended)
Instructions
- Add water and sourdough discard to a large bowl and stir until the starter is dispersed.
- Add flour, then yeast on one side of the flour and salt on the other, making sure the two don't touch each other. Mix by hand, squeezing the dough between your fingers, until a sticky homogeneous mass is formed. Cover the bowl with plastic wrap and let rest for 30 minutes.
- After 30 minutes have passed, perform a stretch and fold, then another one after 20 minutes, and another one 20 minutes later. Let the dough continue its fermentation for an additional hour to 1.5 hours or until it just doubles in size. Don't let it increase in size more than that.
- Gently turn the dough over onto a work surface and cut it in half with a serrated knife. Shape each piece into a log about 9" long, then place the logs seam side down into liberally buttered 9" x 5" bread pans.
- Cover each pan with a piece of paper towel (this will prevent sticking of the dough to the plastic wrap), then a plastic wrap. Let proof for about 1-2 hours or until the dough doubles in size.
- Preheat the oven to 425F (220C). Fill another bread pan or similar with boiling water about halfway and carefully place it on the bottom of the preheated oven.
- Transfer bread pans into the oven and bake at 425F (220C) for 20 minutes.
- After the 20 minutes is up, remove the water pan, decrease the temperature to 400F (205C) and bake for an additional 25 minutes (30 minutes if you want a more crunchy crust).
- Next, remove the bread pans from the oven and place them on top of the stove. Using oven mitts, carefully remove the bread from the bread pans and place it on a cooling rack.
- Using an oven mitt to hold the bread, carefully slice and enjoy it while the bread is hot; or let it cool down completely before eating.
- Once the bread had fully cooled down, wrap it in plastic and store it at room temperature. It will stay fresh for a few days.

Sheila says
OMG! Why is this so good!! Outside crispy, inside soft and pillowy. Great flavor, just missing some tang but this is going to be on repeat. Thank you for sharing!
Victor @ Taste of Artisan says
You are very welcome, Sheila. Enjoy!
Sheila says
Why can’t the yeast and salt touch. They’ll be touching when mixed?
Victor @ Taste of Artisan says
Some bakers argue that salt will affect the yeast's performance, King Arthur Baking posted an article on that some time ago. Some argue that the effect is negligible. Yes, they will touch later when mixed, maybe not fully as there will be some separation in the dough, but not initially when it's most important. I wouldn't stress too much about it though.
Stephanie C says
I’ve baked this recipe a lot. As it’s my favorite. I am trying only starter and no yeast. I know it will take longer to rise, but thought I’d give it a try. Have you ever done this with only starter and no yeast?
Victor @ Taste of Artisan says
Hi Stephanie, yes, I've done this recipe with just sourdough starter. You are correct, it does take longer, so you need to plan for it a little. I also made this recipe with just sourdough starter with a couple of tweaks, like using 90F water and fermenting in a warm oven - around 85F - to expedite fermentation and proofing. I liked the results. Obviously, you get better flavor with extended cold retarded fermentation, but if you want a loaf sooner, this works and works well. I also made some changes to how I bake this bread, without a water pan, and I loved the results. Happy baking!
Stephanie C says
Thank you! I made it last week and it turned out well. I do need to let it rise in the pan a little longer before baking it. I did use the water pan but will try it without this time. Even though I didn’t do a cold ferment, it still tasted like sourdough and we loved it. Practice makes perfect, eventually!
Victor @ Taste of Artisan says
Fantastic. If you aren't going to use a pan, cover with foil for the first half of the baking. I make a little dome to let the dough spring without touching the foil. Lovely crust. Happy baking!
Sarah Penny says
This has been our go to for a delicious quick sourdough bread, it's my son's favorite! Just curious though, if I start this late in the day and want to finish the next morning, at what stage would I put this in the fridge? During the two hour rise or after I have split them and put them in pans? Or is an overnight in the fridge not an option?
Victor @ Taste of Artisan says
Sarah, I have several bread recipes where I describe my overnight technique, like my French baguette recipe. For this particular bread recipe, I would let it fully ferment, shape, let it sit at room temp for about 30 min, then refrigerate (cold retarding the proofing stage) and bake straight from the fridge. My rule of thumb is to look for at least a double increase in volume during bulk fermentation and 30-350% during proofing. If the fridge is too cold (below 37-38F), you may not see a proper increase in volume. In that case, I'd let it sit at room temp for an hour or two before baking. Hope this helps. Enjoy!
Kristin says
What a fabulous loaf of bread this made. Thank you so much for this recipe. This was perfect and will be going into my baking rotation.
Victor @ Taste of Artisan says
You are very welcome. Enjoy!
Cecile says
Thanks for your reply! After you told me where the first rise is, I found it in the instructions that I must have already read 6 times! I make this bread all the time but my dough is always very wet and floppy. When I turn it out to shape the loaf it sticks to everything and does not hold its shape. It still makes a great loaf when it rises, but it was just a blob when I put it into the pan. I weigh everything and it is always the same. I am using bread flour. Any ideas?
Victor @ Taste of Artisan says
Hi Cecile, there are few things to consider here. First, higher hydration dough makes more airy and delicate crumb. I prefer bread made with higher hydration dough. I upped the hydration in this recipe because the dough is a lot easier to handle even for newer bakers as you bake the bread in a pan. That said, a baker should feel comfortable working with dough. If you feel that hydration is too high for you, drop it by 2-3 percentage points. Or more if needed. See how you like the results. Comfort working with higher hydration dough comes with practice. As you get more comfortable, you can work your way back up.
Sometimes it could be ambient humidity that impacts how the dough feels. In high humidity areas you'd need to drop hydraiton as what works for me in my not too humid climate may not work so well in high humidity areas. So, that needs to be considered as well. Hope this helps. Let me know if you need more assistance, I'll be happy to help. Happy baking!
pam says
my first time baking bread, followed the instruction but my bread ended up gummy. could it be my oven? it is electric convection oven and i cannot turn off the air function maybe its too hot? i notice that 10 minutes into baking my bread is already turning very brown at the top
Victor @ Taste of Artisan says
Most of the time gummy bread is the result of insufficient fermentation and/or proofing. I've had plenty of those when I was just starting my bread-baking adventure. Over time, I developed this rule of thumb for myself - fermentation - look for 2x - 2.5x volume increase. Proofing - look for 30% - 50% volume increase. This usually will help you with gumminess.
I find convection good for some baked goods, like focaccia or pizza, and not so much for others. You can experiment with dropping the temperature. Also, I'd cover the pan with foil for the first half of the baking, it should help with premature hardening of the crust and browning. Happy baking!
Joan says
I bake in my Toshiba toaster oven. I actually reduce the temperature by 20deg F from required temperature five minutes into baking I cover the loaves with a foil roof lined with parchment on the inside to avoid contact of bread with foil( just my thing🙂). I keep the roof on until three minutes before I turn the oven off. I get a beautiful brown crust but sometimes the sides get darker. I use my oven on the convection option. Hope this helps.
Victor @ Taste of Artisan says
Thank, Joan. I thought it would work for those with convection ovens. Thank you for your feedback!
Cecile says
I am addicted to this recipe! I do have a question. Is the dough rising during the folding step? When the dough is divided and put into the pan it says to let it “double again.” So when did we let it double the first time?
Victor @ Taste of Artisan says
Hi Cecile, good to hear it. The first time it doubles is during fermentation phase and, yes, partially during S&F. It's step #3 in the recipe instructions. Happy baking!
Pam says
LOVE this recipe! I make 4 loaves every 3 weeks as this is our favorite by far. Have you ever tried to make rolls or hamburger/hot dog buns with this recipe?
Victor @ Taste of Artisan says
Pam, no I haven't used this dough to make burger buns, but my favorite dough for burger buns right now is from my pampushki recipe. It makes outstanding burger buns.
Susan says
This bread is outstanding! I'm eager to try more of your recipes. I think cinnamon rolls will be next.
Victor @ Taste of Artisan says
I am very happy to hear that, Susan. Enjoy!
Stephanie C says
Is there a way to add oats to this recipe? If so, any recommendations? This is my favorite recipe and I don’t want to try any others in general. That’s what happens when you like something as much as we like this recipe. Thanks!
Victor @ Taste of Artisan says
Glad you like my bread recipes. I haven't experimented with adding oats to bread formulas but I recall seeing somewhere that you need to prepare an oat 'porridge' first, I believe the ratio is 3:1 water to rolled oats, and in the recipe you can use anywhere from 5% t0 50%. Of course, the more of that 'porridge' you add, the wetter, more 'custardy' the texture of the bread will be. How much you add is really up to your taste. Good luck!
Stephanie says
Thank you for the info with regard to the oats! I might give it a try! Sounds interesting.
Victor @ Taste of Artisan says
You are welcome. Let me know how it turns out. I am interested in trying as well.
Marie says
OMG. I just cut into it and can’t get over the texture of this loaf. Light, fluffy, airy, beautifully soft crumb, yet, you get that sourdough chew.
Added some fried onions for little twist. Definitely my go to discard recipe from now on.
Note: I did add splash of vegetable oil, I do with all my sourdough for softer crumb.
Victor @ Taste of Artisan says
Glad you liked my recipe and thank you for the tip. Enjoy!
Alisha says
Love this recipe. It is my favorite. How would you freeze a loaf?
Victor @ Taste of Artisan says
Glad to hear it. I don't freeze bread so I am not the best person to ask, but you can try the method that Food Network recommends here. It sounds like a good way to do it. Good luck and happy baking!
Joan says
Hi Alisha, I wrap a whole loaf uncut, with parchment paper and secure this wrapping with foil. I then put it in the freezer I s gallon freezer bag. To thaw I just leave it on yhr counter for three hours or until easy to slice, ,then I slice it and wrap in parchment and slip into a regular empty bread bag(I have friends give me the plastic bread bags from their store bought bread. I toast the bread a little before eating. I have never had to throw away bread. Further, I bake two loaves in my toaster oven. Slice one and freeze one. Let me know if you need anynmore information. I will be more than glad to help.
Kim C says
Just made this bread today and it was so easy and smells delicious! It was just as it looked amazing! Great recipe and will be making it often. I have been making Artisan Bread for a few years and just wanted something different.
This checks the box. Thanks for sharing 😊
Victor @ Taste of Artisan says
Glad to hear it, Kim. Enjoy!
Alex says
Hi, I have made this bread with great success in the past, it is delicious! The kids love it too 🙂 I was wondering how to adjust the recipe if I don't have any discard on hand? Any way I can replace it by additional flour and water? Thanks!
Victor @ Taste of Artisan says
Alex, just substitute it by about 91 grams of water adn 109 grams of flour to be precise, or round those to 90g water and 110g of flour. This is because I use an 83% hydration starter. To give the bread more flavor, use poolish instead. The same 90g water and 110g flour with 3g of instant yeast. Ferment for 3 hours at room temp or in the fridge overnight. Happy baking!
Joan says
Hi Victor, Awesome bread recipe with a double punch- flavorful and reduces waste of precious food ingredients. May I ask if you have tried making this same recipe with an overnight rest? I’d like the ingredients to be subject to a soak before I bake because soaking is believed to break down the physic acid in the grain and make it easier to digest. Let me know. Thank you.
Victor @ Taste of Artisan says
Hi Joan, yes, I've done this recipe with an overnight cold retarding in a fridge. In general, you can cold retard fermentation or proofing with pretty much any bread recipe. Good luck!
Joan says
Thank you Victor. I have made the sourdough discard bread recipe with great success each time. Thank you!!do you have to bring it to room temperature before baking? Thanks again.
Victor @ Taste of Artisan says
If you retard proofing and the dough looks proofed enough, I normally look for 30-50% volume increase, than it goes straight in the oven.
Katie Johnson says
As usual, a Taste of Artisan recipe that has quickly become one of our favorites! This bread is so delicious, easy to make, always has perfect results…and I even made it this week with 50% fresh-ground white whole wheat flour (the rest was organic all purpose). Beautiful rise, beautiful soft crumb with a combination of smaller and larger pockets of air. The delicate crust is my fave part. Thanks for another great recipe!
Victor @ Taste of Artisan says
You are very welcome. Thank you for the kind words. Enjoy!
Amanda says
Excellent recipe! Had a lot of extra starter from Xmas baking, needed sandwich bread for ourselves, and so I found your recipe. I wasn't going to save it and panicked when I couldn't find it again! The chewy crust, the moist crumb, perfect!
Victor @ Taste of Artisan says
Glad to hear it. Enjoy!
Sue says
Can I use half recipe to make 1 loaf
Victor @ Taste of Artisan says
Yes, half will do just fine to make one loaf.
Nikki says
Whelp I didn't notice the requirement for a pan of water till just now! We'll see what happens. I just finished the first 20 minute bake. Now on the 2nd bake at 400. I'm so sad.
Victor @ Taste of Artisan says
It should be OK. Not great, but not a throw away either. Let me know how it turns out. Good luck!
Stephanie says
Hi! If i have an 8.5 x 4.5 pan instead of 9 x 5 can i use that? If not, how much of the ingredients should i subtract? I love this recipe! I just need a smaller amount of bread. Thank you!
Victor @ Taste of Artisan says
Those will work, not a big difference. I actually have a couple of those and use them with 9x5 interchangeably.
Cynthia says
Sandwich sourdough bread has been my unicorn for 2.5 years and I have found it with this recipe. Just two modifications made for two of the most perfect loaves of bread I have ever produced (thanks to you!):
1. Added 1 tablespoon of honey to activate my yeast since I did not have instant yeast. Added the water, honey and yeast first then picked up exactly the recipe as written.
2. Tented the loaves at 10 minutes after removing the water since it appeared to be browning so quickly.
Amazing recipe! So glad I stumbled onto your site!
P.S. I tried your yeasted baguette recipe the other day and loved, loved the flavor and crisp. I do plan to kick up the hydration to 76% and see what happens.
Victor @ Taste of Artisan says
Happy to hear it, Cynthia. Enjoy!
Sally Iñiguez says
This is an amazing sourdough discard recipe!! The flavor and texture was perfect. I'm new to sourdough and started my own starter about 1.5 months ago. I am really struggling getting it to be strong enough to bake a sourdough loaf with. I just can't seem to get it to double in 4 hours. It does double, it just takes much longer than 4 hours. I have been using the discard in other recipes, but have really been wanting to make bread. I found your sourdough bread recipe that uses discard and thought I'd give it a try. I never thought it would turn out so good! Even if I never get my starter strong enough to make a loaf just from the starter alone at least I can make this bread. The sourdough flavor in this recipe was fantastic! So, thank you so much for sharing this great recipe!!!
Victor @ Taste of Artisan says
Good to hear it, Sally.
About your levain, please take a look my Sourdough Starter guide.
Doubling in 4 hours is very ambitious, 8-12 is more realistic. If you want to improve its strength, try feeding it a different flour or a flour mix. More whole grain flour means a stronger fermentation. I've also had issues with my levain's longevity and strength. I fixed it by buying San Francisco dry sourdough starter. The wild strains that are available to me locally aren't good. I've also had a problem keeping it live and happy at 100% hydration. I dropped it to 83% and it's been happy for many years now. Take a look at my post, it may help you. I also have a few sourdough recipes on my blog with tested and very very performing sourdough recipes, if you are interested. Good luck!
Sally Iñiguez says
Thank you so much for replying! I appreciate your suggestions and advice. I will definitely take a look at your sourdough starter guide. Thank you!
Victor @ Taste of Artisan says
You are welcome.
Nadine says
Hello,
I’m new to baking with discard and currently at the proofing stage.
Is it okay to use a round baking pan for the water when baking?
This is about as similar to a bread pan I can get since I’m using both currently .
Victor @ Taste of Artisan says
Yes, a round pan will work just fine. Good luck!
RAlonso says
Oh my goodness! This is by far the BEST sourdough sandwich bread I have ever made for my family. They are devouring it as fast as I can bake it. Thank you for sharing your very detailed, easy to follow, recipe. I just love how crispy the crust is when you first take it out of the oven -- the end piece, with a little butter, hot out of the oven is my favorite part of baking this bread. The loaves are so light and airy and full of flavor. This recipe is a KEEPER!
Victor @ Taste of Artisan says
LOL I am very happy to hear it. My family loves this bread too. So good! Enjoy!
Cecilia says
This is one of the best sourdough discard sandwich bread recipes I’ve come across. Your instructions were clear and easy to follow and I love how the loaves turned out. Delicious!
Victor @ Taste of Artisan says
Glad you liked it. Enjoy!
Matt says
I'm excited to try this recipe! I wanted share this article from King Arthur about a common baking myth about salt and yeast, I also worried about the two touching when adding ingredients - but apparently there is nothing to worry about. https://www.kingarthurbaking.com/blog/2023/07/05/does-salt-kill-yeast#:~:text=Plus%2C%20they're%20not%20going,touch%20without%20any%20negative%20effects.
Victor @ Taste of Artisan says
Thanks for link Matt. To be honest, I don't worry about this. I do it because dropping in salt and yeast separately from each other takes practically no additional effort. Happy baking!
Stella says
great recipe, thank you!
Victor @ Taste of Artisan says
You are very welcome. Enjoy and happy baking!
Edward says
Victor, thank you for your site. I am new to bread making, and this pan bread recipe was one of my first three bakes (including baguettes and sourdough). My wife and boys especially loved this pan bread--it was gone in two days! (I guess having 5 teenaged boys...helps? Lol)
I'll be using more of your recipes. I deeply appreciate your commentary in your recipes. You do a great job explaining things, which really helps this newbie.
Victor @ Taste of Artisan says
Edward, I appreciate the kind words and I am very happy that you found my recipes useful, helpful and tasty. Comments like yours are much appreciated; they help me keep going with this blog. Thank you and happy baking.
Deb Dookram says
Hi- Ive just made this recipe- the dough was tacky and did not hold its shape when placed in pans- I did have to substitute some stone milled whole wheat flour and stone milled all purpose flour as I ran out of bread flour.. but I assummed it would be dryer as the whole wheat absorbs more liquid? I would appreciate any suggestions as I wait for loaves to rise in bread pans! Thank you
Victor @ Taste of Artisan says
My apologies for the late response, hope they turned out great. This recipe is very forgiving, and the higher hydration is this recipe is easy to work with as we bake in pans. High hydration means more open crumb, bigger holes and moister crumb.
Judith says
Love this bread especially when I don’t have all the time for feeding my starter and doing the longer proofing and rising times. I am wondering how long they would take if I shaped the dough into buns instead. Any suggestions?
Victor @ Taste of Artisan says
Glad you like my recipe, Judith. The proofing time will be about the same. Shaped into buns, I'd bake them 10-12 minutes with steam, 10-15 without. Maybe longer, I'd need to experiment. Good luck!
Lindsey S. says
This came out delightfully. First time making pan bread and it's my new favorite! Followed recipe exactly, except I was fortunate to have an excess of ripe starter instead of discard. Simply lovely and looking forward to trying the French baguette recipe next.
Victor @ Taste of Artisan says
Glad to hear it, Lindsay. I would also recommend trying the focaccia recipe that I posted today. It's exceptionally good. Happy baking!
Francesca says
Wonderful recipe and delicious results. I do get some tears in my bread, even with an added 30 minutes to the first stage of fermentation and another 30 to the second stage after shaping. I am assuming it is due to underproofing and I just need to increase the proofing time (even tough the dimple test told me the loaf was ready to bake), but do let me know if you have other guesses. Can't wait to try your other discard recipes!
Victor @ Taste of Artisan says
Francesca, I am happy to hear that you like my recipe. The tears that you describe can be viewed as a good thing by some bakers, they are the result of a strong oven spring. This is what you want in a baguette, but maybe not so much in this bread. I would proof a little longer. I am not good at testing dough by poking it and solely rely on the volume increase, and that's been working for me very well for years. Plus when you bake often you kind of see how the dough looks and can tell when its ready or not. Anyway, for this dough, let it increase 2x to 2.5x during fermentation and 50% increase by volume during proofing. It should be good then. Good luck!
Mary says
Love the recipe, very easy to do, I will be making this again . Thank you for sharing the recipe.
Victor @ Taste of Artisan says
You are very welcome, Mary. Enjoy!
Nora Hoskins says
Quick and easy to follow. And a delicious outcome!
Victor @ Taste of Artisan says
Glad you liked it, Nora. Enjoy and try my other recipes. I will be posting my favorite focaccia recipe in the next couple of days; it's a must-try.
Belinda says
Perfect bread! Crunchy golden crust and a gorgeous spongy texture. Soooo good!!!
Victor @ Taste of Artisan says
Happy to heat it, Belinda. Enjoy!
Val Close says
I half the recipe to make 1 loaf. I can rarely get high gluten flour where i live so add a T of glutennpowder. Delicious every time!
Victor @ Taste of Artisan says
Glad to hear it. Enjoy!
Deb says
Good morning! I am trying this recipe first time..i ran out of my stonemilled white bread flour so i used stone milled whole wheat (13%) protein,same as my bread flour and my stone milled all purpose(11%).. its in first rest before first stretch and fold...should i have added more water due to whole wheat partial substitution?
Victor @ Taste of Artisan says
Deb, I find this recipe quite forigiving so you don't have to, but typically you coud bump up hydration by 1-2% depending on how much WW flour you use.
Sunny says
I have made your baguettes several times with great success - wonderful recipe! Today I a trying the pan bread for the first time. My question is regarding mixing. Would it make a difference if I mixed with a dough whisk? I feel like I lost quite a bit of sticky dough (in the sink) as I couldn't get it off my hands in the bowl. Is this normal? I did measure out all my ingredients by weight so I don't think that should be an issue.
Victor @ Taste of Artisan says
I usually just scrape excess dough off into the bowl. I have never tried a dough whisk, if you try it, let me know how it works for you.
Sunny says
I guess what I’m wondering is should this be a super sticky dough or is that not normal for this recipe? I am pretty new to bread making - your baguettes were my first effort.
Victor @ Taste of Artisan says
Sunny, this recipe is fairly low hydration, 72%, I make some bread that is over 80% hydration... I suppose it's all relative and depends on one's comfort level of working with higher hydration doughs. The dough will be wetter and sticker initially, but as it strengthens after a few stretch and folds, it will become tight and much less sticky. I don't know if you are weighing your dough, if you do, you can try dropping hydration by a percentage or two, see if that will make yuo feel more comfortable handling it. If you are using cups, it's possible that your hydration is off, using cups is not reliable. Happy baking!
Jess says
I am making this bread for the 5th time right now and it is my go to - turns out AMAZING every time! One of the most delicious breads I’ve ever had (and it’s so exciting that it’s something that I made!). Really yummy way to use up discard & comes together so easily. Thank you, looking forward to trying your other recipes 🙂
Victor @ Taste of Artisan says
Glad to hear it, Jess. Thank you for the kind words. I will be posting another recipe that uses sourdough discard, it's a pan rye bread, I like it a lot. Happy baking.
Jess says
Really looking forward to trying that recipe - when will you have it posted? Also, I scrolled through the page but haven’t seen it mentioned - how do you suggest keeping this bread for longer periods of time? Fridge/freezer?
Victor @ Taste of Artisan says
Jess, I'll try to find time to do it in the next week. Heads up - you will need rye and rye malt flour for it. Fridge is not good for bread storage, it hardens it; I never liked it from the fridge. Freezing - I have no experience with freezing bread. The best way to extend shelf life is to cool bread completely and than wrap it tightly in Saran wrap. It will stay fresh for at least 2 days and even longer. You can toast it or warm up on a cast iron pan if it's losing freshness. After 4-5 days, if we have leftovers, we dice it and make croutons, those are always very tasty.
Paolo says
Fantastic fresh out the oven!! I broke the recipe in half due to having only 1 loaf pan, but the crust was so crunchy with a soft airy inside. I’m curious to see how it is after cooled down for 1-2 hours. Again it was a hit with my family and will be another bread on the rotation. Thank you.
Victor @ Taste of Artisan says
Paolo, glad you liked my bread recipe, make sure to try my other recipes, plenty of good ones here. Thanks for the review and happy baking!
Paolo says
I’m making another loaf right now and was wondering if I could add a little more discard for a more sour taste? Thanks for your time.
Victor @ Taste of Artisan says
Paolo, yes you can, I've done it. If it's a relatively young starter, say you feed it in the evening and use it in the morning, that's perfect. That's what I do. I use some or all but one Tbsp of mine, then feed in the evening as I normally would. If it's a very mature starter, it will make your bread tarter, so experiment a little. By the way, I created a new recipe for pan rye bread, which reminds me of Russian Borodinkiy bread, which I like a lot, though less sweet and much simpler to make. Yet, this bread has been so good that I've made 8 leaves already and my family keeps asking me for more and don't want any other bread for now LOL.
Edward Kuosku says
Super tasty bread and easy to follow recipe
Victor @ Taste of Artisan says
Glad to hear it, Edward. Happy baking!
Geena says
I’ve been making this as our sandwich bread for the last month or two. It goes so quickly because we can’t stop eating it! It’s a great easy way to use discard. The recipe is foolproof and cook perfectly each time. Thank you!!
Victor @ Taste of Artisan says
Glad to hear it. Happy baking!
Serena says
I made this today and it was outstanding! Definitely adding it to my weekly rotation. I’m not sure if my oven runs hot or what, but I only had to bake it for about 25mins.
Victor @ Taste of Artisan says
Happy to hear it. I will be posting a few more of my favorite bread recipes soon. Stay tuned and happy baking!
Sandi says
Yum! Just pulled my loaf out of the oven and we stood around it eating slices with butter. Great call to eat it hot! I only made one loaf because I have a small starter but next time I'll feed my starter in preparation for two! Thanks for this wonderful recipe! My husband just commented that we'll never need store bread again!
Victor @ Taste of Artisan says
Happy to hear it, Sandi. We've only bought an occasional loaf here and there, mostly out of curiosity, when we happen to see good bread. Otherwise, we haven't been buying bread for the past 10 years or so. It has become such a part of our daily routines that it's now like frying an egg, almost. Everyone in the family, including my teenage kids, is familiar with the process and knows how to make several different types of bread. Sometimes one person starts and another finishes. It's a lot of fun too and we try to change flours, add mix-ins, etc. Sometimemes we don't tell each other what's in it and make surprises. I once added sliced leftover smoked jalapeno poppers - that loaf of bread disappeared within 20 minute;)
M'Lisa Jo Mitchell says
Love this recipe, but was wondering if I can make it the day before and do a cold rise?
Victor @ Taste of Artisan says
Yes, you can cold retard it. I like to let the dough bulk ferment and do S&Fs until I see fermentation going and blisters showing up under the skin, cold retard, then two hours at room temp, then bake.
M'Lisa Jo Mitchell says
Thank you! I guessed on how to do it based on other cold rise methods. I got lucky and guessed correctly. I'm very new to bread baking but with your website I've been learning quickly. Thank you
Victor @ Taste of Artisan says
No problem. Enjoy!
M'Lisa Jo Mitchell says
Hi Victor, wanted share another successful bake! I made this again with wheat flour and bread flour. Substituted 500g KA bread flour and 300g KA Whole Wheat flour. Turned out perfectly!!! I'm so in love with all your breads. So glad I found your sire, thanks again.
Victor @ Taste of Artisan says
Happy to hear it, M'Lisa. I've also had very good results with ancient grain flours such as spelt and kamut. Adding 5% rye adds a nice flavor and a touch of sweetness. A Tbsp honey, like I do in my French baguettes, is a very good addition too. Happy baking!
Ann says
Hi! I've tried your pan bread a few times and love it! I was wondering for the cold retard, would that be after shaping it? Or do I cold retard and next morning shape?
Thanks for the tip 😊
Victor @ Taste of Artisan says
Ann, you can cold retard either fermentation or proofing. Both ways will work but I personally like cold retarding fermentation, similar to how I make French Baguette or pizza dough.
Sam says
I have question about doing cold retard should I omit yeast and use active starter and I'd it better to shape in loaf pans then refrigerate or shape after taking out of fridge also how long can I leave in fridge? I'm very new to sourdough but have made this bread couple times and love it. Would like to try the cold retard method just not sure how to go about it
Victor @ Taste of Artisan says
Sam, this is not a sourdough bread recipe per se, I use sourdough starter in it strictly for the flavor, not for leavening. If you want to use sourdough starter for leavening, the process will be different. First, you want to make sure that the starter is optimally strong. Then you need to do bulk fermentation outside the fridge because wild yeast are more cold sensitive, and fermentation may stall in the fridge. My preference is to finish fermentation at room temp, then cold retard (proofing stage) in the fridge, you can see the examples of that in my sourdough recipes, e.g. Rustic Sourough or No Knead Sourdogh. Good luck!
Marsha says
I'm probably the only person who's really not a sour dough lover... is there a substitute I could use? BTW, love your baguette recipe - I make it all the time!!!
Thanks!
Victor @ Taste of Artisan says
Glad you like my baguette recipe. Yes, you can sub the sourdough starter with a mix of flour and water in the 1.2 (flour) to 1 (water) ratio. So, that would be about 110 flour and 90 water. The bread will have less flavor but you will still enjoy it. You can also cold retard it like baguettes to get more flavor.
Patti says
I am making this bread now but writing a few comments along the way. Is it just me or does everyone have so much dough left on their hands after mixing that I feel like I could make an extra mini loaf.
So, anyway, I made this bread. The crust and flavor is amazing. So so good. Victor, I will send photos. I don't think I got as open a crumb as you, no idea why.
Here are a few question/observations. The dough seemed to get wetter as it proofed. It started very wet but with stretch and folds it firmed up, but loosened up again after proofing. Because of this it was hard to handle but I'm happy to say that I am not longer intimidated by wet dough. I just envision the amazing result and I'm good. But what I wasn't sure of was when I made the 2 loaves into a log I had an aha moment when I remembered in the past you had told me I needed to shape dough by pulling it in a tight ball. So since I was unsure how II was going to put a seam on the bottom since it was so wet I didn't have a seam, I started shaping it and still had a seam that only one with a good imagination could find. So I went ahead and baked.
The result was brilliant. I'm not sure yup to Victor quality but without tasting his I can't be sure.
BTW, maybe dumb question but does anyone else used a cheap shower cap instead of plastic wrap to cover dough? It's so much easier.
Again, thanks Victor, my bread guru.
https://tasteofartisan.com/wp-content/uploads/2022/07/IMG_1766-rotated.jpg
https://tasteofartisan.com/wp-content/uploads/2022/07/IMG_1767-rotated.jpg
Victor @ Taste of Artisan says
Hi Patti, glad to hear that you liked my bread recipe. Thanks for sending me pictures, your bread looks lovely.
I don't know why your dough would get wetter after proofing, usually this is never the case in my experience, the only thing that comes to mind is high ambient humidity. Hence, it's important to keep the dough well-covered.
I am also puzzled as to why you needed to handle it after proofing... in this recipe - and that's one big point of simplification - I instruct shaping the dough after fermentation, then letting it proof in bread pans, then bake straight away in those very pans. No need to shape after proofing. This is much, much easier for any baker, experienced or novice.
A few things that may help. Overall hydration of this dough is about 73.5%, which is not considered high. Note that my sourdough starter, to which I linked in the recipe, is 83% - 120g flour per 100g water. If you use a 100% hydration starter - I never have success keeping such a starter healthy for long - then your dough would have higher hydration - about 75%. This is higher but not too high, this is what your standard French baguette would have. Some people would be intimidated but it, which is why I dropped hydration in my French baguette recipe.
However, in this recipe, this shouldn't matter much as you don't need to handle the dough after proofing and worry about it keeping shape, etc. I've tested this recipe with 75% hydration and even up to 80% and it worked fine for me. Higher hydration helps get a more open, moist crumb with big holes. That said, you can always drop the hydration by 2% (use 18g less of water or so, depending on your starter) or more if needed. I am sure the bread will still taste great. The goal is to get the dough behave such that you are comfortable handling it. That point may/will be different for differnet bakers. When shaping, if the dough is too wet, you can also dust the work surface with some flour, it will help a lot. I rarely do that, I am too lazy;) Your flour may be veyr fresh too, which would impact overall hydration. So, yeah, drop the hydration by 2% and see if that helps. For me, this recipe works perfctly well. My teenage kids have made it too a number of times with no issues so I won't be making any more adjustments to it.
Happy baking!
Laura says
Thank you for this! I had the same exact thing going on. I was going to put in a bit more flour to offset the wetness but didn't. My starter is 100% hydration. I'll make it again and use a little less water. Loaves are baking right now and seem to be springing up fine with the higher hydration. We shall see 🙂 Thanks again
Victor @ Taste of Artisan says
You are very welcome. Good luck! Hope they turn out great.
Steve Denvir says
Fabulous bread. But I pulled mine after 40 minutes total. Could be that my oven runs a little hot.
But one more winner from my favourite site.
Steve
Victor @ Taste of Artisan says
Hi Steve, glad to hear that you like this bread. As they say, everyone's oven bakes differently. I now use a gas oven so that may be a slight factor as well. Enjoy!
CT says
Best bread I’ve made so far and by far the easiest . The big work is done while you sleep.
Victor @ Taste of Artisan says
Glad to hear it. I made this bread with 50/50 KA bread and stone ground WW flour yesterday and it turned out outstanding. Richer flavor but slightly smaller holes in the crumb, as to be expected. Enjoy!