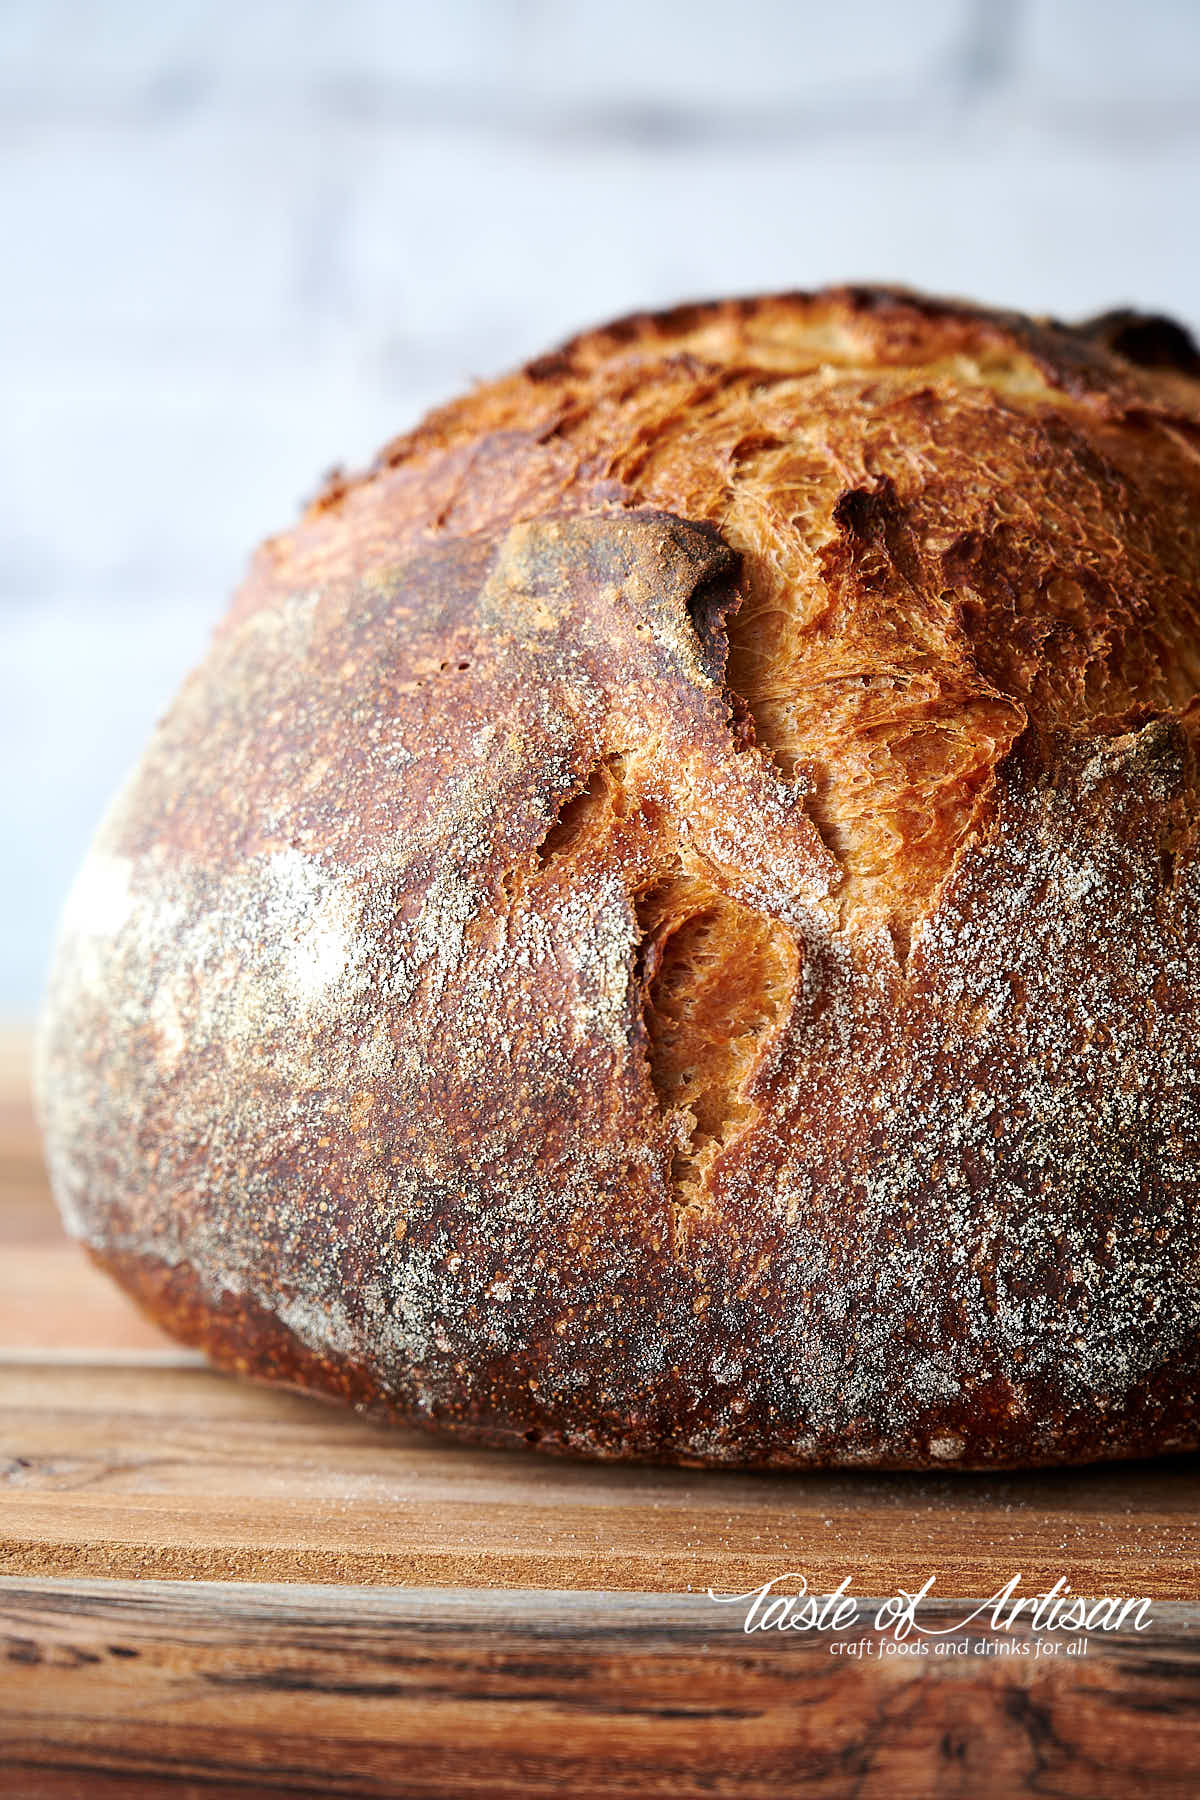
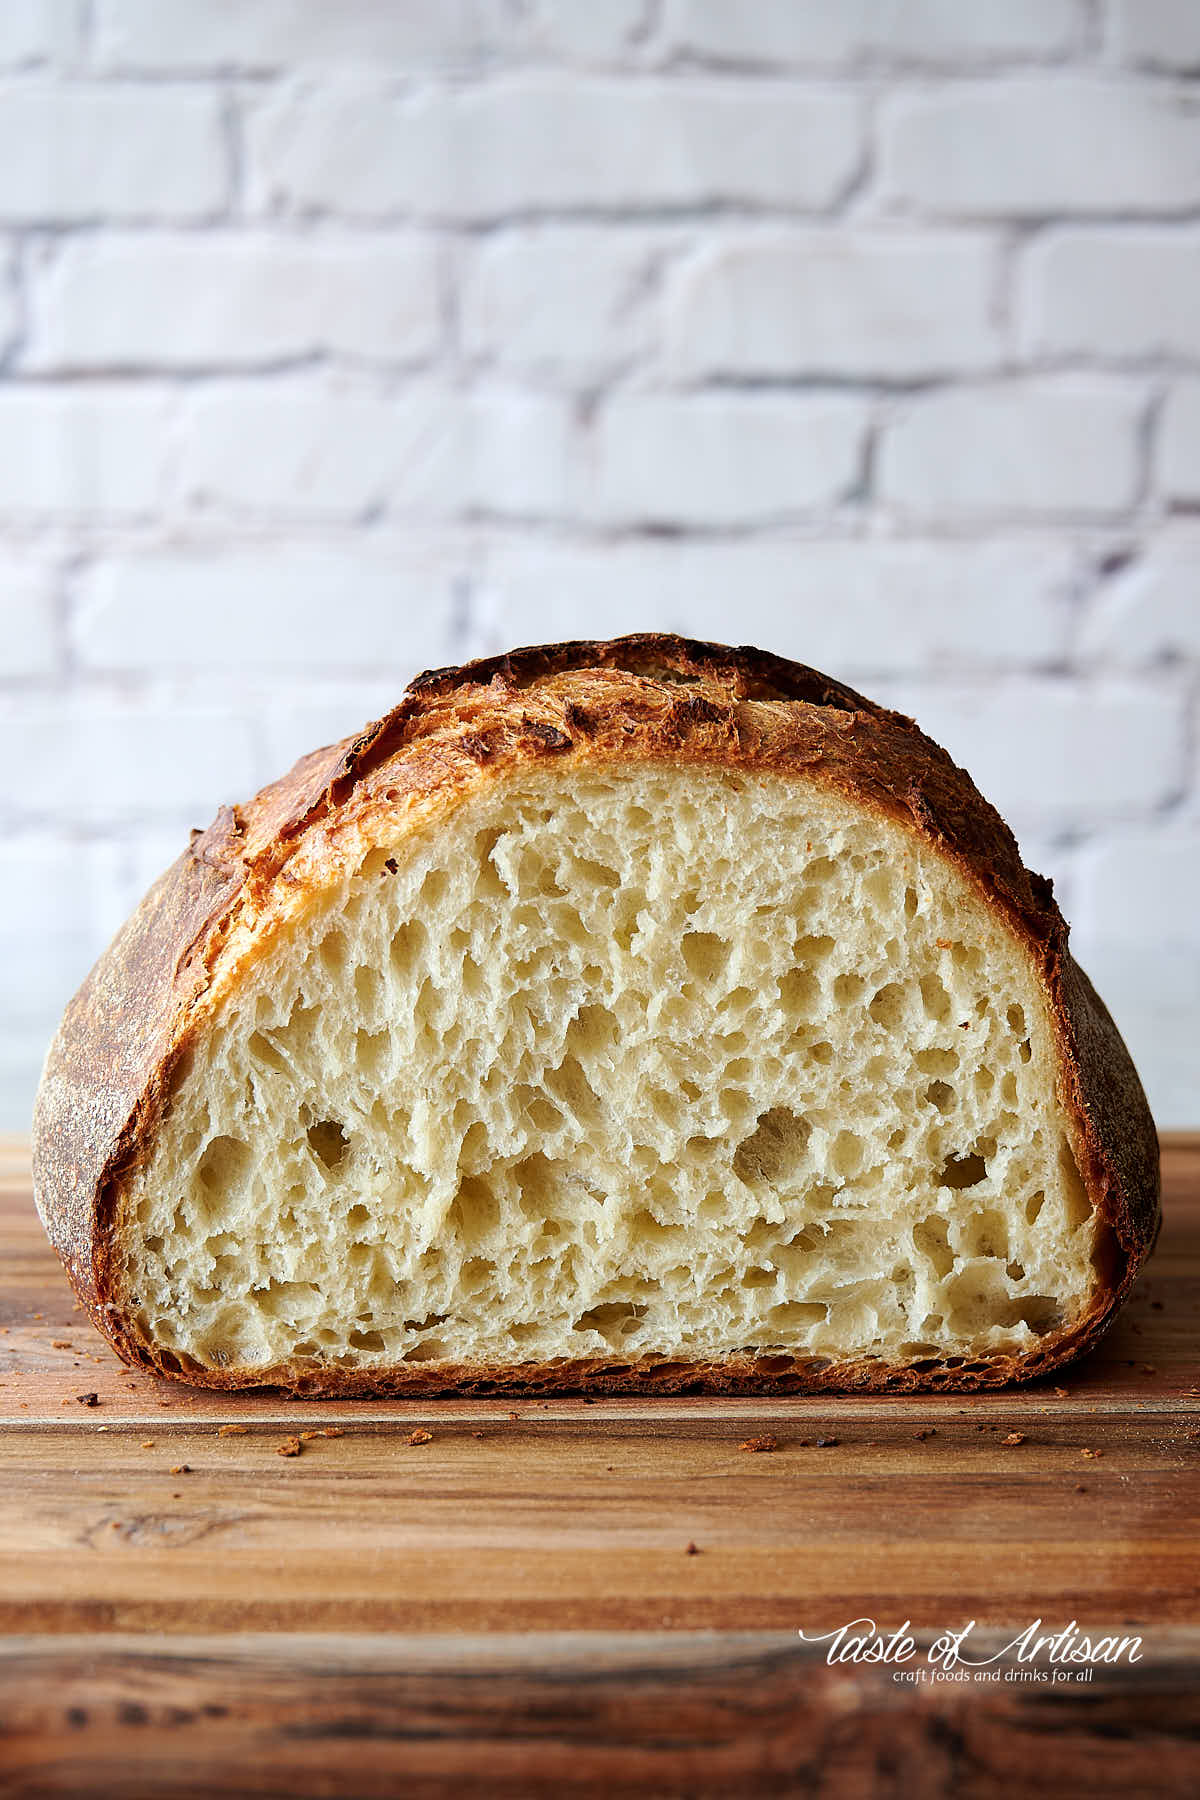
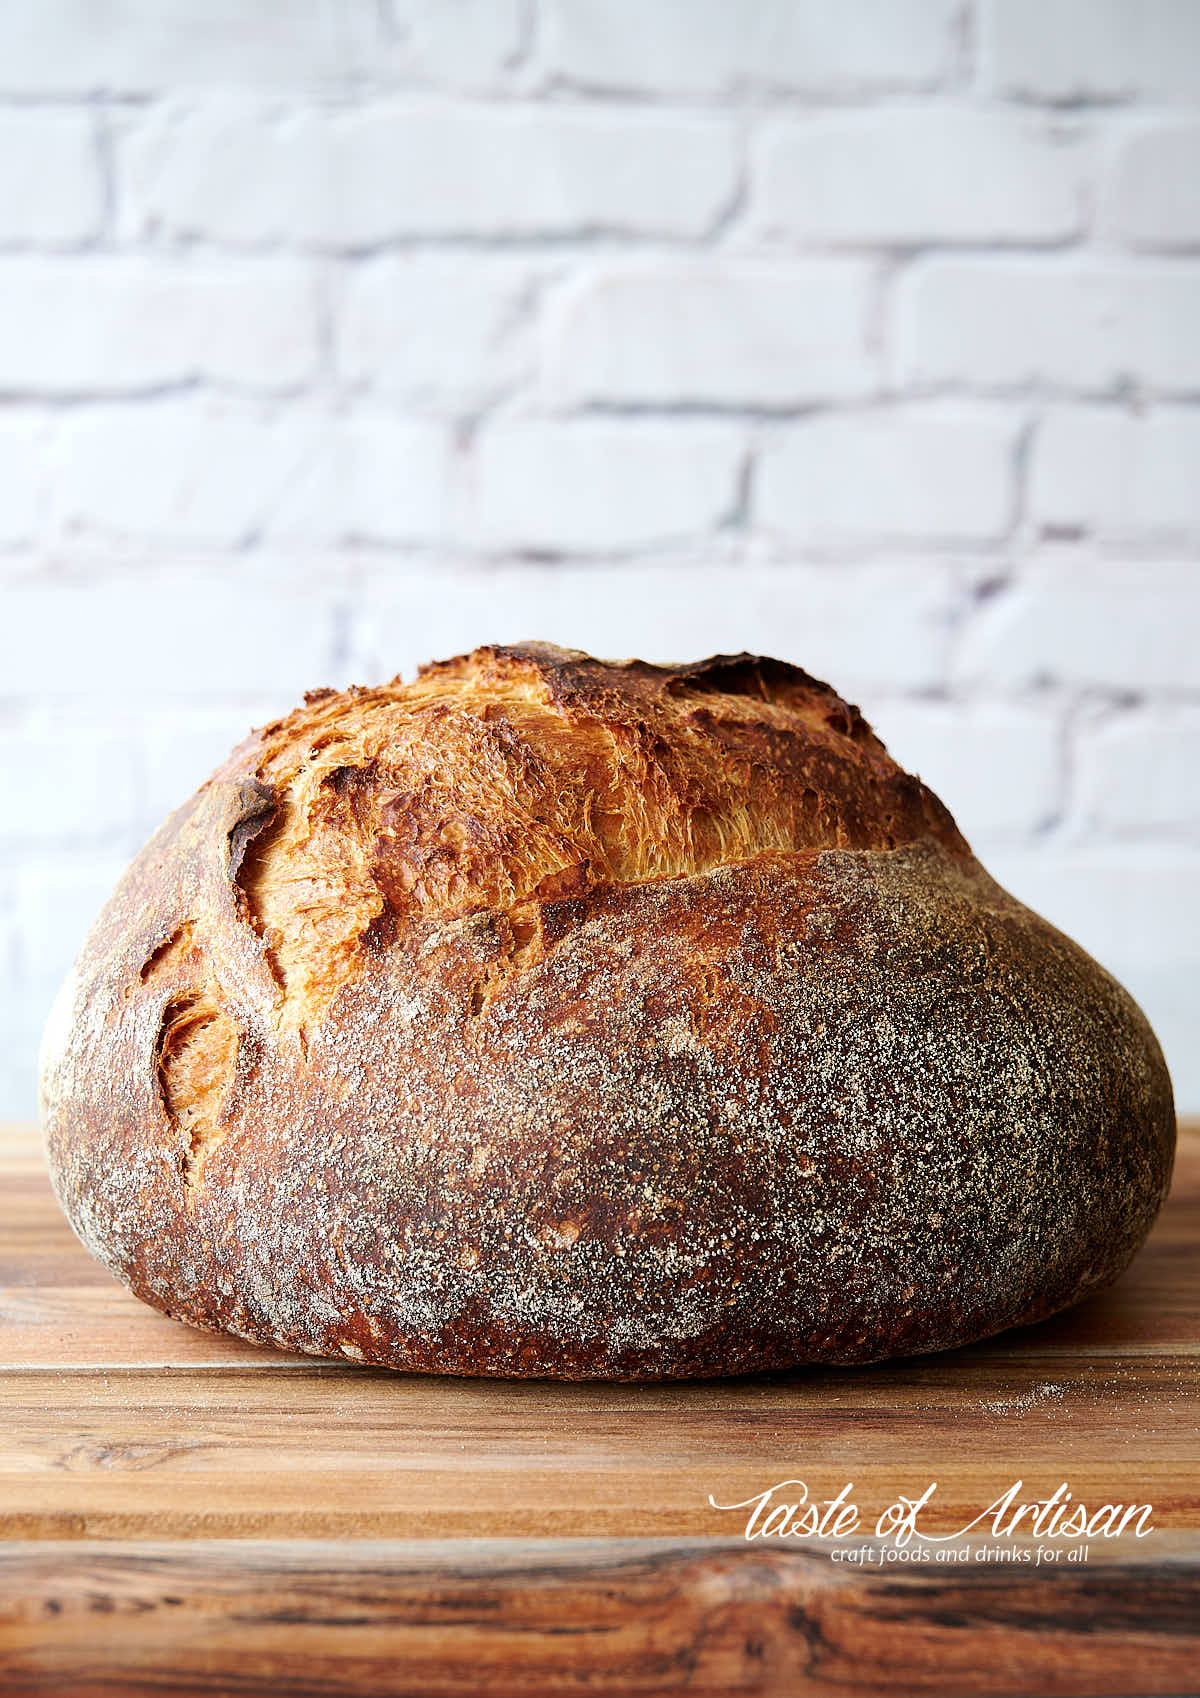
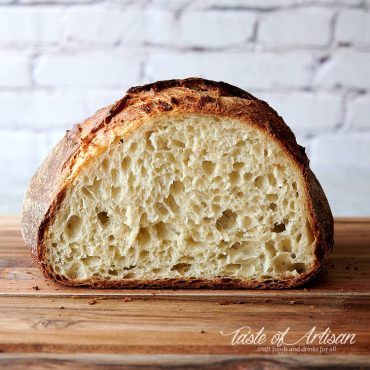
Exceptionally delicious no-knead bread that features airy and soft crumb, thin and crispy crust, captivating dark golden brown color and an unforgettable taste with a touch of sweetness that lingers in your mouth.
No-knead bread was the first bread I ever attempted to make, about 10 years ago. In hindsight, my first bread was a disaster. It had bubbles inside but the crumb was dense nevertheless. The crust was hard and pale-ish . It tasted good but not 'I can't believe I made this bread myself at home' good. It looked OK but not amazing.
I followed many no-knead recipes to the tee and was convinced that my bread was the best I could get in a home environment. It looked, well, just like everybody else's, I thought.
The story behind this bread recipe
Fast forward many years. I've been baking primarily sourdough breads and never really bothered with unsophisticated no-knead breads any more. That was until I was going to visit my friends who specifically asked me to bring a loaf of my bread. Normally, that wouldn't have been an issue, but I only had about 6 hours before I had to leave. Darn!
I ran into the kitchen and mixed some flour, water, instant yeast and salt. And a tablespoon of honey. Yes, a little bit of honey gives bread a hint of sweetness and extra flavor, something that everyone loves in my French baguettes. I used room temperature water not to rush bulk fermentation but making sure that I finish in time. I also increased the amount of yeast to 3 grams to make sure that fermentation doesn't take too long.
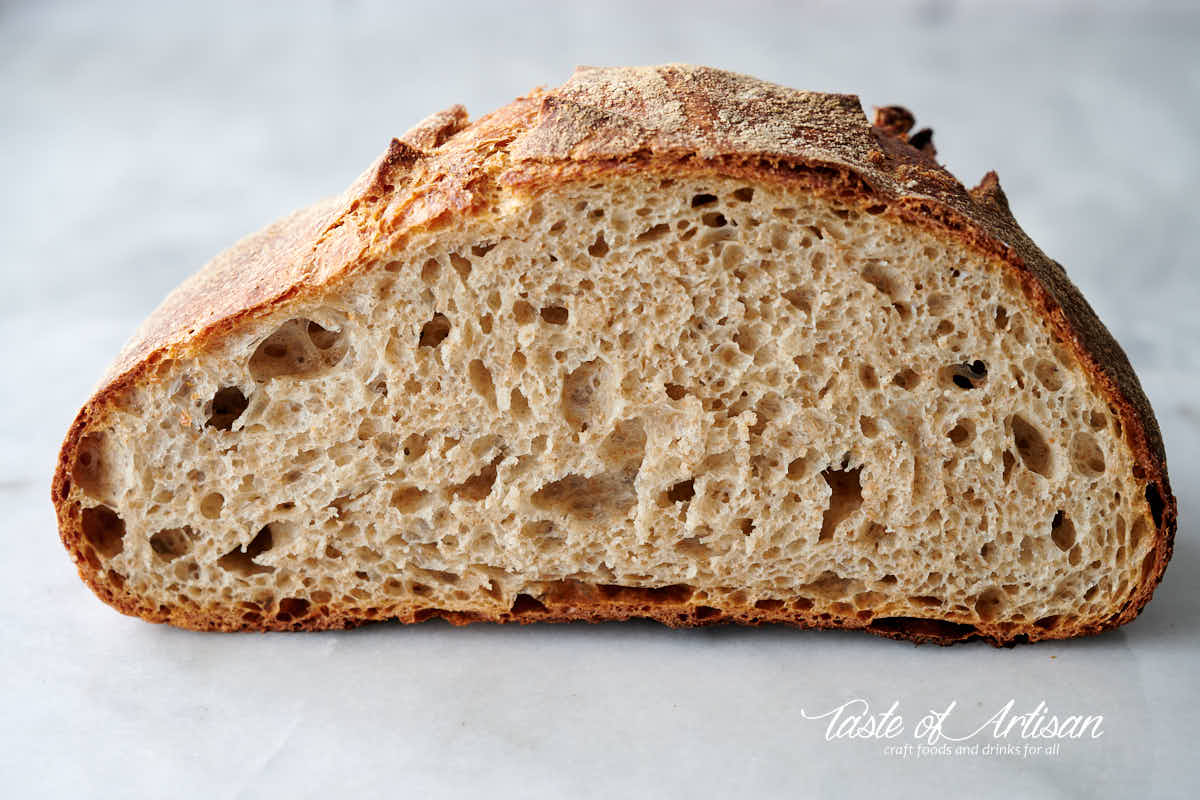
To make a long story short, the loaf that I made that day turned out to be quite outstanding. I did not realize how good the bread was until I heard my friends go 'mmmmmm' while eating it. I tried it. It was fabulous. It was surprisingly flavorful considering it was made using commercial yeast and such a short fermentation time.
The crumb was exceptionally soft and airy. There was a certain moistness to it which I liked a lot. A touch of sweetness made me want to savor the bread in my mouth before swallowing.
The crust was thin and crackly initially but softened over time and became slightly chewy. I liked it a lot.
Making no-knead bread
Suffice to say, this bread is now on a regular rotation in our home. I don't change this recipe, I think it's perfect. The only thing I do is substitute 50 grams of wheat flour for rye flour every now and again. It adds even more flavor. I do the same with my baguettes every now and again.
The ingredients
This bread recipe uses all-purpose flour, water, yeast, salt and honey.
I use King Arthur all-purpose flour as I love the results it gives. It's been my favorite for years especially for making baguettes. There are other brands out there that are just as good or may be even better but this one is my favorite. I highly recommend it.
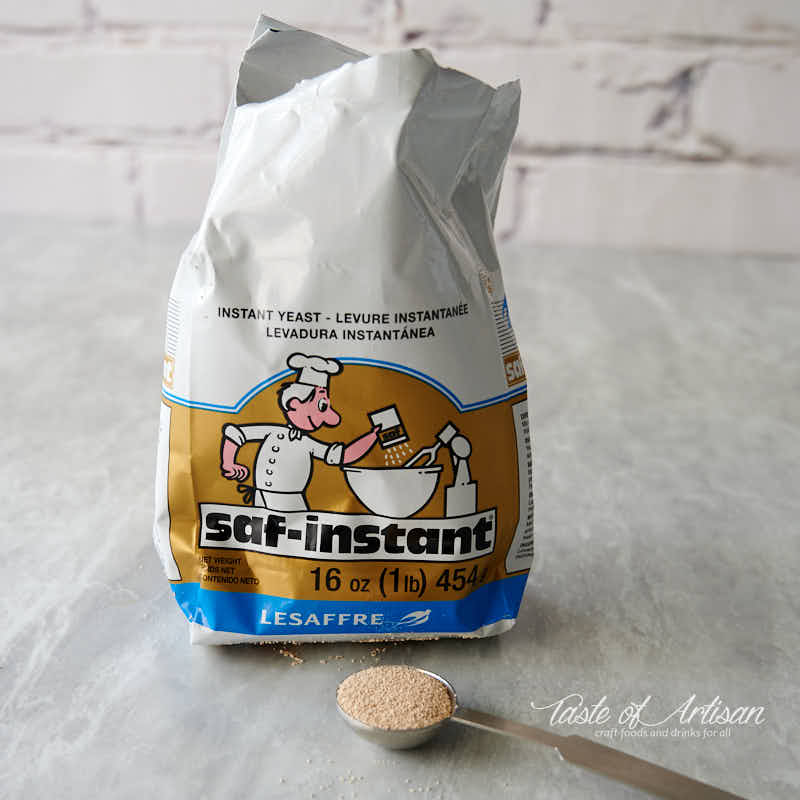
My favorite commercial instant yeast for this bread is SAF Gold. I heard so many good things about it on thefreshloaf.com and it did not disappoint. It gives my no-knead bread a quicker rise and, in general, produces a superior crumb texture.
Mixing the ingredients
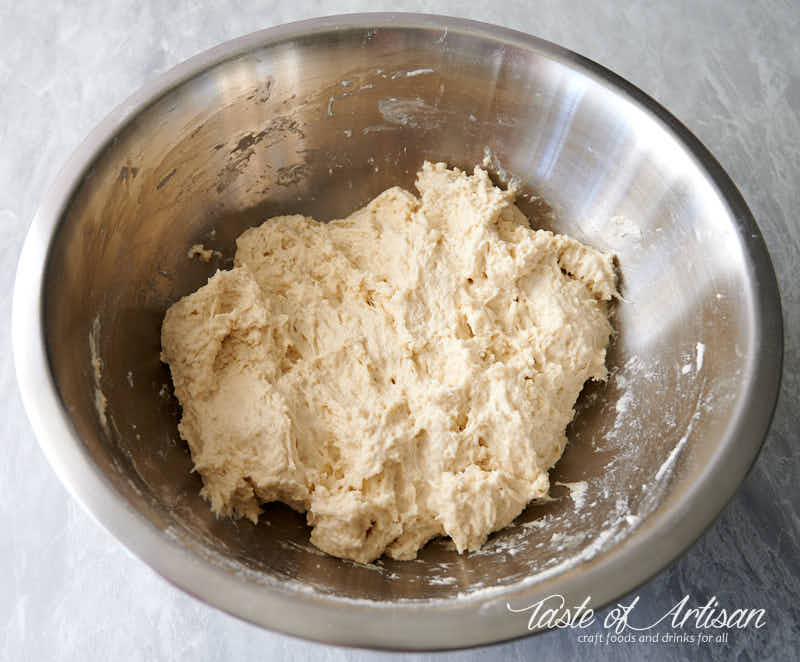
Once you have your ingredients in place, dissolve honey in water in a large bowl. Add the rest of the ingredients and mix by hand, squeezing the dough between your fingers. Cover the bowl and let the dough rest for 1 hour.
Fermentation
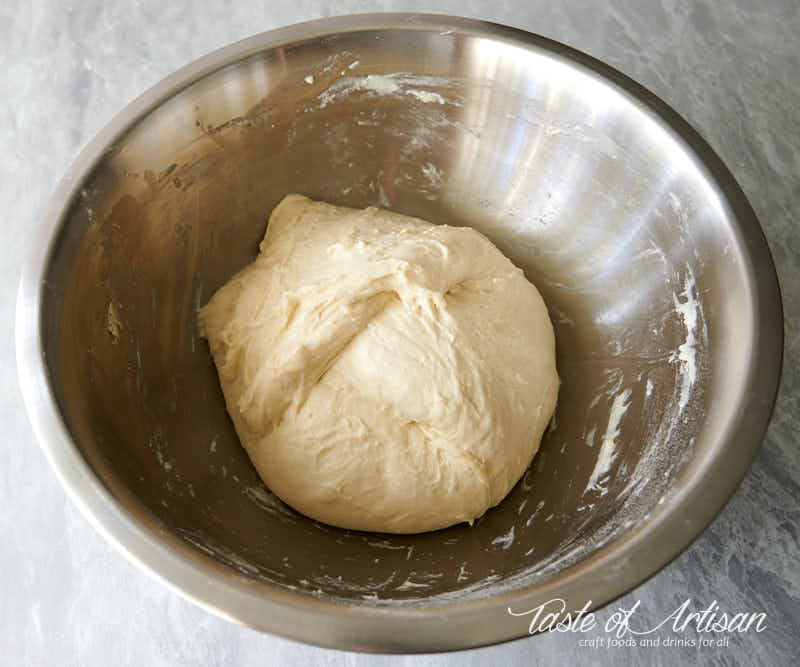
Over the next 3 hours the dough will undergo what is known as bulk fermentation during which it will develop flavor, strength and double in size.
The strength is achieved by using a stretch and fold technique. The stretch and fold technique is where you pull each corner of the dough and fold onto itself, as illustrated in my French baguette and sourdough bread posts. This step is extremely important even though most no-knead bread recipes do not include it.
Below is the illustration of the stretch and fold technique from my sourdough bread post.
[smartslider3 slider=17]
The purpose of the stretch and fold method is to stretch and align strands of gluten, which strengthens the dough. It results in larger bubbles in the crumb, making it open and airy. I do three stretch and fold iterations over a period of one and half hours.
At the end of each iteration I pick up the dough ball and turn it up side down.
By the time I am done doing stretching and folding the dough is smooth, soft and elastic, slightly risen with some small blisters showing on the surface.
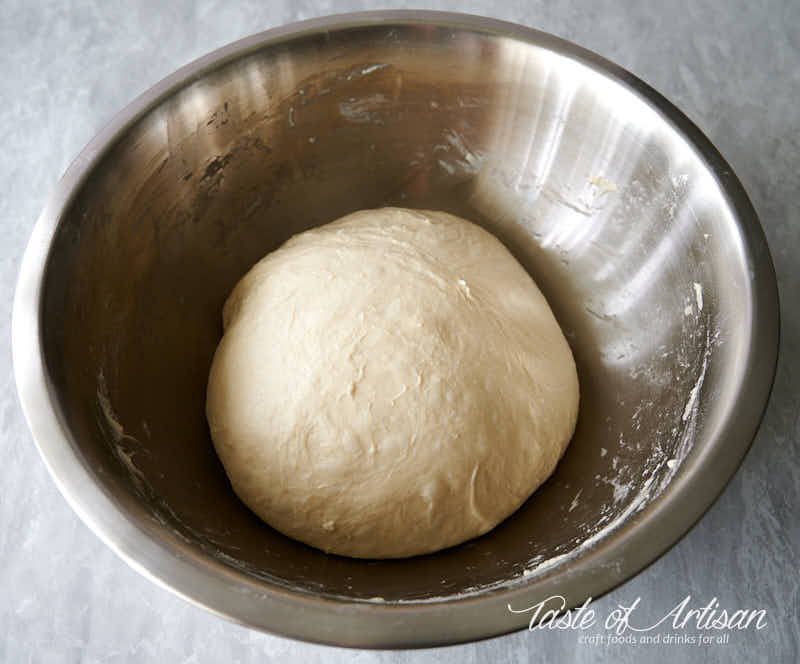
I cover it and let it continue rising for another one and a half hours or so, until it about doubles in size.
Proofing
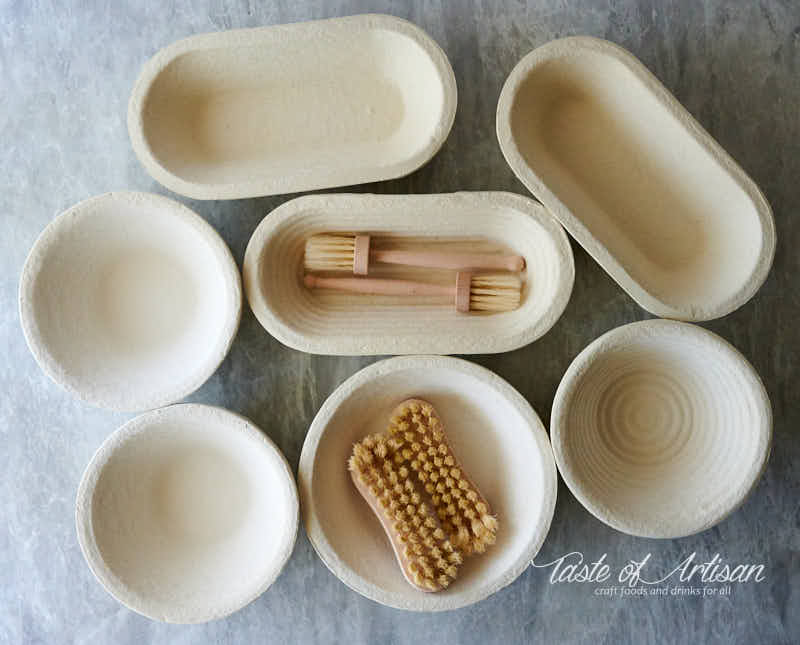
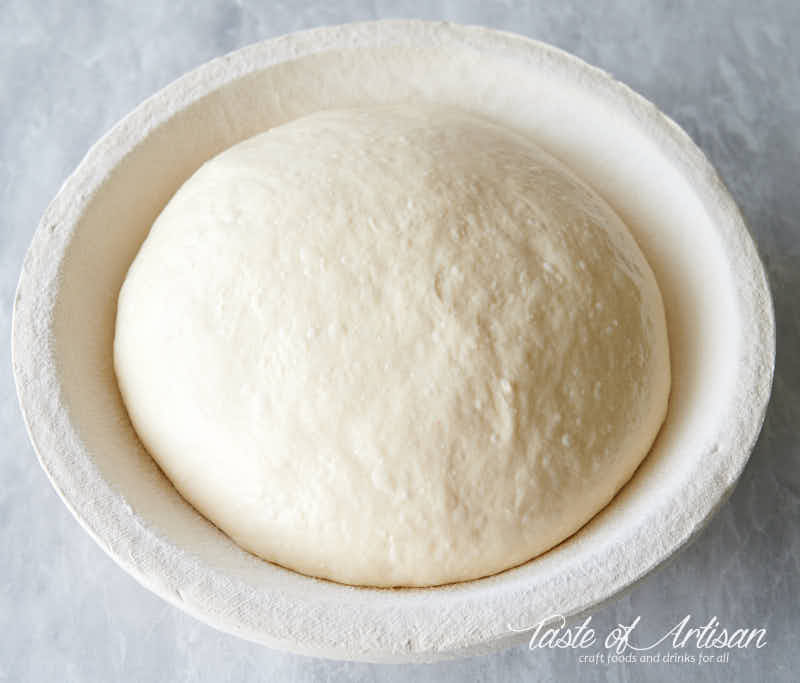
After fermentation the dough will need to be proofed. Make sure that the proofing basket is sufficiently floured with a 50/50 mix of all-purpose and rice flour to prevent sticking. For this recipe, you will need a 9" round banneton.
My current favorite are wood pulp bannetons from Ernst Birnbaum. Ever since I've started using them sticking has not been an issue even with very wet doughs that I normally work with. You need just a tiny bit of flour and breads come out quite clean. You can buy these on Amazon, or order directly from Germany like I did. It will be more economical to buy there if you need a few of them, plus the variety there is unmatched.
Once the dough has sufficiently risen, I transfer it to a proofing basket seam side down.

Cover the dough with a paper towel to prevent sticking, then with a piece of plastic wrap to keep the moisture in.
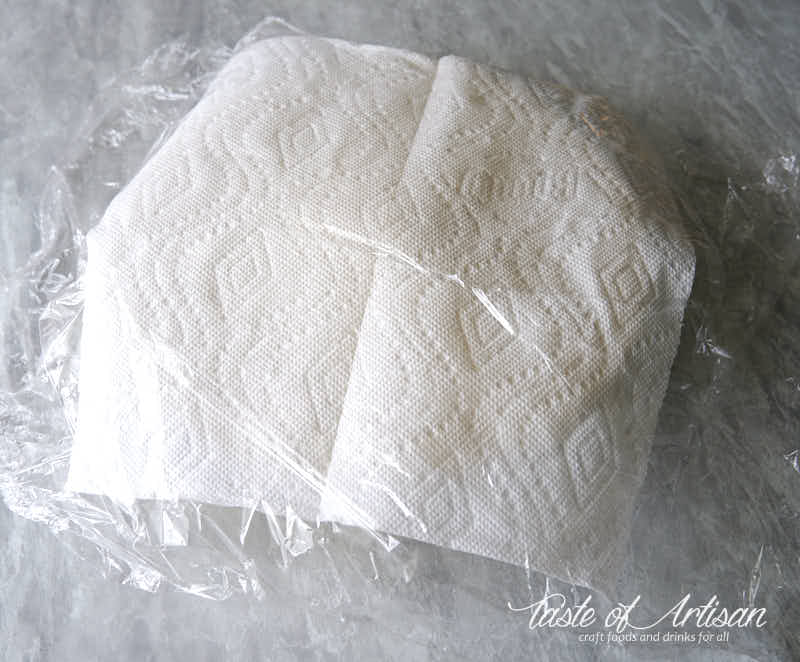
Proofing continues for about an hour or until the dough has increased in size about one and half times and is fully proofed.
The best way to tell if the dough is ready for baking is to gently poke it with a (lightly floured) finger. If the dough is sufficiently proofed the indentation springs back very slowly. If it’s under-proofed, the dough will spring back rather quickly. Over-proofed dough won’t have much strength and the indentation will remain as is.
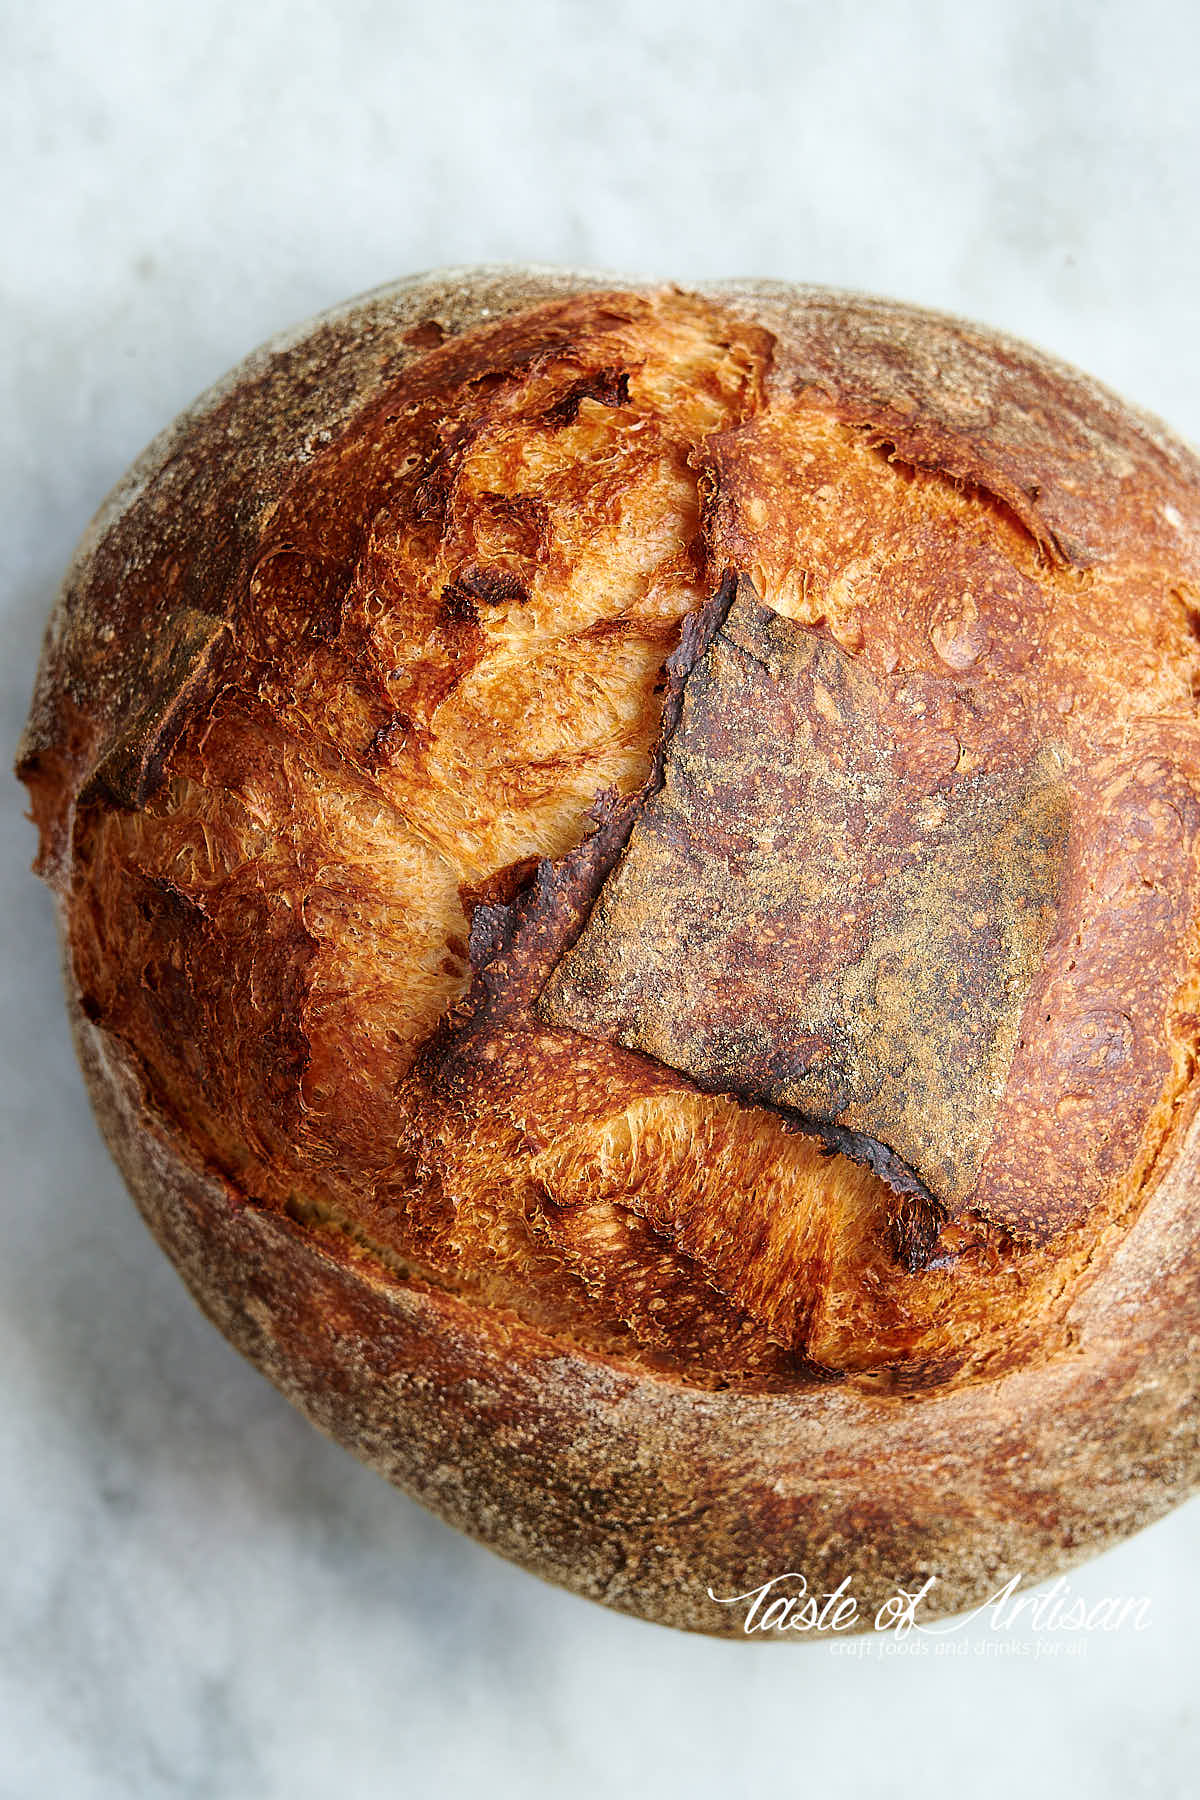
Scoring
The ready to bake dough is gently turned over on a piece of parchment paper.
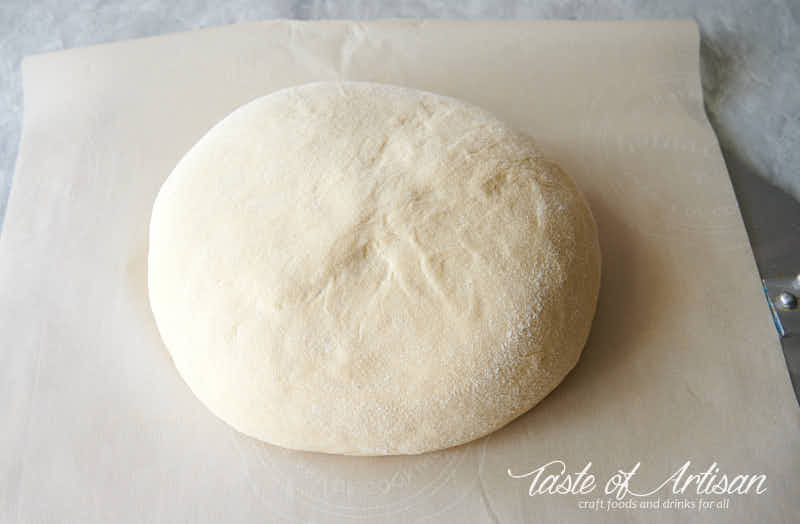
The top is scored with a bread lame to allow the bread quickly expand in the oven, also known as 'oven spring'. Without scoring, bread tends to have a denser, less open crumb, despite being perfectly proofed.
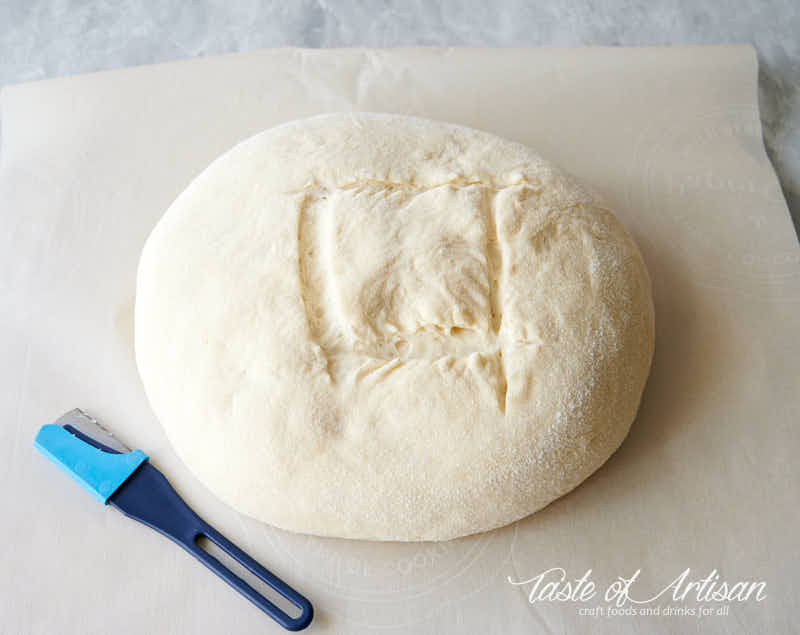
The scores should be about 3/8" deep and relatively short. If you go too far side to side and/or make them deep, the bread will spread out instead of rising up.
Baking
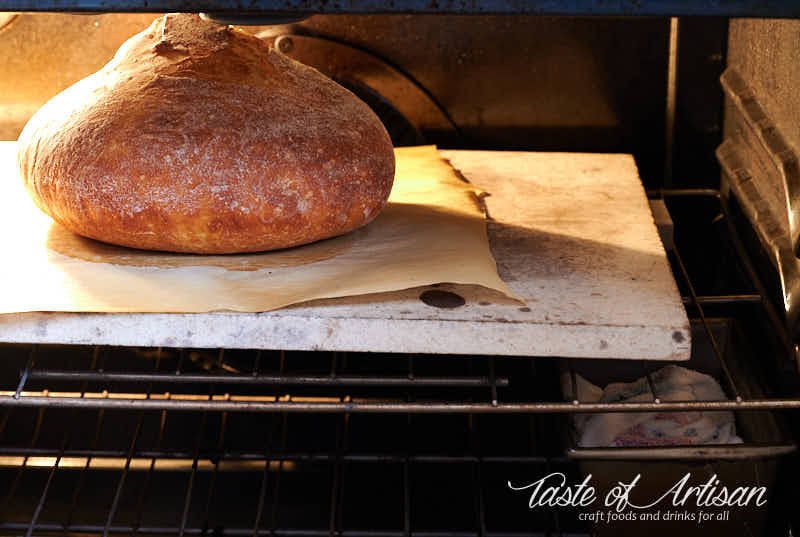
I bake my no-knead bread on a heavy duty baking stone with a steam pan for the first half (25 minutes) and without for the second half (25 minutes) with the oven door cracked-open. The oven is preheated to 500F but the temperature is reduced to 450F once the bread goes in. This dries out the crust, making it thin, crackly and beautifully colored.
Tips and tricks
So, what made this bread so special and taste so different from other no-knead breads I made a long time ago? I don't think it was one thing but rather a combination of little things. The list may not be complete but you will find some helpful points to help you take your no-knead bread to the next level, like I did.
- Using fresh King Arthur All-Purpose flour. I love this flour. It makes amazing baguettes. It's great for white bread too.
- SAF yeast. So many great reviews gets this yeast. I've noticed an improved openness of crumb and softer texture when using it. For quicker rises I use SAF Gold.
- Ditching the cast iron Dutch oven. The crust is so much better when bread is baked on a stone. And so is the oven spring. You can also bake larger or multiple loaves on a large stone.
- Stretching and folding the dough during bulk fermentation. No, it's not kneading. You don't need to be too precise about it. But it helps the dough develop gluten strands which results in a much improved, open crumb and overall light and airy texture. Three sets of stretch and folds every 30 minutes are enough. Each set literally takes 5 seconds to complete.
- Adding a bit of honey. It does wonders to the taste and makes white bread so much more enjoyable.
- Weighing ingredients. Each cup of flour has a variance of 10-20 grams. Four cups can potentially reduce or increase your flour to water ratio by 10 percent. That's huge and will have a noticeable effect on the final result.
- Creating a sufficient amount of steam in the oven for the initial 'oven spring'. This is achieved by using a water pan with a kitchen towel in it for slow steam release, preheating the oven slightly higher than the baking temperature, and spraying a bit of water in the walls of the oven after the bread is in.
- Proper scoring improves the oven spring and, hence, the openness of the bread's crumb.
- Baking the bread during the second half with the oven door cracked open. This does wonders to bread crust, making it darker and giving it a thin, crackly skin.
- Substituting 50 grams of all-purpose flour for rye flour. It adds more flavor and improves the taste.
How to make this no-knead bread even quicker
Longer fermentation and/or proofing give bread better flavor and vice versa. But, sometimes we are in a rush and need make bread fast. Freshly baked bread that may not have all the flavor it could have is way better than no bread at all, right? You can easily shave off another hour or even two by doing these two things:
- Use warm water when mixing the dough
- Ferment and proof in the oven with the light on (stretch and folds every 20 minutes)
This will make the quickest no-knead bread but I guarantee you, it will still taste great and blow the socks off your friends who will try it.
Advanced No-Knead Bread Recipe
Ingredients
- 600 g all-purpose flour (about 4 cups using 'scoop and sweep' method; King Arthur brand recommended)
- 450 g water (2 cups, room temperature)
- 21 g honey (1 Tbsp)
- 12 g kosher salt (two tsp)
- 3 g SAF Gold instant yeast (1 tsp)
Instructions
- Add the water and honey to a large bowl and mix until the honey is dissolved.
- Add the rest of the ingredients and mix by hand, squeezing the dough between your fingers, until a sticky homogeneous mass is formed. Cover the bowl with a plastic wrap and let rest for 1 hour.
- After one hour, perform stretch and folds every 30 minutes over the next one and half hours. Let the dough continue its fermentation for additional one and a half hours or until it doubles in size.
- Shape the dough in a ball and transfer to a proofing basket dusted with a 50/50 mix of all-purpose and rice flour, seam side down.
- Cover with a piece of paper towel (this will prevent sticking of the dough to the plastic wrap), then with a plastic wrap. Let proof for about 60 minutes or until the dough passes the finger test (see post for details). The dough will increase in size about one a half times or so.
- Meanwhile, place a baking stone and a steam pan in the oven (see notes). Preheat the oven to 500F. An hour of preheating is recommended.
- Turn the bread over on a piece of parchment paper. Score on top and place in the oven using a pizza shovel. Be careful opening the oven, it will be full of hot steam. Spray the walls of the oven with a bit of water (gentle mist) to re-create some of the lost steam and close the door.
- Immediately drop the temperature to 450F and bake for 25 minutes.
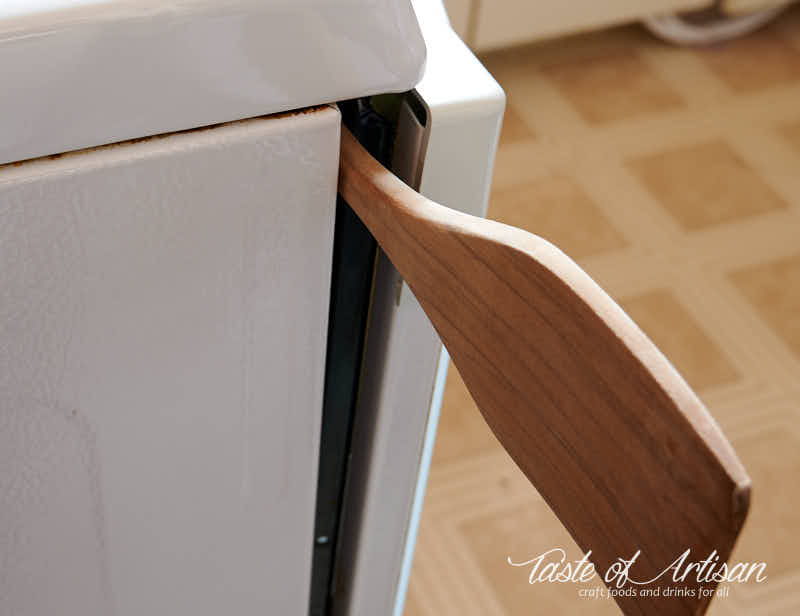
- Remove the water pan from the oven, turn the bread 180 degrees and leave the door cracked open. You can use a wooden spoon for that. Bake for another 25 minutes.
- When the baking is done, remove the bread from the oven and place on a cooling rack. Cool for 1 hour at room temperature before slicing.
Notes
Nutrition
Update on November 2, 2019
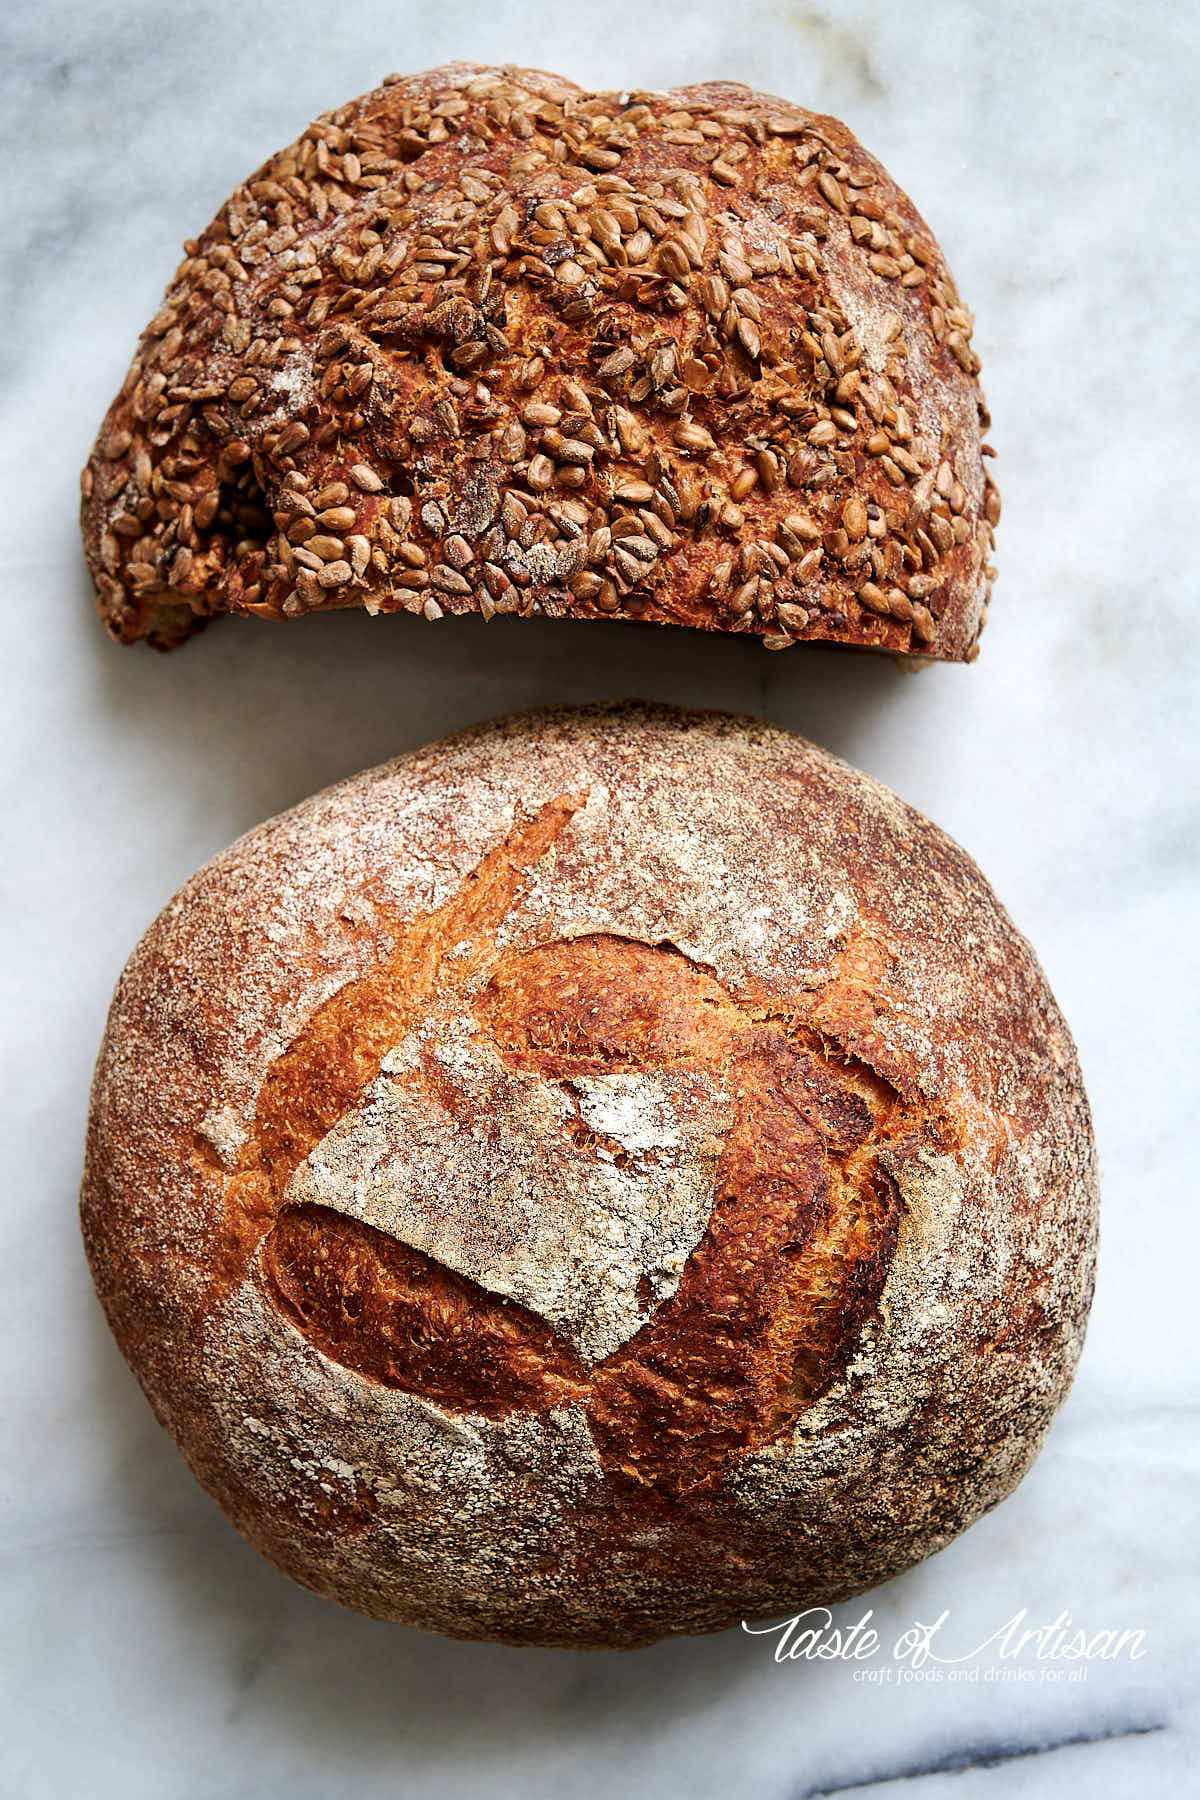
This bread is even more flavorful when you add whole wheat and/or rye flour to it. Nuts and seeds are a great addition as well.
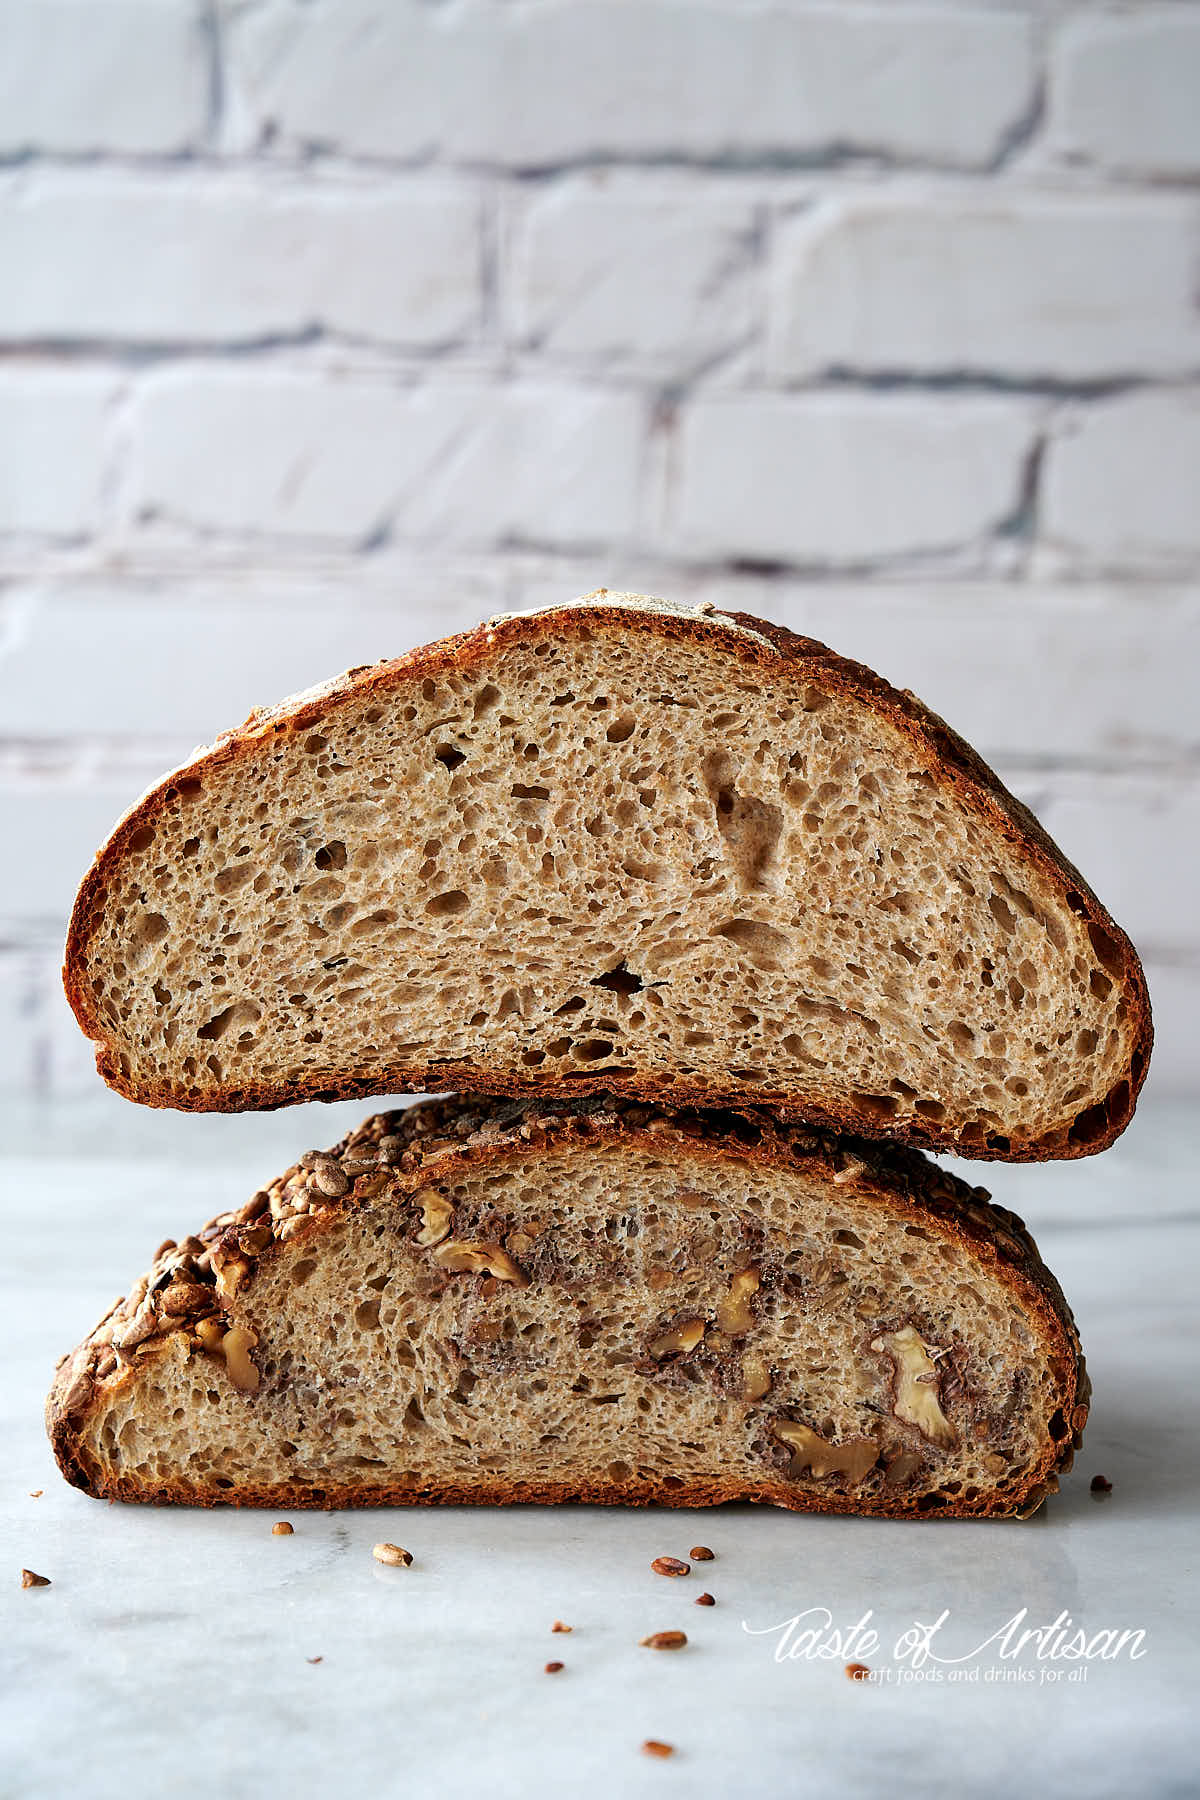
Made this bread with 60% all-purpose flour, 32.5% whole wheat and 7.5% rye flour. The taste is richer, more flavorful. You will get a less pronounced oven spring, and less open, yet still very airy and soft crumb. I like this variation a lot.
The other loaf is of the same composition, but I added a handful each of toasted sunflower seeds and walnuts. Loved it with my morning Americano.
Update November 6, 2019
This loaf is 75% all-purpose, 20% whole wheat and 5% rye flour. I mixed the ingredients too late in the day and finished bulk fermentation only around 10PM. As a result, I shaped the dough, placed in a proofing basket, covered and refrigerated overnight. This technique is called 'cold retarding', I use it for my French baguettes, sourdough bread and more. In the morning, I let the dough warm up for 90 minutes at room temperature, while I was preheating the oven, then baked as usual. There is quite a bit more flavor development due to cold retarding. The taste is just a touch sour, in a way like sourdough bread. Another great loaf that would sure put a smile on any bread lover's face.

Maria says
Hi Victor!
I finally tried this receipe (after making your baguettes on a regular basis!). I have a question on adding seeds. I've read seeds (flax, quinoa, sesame, etc) should be hydrated in few tablespoons of water so they are easier to eat in the bread. When I did this and added them during 3rd S&F, I think I ended up overhydrating. The bread came out gummy/doughy after baking and super dense. Do you think the hydrated seeds threw something off? I did do an overnight fermentation - so maybe baked too soon after taking from fridge. Thanks for any advice and recommendations!
Victor @ Taste of Artisan says
Hi Maria, I add seeds very often to my bread now. I also add rye and wheat berry, oats, and other add ins. Something like poppy, sunflower, chia, flax or pumpkin seeds don't need to be soaked, IMO. I add them dry and all is well. I do soak wheat and rye berries, whole or crushed, in hot water for 20-30 minutes, then drain and add to the dough.
Recently, I've been what some may call lazy, and add everything as I mix the dough. I don't wait until the last S&F as many recommend, and I did not experience any adverse effect. As a matter of fact, the incorporation of add ins seemed more uniform and more cohesive. I liked the results more and it was easier to execute. SO, I fully switched to this method.
To your question, yes, it's possible that you overhydrated. I also think that moisture from the wet ingredients being added at the last S&F, when gluten is mostly formed, will be accompanied by poor water absorption at this stage, resulting in a looser dough. I would suggest adding when you mix the dough. If the dough still feels loose, drop hydration by 2-3%. Sometimes some experimenting is inevitable to get your formulation perfect.
Your second point may also be very valid. If the dough is under-fermented, the bread will have a poor oven spring and/or be gummy and doughy.
I employ several techniques to make sure my bread dough is properly fermented when I do cold retarding. Frist, you want to make sure that fermentation begins before you put the dough in the fridge (if cold retarding fermentation). I look for a strong lactic acid smell, and blistering forming on top of the dough ball. Second, you want the fridge to be around 38F. 36F and lower will lead to poor or no fermentation. Third, the dough must at least double in size, sometimes up to 2.5-3x times the original volume.
If cold retarding proofing, I do a final shape, let the dough sit at room temp for 30-45 minutes, then place in the fridge at 38F overnight. The dough should increase in volume by 30% to 50%. If you have that, you can bake straight from the oven. If not, I let it sit at room temp until it does, then bake. Hope this helps. Happy baking!
Donn says
Thanks for the recipe!
This is perfect, very detailed recipe. I got it successful just one try with half the ingredients.
By the way, how long can it last on table?
I stayed alone, usually only eat 1-2 slice, how can I store this bread for longer?
Thanks again
Victor @ Taste of Artisan says
Hi Donn, you are very welcome. Glad you liked my recipe. This bread lasts up to about 4-5 days. Let it cool down completely, then wrap tightly in Saran wrap or put in a Ziploc bag. You can slice and warm up in a toaster oven/regular oven/toaster or on a grill. Even on a hot cast iron pan with a bit of butter. It will taste as good as fresh, maybe even better, if you like toasted bread. Enjoy!
Mary says
Any thoughts on why my bread ended up ‘gummy’ not ‘fluffy’, more dry?
Victor @ Taste of Artisan says
Mary, gummy bread is typically due to incomplete fermentation and/or proofing. Most likely incomplete fermentation. My rule of thumb is to look for 2-2.5x increase by volume during fermentation and 30-50% volume increase during proofing. That will ensure open, airy crumb. Good luck!
Diane says
Absolutely fantastic! I put another smaller dish of boiling water on the top pizza stone of the opposite side of the one on the lower rack. I also cooked for 20 minutes on 2nd baking cycle. I adjusted as previously suggested (5 minutes st 425, 5 minutes at 400 than 10 minutes at 375 so bread wouldn’t get charred/burn.
Can out light and airy with crispy crunch. Looking forward to trying some of your other recipes. Thank you for sharing such a great recipe!
Victor @ Taste of Artisan says
Glad to hear it, Diane. Thank you for your feedback. Enjoy!
Paolo-Richard says
Could I incorporate some buckwheat in this recipe? Someone gifted me some organic buckwheat flour and was curious about it. Thanks.
Victor @ Taste of Artisan says
I haven't tried using buckwheat in my bread yet, but I use it to make homemade soba, which I love. That said, adding something like 5% rye to this bread adds a lot of flavor and doesn't impact crumb openness. I'd start with 5% and see how you like it, then you can go higher if you want. Good luck!
Renée says
Hi!
A couple of questions:
Can this dough be proofed in the fridge for a few days after the stretch and fold step?
Could it be made with beer instead of water?
Victor @ Taste of Artisan says
Yes, you can cold retard either fermentation stage or proofing. Check out my French Baguette recipe for the example of fermentation cold retarding. You can refrigerate at this stage for up to 48 hours. If retarding proofing, let the dough fully ferment, shape, let sit at room temp for 30 minutes, then cold retard overnight and bake straing from the fridge. But make sure the dough increased 30-50% by volume, if not, let it set at room temp until it does. Good luck!
Lori says
Hello,
If I don’t second rise in the fridge, do you put it in the oven right out of the fridge or do you let it sit out for a while?
Victor @ Taste of Artisan says
If you proof (second rise) in the fridge, you can just bake straight away. I'd actually advise to do that as if you leave it out for long enough, it will over-proof. Just make sure that, while in the fridge, you get a (my rule of thumb) 30-50% volume increase. Sometimes you won't if the time is too short and/or the temp in the fridge is too cold. If that's the case, take it out and let sit at room temp until it does.
Lori says
Hello,
I love this bread recipe and have had many compliments on it. I just got a new oven and it does not allow me to keep the door open for the second part of baking - it just turns the oven off. Should I just reduce the temperature and if so how much should I reduce it by?
Victor @ Taste of Artisan says
Lori, my new gas oven also doesn't allow that but it has large vents so I don't really feel like it's necessary. I do the second part of the baking at 425F and it works well for me. Good luck!
Dorrie Gratto says
Ohhhhh my goodness!!! I have tried many different recipes for a good Artisan Loaf with little success. Your recipe is the BOMB!!!! Yes there is a little more effort with this recipe but totally worth the extra effort. I did the proofing in a colander with tea towel dusted lightly with flour no rice flower (on grocery list) didn’t have a pizza stone so DO did the trick 450 hot oven lid on 23 minutes dropped oven temp to 425 lid off for 23 minutes. Crust was divine even managed a few blisters, my scoring technique needs work but not bad for my first time with a lame. Letting it cool down was the hardest part of the process 🤣 thank you so much!!!
Victor @ Taste of Artisan says
Glad to hear it, Dorrie. You are very welcome. Happy baking!
Regina says
I can't quite seem to get this bread perfect. My first dough was so wet and spread rather than rose. It was still tasty and had a nice open crumb. I live in a very humid place, so I tried reducing the liquid, and I got a beautiful rise, but a dense, tight crumb. The flavor was still great. Maybe I reduced the liquid too much, but I just stopped when the dough was sticky but not wet. What can I do to get a good balance between these two? How do I calculate the hydration percentage?
Victor @ Taste of Artisan says
Hi Regina, dense and tight crumb may not necessarily be related to hydration but rather to fermentation and proofing, which is often the case, so watch out for those too. But, yes, in my experience, higher hydration gives me lighter, more airy, albeit more moist crumb. I love it.
Often my dough after mixing is a wet, sticky mess, which tightens up and becomes just slightly sticky/tacky by the time it's ready to be shaped. Working with higher hydration dough is just a matter of experience. Once you get used to it, it becomes very easy to work with. I now make some breads with well over 80% hydration.
That said, finding that balance is key, especially in your challenging high-humidity environment. Hydration is expressed as the percentage of liquid to flour, so 450g water to 600g flour results in 75% hydration (for simplicity, I am ignoring honey which contains 18-20% water in it). So, 6 grams of water will raise or drop the hydration by 1%. You can adjust it by 1-3% at a time to find that balance, but do keep in mind that once you get comfortable with that hydration level, you can raise it as it will be easier for you to work with then. Good luck!
James Cairns says
I've baked this bread five or six times now and it is absolutely foolproof. Turns out great every time. I bake it in a Dutch oven otherwise it's exactly as per recipe. I love it!
Victor @ Taste of Artisan says
Glad to hear it, James. Dutch oven is a great option. For some reason in my Dutch oven I get bottoms a little to dark for my liking, but that could be because of how my oven bakes. I don't have that problem baking on a stone or in a bread cloche. Happy baking! Please, try my other recipes.
James Cairns says
Hi Victor,
Can you just confirm how many stretches and folds you recommend per set. Is it the usual four, or do I do more?
Kind regards
James
Victor @ Taste of Artisan says
Hi James, I do 4 per set, that is I stretch and fold each corner per set. If the dough feels very loose, especially during the 1st set, I may do 8. Good luck!
Nadiia says
Thank you very much for the bread recipe. Really, it turned out very tasty with a crispy crust. I'm baking it again at the moment.
Victor @ Taste of Artisan says
Glad to hear it, Nadia. You are very weldcome. Enjoy!
James Cairns says
Hi Victor,
I live in the UK, and I just love this loaf. Can you clear up one point please. How many stretch and folds do I do per iteration? Is it the usual four, or is it more?
Victor @ Taste of Artisan says
Hi James,
I usually do just four per iteration, but sometimes the dough feels too lax, especially during the first S&F iteration, so I will doube it up and give it eight. Hope this helps. No harm in that.
Bolivar Trask says
Came out beautiful except that by 40 min the top was charred. Lower the rack position or cook less time?
Victor @ Taste of Artisan says
There isn't a single recipe that will suit everyone because of many factors and the biggest one being how your oven bakes. Making adjustments is sort of a given, though not always required. You've answered your own question. I can add lowering the temperature as another option.
Breadhelpplsty says
Made this today. I followed all measurements precisely with a scale. The only substitution I made was 150g of the 600g of flour was rye, rest all purpose. While my dough started out looking like yours right after combining water, it remained sticky and never formed a nice smooth surface like yours did prior to proofing. I did the folds and it improved slightly, but it remained lumpy and sticky. Any explanation for this?
Victor @ Taste of Artisan says
Rye flour is the reason.
Kim says
Hi there,
My oven only goes up to 482°F. I'm Australia 250°C how would I adjust the cooking time for this temperature?
Could I add a bit of garlic and rosemary? If so would it be fresh or dried?
Victor @ Taste of Artisan says
Hi Kim, 482F should be fine, preheat to that, then follow the steps wihtout any changes. The range of acceptable temps is quite large and you will be getting differnet results, some of this may pleasantly surprise you. I bake some breat at 425F all the way for a softer crust. You can even bake at 375F for a really thin and crispy crust. Just bake until the internal temps is around 195F - 210F. And, yes, you can add garlic and rosemary, I ordinarily use fresh as they have much more flavor. Happy baking!
Barbara says
I’ve been baking no-knead breads for several years, this is the best results I’ve had! The stretch-and-fold technique gave the dough enough strength to keep a beautiful shape! I used a floured tea towel over a bowl and baked on a large stone. Great rise! Next time I’ll try cold retard.
Victor @ Taste of Artisan says
Cold retarding and/or incorporating sourdough discard will elevate it even more. Happy baking!
Jack says
Great recipe. I have made this many times and found that following the recipe exactly as written and then at baking time preheat a dutch oven at 450 and bake 20 minutes lid on and 23 minutes lid off provides a fantastic loaf as well. Makes the baking portion a little less time consuming and safer without having the oven cracked open.
Victor @ Taste of Artisan says
Glad to hear it, Jack. Thank you for the feedback. Happy baking!
Madelyn says
Am I able to use regular active dry yeast instead of instant yeast? Is there anything you’d do differently?
Victor @ Taste of Artisan says
Active yeast needs to be activated prior to mixing it in. I used to use it but now use instant exclusively for both fast and slow-fermented doughs. I've had much better results and repeatability with instant yeast.
Patti says
Hello! I am going to make this bread again and have a question. If I keep the yeast in the freezer can I use it in the recipe straight from the freezer?
I have been making different breads lately and all the basics I learned from you have made me successful each time. Your recipes and instructions are invaluable. Thanks for all the time you put into teaching us,
Victor @ Taste of Artisan says
Hi Patti, that's exactly what I do too and it works great. The freezer is the best way to keep yeast fresh. I put it in the dough straight away. Mind you, this only applies to instant yeast, not traditional. I am glad that my posts helped you and many other of my readers. That's the goal of my blog. Happy baking!
Tanya says
HI Victor, I have a question about the SAF yeast. I read that the Gold is better for breads with a higher sugar content, whereas the RED is used for low sugar breads. You recommend the SAF Gold for this bread. As I only want to buy one kind, I'm a little confused as to which one I should get. I don't add any sugar to my no-knead bread and was not planning to add the honey when I try your recipe.
Thanks for your help!
Tanya
Victor @ Taste of Artisan says
Tanya, I keep two bags of SAF yeast in my freezer, Red and Gold. I've noticed that I use Gold most of the time regardless of the dough's sugar content. It just works better for me, more predictable fermentation, less impacted by the ambient temperature. I did not do any scientific experiments on that; it's only my anecdotal evidence. But yes, Gold all the way for me.
Hyman says
After many loaves of the original NY Times no-knead bread this one is a huge improvement for me. This is my new go-to bread recipe as the family don't want anything else. Thanks for sharing. I will be trying your other recipes as many of them look quite interesting.
Victor @ Taste of Artisan says
Cool! Enjoy!
Larissa says
This recipe is so good! Mine turned out wonderfully with 2/3 white flour and 1/3 whole wheat. Definitely worth the little bit of extra effort required over other no-knead recipes. I don’t have all the supplies so I used a floured mixing bowl for proofing and a cast iron pan instead of a baking stone..
Victor @ Taste of Artisan says
Thank you for the feedback, Larissa. I started baking bread over 10 years ago with using the super popular back then New York Times' no-knead bread recipe and it was great at first but nowhere near the bread that I got to experience while living in Germany or while visiting France. I am glad you liked my recipe. Enjoy and happy baking!
T. Robson says
Far and away the best no-knead recipe I have yet to try.
Excellent results from a straight-forward, easy to follow recipe. We will be pairing this fine crusty bread with some lovely foie gras we received for Christmas.
Victor @ Taste of Artisan says
Happy to hear it, and thank you for the review. Enjoy, it sounds delicious!
Joni Meeth says
Fabulous results. I’ve designated a loaf pan & boiling tea towel now, due to repeated use. Worth every second of prep/rise time.
Victor @ Taste of Artisan says
Glad to hear it, Joni. Happy baking!
KEN NELSON says
I tried a no-knead bread 3 cups flour, 2 tsp yeast, 1 1/2 tsp salt, 1 1/2 cups warm water. I mixed it well, placed in a bowl, covered, let rise on top of refrig for 22 hrs.
It rose, very sticky. Shaped into ball but it wanted to lose shape. Placed in 450 degree oven in dutch oven which was also preheated.
Bread came out 45 minutes later, tasted good but I would have liked it to remain higher like your pictures.
I think putting this recipe on a stone it may have flatten out posibly more.
Seems like to much water for me and the reason for not staying like a ball when shaping.
Any suggestions.
Victor @ Taste of Artisan says
Ken, why don't you try my recipe exactly as written and see how it comes out. Stretch and folds are a must otherwise the dough will be very sticky and lack strength.
You can drop hydration to 72%, it will help.
Lori says
I made this bread and the dough was sticky even when I put it into the banneton. It didn’t rise as high as yours did as well. Is the dough supposed to be sticky?
Victor @ Taste of Artisan says
Lori, by the time you finish S&Fs, the dough should be strong and just tacky, not sticky. That said, if you feel that the dough is very sticky and hard to work with, drop hydration by 2-3%. That should help. Once you get more comfortable with that dough, you slowly increase hydration or stay there if you like the results. Happy baking!
Abby says
Thank you for this recipe, I've made it a dozen times now for friends & family and always get great feedback. I started adding parmesan cheese during the initial mixing and found that it affected the oven spring, creating more pancake-y shaped loaf. Still tasted great but more dense. Is there a better time to add cheese so it doesn't have such an impact?
Also curious about fan-forced ovens, if you're stuck with a fan-forced oven, would you recommend any changes to the method?
Victor @ Taste of Artisan says
Abby, I often add mix-ins to my bread and I do it only during the second S&F. It works well for me.
Fan-forced ovens can be a challenge for bread baking. You have two options - bake at lower temps or use a cloche. I can't be very specific on the first option as it would really depend on your oven and how it bakes, I'd need to test it. But if you get a cloche none of that would matter. I love my two cloches.
Abby says
Thanks for taking the time to respond, I'll try your suggestions this weekend. You've sold me on cloches!
Victor @ Taste of Artisan says
My pleasure. Take a look at my sourdough bread post, I posted some pictures of my bread beaked in a cloche.
Paolo R says
Thank you for this recipe, it is by far the best bread I have ever made. It was big, fluffy and had a great crust. I only had King Arthur bread flour but it worked perfect. I don’t own a proofing basket or a pizza stone so I let dough sit in same bowl I mixed it in and cooked the bread in a Dutch oven. This is my new go to recipe and I look forward to trying more of your recipe’s.
Victor @ Taste of Artisan says
You are very welcome, Paolo. Enjoy!
David Thomas says
Absolutely delicious. I followed the instructions to a T, and the results were raves! Thanks for such a wonderful, relatively quick, recipe!
Victor @ Taste of Artisan says
Glad to hear it, David. Enjoy!
Oscar says
Great sharing of ur life as a bread-maker... I picked up new and important hints! Need to read all your posts/articles now. 5-stars. TY
Victor @ Taste of Artisan says
You are welcome. Enjoy and happy baking!
Corey says
Hi there, made this bread last weekend, and it turned out excellent. The instructions were easy to follow for a newb like me. Thank you for the recipe.
Victor @ Taste of Artisan says
You are very welcome. Enjoy!
H Dan Smith says
Oh, and for novices like me who are slaves to the exact recipe, it helps to know that the stretch and fold is all four sides each time!
H Dan Smith says
Fun! As opposed to the most common no knead bread recipes, which require 8-18 hours proofing, this is same-day bread. I used a cloche my daughter gave me. Thanks.
Victor @ Taste of Artisan says
You are very welcome.
Tiana says
Also I want to say skipping the Dutch oven and cooking straight on the stone is the best idea ever and I’m never going back. 🙌🏾🙌🏾🙌🏾
Victor @ Taste of Artisan says
I like baking in clay bread cloches too, I get very good results with them too.
Ana says
Can you please share if you baked in an electric or a gas oven? I have a gas oven and am wondering if adding humidity with the method described here would work, since gas ovens are designed to vent the moisture out.
Tiana says
UMMMM... WOW. This is THE best bread recipe I’ve ever tried. I followed the instructions to a T except I did an extra stretch and fold (4 in total) the oven spring I got is MASSIVE! I wish I could post a picture with my review!!! I’ve had a few great loaves since I started bread making and a lot of Dutch oven loaves that were flat, gummy and disappointing, but this blows them all out of the water!! Going to share this recipe everywhere. Thank you !!!
Victor @ Taste of Artisan says
Happy to hear that, Tiana. I made a loaf of this bread last Friday and too got a crazy oven spring. This is quite normal with this recipe but I get impressed every time;)
I will email you, send me your pics and I will attach them to your comment.
Tiana says
I sent the pictures😊
https://tasteofartisan.com/wp-content/uploads/2022/03/Tianas-no-knead-bread.jpg
https://tasteofartisan.com/wp-content/uploads/2022/03/Tianas-no-knead-bread-1.jpg
https://tasteofartisan.com/wp-content/uploads/2022/03/Tianas-no-knead-bread-2.jpg
Victor @ Taste of Artisan says
Thank you, Tiana. Your bread looks gorgeous.
Nikki says
Hi there! This is such a fabulous post! So well written and I’m super excited to try it! I have some questions regarding the yeast. All I have on hand is AD yeast. Will that work in this recipe and yield the same results? I’m not a newbie to bread baking, but I’m no expert either lol. Still have lots to learn! I’m dying to try this but I’m not sure how much AD yeast to use, or if I can even use it at all. It’s my understanding that the amounts of AD and instant yeast will differ, but I have no idea how to sub one for the other. I’ve never used instant yeast. Thanks for your time!
Victor @ Taste of Artisan says
Nikki, my understanding is that AD is 1:1 with instant yeast, the only difference is that AD contains fewer active yeast cells and slower to start thus it requires activation before mixing it in. Will it work in this recipe? Yes, it will. Make sure to activate it in warm water with a pinch of sugar and mix it in once you get a nice foam hat going. Fermentation may be a little slower but the difference should be fairly minimal. I used to use AD yeast but stopped as once I tried instant yeast (especially SAF) my results improved... instantly 😉
Nikki says
Thanks for the reply! I really appreciate it! I think I’m going to look for the SAF yeast. I’m intrigued to try it!
Shelley says
We loved your baguette recipe, so I’m going to try this one! Personally, I’ve had good results from the basic no-knead recipe—best bread we’ve ever had, in fact—but I like this combo method. Is there any reason I couldn’t just keep the flipped-over bread on parchment & slide the whole thing onto my stone? I don’t have a peel, and the baguettes were kinda tricky to slide!
Victor @ Taste of Artisan says
Yes, you can do that, Shelley. Turn the dough over onto a working surface first, shape it into a boule and place it into a large proofing basket. Let it proof, I like to see a 30-50% volume increase during proofing, then score and slide into the oven. Coincidentally, I do this very thing every now and again when I want a break from sourdough and other breads I bake. One thing to note though, I find that bread baked from the exact dough tastes noticeably different when baked as a boule vs baguette shape.
James H says
This is what I do and it works fine!
Lori says
I just made another Advanced No Knead Bread. I used the SAF yeast. My bread looks absolutely amazing and tastes it too. I got an almost 4 inch rise and the crumb is perfect. thank You!!!
Victor @ Taste of Artisan says
You are very welcome, Lori. That yeast is potent and bullet-proof, I've had amazing results with it. You have to try my beer bread one of these days, I love it.
Kim says
Hi
Just made your Bread so so easy and soooooo yummy thank you 🙏🏼 I used fresh yeast and no honey, French t55 flour & 50g rye eating it now with fresh Irish ☘️ butter 🧈☺️Can’t see where to upload pictures to show my masterpiece 😅
https://tasteofartisan.com/wp-content/uploads/2021/12/kims-no-knead-bread.jpg
https://tasteofartisan.com/wp-content/uploads/2021/12/kims-no-knead-bread-1.jpg
Victor @ Taste of Artisan says
Awesome! So happy to hear that. I like organic T55 flour a lot, you can go to T65 for this bread. Adding some rye makes the bread especially tasty. I'd love to see your masterpiece, will email you.
Victor @ Taste of Artisan says
Great looking bread, Kim. Love the open, airy crumb.
Ana says
What are your thoughts on extra long bulk fermentation and cold proofing? Kenji Lopez-Alt touts bulk fermentation at room temp overnight, then cold proofing 3-5 days. The idea is to develop best flavor, esp. when using organic artisanal bread flours.
Also, is the sequence you recommend:
1. Bulk fermentation
2. Stretch and fold
3. Cold retarding
4. Final proof to x0.5 times original size + finger test
Or should stretch and fold be done after the cold retarding? Kenji does the stretch and fold after the 3-5 day fridge time, rest the dough 90 min to bring to room temperature, then does stretch/fold and then the final proof.
Thank you for such a thorough recipe and all the suggestions.
Or
Victor @ Taste of Artisan says
Ana, I am not familiar with the technique and to me, it looks a little out there, to be honest. It doesn't strike me as very practical either as I wouldn't want to spend so much time and effort on a loaf of bread. I want it now!:) Even if it's a little bit better and I can guarantee you, it will only be marginally better than most good loaves. If that.
Stretches and folds are done during bulk fermentation, always. As the dough ferments and gets saturated with carbon dioxide gas, it needs structure to hold the shape and develop good, even aeration. That's why most if not all bakers do stretches and folds DURING bulk fermentation not later. Chad Robertson of Tartine Bakery does it this way. Ken Forkish of Ken's bakery in his Flour, Water, Salt, Yeast book even specifically advises not to do S&F's during the last part of fermentation. You don't want to degas the dough. These are just two examples.
As far as the flavor goes, what flour you use will have a far greater impact on flavor. I recently found a mill nearby, an hour drive from me... went there and got freshly milled bread flour as well as pastry, AP, spelt, kamut and einkor flours. All of their flours are whole grain, meaning they use every part of the wheat berry, not just endosperm. Even their pastry and AP flour are whole grain. It was a revelation.
Cold retarding in the fridge (fermentation or proofing, or both) is a good way to develop complex flavors but it has limits. I've gone as long as 48 and 72 hours and found that the longer the dough spends in the fridge the more tart it becomes and the structure begins to deteriorate. I find 16-24 hours to be enough, 48 hours being the max.
My favorite sourdough bread that I now bake 2-3 times a week only gets about 14-16 hours in the fridge and the flavors are outstanding. I don't think it needs more or that more would bring a noticeable improvement. I make my Baguette dough in a similar way and I find the flavor to be excellent. That said, there are hundreds of ways to make a good loaf of bread. You kinda have to pick or develop what works for you and fits your schedule. I know for a fact that Kenji's method would never work for me as I can't imagine spending a week to make a loaf of bread. I also don't quite understand the logic behind S&F after fermentation. His method may very well produce an excellent loaf, I'd have to try it to be the judge... but again, you kinda have to take what he says with a grain of salt - he is not a baker like Robertson or Forkish, he is a pop food writer, he is after a sensation, a splash... that's the nature of food writing. I am after a good loaf that I can comfortably keep making day after day and not getting sick of doing it. If I have the dough to be sitting in the fridge for 3-5 days I'll probably forget about it most of the time;)
shalom says
I've seen corn meal used in some traditional type recipes. Can you compare corn meal vs rice flour?
Victor @ Taste of Artisan says
Hi, to be honest, I've never used corn flour in my bread recipes but it sounds interesting.
Juliemn says
I've just completed my second stretch and fold and the dough seems overly sticky. When I attempt to turn it over and make a ball shape it really sticks to my hands and doesn't form the nice shape shown in your photos. I had this same problem with a different bread recipe last week. I thought I followed measurements precisely - I even used a scale. Can more flour be added at this point? It is cool here so I have been letting the dough rest in my gas oven which has a pilot light so the oven is warm but maybe this contributes to the stickiness? I appreciate any suggestions!
Victor @ Taste of Artisan says
Hi Julie, the thing is that different flours may behave differently even if measured by a scale. The finer the grind the less water they absorb and vice versa. When making whole wheat bread bakers increase hydration as WW flour absorbs more water. So, in your case, yes, decrease hydration by 2-3% and see how your dough behaves. I recommend dropping hydration to where you feel comfortable working with the dough. No, this won't make a bad baguette, it will be a touch different but still good. Then, slowly work your way back up as you get more and more comfortable. While you are at it, note where you get the best results and stick to it. There isn't a single way to make a great baguette. The goal is to make a good baguette with little effort and sufficient comfort... that way you will be making them over and over and not give up.
No, warmer air in the oven won't impact that in any significant way.
janet simms says
This is such a good recipe and I especially like your very clear directions. I'm only on my fourth loaf so far, and bake in an round earthenware casserole that I found at Goodwill and it's perfect! My question is about what might happen if I leave the lid on the casserole during the first 25 minutes and then remove it to allow the loaf to brown in the second half of baking. I realize that could make a difference to the effect of the steam pan, but I'd just like the loaf to get a little less dark, The crust looks almost burnt when it's done, though the inside of the loaf is lovely. The only diversion from your recipe is that I am using up my bread flour, maybe AP flour would make the difference. Any suggestion would be welcome, and thank you for this great recipe!
Victor @ Taste of Artisan says
Hi Janet, thank you for your feedback and the kind words. I don't think a different flour will make any appreciable difference with regard to your problem. I think it's the temperature issue. It looks like your oven bakes hotter than mine or vice versa. I'd suggest dropping the temp by 25F and see what kind of results. Leaving the lid longer may work to point but it will affect the crust and the color.
Jas says
Wow, my first ever attempt at this type of bread and it was a success. Your excellent instructions and patient replies in the comments were so helpful. I halved the recipe. I didn’t have a oven stone so used an old heavy based steel frying pan (missing a handle lol) upside down with 2 baking trays on top. No proofing bowl so used a large sieve lined with muslin cloth dusted with rice flour, and just used a small knife for scoring. My oven is gas and was just a tiny bit too hot as the top crust got really dark so next time will reduce the heat slightly. So happy with the results and it tastes amazing, just like its from an proper artisan bakery shop. Thank you so much for sharing. ❤️
Victor @ Taste of Artisan says
Hi Jas, very happy to hear about your success. Very resourceful, reminds me of my bread baking adventures back when I was starting out and goes on to say that all those fancy tools are not a pre-requisite for making a great loaf. Happy baking!
Lori says
My bread always seems to burn on top. I have it on the lower middle rack and I decreased the temp by 25 degrees but it still burns. I always have to take it out early. Am I doing something wrong?
Victor @ Taste of Artisan says
Hm, that's puzzling. Do you bake with convection? Some ovens operate with a fan on all the time so that could be causing it. You can also get a BBQ thermometer and monitor the temperature in the oven to be sure that the temp is correct. If the temp is right, I'd bake with the steam longer, or cover the bread with foil for a period of time. If that fails, I'd get a bread cloche and bake in it, I have two Emile Henry bread cloches, they work very well for me. Hope this helps. Good luck!
Lori says
Hi Victor. Another big fan here.
My question is this: I work and so finding a full day to devote to baking is difficult. If I did the initial fermentation and folds, could I leave the dough out on the counter overnight as one does in the ‘original’ no knead recipe? Or would that overproof the dough?
Thanks so much. Still trying to figure this science out.
Lori
Victor @ Taste of Artisan says
Hi Lori, long time. I don't remember the details of the 'original' no-knead bread recipe, it's been 10+ years since I've last made it so I can't comment on that. The good news is that you have many options and you can make the process fit your schedule quite easily. In addition to flour, salt, water and yeast, there are two other ingredients - time and temperature. Basically, the cooler the temperature, the longer fermentation will take and the longer or shorter the time, the quicker or slower said fermentation will finish. Check out my French Baguette recipe, I do an overnight retarding of fermentation, you can do the same with your bread. Actually, an even better example can be found in my Rustic Sourdough Bread recipe. I think that's exactly that process that you need. You can even go as long as 24 hours in the fridge and bake in the evening.
In general, you can play with temperature, time and the amount of yeast to extend or shorten your fermentation without getting the dough over-ferment. If you'd rather ferment overnight at room temp, you can do that too. During colder months, my kitchen is 67F or so and that works for overnight fermentation on the counter. If it ferments too quickly, I reduce the amount of yeast or ferment in a slightly cooler place, like near a window/door. Let me know if you have more questions.
Charlotte says
Hi Victor, thank you thank you thank you for this recipe, I have been baking weekly for the last year using your recipe, perfect!! This week, I decided to change up 100% white bakers flour and 75% hydration, with 50/50 white and wholemeal, and 80% hydration. Everything else stayed the same. The dough looked and felt similar in terms of hydration after fermentation & proofing as before. However, I didn’t get as much of an oven spring as previously, probably only 2/3 rise. Would appreciate any tips / suggestions you have?
Thanks!
Charlotte
Victor @ Taste of Artisan says
Hi Charlotte, whole wheat bread doesn't get as much oven spring and the higher the proportion of it the less oven spring you will get. Take a look at my sourdough WW bread, did your crumb look like that? If so, that's to be expected. It's not going to be as dramatic as in this bread or white sourdough bread.
Monica Chen says
Hi Victor,
Thanks for this wonderful blog with great recipe methods. Made half the loaf for dinner tonite. Half the recipe was easy to manage and a good personal loaf size. I don't have a dutch oven, so I used a tall springform cake tin, put a clay dinner plate at the bottom and covered the tin with another clay plate. The heavy clay plates acted as heating stones. I didn't score it as I didn't have a lame and it was a very wet dough. I used bread flour (I asked you about that a few weeks back, thanks for the reply.) Anyways, I wrote to thank you as it turned out really delicious with a lovely crisp crust and satisfactory open crumb!
Regards, Monica
P/s want to show you the pics but can't seem to post
Victor @ Taste of Artisan says
Thank you for the feedback, Monica. Glad to hear that your bread turned out well. I haven't used a lame for a very long time. A couple of years back, I couldn't find my lame so I graned my serrated Wusthof knife and it instead. It did a perfect job and I started using it instead of my lame. It works well and it's always there, in the knife block, so why use a lame, right? Anyway, I am all for making my bread baking process quick, simple and easy.
I emailed you, send me your pics and I will attach them to your comment. Be sure to try my other recipes, lot's of good stuff there. Try my challah bread, I love it.
P.S. Thanks for sending me the pictures. Lovely bread, really nice open crumb. There is nothing like homemade bread hot from the oven.
Patti says
I made this bread today and the result was amazing. I made it once before and it was great then and even better this time. My scoring still has a ways to go but I thought I had done it brilliantly until it didn’t seem to show up very well. I used 30 g of rye flour in place of all purpose. Such good directions and pictures, they help so much to someone who is still learning.
Thanks again and again to Victor!
Victor @ Taste of Artisan says
You are very welcome, Patti. Glad to hear about your results. Scoring takes some time to master and it's best to experiment to see what works better. I've had best results scoring closer to the center but deeper to have a very nice oven spring. If I score too far out the bread tends to come out flatter.
P.S. Thanks for sending me your pictures. Your bread looks outstanding, seriously. Love that open crumb and that rustic crust.
Patti says
Thanks for that tip. I'll try to score near the top. Love reading your positive remarks of the bread loaves. I do have one question. After I have shaped and put in the banneton it seems some of the compactness hasn't held up as much as I think it should so I shape it again in the banneton. Is that correct?
Many thanks again,
Victor @ Taste of Artisan says
You are very welcome, Patti. Do this instead - shape the dough, cover and bench-rest for 20 minutes. Come back, shape again and put in the banneton. This is the way that at least some professional bakers that I've seen do it. Why don't I? My way is simpler, quicker and has worked well enough for me. Though, if I feel that the dough is a little lax when shaping, I give it a bench-rest and reshape before proofing. I bake my own bread in between work and a thousand other things that I need to so that's my excuse to make the bread-making process as quick and efficient as possible. Sure, I could follow every detail and squeeze every bit of perfection out of every loaf but if I tried to do that, I doubt that I could bake bread 2-4 times a week as I do now.
Patti says
May I ask a second question on the same night?! I was reading all the questions and answers and was very surprised by one thing you said, as in I read it 3 times.. Really?? You score and bake the bread seam side up? I must have missed that in all the recipes or I has so sure it was seam side down that it didn't sink in. That opens up a whole new world for me!
So Advanced no knead first , then brioche rolls, then WW sourdough, seam side up!
It's funny Victor, I used to look through countless SD bread recipes trying to find one that looked like what I wanted. Then I found your site. I haven't looked elsewhere since. Doubt I will unless it's something you don't cover. Your recipes are hands down the best.
Victor @ Taste of Artisan says
Actually, I do it both ways as both are good and have their place under the Sun. With high hydration breads it's doesn't matter much - by the time proofing is done, the seam will close up so well you won't even notice it. I like proofing seam side down (and hence baking seam side up) as it allows me to create good tension and keep it while proofing. I think it helps with the oven spring / nice shape. If the dough is stiffer, the seam will open up during the oven spring. If the hydration is low enough you won't even need to score the dough. The bread comes out looking very rustic. In this recipe, I still score the dough but you can see the seams too... looks cool. Hey, you can bake a good loaf of bread in many different ways, every baker has her/his own style.
Patti says
Hi Victor! I am going to make this bread this week but a few easy questions' don't want to use the wet towel for steam, etc. I have the EH cloche like yours. I also have the EH pizza stone that I sent you a photo of. So I can use the cloche or just put the bread on the pizza stone and cover it with the cloche top. Or I can leave it uncovered with a pan of water. Which do you think? The last time I made it with the wet towel it made so much steam I had to stop the fire dept from coming by. 🙂
This weekend brioche buns.
Thanks!
Victor @ Taste of Artisan says
Hi Patti, good to hear from you. Your oven must be very powerful if that created so much steam. In my electric oven, I would get barely enough. More in my new gas oven but still not what I would call 'too much'. I've experimented with baking bread on a stone with and without steam, covered with a SS bowl on a stone, in a cloche and in a CI combo cooker. I haven't tried a stone with a clay cloche top - that sounds interesting. Anyway, I've had noticeably better oven spring and color when baking in a cloche. Second best was the CI combo cooker but it gets too hot and burns the bottom of the bread. Clay is better. This is good news as I am not a fan of using a steam pan... these days I use it only when baking baguettes or very large bread loaves. Check my other bread recipes, I've shown some comparisons here and there. Happy baking!
Patti says
Thanks! Of course I'll send photos of the results!
Victor @ Taste of Artisan says
Would love to see them. Good luck!
Bonnie Perkins says
I am new to No-knead Bread. For several days now I have been researching recipes and methods. I have actually made two loaves this past week. This bread will be the perfect complement to the Mediterranean Diet. I found this website and recipe today. Your method for making this bread is by far the best I have found. I really appreciate all your explanations for why you do each step. That is so helpful. This is the only recipe I need and will use. I do have one question. I have seen some recipes where Extra Virgin Olive Oil replaces a little bit of the water. Have you ever tried doing that? Also I bought some King Arthur Bread Flour I wanted to use. I notice you use All-Purpose Flour. I also plan to use Whole Wheat Flour. (1/3 whole wheat and 2/3 white or bread flour) I would love to hear your thoughts on all of this.
Victor @ Taste of Artisan says
Bonnie, thank you for the kind words. Adding a little bit of olive oil should be OK... I make pizza dough with olive oil, not bread. I would not add more than 3% (of the weight of the flour). Olive oil makes the dough smooth but also adds a slightly bitter quality to the bread, so don't overdo it. The flour mix looks good. There is no right or wrong here. The more WW flour you add the more you need to raise the hydration as WW flour absorbs more water. I like adding rye flour too, about 5%, it lends the bread a nice flavor and sweetness.
Ann says
Hi Victor,
I always use your recipe to make my bread and it turns out perfectly. However, I have a few questions based on my observation from my experiments:
1. I make the though and split it into 2 doughs after S&F. One dough I add Cranberry and walnut as usual. The other I wanted to be adventurous by adding cheddar and jalapeño (fresh). After bulk fermentation and before retarding in the fridge, I noticed that the dough with cheddar and jalapeño became wetter than the one with cranberry walnut. It was very sticky too wet for me to handle. I tried adding more flour and different techniques to shape the dough but it's still sticky. Is it because the fresh jalapeño release water to the dough? I use just one Jalapeño.
2. Do you reshape the dough again after cold retardation? When I notice that the dough is expanding on the side after cold retardation, I usually reshape the dough after taking out from the fridge and let it proof for 1 hour before going to the oven. However, this time I experimented not shaping it i.e. just let it back to room temp before putting it in the oven. I hope that the oven spring will be higher compared to a tighter dough. The result this time was the oven spring of this bread was nearly noticeable, compared to when I did the final shaping. Curious to know what do your practice after bringing the dough out of the fridge.
Thanks for sharing.
Victor @ Taste of Artisan says
Hi Ann,
those are really good questions. Regarding the fresh jalapeno and wet(ter) types of cheese, yes, they do release water and that's what causing the dough to get wet on the surface. When adding ingredients like that, I like to do it during the final shaping. So, what I do is gently stretch the dough as much as I can without degassing it, cover and let rest for 20 minutes. Come back and stretch even more, into a square or a rectangle. Spread the addons, then gently roll up or fold, shape, proof and bake as usual.
As to reshaping after cold retarding, I follow the standard process. So, if I retard fermentation, I take the dough out of the fridge, shape then proof. If I've already done bulk fermentation and shaping and cold retarding proofing, then no, I don't re-shape. Proofing in the fridge can be a little tricky. I look for a 30-50% rise during proofing, retarding or not. If I don't see it, I will leave the dough sit at room temperature after the retarding until I do, about 2 hours. But I won't re-shape. Alternatively, I can go as far as full proofing at room temp then retard in the fridge overnight and bake straight away with very good results, similar to what I described in my rustic sourdough bread recipe. If you see a poor oven spring it may be because of insufficient proofing which is always tricky in a cold fridge. Hope this helps. Happy baking
Ann says
Thank you much for your prompt reply and for the technique for add-ons ingredient. I will give it a try next time.
Victor @ Taste of Artisan says
You are very welcome.
Kim says
Hi! Can you tell me how to adjust rise and proofing time for a warm, humid climate where we are almost always running the air at 70 degrees F? I find that my baked goods struggle to rise adequately and I'm unsure what and how to adjust. Thanks!
Victor @ Taste of Artisan says
Hi Kim, when you say 'baked goods struggle to rise', are you referring to the dough rise or the final product rise in the oven (also known as oven spring)? 70F is perfect for dough fermentation. I live in a cold climate but between a heater and air conditioner, our room temp is pretty much always around 68-70F. The humidity is on the lower end though. If your humidity is very high, the dough will tend to absorb moisture from the air, making it wetter and hard to work with. This may also result in a poor oven spring. If that's the case, drop the hydration by 5% and try. You may need to drop even lower depending on how humid the air is. I always keep my dough in a SS bowl tightly covered with a solid piece of plastic wrap (like Saran wrap) so very little of the outside air gets in. Perhaps that can help. If these don't work, perhaps we can try something else but I will need more details from you.
Louise says
I tried this recipe yesterday and really happy with the outcome! I've followed several bread recipes before but never came out right...Thank you so much for sharing!
Just wondering whether I can reduce the salt level? Will it affect the bread texture?
Victor @ Taste of Artisan says
Louise, you can reduce the salt level to zero if you want to and it will not affect the texture at all. In Tuscany, they even make saltless bread which they use with salty charcuterie meats. Nowadays use less salt than I used to, I keep it around 1.8% to 2% of the flour weight so in this recipe it would be about 11-12 grams (I reflected that in the recipe), but you can drop it even lower.
Mary says
Forgot to rate! My husband loved the bread......me too.
Victor @ Taste of Artisan says
Love to hear that. Thank you.
Mary says
Hi there....just took the bread out of the oven. I formed it it the longish banneton basket. I was wondering why your recipe uses all purpose flour instead of bread flour? Anyway.....I've made many a no knead bread but not including the folds and proofing in a shorter time as in your recipe. I was skeptical when I flipped it over from the basket and it flattened out slightly, but it rose beautifully in the oven! Can't wait to try it!!!! Thanks for the recipe.
Victor @ Taste of Artisan says
Hi Mary, you are very welcome. I use different kinds of flour to make this bread to be honest as I like to experiment. Bread flour is a good option in this recipe, you'll get more chewiness... crustier. AP is a good all-around option for most and many have AP flour readily available.
Patti says
I made this bread last night. It was challenging but delicious. Really delicious. Loved by all. I was a little confused as one person asked about making one loaf instead of 2, but no where did I see 2 loaves mentioned so I made one. No matter, it came out perfectly. I ordered the banneton you mentioned and bought rice flour and no sticking whatsoever except to my hands. I felt like I washed off half a loaf of bread but I have no doubt it was user error. Had trouble scoring because it was so wet, but I did my best. As all of your recipes Victor, it was amazing.
Victor @ Taste of Artisan says
Hi Patti, I LOVE the crumb on your bread the crust is very nice. I always suggest to those who struggle with wetter doughs to drop hydration by 2-3%, get comfortable and then work your way back up... There is just something very special about higher hydration bread, it tastes way better to me. So may like lower hydration bread and that's OK, the goal is to make what YOU like. That said, I am glad to read that you've achieved fantastic results even though you had to overcome many challenges for yourself. Your bread will only get better and better from now on. You would try my French Baguettes and sourdough bread, those are well worth the effort. Happy baking!
Patti says
Thank you! I love the crumb as well and the taste. ..so light, so amazing. Sure, I could have added more flour but then I wouldn't get the result I wanted. I want to jump from beginner to advanced in one loaf. Haha I just love open crump breads.
It was so late and I was so stressed that i didn't weigh anything. I usually do but happily you gave me the choice so I used cups, tsp, Tbs, etc. Your recipes are very forgiving.
Absolutely, the baguettes and sourdough next. Remember I made the WW sourdough, the first recipes of yours that i made, and it came out brilliantly. Each time a different bread.
Victor @ Taste of Artisan says
Each time a different bread - well said... good different... and I love it. Keeps things interesting.
Patricia says
Good Morning Victor,
Thanks very much for your reply and the baking tips. Cpl questions:
1) RE flouring the banneton….why halfsies rice & AP flours VS 100% rice flour?
2) have you tried using a rope coil banneton, or heard anything about them?
Victor @ Taste of Artisan says
Hi Patricia,
Good question, why? When everyone and their brother says that it's got to be the right way, no? 😉 I've actually stopped doing that, need to update all my recipes. I now use just the rice flour - less hassle, less sticking, no difference otherwise.
Rope coil banneton? Had to look it up... Interesting. Clearly, I haven't used one. Can't comment on it. Seems like some sites recommend using plenty of flour to prevent sticking so it's not its forte. Pretty though. It'l work with lower hydration dough just fine, like any other banneton. In the past, I even used plain bowls lined with cotton kitchen towels. Where there is will there is way. For high hydration dough wood pulp bannetons are still best in my experience. You still need to use rice flour but less of it, that's a good thing.
Patricia says
Recently bought my first wood pulp banneton (oval) along with rope coil style (round); looking forward to experimenting with them. Keep you posted within month or so.
RE: flouring the banneton, I’ve noticed and enjoyed 100% rice flour banneton-dusting vs AP flour: less sticking; much finer residue and surface aesthetic on the baked loaf; and easier to manage w/o flour clumping.
Victor @ Taste of Artisan says
Totally. AP flour gets wet and gummy and causes more sticking. 100% rice flour works better for me.
Roxanna Andersen says
I have been baking no-knead variations for some time. However, when making a loaf with additions such as dried fruit , nuts or olives, I am frustrated by the fact the additions which gravitate to the surface of the loaf before baking often scorch at the high temps required for baking.I usually end up flicking the burnt bits from the surface of the loaf. Any suggestions to prevent this happening?
Victor @ Taste of Artisan says
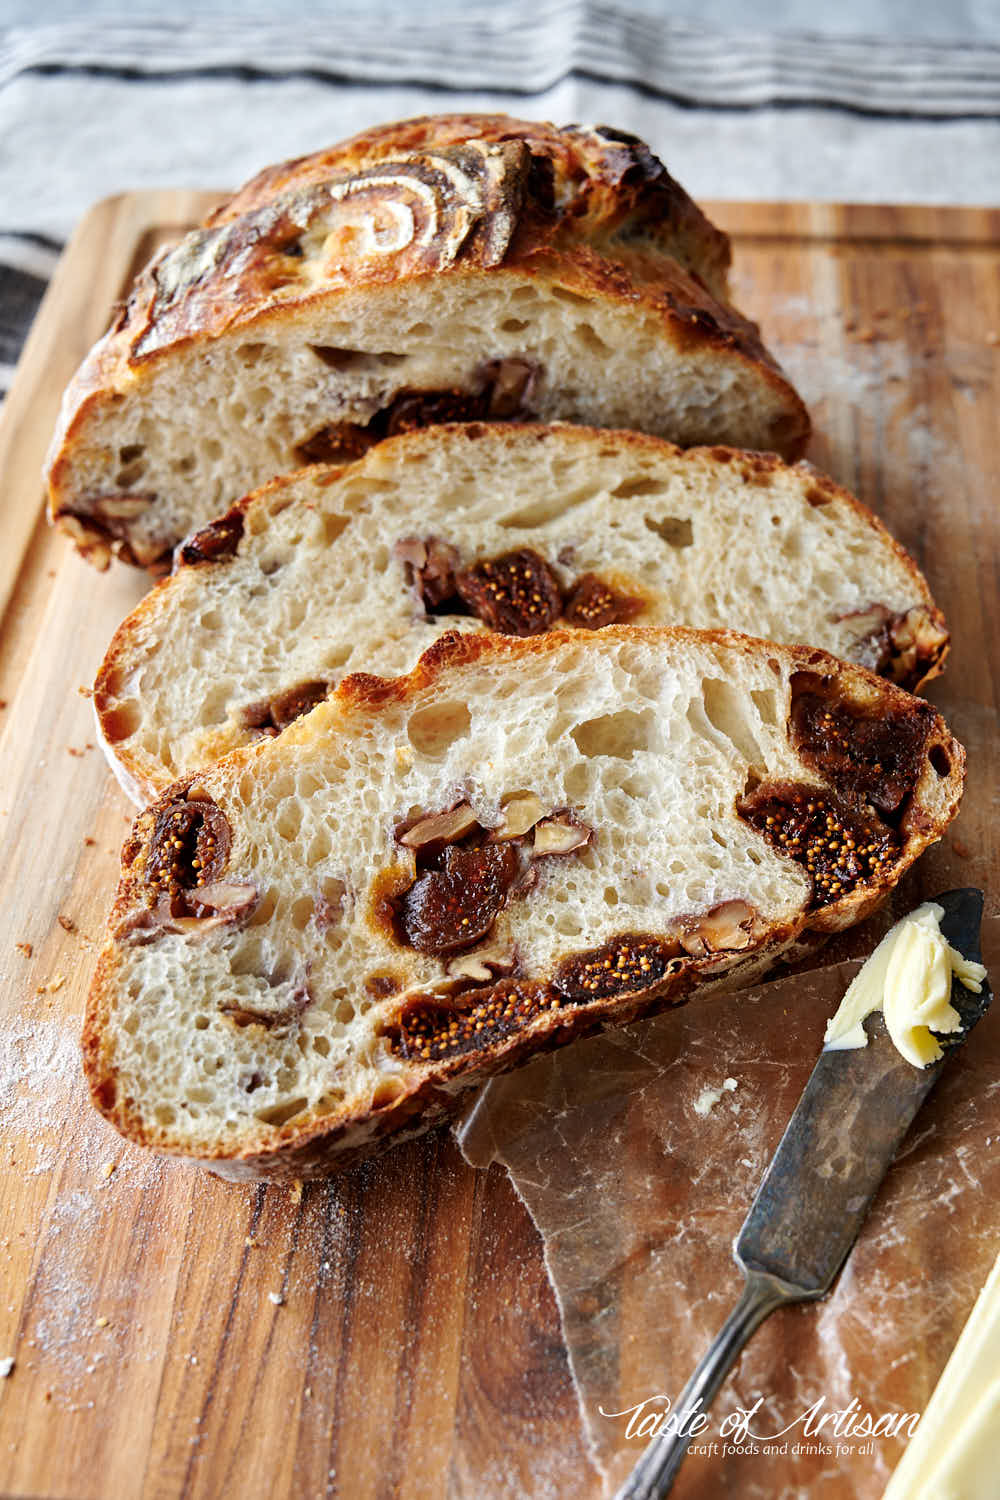
Roxanna, are you looking for something like this?
Patricia says
Victor, that fig-walnut bread....omg!! Just looking at the photo, I can taste it! I plan to make that recipe next month; keep you posted.
Victor @ Taste of Artisan says
I love this bread... I first tried it at the farmers market in Sarasota and immediately fell in love with it. That bread had a very soft, moist crumb, I spoke with the baker, he told me his hydration was at least 80%. Unbelievably good. Mine is 82% and the bread is almost like the one that I remember from the market. I make it less crusty too, also like the one from the market, bake it in cloches for 20 min at 450F with the lid on and 30-35 min at 425F with the lid off. I incorporate the mix-ins at the second stretch and fold. Good luck and do send me some pics.
Joni says
I hope this has not already been asked. Does the parchment goes in the oven with the dough?
Victor @ Taste of Artisan says
Yes, I put parchment paper in the oven. it makes loading bread into the oven super easy. It workes in my electric oven though the paper turns dark brown and becomes brittle by the end of baking. If you have a gas oven, this may not work. You can try but keep a very close eye on it the first time you try it.
Patricia says
Hello Victor & Joni,
RE: parchment paper & oven
I have a gas oven and typically use the natural brown parchment paper with breadmaking. The paper does get dark brown and brittle as Victor mentions, but using it has worked well for me with no problems......with one exception: a couple times, a very wet dough stuck to the parchment paper during baking and removing it required excavating with surgical precision as I attempted to salvage as much of the bread "bum" as possible! I'm thinking the problem may have been not enough rice flour sprinkled on the parchment sheet before laying wet dough on the paper.
Victor @ Taste of Artisan says
That's good to know, Patricia. When the dough is quite wet some extra rice flour will help prevent sticking for sure. You can dust the parchment paper with rice flour then gently turn the dough over onto it. Happy baking!
Phyll says
Just commented but forgot to leave the well-earned 5 stars!
Phyll says
I just love this dough! It is so forgiving. I usually use bread 100% bread flour and just a pinch of sugar. I've made the dough into a single large round. I've shaped it into baguettes with a slow rise. My favorite way to utilize this recipe is to divide the dough into 3 portions after the initial 1 hour rise. Then, during each stretch and fold I add savoring fillings to the pieces of dough. I add about 2 Tbs of filling to each stretch and fold session. The fillings can be anything. I've done cheddar and caramelized onion, hot peppers and cheese, sun-dried tomatoes and Parmesan, olives and feta, and a whole host of spice variants. The loaves come out perfect every single time, all year long.
Thank you for such a wonderful recipe.
Victor @ Taste of Artisan says
Glad to hear it, Phyll. You are very welcome. To your list, add walnuts and dried figs, cream cheese and rosemary, chopped cooked bacon, or how about smoked bacon-wrapped jalapeno poppers;), it was a huge success when I made it.
Monica says
Hi, If I want to halve the recipe, for a smaller loaf, do I only use 1.5g yeast, or go ahead and use 3g? Thanks.
Victor @ Taste of Artisan says
Hi Monica, yes, you will need to halve the amount of yeast. If you keep it the same, the dough will ferment faster which may be what you are after.
PET says
Hello Victor
I found your posting refreshing after having less than optimal crumb structure on baking an artisan bread on my first two attempts. I tried your recipe and followed it to the letter but concerned about the lack of concrete information about how to set the oven temperature - was it fan, fan assist or top and bottom or bottom only. So I tried top and bottom and ended up with a burned bread. It’s back to the drawing board for me.
Paz E Tolentino
Victor @ Taste of Artisan says
Hi Paz, my apologies for getting back to you so late. Have you been able to figure out the baking regimen for your oven? Burnt bread indicates to me that your oven bakes way hotter than mine so you'd definitely need to adjust the temp and/or the timing. If you are still having issues, I'll be more than happy to help you troubleshoot. I will email you in case you want to send me some pics.
Suzanne Dunaway says
I wrote No Need To Knead in 2002 and hope you have a copy. No Knead to Knead was the first book ever published on the no-knead principle and I coined it long ago, winning second place in the James Beard Awards to the Mediterranean Cookbook.
An article is coming out soon by a noted journalist about the errors in the recent NYT article on no-knead breads. Mr Littman was NOT the first baker to use my method and he did borrrow quite a bit from my book.
No worries. "Borrowing" is the highest form of flattery.
Suzanne Dunaway, author of No Need to Knead and Rome, at Home, la cucina romana in your own kitchen.,
Ben Grounds says
Great article 🙂
Nikita says
Thanks for the recipe! Came out perfectly 😀
Never had successfully made bread this airy before!
Best,
Nikita
Victor @ Taste of Artisan says
You are very welcome. Happy baking!
Tamar Pilavdjian says
Hello, I love this bread. Thank you for sharing your recipe and technique - the stretch and fold makes a big difference. -I have a couple of questions:
1. After my stretch and fold, can I proof overnight instead of the time you recommend?
2. My family loved the bread but I think that although the crust was perfect I found the crumb (the inside) to be a bit gummy. Is there something I am doing wrong?
3. Can I freeze the dough? If so, what’s the process?
Victor @ Taste of Artisan says
Hi Tamar, apologies for the late response. Yes, after S&Fs you can retard the dough in the fridge. I normally wait until it rises about 50% then in the fridge. Check out my French Baguette recipe, I described this process in that recipe.
Gummy crumb is a sign of under-baked bread. Different ovens cook differently, perhaps in your oven you need slightly higher temp or longer baking. Using an instant-read thermometer, make sure that the internal temperature of the bread is about 200F-205F. You'll know it's done for sure.
I don't normally freeze my dough so I don't have a verified process to share. I find it easier to just make fresh dough.
Stefan says
Hello and greetings from Denmark. I can't wait to make this bread soon 🙂 I was wondering:
1. if you let it proof overnight in the fridge, do you still do all the steps before with the strecht and folding over 3 hours?
2. If I would make just one smaller bread instead of one big/or two, will the amount of ingredients be proportionally less or would it for example still need the same amount of yeast and what about the amont of salt?
Victor @ Taste of Artisan says
Hello Stefan, welcome to my blog. Happy to see a fellow bread baker from Denmark here.
The thing with the fridge is that depending on the temperature in it, you may or may not have any fermentation activity in it. If I recall correctly, yeast activity pretty much stops below 38F (3.3C), so you have to keep that in mind. If I proof in the fridge, I go through all of the fermentation steps (S&F), bench rest, shaping them into the fridge. If I proof outside the fridge (see my French baguette recipe), I'd finish most of the fermentation before retarding in the fridge overnight. There are dozens of variations in this process so it's best to experiment a little as settle on the method that works best with your environment and fits best in your schedule. I bake bread every other day and it takes me literally 20 minutes of hands on time. I just need to remember to come back for S&F, etc. If I forget, I make adjustments on the fly. I find the process quite forgiving unless you make some huge blunders.
If you want to scale the recipe up or down, use proportionate changes to all ingredients. Hope this helps. You could keep the yeast at the same level even if you decrease the rest of the ingredients though, but your fermentation will be faster.
Gene Mirro says
I'm a novice baker, and I've been trying to achieve a loaf with an airy crumb. This is the first recipe that worked for me. I added 25% whole wheat flour. It tastes great, and has a crispy crust.
Question: how many loaves does this recipe make? I made two with it.
Victor @ Taste of Artisan says
Glad to hear it, Gene and thanks for the feedback. this recipe makes two loaves or you can bake one large one. Tried both ways many times. A large one is a good way to make a really dark, crispy loaf which I love sometimes for a change.
Sonya says
Victor--thank you so much for this recipe. I've been baking since I was a child, but only in the past 2-3 years did I attempt bread, and only because a friend of mine swore by the no-knead bread recipe from the NY Times. I always got tasty bread with that recipe, but honestly, it was impossible to handle (wet sticky mess similar to my 6-year-old's slime toy), and the appearance of the finished product was awful. Your recipe is the first one I've had GREAT results with (from the 1st time), and thanks to you, I now make bread once a week (not necessarily a good thing for my husband and I since we're both trying to lose weight LOL). Anyway, I've made your recipe with the stated 75% hydration and up to 80%. I've tried all KAF A/P, and with 50g rye subbed in. I do refrigerate for the bulk fermentation for about 12 hrs, and the dough easily rises 2/2.5 times in size. I shape, place in the wood pulp banneton, and proof in my proof box (which I am fortunate to have). Once it's 1.5 times its size, I bake on a cast iron skillet which has been preheated for one hour at 500 degrees, and use the steaming method you described. For some reason, no matter what I do, I only seem to get large holes on the exterior of the bread (never in the middle). I would like to get some in the middle as well...do you have any idea what I'm doing wrong? I know my scoring technique is not perfect yet; still working on that. Thanks!
Victor @ Taste of Artisan says
Hi Sonya, apologies for the delayed response. I am with you on the NY no-knead bread, which I made a few times back in the day. 😉
Hm, large holes on the exterior and not inside - I've seen those before, that tells me that the yeast was weak and the dough did not ferment properly. Which doesn't seem to be the case based on your description though. I would like to see some pictures, it would be easier for me to tell what could be the problem. I will send you an email.
Claudia Young says
Thanks so much. I am really enjoying making no-knead bread. Your information and pictures are great. I have some questions.
When you are done fermenting, how do you remove the dough and put it in the proving basket. Mine sticks to the bowl. I am afraid I am flattening it in the move. I think my dough is too wet though I have been weighing the ingredients. I is hard to pull from the bowl when I stretch and turn. Yesterday, it stuck to my proving basket, making the top on my loaf messy. It is so sticky that it pulls agains the lame.
I also don't have the large holes in my baked bread that you have. I'd appreciate any hints you can give me.
Claudia
Victor @ Taste of Artisan says
Hi Claudia, my apologies for the delayed response. My dough sticks to the bowl too, it's normal. I just turn the bowl on its side and let it fall out on the table, helping it with one hand. Be as gentle as possible. If the dough is too wet, decrease hydration by a percentage or two. Once you get used to it, you can go back up. It just takes a little bit of practice. Sticking to the proofing basket is alleviated by a good amount of flour. I use a 50/50 mix of AP and rice flour. Rice flour is crucial. For very wet doughs I use 100% rice flour. Works great, not sticking. It's possible that your flour is very fresh and is more hydrated from the start. In any case, reduce the hydration until you feel comfortables working with the dough and work your way up. I love high hydration bread, there is something very special about it. The moistness, the chewiness... I baked two loaves on Friday, it was a mix of 50/50 WW and AP flour and the hydration was 82%. The loaves turned out terrific. Gave one to my neighbors, they loved it. Happy baking!
Nikola says
Hello I can't get a nice oven spring where crust gradually bursts open and I'm not sure what am I doing wrong. Do you have any suggestions? I have followed your recipe as it is (with 50g rye flour).
Victor @ Taste of Artisan says
Nikola, drop hydration by 3% and try and see how that works. Let me know. If that doesn't work, we can look more closely into how we can get you a nice oven spring.
Daniel says
Victor,
I wanted to ask you about the amount of Yeast. I make no knead breads fairly often. One recipe calls for 7g Instant Yeast in 400G AP. Another calls for a whopping 14g AD Yeast in 800g AP.
Yours only calls for 3g in 600g AP (and you even said that you raised the amount of yeast). Why would there amounts of yeast vary so differently? I'm at high altitude ~4,600FT. Would you make changes for altitude?
BTW I'm a big fan of the corner stretching technique! I use it in my Sourdough recipe from Reinhart. I'm excited to add it to my quick bread regimen.
Victor @ Taste of Artisan says
Daniel, I use only 3 grams because I want to extend the fermentation process in order for the dough to build flavor. Some bakers put the dough in a fridge, a technique called cold retarding, to get more flavor. 14 grams will do by the dough will ferment too quickly and the bread will have little flavor.
Sorry, can't help you with high altitude baking as I have no experience with it.
Herman says
Hi Victor,
This bread recipe helped promote me from a sous chef to an executive chef in the time it took to prepare and bake it. I’ve been trying to make various breads of this quality for a few years and never achieved the results I got today. Your introductory paragraph was spot on. I only encountered one problem that I was sure would cause me to toss the dough: It turned out not just wet but very soupy. But my persistence paid off. The bread wasn’t a high riser but it sure was delicious, with lots of holes throughout the crumb and a thin, crunchy crust. I will add a reduced amount of water a little at a time on my next try until the dough looks and feels like bread dough instead of something to drink.
Thank you for the clear instructions and a great bread recipe.
Photos available.
Victor @ Taste of Artisan says
Wow, Herman, that's the best compliment I've got yet... LOL
The dough wetness may be impacted by flour hydration. If your flour is very fresh, you will need to use less water. Bring the hydration down to where you are comfortable to work with the dough. Later, if desired, bump it up little by little. I do think that bread has a better crumb at higher hydration. My breads are mostly 80% or higher now... With a little practice, it's not an issue. My recent trick is to score after I transfer the dough to the oven. If I score wet dough before transferring, it spreads out more than I like. I also bake in cloches now, much easier for me... So, my advice is to experiment and tweak the process to where it works for your needs/style and you will have great results.
Ann says
Hi Victor,
That’s such a wonderful compliment. Can you tell a little bit more about scoring after transfer the dough to the oven? After for how long? Is it ok to open the lid to score the bread during first 20 mins.
I noticed the same that it’s hard to score high hydration dough.
Thank you!
Victor @ Taste of Artisan says
Hi Ann, I might make a video of how I do that sometime in the future. For now, let me explain. I open the oven, pull out the rack, and remove the lids of the cloches and place the on top of the oven. Then, I flip the dough right onto the bottom parts of the cloches. Using a bread knife, or a razor blade, I quickly score, then place the lids back on, push the rack back in and bake. Hope this makes sense. If you are baking on a stone, it’s the same process - turn the dough over onto the stone, score and bake. Be careful when you do that not to get burnt by the hot oven. That said, you can try dropping the hydration a little to where you are comfortable and then work your way back up. It takes some practice and as you bake more it will be easier each time.
Herman says
Hello again, Victor. I’m reporting that, with your suggestions, my 2nd no-knead bread was just as tasty as the first but the improvement in the shape of the loaf was dramatic, with a great rise and nice scoring. I subbed 50g of rye flour for an equal amount of AP, and mixed in 1/4 cup each of dried dates and chopped walnuts. My biggest surprise was using 40 ml less water and found that there was little difference of importance in the final product. Handling the dough, however, was so much easier. Many thanks for all the excellent advice..
Victor @ Taste of Artisan says
Glad to hear that. A couple of percentage points in the dough hydration will make it easier to handle the dough, no question. Stick to what works. I made this bread today, 80% hydration. Outstanding oven spring. Wonderful crumb. Yes, it was a little harder to handle but the more you practice the easier it gets. I do like the taste of the higher hydration bread. Something special about... softer, moister crumb. But I see your point, the difference is subtle. I think it's more important for a home baker to be comfortable with the process. If you are not, you won't like the baking process and won't be doing it much.
Carolyn says
I was so happy to find your recipe. Thank you. I noticed in the comments you are now using a Cloche for your bread baking. How do the baking instructions change if I choose to use a Cloche?
Victor @ Taste of Artisan says
Hi Carolyn, my apologies for the late response. I love my cloches, I have two so I can bake two loaves at a time. I preheat to 450F and bake for 20 minutes at 450F with the lids on, then at 425F for 30-35 minutes, depending on how dark I want the bread to be. I have to add that I now bake in a gas oven so these parameters may have to be slightly changed for an electric oven. Happy baking!
Ann says
Hello,
I am a novice in bread making. I had made 2 loaves so far but not perfect yet and I keep searching for how to improve and I'm glad I found your blog and can't wait to incorporate stretch and fold technique into my bread. I think I underproofed the second loaf even letting it rise for 18 hours. The dough develop a lot of gluten strands but I guessed I add too much water and my kitchen is too cold so it's wet a bit and didn't hold the shape well after being scored. I have a few questions here:
1. For your recipe that you modified by adding whole wheat and rye flours, do you add more water to the dough? or how much should I add to get it less dense?
2. If I followed your S&F technique, can I also let it rise for 15-18 hours before baking?
3. I noticed that my dough rise higher (almost 3 times) after 5-6 hours but when it reach 18 hrs, it got flatten by 1/3. Usually, is it better to shape it and proof the dough when it hits the maximum height? or it's ok to do it at longer hours so the dough can develop the flavors?
4. When the scoring is not pronounced after baking, what could be the reason? my second dough was wetter and I noticed that the score become closed after baked (instead of separate wide. Is it because it's underproof? or it's too wet?
Thank you much for your advice. Once I try your technique, I will definitely report the result.. probably in a few weeks.
Victor @ Taste of Artisan says
Hi Ann, welcome to the new hobby, it's super rewarding. I started baking bread... well... over 10 years ago I think and still do it several times a week.
To answer your questions:
1. WW requires more water than AP flower by a few percentage points to get the same consistency... say if I am making bread with AP and target 77% hydration, my WW bread will be about 80% hydration. Take a look at my WW Sourdough bread, it's 82% hydration. That said, there is no right or wrong here. If you're new to bread baking, I suggest you start with 72% hydration, white or WW bread, doesn't matter. Get comfortable with that level of hydration. Then increase it by a pecentage. Go higher as you get more comfortable. I love high hydration bread. It's softer, moister, chewier, there is something special about it. I tried it once at a farmer's market and can't make my bread any other way now. Most of the breads I bake now are 80% or higher. These will be hard to work with for someone just starting out but as you gain experience, it will become much easier to handle.
2. Yes, you can but it needs to be done in such a way that the dough doesn't get over-fermented and/or over-proofed. You will need to use cold retarding. Check out my French baguette recipe, you can do use the same technique I wrote about there to make you bread.
3. The way you approached it resulted in over-proofing. My rule of thumb is to reach 2 - 2.5x volume increase by the end of fermentation and about 1.3 - 1.5x size by the end of proofing. If you want to extend fermentation or proofing, or both, you need to cold retard in a fridge. Again, see my French Baguette recipe.
4. Scoring is a bit of art. Score too much and the bread won't spring. Score too little and the bread won't open up enough. It takes some practice. Now, if your dough is underproofed or overproofed, you won't get much of an oven spring either. My recommendation is to follow those rules of thumb I mentioned in point #3 and you should start getting good results. Also start with lower hydration. Once you get a good loaf, it shouldn't be hard, start experimenting by increasing hydration and other things. Check out my other bread recipes, I employ various techniques in different recipes that you may find helpful and decide to use. Good luck and be sure to send me some pictures.
Ann says
Hi Victor,
Thanks much for your prompt reply. It's really helpful. I will definitely check out the link you shared. You are so kind for sharing your tips/techniques to many people.
As to over/underproofing, I first thought I overproofed too but when I use the poke test, it didn't leave the permanent dent like overproof tends to be. That's why I thought I may be underproof. I also see that the dough getting runny could be overproof. So, now I'm not sure what is the real issue to fix i.e. overproof or underproof lol. The good thing is the test is yummy and it's a big hit at the dinner tonight.
If you don't mind, What email that I can share the pictures to you? I don't see where I can attach the photos here.
Victor @ Taste of Artisan says
Ann, I think the poke test is not as easy as many think it is. I've baked hundreds of loaves of bread and I've poke-tested many of them and still can't say I have full confidence in this method. I mean, the method likely works but how I interpret the results is all over the place. The method is just not scientific enough for me. What does work quite well is the percentage by which the dough increases during fermentation and proofing which I mentioned in my prior comment.
Lindsay says
Thank you so much for this recipe! I had given up on no-knead breads until I saw this one, which isn’t way too sticky to shape.
It got SO fluffy and rose SO much, though, that my final loaf was a hilariously massive Frankenstein of a loaf. It was also so large that I had to nearly burn the outside before the interior baked all the way through.
So I was wondering—if I decided to do 3/4 of the recipe to make a smaller loaf, how might that affect time and temp of baking?
Victor @ Taste of Artisan says
Lol... it's one of those old-time European style breads... I remember when I lived in Germany, I would go to this little bakery near my apartment to buy freshly-baked bread and some of their loaves where so big that they would sell it by weight... a quarter of the loaf would be about 2 lbs... people would be buying 100-200 grams...
Anyway, for smaller loaves, 20 minutes with steam and 25 without steam seem to work for me. Happy baking!
Michael J says
Just read the recipe great description. I have been doing basically this recipe but using 500grams of KA all purpose flour 50 grams of rye plus 50 grams of ripe sour dough. I do the folds every hour. I like the sourdough taste but don’t always have the time for true sourdough. I’m calling it a hybrid loaf. Love to hear your comment. MJ
Victor @ Taste of Artisan says
Hi Michael, I actually do it all the time. If I haven't started my sourdough the night before and I want a quick bread, I drop all of my sourdough starter into my quick no-knead bread, about 200 grams of it. That's 200g sourdough starter to 600g AP flour, resulting in two loaves. Works great. Not a whole lot of sour taste but plenty of flavor. I hate throwing away my starter so I try to use it every way I can.
Catherine says
The best no knead bread recipe!! Thank you for the recipe, Victor.
Victor @ Taste of Artisan says
You are welcome.
Lynda Pohlmann says
Fantastic, can't wait to try them, thankyou so much for your efforts and pictures!
Victor @ Taste of Artisan says
Good luck. Send me some pics if you want to share.
Reva says
Hi the dough for this bread after proving is still very very sticky but don’t want to add too much flour what should I do?
Victor @ Taste of Artisan says
Reva, this is hard for me to say without seeing/feeling it. I'd say add more flour (25 grams / 3 Tbsp), which will lower hydration by 3% and the dough should become more comfortable for you to handle it. If still too sticky, add 1-2 Tbsp more. Once you get more comfortable with it, increase hydration by 1-2%, then repeat.
That said, the dough is very sticky initially, this is normal, it becomes much less sticky as gluten develops over time and as a result of stretching and folding.
Patricia says
Hello Victor,
Looking forward to trying your method! One question: why AP flour vs Bread flour? And can Bread flour be used instead?
Thank You!
Victor @ Taste of Artisan says
Patricia, the difference is subtle to be honest. Most people have AP on had, fewer have bread flour. I use both. Bread flour makes chewier bread.
Markus says
This is no no-knead recipe sind you knead the dough (yes, stretching and folding is considered kneading since you are not doing nothing).
Victor @ Taste of Artisan says
Yeah... getting something from doing nothing... that would be the perfect world.
Monique says
Victor, for the past 10 yrs I have tried almost every no-knead bread recipe online.
I was never satisfied with the results...until I found your website about a week ago. Your no-knead bread recipe is INCREDIBLE !!! My dough has NEVER been so fluffy and risen like it did. I was overjoyed ! It rose nicely in the oven and the taste was fabulous, even though I did not use rye flour.
I need to ask you about the baking time. I baked it for the time indicated, but my loaf was a bit too dark for my taste. If I shortened the baking time, would the inside be sufficiently done?
Also, why not lower the temperature a bit more instead of the oven door cracked open?
Thank you for your response!
I am so happy to have found your website. I just can't wait to try the baguettes this coming week ! 😊
Victor @ Taste of Artisan says
Hi Monique. I am so happy that my recipe helped you. Comments like yours make my day and are in many ways the reason why I blog.
Now, to your question. It is so true that everyone's oven bakes differently. In some crazy cases the difference can be dramatic. So you almost have to experiment and make adjustments. If your bread gets too dark for your liking, drop the temperature by 25F in the second part or shorten the baking time, as you did. To be 100% sure that your bread is fully cooked inside, use an instant-read thermometer. The bread is done when it's 200F-210F inside.
Or... just don't crack open the oven door. The reason why I do that is I want to remove moisture from the oven, dry heat is what makes bread brown nicely. If you don't open the door, it won't be as dark. Tastes differ though, I like mine darker, with more of those bitter dark chocolate notes... Happy baking!
Giri Iyengar says
Great article, thank you so much. I recently purchased a nice dutch oven and am about to try baking my very first no knead loaf. (Don't have a stone ... yet.)
Question: I'm a little confused between the number of times the round is turned over "seam side down", which way does it end up in the oven? If you score it right before, then you're obviously not turning it over for baking, but I have seen recipes that say turn it over. I suppose they are nor scoring? This bit was confusing.
I will report back!
Victor @ Taste of Artisan says
Hi Giri,
After each stretch and fold, I flip the dough up side down (seam side down), this helps to keep tension, which is good for gluten development. Not super critical and you fill find many recipes that don't do that. But I like doing that. After you shape, you seams will be down. In to the proofing basket, seam side down. Then turn the dough over onto parchment paper, now your dough is seam side up. Score and bake. Doughs with lower hydration need no be scored, the seams will open up and you will get a nice oven spring. Higher hydration doughs will have seams fuse up so scoring is necessary. In this recipe I score, it looks good. But also the seams open up too a little, giving the bread a nice rustic look. There is no right or wrong here... so many good ways to make a nice loaf.
Giri says
Thank you! That makes sense, I made a couple of loaves and the second one, with 80% hydration, turned out great! Now I need to work on getting a more open crumb and some more color on the crust but that's just quibbling. It looked great and the taste and texture were fantastic. I'll make a couple more before I start expanding my "repertoire" of one.
Thanks so much for being such a great resource.
Victor @ Taste of Artisan says
You are very welcome!
Arthur Okazaki says
Enjoy your posts and your direct, pragmatic approach. I travel a lot and find it difficult to maintain sourdough starter so I've been making mostly no knead variations (no sourdough). With this in mind would I follow the stretch and fold technique and timetable used for sourdough? After shaping the dough and dredging in sesame seeds and placing in the proofing container (I use a reed banneton) seam side down, can the proofing be done mostly in a refrigerator (and for how long)? If refrigerated should the dough be proofed at room temp at first for a while, or does it matter? Before unmolding scoring and baking, how long should the dough rest at room temp? After this resting period would the "poke test" be done to determine proofing level? In addition to the sesame seeds, to reduce the tendency of the dough to stick to the basket, it's often recommended to dust the inside of the banetton witha 50/50 mixture of white and rice flour. For this latter ingredient can I use mochiko---Japanese sweet rice flour?
Victor @ Taste of Artisan says
Hi Arthur, thank you for the kind words. You know, back in the day I used to use faux sourdough starter made of water, flour and a little bit of commercial yeast, just like poolish. I would mix it, let it triple in size, then feed it as you would sourdough starter. It worked great and gave my bread extra flavor and a bit of a tang.
Either bulk fermentation or proofing or both can be done in a fridge. However, the process will slow down considerably and may even stall if the temperature is very low. When I ferment in a fridge I normally do S&Fs outside, let the dough rise a little to get fermentation going (see small blisters on the surface, smell lactic acid), then into the fridge. It's best to ferment at higher temps I find, like 50-55F, in a fridge it will be a very long process as I said. If retarding, I ferment outside, then proof in the fridge, then let the dough sit on the counter while the oven is preheating and bake, 30-60 minutes. Sometimes I let it sit at room temp for two hours. In the end, it doesn't matter where you ferment, just make sure that the dough doubles during fermentation and increases by about 30-50% during proofing. That's my rough guideline. Ambient environment matters a lot, as they say time and temperature are another two ingredients so some experimenting initially is almost always required.
Sweet rice flour sounds like a great choice if it's not too sweet, never tried it. Even if it is, you can always dust most of it off.
Calynn says
I’ve used the technique 10x now and I’m super glad I’ve used your methods to make my bread even better! My breads are more airy and way less dense than they have been. have been baking them In my Dutch Ovens and I’m looking forward to mastering the baking stone when it comes in the mail! Thanks, again for ALL OF YOUR ADVICE! (I would post pictures of my crumb if I could!)
Victor @ Taste of Artisan says
You are very welcome, Calynn. Glad to hear about your success. I'd love to see your picture, I will email you.
Drew458 says
Glad to see I'm not the only one adding honey and rye. I have SAF Gold, but I thought it was only for high sugar doughs.
I use a recipe quite similar to yours for sourdough, or make it a hybrid loaf if I don't have 8-10 hours to wait. I've also done it retarded with success with some countertop top before and after. When I make it really high hydration I cheat a bit, and preshape it after bulk on a heavily floured surface. This firms up the slack dough a lot, and makes it much easier to deal with. As much as I love giant crumb, the people who eat it like the flavor better, and really don't care about how big the air bubbles inside are.
KA flour was pretty hard to find during the pandemic, and still isn't fully stocked. So I had to use common flours instead. For this recipe, "1 part" is 1/3 cup, or 40gm, which will make one medium loaf in a banneton. My process is very similar to yours, baking time @450F in a Dutch oven is 20 lid on 20 lid off, but I also "cure" the finished loaf by letting it cool down in the oven with the door open a little for most of an hour. I think this keeps the crust crustier. A slight spritz of water on the top before scoring gives it those pretty freckles that get me oohs and aahs before the loaf gets devoured.
3 parts bread flour
3 parts all purpose flour
1 part rye flour (KA light rye)
1 part whole wheat flour
2.5% salt
3 parts sourdough starter
70 - 80% hydration, including the amount of water in the starter
1 - 2 tbl honey
( 1 tsp SAF Red instant yeast for hybrid loaf. A full measure will make "rocket bread" but it won't have as full a flavor )
My starter is fed a mix of 1/3 BF, 1/3 AP, 1/3 WW, and I try to keep it at 100% hydration. But I don't bake constantly, so the starter lives in the fridge a bit wet, and sometimes doesn't get fed for 3 weeks and dries out a bit. I pull it out and feed it several times for a day or two before baking.
Victor @ Taste of Artisan says
Hi Drew, thanks for sharing your experience and tips. About SAF Gold, somehow everything I baked seemed to ferment and proof better with it compared to SAF Red... purely subjective view of course. I gave away a pound of SAF Red to friends and colleagues who had no yeast and couldn't buy it, glad I found a good use for it as it was just sitting in my freezer.
I like your 'curing' technique, I will try it.. I love crusty bread...
Oh, if you have a bakery supply store nearby, give them a call, they may have KAF. You will have to buy a big bag of it, but it will be cheaper per lb. Works great if you bake a lot or can split with friends or family members.
Happy baking!
Calynn says
Wow!!!! Thank you so much! I have made about 100 no knead breads (maybe an exaggeration) so far and have been searching for ways to make them better without going full blown sourdough! This post is perfect. I’m trying it out today!
Alan Burrows says
I just finished baking this recipe. While I am not an expert, I thought the dough was too wet but followed the directions. I did weigh the flour and used bread flour as opposed to all purpose. When I tried to form the boule, the dough was very soft and sticky. When I turned the risen bread out of the proofing basket onto the parchment paper, it spread and did not hold shape.
I did get bounce and it looks great but a bit flat and its not what it is suppose to be and I don't know what I did wrong. I'm kind of disappointed.
Victor @ Taste of Artisan says
Hi Alan,
this dough is 75% hydration so it shouldn't normally be wet and sticky. If you see my sourdough bread recipes, many are 80% hydration and higher. If you used cups to measure out your ingredients, it may have thrown off the ratios as they are imprecise. Also, if your flour is very fresh, or just the type of flour that you use, it may be more hydrated to start with, so that will impact the ratios as well. The good news is that there is an easy fix for that - just drop the hydration by 5% in your case and see how you like the results. Instead of 450g water use 420g. See how that works for you and, if needed and once you get used to that hydration level, work you way back up, slowly. Higher hydration produces better, softer crumb that many like. More on crumb, and bigger bubbles. In general, good bread takes a little bit of practice to make. Ingredients differ, how you measure them may differ, how your oven bakes, how you shape the dough, the type of flour, etc. I encourage you to experiment a little, that will make you see what works better for you and will lead you to getting the most optimal results. Let me know if you any specific questions. Happy baking!
Victor @ Taste of Artisan says
You can also try using my French baguette dough which many people have had great success with. It's 72% hydration so easier to use for those who are new to bread baking. It's very similar to this dough recipe but the process is different.
Catherine says
Hi, after the bulk fermentation how do you form the dough into a ball to put in proofing basket without it sticking to your fingers?
Thanks!
Victor @ Taste of Artisan says
Catherine, mine isn't too sticky so no problem shaping into a ball. If yours is, increase the flour by 1%-2% and see how that works for you. Also, insufficient gluten development will result in overly sticky dough.
Catherine says
Thank you! I’ll try increasing the flour next time. Also, how do I resolve the issue with insufficient gluten development?
Thanks again!
Victor @ Taste of Artisan says
No problem. As for gluten development, using flour with a slightly higher protein content or doing more stretch and folds... say in each round do double of stretch and folds. Then pull the corners together, forming a ball, and back into the bowl, seam side down. You want some tension on the top, it helps stretch gluten strands.
Catherine says
Hi Victor,
What would be the reason for the bread not rising? I managed to achieve quite an airy crumb but it doesn’t rise. Also when turning it out onto the peel, the dough spreads a bit, it doesn’t hold its shape well. What am I doing wrong?
Thanks!
Victor @ Taste of Artisan says
Hi Catherine, airy open crumb tells me that your dough fermented and proofed well. If it didn't rise in the oven, the dough did not have enough strength. That can be because it was over-proofed or it wasn't shaped properly. Mine spreads out too, but not much (in this recipe). Try reducing hydration (percentage of water) by 2-5% and try again. Sometimes it takes a bit of practice. Once you get the desired results, slowly increase the hydration back.
Catherine says
Thank you so much, Victor!
I’ll try reducing the hydration and will make doubly sure I don’t overproof next time. Thank you again!
WBW says
Your comment is awaiting moderation.
Thanks for the recipe and tips. After reading the comments, I’m still a little unclear about the recommended retardation process, which I’d prefer as the timing makes it easier to bake for lunch. Is it your recommendation to ferment for an hour, do the stretch and folds for the next 1-1/2 hours (hopefully achieving the doubling in size), and then refrigerate it?
After refrigeration, allow the dough to warm up for about 90 minutes, then shape it into a ball and proof it for about 60 minutes?
My doughs do well in growing during the fermentation process, but I rarely get growth during proofing. My house is rarely warm, so I wonder if that’s the issue there.
Victor @ Taste of Artisan says
There are many ways to do it and I personally do it different ways too, depending on circumstances, needs or if I just want to experiment. If the fridge is very cold, it's a good idea to have fermentation going strong before retarding. You can do it the same way you described, this is how I do my baguettes, it works very well for me. Another way I like to accomplish it is to fully ferment the dough (double in size), shape, bench rest, final shape, place in proofing baskets, cover and refrigerate overnight. I expect to see a 30% percent rise before baking, and bake straight away. If I don't, I let the dough sit at room temp for 1-3 hours until I do, then bake. If using preferments (poolish, levain), you get a better rise in the fridge as the yeast will be much more active/numerous.
su wen says
hello used this recipe for the first time and the loaf came out tasting great!! however when performing the stretch and folds i had difficulty flipping the dough folds side down each time, it was too sticky to pick up and flip into a round like your picture depict. i was wondering if me fiddling with the dough when trying to flip would overwork the dough? also when shaping the dough had lots of larger bubbles on the surface which made it a bit more difficult to shape so i was wondering if i need to degas the dough before shaping? thank you for your recipe!!
Victor @ Taste of Artisan says
Hi Su, you don't really have to flip the dough, most bakers don't as far as I know. I do it as like to see that surface tension but I am not sure if its absolute benefit. The S&Fs are of benefit. I wouldn't degas, you will have a better crumb. Perhaps ferment a little less or do it at a lower temperature.
Corina says
Dear Victor,
I am delighted by all these recipes and I can't wait to start making bread again. My problem is I don't use instant yeast and SAF is not available in Romania. So, for this recipe, what would be the correct amount of fresh yeast to be used and how do you think it will impact the bread?
Thanks!
Corina
Victor @ Taste of Artisan says
Corina, fresh yeast will be just fine. The amount is usually 3 times the dry yeast.
Corina says
Thank you so much. Can't wait to start baking!
Julie says
Hi, really enjoying this recipe and having a lot of success. Do you have any tips for shaping the dough? I find when I pull my bread out of the banneton it spreads a bit.
Also, if adding in nuts, herbs, etc, at what stage should this be done?
Victor @ Taste of Artisan says
Hi Julie, happy to hear about your success. A bit of spreading is normal. The key is to work quickly getting the dough in the oven as the longer you let it sit the more it will spread. That said, decreasing hydration will help but at the expense of a slightly different crumb structure. You can also put the dough in the fridge for an hour or so, it will hold the shape better.
>
Mix-ins are added after the second stretch and fold. The ones on top, they are added just before putting in the dough in a basket for proofing.
Gregg says
Hi, Just a quick question. I have a steel plate (1/4") to use in baking pizzas but no stone. Any reason it would not work the same way in these recipes? Thx.
Victor @ Taste of Artisan says
Hi Gregg, many people have successfully used steel plates (baking steel) to bake bread, some actually prefer those to stones.
Edwin says
Hello Victor,
I am very new to bread making (just short of two weeks) but I LOVE IT!
I already tried 4-5 recipes of Dutch oven no knead bread mainly with a mixture of white and Buckwheat. Tremendous taste but not a good rise in oven.
Yesterday I found your recipe and I tried it.
I kept it all regarding the ingredients but I baked it in Dutch oven simce I don’t have anything else right now.
Of course baking time was a bit longer (30 min with lid on and 30 min without lid).
Another thing that I noticed is that for the flour that I used (Hungarian Hajdu BL55) the hydratation was a little bit on the wet side so I will probably redo it with 72 or 70%...
What do you think of it?
Thank you very much for your recipe and very neat site!
Edwin from Romania
PS How can I attach pictures???

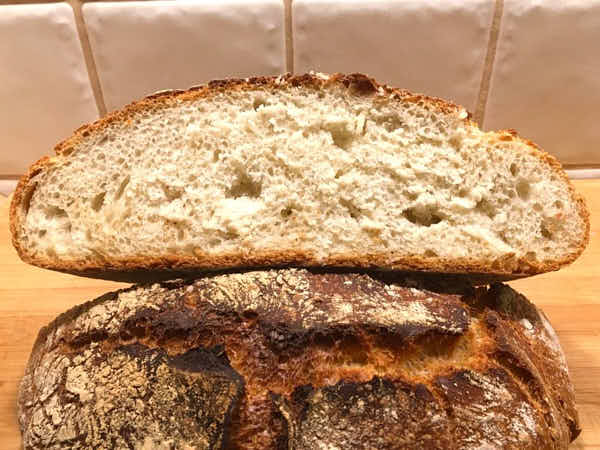
>
>
Victor @ Taste of Artisan says
Hi Edwin, welcome to my blog. Glad you've been having fun with baking bread, it's very rewarding and so much better than most anything you can find at a store. Hydration is a lot a personal comfort kind of thing. Some of my breads are over 80% hydration and I love them. Most of my breads are 75%+. I wouldn't dare going this high even a few years ago but I tasted artisan bread that I thought was the best I had ever tried, and it was over 80% so I kept mastering my technique and building comfort working with wet doughs until I got it. Now, it seems almost easy. And so worth it.
>
Great looking bread. Thanks for the pictures. If I may, I would recommend fermenting and proofing a little longer. It will help open that crumb up and make airier.
EDWIN says
Hello Victor!
Thank you for your answer and advice.
I did again the bread in very similar way, leaving it about 15 minutes more to proof but, more important, i added 10% buckwheat flour to the recipe. So 60gr buckwheat and 540gr BL55 white flour.
The taste improved big time and I think the crumble was not bad either. Surely a step in the right direction.
I send you pictures on email, Victor.
Many thaks,
Edwin
Victor @ Taste of Artisan says
Hi Edwin,
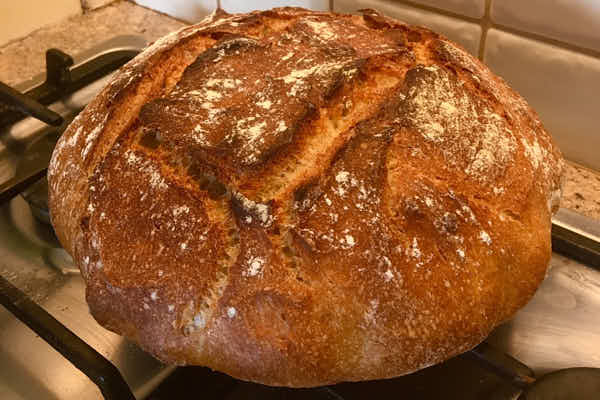
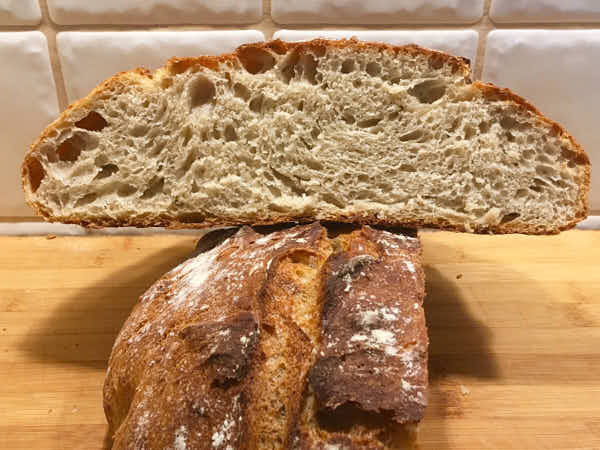
that’s a significantly improved and a great-looking bread. Congratulations! The crumb is very well-developed and open, I like how it looks. Beautiful pictures, thanks for sharing them with me. I hope to see you soon trying my sourdough bread recipes.
>
>
Brandon says
I made this bread and it turned out delicious. I was wondering after the stretch and folds are done, can I let this retard in the fridge before shaping? Or should I final shape and then leave it in the fridge? I was also wondering how long could I leave it in the fridge, 2, 3, 7 days? I am thinking that the longer that I leave it in there, the more sour, tangy notes will come out, but wondering if I should do this after the stretch and folds but before shaping and then shape and bake after taking out of the fridge?
Victor @ Taste of Artisan says
Brandon, glad to hear that you liked my bread recipe. Yes, you can retard in the fridge, which will give the bread a more complex flavor and tangy flavor. You can retard either fermentation or proofing stage, though I've had better results with retarding fermentation. By the way, I make French baguettes that way and they come out excellent. Check out that recipe. I usually retard overnight and up to 24 hours. I've gone as long as 3 days before but felt that the most optimal time is about 12-24 hours, depending on the type of dough.
MT says
Question - step 3 says after 1 hr rest to stretch and fold every 30 min over next 1.5 hrs. Wouldn’t this equal 4 S&F’s? In your post you say to do it 3 times. Sorry if I’m missing something. Can you clarify? For instance if I S&F at the 1 hr mark, then at 1:30, then 2 hr mark, that is 3 folds over 1 hr, not 1.5 hrs. Thank you for this recipe!
Victor @ Taste of Artisan says
There are three S&s in total. Mix, wait 1 hour, S&F, wait 30 min, S&F and so on. That said, this bread is very forgiving. If you do 4 S&Fs you will be fine. If you forget one, you should be fine too. Judge by looking at the dough - it should be smooth and elastic. At first, it's lax and wet, over time and after each S&F it becomes elastic, less sticky and better holds shape. The goal is not to do S&Fs per se, it's to develop enough gluten so the dough holds the shape and is able to rise and develop proper structure.
Bryan says
Thank you Victor!
Perhaps I was a little aggressive with the stretch and fold method. That might have been the culprit.
Here’s a photo (it’s still very delicious - I just have crumb envy)
Not sure how to post a photo here
>
Victor @ Taste of Artisan says
It's very possible; you don't want to overwork your dough. Check out my French baguette recipe, beautiful open crumb with large holes, you may find some additional tips there. Also, try making them, they are well worth the effort. I emailed you, send me your photo and I will attach it.
Victor @ Taste of Artisan says
Nice looking bread overall, Bryan. It looks a little underfermented to me. I would let it rise a little longer or in a warmer place. Be very gentle when you shape and give it an adequate proofing. Don't go by time, go by how the dough feels. It's hard to make that assessment when you don't have a lot of experience but once you do it a dozen times and have a successful one, you will know immediately when the dough looks and feels right and when not. It comes to you with a little bit of practice. The best I can describe it is light, airy, delicate. If the dough feels heavy and dense, it won't get any lighter in the oven.
Bryan says
Victor thank you so much for your advice. Moving forward I'll a) move my fermentation to a warmer spot b) be observant of time c) go gentle on my stretch and pull!
Will post back soon
Victor @ Taste of Artisan says
No problem, Bryan. Happy baking and send me more pics, I'd love to see them.
Bryan says
I followed the recipe to a T but my bread didn't result in the beautiful crumb featured in your photos.
Does this mean my oven wasn't hot enough? Did I play the dough too much during that 1.5 hour period?
Victor @ Taste of Artisan says
Bryan, if you are just starting out it may take a few tries before you get it right, we've all been there. That said, I can't say what went wrong without knowing all the details. The beautiful open crumb is the result of proper fermentation, light handling, proper proofing, steaming, and baking temperature. Did you dough double in size during fermentation? Did the dough increase about 1.5 times during proofing? Can you describe the crumb that you got? Was it dense? Did you take any pictures?
Victor says
Hi Victor,
its me again.
I want to incorporate Quinoa in your recipe and was wondering about the process.
I would have cooked the quinoa and then replaced parts of the flour with the quinoa so I end up with the same water-Flour/quinoa ratio as a straight up water/flour recipe.
I would incorporate the cooled down quinoa from the beginning of the process.
Do you think that would work?
Victor @ Taste of Artisan says
Hi Victor,
yes, a straight replacement of flour for cooked whole quinoa from the start will work. Don't go higher than 20%.
Victor says
Hi Victor,
Thank you so much for your passionate recipe. I cannot follow it completely due to gas oven, pruning basket improvisation (pasta sieve), and limited availability of bread flour (Brazilians are not that into flour). But by experimenting and using less water in the dough and more in the gas oven (as they are already have some ventilation that doesn't close off the oven completely), I got wonderful results.
I saw a picture of one of your breads with an entire garlic head baked into the bread and was so intrigued. Do you have some other ideas for such variations? Did you place the garlic in the bread before or after proofing?
Thank you again for the wonderful description.
Victor @ Taste of Artisan says
Hi Victor, glad to hear about your great results. I know the feeling, it's so satisfying. The garlic bread on the picture is not mine, but I have the details and I have made it several times too. Some of the peeled roasted garlic cloves get mixed in during the second stretch and fold. The whole roasted garlic head gets added before proofing. As for other ideas, the sky is the limit. Fresh rosemary and cream cheese, bacon, ham and cheese, caramelized onions and/or mushrooms, apples, various nuts, plums, hard-boiled eggs, red cabbage... here are some cool pictures from my German bread books.
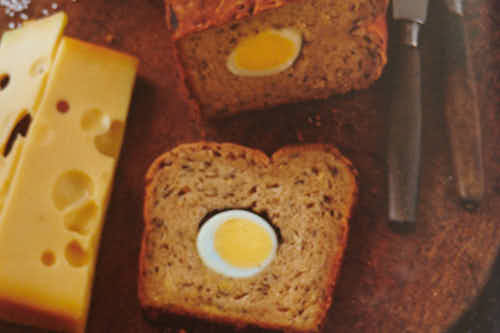
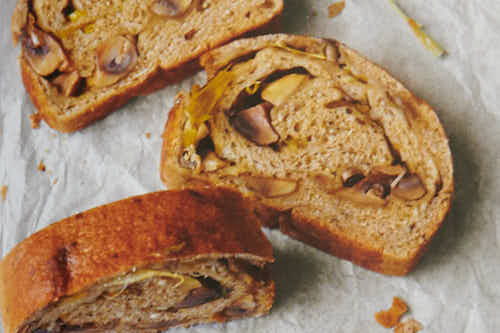
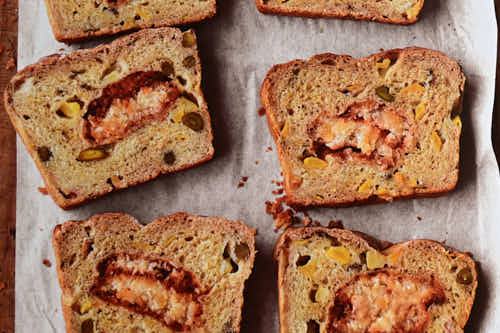
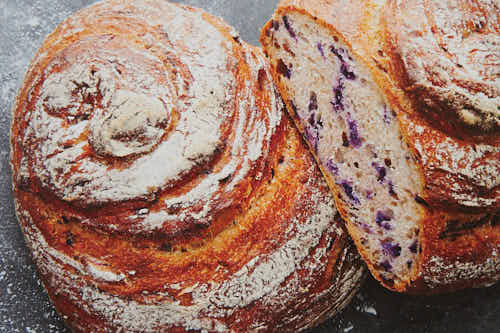

>
>
>
>
>
Victor says
Thank you for the quick return.
I will definitely try the garlic variation soon.
Could you tell me the name of your bread book or, if you have several, one that you recommend the most? Fortunately I am German and won't have a problem with the language 😉
All the best.
Victor @ Taste of Artisan says
Wow, you are in luck then. I lived in Duesseldorf for a year a while ago so I picked up some German but not enough to not use a dictionary here and there;) While I was there, I fell in love with German bread and bake it very often. I have a dozen of good German bread books, I will send the names to you via email.
Becky says
Hi Victor, thanks for sharing your craft! Your baguette recipe was my first success at bread making after MANY years of so so results. I want to move onto sourdough recipes and I noticed you use wood pulp proofing baskets. Do you have an opinion on rattan baskets? That seems to be the most common one I see offered online and they’re fairly inexpensive. Wondering if I should just try one of those or if it would be better to invest in a nicer set. I do have little ones at home who like to “help” so I’m a little worried about the durability of rattan
Victor @ Taste of Artisan says
HHi Becky, so happy to hear about your success!!! Glad I could help you.
>
Rattan baskets are quite durable, in fact, very durable. I've had a few for over 10 years and they are still going strong. Wood pulp baskets are less durable, they get dented if you hit them with a hard object. You can't wash them, I've read that someone did (seriously???) and ruined them. This won't happen to a rattan basket.
Becky says
Perfect! I will give the rattan baskets a try. Cookware serves dual purpose as percussion instruments in our house so it sounds like the pulp ones are out for now. Thank so much!
Victor @ Taste of Artisan says
You are very welcome.
Donald R Emery PhD says
Pls create a summary print option. My computer is a floor away, my iPhone has limited viewing, and your beautifully written essay isn’t needed in the kitchen. Thanks
Victor @ Taste of Artisan says
Donald, after you hit print button on the recipe, you should see two pages that include only ingredients, instructions, notes a few other minor details. Do you see that or the full post? I suspect you are trying to print the entire post, not the recipe. Use the print button in the recipe box. Happy baking!
rage says
I have been making bread for many years now and this recipe is by far the best bread I have ever had. I stuck to the original recipe with white flour. My family just loved it.
I am going to try it today with a mixture of different flours and adding some nuts and seeds. I will keep you posted on how it turns out.
Victor @ Taste of Artisan says
Happy to hear that. I highly recommend trying fig and walnut at least once. A baker at a farmers market once let me try his and I've been hooked since. Also, I highly recommend trying my no-knead sourdough bread I posted a short while ago.
Esther says
Hi Victor,
I made this yesterday with 40 g dark rye, 60 ww and 500 KA white followed by overnight in the fridge, baked today, and it turned out well. I’d love to share a pic! One question, though - do you adjust the water when you add these flours? I ended up adding a bit more, especially when I stretch and fold; I always use wet hands and a wet rounded rubber scraper.
>
>
Victor @ Taste of Artisan says
Hi Esther, happy to hear that. I am going to reach out to you via the email that you provided, please email me the pictures and I will attach them.
>
As far as whether I adust water or not, the answer is both yes and now. I don't when I add a small amount of other types of flour, and I do when the percentages are high. The bottom line is that if the dough feels too wet, I'd add a bit more flour. If it's too stiff, I add more water. Otherwise, a few % more or less don't make a big difference to me. Now, if I specifically target a certain bread type with certain hydration, I tend to be very precise.
>
I attached your photos, thanks for sharing them. Love the oven spring, the beautiful crust, and the lovely airy crumb. I imagine it tasted great and probably didn't last long;)
Esther says
Your bread looks wonderful. I’m going to try your recipe-I normally use Jim Lahey’s. I love making no-knead breads with cold fermentation. Can I bake in my clay cloche or Dutch oven like I usually do? After scoring, I spray the loaf liberally with water, bake at 450 for 45”, uncover and bake another 15”. Turns out great, but I have an iron pizza stone - you say the stone might be even better?
Victor @ Taste of Artisan says
Esther, thanks for stopping by my blog. You can modify this recipe to include cold retarding, I do it too and described my process in French baguette and sourdough bread recipes. This recipe is meant to be a quick no-knead version. So many ways to make bread, which makes this hobby so exciting.
>
Yes, you can absolutely bake in your Dutch oven or the cloche as usual. I can't advise you about a cast iron pizza stone, I haven't used it, but I can talk about the DO/cloche/pizza stone differences. They are subtle but still big enough to cause some people to prefer one method over the other(s). Baking on a stone presents less hassle over the other two methods. But you have to ensure proper steaming with this method, a hassle of a different kind I suppose. On average I get a bit less of an oven spring on a stone with a water pan. No blisters like you get with a cloche or a DO. This crust is thin and crispy. The crust in a cloche or DO is thicker and chewier. Some of my family members like that, some prefer the thin crust. You can't bake baguettes in a cloche or DO. The bottoms in a DO tend to burn a little, causing a bitter taste. Overall, I prefer the stone over the other methods. I can also bake more on it. Lately, I've been experimenting with baking on a stone covering the bread with a large mixing bowl to trap the steam. I like the results.
Peter says
Hello from Germany! I agree wholeheartedly with you regarding the superiority of wood pulp bannetons. I have been using them for many years without any negatives to say. Your bread looks excellent.
Victor @ Taste of Artisan says
Thanks you, Peter. The more I use these bannetons the more I like them. Made an 80% hydration sourdough yesterday, felt just a touch of stickiness when removing the dough from it but overall, very good. With other bannetons I would use lot's of flour, here I only used 203 teaspoons.
Mahvash says
I do the same thing for no knead breads but I don’t know why my crust is so so tough and very pale almost white
Victor @ Taste of Artisan says
Mahvash, it's hard to say with so little information. Hard crust is a result of several factors, including too high of a temperature or too long of a bake. Some ovens bake hotter than they report due to faulty/inaccurate thermostats. Insufficiently proofed or overproofed dough can also contribute, as you won't get a good oven spring. Too much steam can be a factor, or not enough steam which would lead back to poor oven spring. The flour itself can be a factor. Try a different brand, or try bread flour. Poor color points to too much humidity, hence the reason I crack the oven open during the second half of the bake. Did you try my recipe?
Walt Morgan says
Please help. The interior of my bread is always very dense. I have tired many receipts with the same results. I live in southern Louisiana and am familiar with good French bread. Need suggestions.
.
Victor @ Taste of Artisan says
Hi Walt, there are a few things that may be causing dense bread, but the first and most common culprit is poor gluten development and/or insufficient fermentation/proofing. Have you tried my recipe yet? Follow the instructions and see how it works out for you. Take some photos along the way and email to me, and if it's still dense, email them to me, it will be easier to troubleshoot. Stretch and folds will help with proper gluten development. Make sure that the dough doubles in size during bulk fermentation. Else, the bread will be dense. Shape gently, don't de-gas it and tighten too much. Proof until you visually see a 1.5 increase in size. Do the finger test. I say it's always better to over-proof than under-proof. Why? Check this picture of my severely over-proofed sourdough bread (I got busy and forgot about it), it collapsed in the oven and came out as a thick pancake, but tasted great and was airy and soft inside.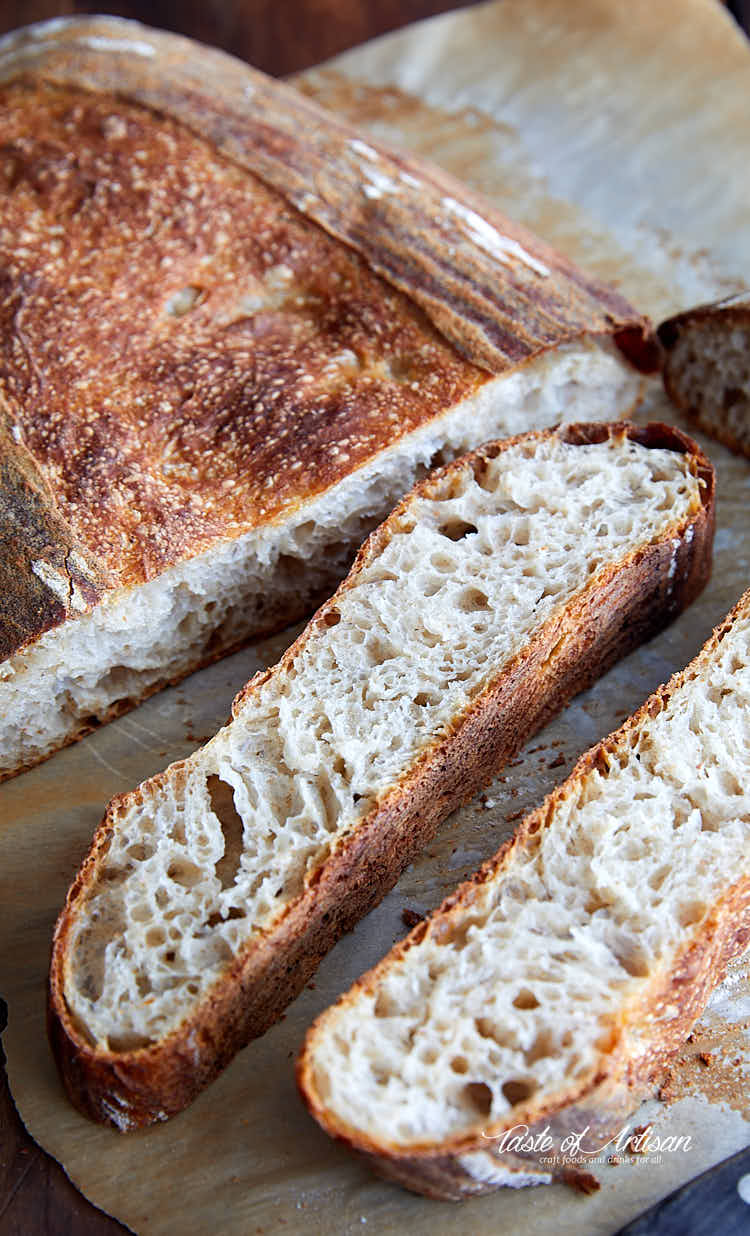
<
< Once you get this bread down, you can apply the same technique to other breads. I highly recommend trying my French baguettes, I make the using a similar technique, they are fantastic.
J.M. says
Hi Victor, thanks for this great guide! This has become THE BREAD RECIPE for me. I can totally relate to what you said about how your early bread wasn't as good. I baked your bread four times now and it sure is better than what I used to make even though I'd been baking no-knead bread for a few years. I must admit that my first attempt was just ok but I persevered and the results improved with more practice. My last loaf turned out so good that I would be happy to share a picture. Thanks again!
<
Victor @ Taste of Artisan says
Hey J.M., thanks for sharing your picture (I attached it to your comment), and thanks for your feedback, your bread looks outstanding, better than mine;-) Love the open crumb, and the perfect gluten development. Excellent oven spring.
Keith says
I have just finished trying out this recipe and am very pleased indeed. The taste is superb, the texture excellent, both complemented by a crispy outer crust. I used 8% dark rye flour (10.6% protein) and 92% strong white flour (12% protein). I deviated slightly from Victor's recipe in that following the stretch and fold process, I placed the dough in the refrigerator overnight. In the morning I removed it and let it warm up to kitchen temperature for about 45 mins. I then followed the recipe again. This loaf is hard to beat!
>
>
>
Victor @ Taste of Artisan says
Your loaf looks fabulous, Keith. Very nice crumb, I would even say it looks perfect, and a lovely crust. Thank you for emailing me your pictures, I've attached them to your comment. I am sure others will appreciate your pictures too. Very happy to read about your success. I have many other bread recipes that I like, will be posting them in the coming weeks, months.
Carter says
Hey Victor, love you baguette recipe and now the no knead bread recipe. Followed your instructions to the tee and got a loaf that looks almost like yours and the taste was outstanding. The bread was gone within a few hours! The 75% hydration is perfect for this bread. Now that I think about it, your baguette and sour dough bread recipes also use 75% hydration. Is that your sweet spot?
Victor @ Taste of Artisan says
Good to hear that, Carter. Never really thought of it before but now that you ask, it does look like 75% hydration is it for me though I make different breads with varying levels of hydration. It depends.
William Richardson says
I weighed everything and the dough was too wet to hold any shape at all. I did continue on without adding more flour just in case it would come together later in the process. When I placed it onto the parchment paper it spread instead of holding a ball shape. It tastes great and has a nice texture and crust so next time I will add more flour or less water.
Victor @ Taste of Artisan says
This dough is 75% hydration (ratio of water to flour) which is higher than the typical 65-72% hydration of common bread formulas but not uncommon. I go even higher than 75% for my standard sourdough bread. Higher hydration gives bread a very soft, open crumb and a nice chew. Working with higher hydration dough may take a little practice but it seems like you are on the right track. If you look at my pictures, the dough initially is very sticky but strengthens over time and after the stretch and folds. When I turn it over on the parchment it spreads out some and doesn't have a ball shape. It's normal. Yours seems to be fine too. In the oven, it will rise substantially.
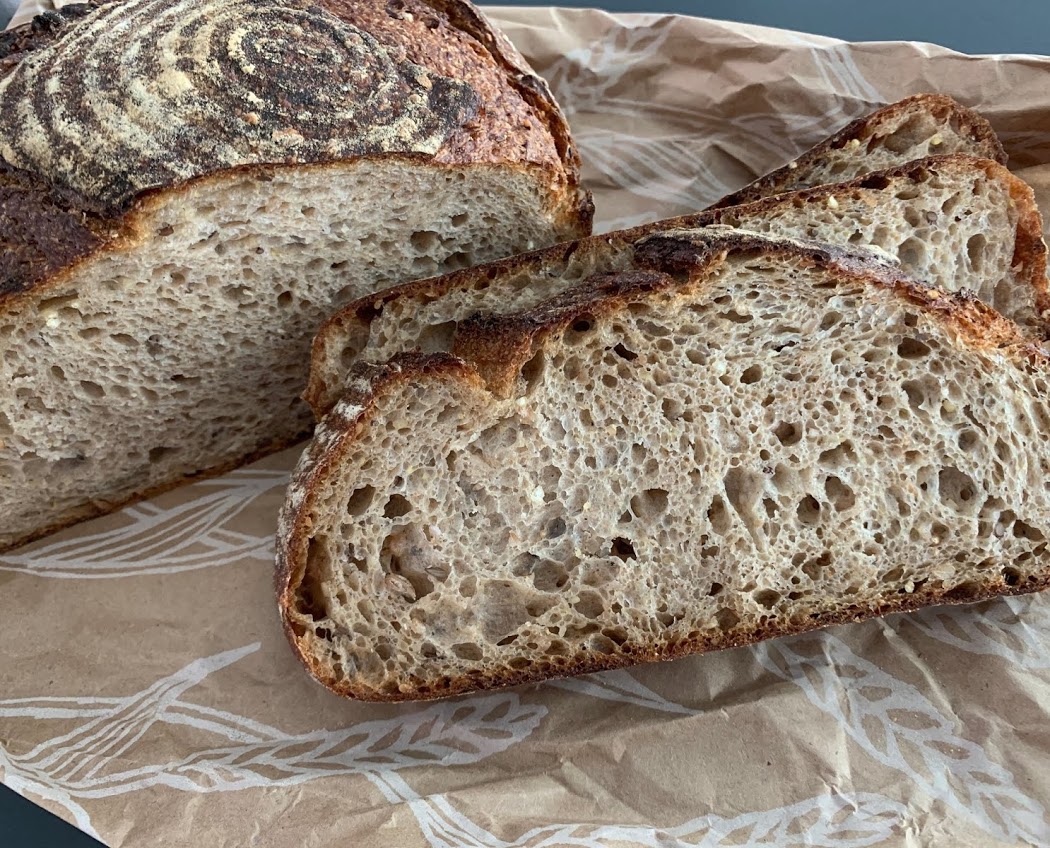
>
If the bread didn't rise in the oven like mine, there are a few things to look into. Insufficient steam in the oven. The outer layer will dry out too quickly and prevent the bread from getting a proper oven spring. The dough is under-proofed - some oven spring and dense texture. The dough is over-proofed - nice open crumb but the dough spreads out too much and little oven spring. Scoring - if you score the dough too far side to side and/or too deep, it will spread out too much and won't spring up properly. You also need to work quickly between turning the dough over on parchment and sending it to the oven. Finally, the temperature - the oven needs to be properly pre-heated, usually for 40-60 minutes. The thicker the stone the more you need to preheat it. It's the thermal mass of the stone that gives the bread a lot of its oven spring.
>
If you are having some challenges but want to learn and need some assistance, let me know. You can also send me some pictures, I'd love to see the results and it would be easier for me to help with troubleshooting.
>
Working with higher hydration dough may take a bit of practice but it's very rewarding as far as the taste and the texture go. You can lower hydration to 70% but I recommend that you slowly work your way back up as you get more comfortable. When I visit one of my favorite farmers markets (Sarasota, FL) I buy bread from a true bread artisan there. His bread is a work of art and has a superb taste. According to him, his breads are typically at least 75% hydration and many are around 80%. Here are some pictures of his bread that are my favorites.
>
>
>
>
William Richardson says
Victor, I live in France so there is a bit of difficulty getting the flour I am used to using when living in the USA. I have been baking bread for over 40 years and started making the no knead style of breads 7 or 8 years ago and have been quite successful with the proper flour. I think that might be the problem as I haven't been able to find a reliable brand to work with . I must say that one of local prize winning boulangers has had problems with some of his flours lacking any taste recently. Your recipe has become my go to as a start. Thank you for the information about the bannetons as I have my first 3 and they work perfectly and now I'm sorry that I didn't order more as the shipping was the same for up to 10.
Victor @ Taste of Artisan says
Hi William,
Sorry to hear about your challenges finding the type of flour you are used to working with. French T55 flour is considered to be the equivalent of the US all-purpose but it's not the same, it's ground coarser. I use T55 La Milanaise flour from Quebec, it's organic, very flavorful, makes great tasting bread and baguettes, but coarser than KA AP flour. Perhaps you can find something that is one step finer than T55 but with the same protein content (11%). If not, T55 is a good choice. And if you are adding WW and whole rye, I guess it won't matter much anyway.
>
>
You are welcome for the banneton info, glad you found it useful, and ordered a few for yourself. Shipping to the USofA cost me a whopping 48 Euros so I ordered everything I thought I'd need, so far so good. Glad I purchased those brushes too, they are terrific and of very good quality. Should last a lifetime with good care. I think every home bread baker should get those, they are so much better than anything I'd used before. It's hard to appreciate how much better they are until you start using them but once do, it's hard to use anything else. This is especially true when you graduate to high hydration dough. There is practically no sticking even at 80% hydration, with just a couple of teaspoons of AP/rice flour mix. Take away a lot of frustration out of the equation.
P.S. Loved reading your blog. Subscribed.
Eugene Tiffany says
What is this 11/2 hours and 11/2 times mean? Never saw durations and size before. No idea what their timing and volume pertains to. That is, how much they are.
Victor @ Taste of Artisan says
It's 1 1/2 (one and a half) not 11/2.