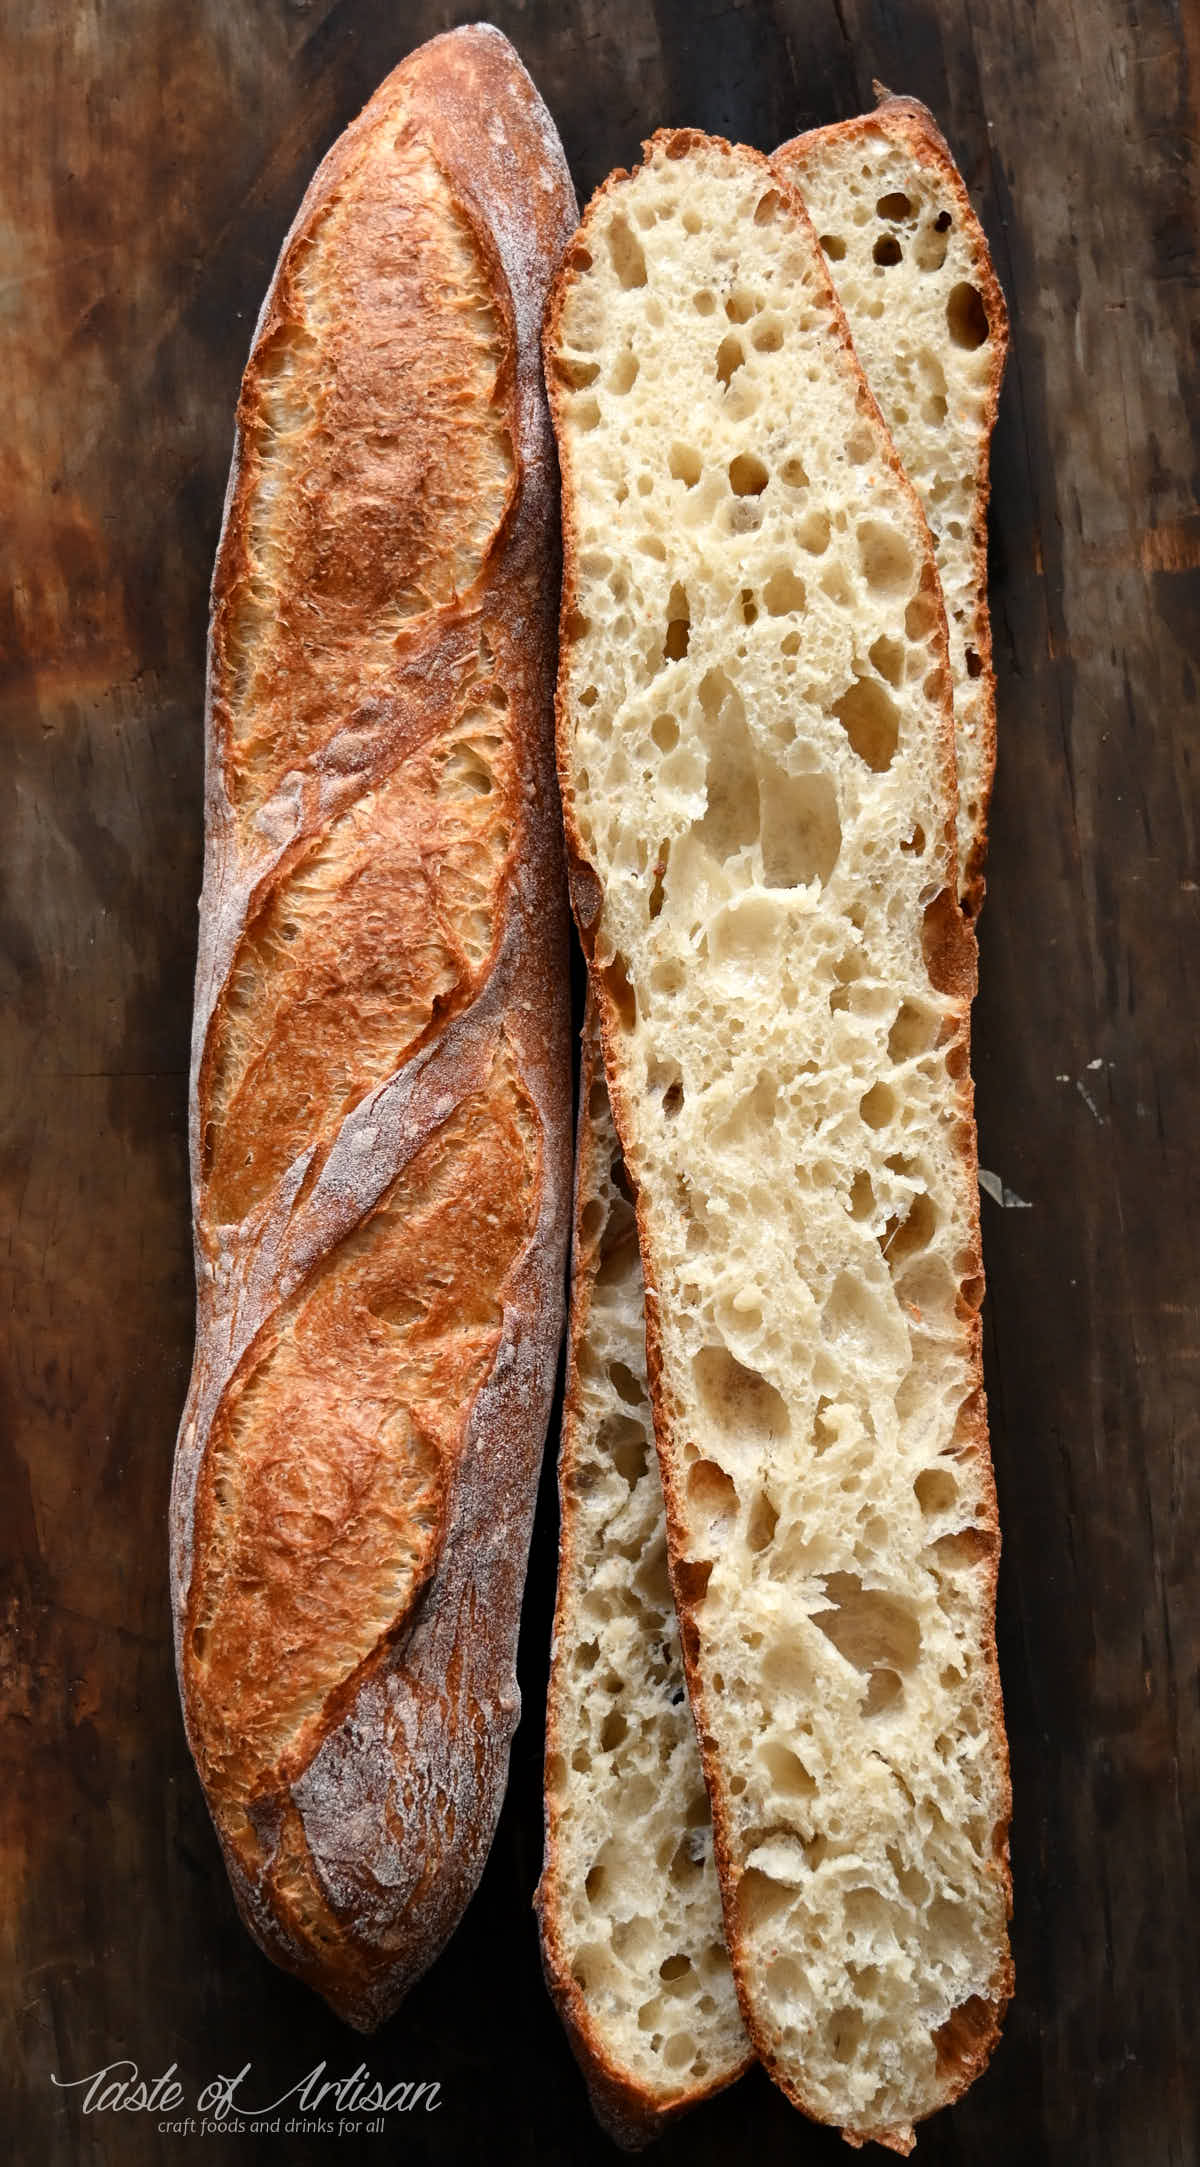
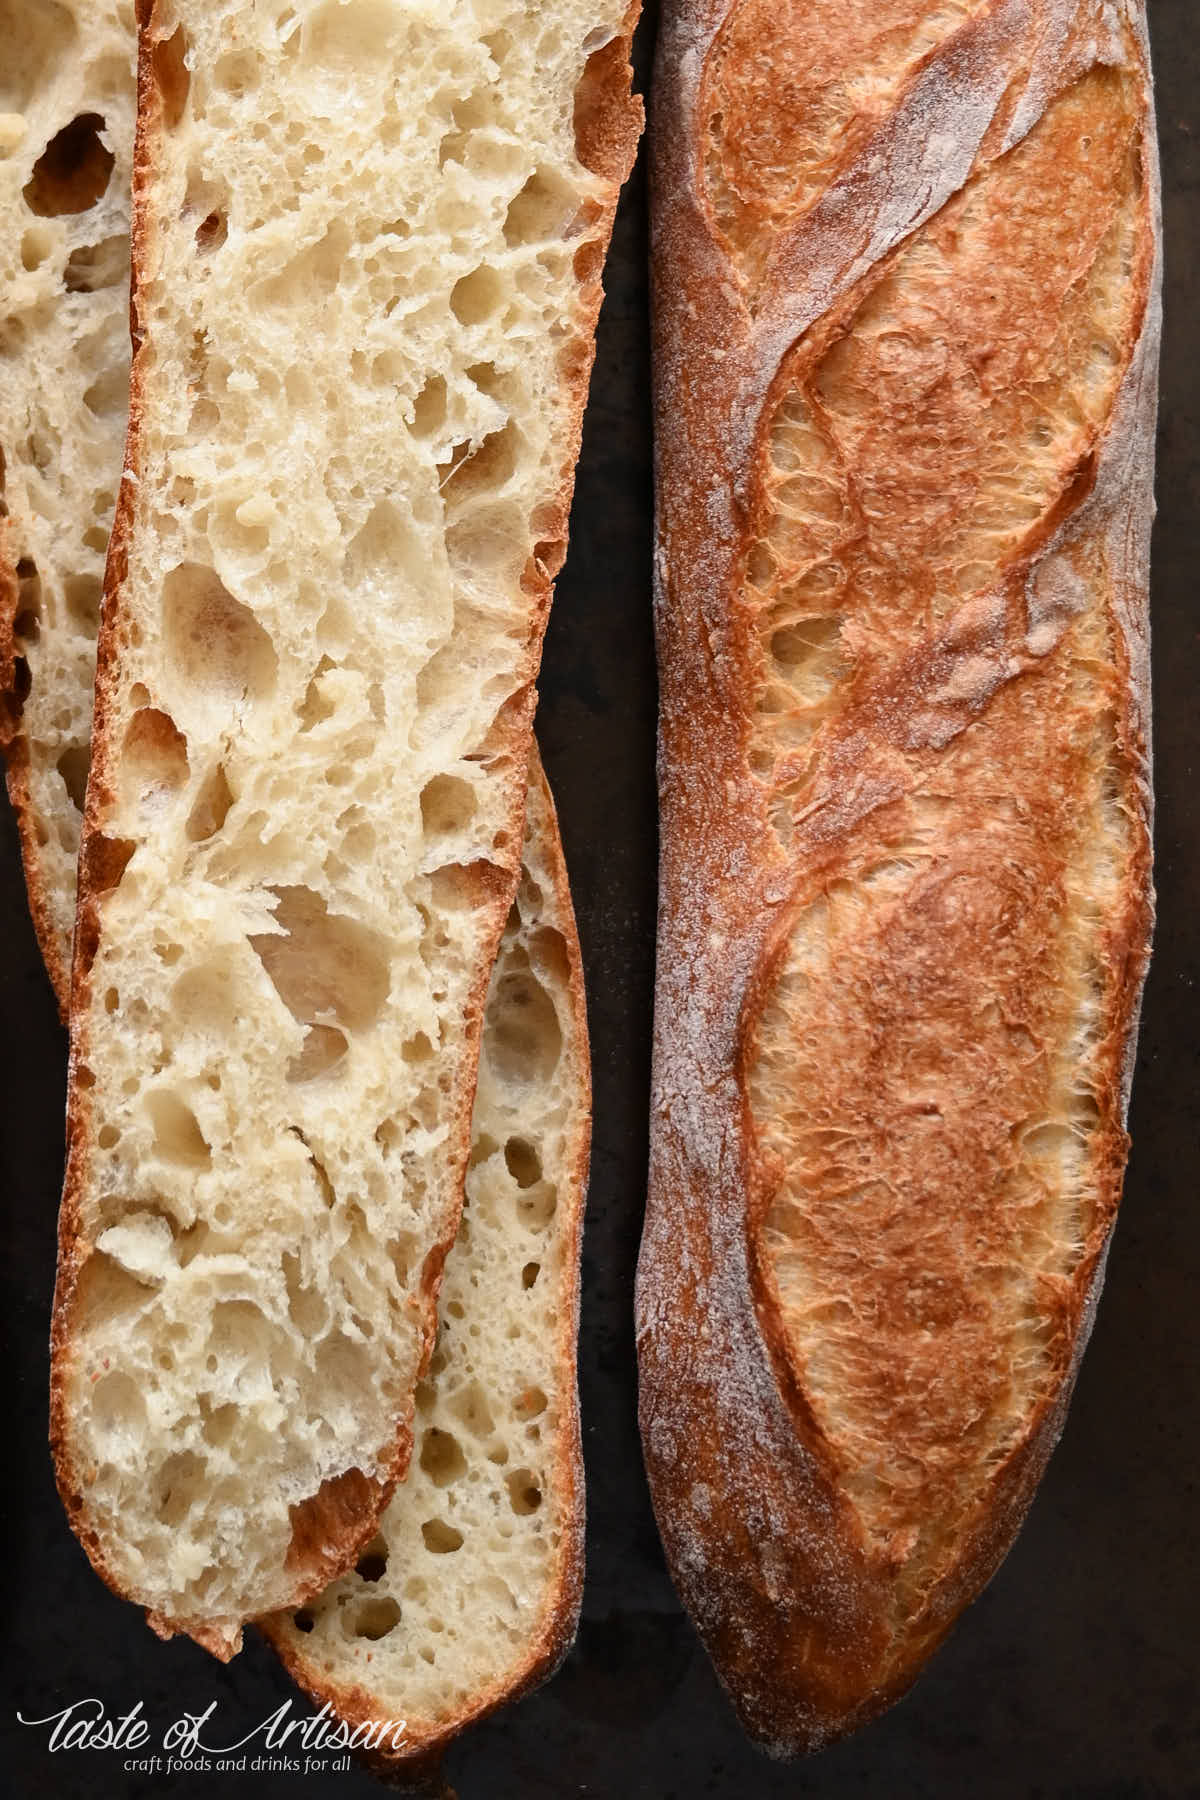
There is nothing like a freshly baked French baguette on a Sunday morning. Or any morning for that matter. Crusty and beautifully colored on the outside, buttery soft and chewy on the inside, with a tiny bit of butter - it's one of my favorite breakfast foods.
Baguettes took me the longest to master. Perhaps it's because my bread baking adventure started (many years ago) right after I baked my second loaf of no-knead bread and I lacked the necessary experience. So many factors here that can affect how your baguette will look and taste.
What French baguettes are made of?
A traditional French baguette is made of flour, water, yeast and salt. It's fascinating how these four simple ingredients produce a beautiful, flavorful, crusty baguette. What's even more fascinating is how different bakers, using the same ingredients, can make baguettes that differ from each other quite substantially sometimes.
Up to about a century ago making bread with natural leaven was the rule for bakers in France. Later it was a mix of natural leaven and baker's yeast, which made the crumb lighter and more open. Lately, many bakeries seek efficiencies and switch to using baker's yeast as using natural leavens requires more work.
Other factors that define a baguette's appearance and taste
As was mentioned above, many French baguettes, while using the same ingredients, differ in appearance and taste. This is largely due to the process that is employed. You can make the dough rise very quickly using warm water and warm ambient temperature but it will lack flavor. Slowing down the fermentation process, known as cold retarding, results in complex flavor and improved taste. Thus, how you ferment the dough, how long you retard it, how you proof it, how you shape, score and bake it - all contribute to how the final product looks and tastes.
Baguette making process
This baguette recipe uses baker's yeast and is influenced by the method used by Anis Bouabsa, winner of the 2008 Best Baguette in Paris contest. In an interview, Anis mentioned using baguette dough that has 75% hydration (meaning the ratio of water to flour), very little yeast, hardly kneaded, folded three times in one hour then placed in the fridge for 21 hours. He also added that baguettes are not fully risen when placed in the oven, it is the wet dough and the very, very hot oven (480F) that make baguettes get the volume.
The ingredients
In this recipe, I use King Arthur all-purpose flour, very commonly used for baguette making among home baking enthusiasts, water, yeast, and salt. I also add a bit of honey. This is a big no-no for baguette purists, but that little hint of sweetness is what everyone I baked my baguettes for liked.
The equipment
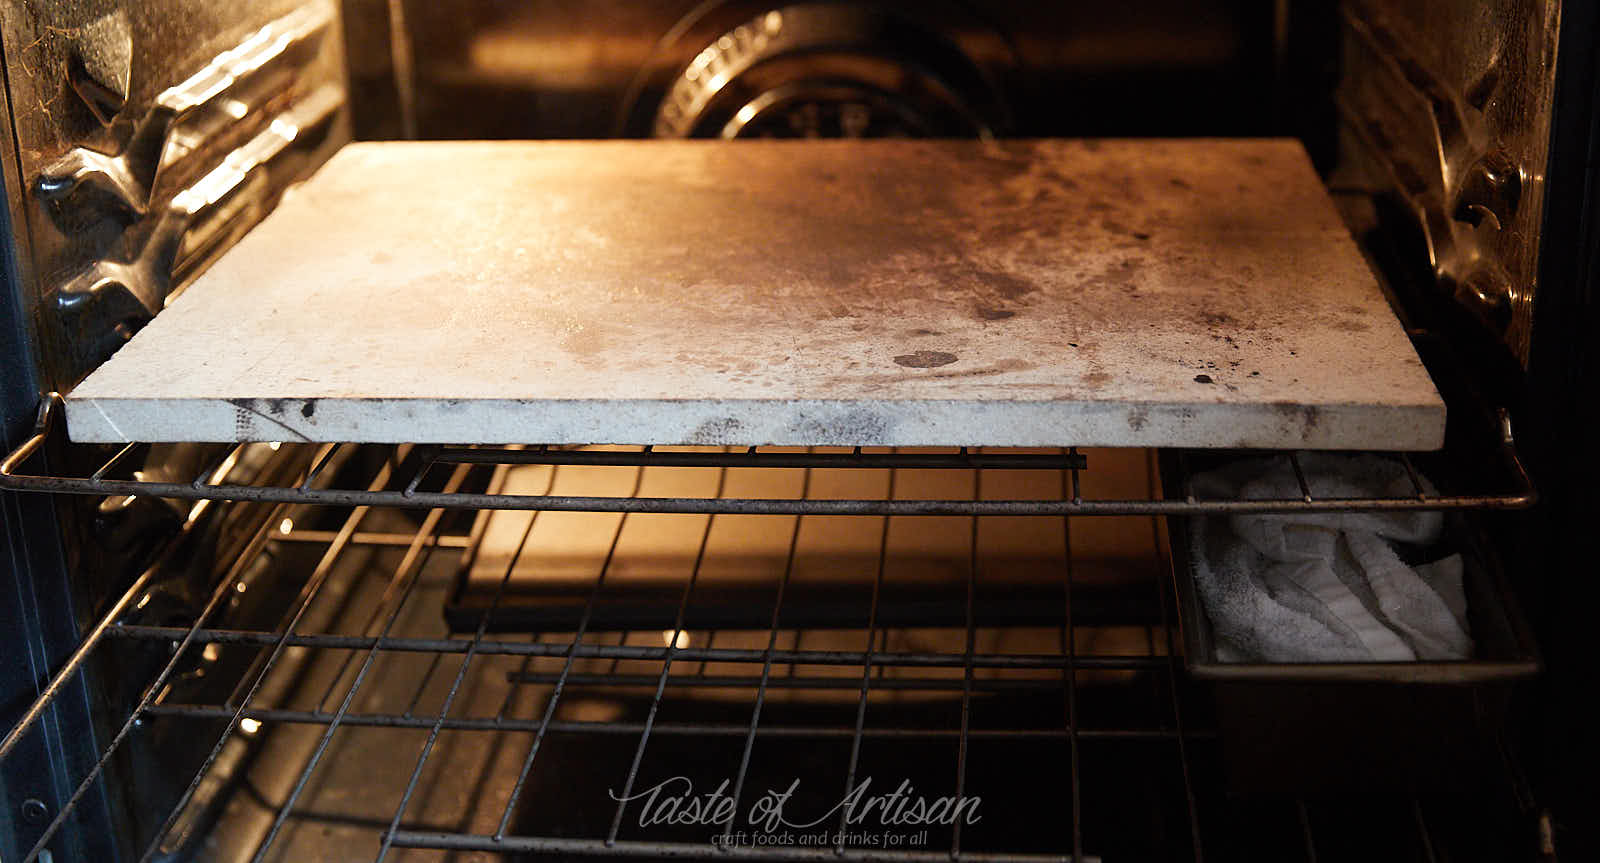
The essential pieces of equipment to make a great-tasting baguette are an oven and a baking stone. You want a large and, importantly, thick baking stone. It won't crack easily and will promote a much better oven spring for your baguettes. Like this heavy duty baking stone. Even better, go to your local pottery supply store and get a Cordierite kiln shelf. They are thicker and can withstand spills with aplomb. You can also get one cut to your specifications.
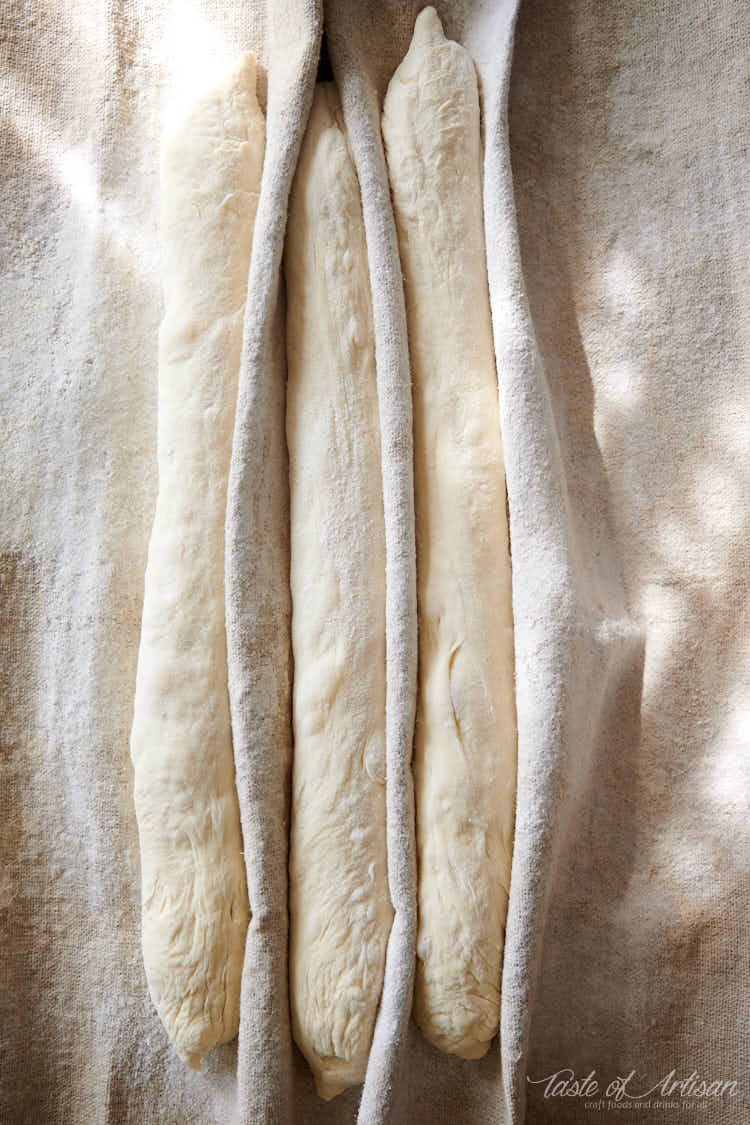
Another piece of equipment that is extremely helpful is the Baker's Couche that you will need for proofing. I used to get away without one for a long time but they are so effective and convenient, and in very inexpensive nowadays.
A bread lame is another tool you will be glad you have. It's essential for scoring baguettes. I can use a serrated bread knife to make pretty good scores, but a lame will be much easier for novice bakers.
Finally, you will need a large pizza shovel or something similar to load baguettes in the oven. I find that the easiest way to do it is to place the baguettes on a large piece of parchment paper, score then slide on the baking stone.
Mixing the dough and stretch and folds
The first step is to mix all ingredients in a bowl and let sit for about 10 minutes, followed by 3 stretches and folds over a period of 1 1/2 hours, about every 30-45 minutes or so. In each stretch and fold iteration, pull one side of the dough and fold onto itself. At the end of each iteration, I pick up the dough ball and turn it upside down.
 Do this in a warm room to get yeast activity going, otherwise the dough will have a hard time rising in the fridge. Examine the surface of the dough before putting it in the fridge and look for tiny blisters and a slight sour milk smell. If you observe both, then the dough is ready to go in the fridge. If not, I let it sit at room temperature for another 1/2 to 1 hour.
Cold retarding
Cover the bowl to prevent the surface from drying out and place in the fridge for 12 hours. After 12 hours the dough will have doubled in volume. If not quite doubled, take it out and let stand in a warm place for 1-2 hours. The oven with the light on is warm enough for this purpose. Alternatively, you could let the dough ferment in the fridge for another 8-10 hours.
Preheating the oven and steaming
Sometime after taking the dough out of the fridge, start preheating the oven to 500F, with a baking stone positioned in the upper part of the oven and a small bread pan with hot water and a rolled kitchen towel inside, on the lower rack. Position your baking stone such that the short side is parallel to the door. Water pan is needed for consistent steam release during baking to help the baguettes rise nicely in the oven (also referred to as oven spring) and prevent surface hardening. The towel helps control steam release.
Shaping baguettes
Turn the dough on a lightly floured surface. Divide into 3 equal pieces, shape into rectangles and let relax for 45-60 minutes.
Stretch into rectangles and roll each rectangle as shown below. Start with the longer side, fold it inside the rectangle and seal the seam with your thumb. Do it tightly enough but being careful not to degas the dough. Repeat two more times until you formed a cylinder.

Seal the seams using your palm and stretch the cylinder to desired length by gently rolling it with your hands.

Proofing
Cover with flour (a mix of regular flour and rice flour works best as rice flour does not absorb water too well and prevents sticking) and place on a baker's couche, seam side up. Let proof for 30-60 minutes at room temperature. You can tell that the dough is ready for baking by a gentle poke with a finger. If the dough is sufficiently proofed, the indentation springs back very slowly. If it’s under-proofed, the dough will spring back quickly. You can read more about this and see pictures in the Basic Artisan Sourdough Bread post.
Scoring
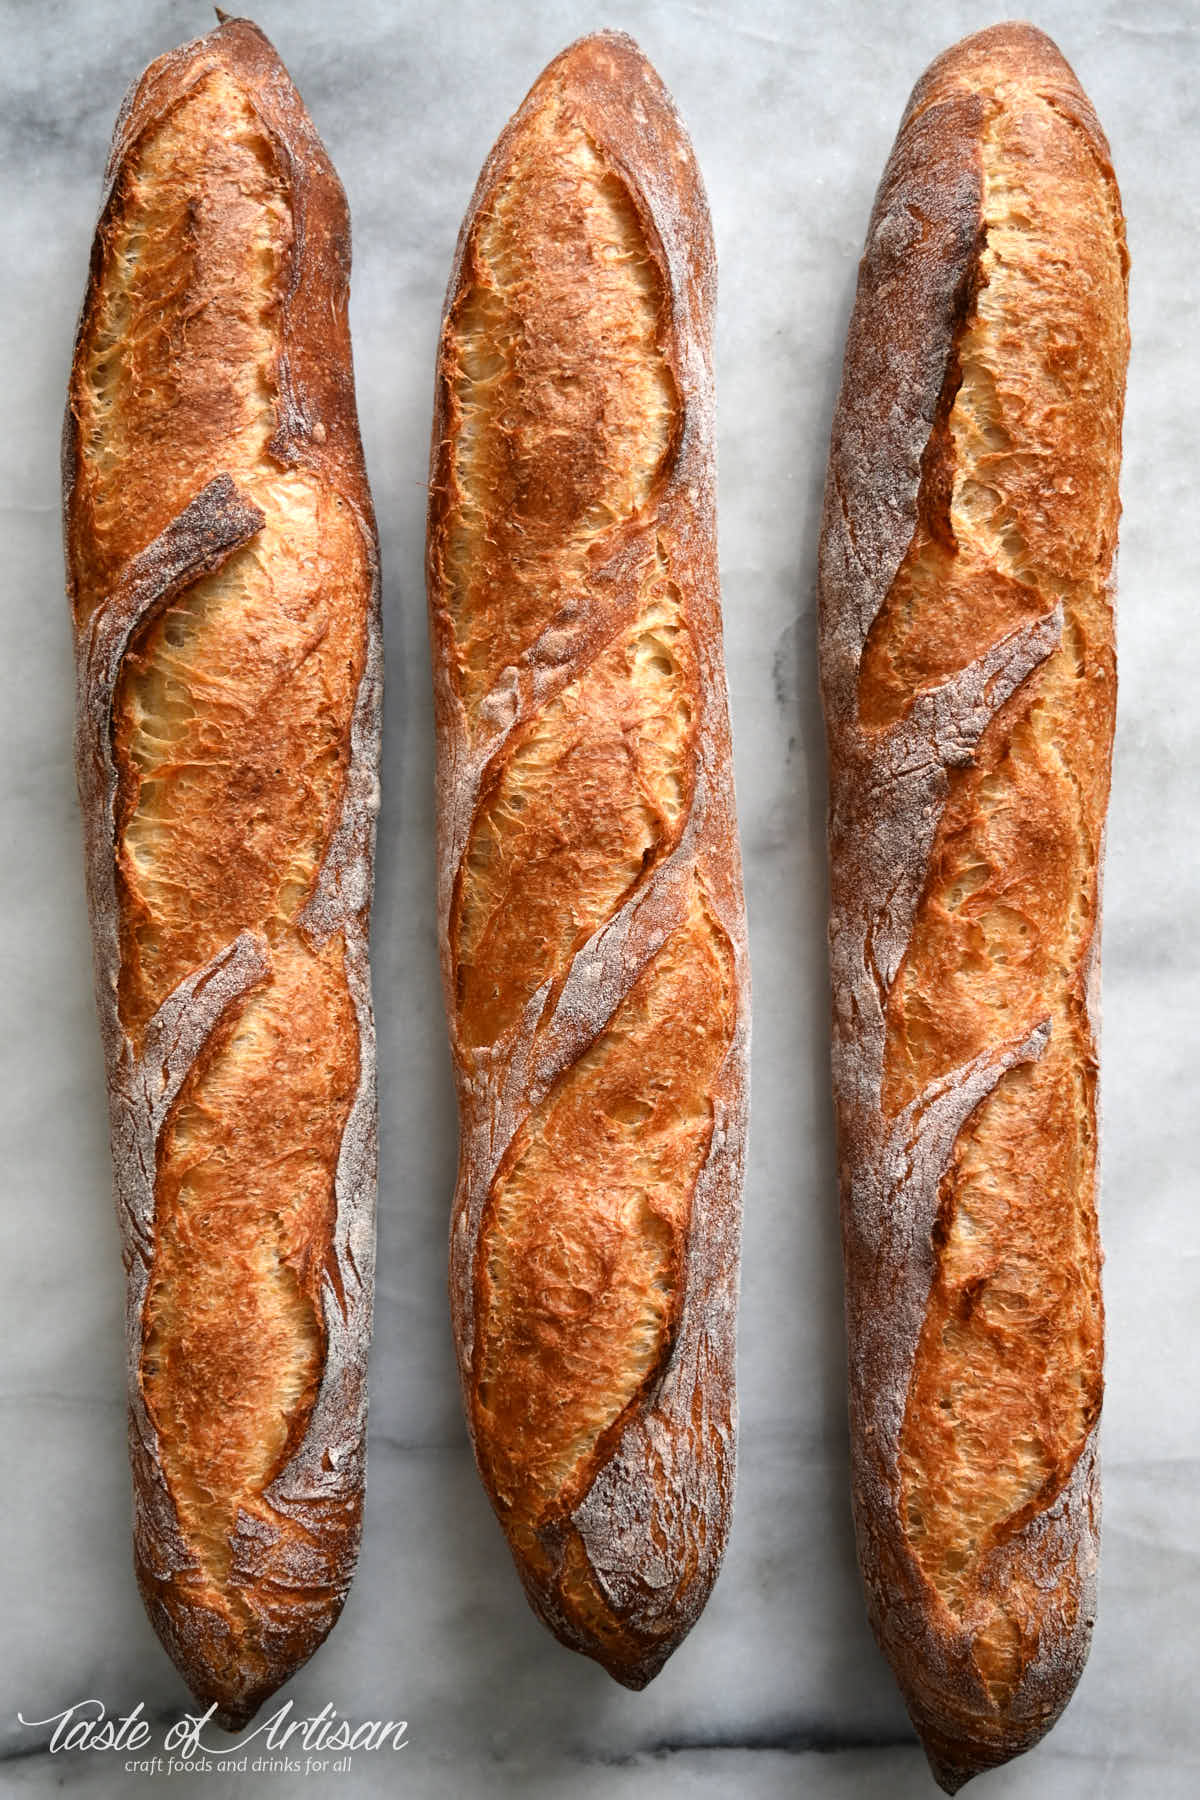
Transfer the baguettes onto a piece of parchment paper, seam side down, and dust off excess flour. Using a bread lame or a razor blade, make 3 cuts, in a gentle but firm motion. Bakers call this scoring. If the baguettes keep sliding when making cuts, hold them with one hand at the top end and make cuts from top to bottom. Scoring baguettes helps them open up and nicely rise in the oven, or as bakers call it, 'have an oven spring.'

Loading baguettes in the oven
Once the baguettes are ready to bake, simply slide them off with the parchment paper onto the hot baking stone. Be careful with opening your preheated oven, it will be hot and steamy and may burn your face if you are too close when opening the door. Using a water spray bottle, spray some water in the sides of the oven to boost the steam.
Note: You don't have to use parchment paper; you can bake directly on the baking stone. Simply use a large wooden pizza shovel dusted with some flour and slide the baguettes off right on the baking stone. This method is slightly trickier and messier; hence, I personally prefer to bake on parchment paper.

Baking
Once your baguettes are in the oven, reduce the temperature to 475F. Bake for about 15 minutes; remove the water pan, rotate the baguettes, and bake another 15 minutes at 450F until deep golden brown. In a gas oven, it takes a bit less, 12 minutes with steam and 12 minutes without.

Ingredients
- 500 g all purpose flour King Arthur brand is recommended about 3 1/2 cups, using 'scoop and swipe' method
- 360 g water about 1 1/2 cups + 1 Tbsp
- 10 g salt about 2 tsp
- 3 g instant yeast about 1 tsp; also known as Quick Rise or Rapid Rise yeast
- 25 g honey about 1 Tbsp
Instructions
- Mix all ingredients in a bowl, cover and let rest for 15 minutes.
- Over a period of 1 1/2 hours, do 3 sets of stretch and folds, flipping the dough upside down after each set.
- Cover the bowl and place in refrigerator overnight for about 12-14 hours.
- Turn the dough on a lightly floured work surface. Divide into 3 equal parts and shape into rectangles. Cover and let rest for 45-60 minutes.
- Stretch each dough rectangle slightly and fold into a cylinder, sealing the seams. Using your hands, roll the cylinders gently stretching them to desired length, about 14-15 inches.
- Place on a lightly floured couche, seam side up. Cover and proof at a room temperature for about 30-60 minutes, or until the dough has sufficiently proofed.
- Starting preheating the oven to 500F, with a baking stone positioned in the upper half the oven and a bread pan filled with hot water on the bottom rack.
- Transfer the baguettes to a piece of parchment paper (see note 3), seam side down, and dust off excess flour. Using a bread lame, a sharp knife, or a razor blade, make 3 scores on each baguette. When scoring, use a swift and firm motion to ensure nice and clean cuts.
- Open the oven, taking caution not to get burned by steam, and slide the baguettes off onto the baking stone. Close the oven and reduce temperature to 475F. Bake for 15 minutes.
- Remove the water pan, rotate the baguettes, drop the temperature to 450F and continue baking for another 15 minutes or until deep golden brown.
Notes
Nutrition
Oh, and don't forget to try my favorite Neapolitan pizza dough recipe. It makes exceptionally good pizza crust.


Jarrod says
What type of salt do you use, it makes a big difference? Morton’s Kosher or Diamond?
Victor @ Taste of Artisan says
Jarrod, most of the time I use Morton's Kosher. I also sometimes use pink Himalayan or coarse sea salt.
Christine says
Question?
Convection oven ok?
Victor @ Taste of Artisan says
Christine, I don't like using convection mode when baking baguettes as they brown way too quickly for me. It works fantastic for pizza or focaccia though. If you can't turn it off, I'd suggest decreasing the temps by 25F, which is the typical recommendation and watching closely how it goes. You may need to adjust the time as well. In other words, it should be perfectly doable but you will need to make some tweaks to get it to work perfectly for you. Good luck!
Brooke Cesarz says
What is the max time you could leave it over night in the fridge ? 16-20 hours ?
Victor @ Taste of Artisan says
I find that up to 48 hours is fine, after than the dough begins to degrade. Half the time I keep the dough in the fridge close to 24 hours due to my schedule and it work great for me. If you fridge is on the colder side, longer time will actually be beneficial for achiving proper rise/fermentation. Good luck!
claire says
very good recipe! delicious, low-effort bread would recommend 100% it stayed delicious even after i left it in room temperature at 5 hours and didn't do another proof lol
Victor @ Taste of Artisan says
Glad to hear it. Enjoy!
Ashley Willis says
First of all I have made this 10x in the last .month and I am thrilled to have found you. Thank you!
I read through most comments and i feel satisfied that this question hasn't been asked (I hate when people repeat the same damn question), I need to talk about seams. I didnt pay attention to the seam side down/up and today I tried but the seam disappears with my rolling and I was wondering how important this seamingly small step is, what is the point of the seam flip? Thank you!
Victor @ Taste of Artisan says
You are very welcome, Ashley. About the seam. It's mostly about the appearance. If you bake seam side up, the dough will spring up and you will get cracks along the seams in addition to the scores. The baguettes may not look perfect, but there will be some rustic look to them. I actually like it sometimes. I bake some of my bread seam side up to get that look.
Ana says
Whats the shortest possible time to leave in the fridge ? Could 2-3 hours be enough or is overnight absolutely necessary?
Victor @ Taste of Artisan says
Overnight is a must in this recipe. If you can only do 2-3 hours, that won't do much in this recipe. You could always skip cold retarding altogether, but the process and the flavor of the bread would change.
Anthony De Pasquale says
This came out perfect !
First time baking bread
I used a sheet pan for cooking
Thank You
Victor @ Taste of Artisan says
You are very welcome. Enjoy!
jaladreips says
I tried the recipe and the results were quite good. I didn't get the nice crust, but I blame being baited into doing 12min/12min bake because of the gas oven, next time I will try 15min/15min as recommended for electric ovens.
What issues could I encounter if I try to scale down this recipe? To 2 baguettes (2/3 of all ingredients) or even 1 baguette (1/3 of all ingredients). Will it be harder to do the stretch & fold?
Victor @ Taste of Artisan says
I would recommend to experiment with the time and even the temperature to see what results you get. Whenever I do that, I discover some really cool things for myself. As well, different ovens may bake quite differently, so you almost have to play with a base recipe to get optimum results.
If you want to scale down this recipe, it should be pretty straightforward. You may have a harder time to do S&Fs, as you mentioned, but it should be doable. It would have been a lot harder, maybe impossible, if you attempted to knead 1/3 of the dough in a stand mixer.
Good luck and happy baking!
Kevin says
I made 1 batch was decent. 2nd I figured out the active yeast because I don’t bake. It came out amazing. But I can’t figure out what I did n last batch was not proper. I think I didn’t give enough time after mixing. So it was watery and I added more flour. I think that was a mistake. Also I buttered it n came out way too crispy. Again, I’m doing active yeast where I mix the stuff if anyone can specify instructions great. Or I’ll try commenting again if I sort it out this time
Victor @ Taste of Artisan says
Sometimes it takes a little practice to get a consistently good result. I went through many batches before I figured out what works well and dialed in my recipe. Observe how the dough behaves. Make sure it ferments properly (2.5x - 3x volume increase). Also look for a 30-50% volume increase during proofing. If you get those two down, the whole thing will be fine. Happy baking!
Tina says
Can I make it without a baking stone????
Victor @ Taste of Artisan says
Yes, you can. Please, search the comments, this was discussed many time and there are some really good suggestions there. The simplest one is to use a stack of baking sheets. Good luck!
Nura A says
Just made this bread. Very nice simple to follow recipe although due to my oven, the bake didn't go as well as I'd hoped. Quick question, is the dough supposed to remain extremely sticky throughout? I mean it was sticking to my hands, the counter top, and even the grease proof paper. I assume this is what is needed for the lighter baguette structure?
Victor @ Taste of Artisan says
Hi Nura, the dough should be fairly sticky initially, but should tighten up by the time you are done with the third stretch and fold. It will be a bit tacky, but not very sticky. You can always reduce hydration by 2-3% and see if that works better for you. Sometimes, as you get used to the lower hydration, you can work your way back up. I like bread made with higher hydration, it's softer, moister, with a better crumb IMHO.
Martha Cerutti says
My husband and I work together making this recipe follow every steps, I feel that we did a good job considering it's our first time making French 🥖 I do have pictures. I can't wait to enjoy we my family 💗
Victor @ Taste of Artisan says
Glad to hear it, Martha. Enjoy!
LizDaBaker says
Fantastic and pretty easy to do for bread.
Victor @ Taste of Artisan says
Glad to hear it. Enjoy!
Tom says
Can you leave this out at room temperature to proof instead of fridge for 12+ hours?
Victor @ Taste of Artisan says
Tom, bakers consider time and temperature to be the ingredients. Which means if you ferment at room temp with the same amount of yeast, you will definitely overferment. I'd say 3 hours tops at room temp. Look for 2.5x volume increase. But without cold retarding in the fridge, the flavor won't be the same. Hope this helps. Happy baking!
Shannon Holland says
Just made it tonight it was so delicious. I was shocked. Thank you for the recipe!
Victor @ Taste of Artisan says
You are very welcome, Shannon. Enjoy!
Mika says
Can I use plain flour instead of bread flour ??
Victor @ Taste of Artisan says
Yes, all purpose flour will work.
XJ says
I took up a bread baking course last month and this is my 3rd attempt at making baguette at home. I must say this is the most successful bake so far. My family is very pleased. Thank you so much for sharing the recipe. The steps were very detailed and well explained.
Victor @ Taste of Artisan says
You are very welcome. Enjoy!
Dominic says
Great bread! I used bread flour for a slightly chewier crust and everyone thought it was amazing. I also liked using the parchment paper on a pizza stone. First time just follow the recipe and be patient.
Victor @ Taste of Artisan says
Glad to hear it, Dominic. I use parchment paper for most of my bakes - baguettes, pizza, bread, etc. It makes the process of loading bread so much easier and no issues with excess flour all over bread.
Lisa Symons says
A lot easier to make than it might initially seem and definitely worth it! Crunchy, a bit chewy and generally delicious!
Victor @ Taste of Artisan says
Enjoy!
Grai says
Absolutely love this recipe so so easy to follow and was a success my first try which made me very happy and they taste incredible- I made mine and put cream cheese sun-dried tomato’s and salami and it was so so delicious
Victor @ Taste of Artisan says
That sounds scrumptious! I am glad you had success with my baguette recipe. Thank you for your feedback. Enjoy!
Mil says
Can this be made with active dry yeast (not quick/rapid rise)? How would the affect the rising time?
Victor @ Taste of Artisan says
I used to make my baguettes with active dry yeast, but found they gave me inconsistent results. Make sure they are properly activate, get a nice foam cap, before mixing in. Then, the rest of the steps should be the same. Make sure fermentation is active before putting the dough in the fridge. Look for lactic acid smell and blistering on the surface of the dough. Also make sure the fridge temp is no lower than 38F. The dough should at least double before the next step. If not, take it out of the fridge in the morning and let sit at room temp until it does. 2.5 volume increase is what I target. Then follow the rest of the steps. Good luck!
Aydlette says
I’ve done this three times. While the shape of the baguettes is much better now, I can’t get the dough to rise very much, so it ends up dense. I’ve followed it step by step, but no luck. Any ideas?
Victor @ Taste of Artisan says
Poor rise will definitely cause dense crumb. Difficulty rising is usually the result of any or a combination of the following: bad yeast, too cold of a temperature, or not enough time to rise. I would try different yeast and see if that works. Also, check that temp in the fridge is 38F. Lower temps will slow down or even stall fermentation. Also, make sure that the dough goes into the fridge smelling of lactic acid and having blisters on top - a sign of active fermentation. You can also try letting the dough ferment for longer, like 24-48 hours, until you see 2.5x volume increase. Alternatively, take the dough out in the morning and let it sit at room temp until it rises, then proceed to the next step. Hope this helps. Good luck!
Sonya Freeman says
Any recommendations if using King Arthur unleashed bread flour? That’s what I had on hand.
Victor @ Taste of Artisan says
Both can be used interchangeably without any modifications to the recipe. I have both on hand all the time, I love KA flour, and have used both to make baguettes many times.
Sonya Freeman says
Thank you!
Chad says
Is the addition or omission of the honey affect anything other than the taste? Will the texture remain the same?
Was thinking of leaving it out, as I wasn't aiming for a "slight sweet taste", and aiming more for a savory approach
Victor @ Taste of Artisan says
The texture will be the same if you just leave it out.
Taso Lyristis says
What if instead of the stretch and folds, it was kneaded in a mixer? Would the results be different?
Victor @ Taste of Artisan says
Mechanical mixing kills the texture by ruining gluten networks. You will get more of fine-grain, gritty/crumbly, uniform texture with tiny holes, like what you see in most store-bought bread, as opposed to open crumb with large holes, and chewier texture.
Sean Mathis says
Brilliant! Took me 2 tries to get it right.
Just 12 min at 475 (wet) and 11 min at 450 dry and it's perfect in my oven (Kenmore convection oven).
Absolutely delicious. Feels like I'm back in France.
Thank you.
Victor @ Taste of Artisan says
You are very welcome. Enjoy!
Stevan B says
Bread tastes 10/10. Have made quite a few times now!
I can’t seem to get it as airy internally as the photo you have used.. seems more dense. Still some small air bubbles but not the typical ones you’d expect.
Any tips? Weighing everything, tried proofing for a little extra time.. saf Instant yeast and all purpose organic flour being used.. maybe need to stretch fold every 45 instead of 30?
Thank you!
Victor @ Taste of Artisan says
Hey Stevan, dense bread more often than not is the result of underfermentation. Some tips as per your request. 1 - Before putting the dough in the fridge, do make sure that fermentation started. Look for a slight increase in volume, strong lactic acid smell, blistering on the surface. 2 - Make sure your fridge is not too cold, aim for 38F. 3 - The dough must double in volume at the very least. 2.5 times better. 3 - during proofing the must increase in volume by 30-50%. All of those will ensure perfectly open crumb with large holes. Hope this helps. Let me know if you have more help with this, be happy to help.
Emma says
These turned out delicious! Pairs well with the jam I've been making.
I only have a smaller round pizza stone so I did the two shorter ones curved onto it first and the longer one curved onto it after. I also didn't realize the dye in the towel would come out in the water (it's a cheap old one so it didn't matter), but next time I will use a plain one.
Victor @ Taste of Artisan says
Glad to hear it, Emmma. Enjoy! Thank you for your feedback!
Judith McClendon says
I’m getting ready to make these but I’m by myself and only need one at a time. At what point could I freeze the other two unbaked or how would you suggest storing them if baked?
Victor @ Taste of Artisan says
Hello Judith, I would recommend baking all the way, cooling down, than vac sealing and freezing. When ready, pop it in the oven for 10 minutes or so and will be almost as good as fresh. Also, please search in the comments below, this was discussed at various times and some of my readers shared their techniques as well.
Peter P Kopcinski says
Best baguette outside of bakery in France.
Victor @ Taste of Artisan says
Thanks, Peter. I should say that it depends on the bakery. I had some lousy baguettes in Paris too. Enjoy!
Ana says
My husband made this bread per recipe but kept the dough together and placed it in a Dutch oven pot using parchment paper. Our family of 4 finished it in one afternoon!
I would like to make sourdough bread/baguettes with this recipe. Any suggestions?
Victor @ Taste of Artisan says
Ana, there are several ways to do it. You can use the same process but incorporate SD starter by substituting the equivalent amount of water and flour in the starter, and adding some, e.g. 2g of instant yeast. Alternatively, you can go 100% SD starter as you leavener. Use strong starter, say after 8-12 hours of feeding. Then ferment at room temperature until the dough increased in volume 2x-3x. Then follow the same process as described in the recipe. You can also cold retard. I like to cold retard proofing for my SD breads. Hope this helps.
Chris Hayes says
This is a great recipe. I didn't have a couche but just used a clean floured heavy towel instead and it worked perfect. I transferred directly onto my pizza stone with the pizza peel.
Victor @ Taste of Artisan says
Thank you. Enjoy!
Jason McClelland says
For me- I had to reduce the time significantly to 10+10 instead of 15+15 to prevent crust/outer layer getting too hard and chewy. At both ~6k foot elevation and sea level- both houses ~55% humidity.
Victor @ Taste of Artisan says
Thanks for chiming in. It's impossible to have the same timing for every baker as there are too many factors at play. Ovens do bake differently, sometimes very much and adjustments are needed.
Angela Terradista says
Does the water have to be warm? About what temperature?
Victor @ Taste of Artisan says
Room temperature, about 68F-70F (20C-21C)
Celine says
The recipee is perfect, bread turns out excellent
Victor @ Taste of Artisan says
Thank you! Enjoy!
Kellea says
Do you have a tiktok or instagram with videos?? so we can follow you 🙏🏽
Victor @ Taste of Artisan says
I am not on tiktok but I do have an instagram and YouTube accounts. I'll do my best to start posting there as well, it's been on my mind.
Kellea says
Absolutely love this recipe!! Taste of Artisan is on point with this one!!! Best homemade bread by far, and easy to follow.
Victor @ Taste of Artisan says
Glad to hear it. Enjoy!!!
Caitlin says
I’m very excited to try this! Question - if you let it sit in the refrigerator longer than 14 hours is that going to mess things up? I was hoping to prepare the dough/stretching etc this morning and then bake it the next morning but that would be about 18-20hrs in the fridge.
Victor @ Taste of Artisan says
No, you can go up to 48 hours, but overnight works perfectly fine with good flavor building up in that time. The longer the dough sits in the fridge the more tart it becomes and I noticed that after 48 hours it begins to change the structure and I didn't like that. Up to 48 is fine. Good luck!
James says
What temperature should the water be?
Victor @ Taste of Artisan says
Room temperature.
Blawson says
Can you let this proof in fridge for as long as 24 hours.
Victor @ Taste of Artisan says
Yes. IME, up to 48 hours is fine.
[email protected] says
Appreciate your response!!! Thx!!,
Victor @ Taste of Artisan says
You are welcome!
Nina says
I’m not sure what I’m doing wrong. I used a scale for the ingredients and followed the stretch and fold instructions, even did the extra hour but somehow the dough never held its shape like in the pictures. It stayed very sticky and just flopped into the shape of the bowl.
Victor @ Taste of Artisan says
Nina, sometimes ambient humidity may have a big impact, sometimes it can be the flour. I can suggest trying two things. One, try a different flour. Two, drop hydration by 2%-3% and see if that helps. If that doesn't work, let me know and I will help you figure it out. Take detailed pictures along the way, it will be helpful for troubleshooting.
Courtney says
I'm usually not the type to comment on these but this recipe is absolutely phenomenal. This was my first time making baguette. Bread in general really any attempts I made 15 years ago in my 20s was just I don't even count those lol.
I don't even know how these could possibly have turned out more perfect than they already did. I chose this recipe in particular because of all the pictures I saw of other baguette recipes, This one had the interior that was less dense looking like you could tell there were some bigger bubbles. A lot of the other ones I looked at had a very dense type small crumb and that just doesn't feel like baguette to me, and I saw this one and I was like that's it. that's perfect. that's what I want mine to be.
I followed the recipe exactly as stated. Measured everything with my scale in grams. Watched a couple videos from the King Arthur brand on how to shape baguettes and I even gave them a little dusting with the rice flour which was another tip I saw somewhere on top before scoring.
Let it cool down to room temp and I finally got to try one it was the best thing I ever tasted. Like I literally don't need to ever buy baguette again. I think of how much money I wasted at sprouts lol..
And this one I made it all in one day too. I was wanting some same day bread so I skipped the overnight cold for men because I was in a hurry and even still it turned out delicious. Can't wait to try it with more time to do the overnight. This is turned me into one of those bread people now who will be making their own bread
Victor @ Taste of Artisan says
Hi Courtney, my apologies for the delayed response. Thank you very much for the detailed feedback, I love reading them. I am very happy that you were successful at making French baguettes so quickly. That was my goal when I wrote this recipe and the detailed instructions. When I first ventured into baguette making, I experienced many failures at first, so I experimented a lot and created a recipe (easier part) and the process (a much harder part) to make a fool-proof process to make a perfect baguette every time. I am happy that I was able to help so many people do that. That's the goal of this blog post, and my entire blog for that matter. Again, thank you for taking time to write such a detailed feedback and happy baking. Please, try my other recipes, there are plenty of great recipes here on my blog.
Lary says
This recipe is perfect! It is the best bread I've ever made, thank you
Victor @ Taste of Artisan says
Thank you for the compliment, Lary. Enjoy!
giuliana says
making this today! in the first step, the dough looks quite shaggy; should i knead until it’s smooth and then rest for 15 minutes?
Victor @ Taste of Artisan says
You don't need to, as long as you measured the ingredients in grams. It will tighten up as the gluten develops.
giuliana says
yup everything in grams, i’m not from the US. that’s exactly what happened 🙂 now chilling in the fridge, can’t wait for tomorrow! will come back with updates. thank you!!
Mama_V_10 says
I haven’t made this yet because I want to get it just right and need feedback before I give it a shot.
I just mix all the ingredients in a bowl and let it sit for 15 min? No need to proof the yeast first?
I don’t have a baking stone, can I use my regular baking sheets?
We are a large family, can I double this recipe or would I need to make two separate bowls to get 6 loafs?
Victor @ Taste of Artisan says
Correct. No need to activate the yeast AS LONG AS you use instant yeast.
No baking stone, no problem. If you search the comments, many of readers used other tools. A stack baking sheets will do too. I've done it. The goal is to increase stored heat to give the bread an good oven spring. A single sheet will cool down very quickly as soon as you put cold dough on it.
Yes, you can double the recipe and only split when actually beginning to shape individual baguettes. Good luck!
Fathin says
I want to know, what is the purpose of letting it be in the refrigerator for 12-14 hours? And if I don't do it and just baked it after shaping it, what is going to happen with the bread?
Victor @ Taste of Artisan says
Spending some time in the fridge, called 'cold retarding', slows down fermentation and gives the dough time to develop flavor. That's what makes bread taste good. You can, of course, let it ferment quickly at 80F, shape, poof and bake, but that bread won't taste good. You can get similar from a grocery store.
Fiona says
I love your recipes, and have made these a few times. I have a question about this section of the instructions:
MY QUESTIONS ARE IN BOLD PRINT
Shaping baguettes
Turn the dough on a lightly floured surface. Divide into 3 equal pieces, shape into rectangles and let relax for 45-60 minutes. WHAT SIZE ARE THE ORIGINAL RECTANGLES? ABOUT THE SAME AS THE UPPER LEFT AND UPPER RIGHT IN THE PHOTO?
Stretch into rectangles BIGGER THEN? and roll USING A ROLLING PIN? each rectangle as shown below AT FIRST I THOUGHT ROLL THE CYLINDER< BUT SINCE THIS STEP BECOMES BEFORE THE CYCLINDER IS MADE< NOW I WONDER IF YOU MEAN WITH A ROLLING PIN?. Start with the longer side, fold it inside the rectangle and seal the seam with your thumb. Do it tightly enough but being careful not to degas the dough. Repeat two more times ON THE SAME RECTANGLE? until you formed a cylinder. I AM NOT SURE WHAT EXACTLY IS BEING REPEATED TWICE?
And further questions:
I am weighing ingredients, but my dough is very sticky. When I used quality parchment paper the bread stuck when cooked (irretrivably), so I now add a bit more flour to the recipe and then put a genrous layer of flour on the baking surface. I experimented with flour and corn meal, but the flour seemed to give the best results. Do you have any other suggestions? Thanks!!!
Victor @ Taste of Artisan says
Hi Fiona, apologies for the delay with the response. Yes, the size of the rectangles as in the photo, about 4-5" by 7-8" or so. Yes, stretch them into slightly larger rectangles and roll into cylinders, kind of like you do cinnamon rolls. No rolling pin. By hand. Gently. As little degassing as possible. Repeat meaning repeat with the other other two rectangles, as you are starting with three.
If you find that the dough is still too 'wet' for your comfort, decrease hydration by 1-2%. Once you get comfortable, you can work your way back up. Or just stay at the lower hydration if you are more comfortable working with it and like the results. Happy baking.
'
Green Baker says
Hello, i am a little confused about the 3 sets of stretch and folds. In each set, do you stretch the dough anf fold it over exactly once and then conver the dough up. The. 30 min later, stretch and fold once, then cover. Then another 30 min, stretch and fold once then cover?
I am an inexperienced baker and have beeen reading that people stretch and fold at least 200-300 slaps. So I am not sure how many time I need to stretch and fold within each set.
Thank you.
Victor @ Taste of Artisan says
Green Baker, each S&F has 4 stretches and folds. Imagine the dough having 4 corners. So, you'd want to stretch and fold each of those corners once per S&F session. Check out my Focaccia Recipe, I put a link to my video in that recipe that shows the process of stretching and folding. It's identical to what you'd want to do in this recipe. Good Luck!
Jessica says
These turned out great, although I forgot to take into account I have a convection oven and the first bake at 15 and they were done - the crust was almost burned. So, definitely watch them closely on the first bake. Beyond that, this was the best and easiest baguette recipe I’ve used! And I bake a ton of bread - at least a loaf a week.
Victor @ Taste of Artisan says
Glad to hear it! Thank you for your feedback, Jessica. Enjoy!!!
PJ SUTHERLAND says
I’ve been making this recipe for about 6 mths now - the baguettes are perfect - even had my grand kids make with me one day. Theirs were as good as mine! I use bakers flour .
I just place the baguettes onto baking paper and slide onto oven rack - don’t need a stone. My neighbour commented that this recipe is as good as any baguettes she’s had in France!!
Thank you for sharing your recipe
Victor @ Taste of Artisan says
Thank you for the kind words, PJ. Glad you like my recipe. Enjoy!
Sky says
Hi, I've made these a few times, and they're absolutely amazing! However I would like to know, If I decide to split the dough into 6 to make smaller baguette, is the baking time the same or not?
Victor @ Taste of Artisan says
Glad to hear that, Sky. If you make smaller baguettes, if they are thinner, baking time will be shorted. If you make them the same thickness, but shorter, the time is about the same IME.
Ian says
If I’m using fresh yeast instead of dried/instant, how many grams should I use?
Victor @ Taste of Artisan says
I don't use fresh yeast, so I don't have a clue. But as far as I recall, it's typically 3x fresh when subbing for dry.
Phil says
Looking forward to making this! How big should my baking stone be? That is, how long are your loaves?
Victor @ Taste of Artisan says
The bigger the better. My baguettes are roughly 16 inches long.
Jodi Leuer says
AMAZING Recipe!
Gino says
I have a nice piece of granite, could I replace that for a regular pizza stone?
Victor @ Taste of Artisan says
I don't think granite can be used as a replacement for a pizza stone. Look for Cordierite, you can find it in pottery making supplies. Kiln shelves.
Irma says
I made a couple of mistakes with this recipe. It started out by taking a chance using the yeast i have which is the one you said not to use. I live in the SE US and with 7 minutes left to go my bread looked like this. Still delicious but overbaked. Very crusty tho! Will try again.
Victor @ Taste of Artisan says
Practice makes perfect. Good luck.
Michael Mendez says
This worked out perfectly! You need to watch the rises and adjust accordingly because of different factors: room temperature, humidity, and flour and yeast. I also added a small amount of starter to give it a slight twinge of sourness. I also used a steel plate instead of a stone, which worked well and cut baking time down by about 25%. Thank you so much!
Victor @ Taste of Artisan says
You are very welcome, Michael. You are right, those are important factors and can have a big impact sometimes. The good thing is once you have 10-15 bakes under your belt, you start to 'feel' the dough and start accounting for those factors on the fly, without thinking twice about them, and the process becomes more intuitive and effortless. Happy baking!
Laura says
Can I leave the dough in the fridge for longer than 14 hours? Say 24?
Victor @ Taste of Artisan says
You can leave it in the fridge for up to 48 hours.
Mr Peter Collett says
Just made for first time. Look very nice. Will make more when we have baguettes. Won't buy them ever again. I've made bread for few years now. But these baguettes are off the scale.
Victor @ Taste of Artisan says
😉 Glad to hear it. I am of the same opinion 🙂 Love them!
Alan Nisbet says
Great recipe. They turned out great. I’ve made bread many times with no success, bug this is the real deal. I want to make mini baguettes like a local bakery and make nice thin little sandwiches with them. So delicious and the smell in the house is heavenly. Thank you!
Victor @ Taste of Artisan says
You are very welcome. Enjoy!
Harley says
I have active yeast or stater. Could I use that instead of the rapid rise?
Victor @ Taste of Artisan says
Yes, you can. I used it a long time ago. It works but I couldn't get consistent results so I switched to instant yeast. It's been fail-proof for me.
Chin says
Thank you for sharing the recipe. I tried and turned out, as my daughter put it, looked and tasted "legit" even though i did not let the dough rest after taking out from the refrigerator. I shaped the dough into cylindrical shape and proofed it for 40min immediately after taking out from the refrigerator. May I know what is the purpose of resting the dough before shaping into cylindrical shape? And how will that affect the final taste and texture? thank you.
Victor @ Taste of Artisan says
LOL Great to hear it. I let the dough rest after cutting it in to pieces and pre-shaping into rectangles to let it relax, otherwise it often tightens up and shaping it into logs becomes challenging. If you are super careful and gentle with it, it should work too. Happy baking!
Pat S. says
Has anyone ever tried freezing the dough right at the stage when you are supposed to put it in the oven? If so, can it be cooked from frozen?
Victor @ Taste of Artisan says
I haven't but I've seen some stores sell pre-shaped and fully proofed bread dough ready to bake. The end result may be a little different though. I sometimes freeze my pizza dough but let it proof at room temp after defrosting in the fridge and I do see a difference in the final product. But it sure saves time and makes prep easier.
Alex says
This is the best baguette recipe! I've been making baguettes for a while and now have neighbours asking if I will make them a batch for their holiday dinners. I now have an Emile Henry baguette maker, not the mini but regular size. I followed the recipe and think the amounts need adjusting as the dough went outside and baked under the lid. Has anyone adjusted the amounts?
Thanks! Your focaccia recipe also gets rave reviews.
Victor @ Taste of Artisan says
Hi Alex, glad to hear it and thank you for the detailed feedback.
I recently bought the HR baguette baker as well to test it out. So far, I've only made one batch and I also noticed the same that there is too much dough for it. Mine didn't get out but the baguettes swell and almost touched each other, resulting in poor browning in those areas. I will experiment a little more with it and post my results.
Khay says
Tried this recipe today wasn’t able to rest it long enough. Rested for 8 hours and it was a lovely baguette. No big air pockets understandable due to the underproof.
Lovely recipe would bake again
Victor @ Taste of Artisan says
Good luck!
Diana says
After reading all the great reviews I’m going to give this recipe a go. I’m a little gun shy though. I’ve tried making baguettes in the past and they always came out perfect. Since we moved to a small town 1 1/2 hours north (north central Alberta Canada) every type of bread I make is gummy in the middle. Any tips or insight as to why this suddenly happening before I try your recipe? Thanks in advance!
Victor @ Taste of Artisan says
There are many reasons for that - under fermented dough, underbaked bread, etc. If something worked, then stopped working, you need to figure out what changed. New yeast? New oven, obviously. New flour? New environment - humidity? The best way to troubleshoot is to take good notes and pictures along the way, then analyze what went wrong. I hope with my recipe it will work perfectly. My intent was to make it bullet-proof for anyone and so far most of my readers had success with it. Good luck!
Chef Rose says
Sounds like the altitude may have impacted your baking. Check the alitude and adjust if your closer to 5000 square feet.
CORINE FITZGIBBONS says
Love this recipe. Any recommendations for how to store the loaves?
Victor @ Taste of Artisan says
Glad to hear it. I let them cool down to room temp and wrap tightly in plastic. Some of my readers freeze them and reheat in the oven. You can find several comments in the comment section about that. Happy baking.
Tracy says
Fantastic baguette! The recipe makes enough to share... My neighbors love me. 😊
Victor @ Taste of Artisan says
Enjoy!
TP says
Thanks for the recipe, looking forwards to trying it!
Can I assume these baking temperature are for fan forced ovens? Thanks 🙂
Victor @ Taste of Artisan says
You are very welcome. Sorry, I don't have any experience with fan forced ovens and can't comment on that. I bake my baguettes without convection.
TP says
Noted, thanks for the feedback. I’ve made them twice now and learnt the first time that I shouldn’t have used a convection oven; I had to take them out after only 18 minutes of bake time the first time around. Non-convection it is for future bakes!
Victor @ Taste of Artisan says
You are welcome. Happy baking!
Eileen Pomeroy says
This is the first time I’ve made this recipe. Having followed it exactly, I am so pleased with the result. I used 2 sets of baguette tins I am lucky to have, and the baguettes look great. The only thing I did was not use plain flour, I forgot, as I’m so used to using bread flour for bread! But the truth will be in the eating, which, will come a bit later! I have taken a photo ,but I couldn’t attach it!
Victor @ Taste of Artisan says
So happy to hear that, Eileen. I emailed you. Please, respond with your photo and I will attach it to your comment.
patty says
I love making homemade bread but, I don't live in Europe or Canada so I hate it (unnecessary anyway) when recipes are mentioned metric. AND, I do not use a scale most times. I also find especially for bread that it doesn't matter. If the dough needs to be wetter or drier, then....duh, add more water or flour to satisfy the situation. The only time I don't get the end result I want is if I add in whole wheat (not all white) flour, or underbake it. 99 % of the time it comes out great ! So, all those recipes direction on rolling this, and stretching that and rising all day...gimme a break. But, I do appreciate the detailed instructions if one is so inclined to do it that way. And, I do agree you need to use parchment paper if baking on a stone. I use a dutch oven sometimes (great bread) but you need to use 2 pieces of paper on the bottom of the pan otherwise the bread will burn before it's done.
I have checked a lot of recipes and yours is using exactly the ingredient amounts I do. I make 2 baguette loaves (not 3) If I am not using dutch oven.
Victor @ Taste of Artisan says
I'll start with saying that bakers all over the world, including USA, use metric measurements to formulate their recipes. Metric measurements are precise and produce repeatable results. Most, if not all, books written by american bakers use metric measurements, e.g. Michel Suas's (well-known baking and pastry chef and founder of the San Francisco Baking Institute) Advanced Bread and Pastry, Chad Robertson's (one of the best American Bakers out of San Francisco) Tartine Bread and other of this fantastic books, Ken Forkish's (he runs an artisanal bakery out of Portland Oregon) Flour Water Salt Yeast, Jefrey Hamelman's (he is one of the few Certified Master Bakers in the United States) Bread: A Baker's Book of Techniques and Recipes... some, like the last two include 'cup & spoon' imperial measurements, but the recipes are written for Metric and US measures in grams and lbs/ozs respectively. The main reason is that cups and spoons are notoriously imprecise and produce inconsistent results.
I can agree with you that in many/some recipes it doesn't matter and that you will get good/passable/sometimes even excellent results. But it begins to matter when you want replicable results, optimal/best results, consistent results. Then it matters a lot. Some recipes are less forgiving and it matters a lot. The results between very hydrated flour (freshly milled, stored in very high humidity, or used in very humid environment) and dehydrated flour can be dramatic. Everyone's flour and environments will be different and precise measurement will help level out the playing fields for all bakers.
That said, I am happy that your approach works for you. I am all for simplicity if it works. Happy baking!
David Swanson says
Hi, a few questions.
Do I assume I soak the yeast in the water for a bit? With or without the salt and honey?
How long should I mix?
Do I transfer to an oiled bowl to rise?
What is the 1 tablespoon of water for? The steaming?
Thank you.
David
Victor @ Taste of Artisan says
Hi David, no soaking is needed if you use instant yeast. You need activation if you use active dry yeast, but I don't recommend using it.
Mixing is done until the all ingredients are uniformly distributed.
You don't need to oil the bowl. I don't.
360 g water equals to 1 1/2 cups (water) + 1 Tbsp (water).
Great Baguette Recipe says
I am saving ths one for the books. It made delicious baguettes- perfect recipe for a snow day like today.
Victor @ Taste of Artisan says
Enjoy!
Anita says
Hi. I've been baking your baguettes for 2 years and my family loves them. My baguettes shape isn't perfect but the taste is the best. Thank you very much. Greetings from Norway
Victor @ Taste of Artisan says
Wow, all the way from Norway! I am very happy that you and your family love my baguette recipe, Anita. Thank you for your feedback. Happy baking!
Mary says
Can I leave the dough in the fridge for 2 nights?
Victor @ Taste of Artisan says
Up to 48 hours is fine based on my experience.
Em says
Hello and thank you for the great recipe.
How long can the dough safely wait in the frig?
- I was thinking of making two batches, one for two days in a row.
Victor @ Taste of Artisan says
Hello and apologies for the late response. I find that up to 48 hours is fine, and after that the dough beings to deteriorate, though I've seen some people suggest up to 5 days is good. Happy baking!
Kathy Charest says
Thank you for this recipe. Although the baguettes are cooling and I haven't tasted them, I feel they are going to be lovely. I did have one issue though, and I think it lies in the temperature of my home/kitchen. May I ask what your average home/kitchen temp is? My dough was rising well, TOO well. I had to cut the times down a little bit on day two and unfortunately I wasn't able to score deep enough as I feared they would deflate. However, I managed to wrangle them into the oven and bake (on my baguette pan). I'll try this recipe again, perhaps using my sourdough starter and see if that slows the rise down a bit. 🙂
Thank you again, can't wait to taste!
Victor @ Taste of Artisan says
You are very welcome, Kathy. My kitchen is around 69F-70F during warm months and 67F during cold months. There several things you do to control the fermentation/rise - use cooler water, less yeast, or have a shorter fermentation time. Hope this helps. Happy baking!
Angela says
Hello,
I have a baking steel. Would that work just as well as a baking stone?
Thank you,
Angela
Victor @ Taste of Artisan says
Yes, both work very well. Good luck!
Amanda Wiseman says
This recipe has never lead me astray. They’ve turned out ever since time. So happy to have delicious homemade baguettes!
Victor @ Taste of Artisan says
Glad to hear it. Enjoy!!!
Angie says
Great recipe and I definitely had better results once I purchased a baking steel. I'm slightly confused by the stretching - am I supposed to stretch 3 times in total and if so, am I supposed to stretch after the first 15 minutes of rest? I ask because right now I'm stretching it after the first 15 minutes of rest - but if this is the "first time", and I'm stretching 3 times in total, then I'm only actively doing something for another hour (vs the 1.5 hours listed in your instructions). I'm erring on the safe side and stretching 4 times as a result, but would love the clarification. Thanks!
Victor @ Taste of Artisan says
Angie, glad to hear it. About the stretches and folds, here is what you do: mix the dough, let it rest for minutes. The the first set of S&Fs, let the dough rest for 30 min, another S&F and a 30 min rest, then the final S&F. Yes, 3 S&Fs in total. Hope this helps. Happy baking!
Emily says
Thank you for this recipe! I've made these several times now and they've turned out really well. I use a baguette pan rather than a stone, which works fine. For baking time, the 12 minutes with steam and 12 minutes without worked best for me. I also tried with Caputo flour and loved.
Victor @ Taste of Artisan says
Fantastic! Glad to hear that. Enjoy!!!
Jamie F says
How do you slide the baguette onto the baking stone? Mine stuck to the parchment paper.
Victor @ Taste of Artisan says
I bake on the parchment paper. If you want to slide them off, put them on a wooden pizza shovel dusted with flour and they will slide off quite easily. But it's a messier way so I now bake on parchment paper exclusively.
Karli says
Just tried this recipe! For someone that is pretty terrible at making bread, I enjoyed the outcome of this experiment. I especially have some results for those people who maybe don't have all the fancy bread-making equipment and are inexperienced in bread-making.
You're not alone! I didn't use any expensive main-brand ingredients, just some Great Value all-purpose flour, some (probably fake) honey from the Dollar Tree, random cupboard salt, and some no-brand bottled water. I did use Red Star Active Dry Yeast, that's about the most expensive thing to be honest. I don't have a scale, so I had to use measuring cups and spoons.
Error #1 occurred when I overlooked the fact that I had Active Dry Yeast, not Rapid Rise or Instant. I used room temp water which probably didn't help the yeast activation too much. I noticed the dough had difficulty rising, and after sitting in the fridge for around 18 hours, it still didn't look too promising.
Error #2 is I believe I misunderstood the whole stretching and folding aspect, my dough was pretty tough still (probably from error #1) and I ended up just grabbing the dough, stretching it out between both hands, and folding it in upon itself and flipping it upside down in the bowl.
Error #3 is that after the whole waiting overnight ordeal and not seeing much progress, I attempted to proof it some by putting it in my oven on the lowest setting with the door cracked so that it wouldn't get too hot-- spoiler alert, it got a little too toasty and I ended up with a layer of par-cook/dried dough on top that I had to peel off (yikes).
After that, I also skipped the step of forming it into rectangles because it appeared that the time it spent in the oven managed to overproof the dough, as it didn't hold its shape very well and seemed to deflate easily. I didn't want to degas it completely, so I just cut the dough into 3 not exactly equal chunks and did a simple stretch and twist to get it into a cylindrical shape really easily. I used a sharp knife to score the dough in three spots, which was probably the thing that went the smoothest during this whole ordeal.
I do not have a baking stone, a baker's Couche, a pizza shovel, or even parchment paper. I didn't have any baking sheets that stacked nicely either. So I had to really get creative. I ended up choosing my largest baking sheet, dusting it in a severely light coat of flour and dumping off the residual flower, and heating it in the oven as it pre-heated. I turned a burner on the stovetop to medium to try to maintain some of the heat from the baking sheet, as I pulled it out and quickly placed my baguettes on it before rushing it back into the oven. I followed the heating and baking instructions pretty well. I have a conventional oven that's older than the hills, but it maintained moisture pretty well since it didn't have any fans or much of an exhaust for excess gases. I ended up baking them for 13 minutes, pulling the towel pan out, and baking them for 9 more minutes, and they were pretty good. Considering all of the mishaps along the way, they rose pretty decent and got a really good crust. If you plan on using yours to make a toasted sandwich like me, you might want to undercook them a tad, because they ended up getting a little too dark with the prolonged oven exposure of melting the cheese. They also had a good amount of fluffiness and chew to the inside, and had plenty of air pockets despite everything.
Overall, I found this recipe to be very successful for me and very forgiving. I only tried making bread one other time from scratch, which was a simple loaf of white bread and I completely butchered it (it was inedible). I would give it 10 stars if I could! I plan on trying again in the future, correcting my initial mistakes. 🙂
Victor @ Taste of Artisan says
Hi Karli, thank you for the detailed feedback, I am sure many of my readers will appreciate learning about your experience. I am glad you liked the results, though there is clearly room for improvement, and, I assure you, every next batch will be much better and very soon you will be making jaw-dropping, mouth-watering, scrumptious baguettes. Guaranteed! And you are right, there is no need for fancy equipment in order to make good bread. It was quite some time before I accumulated certain baking things that make my bread baking easier, more convenient, with, perhaps, a bit better results. But, they aren't mandatory by any means. Happy baking!
RQ says
This started off positive because I also don’t have any special supplies, went into a train wreck where I thought I most definitely will not be making this recipe and ended on a pretty positive note. What a hilarious comment I love it and I’m definitely trying this bread
Gary Cremieux says
I’d like to use my bread machine for steps one and two then proceed according to your instructions. I do this for various other breads like challah and focaccia.
What are your thoughts?
Victor @ Taste of Artisan says
I wish I could help but I've never used a bread machine. Perhaps someone who has will chime in here.
Matthew says
Hello - I have a Cuckoo brand bread maker and I tried using the MIX (15min) cycle to mix everything, and it was OK. I used the DOUGH (1h30m) cycle to both mix and rise the dough, then put it in the fridge overnight, then followed the instructions to let it rest at room temperature, then bake. Results were phenomenal and saved much of the dough mixing/kneading steps. Strongly recommended!
Mark Rocklin says
Only baguette recipe that comes close to bakery.
Don’t have a couche or a stone so had to wing it.
Victor @ Taste of Artisan says
Glad you liked it. We've all been there. The things I used before I upgraded my setup 🙂
Gregory Tischner says
I followed this recipe to the exact specifications and instructions however, the spring was not very large (didn't rise much during the baking process) and the crumb was tight, akin to a heavy, rustic, italian bread (crusty on the outside and more dense on the inside). There is no mention in the instructions that when using an instant or active rise yeast, the water temperature requires a range of 100F-110F to be activated, which I followed on the packet as well. I used a Francine brand My Wheat flour as well.
Victor @ Taste of Artisan says
Lack of oven spring and tight crumb is a sign of under-fermentation and/or under proofing. It could be due to bad yeast, insufficient fermentation/proofing time or low temperatures (ambient or fridge). My rule of thumb is that the dough must double to triple by the end of fermentation and gain 30-50% in volume during proofing.
There is no mention in the instructions to use 100F-110F water because it's NOT NEEDED for instant yeast. I think you are confusing it with Active Dry yeast. 100F–110F is the ideal temperature for Active Dry Yeast. I stopped using AD yeast about 10 years ago as it was a hit or miss. Very unreliable. I use SAF Red and SAF Gold instant yeast, it works well. 100% of the time.
Gregory Tischner says
And, being professionally culinary trained, I’m used to using dry active yeast but it’s been awhile so I forgot to proof it as well, otherwise the outcome would have been much better. Thank you for the clarification! 🙏
Victor @ Taste of Artisan says
You are welcome. Good luck!
Kerri Stoner says
The perfect bread every time!
Victor @ Taste of Artisan says
Enjoy!
M Pos says
Hi there! Thanks for the recipe!
I'm making this today for the first time (birthday party, fingers crossed).
My question is, can I use bread flour? Would the amounts be the same? What's the difference, would it be chewier?
Victor @ Taste of Artisan says
Bread flour will be fine, no adjustments needed. I once tried this recipe with high gluten King Arthur flour (Sir Lancelot) and they still turned out really good. Yes, a touch chewier, but not overly so. Everyone liked them. Good luck!
Liza says
Any substitute for parchment paper, or is baking directly on the stone just as efficient? Wasn’t sure if the parchment affects baking or is more so for less mess. Should I flour the stone if baking directly on it?
About to take it out of the fridge! Excited to see the results. Thanks for the recipe!
Victor @ Taste of Artisan says
Liza, baking directly on the stone is how baguettes have been made for centuries. That's the way to do it. You don't need to flour the stone. What you do is you flour the pizza shovel or a similar tool that you will use to transfer the baguettes onto the stone. Flouring the pizza shovel will allow to easily slide the baguettes off on to the baking stone without sticking. I used this method for several years and got tired of it as it's messy and trickier to use. I also don't like the residual flour on my baked baguettes. I once tried baking on parchment paper and loved the results; it was a lot easier for me, a lot less messy, and baguettes looked better, so I switched to this method and never looked back. Good luck!
Dave says
Not all parchment paper is created equal. Cheap dollar store paper might only be rated to 400 degrees. Probably would be fine, but you’d only have to be wrong once to burn your kitchen down. Check the side of the box for a temp rating. Thanks for the recipe!
Victor @ Taste of Artisan says
You are welcome. Good point. Always check the temp rating. That said, I mostly use Kirkland brand parchment paper from Costco. It's rated up to 425F, at least that's what it says on the box. I don't know what what that rating means exactly, though. Is it the temperature at which the parchment paper remains intact structurally and color-wise? Probably. Is this a very conservative rating to prevent any issues? Also likely. I've taken this (and other brands) parchment paper all the way up to 485F-500F and the worst that I've experienced is the paper becoming brown and brittle. Here is an example of my Kirkland parchment paper that I used to bake two bread loaves this morning in ceramic bread cloches lined with parchment paper in my gas oven.

The cloches were preheated to 500F and once loaded with the dough on parchment paper, the temp was dropped to 485F for the first 22 minutes and then 450F for the remaining 25 minutes. This is about the darkest I've seen parchment paper get for me.
You can always bake without the parchment paper if you are concerned, but parchment paper sure makes things easier. I've been baking bread and baguettes on parchment paper for many years without any issues. When baking at temps up to 450F, I even reuse them sometimes. At higher temps, they become brittle and no good for more uses.
All that said, always keep a close eye on the baguettes the first time you bake them so you can make quick adjustments if needed. This applies to any recipe. Happy baking!
Tika Newman says
The bread was delicious! The only issue is that when removing the dough from the parchment paper, it sticks. Next time I will flour the parchment first.
Tika Newman from Chew Wanna Eat?
Victor @ Taste of Artisan says
Removing from parchment before baking or after? I bake on parchment paper, never had sticking issue. The only thing I can think of is maybe hydration was too high. You could drop it by 1-2%. Enjoy!
Elena Lim says
Your recipe and method is amazing.
I'm having GDM now, will this work with wholemeal?
What alterations would I need?
Victor @ Taste of Artisan says
Whole wheat takes in more water so you'd typically need to bump the hydration by 1-2%, but I find that it's not usually necessary in this recipe. You can substitute 1:1 and it will be just fine.
Troy S says
First time Baker, I have to say I followed your instructions and everyone was blown away. So good. Amazing crust, soft center, big air pockets incredible flavor. It felt like we were back in France. We keep our home at 64 degrees (Northern Indiana winters) so I had to go a little longer before the fridge but it was spot on with the sour milk smell and turned out great. I can’t wait to try baking other things. Great step by step instructions. Fantastic teacher!
Victor @ Taste of Artisan says
Happy to hear that, Troy. Feedback like this makes my day. I love when my readers have success with my recipes and enjoy delicious, homemade artisanal food. I will be posing many more of my favorite recipes, just need to find time for that. Stay tuned!
Tony says
This was my Christmas Day pleasure, I followed the instructions but found my oven running on bottled gas does not make 500 degrees. It makes about 475 according to my thermometer. Have you any advice on the cooking time based upon the 475 degrees?
Thailand is not renowned for bread making or consumption so finding flour is a hit and miss affair. The flour I used was from the local Macro but it appears it needs more water than the recipe as it was good but not great. In the end the baguettes tasted good but not those in my village in France. Any advice will be appreciated. HNY to you all.
Victor @ Taste of Artisan says
Tony, 475F should be fine, as I preheat to 500F then drop to 475F for baking anyway. My oven goes to 500F, but sometimes I need more, so I run it at 500F with the fan on (convection), so that may be a way for you. Hope this helps.
Nina Rogoff says
What can I use if I don't have a baking stone and should I make any adjustments to temperature or baking time as a result? Many thanks!
Victor @ Taste of Artisan says
Nina, I recommend searching the comments as many of my readers commented on various ways the successfully baked baguettes without a stone. Essentially, you want something that will store plenty of heat to give the dough a good oven spring. It can be 2-3 baking sheets stacked on top each other. You can use baking steel, unglazed tiles, etc. There is no need to adjust the temps. Good luck!
Ann says
This is maybe the fourth or fifth time I’ve made these baguettes and they are literal perfection. Have you had any luck freezing them? I don’t typically freeze baguettes since they tend to dry out easily but figured I’d ask. Thanks!
Victor @ Taste of Artisan says
Glad to hear that. I don't freeze my baguettes but I've received a lot of feedback from my readers who did and they reported success freezing then reheating in the oven.
Steph G says
Hi Ann - I always freeze 2 of the baguettes (or we would just devour them in one day!)
Defrost at room temperature (or 1 min in the microwave if you're in a hurry), then a blast in a fan forced oven at 200°C for about 6 mins restores the lovely crunch of the crust.
Jill Blomquist says
I’ve made this several times and it comes out great!
I would like to make rolls with the dough. Do you think it would work?
Victor @ Taste of Artisan says
Hi Jill, glad to hear it. Yes, you can. I actually did and they weren't bad. Though, I personally prefer rolls made with the dough from these recipes: Pampushki, Vanishing yeast rolls, or my challah recipe. Good luck!
Will says
Didnt get big air bubbles like in the picture, but super good flavor! Best bread ive made.
Victor @ Taste of Artisan says
Glad to hear it, Will. With some practice, I am sure you will perfect this recipe and get perfect bubbles. Enjoy!
Susan Miller says
The dough was great and easy to work with. I had trouble with the baking temperature. I heated my oven to 500 degrees and reduced it like you said but, after the first 15 minutes when the bread was to be turned and water pan removed, my bread was done. I temped it and it was 210 degrees. The crust was also getting dark. I may have had the stone too high - just one rack up from halfway. I don’t know, maybe cut the temperature to 450 degrees for the first 15 minutes? It’s a new Wolf oven and I haven’t seem to have had trouble with it running too hot before. Any suggestions?
Victor @ Taste of Artisan says
Looks like you missed step #9 - "Open the oven, taking caution not to get burned by steam, and slide the baguettes off onto the baking stone. Close the oven and reduce temperature to 475F. Bake for 15 minutes". You need to preheat the oven to 500F but drop to 475F immediately after putting the baguettes in.
Maxime Couture says
Hello, currently making his recipe and the dough seems very wet and sticky is that normal? Also I saw you use la milanaise T 55 is that their pizza flour? Can I use that one for the baguettes?
Thanks 🙂
Victor @ Taste of Artisan says
Hi, yes, the dough should be sticky initially, but will significantly tighten up by the time you are done the third stretch and fold. See how it goes, it should be perfectly fine in the end. That said, some people aren't comfortable handling higher hydration dough and for them I recommend dropping hydration by 1-2%. Maybe even three if you are in a high humidity area. Once you get comfortable with that, you can work your way back up, or stay there if you like the results.
(La Milanaise) T55 is typically used for baguettes, so yes, you can use it. I used it a lot back in the day and still do occasionally when I can get my hands on it. Good luck!
Mary McElhinny says
This worked out really well for me. I was always afraid to try making baguettes, but now I can! 🥖🥖🥖
Victor @ Taste of Artisan says
Enjoy!!!
Ann says
My dude just use a scale. Baking is an exact science, measuring cups are not.
Also, online converters exist so you can calculate what these values equate to yourself.
Alyssa McCord says
I have made this recipe so many times! It comes out amazing each time and I like that’s it’s not fussy. Sometimes it has to stay in the fridge a little longer and it’s still ok!
Thank you so much!!!
Victor @ Taste of Artisan says
Glad to hear it, Alyssa. Enjoy!
Daniel R Payne says
This bread 🍞 is delicious 😋 perfect
Victor @ Taste of Artisan says
Enjoy!
Tammie Wanless says
Hello, I would like to make this recipe because the reviews are so good, but I would like to know if I could use a Perforated French Bread Pan instead of a stone to bake?
Victor @ Taste of Artisan says
Tammie, I believe several of my users have had success with my recipe using perforated pans (tsearch the comments below). It may not come out exactly as when baked on a stone, but I am sure you will still like the result. Good luck!
JR Lewis says
Why are you using metric measurements? No one in the U.S. where I am from uses the metric system in baking or cooking. Please revise recipe using familiar cups, ounces, teaspoons, tablespoons, etc.
Victor @ Taste of Artisan says
Because metric measurements are precise and result in predictable, consistent results. A cup of flour may weigh +/- 10% or more depending on freshness (higher water content in fresh flour) and ambient humidity. That variation can have a dramatic impact on the final result. Even 1-2% change in dough hydration can make a big different for some. ALL professional bread bakers, in the US or elsewhere in the world, use metric system for that reason. If you want to use cups and spoons, I provided them as well.
Jen Fisher says
I’m in Australia and we use metric. Its not all USA.
T says
It's a FRENCH bread. Metric is far superior when it comes to baking due to the accuracy, scales cost barely the same as a medium coffee and a Starbucks.
Bud says
Priceless. How about you do that yourself?
Nyx says
I’m in the USA and I use metric to weigh most ingredients. It’s more accurate and easier to use. Scales are cheap.
Evan says
Great recipe! I have 2 questions:
If I use the baking stone you provided the Amazon link for, which size should I use, and also will it stick to the baking stone? What should I do about sticking?
Second, if I’m going to transport the bread while it’s still hot, like right out of the oven, how should I do it? In an airtight container?
Thank you,
Evan
Victor @ Taste of Artisan says
Hi, I don't quite understand the question about the size... the size of the stone linked in the post is 15"x12"... if you are asking about the length of baguettes, then limit them to 14", it will work fine.
There should be no sticking if you flour them enough... but I haven't done that in many years, meaning I haven't baked baguettes directly on the stone for a while. I place them on parchment paper right after shaping, score and slide in the oven on the pre-heated stone with the parchment paper. Works great for me. No mess, no fuss, no sticking.
To take the bread out of the oven I use a large pizza shovel. I use a pizza shovel to load baguettes in the oven as well. It makes things very easy. Good luck!
kevin says
I’ve been playing with bread for almost 5 years. I followed this recipe exactly. The outcome was amazing each and every time.
Victor @ Taste of Artisan says
Glad to hear it. Enjoy!
Joan says
I’ve been trying to master the crust on my baguettes for a long time. This recipe and method has given me the results I have been craving. Thanks for the info.
Victor @ Taste of Artisan says
Glad to hear it, Joan. Enjoy!
SEEMA KOSHY says
Hi , I am about to make this baguette after the amazing reviews. What should the temperature of the water be ?
Victor @ Taste of Artisan says
Room temp. Good luck!
Alex says
Hey. been doing your recipe for years! its amazing. Can i just double de recipe? Also, can i freeze them? Before or after backed? I'd like to freeze them just before the oven phase and then could i defrost and bake?
Thanks
Victor @ Taste of Artisan says
Hi Alex, doubling the recipe is not a problem. Freezing may be. I never freeze my baguette dough. There isn't a simple way to defrost and bake. I'd freeze after cold retarding, but then go through the rest of the steps as usual. Seems like the same effort to me as making fresh. You may be able to freeze after proofing, but I've never tried and don't know how they will turn out. The best and easiest option to me is to bake them and freeze after cooling down. Then, when you want to enjoy your baguettes, pop them in the oven for 10-15 minutes and they will be almost as good as freshly baked. There are several comments on that down below, just search for 'freeze' or 'freezing'. A number of my readers have had great results with that and described their methods for re-heating. Good luck!
Bart Goethals says
Hey yes .. I also noticed after normal thawing they are still really good
Toni says
I followed your instructions to the letter and they were simply amazing. I’ll have to double the recipe next time because they flew off the bread board. Everyone agreed this is “the” baguette recipe. Thank you.
Victor @ Taste of Artisan says
Glad to hear it, Toni. Enjoy!!!
Amber says
Hi
Followed this I think I’m happy with what I got, but I need a thinner, crackly and shattering crust. Do you have any tips for me to get crust? Mine was a tad too chewy for my personal taste….
Thank you for a well-written formula!
Victor @ Taste of Artisan says
You could try with a different flour that has less protein, that should give you a less chewy crust. As well, baking at a higher temp results in a more 'crackly and shattering' crust. I'd check your oven temps with a BBQ thermometer, make sure the thermostat works as expected and go from there.
RJ says
Hi, a little late but there’s a funny trick I found years ago while desperately trying to save a stale loaf I needed immediately.
If you make a loaf the day before and run it under the tap for a second or two before throwing it directly onto the rack in a hot hot oven, the inner part will get nice and springy again and the crust will be thinner with a more crisp than crunchy texture.
Just pull it out as soon as it’s dry on the outside again.
Loving this recipe, I split my time between the coast and high altitude and it works great for both, which is a massive blessing in baking! My cakes are so unpredictable hilltop but at least we have baguettes
Victor @ Taste of Artisan says
Cool trick, RJ, thanks for sharing. Glad you like my recipe. Happy baking!
Baguette says
Nice
Laura says
Hi! This looks incredible!! Can’t wait to make it!! Do you think the fridge time can be extended? I want to prep the dough tonight for a party tomorrow evening. If I put it in the fridge for the initial 12-14 hours then pull out and let rise 60 minutes then can I put back in fridge for several hours before letting sit out at room temp again before shaping and letting rise for a final time? Thank you!
Victor @ Taste of Artisan says
Laura, I've gone as long as 5 days. I noticed degrading after 48 hours, so up to 48 is fine. 12-24 would be optimal for this recipe, IMHO.
I am not sure pulling out for 60 minute and putting back for another several hours would be necessary. Just keep in the fridge until ready, then follow the instructions. Good luck!
Desire says
What makes it turn brown like that 👆 while there's no sugar in ingredients?
Victor @ Taste of Artisan says
Well, there are sugars in the flour itself and in the honey. Even without honey the bread will usually brown if baked at a higher temperature as a result of Maillard reaction, a chemical reaction between amino acids (proteins) and carbohydrates (sugars).
Marface says
I added a couple of steps before putting it in the oven. I wet my hands and coated the dough lightly with water. I didn't have a spray bottle or brush. Then I lightly dusted the loaf before scoring it. I like the pretty marks the flour and slashes make. Then when I put it in the oven poured a bit of water and ice right onto the floor of my oven. Perfection!
Victor @ Taste of Artisan says
Glad to hear it. Sounds like you are having a lot of fun and changing things up to suit your style and vision of the perfect baguette. That's the best way to cook/bake and that's how I like it too. I've been baking bread for over a decade and do it very regularly. I never get tired and I always have fun doing it. Happy baking!
Bart Goethals says
At what stage can you freeze dough and what is the process from getting out of the freezer? Thanks 🙏
Victor @ Taste of Artisan says
I don't freeze baguette dough so I don't have any experience with this, but a few of my readers posted in the comment section success with freezing baked baguettes and then popping them into a hot oven (400F) for 5-7 minutes. You can try that or search the comments for other tips on freezing.
Carol Kelly says
Hi Victor, your focaccia recipe is superb, beloved by all of us. I have tried many recipes over the years but yours is best by a long way. That is what my 5 stars are for.
Now I am going to try your baguette recipe and am planning to bake it in an Emile Henry mini baguette baker to help a friend who is struggling with her new purchase. I figure your recipe will give me the best texture, crust and flavour (better than the KAF recipe which had a disappointing texture and flavour, although the crust was great).
So, I am wondering if you or any of your readers have tried the EH mini baguette baker, and if so, what temperature and length of time would be recommended in an electric oven ?
Elena (below), you did not say if yours had a lid and was the same as the one I am going to try, can you please update me now that you have tried it?
The instructions say not to preheat the baker, and I am reluctant to preheat it in case it cracks. Timings etc will be quite different from when using a preheated baking stone and I need a little guidance please.
Many thanks, Carol
Victor @ Taste of Artisan says
Hi Carol, glad you like my focaccia recipe. By the way, apologies for the delay responding to your question; sometimes I get so much spam that legitimate comments get lost.
I don't have experience baking in the EH baguette baker, but I've been thinking of trying one for some time. The reason why is I once baked mini baguettes in my EH bread cloches and I really liked how they turned out.
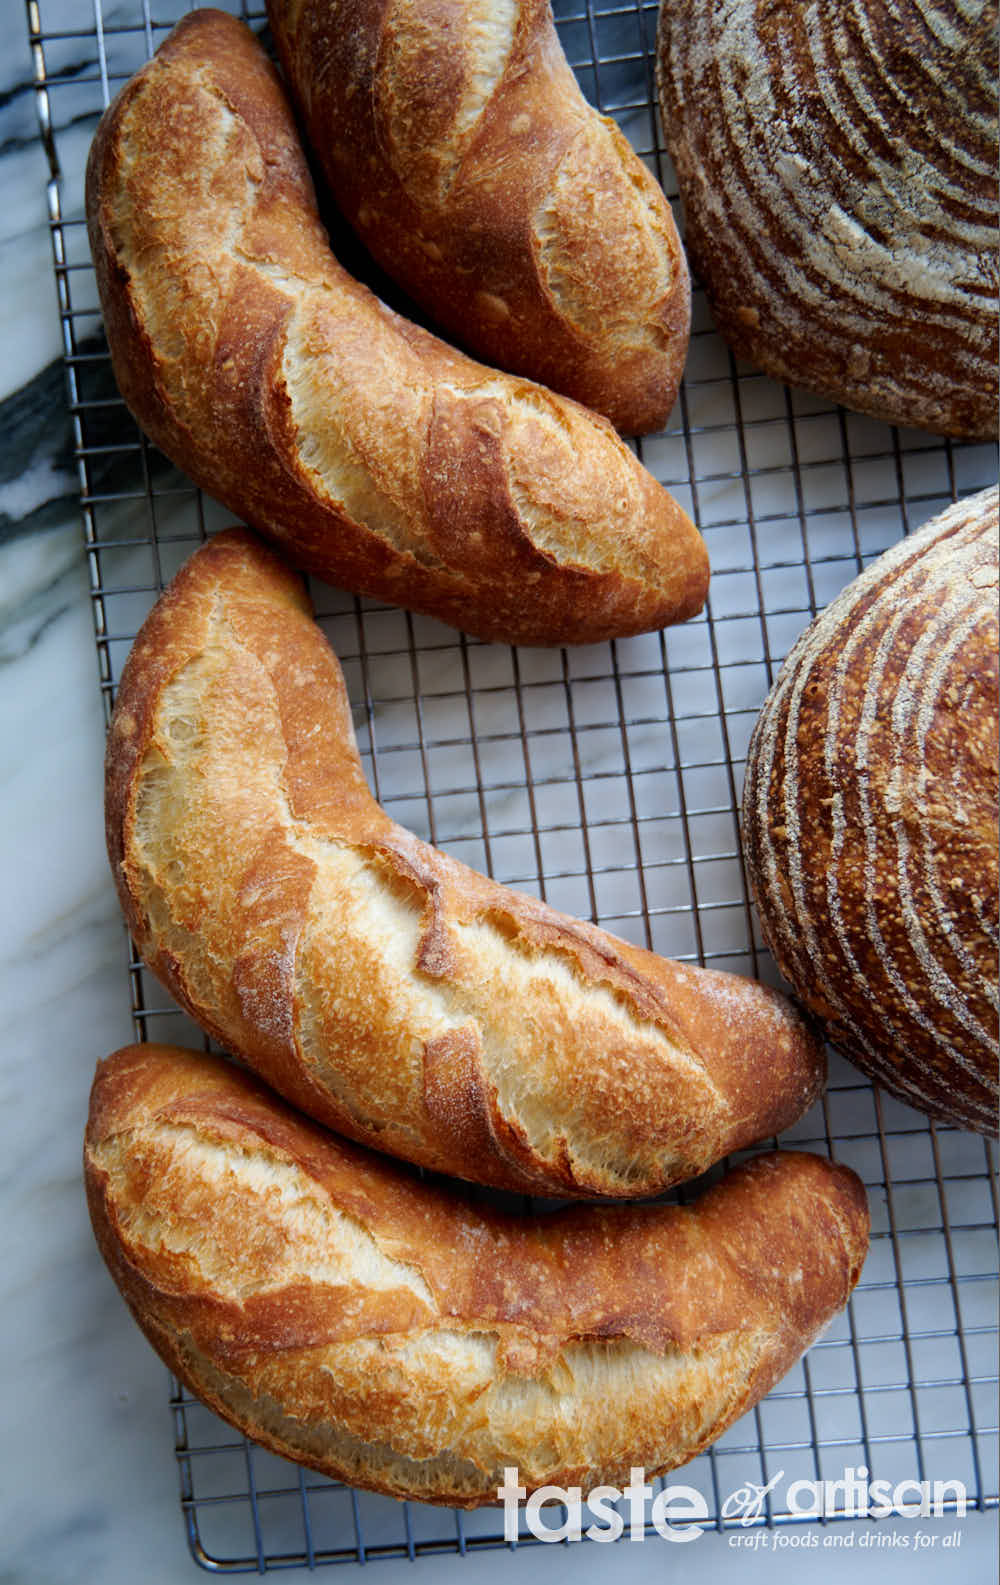
I always preheat my EH bread cloches. EH instructs to preheat them to 400F. That's not my style, I like crusty, colorful bread so I preheat to 500F. Been using mine for many years, no issues. If anything, my cloches darkened over time, but that doesn't bother me. They are oven safe to 270°C / 520°F per EH website, same for their baguette bakers, which I assume are made of the same ceramic material.
Now, I don't know where your instructions for the EH baguette bakers come from, but on EH website they do instruct to preheat them (well, their bases) to 400F - "Preheat oven to 400F degrees with the base of the Emile Henry Baguette Baker in the oven." This makes sense, as, in my experience, nothing good will come out of that ceramic baker if it wasn't first pre-heated before putting the dough in.
I personally would preheat the tops as well, as I always preheat tops and bottoms of my EH ceramic bread cloche, but I'd need to test that first... perhaps the tops are too close to the dough and the baguettes will brown too quick. In bread cloches, the preheated tops work fine but they are tall.
Before testing them, my concern would be putting a cold ceramic top on a hot ceramic bottom. Cold and hot don't mix well together. Also, wouldn't the cold top cool down the bottom quickly? I don't know, I'd need to test. Perhaps someone else who tried them can chime in.
As far as timing and temps go... in my bread cloches, I bake baguettes at the same temps, the timing is about 12 minutes with the top on, and 11-12 minutes with the top off. In a gas oven.
Good luck!
Elena Marosek says
I have a ceramic mold for the breads to bake, shall I put it n the oven when its preheating ? I also keep in the over a pizza stone that never comes out, do I place the mold on top of the stone?
Victor @ Taste of Artisan says
Hi Elena, you'd want to bake baguettes in a preheated oven on a preheated stone or baking steel. A ceramic bread mold would be similar, you'd want to bake in a preheated mold, unless the manufacturer's instructions tell you otherwise. I don't use them so I can't be certain. Preheating molds on top of a stone is fine, I do it sometimes with my bread cloches.
Judy says
Easy and great results - crispy crust and soft interior
Victor @ Taste of Artisan says
Enjoy!
Arlene says
Best bread I've ever baked! Making it every weekend now.
Victor @ Taste of Artisan says
Happy to hear it. Enjoy!
Sean says
What if you aren’t cooking on a baking stone? And are using a metal baking sheet? Do I still need to pre heat the pan for so long?
Victor @ Taste of Artisan says
The idea is to have enough stored heat that bread gets optimal oven spring during the first 10 minutes of baking. You don't need to use baking stone necessarily. Baking steel will work, unglazed tiles, a stack of baking sheets. A single baking sheet will lose heat very quickly once cold dough touches it, hence it's better to use a stack. It will work, but you won't get optimal results. As far as preheating goes, you can do it for less time, as long as the oven gets hot enough to get good results. Different ovens bake differently, some are more efficient than others, so there is no universal answer. I recommend experimenting and optimizing your baking based on the results you get. Good luck!
Ruth Louw says
How long are the sets for stretch and fold please? Not clear on how many times im supposed to stretch and fold the dough for in each set?
Victor @ Taste of Artisan says
Each stretch and fold set consists of four S&Fs. You can see how this is done in my Focaccia video, around 1:26 mark.
Yana says
Well, that was a new record of my baking goods going down the kids' bellies =) All baguettes finished before they had a chance to completely cool! Thank you for the recipe, will be doubling and making more.
Victor @ Taste of Artisan says
Glad to hear it, Yana. Enjoy!
Anna-Lisa says
hey there victor I am currently making this recipe and I’m wondering if I can leave the dough in room temperature to rise for a while instead of putting it in the fridge to rise overnight. I usually do this when I make focaccia, and it works out tasting even better and fluffier. Do you think this dough will rise throughout the day or does it need an extensive amount of time in the fridge overnight?
Victor @ Taste of Artisan says
You can try if it works for you. The temperature if very important. If the fridge is too cold, the dough wont' ferment properly. If the temp in the room is cool, it may work fine too. If too warm, it will over-ferment and collapse. Good luck!
Taylor says
Hello, is it safe to omit the honey and make it the traditional way? Does it still come out the same?
Victor @ Taste of Artisan says
Hello, yes, you can. Honey makes the dough a little softer so I'd imagine a slight bump in hydration would be welcome. I haven't made my baguettes without honey for years so I can't give you more information on that. Good luck!
Jenny says
PLEASE remove the reference to plastic film/ cling film. A) We are in a plastics crisis, B) bread has been made for millennia without it.
Victor @ Taste of Artisan says
I agree. Done!
Barbi says
🙄
Kelli Cook says
Can the dough remain in the refrigerator longer than twelve hours?
Victor @ Taste of Artisan says
Yes, you can go up to 48 hours... even longer, but, in my experience, it deteriorates.
Craig Allen says
The water to steam the bread for a crispy crust only works in electric ovens. Unfortunately modern gas ovens have a fan to vent gases and prevent the gas from building up. This also vents the steam and prevents crisping of the crust. A covered clay cloche specifically for baguettes would be the best alternative, but those are very expensive. I have a clay cloche for bâtards and will try making a baguette in that. It will be shorter then one expects, but hopefully will work to crisp the crust. My full sized bâtards come out with a nice crust so we'll see.
Victor @ Taste of Artisan says
I've been baking in a gas oven for the past few years, seems to work just as well. I don't know how modern or not my gas oven is, but it works. I agree on the cloches, they work great. I don't use them for baguettes, but I have two round bread cloches and use them a lot. Happy baking!
Staci says
You have likely answered this already so please forgive if it's a dupe question. If I use T55 flour instead of KA AP, should I use the same amount of flour? Any other tweaks to recipe for T55 flour? Thank you!
Victor @ Taste of Artisan says
Staci, no changes needed with T55. I use La Milanaise T55 from Quebec, all good.
Joshua says
Worked great and super easy! Thanks!
Victor @ Taste of Artisan says
Glad to hear it. Enjoy!
Diane says
Very easy, smells wonderful while proofing and baking! I can't wait to make it into garlic bread and garlic croutons! Thank you for the recipe!
Victor @ Taste of Artisan says
Or shape it into small balls filled with a teaspoon of cream cheese 🙂 Those are so good!
Gabin says
Great recipe chef! Do you bake the pizza with the water pan as well?
Victor @ Taste of Artisan says
Thank you! No, no water pan when baking pizza or focaccia.
MarkNs says
A great, pretty fool proof recipe and that is what I need. I play around with rise time depending on time available and it always turns out great although the flavour is not fully developed.
Francois Kruger says
Hey! Thanks for the recipe, trying it out now! I just wanted to comment that your flip and fold method is not explained well. I think you can add more detail to that section to make it more clear. You mention in the comments below a video in your focaccia recipe, but I can't find the video there. And if it is there, it might be worth linking that video here as well. Something I find really weird which causes even more confusion, all 4 your flip and fold photos here do not come from the same flip and fold. It's obvious by looking at the shape of the dough and the stains on the bowl. And lastly you say you flip the dough over after folding, which I assume is image 4. But it's literally impossible to flip this wet dough 180 degrees over and have it look as smooth as your image 4 unless you are doing some interesting sideways flip or something. Anyways my point is just, clearly we're missing some info here. I guess exactly how you do it doesn't make a massive difference, but might be worth clarifying a bit. Either way, thanks for the recipe! 🙂
Victor @ Taste of Artisan says
It's actually 'Stretch and Fold', not 'flip and fold'. I linked the video in my other response, but here it is again: https://youtu.be/ZnaJItpvf5Y?si=j-L3ZebtUdihB_Zy. Good luck!
Caroline says
Is it possible to do step four and let the dough rest a few hours in the fridge before you intend to do the final rise and bake?
Victor @ Taste of Artisan says
Never tried doing that but I think it won't be a problem.
rodney hoult says
Really pleased with the final results beautiful bread , first time I’ve made baguette’s using this recipe and method
Victor @ Taste of Artisan says
Glad to hear it. Enjoy!!!
Alan B says
Great recipe. I have made them several times. I use remineralized reverse-osmosis filtered water because the tap water here in Southern California tastes just awful. I just returned from three weeks in France, and these are every bit as good as any baguettes I had there (and I had quite a few of them!) I will definitely echo Josh’s comment below about the cooking time. After 20 minutes in my electric oven, they were done - nicely browned and internal temp ~210°F.
Victor @ Taste of Artisan says
Glad you liked my recipe, Alan. Enjoy!
Sirous says
Hi there
I find 3 techniques
1. add a towel in the water
2. In half way we have to take out the water
3.the Easier methods to roll the dough
Josh says
My go-to recipe for baguettes, always turns out delicious and each time I make it it just seems to get better. Like it says in the notes, each oven is different, and my baguettes are done in about 20 mins, so definitely keep an eye on them!
Victor @ Taste of Artisan says
Glad to hear it, Josh. Enjoy!
Melanie says
I have failed at making any type of bread multiple times but thought I would give this recipe a try after reading the reviews. I have finally experienced success making bread!! It was so delicious. The only thing I found was that my baguettes didn’t have as many holes/air pockets as I would have liked. I weighed out all ingredients but used bread flour. Could that be the reason? Don’t get me wrong, there were definitely air pockets, but not as many as in the pictures posted in the recipe. I can’t wait to make this recipe again using all purpose flour next time. Thank you for such clear and detailed instructions!!
Victor @ Taste of Artisan says
Hi Melanie, glad you had some success and found my instructions helpful. Many/bigger holes are usually due to a combination of factors - hydration, flour, how you handle the dough, fermentation, proofing, shaping, etc. Any of those can influence how the crumb looks. I'd need to see some pics to have a better idea, but, generally, the more you practice, the better you become at it. Happy baking!
ML says
Great Recipe. I accidentally used regular yeast. It still rose but after baking it turned out smooth and not as many air pockets as desired. Will give it another try, flavor is right on.
Victor @ Taste of Artisan says
Enjoy!
Sarah says
Could I divide the recipe by 3 if I just wanted to make one baguette? (Excuse the ignorance, I’m new to this.)
Victor @ Taste of Artisan says
Absolutely. Just divide everything by 3. Good luck!
SR says
It's a lot of work for 1 baguette, trust me. When I make these, the 1st baguette is eaten right after I take it out of the oven. To me, this is a fool-proof recipe.
Sona Kim says
I love this recipe! Have baked three times now with it. I stopped buying baquette from bakery and store.
Thanks for sharing it.
Victor @ Taste of Artisan says
You are very welcome. Enjoy!
Simon says
I’ve been making this bread for 4 years now - absolutely love it. About 2 years ago I did modify the receipe slightly by adding 2 tablespoons of sourdough discard in and always putting it in the refrigerator for 12 hours
Victor @ Taste of Artisan says
Glad to hear it. Enjoy!
Jon says
I’m going to bake this afternoon, I live in a cabin on a lake and don’t have a baking stone, what would you suggest?
Victor @ Taste of Artisan says
Try a stack of baking sheets, the more stored heat, the better the oven spring will be. If you only have one, well, it is what it is... some people have had good results with just that.
Good luck!
Apple Dumpling says
Tried multiply times with great results!
Quick question, can I replace the instant yeast with active dry yeast?
Victor @ Taste of Artisan says
Glad to hear it. Yes, you can but make sure to activate it properly. I could never get consistently good results with and stopped using AD yeast a long time ago. Good luck!
Angie says
Wow - fantastic recipe - yours is the third one I've tried and I'm sticking with it!!! If I wanted a thicker/crustier crust ... do I need to steam bake it for more time or for less time? Thank you again!
Victor @ Taste of Artisan says
Glad to hear it, Angie. In my experience, higher baking temps make a thicker and harder crust. As far as steaming goes, less steaming would make a harder crust. Good luck!
Brad says
While I'm extremely confident in the kitchen, I have little to no experience baking. Not only was this recipe well documented, easy to understand and very straightforward, but the final product turned out fantastic. I have some work to do when it comes to shaping, but that will come with some practice.
Thank you for an awesome recipe that I'm sure to use over and over again. I have a pretty great photo of my final product if you'd like it for the comment section.
https://tasteofartisan.com/wp-content/uploads/2024/06/baguettesBrad.jpg
https://tasteofartisan.com/wp-content/uploads/2024/06/baguettesBrad-2.jpg
https://tasteofartisan.com/wp-content/uploads/2024/06/baguettesBrad-1.jpg
Victor @ Taste of Artisan says
You are very welcome, Brad. I am glad you found my baguette recipe helpful and easy to execute, that was my intent given the struggles I had with making baguettes initially. I would love to see pictures of your baguettes, I will contact you via email so you can send them to me. Happy baking!
Reece LeCouteur says
j'adore les baguettes merci pour la recette
Victor @ Taste of Artisan says
You are very welcome. Enjoy!
Vivienne Butler says
Made this recipe and followed every detail and instruction and my baguettes turned out fantastic. I used whole wheat flour that I had ground myself with my machine, and even though whole wheat can be hard to get good results with, my baguettes still came out great due to your recipe and my husband loved them. Thank you so much!
Victor @ Taste of Artisan says
You are very welcome, Vivienne. Thank you for the detailed feedback. Enjoy!
MK says
Hi! I love this receipe, I’ve made baguettes a few times now. I keep running into one problem, I cannot get 12 baguettes. I can get 3 big fluffy rolls (think cheesesteak rolls) or 6 12ish in baguettes. Any inside as to where I might be going wrong? Thanks
Victor @ Taste of Artisan says
Hm... One recipe makes 3 baguettes. Mine are about 20 inches long to fit the length of the baking stone. If you make them short with the same amount of dough, then I see how they would be more like big fluffy rolls and less like baguettes.
charlie bellinder says
Just wondering if there was any reason you say to use king arther brand flour( ie. sponsorships, prefrence or anything else).
Victor @ Taste of Artisan says
No affiliation with with King Arthur of any kind. I just like the results I get with this flour. I am sure that there are many other brands that are just as good or better, but out of the ones that I tried, this KA AP and La Milanaise organic T55 are may two favorite ones.
Alejandro B Engel says
Great recipe I use it to bake a loaf instead of baguettes, and it works wonders. Very tasty. Thanks!
Victor @ Taste of Artisan says
Glad to hear it, Alejandro. Enjoy!
Marcia says
Thank you for providing the best recipe and instructions! I've dappled a bit with adding soaked seeds - any thoughts or suggestions on needed adjustments? Thank you!
Victor @ Taste of Artisan says
You are very welcome. I would keep the ratios unchanged, but when adding soaked seeds make sure that you pat dry them well before adding. Enjoy!
Candace Taylor says
Oh my gosh this is so delicious! My first time making baguettes so ran into technical difficulties transferring the dough to the oven in the baking stone, so a bit of a tangled mess. I managed to quickly unravel,so the end result were baguettes shaped like snakes! Also I realized I would do 13 minutes baking. I love the taste and crumb! Can’t wait to redo again. I would transfer only 1 at a time in the oven, and shorten the baking time. Thanks for a great recipe!
Victor @ Taste of Artisan says
You are very welcome, Candace. Enjoy!
Josh says
I've now made this recipe a half dozen times. Its excellent. My cooking time is shorter than the recipe, but that just over differences. Great, easy recipe.
Victor @ Taste of Artisan says
Glad to hear it, Josh. Enjoy!
Karl W Hesterberg says
How do I move these baguettes easily off parchment paper safely onto hot baking stove?
Victor @ Taste of Artisan says
I have no idea 🙂 I slide them off on the baking stone with the parchment paper. Have been baking them like this for years. Easy, simple, and works like a charm for me. Good luck!
Guy Carreon says
I'm trying your recipe for the first time using a Black&Decker breadmaker to make the dough. Do I store the dough in the fridge after or do i need to handle it before storing?
Victor @ Taste of Artisan says
This recipe is not for a breadmaker. If you make the dough in a breadmaker your results will be quite different. I recommend making my recipe as per the instructions I provided. Good luck!
Alan B says
Solid baguette recipe, they turned out great. My AP flour is malted, and the baguettes got quite brown even with a slightly reduced cooking time. Next time, if I use malted flour, I’ll either reduce the amount of honey or skip it completely.
Victor @ Taste of Artisan says
Thanks for the kind words and the tip re malt flour, Alan. Enjoy!
Nick03 says
I made the recipe this morning. The best baguettes that I have ever made. They were crispy on the outside and soft on the inside. Not chewy. Divine hot with butter.
Victor @ Taste of Artisan says
Enjoy!
G Vazquez says
I've made baguettes from about five different recipes, with poolish, with pate fermente and without . This is the simplest recipe that gives consistently great results. Fantastic recipe and probably what I'll use from now on. Why mess with success
Victor @ Taste of Artisan says
Happy to hear it. ENjoy!
Jean says
I would like to make the baguette recipe. I
do not have a couche. Is there something else I can use?
Victor @ Taste of Artisan says
You can use a kitchen towel in a pinch. It works well.
Veerada Carter says
I typically visit France a few times a year and always miss freshly baked baguettes. I’ve tried a few recipes and yours is hands down the best! I had to adjust the water measurements because I live in an extremely dry area but it turned out amazing.
Victor @ Taste of Artisan says
Glad to hear it. So happy you liked my recipe. Enjoy!!! And please try my other recipes.
Nicholas Albert Gardner says
I too live in a very dry area in southern Alberta. Year round we have 11% humidity. When it is raining out (rarely happens), humidity will be higher. I added 50 ml water extra.
Lewis J Lautin says
great recipe. I did make one change; 250 ap and 250 bread flour. Great bake, easy bake. thanks. Can I send a photo?
Victor @ Taste of Artisan says
Great to hear it, Lewis. I sent you an email about pictures, send them to me and I will attach them to your comment.
Mike says
After returning from Paris a couple weeks ago I was just longing for an authentic baguette. I made a failed attempt before finding your recipe. These baguettes turned out amazing. Crusty and a nice golden color. The inside was soft and chewy with nice open crumb. I’m working with a gas oven and agree with your comment that 12 and 12 is a good bake time. I need to get a scale and probably play with the salt content just a little, but these really took me back to my early morning walks to the market on Rue Cler!
Victor @ Taste of Artisan says
So happy to hear it, Mike! I love it when my readers have success with my recipes and enjoy great homemade food. Happy baking and thank you taking time to write your feedback. Enjoy!
Lori says
This is the best French baguette recipe I’ve ever tried. When I removed the baguettes from the oven to cool they were “singing” - making a light crackling sound. I had never had bread do this before and had to research to learn why it was crackling. I learned this is the hallmark of bread with a perfectly thin crisp crust and light airy interior. And they were delicious. The crust was so crisp and interior light and chewy. Thank you so much for the recipe and excellent instructions.
Victor @ Taste of Artisan says
Happy to hear it, Lori. Glad you liked my recipe. Enjoy!
Tracy Samra says
My dough seemed to hydrated. It was hard to work with.
Victor @ Taste of Artisan says
Reduce hydration by 3% and try again, that should help. Reduce further if still too hard for your to work with. Sometimes that type of flour, as well as humid environment, can influence that quite significantly. Another thing to keep in mind is that with practice it becomes much easier to work with higher hydration doughs for most people. As you get more practice, you can increase hydration. Good luck!
Rina McCann says
Can we leave this in the fridge 1 to 2 days before baking?
Parker B Smith says
What do you mean by "rotate," the baguettes after the water pan removal?
Victor @ Taste of Artisan says
Rotate means spin around 180 degrees. This will help get a more even browning.
Ehsan says
Hi,
Can a percentage of the flour be replaced by whole wheat flour?
Thanks
Victor @ Taste of Artisan says
Yes, but expect the crumb to be different - less open with smaller holes.
Issa says
This bread is delicious! I make it every week! A winner!!!
Thank you so much for sharing the recipe! Exquisite! Thanks!
Victor @ Taste of Artisan says
You are very welcome. Enjoy!
Dolores G Shepherd says
I forgot to stretch and fold and it's been sitting out 4 hours. Can it be saved?
Victor @ Taste of Artisan says
Do one now and sneak another one later at some point. It should be OK.
Pete Krone says
Found your recipe and just gave it a try. The stretch/fold method was definitely different than the Kitchen-Aid method, but worked like a charm. The baguettes turned out beautifully. Thanks for sharing!
Victor @ Taste of Artisan says
You are welcome, Pete. Enjoy! Please, try my other recipes, there are plenty of great ones here on my blog.
Sheila says
I’ve used this recipe many times - it’s delicious and so easy. I find that step 5. preheating the oven, is better placed between steps 7 and 8 (the final proof on the couche).
Victor @ Taste of Artisan says
Thank you for your feedback, Sheila. You made a great point about the step 5 being better between the current steps 7 and 8, so I moved it. Enjoy!
Amy Campbell says
This is the best French bread recipe I have come across in twenty five years!! Thank you so much!!!
Victor @ Taste of Artisan says
You are very welcome. Enjoy!
Raphael Soetan says
Hi,
Thanks for the recipe. Can this recipe be adapted for active dry yeast and all purpose wheat flour? I already have those in my pantry.
Thanks,
Raphael
Victor @ Taste of Artisan says
Hi, yes, you can use active dry yeast, just make sure to activate it. I don't recommend using it as I've never had consistent results with it. Good luck!
daemenoth says
I make this recipe with all purpose flour and bulk non quick yeast all the time. I have a double batch of it in rectangles waiting to do it's thing in the kitchen as I type this.
I just add my sugar or honey to the warm water and stir it in then add the yeast to proof for about 5 mins and mix it in as per normal instructions. Then I mix the dough as normal and let it rise for an extra 40 minutes or so than the recipe calls for and add a bit of extra time (about 10 more mins)in all the rise steps and between the stretches.
It turns out amazing.
Elle says
I started late morning - is it okay if my dough sits for 16/17 hours in the fridge??
Victor @ Taste of Artisan says
Totally fine. You can go up to 48 hours if need be.
Crystal Hill says
I’m allergic to honey. What would you use instead? Also don’t like the taste of agave
Victor @ Taste of Artisan says
maple syrup, corn syrup, malt... I'd pick in that order. Hope it works for you.
Elena says
Hi thank you for the best homemade baguettes recipe and all your tips up to now. Do you have any tips on achieving better scoring and colour results?
Victor @ Taste of Artisan says
You are very welcome, Elena. Thank you for the kind words. Scoring works best when you do it with a swift, decisive motion. The slower you go, the more drag and sticking you get, resulting in a messy score. The lower the hydration, the easier it is to score but higher hydration dough has a better crumb. It's a tradeoff. But, the more you practice the easier it gets. Back in the day I stopped using a lame and switched to a serrated Wusthof bread knife, it worked much better for me to do scoring. Later, I started using a lame again. Both work well for me now and I use them intgerchangeably. Once you get a hang of it, anything will work well IMHO. For color, what issues are you experiencing with that?
hank says
for a salted outside do I add the salt before or after baking
Victor @ Taste of Artisan says
Definitely before, otherwise it won't stick.
Dianna Dillinger says
the Baguette pan I have will not tolerate these high temps.. Do I just use a baking sheet?
Victor @ Taste of Artisan says
A baking stone would be ideal but a baking sheet will work. Better yet, a stack of 2-3 baking sheets to add more heat capacity to give the baguettes a nice oven spring.
Mel says
I'm not one to follow directions. Didn't use a baking stone, and didn't cold ferment due to time restrictions. But I did do the 3 folds. Also didn't make 3 baguettes, just one big loaf on a baking sheet. Kiddos raved and said it was the best bread they ever had. Great (and forgiving) recipe! I'll try following directions next time and I'm sure it will be even better!
George Sheppard says
Great bread made it about a dozen times....Quick question after the cold ferment do I let the dough reach room temp then shape it or just shape it when it is cold....tks
Victor @ Taste of Artisan says
No, you don't need it to reach room temp as long as it's properly fermented. You are looking at the volume increase of 2.5x or so. If the fridge is too cold and the dough ball is small, you need to let it sit at room temp until it reaches the target volumet. Otherwise, take it out, cut into pieces, form rectangles, rest, shape, proof, score and bake.
David says
This was my first attempt at baguettes since getting an EH baguette baker for Christmas and I wanted to use you recipe since it got so many great reviews. And the flavor and crumb were great! I have just a couple of questions; 1) the dough was very wet, so I increased the flour to approx 512g for approx 70% hydration. Still the dough in the bowl was so sticky that it didn’t pull to fold easily and it was next to impossible to turn it over in the bowl as it was sticking so much. Should I have greased the bowl? Any other suggestions on this issue? 2) following the baking instructions for the EH baguette bake (preheat oven to 450, bake covered at 425 for 25 mins and another 4-5 mins uncovered. They came out at approx 208-212 degrees, the bread was soft, and while the crust was only slightly browned, it was a bit tough to cut. I’m thinking next time I’ll reduce overall bake time by 2 mins or so, but increase the uncovered time a 1-2 mins. I’d really appreciate your thoughts on this. Thank you for the really good recipe and helping me get better with my baguettes.
Victor @ Taste of Artisan says
David, the dough should feel wet and lax initially, but will strengthen as you do stretches and folds. If some dough sticks to the bowl initially, that's totally fine. No, you should not grease the bowl, but you could if that helps. The goal is to figure out the process that works for you, which will encourage you to bake more often and enjoy the process. Now, did you weigh the ingredients? Cups and spoons are terrible for measuring out ingredients for baked goods as even small deviations may have a significant impact. 75% hydration is typical for French baguettes. That said, go down until you feel comfortable then work your way back up. More often than not, working with higher hydration dough is a matter of practice.
On your second question, what EH specified there isn't optimal, IMHO. Actually, it makes little sense to me. You don't want to steam bake baguettes for 25 min, and 4-5 uncovered isn't nearly enough for proper browning. However, I've never used their baguette bakers so I may be missing something.
On the other hand, I own two EH bread cloches and love them. Every now and again I use them to make mini baguettes. In my gas oven, I preheat them to 475F, load, drop the temp to 450F and bake for 12 min, then 12-13 min without lids at 425F. Don't know about your baguette bakers, but, according the product spec, the bread cloches are rated up to 500F, so the higher temps are not a concern.
I found a picture of my mini baguettes baked in EH breach cloches:
https://tasteofartisan.com/wp-content/uploads/2024/01/mini-baguettes.jpg
Good luck!
David says
Victor, thx for the fast and very helpful reply. I did weigh all the ingredients, including the water. I think you’re probably right about just needing some more practice working with such a wet dough, perhaps starting with a slightly lower hydration, then working my way back up. More baguettes! Yay! Also, I’m going to take your suggestion on the bake and brown times in the EH baguette oven and I’ll bet I’ll be more pleased. Your mini baguettes look beautiful! They give something to work toward! Again, thank you for helping me on my still new baking journey! Cheers!
Victor @ Taste of Artisan says
No problem, David. Good luck!
scott says
would it be acceptable for the dough to sit out in kitchen aor 6 hours instead of in fridge for 10-12? or would the dough be compromised?
Victor @ Taste of Artisan says
You will get a little more flavor development with cold retarding but the dough won't be compromised. The thing that you need to watch out for is over-fermentation. Depending on how warm your kitchen is, the dough may ferment fully in 3-4 hours, maybe 5, so you want to make sure to not let it overferment.
scott says
Thank You!
Baker-Bird says
Agree with other reviews.
I've tried every baguette recipe I can find and this is the only one I'm happy with.
Great texture inside and out.
Didn't have couche or stone big enough but still turned out great.
Victor @ Taste of Artisan says
Glad to hear it. Thank you for the kind words. Enjoy!
Vivienne says
Hi Victor,
Wondering what kind of salt you use?
Is it Maldon Sea Salt flakes? Or Kosher salt?
With my other baking, 10g of Maldon would equal 15g Kosher, or 10g Kosher would equal 6.6g Maldon.
Obviously this is important.
The recipe looks very easy, can't wait to try it.
Victor @ Taste of Artisan says
Hi Vivienne,
I use kosher salt most of the time but also use Mediterranean sea salt and Huimalayan salt. Your conversion examples come as a suprise to me, I've always thought that 10 grams of any salt is 10 grams regardless. Now, if you use spoons, it's different, where a teaspoon of fine salt would weigh more than a teaspoon of flaky or corasely ground salt. But I am not salt expert 🙂 Good luck with my recipe. Let me know how it turns out.
Gabi says
Salt measurements do change depending on the type you are using!! It’s an important lesson in chemistry that is quite applicable to baking, there’s a cool Netflix documentary called something like salt fat acid heat I think that has lots of cool baking info 🙂
Victor @ Taste of Artisan says
Sounds interesting. I'll check it out.
Vivienne says
Hey Victor,
I made the baguettes today - I had to wait for my stone to arrive.
OhMyGOODNESS! It's perfection!
FYI, I used 15g Kosher Salt - it's not as 'strong', & it's finer than Maldon flakes, so the salt is dispersed through the dough more evenly, in my opinion.
I also did it as a 24 hour bulk fermentation - that works best for me & my lifestyle - and I also think the yeast develops a richer flavour. So I made the dough yesterday morning, around 10am, did the 4 sequences of stretch & fold, then into the fridge until 9:30 this morning.
I got a bit bamboozled with the envelope folding & where the seam is supposed to end up & which side needs to still be sticky etc, but by the 3rd loaf i was back in control. Kinda.
Proofing, scoring & cooking were a breeze, though I think my oven is running a bit hot - they're just a touch dark - but thye look so rustic.
And they're DELICIOUS!! Thank you SO much.
You're my hero. xVivienne.
Victor @ Taste of Artisan says
🙂 Thank you for the kind words, Vivienne. I am glad that you liked and had success with my recipe. That's the goal. Enjoy! And do try my other recipes. Happy baking!
Maureen says
I used bread flour and have an issue with not being able to get the dough right. While my oven is less than 3 years old, I have an issue with keeping the high temp when taking out the water. How my more hydration would you recommend with bread flour? Also my bread gets really crunchy trying to get the deeper color.
Victor @ Taste of Artisan says
Bread or AP would use the same hydration. You'd want to up the hydration when using WW flour. Can't really advise on your oven, perhaps try baking at a higher temp or use convection in the second part of baking. Sometimes a little experimenting helps as you will learn more about how your oven bakes. Good luck!
Christine says
I've been thinking about fresh baguette tradicion since my recent visit to Paris. As a pastry chef in Colorado at 9000 ft, I had some concerns! This recipe was 100% AMAZING. The overall process was 16.5 hours and totally worthwhile. Can't wait to share with my chefs!
Victor @ Taste of Artisan says
Glad to hear it. Enjoy!
Tea Leigh says
made this recipe for my first time making baguettes and i have zero regrets. weighed everything to the exact measurement and followed the recipe closely.
I'm looking forward to perfecting my skill with these.
Thank you for such an enjoyable recipe!
Victor @ Taste of Artisan says
You are very welcome. Enjoy!
Wilson Cook says
Just made this bread. It is my best of many attempts at baguette. Wasn’t sure about skipping the poolish but worked great. By far the most airy crumb I’ve achieved. I suspect the honey contributes to that.
Victor @ Taste of Artisan says
Glad to hear it. Enjoy!
Janice says
Hi Victor, want to say thank you for your recipes! I have been making this french bread for my parents for 2 years now and they love it!
Have a question how can I save time by making them in advance and may be fridge or freeze them?
Also, my husband loves bread but recently both him and I are tested higher blood sugar…therefore needs to cut back or even cut out white flour bread. Do you have any recipes for whole grain bread or bread that are suitable for type 2 diabetic so that we can continue to enjoy bread?
Btw I made the Pampushki last night and my kids love them:)
Victor @ Taste of Artisan says
HI Janice, thank you for the kind words, I am happy that you enjoy my recipes.
I don't normally make baguettes ahead so I don't have a lot of experience with this, but a few of my readers posted in the comment section success with freezing baked baguettes and then popping them into a hot oven (400F) for 5-7 minutes. You can try that or search the comments for other tips on freezing.
About the whole grain bread - I love whole grain bread for its flavor and health benefits. I can ceretainly post some of my favorite recipes. Stay tuned.
Linus Aleksandr-Marie Greene says
hey, I have been tentatively immersing myself in the baking world and decided to take a plunge and do something without the word easy in the name. This recipe was very clear and straightforward! The only trouble I had was at the end when I took the bread out of the oven. My baguette had missed being burnt by a hair. I guess my over is more efficient than most because I only put it in for 12 minutes with steam and 12 without. I will definitely be trying this recipe again and by learning from my mistakes I hope to make my favorite bread perfectly. Thank you
Victor @ Taste of Artisan says
Different ovens bake differently and some tweks may be necessary. In your case, you can drop steaming/non-steaming to 11-11 or 10-10, or keep the steaming part at 12 and drop the browning step to 9-10 min. Looks like you are pretty close so it should be an easy tweak. Good luck!
Larry says
This is not my first time making bread. In the past it turned out perfect. However, I am having some problems making the dough.
1-Badge the dough turned very liquidty; I had to throw it away
2-Second badge the dough has not increased in size.
I am using fresh Yeast exp 2025. I combined all dry ingredients and then poured the warm water. I added salt and sugar to the flour and allowed some space between these two ingredients.
I am ready to try my 3rd badge. I am using 3 cups of flour and 1/4 tsp of rapid yeast I am aware that your recipe says 2 tsp of salt. I only added 1/2 tsp. What am I doing wrong? Thanks
Victor @ Taste of Artisan says
I would recommend getting a scale and weighing the ingredients. That wil help you enourmousely. If, after weighing, the dough still feels too wet for you to be comfortabel with it, drop the hydration by 2-3%. You don't need to throw wet dough away, just add more flour to it. Hope this helps. Good luck.
charles Hole says
I wrestled with sour dough baguette recipes when I was in my sour dough period of enthusiasm. This is easily the tastiest and best looking trio of baguettes to emerge from my humble oven - without all the extra maintenance that comes with sour dough starters. Thank you for your care in fine tuning and accurately passing on your find.
Victor @ Taste of Artisan says
You are very welcome, Charles. Thank you for the kinds words. I am glad that the effort that I put into developing this recipe has proved so helpful not only for me but also for many people who like great tasting French bread. Enjoy! And, please, try my other recipes and stay tuned as I will be posting more of my favorite bread recipes.
Ashley says
I just made this recipe and weighed everything on a scale. It was a very wet dough and extremely difficult to work with, just curious if that is the norm? Thanks!
Victor @ Taste of Artisan says
For some of my readers who had a similar issue, dropping hydration by 2-3% helped. Once you are comfortable handling the dough at that hydration level, work your way back up, or stay there if you get good results. Good luck!
Carol says
When I have to work with wet dough, I wet my hands; keep a little bowl of water next to your dough so you can keep wetting hands for folding & stretching. It gets better as you go! Hope this helps!
I've been making baguettes for a few years now. I've tried numerous recipes and they're better than average but I always feel like they could taste better. I can't wait to try this recipe! Thank you!
Victor @ Taste of Artisan says
Aren't you introducing more water and making the dough even more hydrated/wetter this way? I always recommend dropping the hydration by 1-3%, getting used to it, then working your way back up. But, if it works for you, that's great.
Lilie says
Excellent bread! Accidentally forgot to put it in the fridge and woke up to a giant bowl filled with bubbling dough. Cooked it in a preheated Dutch oven and made the most amazing bread for sandwiches. Happy accident!
Victor @ Taste of Artisan says
Glad to hear it. Enjoy!
Donna W says
Like many others who have tried other baguette recipes with no success, baguettes is the one bread that I haven’t been able to master to get the perfect crumb. Going to give this one a try based on the comments. I do have an Emile Henry Baguette Baker, so I assume I can skip putting the pan of water in the oven and can bake directly in the baker versus a preheated stone?
Victor @ Taste of Artisan says
Hi Donna, welcome to my blog. Correct, when baking in the EH baker, you don't need a stone or a water pan. There will be plenty of humidity inside the baker. Just remove the top par of the baker half-way. Good luck!
Steph G says
Just back from France and craving baguette, so was stoked to find this post! I halved the recipe to try it out in my small oven - but my maths must have been off and I used too much liquid, because the dough was very wet and difficult to handle. I persisted and the result was delicious, although didn't look anything like the photos! Will try again - practice makes perfect (I hope!)
Note: I don't have a baker's couche, so used a bunched up silicon baking sheet to prove and left the loaves on it to bake - worked quite well.
Victor @ Taste of Artisan says
Glad to hear it, Steph. Indeed, practice makes perfect. I mean, you should have seen my first baguettes... oh my...
Here is some of my first baguettes from 2010. Mind you, these were made with some practice under my belt, not as bad as my very first ones. I don't seem to have pictures of those. That's a good thing:)
And this one is from 2012. You can see some progress 🙂
By the way, I didn't get a couche until many years into my baguette baking journey. Just about anything works. I used very slightly damp kitchen towels. They worked great. I also used Saran wrap. It worked good too.
LB says
Hi there-
If I want to only cook the bread in the evening, in time for dinner, should the dough stay in the fridge until I’m ready to start proving it or should it come out after 12hrs, be proofed, rolled and then wait until I’m ready to bake?
Thanks! LB
Victor @ Taste of Artisan says
Hi,
It can stay in the fride until you are ready in the evening.
Hannah says
500 g flour does not convert to 3.5 cups. It is 3 cups and two tbs. Even still, be prepared to add an additional cup or so of water to avoid dense, overly dry bread. I agree with the stretch and fold and steaming methods just be careful with the flour to water ratio.
Victor @ Taste of Artisan says
The weight of the flour highly depends on its hydration, which is a function of freshness, storage conditions, ambient humidity, etc. Which is why I always recommend using a scale instead of cups and spoons. Please, read my note #1 below the recipe.
Five hundred grams of the flour that I use (KA AP) is about 3.5 cups, give or take a few grams-I measured several times to be sure. The built-in conversion tool in the recipe card that I use converts 500g of flour into 4 cups. Your arriving at 3 cups and 2 Tbsp yet again confirms my concern about using U.S. Standard measurements. These deviations can and often will have a huge impact on the results.
Keith says
You should always use weight and in metric
Using a scale
Ticia says
I am scrolling through the comments looking for info to explain why my initial mixture is very dry. 500g of KA-AP flour (using a very reliable scale) and 360g water did not produce a shaggy dough as pictured. I, too, had to add more water. My flour was organic, however. Wondering if that made a difference somehow . . .
Victor @ Taste of Artisan says
If you weighed the ingredients you shouldn't have needed to add any water, the other poster used cups to measure out the flour which most likely resulted in excess flour. A number of my readers actually had to reduce water to be comfortable working this dough. Organic/non-organic shouldn't matter. What could matter is the grind. Coarser grind needs more water while finer grind requires less water. That or a mistake/scale malfunction happened somewhere along the way. Happens to all of us every now and again.
Mike says
I love this recipe, thanks! I have made it quite a few times with great success but am wondering if it would work to shape into mini rounds/ rolls? If yes how to shape? Thanks again.
Victor @ Taste of Artisan says
Mike, you can, but expect the taste to be different. I've used this dough to make batards, mini buns, little cream-cheese filled balls, and every time I change the shape somehow the taste changes. To shape, just cut the dough into pieces after bench-resting, and shape into balls, pinching the seams. If you want to make good rolls, try my Vanishing Yeast Rolls, these are fantastic, one of the more popular recipes on my blog.
Mike says
Thanks for the quick response! I went ahead and tried making rolls from the baguette. Made 12, lowered the temp to 425 and baked for 15 min. Turned out beautifully and the flavor is good. I would make traditional rolls but got a request from a family member to make crusty rolls for Thanksgiving and I think these will work perfectly! They also make really great sandwich rolls for leftover turkey. Thanks again for such a wonderful recipe!
Victor @ Taste of Artisan says
Oh, I see. Glad you liked them. Try shaping this dough into balls filled with a teaspoon of cream cheese. They were the bomb. My daughter made them and they were such a hit.
John Meheski says
What if I don't have a stone?
Victor @ Taste of Artisan says
Use a stack of baking sheets, that's the simplest options. Unglazed tiles work too. If you search the comment section, a few of my readers shared what they used as alternatives adn how well it works for them.
Jacob says
This wad my first time making baguettes and it was easy and they taste good. Highly recommend for everyone
Victor @ Taste of Artisan says
Enjoy!
Natasha says
I've been having some issues with recipes similar to yours, so I'm going to try yours next. Essentially, every time I make bread, it turns out dull on the outside, with a thick hard crust that is not yummy at all, and too dense inside. I've been googling like crazy, and everywhere says it could be so many different things. I live in a very dry climate, for reference. Could anyone have any tips or personal experience that may help with my problems?
Victor @ Taste of Artisan says
I would start with making my baguette recipe and going from there, as it will be easier to address specific issues. Dense crumb means insufficient proofing/fermentation. I've made sure this doesn't happen by providing detailed process instructions and what to look for (blistering, specific volume increase, etc.). Dull on the outside - insufficient steaming. Thick, hardcrust - could be too high temp, insufficient steam, etc. Good luck!
Alma says
The best baguette ever 😍I have made this recipe 3-4 times already and every time comes out amazing.Very easy to make and just delicious. My two year old daughter is just enjoying her sandwich with this fresh baguette.
Victor @ Taste of Artisan says
Glad to hear it, Alma. Enjoy! And, please, try my other recipes.
Wilson Cook says
Alma, you must be doing a great job raising your daughter on good food since many kids want the “crust” cut off bland store bought “bread”!
Angela says
I made this baguette recipe today & it was a huge hit! My husband said it’s the best one yet & I’ve tried quite a few which were good, but this one tops them all. Thank you for an amazing recipe!!
Victor @ Taste of Artisan says
You are very welcome, Angela. Enjoy!
Kelsey says
Did everything as described including weighing the ingredients. The bread was delicious with a perfect crunch. However, it cooked in the first 15 minutes and developed a dark crust and puffed into a cylinder. Anything you can think of I may have done wrong?
Victor @ Taste of Artisan says
Some ovens bake hotter so you may want to adjust the temp down a little. Premature browning may also indicate lack of steam in the first half of baking. Hope this helps.
Sally says
Thank you for sharing your step-by-step recipe - and especially the time you take to respond to Qs! It takes a lot of time and efforts and is much appreciated.
I have been baking baguettes regularly for a couple of years, and the following are still the most challenging phases for me:
(1) How to make a baguette uniform - instead of too thick in the middle, too thin in the middle, too narrow at one end, just right at the other end. You know what I mean.
(2) In a batch of three baguettes, there's usually one that is nothing like the other two. Why does this happen? Not smooth looking. Too wet. Impossible to roll out. Gets stuck on the bench (granite counter). For the two that look ok, once rolled out, they tend to spring back so length is not maintained.
Would really appreciate any suggestion/guidance to improve in these areas. Hydration is 72%
I have no problem with scoring. And if I don't get the rise I want, I can pinpoint user-error(s) as to why. Thank you!
Victor @ Taste of Artisan says
Thank you for the kind words. To answer your questions, 1 - yes I do, I had the same problem. The things that helped me - proper proofing, proper rest time, and practice. The dough should be well-aerated/fermented and relaxed before you can stretch it uniformly. if it's tough, that's when this problem happenes. Given that the dough is fine and you still see the problem, it's the technique that can be developed with practice. Start from the center and roll and stretch out simultaneously yet very gently. 2 - hm, I am not sure about this, they should technically be the same. Pay closer attention and see what you may be doing differetnly. If the dough feels too wet for you to work with comfortably, drop the hydration by 2-3% and go from there. If they shrink, you need to proof a little more. Hope this helps. Good luck!
JB says
Absolutely love this recipe! Made at least 3 times in one week. 🙂 I tweaked it slightly with 15g (total) of salt and doubled the honey to 50g. As the dough was slightly more wet, also added 25g more of flour. I've made this in loaves and also as round bread in a dutch oven (make sure you spray or butter to avoid sticking!). For my oven, 20 minutes and this bread has already reached temperature and avoids it from getting too dark. 30 minutes were dark loaves. 24 minutes and still almost very dark. The longer it cooks, the crustier the outside though! This bread was preferred over the Italian bread my parents normally eat. Plus love the simplicity of the recipe. Thank you!
Victor @ Taste of Artisan says
You are very welcome, enjoy! I like how you tweaked it to your own taste, I do it all the time. Happy baking!
Sally Hu says
The thing about recipes with a sound foundation is that it can be tweaked to suit individual preferences. For clarification, you have made both baguettes ("loaves") as well as round-shaped bread baked in a dutch oven? Is the latter easier to make? Which of the two does your family prefer ... or is it a tie? Thank you for sharing.
JB says
Hi Sally,
I actually split the dough in two and made one a baguette and one a round loaf. I used the dutch oven to help keep the shape of bread. The dough is the same either way, but sometimes we prefer larger slices rather than a smaller baguette. So I think it is really just a matter of preference. I will say it is easier cutting the baguette than the round loaf. 🙂
I saw your post above and was curious why your third baguette is different. The first I made the recipe, I just took the dough and cut it in 3 fairly equal sizes and then stretched to rectangles. They were all essentially the same or at least similar. The second time I didn't bother with the rectangles and just let the dough rest in the shape - baguette or loaf, so I think like you said, you can tweak the recipe and directions as needed. Not sure this helps in the least, but throwing my two cents out there. 🙂 Good luck!
Steve says
When baking is it better to bake vs bake with fan???
Victor @ Taste of Artisan says
Steve, both my old electric and the new gas ovens have fans. I tried baking baguettes with them but the crust forms and browns too quickly, I wasn't impressed with the resulting ovne spring, and I never liked the end results. So, the simple answers is NO to convection based on my experience. Good luck!
Sandra says
I love this bread. It has such good flavor with the addition of the honey. Very easy recipe. I have made this several times. It is my go-to recipe for baguettes. I use tupelo honey. It has excellent flavor for this recipe. Thanks so much.
Victor @ Taste of Artisan says
You are very welcome. Enjoy!
Jeffrey Wong says
NEW USER HINTS for this great recipe:
1. I found it a bit easier to stretch and fold the dough with wet fingers—less dough stuck to them.
2. I couldn’t slide all three baguettes off the parchment paper at the same time. Transferring them one at a time will take a few seconds longer and doesn’t materially affect the final result.
3. Do check several minutes early on the final phase of baking because your oven might be hotter than Victor’s. My first baguettes were dark. My total baking time was 4 minutes less on subsequent batches.
Victor @ Taste of Artisan says
Thank you for your feedback, Jeffrey. To be clear, I bake ON parchment paper. I used to place baguettes on a lightly floured wooden pizza shovel and then I would slide them off onto the baking stone, but that is somewhat challenging plus all the flour makes a mess in the oven. It's easier to just arrange baguettes on a piece of parchment paper and then move them all together to the oven.
Lena says
I was trying to read through the comments and wanted to know that since you don’t advise baking directly on cast iron, do you think placing a baking sheet on top of a cast iron would work better than baking on 2 stacked baking sheets? Or do you think the bottom would still burn at the high temps?
Victor @ Taste of Artisan says
I always recommend experimenting and figuring out what works best for you. I know there are many bakers baking bread in cast iron cookware with satisfactory results. I had issues with bottoms of my bread sliglty burning (but enough for me not persue this method) but I did not experiment enough to figure out how to fix that, I am sure there probably is a solution, like what you suggested - placing a baking seet on top. I can't say as I've never tried that. I've had excellent results baking on a stone and so I didn't seriously explore other methods. There isn't a better way to tell other than trying for yourself and seeing what gives you the results you are looking for. I always do that and I sometimes I discover some really cool things. I hope this helps somewhat. Happy baking!
Lisa says
I have a gas oven - will this process for creating steam work for me?
Victor @ Taste of Artisan says
Yes, the process for steam is the same. I also now use a gas oven and everything is the same except the baking time, which is now about 12 minutes with steam and about 12 min without.
MICHELLE says
i would love to try your baguette recipe. Quick question, I have a 12"x 30" flat cast iron griddle. Could I use this instead of the baking stone? Look forward to trying this!
Victor @ Taste of Artisan says
Michelle, anything with a good heat capacity will give baguettes a nice oven spring, cast iron included. I have to mention that I am not a big fan of baking bread in/on cast iron because it tends to burn the bottom of bread for me. Perhaps, if I bake at lower temps it will be fine, but not at the temps that I like to bake my bread and/or not in my oven. So, yes, cast iron will work, but you need to be careful the first time you bake and assess as you go. You may need to drop the temps a little to avoid burning if that, in fact, becomes a problem. Good luck!
Zara says
Does this 100% need to be left in the fridge for 12-20 hours or will 3-4 hours in a room temp room be ok?
Victor @ Taste of Artisan says
There are hundreds of ways to make a baguette and each year hundreds of Paris bakers enter into a competition for the best baguette in Paris. Yes, you can make a baguette without overnight cold retarding but it will be a different baguette. Happy baking!
George says
I have a huge issue with this recipe....ONCE YOU TAKE THEM OUT OF THE OVEN YOU CANT STOP EATING THEM!!!....Perfect taste and fabo crust....Thank you so much from my taste buds but my waist is not happy with you....LOL
Victor @ Taste of Artisan says
LOL I hear you. Same problems here but hey, we only live once. You've got to try my bagels, focaccia and pizza dough... I am sure you will love them as well. Enjoy!
Katie says
Fantastic recipe, I’ve made it twice now. I scale it down to make 2 baguettes and it works perfectly. I’ve tried many baguette recipes over the years and this is by far the best - it is also surprisingly straightforward as long as you plan ahead for the long resting time.
Victor @ Taste of Artisan says
Thank you for the kind words, Katie. Straightforward, simple and consistntly great resullts - this is what I wanted to achieve when I developed this recipe. I love baguettes and I wanted to be able to make them at home all the time without fuss. Another benefit is that my kids learned the process and now make baguettes themselves every now and again. This helps me and they've learned a great skill. Happy baking!
Birgit G De La Torre says
I have tried several baguette recipes that gave less than optimal results. This recipe is a keeper. I am so happy to have found it.
Victor @ Taste of Artisan says
Enjoy!
Jane says
Simply Amazing
Denise says
Thank you for the recipe and tips! Our foreign exchange student from France has been impressed. One thing I’m struggling with is the bread is getting dark within 15-20 minutes - to the point that I have to take the bread out because it is starting to burn. I tried moving the rack down (farther from the top of the oven) but the bread is still getting dark/black long before the 30 minutes are up. Taking it out early saves it from burning and the bread is still done (not doughy) but it lacks the hard crust of an authentic baguette. (I followed all instructions.) Any suggestions?
Victor @ Taste of Artisan says
I am happy to hear it, Denise. It's one of the best compliments I can get. Thank you.
So, as far as browning too soon and starting to burn. Some of my readers have reported the same problem while most don't seem to have this problem.
I suspect that this has to do with one or a combination of the following:
1. Faulty oven thermostat. Your oven may be baking hotter than it's reporting. If this is the case, drop the temp by 25F and try again. If the problem still persists, drop the temp a little more and try again. It may help to get a BBQ thermometer with a probe and test your oven's actual vs reported temperatures.
2. You oven just bakes differently or more efficiently. My old cheapo electric oven which I used to develop this recipe baked perfectly within the specifid time. I've also referenced several baguette recipes by professional bakers, like Chad Robertson. He also suggests baking his baguettes for 15 min with steam at 475F (preheated to 500F) and 10-15 min at 450F. So, these temps/times work in his oven, they worked in my electric oven, how do we fix this? If your oven's temps are correct but it just bakes more efficiently, I suggest shortening baking times. My new gas oven is like that, 15-15 is too much for baguettes at the propsed temps. I've experiemented and settled on 12-12. So, I bake with steam for 12 minutes and 12 without.
3. Another culprit may be convection. Some newer ovens bake with a fan on to produce even heating/browning. I do not recommend baking baguettes with convection as I've never had the desired results with it. If that's the case, turn the fan off.
Hope this helps. Happy baking!
Denise says
Thank you Victor! I did as you suggested and played with the time and temperature. Lowering the temp a little and shortening the baking time gave me the perfect end result. Thank you so much!!!
Victor @ Taste of Artisan says
Glad to hear it, Denise. Please, check out my other recipes: bagels, focaccia, bisquits, Neapolitan Pizza, English muffins, cinnamon rolls, bread... Happy baking!
Richard F Henderson says
Best recipe I've used to date. A lengthy process but so worth it. Need to figure out how to make more each time though.
Victor @ Taste of Artisan says
LOL. I hear you, I'd like to make more too but I am usually too busy/lazy to do two batches back-to-back.
Yes, lengthy, but the hands-on time is not... and the more I make them the more my hands-on time becomes a breeze and I barely notice it. I make my baguettes in-between other tasks so it feels like I only spend a few minutes here and few there.
Sarah Winston says
I am just making this for the first time, and compared to other breads, I thought the hands-on time was pretty low. It's just the usual waiting to proof/rise, so, like you, I do other tasks. And by that, I mean, marathon streaming horror shows, because it's Halloween Month now. My bread came out golden, the way I like it, made in my new Black and Decker toaster oven (6 or 8 slice, large enough for a 12-inch pizza) The texture and crumb is magnifique! This is my new go-to French bread recipe for sure! Thanks so much for sharing it.
Victor @ Taste of Artisan says
I love a good horrow show/movie. You are very welcome. Glad you had success with my recipe, Sarah. Happy baking! Do try my other recipes.
Sukie says
Amazing results! Also was able to skip the steaming and use a small toaster oven to make two mini baguettes (just working with what I have…). Put the toaster to highest setting for 15 min makes perfect mini versions. Never have to buy baguettes in stores again!
Victor @ Taste of Artisan says
Happy to hear it. Enjoy and happy baking!
Sarah Winston says
Hey, Sukie! I used a toaster oven too, but a brand new, large and wide one. I was amazed a toaster oven can make this recipe so good and you get real, honest to goodness bread!
Thressie Venning says
Hi, I am new at this. Trying for the first time. What is the stone you are using to put in the oven to heat before you put the bread on?
Thank you
Thressie
T
Victor @ Taste of Artisan says
This is a cordirite stone cut from a kiln shelf. I got it from a local pottery store. The shelf was a bit larger than I needed so they cut it for me to 16" by 21".
You can also get a heavy duty baking/pizza stone. Make sure it's heavy duty.
Lisa says
I’m very excited to try your recipe and method for making baguettes. Your instructions large very thorough and your answers to the many comments answered my questions and beyond. Thank you for the inspiration and advice to try something outside my comfort zone!
I’ve been baking bread and rolls for ages since “helping” my French Canadian grandmother bake as a small child but I’ve never ventured to try baguette. Her recipes were so delicious she sold them at my grandfather’s gas stations/garages in town, but she loved to tell the story of her most famous (or infamous) fan, John Dillinger, who said he traveled back to their resort town just to have more of her baking! She passed when I was very young but the smell of baking, especially baking bread, always brings me back to that stool in her kitchen.🥰
Wish me luck!
Victor @ Taste of Artisan says
Hello Lisa, thank you for the kind words. I would have loved to try your grandmother's baking creations... I hope you find many good recipes on my blog and enjoy them like I do. I only post my favorite family recipes and hope others will enjoy them as well. Good luck with your baguettes. I hope they turn out great on the first attempt and if not, give it another try or two, and you will see an improvment. Sometimes it takes a little bit of practice. And if you take some pics to share, that would be great. Happy baking!
Paula says
These came out really great for me. My first baguettes. I'm so pleased. I definitely need to work on my shaping, but they are crisp and have such a nice crumb!
Victor @ Taste of Artisan says
Enjoy!
Ally says
Can you clarify? You say to put the stone with the short side parallel to the oven door, yet your photo shows the short side perpendicular to the front of the oven? Thank you!
Victor @ Taste of Artisan says
No, that's just the angle/cameral lens that makes it look like that. My stone is 16" x 21", the oven isn't deep enough to fit 21".
Bjorn says
1. Your oven isn't deep enough to fit 21"
2. Doesn't that mean that it HAS to be the 21" side that is parallel to the door?
Brian says
Having trouble with timing. If I can’t finish the process right away after the 12-14 hour time in the fridge, is it better to take it out or leave it in?
Also, will a pizza steel work in place of a stone?
Thanks
Victor @ Taste of Artisan says
You can leave the dough in for up to 48 hours. Steel is a good option. Happy baking!
Katie Printen says
Help! Do you bake the loaves on the parchment or slide off the parchment onto the hot stone?
Victor @ Taste of Artisan says
I bake on parchment. It will be exremely hard to slide them off parchment. Good luck!
Lourie Tabron says
digital kitchen scales are the stuff that i always use on my kitchen when i weight things”
Karen says
Thank you for sharing, the bread comes out nice and light and is delicious. I had to reduce my last cooking time by a little bit.
Victor @ Taste of Artisan says
Glad to hear it, Karen. In my gas oven, I bake for 23-24 minutes - 12 with steam and 11-12 without steam. It's normal as different oven bake differently. Happy baking.
Beth says
Can you think of a way to do this with an electric mixer? I don’t have confidence in my stretch/fold. Would it work to knead with a dough hook for 5 mins and then let rise for an hour and a half? Any insight is appreciated! I’m excited to try this.
Victor @ Taste of Artisan says
Beth, mixing dough in a mixer will break and change the texture. I would advise against that. Check the video in mu focaccia bread recipe, you will see how stretch and folds are done, it's a lot easier than you think, I am sure of it. Good luck!
Francois Kruger says
Could you link to the video directly? I can't find the video on the Focaccia recipe.
Victor @ Taste of Artisan says
Hi Francois, the video is at the end of the Focaccia post, just above the recipe card. You can also view the video Youtube if you follow this link: https://youtu.be/ZnaJItpvf5Y?si=oHaRbkP9hhJt7jB2
Sandy D says
My dough collapsed in the refrigerator after 36 hours (I forgot about it) while cold retarding. Can I still use it?
Victor @ Taste of Artisan says
It means it over-fermented. Best to start over.
Nitin says
I tried the recipe yesterday and it worked great but noticed something missing. The outside is not as crisp and crumbly as baguettes in Paris. What can I do to fix this?
Victor @ Taste of Artisan says
It's hard to say without knowing what exactly you are referring to. Not crisp and crumbly? Was the crust rubbery/bendy? That could be because of too much pretein in the flour / too much gluten. It could be because of too much humidity in the oven during the second part of baking, etc. If you give me more details about what exactly you did and more details on what the problem was, it would be easier to pinpoint what needs to be changed.
Nitin says
Good point about too much humidity in the second part. Trying it again tomorrow so will definitely let you know. Also, is a baguette pan an alternative since I don’t have a large enough stone?
Victor @ Taste of Artisan says
Good luck. I've never used a baguette pan but I've heard people have success with it, so, yeah, it's an alternative.
Marina says
Hi Victor! I am excited to try this recipe out. However, 3 loaves is too much for my husband and I. Can I half the recipe? If I do, do I half every measurement?
Victor @ Taste of Artisan says
Marina, simply divide the ingredients in grams by 3. When shaping, you want to maintain similar thickness to be able to bake at the same temps, so you should have one regular length baguette from the 2/3 of the dough and half-length baguette from the remaining 1/3 of the dough. Good luck!
Steve C says
Born and raised on Brooklyn NY Italian Bread. This recipe actually is the closest bread I have found to the bread I grew up on. I substituted one tbsp of water for the honey. I tried the 16 hour cold proof vs four hours of folding my dough every 45 min or so. Honestly there was not much difference. Absolutely love this bread recipe.
Victor @ Taste of Artisan says
Glad to hear it, Steve. Enjoy!
Mady says
Hey! I'm excited to make this recipe tonight, but I don't have a baking stone. Any alternative recommendations?
Victor @ Taste of Artisan says
Mady, if you search the comments, we discussed many options. In a nutshell, you need something that will accumulate enough stored heat. A baking sheet will work but a stack of several baking sheets will work even better. Baking steel, unglazed tiles are among other options. Good luck!
Vince says
The first recipe that resulted in a wonderfully open crumb. Thanks Victor!
Victor @ Taste of Artisan says
Glad to hear it, Vince. Enjoy!
May says
Hi. The recipe is fantastic, Thank You. I've made the baguettes several times. The only thing I can't get right is after cutting the slits, they seem to seal up and does not create those beautiful cracks seen on the baguettes. I weight everything out including the water and follows the recipe to the "t". My dough is very sticky and during the slitting process the dough is pulled and sticks to the lame. Any hints on this would be appreciated. Thanks
Victor @ Taste of Artisan says
May,
increasedecrease hydration by 3% (or more if needed), that should help with stickiness. Sometimes it's just a matter of getting used to working with more hydrated dough. Once you are comfortable with lower hydrration, you can work your way back up. Or stay there if you are happy with the results. Happy baking!Gil Bul says
Hi, you probably meant "decrease hydration", right ?
Victor @ Taste of Artisan says
Gil, you are correct. I fixed the typo in my response. Thank you for notin. Happy baking!
Jocelyn says
You mentioned the short side of the stone be parallel to the door. Your picture shows otherwise. I’ve always had the Long side parallel to the door since it won’t fit the other direction
Victor @ Taste of Artisan says
Jocelyn, I can't recall where I said that, but I clearly mis-sppoke or maybe was talking about something else. I have a 21" x 16" stone, I wouldn't be able to position it with shorter side parallel to the door and be able to close the door:)
Lorraine says
Super easy recipe! I have made this twice using bread flour and they turned out excellent. They also freeze well. I take a loaf out and let it thaw then toss is a hot oven for 5 to 7 minutes. Taste just like fresh baked! Thanks for the great recipe!!!
Victor @ Taste of Artisan says
You are very welcome. Enjoy!
Chris says
Made these with strong bread flour (excellent results) then tried it with traditional T65 French bread flour. Astounding. Took me back to being a kid on holiday in Southern France. Flavour, texture, crunchy crust the lot! Using the latest batch to dunk in some mussels tomorrow…😋😋😋
Victor @ Taste of Artisan says
Happy to hear it. Enjoy!
Isabelle says
Just made this bread and it turned out amazing. I thought this type of bread would be harder to make, but it was super easy. Thanks for this and the step by step instructions.
Victor @ Taste of Artisan says
You are very welcome Enjoy!
Dave says
Ok, total newbe here. The stretch and folds after mixing ingredients. It appears that you say only touch the dough one time (lift one side and fold under, then pickup the dough and turn upside down) per iteration. Am I reading that right? So really only 3 lift and fold actions over the hour and a half.
Victor @ Taste of Artisan says
No, you lift and stretch 4 times each S&F time. Check out my recipe and video for focaccia. You can get a better idea how I do it.
Rhoda Zingale says
I have a question for this forum. I purchased eikorn all purpose flour and can't seem to work with it. My breads are very dense, cookies look and taste weird. I use the whole wheat flour in most breads, but only us about 100 grams as it too seems to change the texture. I love the concept of this healthy ancient grain, but have had no success with the all purpose and have 15 lbs of it.
Anybody know how to use this?
Rhoda Zingale says
Came out perfect first time around. So glad I found this site. Will be making the sourdough rye next. I am a crazy bread maker, so sourdough starter is always on hand. So simple to make these baguettes just need time.
Victor @ Taste of Artisan says
Enjoy!
STEPHANIE says
I have Active Dry Yeast. Do I need to dissolve 1 tsp in warm water before adding to dry ingredients or do I add 1 tsp of (undissolved) yeast and use warm water?
Victor @ Taste of Artisan says
Active dry yeast needs to be dissolved in warm water and activated (need to see foam cap appear) before adding to the rest of the ingredients. Hope this helps. Good luck.
Newbie says
Can I make two larger baguettes or is there a size where the insides don’t cook properly?
Victor @ Taste of Artisan says
That's a fantastic question. I've noticed this many times, when I take dough from one recipe and shape it or bake it differently, the texture and the taste become vastly different. I've baked this dough as one large batard and it made a great bread, but it tasted nothing like baguettes. As far as cooking properly, they will cook just fine, you may need to add a few minutes of baking time, it's not an issue. Good luck!
Katie B says
These are amazing. I made them last week and loved them so much that I decided I needed to make them again. I sent some with my sister and she thought they were delicious. I have plans to try your Neapolitan pizza dough this week, because it's all I keep thinking about since I saw it last week. Thank you!
Victor @ Taste of Artisan says
You are welcome, Katie. Enjoy!
Farida says
Hi, this looks great! What temperatures would you recommend for convection baking?
Victor @ Taste of Artisan says
The usual recommendation is 25F lower. I don't use convection for any of my breads though.
April says
This bread recipe is so delicious. I’ve made it several times for meatball subs, Italian subs, and bread for soup night. Thank you for the amazing recipe.
Victor @ Taste of Artisan says
Enjoy! Happy baking!
GJohnson says
How do I preserve the crispy crust when I make it to give away or store in my freezer? It seems I loose the crispy crust when I wrap it once cooled and put in a ziplock bag. I love the recipe!
Thank you!
Victor @ Taste of Artisan says
To be honest, the only way I know to do that is to bake fresh baguettes 😉 They are best fresh hot out of the oven. I let them cool all the way down, then wrap them tightly in Saran wrap and store them at room temp. Most are devoured before then ha-ha. Happy baking!
Sara says
Ive had great luck with putting the frozen baguette in a 250 oven for 20 min to warm it up! Tastes great and you get the crunch.
Janet says
I made baguettes before using another recipe but the dough was very difficult to work with and almost impossible to shape. Your recipe is fabulous! The dough was wonderful to work with and the bread was delicious 😋. Thank you!
Victor @ Taste of Artisan says
You are welcome. Glad to hear that you had success with my baguette recipe, Janet. Happy baking!
Georgianne says
How do I keep the crisp crust? It seems like once they cool and you wrap them, they go soft. They still taste great. I want to make some ahead for family, but I want the nice crisp crust. I guess I would have the same problem when I keep some in the freezer? Thank you for the wonderful recipe!
Victor @ Taste of Artisan says
You are very welcome. Yeah, as I mentioned before, the crispiness is hard to preserve. I've noticed that if you let them cool down uncut, they soften up. The same is true for any bread. If you cut it in half while hot, a lot of steam will escape. That moisture is what softens the bread up during cooling. If you cut them right after baking, they will be less soft. Perhaps you can try that but there are downsides to that option as well.
Liz Bulasko says
Hi, I made a different recipe recently which also used the cold fermentation method - and a tiny bit of honey - and it turned out great! Now I'd like to try yours this weekend. My only issue with the other recipe was that I don't have a stone so I used a heavy cast-iron griddle and the baguettes were just starting to burn a tiny bit on the bottom. Her recipe called for preheating the oven to 500 and then turning it down to 450 after the baguettes went in. Before I invest in a stone, I was thinking of trying a baking sheet turned upside down. Thoughts about that? A lot of recipes seem to call for a baking sheet rather than a stone. Even the King Arthur site gives that as one of several options. Thanks...
Victor @ Taste of Artisan says
Sorry, I have no idea about the other person's recipe specifics. There are many ways to make a great baguette, mine is just one of them.
Liz Bulasko says
I was asking about whether the baking sheet turned upside down would work with your recipe. Anyway, I made your recipe that way a few weeks ago and it turned out great! So many reviews of baking stones say they cracked on first use...I may look into contacting a pottery supply store, as you suggested.
Victor @ Taste of Artisan says
Happy to hear it, Liz. Yes, you can have a baking sheet or, better yet, you can stack several for more stored heat, which will potentially give you a better oven spring. That probably matters less so for baguettes them being relatively skinny compared to a large loaf of bread, where you must use a good, thick baking stone. Please, understand that we all speak coming from our own experiences, standards, and needs. So, when I say you need a baking stone may not be necessarily true for someone who bakes baguettes 2-3 times a year. I also bake a lot of things on a stone, from baguettes, to Uzbek obi-non bread, to focaccia, to large 3-5 lbs loaves of bread, and much more. A stone for me is indispensable.
Getting a kiln shelf from a pottery store is probably one of the best choices, if not the best if you want to get a stone, as opposed to baking steel which I am not very familiar with. Those kiln shelves are very thick and rarely break. I've had mine for many years, had spills and what not, and it's still going strong. Another great thing about them is that I asked to cut mine to the exact measurement and they did, I think mine is 21" by 16", which allows me to bake 3 long baguettes of a pretty standard length of 55-65 cm, or close to that. I use a larger oven now, so I could probably go to 22" but the extra benefit will be little anyway. I am veyr happy with mine.
Amazon baking stones are not created equal. Some are very thin and crack easily. I went through 2-3 of them before I got a heavy duty one, it was thicker, and it lasted me a lot longer, but I also learned by that time to take a better care of it, no spills of any kind, etc. I replaced it with a kiln shelf as I wanted something much more durable as I bake a lot and I don't want to tip-toe around my stone, it's a tool, not some delicate flower that you should take gentle care of.
Mel says
I would say to go for the baking stone or a pizza steel. They are well worth the money and work well for breads And pizzas. I have both and wouldn’t want to be without. O don’t have top of the line but they are elk seasoned and I’ve had the stone for close to ten years.
devon says
You honestly do not need a stone... you can use a cookie sheet... and put it in your oven while it pre heats and then slide your baguettes on to them.. .it works just fine. Also go to your local goodwill or thrift shop to buy a stone...
Victor @ Taste of Artisan says
For optimal results, you need something that will provide enough stored heat to ensure a proper oven spring. A cookie sheet is not enough, IMHO. A stack of several cookie sheets will work OK based on my experiments in the past. If you search the comments, you will find more information on this. A baking stone or steel would be ideal. That said, if you are happy with the results from baking on a cookie sheet, that's all that matters.
Cheryl fong says
I’m Terrible at shaping but these were great instructions! I didn’t add the honey since I deemed it optional but the dough was lovely and bubbly and stretchy. Since I sew, I just quickly cut a rectangle of heavy linen for the baguettes to rest on! Loving it!
Victor @ Taste of Artisan says
Happy to hear it, Chery. It makes my day when my readers, especially those who are new or somewhat new to bread baking, succeed with my recipes. That's my main goal. There is nothing like well-made homemade bread, especially when it's fresh hot out of the oven. It's almost impossible to buy anywhere here. I used to live in Germany and we had a small bakery right around the corner from my building. I'd go there every morning and get the freshest, the most delicious bread I had ever experienced in my life. It spoiled me so much that when I moved, I had to start baking my own bread. LOL
Steve says
Absolutely fabulous recipe. Made baguettes for Easter dinner, and family and friends couldn’t stop talking about how great they were. And these are all people who have lived in and/or traveled to countries where fresh baguettes are a staple. Thanks so much for sharing this recipe, as well as graciously answering people’s questions.
Victor @ Taste of Artisan says
You are very welcome, Steve. So happy to hear it. Enjoy!
Brittany says
Hello,
Question…can you let the dough cold retard past 14 hours? I plan on prepping this evening, but cooking tomorrow night.
Thanks in advance!
Victor @ Taste of Artisan says
Yes, you can. Up to 24 or even 48 hours is fine.
Kathy Ritter says
This is an amazing bread recipe. Thank you.
I love that it has very little touch time, but develops flavor over 2 days.
Thank you for sharing.
Victor @ Taste of Artisan says
You are very welcome. Enjoy!
Arlene says
I have T55 flour. Would I change the hydration percentage?
Victor @ Taste of Artisan says
I wouldn't. I use T55 La Milanaise from Quebec with the same hydration, works well.
Steve says
Just made this for a large group of family and friends. Having lived in Europe, our standards were pretty high. The recipe is absolutely killer. As good or better than we’ve had in France or Belgium. The recipe is well explained and easy to follow. Everyone loved the baguettes…..there was nothing left but crumbs by the end of dinner. Thanks so much for this recipe!
Victor @ Taste of Artisan says
Glad to hear it, Steve. There is nothing like these baguettes, hot from the oven, with a smidgen of butter on top that melts from the residual heat... oh my... I love making little mini sandwiches with this bread, a little butter, a slice of salami... or a slice of tomato, a basil leaf, and some olive oil with a touch of salt and pepper... delicious!
Abogado Trafico Orange Va says
This recipe is great. Love the flavors in this comforting dish! Sometimes I make this and the bread a meal on its own. Love it, it is very fresh.
Victor @ Taste of Artisan says
Enjoy!
Pauline says
I have a question…have you ever added sourdough discard to your recipe? If so would you care to share how please?
Victor @ Taste of Artisan says
Pauline, I use sourdough discard to make most of my same-day breads but I haven't tried it with this specific recipe with cold retarding. I did use it to make same-day baguettes though. My starter is 83% hydration so when I add 100-120g to a 500g flour recipe, I just add it on top in stead of substituting it in. I don't bother adjusting the hydration either, only the salt content. I'd usually bump the yeast to 5g if I want faster fermentation and/or use 85F water.
ΓΕΩΡΓΙΟΣ ΚΟΝΤΟΣ says
Superior taste. I made it twise and it turned out perfect. I use Greek bread flour. Well done Victor you get it right. George.
Victor @ Taste of Artisan says
Thank you for the kind words, George. Enjoy and stay tuned for more of my favorite recipes.
Paolo says
I have made these 2 days in a row and the flavor is awesome. Mastering the perfect looking baguette is challenging, luckily it is delicious practice. The thing I am wondering is how long do you let the dough warm up after you take it out of the fridge (after cold fermenting). Thanks, always really enjoy your recipes and feedback.
Victor @ Taste of Artisan says
I don't, I do it exactly as written in the instructions. That said, if the temp in the fridge is too low and the dough did not double in volume, you'd want to let it rest at room temp until it does. This is not typically required.
Linda M says
I have been trying many different baguette recipes, and I keep coming back to this one! It is fabulous.
I do have a fine-tuning question. What is the ideal water temperature when you first mix all the ingredients? Instant yeast typically needs warm water between 110 and 115°F to activate. Is it better to get the yeast activated in a small amount of warmer water first, and then add it to the mixing bowl with the rest of the water at room temp water? Or, should I use 80 degree water? Or regular cold water?
Thanks again for this recipe!
Victor @ Taste of Artisan says
Linda, I use water at room temp in this recipe. It's water from a re-mineralizing RO filter that sits under the sink. Instant yeast does not need 100F - 115F to activate. Happy baking!
Anatolii says
I wish we all could share photos of our baguettes!
This was my first baguette ever. I was certain it would come out awful looking and unsuitable to eat. Well, to my great surprise it came out AWESOME looking and so DELICUOUS! Despite that it was in the fridge for 11hr, and didn't double in size when I took it out of the fridge, the outcome was beyond expectations. Everyone in my family loved it!
I used a baguette tray (wavey perforated sheet metal) for 3 baguettes instead of bakers couche and stone.
I have a question, though: there came out 3 baguettes about 4cm diameter each. Next time I'd like to split them into 6 baguettes 2cm diameter each and maybe even a bit longer. How many minutes do they need to be baked for with water pan and after? Same 30 min or shorter?
https://tasteofartisan.com/wp-content/uploads/2023/08/baguettes-2.jpg
https://tasteofartisan.com/wp-content/uploads/2023/08/baguettes-3.jpg
https://tasteofartisan.com/wp-content/uploads/2023/08/baguettes-4.jpg
https://tasteofartisan.com/wp-content/uploads/2023/08/baguettes-5.jpg
Victor @ Taste of Artisan says
Hi Anatolii,
You baguettes look fantastic, you've mastered them, my friend. That's a million dollar crust and the crumb with those huge holes is amazing. I am very happy that they turned out great for you and my recipe was of help to you. (For some reason I can't attach them to your post, but let me try to fix that).
To your question, I would probably keep the water-pan part (with steam) about the same, maybe drop to 10-12 minutes, but the second part will likely need to be shorter. I would keep an eye on them and pull them out as soon as they have sufficient browning.
Keep in mind though, there is a good reason why baguettes are shaped they way they are shaped and they all have similar thickness, though they vary in length. And the reason for that is once you've change the thickness the texture changes as well. Take this baguette dough and shape it into a boule or batard. It will naturally require a longer baking but the texture and the taste will be very different. It will taste like bread, not baguette. On the other side of the spectrum, once you've made them thinner, they will will taste more like bread sticks and the thinner they are, the less like baguettes they will taste. These are my observatiosn based on my experiments. So, if you want a baguette, it's a good idea to keep the same thickness. If you want 6 baguettes, scale the recipe 2x. That's my recommendation but feel free to experiement. I've discovered so many cool new things while doing that. Happy baking!
Victor @ Taste of Artisan says
Anatolii, your pictures are attached. Thank you for emailing them to me. The baguettes look scrumptious.
Linda says
I made these today and they turned out awesome. The taste and colour is perfect! However I am beginning to realize I may have an intolerance to gluten. I have searched online for gluten free baguette recipes and I see the ingredients and method is completely different for gluten free. Why is that? Also do you have any ideas for a gluten free recipes. Any help on this would be appreciated.
Thanks so much
Linda
Victor @ Taste of Artisan says
Hi Linda, thank you for the kinds words about my baguette recipe. I am sorry to hear about your gluten intolerance. I wish I could help but I've never baked any kind of gluten-free bread. I can look through my countless bread books and see what I dig up. If I do, I will email you.
Nancy says
Can you please share any gluten-free bread recipes you find, I’m the only one in this family who isn’t gluten intolerant and it’s a challenge to find ‘great bread’ recipes…thanks!
[email protected]
Victor @ Taste of Artisan says
Let me take a look and see what I can do.
Liz Bulasko says
Hi, Victor, I was planning on making this tomorrow with the Bob's Red Mill Gluten Free 1 to 1 Baking Flour so I can share a loaf with a neighbor who has gluten issues. My understanding is that the Bob's flour can be used in place of any wheat flour in any recipe...or at least that's what it says on the bag. I hope that's correct! I've used it a lot but never in bread baking...
Victor @ Taste of Artisan says
I don't have experience with BRM gluten flour so I can't comment on that but do try. Experimenting is the best way of learning and discovering new things. Happy baking!
Georgianne says
I am making these for a second time now, but this time for a neighbor with homemade French Onion Soup. The bread is delicious. I just want to double check 2 things…
1). Is the dough suppose to be sticky and stay that way until the rise on the baker’s couche?
2) I have been using table salt —should I have used Kosher salt instead?
Thank you for your wonderful recipe!!!
Victor @ Taste of Artisan says
You are very welcome.
The dough is sticky initially but strengthens and tightens by the time you are done with stretching and folding. It will remain tacky but not sticky to the point where it sticks to your hands. If you weighed your ingredients, it should be fine. If you used cups, anything goes.
Table salt is OK if you weigh it. If it's too fine and you use spoons to measure it out, you'd need to use a little less. I prefer to use kosher, sea or Himalayan salt.
Good luck!
Katherine says
Dear Victor,
Thank you for this recipe. I’ve been cooking and baking my whole life and this is by far the best baguette I’ve had. I use it also for hamburger buns and they take a burger to next level. I am however not happy with the extra lbs on my bathroom scale. Keep up the great work, you are appreciated.
Victor @ Taste of Artisan says
LOL. You are very welcome, Katherine, and thank you for the kind words. Enjoy!
Patti says
When stretching the dough before the cold rise, do you cover your hands in oil or flour to prevent sticking? This is my first time using this recipe but my dough is very sticky. Every ingredient has been weighed to the exact gram. Thanks!
Victor @ Taste of Artisan says
No, never oil your hands as it will affect the dough. It's sticky initially but the dough will strengthen over time and should be just tacky by the end. If you feel like the dough is too sticky for you to comfortably work with, drop the hydration by about 1-3%. Once you get more comfortable with it, work your way back up... or stay at the lower hydration if you like the results.
Kaitlin says
Hello! What would be the best way to freeze this recipe, if at all? Thank you!
Victor @ Taste of Artisan says
Kaitlin, I don't freeze my dough or cooked bread so I can't speak to that but search the comments, a number of my readers did that and shared their experience. Good luck!
Lorna says
Hello. Can I use regular yeast? We do not often get rapid yeast on the island. Thank you.
Victor @ Taste of Artisan says
Yes, you certainly can. I stopped using traditional dry yeast because of inconsistent results.
Mimi Verdone says
Would you increase the amount ?
Victor @ Taste of Artisan says
Considering that it has fewer active cells, it would make sense, though typically, they recommend a 1:1 substitution. But that's not the issue. My experience with traditional yeast was that it would not kick in reliably no matter the amount of yeast. I hydrated it in warm water with some sugar and/or dextrose and still had inconsistent results. Try increasing the amount by 50% and letting it activate in a warm place with some sugar until you see good foaming. You can even make a little starter going by feeding it with a little bit of AP flour, letting it ferment for a few hours, then mixing in the final dough. Yeah, this is a little bit more work but it's a sure way to get spot-on results. You need to experiment and see what works. No need to go to extra lengths though if a simpler approach works. I am all for simplicity as when recipes get complicated I don't make them often or stop making them entirely.
Priyanka Chakraborty says
I used active yeast, and as I had halved the ingredients, I used 1.5 gms of yeast, and added it directly to the ingredients mix by mistake. Then I read your reply for the active yeast question, and added another 3 gms to 1 tsp of water and honey, proofed it, and then added to the mix. And then followed all the directions. But before the cold retard, the dough was quite sticky. I added some flour to the dough, and kept for cold retard. Hope it will be good. Fingers crossed.
Victor @ Taste of Artisan says
Hope it works out. Good luck!
Lisa S. says
These are the best baguettes we've ever had!!! It is so worth being patient.
Tim Robinson says
After 2 years of Covid Baking I finally baked the best baguette yet. It's every bit as good as a bakery. Great recipe and technique! Thanks.
Victor @ Taste of Artisan says
You are welcome. Enjoy!
Magdalena says
Dear Victor,
These baguettes are amazing! I had a perfect result on the first try. I've been battling baguettes for years, with limited success. This is it. You recipe is fantastic. Thank you!
Victor @ Taste of Artisan says
You are very welcome, Magdalena. Thank you for the kind word. Enjoy
vj says
is there anything i could use instead of a pizza stone?
Victor @ Taste of Artisan says
A stack of baking sheets will work. You want something that will provide enough stored heat to give the dough a good oven spring. Search the comments, this has been discussed a number of times, you should be able to find what worked for some of my readers without a stone. Good luck.
Yoli says
Wow! Thanks Victor for this recipe. They turned out wonderful. I followed the recipe exactly except for the honey. I did pull them out at 25 minutes, though. They were nice and golden brown. Delicious crunchy crust, so yummy. I didn’t score too deep it seems. How deep should the blade go?
Thanks again!
Victor @ Taste of Artisan says
Glad to hear it, Yoli. Thanks for your feedback. I never really measured how deep I score, but I'd say nowadays it's about 1/4" to 3/8". If you score too deep they may not spring. Too shallow and they will not open enough. You can score a bit deeper but do it at a 30-40 degree angle, this way you will get nice ears. Hope this helps.
Yoli says
Thanks!
Alicia says
Hi, do you use a Kitchen Aid mixer with dough hook to mix, or simply hand mix in a bowl with a mixing spoon? Thanks!
Victor @ Taste of Artisan says
Hi Alicia, no mixer, only by hands. You could use a mixing spoon but your hands are better suited for that. As you mix, squeeze the dough between your fingers, smother it on the walls of the bowl, this will give you a very even ingredient distribution.
WendyB says
I made this in my Emile Henry Baguette Baker, following the recipe to a tee, up until the time I made it into 5 baguettes for my baker. 5 delightful mini loaves. I will definitely do this recipe again as the results were very very good! Thank you Victor!
Victor @ Taste of Artisan says
You are very welcome, Wendy. Thank you for your feedback.
WendyB says
Victor, would there by any reason that I could not make these into 4 mini baguettes? I have been gifted an Emile mini baguette baker that I want to try. Do you have any suggestions? TYIA!
Victor @ Taste of Artisan says
Hi Wendy, no reason. You can do 4, or even 6 just keep the thickness about the same. Sorry for the late response, I see that you've already tried that and it worked for you. Happy baking!
Ramble says
So far the best recipe for French Baguettes that I have made. Thank you!
Victor @ Taste of Artisan says
You are very welcome. Enjoy!
Joseph Fidaleo sr says
Total baking time 30 minutes. I don't think so unless you want a
piece of charcoal.
Victor @ Taste of Artisan says
Different ovens bake differently, sometimes very differently, due to faulty thermostats, convection features that can't be turned off, and some other factors. In my old electric oven that was exactly the time it took, and that's what most people use. In my new gas oven, it takes 24 minutes total. Yours clearly bakes differently so adjust to how your oven bakes, it's a simple fix.
Ali says
What temperature does the water need to be at the start when mixing everything together?
Victor @ Taste of Artisan says
In this recipe I use room temp water.
annette says
I have made this baguette many times over the past year and love it! The best part is that this week I had French friends from Paris staying with me so I baked them baguettes before they arrived. They loved it!! And said it was every bit as good as what they had in Paris or better. And they are French, so you know they would be honest! I admit that I do use French organic flour bought on Amazon because I have many gluten-allergic students who do not tolerate American flour but who have no problem with French organic flour. Interesting, isn't it? Mille fois merci !
Victor @ Taste of Artisan says
Wow, what a compliment! Thank you. I am glad you liked my recipe. I also surprised to hear that people may have a reaction to gluten in American flour but not in French as both contain gluten. Could it have to do with one being organic and the other not? Some trace elements from pesticides causing the reaction? Anyway, I've used many flours to make baguettes, including a range of organic and non-organic whole-grain flours from a local mill, and I still think that the best-tasting baguettes are the ones made with KA AP flour and organic La Milanaise AP (T55) flour from Quebec. Happy baking!
Loren says
My wife was born and raised in Paris and had the same comment. It was such a compliment to hear that my baguettes are as good, if not better, than her local boulangerie. Kudos to you Victor!
Victor @ Taste of Artisan says
Thank you so much for the kind words, Loren. That's quite a compliment. Happy baking!
Stephanie says
This is the best baguette I have ever made-great taste and structure. Thank you!
Victor @ Taste of Artisan says
You are very welcome, enjoy!
Alyssa McCord says
We just got back from Europe and we already miss the baguettes! The first day I overcooked them a bit (didn’t adjust temp for the convection oven). Today they came out just a tiny bit darker than I prefer, I did 15 min then rotate and 10 min. I think tomorrows will be 10 min, rotate and 10 min. But this is just my adapting to my oven.
The taste is ON POINT! Even my 9yo said “yep, this tastes like Europe!”
I have been baking bread for 20 years and this was the easiest, most hands off approach I’ve ever done. With the taste and the menthol this will easily be a daily or every other day thing in our home.
Thank you!!!
Victor @ Taste of Artisan says
Glad to hear it, Alyssa. It took me many batches to develop a easy and straightforward process that works consistently every time. Glad you and my other readers are benefiting from it. It's hard, sometimes impossible, to find a good baguette outside of France, besides they are best fresh hot out of the oven. Happy baking!
Claire says
I am in love with this recipe.
It worked well the first and second time and the third time I felt like I really hit my stride. Thanks so much for the excellent recipe and clear instructions! This recipe is a keeper!
Victor @ Taste of Artisan says
You very welcome, Claire. Glad to hear that you like my recipe. Enjoy!
jh says
Why do I have to use honey? Can I use malted barley ?
Victor @ Taste of Artisan says
Feel free to use anything you desire, there is more then one way to make a great tasting baguette and tastes differ too.
Kathy says
I think many people thought like I did that the honey would make the bread taste sweet. It doesn’t. I decided to follow the dang recipe and it was absolutely superb!
Thanks!
Victor @ Taste of Artisan says
Glad you think this way. Enjoy!
Ronit Naudin says
I've been making those incredible baguettes for months now and they are amazing....so easy and fool proof. Thank you for the incredible recipe, my entire family is thanking you as well.
Victor @ Taste of Artisan says
You are very welcome. Happy to hear it. Enjoy!
estelle Howell says
this are the best instructions I have ever come across. And I will be making this bread. With this detailed instructions I am sure I will be making wonderful Bread. Thank You Victor.....
Victor @ Taste of Artisan says
You are very welcome, Estelle. Happy baking!
Vera says
Hi Victor
Can I cold prof for longer say 24hrs
Victor @ Taste of Artisan says
I find that 24-48 hours is optimal, after that the dough starts to change and not in a good way, IMHO.
Angela says
Can i use a baguette pan?
Victor @ Taste of Artisan says
Not my preferred method but yes, you can. There are many ways to make a great tasting baguette.
Niin says
I have never responded or commented before and my fam literally called this recipe beautiful…
Just sayin’
Folks aren’t going to lose weight with this one.
Victor @ Taste of Artisan says
LOL Enjoy!
Mary Ann says
I can only find parchment paper that is safe to 450. What kind do you use that can withstand the 500 oven?
Victor @ Taste of Artisan says
I use regular parchment paper from Walmart, it works fine. It will brown and become brittle but it works fine. I even use it 2 times when baking two batches. By the way, you won't be baking at 500F, it's 475F and then 450F.
Kris says
I just want to contribute to the praise for this baguette process developed and described by Victor. This is the second time I have tried to make a baguette in the past few years. I am not a bread maker, but I crave baguettes, and I have just had to buy then from local grocers. From my last attempt at making one from scratch, which resulted in a dense, spongy crumb, I had to find a new process. I am seeking the airy crumb shown in the photo. This blog showed up in my search results. I read through several recipes on different sites, and this one just stood out. First, it is written from the heart. Next, it covers the attention to preparation, and ingredients, and then the process. While following the recipe, I was not really sure of what I was doing. I was not kneading the bread much, just squishing the ingredients together. In the fridge, the dough was not doubling in size, yet I stayed the course. After 22 or so hours, I ended up with these wimpy looking baguette rolls that I scored at the top before sliding them into the oven. In 10 minutes, I turned on the oven light and found them blossoming and resembling the robust baguettes I see in the photo. After pulling them out hot, the crust was a bit tough to slice, but wonderfully crispy to bite into and chew on. Finally, an entire house of family guests, including the proprietor of a well-regarded local restaurant, were singing praises of this baguette, going back to slice off another piece, each for themselves, and others for every niece and nephew. Thank you for sharing this. I felt like a bread hero, and I will be trying this again soon.
Victor @ Taste of Artisan says
You are very welcome, Kris. Glad my post helped you. Thank you for the kind words, I really appreciate your detailed feedback. Happy New Year and happy baking!
Bobbie Power says
Followed this recipe to the letter, turned out perfect. This was my first time making baguettes, although I have been making bread for a long time. Absolutely great recipe. Thank you! I was wondering if anyone has tried adding some white whole wheat flour?
Victor @ Taste of Artisan says
Bobbie, I made a batch for the Christmas Eve and two batches yesterday again upon request. I am glad I had helpers make the dough for me so I all had to do was take it out of the fridge and go from there. Anyway, I'd love to hear from others on incorporating WW flour into the dough, but I can let you know that I've tried making these baguettes with various types of flour, including WW, white (fine-sifted) whole grain flour, spelt, einkorn, and many more. Some flours change the texture and the openness of the crumb, some change the taste/flavor/color. Substituting honey for liquid malt changes color and flavor, I wasn't a fan of it but some people do. It will really depend on your taste to say what will work well and what won't.
I can tell you one thing, for my taste, nothing beats the 100% KA AP flour and a little bit of honey, as per my recipe. I like subbing about 5% rye flour, it add complexity to the flavor and a touch of sweetness. This is my close second. As is a baguette made with French T55 flour. I use organic La Milanaise T55 from Quebec, it's coarser than KA AP but produces amazing crumb with really good flavor. The rest of the flours and flour combinations worked, some better than others, but I've always seem to want to go back to the KA AP or La Milanaise. I've also made them with organic whole grain AP and bread flours from the local mill, but didn't like the results as much. The crumb was not as open, and that rich wheat flavor that I thought I'd love like I did in my sourdough bread, just didn't work as well in baguettes. It's had to explain this but I knew I didn't like it as much as the original after the first bite. Happy baking!
Madeleine says
I made this last night for New Year’s Eve and they were a huge hit! Absolutely delicious - perfect crumb, crust, and taste. However, my baguettes weren’t as nice and golden as the pictures and were quite dark/brown, even after just the initial 15 mins. Anything I should change to get that colour?
Victor @ Taste of Artisan says
Different ovens bake differently, many report incorrect temps as their thermostats are off from the start or change over time. Dark brown after the initial 15 min tells me that the oven is too hot and/or humidity is very low. Mine are pale brown after 15 min in the electric oven or 12 min in the gas oven. Drop the temp by 25F and try again. You can also reduce the time from 15 to 12 min for the first half. If you cook with convection, turn it off. Good luck.
Tess says
I made this recipe thrice in a week!! Delicious. Is it safe to double and follow the same instructions for proving/baking?
Victor @ Taste of Artisan says
Tess, you can double safely until the last step - baking. I could never get the same crispy exterior and color when I bake (in my non-commercial oven) double the recipe or 6 baguettes which requires two stones on two racks. Happy baking.
Stephanie says
I've been making this bread weekly for a few months now, the recipe is flawless! Perfect every time. Thank you!
Victor @ Taste of Artisan says
Happy to hear it. I made three batches just in the last few days;) Enjoy!
Rita says
This is my second time making these and I can’t get enough. I half the recipe and make smaller baguettes and they’re perfect for 4 servings.
Victor @ Taste of Artisan says
Enjoy!
Kristen McLaughlin says
Thank you!
Gabe says
Tried this recipe. INCREDIBLE!! Came out unbelievably good! This was my first try at French bread and the loaves look like they came from a French bakery! My only deviation from the recipe is that because of my 6600ft altitude, my total cook time was 20 minutes for a golden brown/crusty exterior and fluffy interior. Thank you so much for sharing this recipe.
Victor @ Taste of Artisan says
You are very welcome. Happy baking!
Patti says
I just noticed the amount of flour. 3 1/2 cups of King Arthur Flour is 420g. You have 500g.or 3 1/2 cups of flour, a typo?
Victor @ Taste of Artisan says
No, not a typo, I measured several times myself. The weight of the same flour will vary depending on how fresh it is and/or how it was stored, on the ambient humidity level. That's why it's best to weigh your ingredients.
Shaide says
ABSOLUTELY DEEEEELICIOUS!!! This is our FOREVER GO TO French bread. THANK YOU!!!!
Victor @ Taste of Artisan says
Enjoy!
Spanner says
Best baguette recipe on the internet!
Victor @ Taste of Artisan says
Glad to hear it. Happy baking!
Mik says
Hi Victor!
Thank you for such a great education and explanation of the baguette recipe! I have tried various different baguette recipes and with a lot of different opinions on hydration percentages, flours and salt.
I am going to try this recipe with my fingers crossed and hoping for the best!
I have a few question, what is the difference in using all-purpose flour versus bread flour for a baguette? And then what type of salt would you recommend using? I have used fine sea salt, normal table salt, and kosher salt.
Thank you so much in advance! 🙂
Victor @ Taste of Artisan says
Hi Mik,
Technically, bread flour has a higher protein content which results in a chewier texture and more open (larger holes) crumb. In practice, I don't see a significant difference that would make me strongly prefer one over the other. Both baguettes taste great, have similar open crumb and big holes. When I use high gluten flour, I see a huge difference in how chewy the bread becomes. Too chewy but I use it every now and again when I want that texture. Some AP flours many have lower, sometimes much lower, protein content compared to others so those may not give you good results. I'd recommend trying different flours that are readily available to you and picking what works best.
As far as salt goes, I mostly use either Himalayan, Mediterranean sea salt, or Kosher salt. Medium to coarse grain.
Happy baking!
Mik says
Hi Victor!
Thank you so much for the advice, I truly appreciate it so much!!! I’m gonna give it a go and keep you updated, thank you again!
Mik
Victor @ Taste of Artisan says
You are very welcome. Happy baking!
Don Adleta says
Just like at Chev Paul!
Victor @ Taste of Artisan says
Better;) Enjoy!
Arie says
Just baked my first baguettes! Tastes wonderful!
I found there was no sliding off of parchment? (I live in florida) I had to pick them up and set on stone Think I messed up my lame cuts by doing this or I didn’t cut deep enough.
If I want the baguettes a bit lighter in color should I lower temperature or take out of the oven a bit earlier?
If I wanted to brush with olive oil and sprinkle a little sea salt. When would I do this step?
Victor @ Taste of Artisan says
Arie, I bake on parchment, no need to slide them off, not that they would anyway, the tend to stick to it. When I want them to slide off, I use my wooden peel.
If you want your baguettes lighter in color, I would suggest baking at a lower temperature. You could bake them less but It will be easier to achieve a consistent color by baking at a lower temp.
If you want to glazem them with olive oil, do it very gently before putting in the oven and immediately after taking them out, that will give you the best looking result. The salt would be applied after the first coat of olive oil prior to baking. Don't know how it will hold up to the second brushing, but you may find that one coat of olive oil is enough. Happy baking!
Ryan says
I've been following this recipe for about a year. Love these. Depending on what I plan to use them for sometimes I use the same recipe but only make 2 loaves (massive meatball parmesan sandwiches anyone?)
https://photos.app.goo.gl/LJYzkfPHz3YDhUQq6
Victor @ Taste of Artisan says
Mouthwatering! Your bread looks fantastic. Enjoy!
Frankie says
Wow! Well done on the bake job! Can you advise if you use the pan/water/towel method to steam the bagels? Thats the hardest part for me to get right, the steam in the oven. Thanks.
Fara Allen says
This is my favorite bread recipe of all time. Exactly as you’d expect in a bakery baguette, light and airy inside, crispy outside. Perfect for butter, jam, or dipping in soup. Told
My husband today - “making French baguettes Thursday”. Husband - “I’m so excited!”
Victor @ Taste of Artisan says
Very happy to hear it, Fara. Happy baking!
Jean says
Is there something else you can recommend to bake the baguette on other than a large baking stone? Would a large sheet ban work?
Victor @ Taste of Artisan says
Anything that can provide a lot of stored heat, like a stack of baking sheets. If you search the comments, this was discussed in detail. Good luck.
Christopher says
Hi Jean. I make this excellent recipe all the time and just use a sheet pan with a piece of parchment paper on the bottom to bake them. They are perfect every time.
Cheers, Christopher.
ron says
Love the baguettes!
Victor @ Taste of Artisan says
Happy to hear it.
Tracy Bunovsky says
I have tried my hand at sourdough recently and have a starter that I have been using. Can I substitute that for the yeast to use as a leavening agent? If so, what hydration % do you suggest?
Thanks in advance!
Tracy
Victor @ Taste of Artisan says
Yes, you use the starter. If you seach the comments, a reader posted his forumula that worked well. Regardless of using sourdough starter or commercial yeast, you shouldn't need to change the hydration. Good luck!
John says
Hi,
The recipe is great. I've tried it twice and love the results. However my dough is very sticky. It sticks to the parchment paper and it's almost impossible for me to get a good score even with a razor blade. It just sticks to the blade. Is that expected? Thanks for a great recipe.
Victor @ Taste of Artisan says
John,
drop hydration by 2-3%, it should help. I don't know if you use cups and spoons, but if you do, that may be the problem. It's best to weigh the ingredients out on an accurate scale. Sometimes flours can be more hydrated, ambient humidity higher than normal, both can impact the dough. The goal for you to have a dough that is comfortable to handle. Higher hydration produces better crumb, so you may decide to work your way back up as you get more comfortable with the process.
Patricia says
I LOVE THIS RECIPE!!!! This is the best. I am trying to make mini-baguettes . . . about 65 grams each. They do not come out like this. They are wonderful but not mini versions of the photo. (I am in Arizona . . . humidity 7%!) What changes should I make?
Patricia
Victor @ Taste of Artisan says
Patricia, when you say they do not come out like this, what exactly is different? But I think I know what you mean. I've taken this baguette dough, shaped it into a batard or boule and baked at the same temps and it tasted nothing like baguettes. I don't know if there is anything that can be done about it.
Patricia says
Crust is not as springy . . . does not brown. I put pan at bottom with water for steam. (One day I broke oven glass pouring water into pan. Now I put in pan EARLY. Crust is a bit hard and there is a thin of white string between dough and outer crust. Also, not big holes. I LOVE THIS RECIPE and would like to find out what I am doing wrong. Also . . . can I lower the honey measurement alone or do I have to make other adjustments? Thank you for all your help.
Patricia
Victor @ Taste of Artisan says
Hi Patricia,
Pouring hot (or cold) water into a hot pan is a bad idea, it creates a lot of steam at once which can cause burns and/or oven damage, like it did in your case. I stupidly followed someone's advice a long time ago to pour water over hot lava rocks to create steam. A LOT of it. Did it two or three times and my oven stopped working. It's best to pour hot water in a cold pan and place in the oven, letting it heat along with the oven. That way you get a slow, consistent release of a small amount of steam throughout the baking process. Just follow the instructions in my recipe and you will be good.
My crust is more crisp and brittle rather than springy. It does soften up as the bread cools down and becomes more springy. If you want the crust that is softer and more springy, bake at a lower temperature.
No browning means you temperature is lower than it should be, many ovens' thermostats are not or become inaccurate over time. It's also possible that there are cold spots in your oven that cause that. Rotating or baking with a fan could help with that. Also try baking at a higher position in the oven.
Yes, you can reduce or remove honey altogether if you want to, no need to make any other adjustments.
Hope this helps. Good luck!
Patricia says
I also forgot to mention that I am baking in a baguette pan, the non stick with holes and 3 dips across. My bread was fine for a few months and then it changed. I am so confused.
Victor @ Taste of Artisan says
I don't have any experience with baking on a baguette pan, perhaps there are nuances that you need to know about, which I wouldn't know about. Perhaps someone who does can comment on.
But if all was well then suddenly changed, perhaps your oven malfunctioned. I would check the thermostat.
Dean says
Hi I was wondering if I could add butter to the recipe but I’m worried it would affect the bread because I know that honey and butter are good for making the bread softer but I only tried it on another recipe
Victor @ Taste of Artisan says
No!!!!!! LOL Please, don't add any butter until after the bread is done baking. Take it out of the oven, slice, spread some butter and enjoy. Happy baking!
Capri says
Amazing! I wish I could post a photo of my baguettes
Edit: added the picture for you.
https://tasteofartisan.com/wp-content/uploads/2022/10/baguettes-from-reader.jpg
Victor @ Taste of Artisan says
Hi Capri, your baguettes look fantastic. Love the rustic look. Thanks for sharing the picture.
PP says
Hi.
I will be having a go at making this bread within the next couple of days and wish to keep it a little more authentic by using French T55 flour. Also because we dont have all purpose flour in the Channel Islands.
Would you recommend leaving the hydration level the same or changing it slightly?
Thanking you in advance for any advice or suggestions you may have.
Victor @ Taste of Artisan says
I use French T55 every now and again, it's La Milanaise brand from Quebec. It's slightly coarser and darker than KA AP flour. I don't change the hydration when using it and the dough feels relatively the same. The difference, if there is, is not noticeable. If the flour is very fresh and more hydrated, you might want to drop the hydration a little.
Max says
Hello Victor, I tried making this recipe for the first time today. I accidentally used 00 flour instead of all purpose, the flavour inside is wonderful but I found the crust to tend to burn and not quite become golden brown. Any suggestions as to what I might be doing wrong ? I feel like I followed the recipe other than mixing up type of flour.
Victor @ Taste of Artisan says
Max, when the crust burns or darkens too quickly it's usually because of lack of humidity/steam initially and/or too high of temperature. It's possible that your oven cook hotter than the thermostat indicates, you can try baking at a lower temp, say drtop it by 25 degrees and go from there. Good luck.
Rath says
Hi Victor,
This was my first ever loaf of bread that I tried making and it was a huge success! I have made it 3 times now in the last 2 weeks and everyone loves it!
I found another recipe to try (my 2nd time ever baking bread) and enjoyed it but liked this recipe better. One big difference was this called for less than half the yeast of the other one,for roughly the same amount of flour. I am curious, what happens if instead of 3g of years you were to use 5 or 8? Would it turn out ok? Would you need to make adjustments to an god the steps? My guess is you would need to cut the 12 hour cold retardation down so the additional yeast don't eat up all the sugars. Any thoughts?
Thank you again for the amazing recipe, I am excited to try some of your other ones!
Victor @ Taste of Artisan says
Hi Rath, happy to hear about your success. You are very welcome. I am going to post my favorite focaccia recipe in the near future, everyone raves about it when I make it. You should try it.
To your question about the amount of yeast. Not many people realize it but time and temperature are also bread ingredients. More yeast will expedite fermentation, lowering fermentation temperature will slow it down. And vice versa. This may/will change how the bread tastes. Sometimes we need a faster fermentation to accommodate our schedule. It all depends on what you are trying to achieve. As I've been saying for years, there are hundreds of ways to make a good baguette. The trick is to balance out the ingredients with time and temperature and your process. Once you get that balance, you will have a great-tasting baguette. It took me many attempts to get my baguettes taste how I wanted them to taste on a consistent basis. Happy baking!
Liz Rahal says
When you say "rotate the baguettes"..
Do you mean to turn them pointing a different direction in the oven or to turn the bottom side up?
Victor @ Taste of Artisan says
poiting a different direction (rotating 180 degrees).
Emily says
Would you ever do a sourdough baguette recipe?
Victor @ Taste of Artisan says
Yes, I make sourdough and hybrid dough baguettes as well. If you search the comments, there is some information on how to make this recipe with a sourdough starter.
KONTOS GIORGOS says
Perfect recipe. I made it 2times.
Jenine says
I was accidentally delivered someone else's baguette pan which I was told to keep and found myself here in a hunt to find out how to use it! Would this recipe work on a baguette pan instead of the stone?
Victor @ Taste of Artisan says
If you search the comments, you will find references to that. I believe at least one person tried with success.
Glynda says
I made this two nights ago, and am baking another batch tonight. Excellent recipe, great with pate or in French onion soup.
Mike says
I use baguette trays for this recipe. However i do turn them over for the last 10 mins or so just to make sure they golden on the bottom as well.
Kathy Robinson says
Made this recipe a few times and it is a hit!!! I made it again last night and forgot to put the dough in the fridge to proof :/ have I ruined this batch ?
Victor @ Taste of Artisan says
You don't have to put it in the fridge. The rule of thumb that I use is to ferment until the dough doubles and proof until the dough increases in volume by about 50%. This can be done at room temp or in the fridge (cold retarding). Cold retarding can be partial or full, you can cold retard fermetnation or proofing, or both.
Meg says
I have a baking sheet but not a stone, is it even worth trying? I'd really like to try this recipe but I'm not going to be able to get a stone anytime soon.
Victor @ Taste of Artisan says
Meg, the stone is not a requirement but is highly recommended. The reason we need a stone is because we need all that stored heat from it to be transferred to the dough which causes it to get an oven spring - puff up or rise if you will. I've successfully baked baguettes on baking sheets in the past, but I'd use 2-3 of them to get more stored heat. Check the comments, some of my readers have done that.
Meg says
Replying to myself to say that I gave it a shot and it actually worked quite well! I ended up baking the baguettes on an upside down jelly roll pan. I didn't have a couche or parchment paper, either. I'm sure those tools make for a more perfect outcome, but my baguettes are chewy and golden and make wonderful crackling sounds, so I'm happy. This was a much better result than my first attempt at baguettes, when I used a recipe that didn't call for the cold retardation, just a normal rise. That definitely made all the difference.
Laura says
Really good!!!!
Emma says
What is the best way to rotate the baguettes if I don’t have a pizza shovel thing??
Victor @ Taste of Artisan says
Emma, I rotate them by hand all the time. Wearing long oven mitts, I grab all three of them from both sides in the middle, pull them out about halfway, rotate all three simultaneously, then put them back in place and space out as needed. Quick and easy. You can pull the rack out as much as it will go, it will help too. Good luck!
Jon says
Many baguette recipes I see require spraying the dough with water before placing them in the oven. Apparently helps with the crust. Thoughts?
Victor @ Taste of Artisan says
Tried that a long time ago, it produced a shiny, fused kind of crust which I did not like. Some may like it. Good steam is all you need to get a perfect crust.
Lis says
Hi Victor:
Your recipe is easy to make, dough rises well, baguettes turn out tasty. However I still have a problem that is the baguettes look fine in the baking process but afterward when they cool down they become deflated to a flatter surface. Why? How to retain the baguettes “body” afterward? Thanks
Victor @ Taste of Artisan says
Hi Lis, when you cut into bread right after it comes out of the oven, a lot of steam comes out. If you don't cut it, the steam will soften bread from the inside. If you want bread to stay crunchier/crispier, cut a piece off, let it cool down then wrap tightly with plastic wrap. This will help. To a point of course, nothing stays fresh for a long time.
mitch wikins says
Victor! this kind of success is addicting! Fabulous crust and crumb!! I've been baking baguettes a long time but these are the best! A link to the results:
https://www.flickr.com/photos/19089828@N00/albums/72177720300127302
[url=https://flic.kr/p/2nuBryN][img]https://live.staticflickr.com/65535/52175961482_8cfe615fb1_c.jpg[/img][/url][url=https://flic.kr/p/2nuBryN]20220627_094103[/url] by [url=https://www.flickr.com/photos/19089828@N00/]rynegold[/url], on Flickr
As you can see in my pics of my oven, I've used 8"x 8" square, high quality teracotta unglazed floor tiles for the baking stone; mine say "made in Italy" on the back and are approx. inch 5/16 or so in thickness. They are inexpensive, and can be cut to fit; mine as you can see go almost to the edge of the rack.
Regards, mitch
Victor @ Taste of Artisan says
Thanks for sharing pictures, Mitch. Your baguettes look fantastic. Perfection! Happy to hear about your success. Like your baking tiles, those can be easily put away. Happy baking!
Denise Algarin says
Wow.. your bread looks bueautiful…
Steve says
Great Recipe and process. Making these for the 3rd time. Thank you!
Victor @ Taste of Artisan says
You are welcome, Steve. Enjoy!
Anita says
HI
I have traditional yeast - not instant. How do you substitute?
Victor @ Taste of Artisan says
Just hydrate/wake it up properly, and make sure that it's strong and very active before adding it to the dough. I used it before but found the results to be inconsistent. Instant works flawlessly on the other hand.
Bob says
This is my go to bagette recipe - it never fails me. I always make enough to freeze a few loaves too. I find one thing in the instructions that confuses me though...
After the initial mixing and resting it says "Over a period of 1 1/2 hours, do 3 sets of stretch and folds". It seems to me is should be over one hour, not 1-1/2.. For example. S&F, wait 30 minutes - S&F, wait 30 minutes, then S&F. At which point I put it in the fridge to ferment overnight.
Am I missing something?
Victor @ Taste of Artisan says
Hi Bob, this comes from the fact that typically after you mix the dough you let it rest for 30 minutes and up to an hour, then do S&Fs. Hope this clarifies it.
Marcia says
I've made this bread about 10 times ... still trying to perfect it, but absolutely wonderful recipe! Any chance of a video of the whole process Victor? Thank you!
Victor @ Taste of Artisan says
I will try to do it in the near future.
Mr. Robert Ashton says
An excellent recipe, although I swap out about a tablespoon of malted barley for the honey: I find it adds a little more depth with the sweetness, and it’s a traditional amendment. It’s very difficult to get the amount of steam in a typical kitchen oven that is available in a bakery’s steam oven, so this technique yields a perfectly acceptable and tasty, if somewhat old-fashioned, loaf, rather than the shiny, somewhat more dense loaves from a good commercial baker. These are rather reminiscent of bagels, while this recipe transports me back to a French country kitchen.
Victor @ Taste of Artisan says
Traditionally, no amendments are allowed but I love that little sweetness that honey adds. Malted barley is a grain, it will be a bad substitution for honey. You must have confused it with liquid malt extract (LME). LME introduces a nuttly flavor profile, while honey flavor profile is more floral. Neither is better than the other, it's a matter of personal taste. LME is less sweet, about half as sweet as honey, so to use it my recipe to attain the intended sweetness, I'd recommend doubling its amount relative to honey.
Jack Kephart says
I'll see your tbsp of malted barley and raise you 50 grams of malt flour (I mini mashed this with 150 grams of the water and then boiled it to denature any remaining enzymes). I work at a brewery and our system makes a couple pounds of "waste" malt flour a week. I learned the hard way then read that bread dough does not like large amounts of malt...or more specifically enzymes from the malt.
It's in the fridge tonight, will form and bake them later today
Alvin says
What is the absolute, nips-deep amount of time you can leave this to ferment without ruining the dough? I love the ferment-y flavor as well as the texture breads get when they're fermented for long periods of time.
Victor @ Taste of Artisan says
I've gone as long as 72 hours and found that 48 is where I'd stop. After that, the dough feels like it loses structure. Depending on the temp, it may also overferment and become too tart.
Robin says
I followed the directions to the tee but my baguettes didn't fully rise and they were too crispy on the outside to really eat. Not sure what happened.
Victor @ Taste of Artisan says
There are many variables that could affect the results - the flour (even the same brand of flour could be less or more hydrated depending on freshness), the ambient humidity, how your oven bakes - yes, everyone's oven is different, how well you steamed your oven during the first part of baking, etc. Provided you used a baking stone that was well-preheated, poor rise can be attributed to under-fermenting, under or over-proofing, improper scoring, and insufficient steam. If the bread came out too crispy, bake less or at a lower temperature. Not enough steam will cause premature browning too. I would experiment and make adjustments specific to your oven for the best results. Back in the day, this recipe went through dozens of changes until I got it dialed in where I'd have optimal and repeatable results with my oven. It seems to work for most people who tried it but definitely not for everyone and in those cases some adjustments will be needed. Good luck.
Carmine says
Did. Anyone make the bagels? Would like to hear about your experience
Thanks
Vicki says
Excellent recipe!
Best bread I've ever made.
Thank you for sharing.
Joyce says
Hi Victor, thank you so much for this amazing recipe! I've followed the instructions exactly except I don't have a baking stone. My baguettes came out a little ashy and dark looking. I'm very happy with the crumb and the flavor but just want to know how I can get the aesthetic appeal of the baguette like yours does. Would I be able to send you a photo? Thank you so much and I appreciate you reading and responding to all of your comments!
Victor @ Taste of Artisan says
Joyce, everyone's oven bakes differently, sometimes significantly so, so adjustments need to be made. It seems as though reducing the temperature and/or baking time would help. I will email you so you can send me a picture, I may have a better idea on this.
Carl says
Hello Victor,
I have had several attempts of making your baguette, but with mixed results. I have a couple of issues. First of all, on the little Caribbean that Iive, there is no bread flour, so I use all purpose flour. So I have tried reducing the hydration level to 70% and even 68% and I appear to get better results. The few times it turned out right, got positive comments from the family and once a visitor said it was the best bread he had on the island.
The other problem is the bread never quite look the same even in the same batch. A recurring issue is that the bread rises with peaks and valleys. It is as if the bread doesn't rise evenly. Even so it taste great. I use an electric fan oven. It only happens when baking the baguettes.
I'll be very greatful for any light you can share on this matter.
Thank you
Victor @ Taste of Artisan says
Hi Carl, I am often asked why some of mey bread recipes use AP flour vs bread flour. To be honest, I use both interchangeably and the differences are very minor. You can make a great tasting baguette out of any flour pretty much. I've used pastry, AP, bread, WW, wholegrain (AP or bread flour that is milled out of the entire wheat germ), T55, T65, spelt, combinations of flrous, and even King Arthur high-gluten flour. All tasted very good though they differed in texture, crumb openness, chew and appearance. The difference between white AP and bread flour is insignificant to me. So, feel free to use any flour, really.
The issue of peaks and valleys, I think, is related to underfermentation, insufficient rest, or too strong gluten development. I've had this issue before a few times. When the dough isn't sufficiently relaxed, you have a hard time rolling it out into a long, uniformly thick log. What will happen is that you will have thinner and thicker parts which during baking will rise differently. Underfermented dough may lead to this too. In the end, you want the dough to be soft, well-rested and well-aerated when you shape it. It should not resist when you roll it into a log. If it does, that's when you may see this problem.
On hydration - it really depends on so many things - the flour itself and the humidity in your kitchen will impact how the dough feels, how hydrated it will be. Experiment and settle on what works best for you and what gives your best results. No need to strive to get it back to, say, 72 or 75%. In the end, what you want to have is great results combined with the ease/comfort of making the bread because if you don't feel comfortable making/handling 75% hydration baguette dough you won't be making it often, and that is not good;)
Good luck and happy baking.
James says
Still curious about kneading. You suggest simply missing ingredients, forming a bulk dough, letting it rest, then over two hours doing several “slap and folds” to build gluten structure. Other videos, including those from professional French bakeries, show mixing machines kneading for 10 minutes or more.
In your view, what’s the difference? I can’t help but think slow speed kneading in a spiral mixer/KitchenAid, along with several slap and folds. would result in a better structure, especially with higher hydration levels. I’m almost afraid to just try several slap and folds and let it be. But your method obviously works too.
Victor @ Taste of Artisan says
There are dozens, maybe hundreds of ways to make a good baguette. I suggest you pick then one that you care comfortable with and that gives you the results you want and go with it. Happy baking!
James says
Great. Will do (ps, typo. meant “mixing” ingredients in earlier message). 😊
Carmine says
Hi James,
I have been “studying” artisan baking for about 15 years. In classes with 2 professional bakers, and let me say this. Victors blog and the instructions if followed, and it does take some time to “practice” baking techniques, you will find to be one of the easiest approaches for especially the home baker. In 3 days I taught my granddaughters how to mix, stretch and fold, cold ferment, shaping, baking and watch them as they produced some excellent baguettes, boules and batards. They baked on stones and in clouch. They now send me photos of the breads they are making. We even did pizza baking.
I read dozens of Artisan bread baking books. Big bakeries likely move to machines. But lots do stretch and fold, some do turn and fold. Read, learn in class, but develop and use what you find best for you and you “ bakery”. Try it all if you have the patience. My family and friends always ask me to bring breads to the parties. That is the best compliment. And thanks to Victor for his instructions💕.Carmine
James says
Such a kind reply. Thanks!
Deb says
I’ve made this recipe for about two years now, and it’s absolutely the bomb!!!!!!
Best recipe ever!!
It is so good people ask me all the time for the recipe. They can’t believe it’s homemade.
I only make two loaves, and I omit the honey.
I’ve never needed the total amount of cooking time that’s given either, as its a bit burnt. I usually do 10 minutes on 475°, then 5-8 on 450°. I test with a thermometer until it reaches 180, and take it out, less if I want to reheat it the next day.
Victor @ Taste of Artisan says
Glad to hear it. Enjoy!
Jan says
Hi,
This will be my first baguette attempt. Can I use a recently purchased scalloped metal pan to bake? If so, do I need to adjust oven temp/time? Thanks so,much!
Victor @ Taste of Artisan says
Jan, you can generally use any material as long as it's thick which will help hold a lot of heat. That heat is needed to give the dough the initial oven spring. No temp adjustment is needed. Ideally, stone or steel/iron are best. I
've baked on multiple baking sheets stacked together way back and it worked.
James says
I’m going to likely get a steel. i’d like a larger one for the entire oven shelf. Is 3/8” thickeness sufficient? Does it make a difference if it’s two pieces or a single slab? Mine would need to be 12x22” and a single slab may be very heavy.
Victor @ Taste of Artisan says
James, it looks like 3/8" is pretty standard although I am not very familiar with baking steels. All I know is that some people prefer steel for baking pizza due to steel's higher thermal capacity and heat transfer which results in faster cooking and crisping up. If it's too thick you may have problems with the bottom cooking too fast relative to the top. A solution to that would be baking at a lower temp but it may cause other issues like the tops not browning... something to think about. I use a custom-cut 3/4" 16" x 21" kiln shelf (cordierite), that's what I am most familiar with as far as baking baguettes.
As far as a single slab vs multiple, it won't matter as long as they lay flat. Back in the day, I used unglazed ceramic tiles with good results.
Auntie Annie says
Greetings!
Your recipe looks wonderful! I'm hoping you can offer counsel on one of the ingredients. I have made a Sourdough Starter that I converted to T55 and Bread Flour for feeding. When I do a discard, I replenish with 50gr SS, 100 gr Spring Water, 50gr Bread Flour, 50 gr T55. Can you please advise me on how I might adapt your recipe to be able to use my T55/Bread Flour Starter in place of packaged yeast? Also, will the quantity of water in the recipe require adjusting to accommodate for the wet Starter?
Many thanks!
Kindly,
Auntie Annie
Victor @ Taste of Artisan says
Hi,
please take a look at Jeff's comment on June 21, 2021. He provided an excellent sourdough version of this recipe which he successfully tried many times.
Another way would be to make a hybrid douhgh with sourdough starter and some commercial yeast to give the dough more lift. I know some French bakers that do this. There is not right or wrong way here, lot's of good options.
James says
My error. It’s not 60 percent hydration. It’s 72.
Victor @ Taste of Artisan says
Correct, it's 72% plus the honey which bumps it up a bit higher. 75% is typical for French baguettes but many novice bakers have a challenge shaping and handling dough at this hydration level. Always better to start a little lower and work your way up... or just stay there if you like the results.
James says
Hi. I’ve been making a poolish preferment pizza recipe and used it for baguettes. I have read many times that the most traditional baguette recipe uses poolish. Yours is direct. Why the difference?
Also, you mention 75 percent high hydration from a baguette, but your recipe is actually a rather low 60 percent. Can you explain?
The technique you describe is similar to mine, but I used poolish, 75 percent hydration and an overnight cold ferment with great results.
Steve B says
Wonderful! a US site that doesn’t use bonkers measurements. (‘About’ is the operative word for volumetric measures lol).
The baguettes look wonderful! will try soon, I’ve got some French T60 flour, have to experiment with the hydration a bit. A sourdough version would be great?
Victor @ Taste of Artisan says
Lol... I tell everyone to use metric measurements as those will give repeatable results... I see more and more people do... I like T55 for my baguettes but T60 will do to, quite common in France... daker, coarser but mnre flavor.
Tharinee says
May I substitute anything to baking stone ?
Such as using higher temp instead ?
As I am using deck oven and quite difficult to set upper or lower rack.
And also for the heat pan with hot water , can it be substituted by water spray or a glass of water put aside the dough ?
Thank you very much for your suggestion indeed.
Victor @ Taste of Artisan says
I've baked on a stack of three baking sheets with good results, you just need enough stored heat to get a nice oven spring. A water spray may work but do it a few times, eg. at 0, 2, 5 and 7 minutes or so. There isn't one way, feel free to experiment. Happy baking!
Dean says
Have had varying success with yeast breads over the years ( i live at 4,500 ft) and have avoided them as a rule. But I gave this one a try and it has come out perfect three straight times and the taste and texture is wonderful. It is easy to make too, this is now a staple at our home.
Rc says
Fantastic recipe....I cold retarded for 24 hrs...delicious
Daniel says
Is there a "fast" way to do this? Let's say you're pressed for time and you need baguettes this evening, and all you have is maybe 6 hours?
Victor @ Taste of Artisan says
Yes, there is. I've made baguettes in as little as 4-5 hours, can't remember the exact timing but I started around noon-ish and had them on the table by 5-ish or so. There are many, many ways to make bread/baguettes. There isn't a single 'best' way. Take a look at my no-knead bread post, it's one example of making (good tasting) bread fast. Some pointers - higher fermentation temp, higher water temp, more yeast will result in faster fermentation/proofing. Finally, skip S&Fs and knead the dough in a stand mixer for 8-10 minutes to develop gluten quickly. You won't the same crumb but it will be quick.
Carmine says
Every one should try the bagel recipe and give some feedback about the results.
With so many comments about the baguette results there should be a lot of home bakers who are experiencing the dough handling the bagel lovers should do the same.
Happy baking days to all.
Aphawan says
I got amazing result from this recipe! Thank you.
Beverly Johnson says
Turned out perfect the first time. Crusty outside tender moist inside. Have to give two loaves away immediatelytokeepfromeating them.Thankyou Anxious to try more recipes. . .
Victor @ Taste of Artisan says
Try those bagels I posted the recipe for recently, they are really, really good. Challah is amazing... among other things.
Beverly Johnson says
Excellent directions and results. Thank you.
Chris says
Victor,
When you shape the dough into 3 rectangles, do you do any folding or do you just stretch into a rough rectangular shape?
Thanks
Victor @ Taste of Artisan says
Hi Chris, no, no folding at this time, just stretching. I've folded the dough in that step in the past but it tightens up so it will need a longer rest. If you up the hydration and the dough becomes quite soft, folding at this step may not be a bad idea though. I hope I did not confuse things. Good luck!
Dan says
A few questions. Great recipe made it for first time and definitely is done after 20 minutes of total cooking for me.
1 when you say “turn” the baguettes in the oven what do you mean? Rotate each load 180 degrees so left side is on right side of oven?
Also, when taking it out of the fridge after 12 hours, is there any turning and folding. Or simply take the dough ball sitself, no turning no folding, laying it out and cutting into 3 even pieces?
Also perhaps not appropriate for French baguette but if you were to put any seasoning on top before baking (perhaps rosemary thyme or an “everything” type seasoning (I know not traditional French bread but my kids keep asking to try it, would you use oil to get the seasoning to stick? Thanks!
Thank you!
Victor @ Taste of Artisan says
1. Yes, that's what I meant - rotating 180 degrees.
2. Nope. Just turn the dough onto a table and cut into 3 equal pieces.
3. Oil will change the crust, it will have a different look and texture. I've made a few loaves of bread with oiled surfaces in the past. Didn't like it too much to do regularly. I'd gently mist with water and apply the seasonings. But feel free to experiment, you never know what you are going to like. I never thought I'd like my baguettes with honey in them but that's the only way I make them now after I once decided to add honey as an experiment.
Sydney says
Amazing recipe! Those who I shared the results with loved it. I’ve never done a steam bath before and found it very helpful! I also used a small spray bottle to add a little bit of extra moisture.
I found I needed to add more water (I love in a very dry climate and it’s winter), I added small amounts at a time until dough was mixed well. I used two metal baking sheets so the bottoms were slightly crispy but otherwise a lovely golden crust!
Carmine says
Hi Sydney
You could try to put a baking sheet on a rack below the one you are loading bread into, may help the crisping.
Louise says
Can I use bread flour which I purchased from France and if so , do I need to adjust the amount of water . Thank you
Victor @ Taste of Artisan says
Yes, French T65 (I assume that's what you got) is perfectly fine for making baguettes, many bakers use it too. Coarser flours such as this one require slightly higher hydration so you could bump it up by 2% or so but I'd start with the base recipe, evaluate and go from there.
Jim says
Did this recipe for the first time - to the letter. Loaves didn't rise much, kind of skinny and flat. Biggest problem is how wet and runny the dough was through the entire process - from initial mixing clear through the couche. Is that normal? It was hard to work with and hard to form. Couldn't get a good cut with the lame because it pulled through the wet dough.
Also had trouble with the "steam" oven. Poured boiling water into a roasting pan with the wet towel inside a 500 degree oven, but it never generated much steam. Anyone else have that problem?
Has anyone else formed this into (2) larger baguettes instead of (3) smaller ones?
Any feedback would be much appreciated.
Victor @ Taste of Artisan says
You should have seen my first baguettes, they looked very sad. It takes some practice.
The dough will normally be a little lax and wet initially but will tighten up by the end of fermentation and after the three sets of stretch and folds. If still too wet, drop the hydration by 3%. If still wet, drop it more. Some flours may be too fresh and more hydrated. Some flours may not absorb water as well as others so they need less water. Did you use cups and spoons to measure the ingredients? If so, that could be the problem. Always best to measure the ingredients out with a scale. It's also a good idea to think of any recipe as a starting point. No single recipe will work for everyone, some may need to make adjustments because of the flour they use or how their oven bakes.
If your baguettes were skinny it indicates to me that the dough did not rise enough. Next time, try using warmer water and/or ferment in a warmer palace. Make sure that the dough has risen by about 30-50% and got blisters on the surface before putting it into the fridge. It should have a nice lactic acid smell.
Yes, you can do 2 instead of 3 or even 1. I've done it. I've used this dough to make bread shaped as a boule and batard.
The water pan will not generate a lot of steam, it will release barely visible steam slowly but just enough. You don't want too much steam in the oven. It's not needed for the baguettes and can be damaging to the oven. Right after putting the dough in the oven, you can spray some water on the sides of the oven and quickly close the oven to compensate for the lost steam. But that's not typically needed.
Good luck.
Carmine says
Definitely takes some time to learn how to mix. to fold a wet dough and how to prep for placing in an oven
Lots of info and videos on the net
Be patient the results are terrific
Maggie says
I made this exactly as written and it was perfect. I would like to make it again and use half regular flour and half bread flour ( I have some that is stone ground and excellent from a small mill). Would the water amount be the same?
Victor @ Taste of Artisan says
The water may be OK but add a little more if the dough feels drier. Usually coarser/whole wheat flours can absorb more water.
Maggie says
I just made it up and used the same amount of water - it looks fine. I can’t tell you how impressed I am with myself for making these - and my family as well. I started making sourdough during the pandemic but always wanted to master baguettes. Thank you!
Victor @ Taste of Artisan says
You are welcome, enjoy.
Lis Alberts says
Hi Victor:
I found after 15 minutes my loaves are baked. Any minutes after that they will burn! Have tried a few times. Same thing! Rather than that the result was very tasty Baguettes. Thanks!
Victor @ Taste of Artisan says
Liz, I've had a couple of people report the same, if you search the comments, you will find their comments on that. All I can think of is 1 - insufficient steam, 2 - your oven bakes quite a bit hotter/more efficiently than mine. If your oven has a fan, that will also cause premature browning. If your oven has vents, you may want to close them while baking with steam, I cover mine with a kitchen towel. Try baking at a lower temp (drop by 25 degrees) and see how you like the results. Good luck!
Barry Wright says
As close as you can come to a real French Baguette it does take a little practice but a great product
Raymond Martinot says
Excellent, I am very happy, the result is as expected, very well explained, thank you so much.
Victor @ Taste of Artisan says
Enjoy!
Ginger says
Hello, I have read this recipe over and over a few times and before I attempt to make this, my question is when I preheat the oven, I do this for the 30-60 minutes while I wait for the dough to come to room temperature sitting on the floured couche? The oven is on the entire time until it is ready for the dough to be put in? My second question, I am a bit confused in the picture of inside the oven where there is a bread pan on the side with water and a towel. Is the towel necessary? I only ask because it is mentioned in the story part of the recipe, but not in the actual recipe instructions. Will the pan of water evaporate before it is ready for the bread? Sorry for the very specific probably annoying questions (I am seriously annoyed with how my brain functions when it comes to trying out new things).
Victor @ Taste of Artisan says
Preheat the oven for about 30-60 minutes before putting the dough in.
The towel helps with even slow steam release. Happy baking!
Terri says
This is now my new co to baguette recipe. The best I've ever had and so easy to follow the directions. Thank you!!
Victor @ Taste of Artisan says
Enjoy!
Alene says
I never leave comments but this bread…so amazing! I followed the recipe exactly and it is the best bread I’ve ever made. Thank you for a recipe that wasn’t overwhelming and allows the average home baker to impress others and themselves too!
Carmine says
We have baked this bread in a clouche on a pizza stone and baguette on metal cookie sheet all perfrct
Natalie says
Hi, can I make this with a baguette pan instead of a baking stone?
Victor @ Taste of Artisan says
Yes, you can. You need a good amount of stored heat to give baguettes a nice oven spring, that's why a stone is ideal. But a baguette pan should give you good results.
Gundula says
Thank you for your recipe and description. May I ask two questions. You say 75% hydration, ratio of water to flour. But with 500 g flour wouldn’t that be 375 ml of water rather than 360?
And this might be a peculiar one. When you stretch and fold, you stretch upward out of the bowl and over and then flip the dough so that the next fold will be over the “nice” round side. I noticed that some ppl seem to treat one side as the “good side” so that they flip the dough first and then fold into the other side and retain tension on the “good side”. (I’ve noticed this particularly in the later stages of shaping but it’s never commented on.) ami overinterpreting? Or is this different in the stretch and fold versus the shaping stage? Or does it not matter?
Victor @ Taste of Artisan says
You are very welcome. Regarding the hydration, please refer to my comment on March 07, 2021.
Regarding S&F, I can't really comment on how some people do it and why they do it like that. There are many good ways to make good bread, mine is just one of them.
Happy bakng!
halle says
I'm in college but love to bake. What would you suggest I use if I don't have a baking stone or baker paper/the sheet? I have glass pans, baking sheets, and parchment paper. Is this recipe doable with normal household baking items?
Victor @ Taste of Artisan says
Halle, it is doable but your results maybe just a little different. A bit of nerdy technical info;) - we need a baking stone to store a lot of heat which is needed to create that 'oven spring' that bread gets in a hot oven. It's when dough expands rapidly and baguettes form ears/splits. If you put the dough on a thin sheet, the sheet will lose the heat very quickly and there won't be enough heat left for a good oven spring. If you search the comments, we've discussed this before and many people had success with using alternative methods. The simplest one is to stack a bunch of metal baking sheets/trays and bake on them. I used this very method back in the day myself. You can also use a CI griddle, or a few unglazed tiles that you can get for a few bucks at your local HD/Lowes.
Parchment paper will work fine. I use it all the time without issues... did it in my old electric oven and the new gas oven. It will get very dark and brittle at high temps but it works. Happy baking!
Victor @ Taste of Artisan says
Halle, it is doable but your results maybe just a little different. A bit of nerdy technical info;) - we need a baking stone to store a lot of heat which is needed to create that 'oven spring' that bread gets in a hot oven. It's when dough expands rapidly and baguettes form ears/splits. If you put the dough on a thin sheet, the sheet will lose the heat very quickly and there won't be enough heat left for a good oven spring. If you search the comments, we've discussed this before and many people had success with using alternative methods. The simplest one is to stack a bunch of metal baking sheets/trays and bake on them. I used this very method back in the day myself. You can also use a CI griddle or a few unglazed tiles that you can get for a few bucks at your local HD/Lowes.
Parchment paper will work fine. I use it all the time without issues... did it in my old electric oven and the new gas oven. It will get very dark and brittle at high temps but it works. Happy baking!
Rosie says
What I meant was a separate poolish before mixing with the dough.
Victor @ Taste of Artisan says
Rosie, I am still not sure about what you are asking, perhaps you can re-phrase your question. There are dozens even hundreds of ways to make a baguette, some may use poolish, this one doesn't. No, they won't give identical results, there will be slight differences... but therein lies the beauty of bread baking and that's why we have competitions like best baguette in Paris... if everyone made the same-tasting baguette life would be boring.
Rosie says
I see this recipe does not make a poof 12 hours before. Will it still be the same without it?
Wendy Trudeau says
Very good. I ran out of flax so I replaced about half of the ground flax with almond flour. I only had caraway seed, but they were not a prominent flavor, so more would be better if you are using caraway. I also used white whole wheat flour, but all in all, the texture and flavor was very nice and is very good toasted.
Victor @ Taste of Artisan says
Enjoy!
LT says
Hi Victor, is the dough supposed to come back to room temp after being refrigerated for the 12 hour period?
Victor @ Taste of Artisan says
No, that's not necessary. Just follow the instructions and it should turn out well. If you do, the results may be different, i.e. it will over-ferment.
LT says
I just finished the first step. It looks much drier than your picture. Should I add a little more water before I do the stretch and folds?
Victor @ Taste of Artisan says
If it's too dry, then I would. I am going to guess that you measured your flour in cups, that can be tricky. I'd get an inexpensive kitchen scale for your next bake, it will a lot.
LT says
Hi, thanks for getting back to me. No measuring cups, I always use a scale for baking. I did notice after the first 15 minute rest it had gotten much more moist. Does that make any sense to you. I can’t tell you how much I appreciate your help. Even though I’m new to making baguettes the 2 times I’ve made them , while not perfect they have been delicious!
Victor @ Taste of Artisan says
Yes, the flour gets hydrated, it's normal. You are welcome Enjoy the baguettes!
Robert says
Came out Fantastic ...thanxxx...I followed your directions to a T ...I almost blew it on the 2nd turn down to 350 ...but caught it....I let proof in frig overnight ...
? After I took out of fridge I let sit for 3 hours to get back to room temp ... Can I leave it longer ? ...but Came out Much better than All my previous Baguettes ...& I've made some nice ones ,So thank you very much ...the one thing - Touching of the Dough on last Sitting ...Very Helpful ....
BEST BAGUETTE RECIPE Robert ...
Victor @ Taste of Artisan says
Glad to hear it, Robert. Thank you for the feedback. Enjoy!
Victor @ Taste of Artisan says
Leaving the dough out a little longer shouldn't be a problem unless the room is very warm. In the end, if it works for you, then it's fine. Everyone's environment is different.
LT says
Thank you so much for responding so quickly. I forgot to ask you about the salt. Do you use Kosher coarse, such as Morton’s, or regular table salt?
Victor @ Taste of Artisan says
I use three types of salt quite interchangeably in my bread baking - coarse Morton kosher, coarse sea salt and Himalayan salt.
LT says
Can you describe the technique for the initial mixing of the dough ingredients. I’m used to using a stand mixer for this step, but would like to do this by hand. Any advice would be helpful.
Victor @ Taste of Artisan says
Hi LT, you could use a mixer, just run it on the lowest setting until the flour is incorporated. It's best for the gluten structure to not have any mechanical intervention though so I always mix by hand. Take a look at this sourdough bread post, I have a lot of pictures in it showing all the typical steps I go through, from mixing to stretching and folding and more. You will see a number of sliders there, slide the images to the left to see more.
NK says
How does one transfer the dough from the couche to parchment paper?
Victor @ Taste of Artisan says
I've done it three ways:
1 - carefully pick up and move by hand (not recommended but works in a pinch).
2 - a long, narrow, thin board - place the board next the dough, using both hands, gently roll it over onto the board, then similarly roll it off onto the parchment.
3 - same as #2 but I now use my 19.5"-wide aluminum pizza shovel, which works perfectly for transferring the dough and loading it into oven.
LT says
This is only my 2nd attempt at baking baguettes. Followed your recipe for the first try and had very good results. I’m using a Kitchen Aid to mix the dough and would like to know what speed and for how long to mix do you recommend ? Also, I’m using water at about 70 degrees Fahrenheit is that correct? Thanks so much for your help!
Victor @ Taste of Artisan says
I mix by hand, long enough to get the flour hydrated and all of the ingredients mixed together evenly. I never timed this but it takes about a minute or so.
ER says
Hello! Thank you so much for this delicious recipe. It was my first time ever making bread and so had quite a bit of success with these, so thank you for that! I do have a bit of a dumb question — do I need to cover the dough in between the stretch & folds and while it’s proving in the couche? Thank you!
Victor @ Taste of Artisan says
HI ER, glad to hear that. That's fantastic! Yes, you need to keep the dough covered at all times during fermentation or it will begin to dry out. When it's in the couche, I pull the sides of the couche over the baguettes, that works well.
TAOUFIK BAYOUDHI says
Best recipe I came across for baking baguettes,very well illustrated brilliant highly recommended.
Rose says
Getting good bread, but not enough holes, why is that, otherwise delicious
Victor @ Taste of Artisan says
Hi Rose, please see my comments from June 26, 2021, March 27, 2021, July 10, 2020, June 08, 2020 and April 24, 2020, those should help. Happy baking!
Joseph says
Are the temperatures for fan oven?
Robert says
Hi Joseph,
Looks like a great recipe but I have a couple of questions... I only have Red Star yeast (not an instant or quick yeast)... can this be used in your recipe and if so, what would be the measurement for the gms of yeast?
Many thanks!
Rob
Kelly says
My first try at this recipe went brilliantly! Lots of me gloating around the kitchen 🙃
I'm making a batch of demi baguettes for Bahn Mi sandwiches today, wondering if the bake time would be reduced?
Thank you for this detailed tutorial!!
Victor @ Taste of Artisan says
You are very welcome, Kelly. You should be very proud of yourself, making a good baguette is not a trivial thing so, good job!
If they are of the same thickness the time should be practically the same but keep an eye on them. Oh, for sandwiches I like them a little softer so I bake at 425F - 220C all the way or start at 450F and finish at 425F.
Happy baking!
Elizabeth says
Hi,
Is it ok to proof for 24 hours or does it have to be 12?
Thanks!
Eli
Victor @ Taste of Artisan says
24 will be fine. I've gone as long as 48 but didn't quite like the results.
Elizabeth says
Thanks!!
I made it and it was delicious! It did not last long.
Victor @ Taste of Artisan says
You are welcome. Enjoy!
Baker says
Hi hello!
I’ve been baking my own sourdough bread for about 6/7y, i do bake and cook everything from scratch so I was super excited to do my first baguette!
This recipe is great, love the detailed instructions and photos!
But I did have few issues with it :
1. Baking time seams way too long -30 minutes on 475f?!?! I have baked it for 18min and I think that’s too much already, the baguettes are very “hard” and slightly burned on the edges.
2. Too much water for 500gr , ….
3. Would be helpful to know what is the recommended oven setting ??
Many thanks for sharing, will try again but won’t few amendments 🙂
Victor @ Taste of Artisan says
Hi, baking time is 475F for the first halt and 450F for the second half, not 475F. If baguettes are getting too dark too quickly there is either not enough steam or the oven bakes too hot or it bakes with automatic convection. Every oven bakes differently as I am sure you are aware as you bake bread and often recipes need to be slightly adjusted. These settings/timings work very well for me and seem to work for most people but it's not out of the ordinary that some may require an adjustment. Drop the temp settings to 450F and 425F for the first and the second half respectively, see how you like the results. I like my baguettes crustier - they will soften up considerably if you let them sit for an hour or so - but some may like them softer so you can drop the temps. I've made baguettes baked at 425F all the way and they have a soft crust. There is no right or wrong here, it's all about making a great-tasting baguette that you like. About water - I have to disagree with you. 72% hydration with some honey... is not a lot of water. A typical French baguette dough has 75% hydration. If you find that dough is too wet for you to work with comfortably, drop the hydration by 2-3% and see how that works. Then work your way back up as you get more comfortable working with it. Or leave it where you like it. BTW, high hydration dough produces amazing crumb - moist, soft, and exceptionally delicate. For my sourdough breads, I use 80% hydration and higher when using WW flours. Hope this helps. Happy baking!
Liesl says
These are beyond fabulous! So easy and such a gorgeous, delicious product. Thank you!
Victor @ Taste of Artisan says
Enjoy! Happy baking!
Adrian Perkin says
Great recipe, I have be looking at numerous recipes on line this one is by far the best, many thanks you’ve made an old man very happy.
Victor @ Taste of Artisan says
You are very welcome. Happy New Year!
Tereza says
Would this recipe work if I prepare the dough in a bread machine or it's too much mixing?
Victor @ Taste of Artisan says
Please, do not apply any kind of mechanical mixing. It will ruin the delicate gluten networks.
Constance says
Fantastic recipe! Full of holes inside the bread and very tasty!! Thank you so much for this detailed recipe and pictures. I cut the recipe to 1/3 making only one loaf for myself. Also have problem slashing the dough with a knife, may have to get a razor blade or invest in a lame knowing I will make this baguette again!
Victor @ Taste of Artisan says
You are very welcome. Happy baking!
Mike Leavey says
Hi Victor,
I have followed your recipe to the letter, and the Baguettes turn out very tasty with plenty of air holes, very tasty, my wife says she can eat the bread morning noon and night. My problem is I have great trouble in shaping the very wet dough, it lays quite flat when put in the oven, I cannot score the dough before putting in the oven, as soon as I try to run the lame through it closes up immediately, I don't like to add more flour as the end result won't be the same. I have a metal couch with holes in it shaped for four baguettes, could I use that to keep the shape instead of cloth. I must admit I have been using tea towels instead of proper couch material, but I can't see that doing much good.
Victor @ Taste of Artisan says
Mike, some flours are just more hydrated and it can make a huge difference. Drop the hydration by 2% and see how the dough is. If you like the results, stay there. If the crumb is not what you want, practice with lower hydration dough and work your way back up. Don't be afraid to experiment, that's how I created this recipe which works for me, through lots of trial and error. In general, working with wet dough is a matter of practice - the more you do it the easier it gets and the better the results. A couche is a very good tool, my results improved once I got it, I have two in fact. Kitchen towels work too, I used them for years, but it's not the same to be honest.
Carmine says
Hi Victor
Been following but just got back to house living with an oven. Two baguettes, one boule from
Same dough. Best loaves ever. Christmas gifts for my children.
💕💕
Victor @ Taste of Artisan says
Oh, comments like this make my day. Very happy about your results, Carmine. Do try my other recipes and subscribe as many more are coming. Merry Christmas!
Emily says
I made this recipe on Deployment once a week, served with olive oil and seasonings to dip and used the left overs for mini breakfast sandwiches. Turned out perfectly every time! Thank you for this recipe and such simple ingredients that we always had on hand.
Victor @ Taste of Artisan says
You are very welcome, Emily. Happy baking and thank you for your service.
Sonal says
I made these for the first time today and they turned out beautifully! Thank you for the clear and detailed instructions, Victor. I was quite nervous about attempting this but it worked perfectly. Happy Holidays from Mumbai!
Victor @ Taste of Artisan says
Hi Sonal, I am very happy that you liked my recipe and have had success with it. It's so cool to see how people from all over the world use this recipe and enjoy it. Please, try my other recipes, plenty of good stuff here. Happy holidays! Happy baking!
Justin says
How long are we supposed to mix the initial ingredients before doing the 15 minute test? Just until incorporated or until a dough is starting to form?
Victor @ Taste of Artisan says
Just until the water is incorporated and the dough looks homogeneous.
Jessica says
This was my first time making baguettes, and it turned out so much better than I expected. I’m familiar with making dough, but the baguette shaping and scoring intimidated me, but thanks to your super detailed instructions and images, I shaped them successfully, and I think they came out beautifully! Thank you, Victor!
https://tasteofartisan.com/wp-content/uploads/2021/12/best-baguettes.jpg
Victor @ Taste of Artisan says
What lovely baguettes, Jessica! I wish my first baguette looked even remotely as good as your first baguettes;) Congratulations! Next time, try to score a little deeper and at an angle (about 30 -35 degrees), they will open up even more. Thanks for emailing me the lovely picture. Happy baking!
candace says
Unbelievable. Perfect. I’ve been searching for this recipe for years and now I have great crusty full flavored bread anytime I want . I’d like to freeze the dough somewhere in the process any ideas ?
Victor @ Taste of Artisan says
Hi, Candace, happy to hear that you liked my recipe. As far as freezing, I don't do it but search the comments, there are quite a few good tips on that from my readers.
Marty says
I followed the recipe to the letter until baking, with wonderful results. Instead of a massive stone I used aluminum baguette pans that are curved with tiny holes. Flavorful loaves that were tender and airy inside, and lovely and crisp outside were the results. Tasted like bakery baguettes. I'm making a new batch even as I type
Victor @ Taste of Artisan says
Like bakery baguettes, ha? 🙂 I'll take it as a compliment. Happy baking!
Pam says
My oven has a steam option. How long should I let the banquettes
steam?
Victor @ Taste of Artisan says
15 minutes - step #9 in the instructions.
Jen says
Excellent recipe. I made three loaves this morning and my family was tres impressed!
Victor @ Taste of Artisan says
Glad to hear that, Jen. Enjoy!
Alex says
I tried several baguette recipes before finding this one, and it's by far the very best. I was going to make a double batch today and freeze half the dough but after reading your comment below, I decided not to do that. -Thanks for sharing this recipe with instructions, and the tip about freezing.
Victor @ Taste of Artisan says
You are very welcome, Alex. Enjoy!
Linda says
What should the water temp be?
Victor @ Taste of Artisan says
I use room temp water.
Gertrude says
Hi there! These are super tasty but I’m not getting the honeycomb:( but I have a feeling it’s the way I’m baking! I don’t have a pizza stone so what could I used instead? 🙁
Victor @ Taste of Artisan says
HI Gertrude,
search through the comments, there were a few discussions on that. Essentially, you want enough stored heat to give the dough a nice lift. You can get creative here, use unglazed tiles, stack 3-4 baking sheets/pans, etc.
Tracy says
I LOVE this recipe and get compliments on it every time I bake them! My question to you is this
Can I replace regular flour with GF flour and get the same result? Has anyone tried this , if so please reply!
Again Thank you for the amazing recipe!!!!
Victor @ Taste of Artisan says
Tracy, I don't use GF flour so can't help you here... perhaps someone else can chime in.
Patricia Wallace says
This recipe looks amazing! I received a emile Henry baguette cloche today for my birthday. How would I bake the baguettes using it? I would use the recipe that came with it but I like the slow fermenting as well.
Victor @ Taste of Artisan says
You can use my recipe as well and bake in the pre-heated cloche, part with the lid on and part uncovered. Everything will be exactly the same except when using a cloche you don't need to steam the oven and you need to shape the baguettes such that they fit in the cloche.
Nina says
Excellent!
Brandy says
Hi, this is my 2nd tries… is the dough soft when u score? My dough kind of degas after scoring and it doesn’t bloom when baked? What went wrong?
Victor @ Taste of Artisan says
Brandy, the dough should not do what you describe though there may be some, very minimal deflation. Based on what you described, it sounds like your dough may have over-proofed. If your room is warm enough, it will proof quickly so you may have to shorten proofing time. Also, try to decrease hydration by 2-3%, that will make the dough more forgiving. Once you get that to work, slowly increase hydration back. How you score also can affect oven spring. Do not score too deep and all the way to the edges. Try to keep the scores about 1/3" deep, make them at a 45-degree angle and don't go closer than 1/2" to the sides. These are approximate, never really measured them, but I think it should help.
Brandy says
Thank you so much Victor for your advise and suggestions… I am a noob when comes to bread making… would definitely try again soon! Other than the ugly turnout, the baguette was delicious!
Victor @ Taste of Artisan says
You are very welcome. Good luck!
Kontos says
Best recipe.
Emos says
Victor @ taste of artisan . Com
Hi Victor
Please take look how my bread looks.
This recipe is a killer. Easy to follow and the result is wonderful
I will send to you the picture of my bread when I received your feedback
Tx
Victor @ Taste of Artisan says
Great. Sent you an email.
Emos says
Hi Victor
You deserve more than 5 stairs. I do not have a right words to describe the recipe. It works and I will send to you a picture of the first attempt I made.
Kindly regards
Victor @ Taste of Artisan says
Thank you for the kind words. Please, try my other recipes, plenty of good stuff there.
Emos says
Hi Victor
I like to thank you for giving away this nice recipe with all details we should know before to make a French baguettes. I love baguette in morning with coffee, and milk.
I greatly appreciate.
Where I am struggling to make the baguettes is the measurement:
500:125= 4 cups of flour. In the recipe is equal de 3 1/2 cups. How do you come out with 31/2 cups?
Thank you and you have a wonderful day
Victor @ Taste of Artisan says
Emos, this is a bit late as you have already made the bread and it turned out great, but still... My measuring of KA AP flour using the scoop and sweep methods shows that 1 cup is about 150 grams of flour, so 500 grams is about 3 1/2 cups. That said, I STRONGLY suggest weighing the ingredients, granted good kitchen scales now cost only about $10, as that will greatly improve the results. There is a lot of variability from cup to cup, sometimes 5-10 grams. Those 5-10 grams multiplied 3 times will produce vastly different results, you may get a very wet, hard to work with dough, or very dry dough.
Bob says
I'm a big fan of your baguette recipe. The one head scratcher I had was the instruction to do 3 stretch & folds every 30 minutes over 1.5 hours. I always get confused when I read it as I think it should be over 1 hour: e.g: S&F - 30 minutes - S&F - 30 minutes - S&F....
Or am I supposed to wait an extra 30 minutes before starting?
Just curious.
Victor @ Taste of Artisan says
Hi Bob, I see what you mean... No, you don't need to wait, that's what the initial 15-minute rest is for. You need to finish S&Fs within 1.5 hours after the rest. The timing of the S&Fs doesn't need to be precise - you can do one after the rest, another after an hour, and another after 30 minutes, or space them 45 minutes, or do one after the rest, then another after 30 minutes and another after 30 minutes, etc. It doesn't have to be precise. I updated the post to make it more clear, hope that helps.
Beth says
Love love love this recipe! So simple and so good…everyone I serve these baguettes my guests are shocked they are homemade…since excellent baguettes are available in or local store…thank you for sharing!
Victor @ Taste of Artisan says
You are very welcome. Happy baking!
Jon says
Hi Victor,
First, thank you! The recipe is incredibly great! I just made them and they turned out great! The looked and tasted great! The only thing was the air pockets weren’t there like in your pictures.
Any idea why it didn’t get airy?
Thank you!
Victor @ Taste of Artisan says
Hi Jon, search the comments, we discussed this several times, it should help. If not, let me know.
Jon says
Thank you Victor! Yeah, it seems like maybe I didn't proof long enough, but I'm pretty sure that I followed the recipe to the letter. 🙂 Oh well, I'll be trying again because even though it wasn't as airy as I would have liked, they were delicious! 🙂
Ricardo Hooper Duarte says
A master class to yield a classic perfect French baguette.
Hanlie says
My very first attempt at yeast bread. Wish you could see the pics. I am super impressed! The texture is slightly chewy, which I love and the crust impressive. Through my novice eyes, the little holes are evenly spread. Just delish. PS I used 00 stone ground flour and no honey. The dough was very sticky and slack but I persevered with tender fingers. Also did not have rice flour so i mixed semolina and regular flour. I will certainly make this again. Thank you!
https://tasteofartisan.com/wp-content/uploads/2021/10/Hanlies-Beautiful-Baguettes.jpg
https://tasteofartisan.com/wp-content/uploads/2021/10/Hanlies-Beautiful-Baguettes-2.jpg
Victor @ Taste of Artisan says
Happy to hear that. Congratulations on your success! I will email you so you can send me your pictures.
P.S. Lovely baguettes, such beautiful crust and airy, open crumb.
Thomas says
Thank you for the great post.
I've been trying to bake baguettes with mixed success for a while now. My most recent result prompted me to search the internet and lead me to this post.
I usually do the stretch and fold, but as part of a test this time, I tried kneading the dough for a lot longer, then letting it rest for 5 hours straight at room temperature. Compared to my regular dough, I noticed:
- it didn't rise in volume as much as usual even after 5 hours
- the dough seemed more sticky than usual
- the shaped baguette (before going in the oven) had a more flattened look
- finished baguette had great moist, glossy, airy crumb along the middle, but rest was quite dense
I've been trying to figure out what happened and my best guesses are:
- too much kneading in relation to the proofing time making the gluten too strong for the gas to form enough air pockets
- too high hydration?
- not enough proofing, again in relation to the amount of kneading and gluten strength formed in the process
The fact that I had great airy crumb along the middle makes me think it wasn't a total failure.
Would love and appreciate some feedback and insight.
Thanks!
Victor @ Taste of Artisan says
Hi Thomas, I mot totally clear on whether you followed my recipe as is or had it changed up where you had the outcomes that you described.
This recipe requires no kneading. Kneading, especially excessive kneading ruins the gluten structure leading to crumbly, store-bought bread-like crumb.
This recipe has fairly low hydration - 72% - so I am quite surprised that the dough was that sticky. That may happen if you used cups and spoons to measure the ingredients. Get a scale instead.
Sometimes flours may be too hydrated which will impact the hydration of the dough in a significant way. You will need to drop it until you feel comfortable working with it. Start there and work your way back up. French bakers target about 75%. As you bake more you will get more comfortable with wetter doughs.
No, it doesn't sound like a total failure but you may need to practice more and make some tweaks. We've all gone through that. You can always send me some pics, a pic is worth 1000 words.
Naomie says
The baguette would've tasted better if I wouldn't have over cooked. Besides that it was super good!
Fernando says
Victor,
I was visiting family and they asked me to bake baguettes. My son-in-law has a wood pellet grill and suggested I try it. I did. The results were very good, as good as my electric oven at home. The baguettes had an almost imperceptible smoky flavor. Of course I follow your recipe albeit I have tweaked it a bit -no honey, time and temperatures modified depending on the oven being used, 78% hydration.
Fernando
https://tasteofartisan.com/wp-content/uploads/2021/09/Homemade-baguettes.jpg
Victor @ Taste of Artisan says
That's awesome, Fernando. I would love to see them, I will email you, perhaps you have some pics to share. 78% hydration is nice. I love high hydration baguettes, that moist crumb is so good.
P.S. Thanks for the picture, Fernando. Your baguettes look really, really good. Love the rustic crust and the great oven spring you got there. Nice! I am going to try on my BGE. Thanks for the inspiration.
Rosann says
This recipe looks fabulous. A question: after the initial 12-14 hour refrigeration, do you work with the dough while it’s cold or wait for it to come to room temperature? Looking forward to giving this a try. Thanks.
Victor @ Taste of Artisan says
Cold. But it will come up to the room temp during the rest period (step 4).
Jean-Yves Avenard says
How do you manage to keep such a great shape for your baguette?
I find that 75% hydration make for a very sticky and soft dough; cooked on the stone it doesn't hold its shape nicely and make for a flat bottomed baguette.
Also, 30m cooking at those temperatures gave me something close to burn.
I'm super impressed by how your photos looked though
Victor @ Taste of Artisan says
The hydration is 72% in the recipe if noticed, the original recipe was 75% but I dropped it a while ago as many of my readers had a problem working with a wetter dough. It takes practice, nothing more. For everyone who starts out, I recommend starting with lower hydration and always measure the ingredients. Cups and spoons are too imprecise and even a little deviation may have a large negative impact. Your flour may also have a significant impact. Some flours are very hydrated, especially if they are fresh. I suppose it's not out of the realm of realistic to see some crafty sellers sell very hydrated flour to maximize their profits. That said, if your dough is very sticky for your comfort, drop the hydration until you feel comfortable. Get good results, then work your way back up. It's worth remembering that very sticky dough initially will become much less sticky as the gluten develops and the dough strengthens. Also, the key to success with high hydration (this recipe is not by the way) dough is to work quickly and making sure that the dough is properly fermented and proofed. Baguettes may become flat if the dough is overfermened/overproofed or scored incorrectly.
Different ovens bake differently. MOst people have had very good success with this recipe but some noted that they had to shorten the baking time. In my old electric oven 30 minutes was perfect. In my new gas oven, I had to make slight adjustments but it's pretty close. In your case, I would suggest dropping the temperature by 25 degrees and see how it goes. That should help. You want to hit 12-15 minutes for the first part with steam and 12-15 minutes for the browning part. If they brown too quickly, they won't bake properly. Hope this helps.
Britany Delacy says
Thx so much !! Appreciate the helpful information.
Elisa says
Love your recipe!! Thanks for sharing your knowledge and your time.
Victor @ Taste of Artisan says
You are very welcome.
Tom says
Few weeks ago I craved a Baguette and drove 30min to a specialty French bakery. Paid $7 for one and was unimpressed and thought surely I can make a better one. Found your recipe and all I can say is they turned out incredible. Not exaggerating when I say they looked and tasted exactly like they do at top Parisian boulangeries. I didn't even have a baking stone and used a metal tray. Few people seemed to have struggled with transferring them into the oven, I just transferred the entire parchment paper and cooked them on top.
Victor @ Taste of Artisan says
Glad to hear it.. that's what my experience was as well back in the day... food business here is a weird one... people don't seem to demand the same quality as in Europe... it's highly competitive too, 20% go kaboom in the first year, 80% are gone by the year 5, the remaining 20% stay in the game but only a small portion of them make good returns. This leads to a very sad state of things where quickly and cheaply made trumps quality and taste. It's easier to do it yourself.
I also bake on parchment paper these days, way easier, no flour all over them, and no issues transferring. Do the same with pizzas and bread (unless I turn the bread over from proofing baskets right onto the bottom of clay cloches).
matt says
I have tried different recipes for baguettes and they have been "okay", and even though I still need practice shaping them, my husband, a French Canadian who adores baguettes, yelled with happiness when he ate these for his Jabon and fromage baguette sandwich. Thank you.
Victor @ Taste of Artisan says
You are very welcome, enjoy!
Jim Zaleski says
A few questions.
How do you do your mixing? It is pretty stiff and hard to mix to get the ingredients blended by hand. I don't want to over do it.
Stretch and fold - do I do one stretch and fold every 30 minutes or 3 stretch and folds every 30 minutes? And you say every 30 minutes over 1 1/2 hours which means four times 0, 30, 60, and 90 minutes. Correct?
Victor @ Taste of Artisan says
The dough should not be stiff, if it is, your ratios got messed up somewhere. If anything, people comment on how wet the dough initially is. Your flour affect this too. Anyway, mixing by hand only.
S&F - one set, each set you pull one corner, stretch up and fold onto the dough. Four corners, four stretches, that's one set. Three sets altogether. Mix the ingredients, let rest for 15 minutes, then do S&F 1, then 2 and 3 spaced 30 minutes.
Sally says
Love, love, love! Bakery quality. They look beautiful and smell delicious. Followed the recipe except I left mine out of the fridge to ferment around 10 hours and then placed in fridge overnight. Also placed a pan of water on the top rack as another reviewer suggested. I wish I could insert a picture. Words can’t describe how great they look.
https://tasteofartisan.com/wp-content/uploads/2021/09/baguettes.jpg
Victor @ Taste of Artisan says
Happy to hear it, Sally. I get a huge energy boost when I read about my readers' success making my recipes. Thank you very much for your comment.
I send you an email, respond with your picture and I will attach it to your comment.
P.S. Your baguettes look fabulous. GREAT JOB!
Carmine says
What temperature did you bake at Sally?
Sally says
I preheated the oven to 550. Baked at 500 for the first 5 minutes then dropped the heat to 475 for an additional 10 minutes. After that, I opened the oven rotated the baguettes as instructed, removed the water pan and baked for an additional 15 minutes at 475.
Carmine says
That is amazing your parchment paper did not “burn”. Lovely loaves👍
Fab Mundo says
I have just started baking post-post pandemic (if you include all the mutations present and more to come) and I am always searching for the best crumb I can make, I have baked baguette 'like' demi-rolls up to 16 of them at a time as I have 2 containers of dough that I place in the fridge for up to 48 hrs, they always come out yeasty wine smelling and still semi-denser than my ideal crumb (spongy fluffy, semi-dense and filled with small and large crevices) of real french baguettes...I am using Ken Forkishs' seminal book as a guide but I love experimenting with other recipes and techniques as I just happen upon your web site. I look forward to using your techniques and recipes. Fab.
Victor @ Taste of Artisan says
Good luck, Feb. Hope you like my baguette recipe and my other recipes, lots of good stuff here if I may say so.
Mike says
The taste you're describing is because of overproofed dough. It's always good to use less yeast and let experience tell you if it's proofed enough or not. Some yeasts tend to be more active than the others.
Beth Bilous says
Sorry this bread came out terrible. I am not inexperienced baking bread. I figured i would try just to see if i have been putting in more effort than I had to. Nope, the effort is so worth it.
Victor @ Taste of Artisan says
Sorry to hear that. If you have a recipe/way to make a better baguette then by all means stick to it. As I say, there are hundreds of ways to make a great baguette, that's why they have those yearly competitions for the best baguette in Paris. This recipe has worked well for so many people though. I've been using it for many years with fantastic results. Love it.
P.S. If your bread came out terrible, I am 99.9% sure that it's not the recipe. It could have been not as good as your other recipe but not 'terrible'. Would you mind giving me a little more information as to why you think the bread came out 'terrible'? Perhaps I can help fix that.
Chris says
I just attempted this recipe for the first time, and let's just say things did not go as well as I'd hoped. The photos must be the most beautiful baguettes I've ever seen. (I've made them before with other recipes and have had decent results.)
Other recipes I've followed mention trying to minimize how much the dough is 'handled', so I mixed it pretty gently before doing three stretch and fold iterations 30 minutes apart and going into the fridge for 12 hours. I got through the shaping stage and they completely flattened out on the couche. I managed to get them each onto a piece of parchment paper, but there was no way they were going to 'slide' off, onto the preheated baking stone.
Should I have gone ahead and done the initial mixing in a stand mixer? Maybe some more stretch and fold intervals? While definitely stickier than baguette dough I've worked with in the past, I thought it felt good when doing the last stretch and fold before going into the fridge. Any troubleshooting tips would be most appreciated.
Victor @ Taste of Artisan says
Hi Chris,
It sounds to me that your dough may have over-proofed if it collapsed on the couche. What's the temperature in the fridge? That or the gluten did not develop properly. It's hard to say without seeing the pictures, perhaps you can try again and send me some pics taken along the way. Mixing in a stand mixer is what kills the texture and makes 'supermarket' baguettes, I would not recommend doing that. In general, I find this recipe quite forgiving and hard to mess up, a lot of people had good success with it. Anyway, I will email you, send me some pics, let's go from there.
Fernando says
Victor,
I have been baking with your recipe for a year. Everything is perfect. My family and friends say it is the best baguette they have tried. However, I am not satisfied with the “aesthetics” of my baguettes. Sometimes they look fine but not all the time. Scoring is not the issue, just the shape. I think that the step where baguettes are shaped is where my problem is. Could you tell us how to get a perfect shape every time?
Victor @ Taste of Artisan says
Hi Fernando, I am glad that you like my recipe and have been having good results with it. Shaping can be a challenge even for me sometimes and I've made them probably well over 100 times. I think there two main factors at play to getting the shape right - one is getting the initial rectangles shaped evenly, and the second one is to let the dough relax enough. Try to be as gentle as you can, don't force the dough. If you feel like you are having a hard time stretching the dough into rectangles or rolling it out, stop and let the dough relax more. That's the key I think. Also, don't stress out too much about the aesthetics, just enjoy them;) Happy baking!
GaryODS says
Well written I've tried similar but haven't achieved such an open crumb.
Kitchen tip for you, run your stone through an oven self-cleaning cycle and be surprised how much cleaner it looks.
Nichole Brunsvik says
I read that the creator of this recipe kept it in the fridge for 21 hours, can I do that? Seems much easier for me.
Also, the STONE under the bread, can it be any ol stone, or does it have to be what is suggested. thank you, Nikki B
Victor @ Taste of Artisan says
I created this recipe so I am not sure what you are referring to. There are hundreds of ways to make a good baguette, mine is only one of them. YOu can retard the dough for any number of hours as long as you don't over or under-ferment.
Stephen L Lyford says
While baking it says to "rotate". Do you mean turn the baguettes over? or rotate the stone on which they're baking? Thanks!
Victor @ Taste of Artisan says
Oh no, don't turn them over. By rotating I mean turning them 180 degrees. You can do it with the stone but that's too much work. Easier to just rotate the baguettes but do what is easier to you. That said, I had to do it in my old cheapo electric oven. In my new gas oven I don't have to do it as it bakes quite evenly.
Carmine indindoli says
Wow never say an article with so many comments, congratulations
. At 475 to 485 F I cannot find a parchment paper that is rated that high. Could you help me, or do I just use a 450 F max paper and live with some burned paper?
Very grateful for your absolutely well written recipe and photos.
Wish you could come visit us and taste our wines and garden meals. Bread of course per your teaching!,🍇💕😃👍
Victor @ Taste of Artisan says
LOL, I'll gladly be over, with a bunch of baguettes, just send me your address 😉
So, to your question, there are two ways to go about it:
1 - don't worry about it. I and many others have used the standard 450F-rated parchment paper just fine, in both electric and gas ovens. You can see feedback on that in the comments of this and other bread recipes on my blog.
2- drop the temp to 450F and 425F respectively. Some ovens are more efficient and bake better so lower temps will work just fine. You can also bake at a lower temp for a different reason - to make your baguette less crusty. It's a personal preference thing. You may have to extend the second part of the bake to get the color that you want. You may also use convection during the last 5-10 minutes to get a nice color. The possibilities are endless. I encourage you to experiment and pick what you like best. There are hundreds of ways to make a great-tasting baguette.
Carmine says
That was so very kind to write thank you Victor
Just write me personal email for my contact info🍇
Kevin Ricks says
Victor, I've been making baguettes for many years but have become dissatisfied with my crumb so I'm off on a mission to find the recipe that works. This looks like the best combination of all that I've found and I'm making them next. I see you use honey in yours. While non-traditional, if it works and you and people like it I say go for it. My question is about diastatic malt or dry malt powder. It looks to me that about one gram per loaf is a general average. Is that something you can recommend, or poo poo? It is relatively cheap and if I can get a better baguette, I'm all for it. I rate the recipe 5 stars just because I've read so many and it seems the best and most doable in a standard kitchen. After I make them, I'll be back as Arnold says.
Victor @ Taste of Artisan says
Kevin, to be honest, I've never tried adding any kind of malt to my bread, not yet, so I can't really comment on it. I have plenty of it though as I brew my own beer but honey just felt like a natural fit for my baguettes. I liked the results so much that I never wanted to try anything else. That's my story;) I would suggest giving it a try though and letting us all know how you like it.
Jeff says
Kevin,
I add 1 tsp. diastatic malt powder to this recipe and it works great.
Yann says
Howdy, how many folds do you actually do within each 30 mins block for 90 minutes or until some gluten is form ?
Victor @ Taste of Artisan says
Hi, I do 3 sets of S&Fs, each set consists of stretching and folding each of the 4 corners. If the dough feels a little too lax, I may go around and S&F a couple more times in each set but usually 4 is enough. Each time I do it I want to feel the dough tightening up and getting stronger, hope this makes sense.
Debra Amrein-Boyes says
Thank you for the recipe. If doubling (or more) the recipe, are all ingredients doubled? Or is the yeast reduced in the ratio? Thanks!
Victor @ Taste of Artisan says
Hi Debra, yes, double all of the ingredients including the yeast. You could reduce the yeast but your fermentation time will be longer.
Debra Amrein-Boyes says
Thank you, it’s done and in the fridge, shall see how it goes tomorrow!
Naomi says
Can I ferment this longer than 14 hours? Is there a way to make this dough a few days in advance?
Thank you!
Victor @ Taste of Artisan says
Naomi, yes, you can easily go for 24 hours and even up to 48 hours but you have to do so at a lower fridge temp as the dough may over-ferment. It's all about balancing yeast activity/yeast amount, temperature and time. The longer the dough in the fridge the more acidic it becomes and slightly changes the consistency... it's hard to describe but once you see it you know... I don't like going over 24 hours with most of my breads.I suppose you can make the dough in advance but you have to make sure you keep it at a temperature where all yeast activity stops, well below 38F, say 33-34F. I don't like freezing and thawing my bread dough but I suppose it's an option too.
Izzie says
Hi! This recipe seems amazing. I don’t have a baking stone, couche, or any of these bread specific tools. Can I still make this bread at home? Thanks!
Victor @ Taste of Artisan says
Where there is a will, there is a way. Of course, you can. In the past, I would use a kitchen towel or Saran wrap instead of a couche. The goal is to keep the pre-shaped dough tight and not let it spread out. Use enough flour to prevent sticking. Instead of a stone, use a stack of 3-4 baking sheets. The idea is to create a surface with enough heat capacity to make the baguettes get a good oven spring. You can also use unglazed tiles if you have them. You may not get the same results as on a good thick baking stone but they won't be bad.
Jacklyn says
This is the best and the most reliable baguette recipe I've attempted and I've tried over a dozen of them.
Mo Duggan says
I can’t believe the results of this recipe. Amazing bread ! And the step by step instructions are foolproof!I’ve stopped buying bread altogether.
Have you got a really good sourdough recipe.
I think you should write a bread cookbook. I’d be your first customer.
Victor @ Taste of Artisan says
Happy to hear that, Mo. Thank you for the kind words.
Wendy says
Hi. Can I use sourdough starter instead of yeast? If so, how much?
Thanks,
Wendy
Victor @ Taste of Artisan says
Wendy, using a sourdough starter instead of yeast is definitely possible and I have done it many times. However, in this specific recipe, there is no simple substitution of yeast for a sourdough starter. Sourdough behaves differently... it will have to be a different recipe.
Jeff says
Hi Wendy,
This is how I converted Victor’s excellent recipe and instructions to a sourdough version. I’ve made it many times now and the baguettes are fantastic.
(Try adding 1/2 cup sliced Kalamata or oil-cured olives to the dough for amazing olive baguettes!)
100g active sourdough starter
450g King Arthur All-Purpose Flour
310g water
10g salt
1 tbsp. honey
NOTE: I have been letting the dough bulk ferment on the counter overnight, instead of the fridge. I do that because during the winter and spring, my kitchen is pretty cool. Now that summer is here, I may switch to letting it bulk ferment in the fridge overnight.
Hope this helps!
Tania Kasdan says
I can’t imagine anyone who loves and appreciates good bread more than me.
Born and raised in Moscow, Russia, where bread is truly a food group, and traveling extensively to Europe, I became very picky when it comes to baked goods, bread particularly.
I tried and failed many times to replicate the taste, texture and flavor of French baguettes.
Until I tried this one.
For anyone who decides to use this recipe, my suggestion is to follow every step as instructed. Don’t rush the time.
And if you a bread lover like me, invest in buying necessary tools, it’s so worth it!
Thank you so much for sharing this recipe!
Victor @ Taste of Artisan says
You are very welcome, Tania. Happy baking!
neil chapman says
Fantastic
I love it
Biba says
Excellent recipe! I have tried many before, this one is the winner. I made my bread regularly during the pandemic, used a mix of white and whole wheat flours, white and oatmeal flours or only white, always delicious. I put the leftover baguette (s) in a ziploc bag and freeze. When I need some bread I reheat in a 400 degrees oven and it comes out crispy and delicious like just baked!
Thank you for this wonderful recipe.
Victor @ Taste of Artisan says
You are very welcome. Happy baking!
Debbie Larkin says
By far the best and easiest baguette recipe I’ve ever tried. They get rave reviews whenever served even from husbands for whom “bread is bread.”
Harry O’Rawe says
Hi, In the recipe it says 360 grs of water but in the descripción you talk about 75% of hydration, those are 15 grs difference and it makes a huge difference, what is the right amount?
Victor @ Taste of Artisan says
Hi Harry, my apologies for the long delay in responding to your message. Yes, I originally specified 75% hydration in my recipe but eventually dropped it to 72% as many of my readers had difficulty working with a wetter dough. I initially had a problem too. I think that 75% is the optimal hydration for baguettes but I recommend for anyone who is just starting out to use lower hydrations and work their way up to 75% as they get more comfortable. That said, if you like the results using a lower hydration dough, stick to it.
Jeff B says
Hi Victor,
This is the perfect baguette recipe and instructions, so thank you!
If I want to use only sourdough starter and no yeast, would I reduce the water and flour in the recipe? I use a 100% hydration starter. So, if I used 100g of starter, would I reduce the water by 50g and the flour by 50g? Thanks!
Victor @ Taste of Artisan says
Hi Jeff, my apologies for the late response. In so many words, yes, that's what you would do. The idea is to maintain the same level of hydration. That said, the dough leavened with pure sourdough behaves differently and the crumb won't be as open, that's why many bakers prefer to complement sourdough with commercial yeast/poolish when making baguettes.
Nick says
The BEST baguette recipe I have tried. Baguettes came out perfect.
Mary says
i plan to make this tomorrow I have been baking breads but still a novice
My husband bought me baguette pans they fit 2 loaves and the pans have small holes in them Can i bake them in these on my stone?
he also bought me the couche
clearly he wants bread haha
Victor @ Taste of Artisan says
Hi Mary, apologies for the delayed response. I hope by now are making some impressive baguettes and you and your husband enjoy them. I know it's late, but let me answer your questions. I'd rather bake them directly on the stone, which is what I do, but you can try baking on the baguette pan as well. There are many ways to make a great baguette or bread. Find what works best for you and what gives you the results you are looking for. I think the most important part about home bread baking is to make the process enjoyable, stress-free and convenient. If it isn't, you won't be baking a lot if at all.
Janice says
Hi Victor, I have done this recipe 6-7 times now, everything looks good but I cannot get the opening that you have on pictures. I invested on the stone, better. But still not big “mouth” opening. I am thinking when I open up the oven and load the bread one by one, the temperature drops a chunk almost 100F from 500F to 400F. Then close oven, the oven temp climbs backup to set temp. And I did not use convect back so the temperature rising is slower. I am afraid I loose some oven spring due to this reason? What do you think? Baking time is about the same as you instruct on recipe. How can I send you some pictures? Thanks for your reading!!
Victor @ Taste of Artisan says
Hi Janice, I emailed you. Let's see some pictures first.
Dom says
Can we store the dough in the fridge for less time? If so, what's the minimum time it has to be stored. I see mine has already risen after about 5-6 hours. I wanted to eat it today so that's why I ask.
Victor @ Taste of Artisan says
Hi Dom, sorry about the late response. Putting dough in the fridge allows to slow down fermentation (known as retarding), which allows for better flavor development and out of convenience too... some may like to pre the dough in the evening and bake early in the morning. Whenever your dough looks ready for the next step it's a good idea to go to the next step. You can skip refrigeration altogether if you want to.
Pamela says
Do you not use Bread Flour?
I have an Artisan Blend I use for my breads.
Any type of formula to use Wild Live Yeast?
Victor @ Taste of Artisan says
Bread flour will work too, you will get a chewier texture. Wild live yeast / sourdough - yes I use it too. Prefer a mix of commercial and sourdough, will post my recipe on the blog in the near future.
Mark says
Looking forward to a version of this using a mix of wild and commercial yeast also. I assume it would be to make a pre-ferment with the wild yeast and maybe 200g of the total flour? Would love to get your thoughts on it for timings and amounts!
David Swanson says
Temperature of the water?
Mix all together with or without letting yeast foam first?
Degas the dough?
Thx
Fernando says
Victor, after a few months of getting awesome results I found myself without bread and had to go out and buy some for a special dinner. Wow! What a disappointment... yours (and mine now) are so much better! From now on I will freeze a few for emergencies.
Victor @ Taste of Artisan says
Hi Fernando, my apologies for the late response. I hear you, we rarely buy bread anymore, only in extreme situations or when we see some really nice artisan bread. Modern bread making here is mostly about profitability, not taste or quality, unfortunately.
Arun says
Your recipes and instructions are the best I have seen on the subject. Thank you for great detailed instructions. Looking forward to making these.
Cheers!
Victor @ Taste of Artisan says
You are very welcome. Happy baking!
mo duggan says
Amazing results. Can’t wait to taste!
Nat says
Hi! I made the recipe and loved it. I am hoping to do 6 smaller loaves instead of 3 big ones next time, do you think that would work? Thank you!
Victor @ Taste of Artisan says
Hi Nat, sorry for the delayed response. Yes, you can do that. You may have to adjust the baking time slightly.
Janice says
Hi there, I tried a couple times of the recipe but not getting the “big holes” effect, what did I do wrong possibly? The crumb is densed. I do not have a stone so I just bake it in my baguette pan. I baked at 450 for about 20 mins. Any comments would be appreciated. Thanks!
Victor @ Taste of Artisan says
Hi Janice, my apologies for the long delay in responding to your message. Dense crumb indicates to me insufficient fermentation and/or proofing. The dough should at least double during fermentation and increase in volume by 30-50% during proofing. Baking in baguette pans may also be the problem. To get a good oven spring you need to begin baking on something with a great heat capacity, like a thick baking stone, or unglazed tiles, or a thick baking steel, or even a stack of baking trays. That heat is what makes the dough puff up/rise/spring up, opening up the crumb. If you just put the dough on a cold baguette pan and into a hot oven, that won't happen, though you may still get somewhat acceptable results. Hope this helps.
Wolfgang says
Hello Victor,
Your french baguette recipe is very tasty and the honey adds a great sweet nuance to the baguette. However from a finish perspective mine are not having this vibrant sheen. I only have a regular oven no baking stone and I tried King Arthur All purpose and Bread flower. Any tips you can share would be appreciated.
Thank you.
Victor @ Taste of Artisan says
Hi Wolfgang, my sincere apologies for not having responded to your comment for so long - it got lost in a pile of spam.
The sheen is usually the product of good steam. See if you can increase the steam during the initial baking, that should help.
Betva says
I'm going to try this today. One thing do becauseI can't stand day old bread is freeze them after they cool down.
Just like fresh but of course not as goid as right or of the oven but fresh frozen works for me. When I take a loaf lot from the Frazer, I defrost, dampen and cook 8-10 min in a 400 degree over...delicious
Sally Jackson says
I have made this bread several times and the baguette recipe from The Bread Bakers Apprentice. My family and I all definitely prefer this recipe. We feel that the flavor of this recipe is far superior. Thanks, Victor.
Sally
Victor @ Taste of Artisan says
You are very welcome, Sally. Happy baking!
Ann says
Hi there,
I just made these for the first time, and although I had some doubts I was doing it correctly, and fumbled getting the loaves onto the baking stone, they turned out really well!! Nice and airy, and super crunchy!
I wasn't sure if each "iteration" set comprised 3 stretch and folds (making 9 altogether) OR whether it was a single stretch and fold per iteration (making 3 altogether). But I read some of the other recipes on this site and it's very explicitly stated when an iteration comprises multiple stretch and folds, so I stuck with just doing one per "set". They certainly turned out well, but wondered if that was the right reading of those instructions?
They ended up slightly overcooked in my oven. My fault, I should have checked them with 5 mins to spare, but got distracted until the buzzer went, so they ended up a little too dark and the crust was slightly too thick - just slightly beyond what I would consider to be "deliciously dark", but honestly still very, very edible! I'll keep a better eye on them next time!
All in all, I highly recommend this recipe, and am looking forward to trying again, so I can perfect this!
Thank you for posting. I really enjoyed all the tips in here too (such as using rice flour to help prevent sticking, and tips around the shaping and using the bread lame).
Ann says
Hi there
I am about to make this, but have a few questions (sorry if I’m missing information that is actually written!):
The stretch and fold step: do you only stretch and fold ONCE per iteration? Other similar methods I’ve done in the past, they stretch and fold 4 time per iteration I.e. once per “corner” of the dough.
If once per iteration, do you stretch and fold from the same side each time, or do you rotate around the loaf?
Adding water to the oven for steam: is the towel actually inside the container of water or in another container? I ask because the image posted looks like there are three things in the oven, but I can’t make out what the third thing is.
If the towel is in the pan of water, do you allow the towel to soak up all water or ensure it is saturated enough so that water remains around the towel?
Thank you so much for posting this recipe!
Victor @ Taste of Artisan says
Stretch and fold once per corner, per iteration. So, four corners/four stretches per iteration. In general, in this recipe or other, if I feel that the dough is too lax/weak, I will S&F each corner twice.
The towel is inside the pan of water. What it does is it slows down the release of steam. You can do it without the towel too, the difference, I feel, is not huge. The towel does not soak up all the water, there should be much more water than a towel can soak up. Hope this helps. Good luck.
Angie says
I would like to know if it's possible to use active dry in place of instant yeast. I've read that using more of the ad yeast will yield a satisfactory result.
Victor @ Taste of Artisan says
Hi Angie, I've experimented a lot with ad yeast and my results would vary but instant was a consistent performer in this recipe, hence why I recommend it. That said if you activate your ad yeast, get a good foam cap going, it should be sufficient. You could increase yeast by a little but don't go too far as it will impact fermentation time/activity... could be a problem if you are following my instructions to the tee... otherwise, you could make some adjustments on the fly.
Fabiane Rouille says
Amazing flavor, easy to make. I did not get such an open crumb dough.
It was nice and crispy out of the oven but it became stale very fast. How do you keep it crispy longer?
Victor @ Taste of Artisan says
Fabiane, I cool down my baguettes completely then seal in Ziploc bags. Try to expel as much air as you can when sealing. That will help keep them fresh longer.
FABIANE says
Hello! Can you put the baguettes after shaping and proofing in the fridge to bake at a later time?
Victor @ Taste of Artisan says
Fabiane, there is a risk that your baguettes will over-proof in the fridge unless the temperature is very low. Probably best to shape and proof in the fridge. That said, there are a gazillion ways to make a good baguette, all are good and are driven by your style/preferences/schedule.
Simon says
Bread was as described and delicious to taste. Could be an artisan bread maker, Dunsborough
Melissa says
Thank you for the excellent recipe and clear instructions. This is the 5th baguette recipe I tried, and they came out well! Minor problem when I tried getting the dough onto the baking stone...the dough felt really soft and stretched out so much and hung over the stone (I do not have a pizza peel so that could be the problem). Just wondering if it's a soft dough or did I add too much water. Still delicious, and will try again.
Victor @ Taste of Artisan says
Yeah, that is a challenging task. I made a long wide 'pizza peel' out of a thin wooden board to help me load them in the oven. You can also decrease the hydration and literally transfer with just bare hands which I've done many times too.
Nora says
Is it okay to use flour brand other then King Arthur
Victor @ Taste of Artisan says
Nora, it's totally fine to use other brands. KA is my favorite one but there are many other excellent flours out there. I'd recommend experimenting with what you have readily available/economical and pick the one that you like best.
Sarah says
Have you tried this recipe at high altitude?
Victor @ Taste of Artisan says
Hi Sarah, sorry, I haven't.
Sally Jackson says
Sensational! I’ve never made baguettes before, and these were wonderful. I still have some technical skills to work on, like scoring, and and should I mention not dropping one of the baguettes into the bottom of the oven? It landed on the baking element and burst into flames, producing prodigious amounts of smoke. That’s’s probably something to work on not doing. The other two loaves had a lovely crisp crust, soft crumb and a beautiful flavor. Great recipe, clear instructions and a great site. Thank you!!
Victor @ Taste of Artisan says
You are very welcome. Glad I could help. The joy of eating a freshly baked French baguette is priceless.
Maggie says
Oh Sally that me laugh out loud! I have never done that but have made many other similar mistakes including using what I thought was the bottom of a roaster to make a roasted chicken - it was actually the top and had a steam vent so as the chicken cooked, the fat fell through and smoked up my kitchen. Not to mention made a mess of the oven. But I guess if we cook and bake a lot things might get messy.
Madison says
Do you have any recommendations for storing them? Its very humid where I live and I worry about the bread getting stale
Victor @ Taste of Artisan says
Cool them down and store them in a tightly sealed container or a Ziploc bag. That's what I do but usually, the 3-baguette batch that I normally bake is gone by the end of the day.
Patrick says
Hi Victor,
Can you recommend a good organic flour (I live in Florida) that would give airy french baguettes?
I tried Great River Organic Milling, Lily White Bread Flour, All-Purpose, Organic, purchased on Amazon and get a good looking baguette but too dense to my liking, even using 75% hydration. Is it possible to get a airy baguette using organic flour?
Victor @ Taste of Artisan says
Hi Patrick,
I've tried many flours and all of them worked well, some a little better than others, but they all worked. The differences sometimes are very subtle. I think you should experiment with what you have available to you and pick whichever one gives you the best results. I like KA flour a lot but I also like other flours. I haven't tried the ones you mentioned so can't comment on them.
As far as how to make the bread less dense, airier with more bubbles... Perhaps start with searching the comments section, we have discussed this a few times. In general, bigger holes, more airy product, has to do with higher hydration, gentle handling, no punching down, proper fermentation, proper bench rest, longer proofing, better oven spring (a function of good steam, good scoring), better gluten development. It takes some practice sometimes. It took me a while to get the results that I got but I've seen people use my recipe and get excellent results right away. It could also have to do with expectations, I suppose. What I may call soft and airy you may call dense. I will send you an email, send me a few good close-up pictures of the crumb that you would call dense. Perhaps I can suggest what you could improve.
Brandi says
I’m excited to try this recipe, but I’m wondering if you can refrigerate longer?
Victor @ Taste of Artisan says
Hi Brandi, you can refrigerate for up to 24 hours. I've gone as long as 48 hours but you will start getting a more acidic taste. You have to experiment with you fridge. If it's too warm, the dough will over-ferment.
Jeff B says
Excellent recipe and instructions!
I started them last night and baked them off this morning. These are delicious baguettes that remind me of my time in France.
The only minor disappointment is that mine didn’t have the airy, hole-filled structure that the picture shows. They were great inside, just not open and airy like the pic. Is there anything specific that contributes to that texture?
Thanks for sharing the recipe and techniques!
Victor @ Taste of Artisan says
Hi Jeff, did you find the dough easy to work with? If so, I'd suggest you increase hydration to about 75%, which should help get a more open crumb. I also shared other tips for that in the comments below, just do a quick search.
Jeff says
Yeah, I think it may have been 75%. After I mixed the dough, it seemed a little dry. So, I added more water. So, it was a pretty wet dough. I wet my hand to do the stretch and folds, cuz it was sticky.
But, I’ll check out the tips, thanks!
Victor @ Taste of Artisan says
Jeff, sometimes how wet/dry the dough feels depends on the flour you use. I'd recommend adjusting the hydration to where you feel comfortable handling the dough. My typical bread dough used to be fairly dry and so was my baguette dough, now I use a much higher hydration. Heck, I made two loaves of 50/40/10 white/ww/rye bread yesterday with 84% hydration and it was terrific. It was a little more difficult to handle but I've learned a good way so it was pretty easy for me. All it takes is some practice.
Kelly says
Good Morning Victor! Thank
You for. Sharing your recipe! I have been baking for a couple of months now. My baguettes have been tasting delicious but I’m not getting consistent results on the shape of my baguettes. They’re not consistently elongated like the picture you have on your post! 🙂 advise on how to get that shape. Is the scoring? Shaping?
Victor @ Taste of Artisan says
Hi Kelly,
It takes a little practice to get them perfectly shaped so keep trying and I am sure they will be better and better each time. Mine initially were all over the place as far as shape, ears, oven spring... but got much better over time. That said, I've noticed that when the dough is not relaxed enough I would have a hard time stretching it and getting a uniform shape. Proper fermentation and bench rest are important. When the dough is tight, you will get thicker and thinner parts which will expand during baking unevenly. Hope this helps.
Christine says
Definitely the best bread I have ever made! Easy to follow instruction, thank you
Victor @ Taste of Artisan says
You are very welcome.
Mary Kelly says
Great recipe! For proofing, I place the loaves (I make 2 batards from this recipe) on parchment paper, and put rolled up kitchen towels in-between and on either side so they hold their shape. Then simply slide the loaves on the parchment paper into the oven using a peel or cookie sheet. Easy-peach.
Mark says
It seems to measure out 72% hydration, which seems too low to do the stretch and fold method. My dough came out as a taught little ball. Can't do stretch and fold. I don't think this will yield those large bubbles as seen in your picture.
Victor @ Taste of Artisan says
72% works fine for S&F, done it numerous times. The optimal hydration for baguettes is 75% though. My initial recipe specified 75% but many people had a hard time working with wetter dough so I changed it to 72% which seems to be the sweet spot for most and works very well. If you are comfortable working with a higher hydration dough, I suggest you try 75%. Really, there is no right or wrong here. I always recommend experimenting and settle on what works best. Ideally, you want the process to be so intuitive and easy that it becomes your second nature. Only that way you will be making baguettes often and enjoy making them.
Charlie says
Can I just not add the honey or does not adding honey (no other substitutions either) change the weight amount for the other ingredients?
I prefer an unsweetened baguette!
Thank you!!
Victor @ Taste of Artisan says
Simply omit the honey. Simple as that.
Petar says
Hello! Great recipe!
I was wondering - how is gluten developed without kneading? Last time I did it, my baguett became flat before going to owen.
Thanks for answer!
Victor @ Taste of Artisan says
Petar, gluten development is a function of kneading and time. Stretching and folding strengthen the dough and also promotes gluten development. Your dough should have a very strong gluten structure by the end of fermentation. If the dough goes flat before you stick it in the oven, most likely it's over-fermented and/or over-proofed. There could be something else, of course, but it's hard for me to say without knowing more details at each step.
Mary miller says
Can you use a marble slap to cook it on x
Victor @ Taste of Artisan says
I would not, unless it clearly states that it's oven-safe. I don't think I've seen/heard of anyone using marble slabs for baking.
Syb says
Can you recommend baking time and temperature for convection oven? Thanks!
Victor @ Taste of Artisan says
I haven't really experimented with convection baking for this recipe but check the comment below - it looks like 15 minutes produced great results.
Friederike says
So yummy. In my convection oven it takes only 15 min baking.
Katie says
Fantastic recipe!! So easy and makes perfect baguettes every time. Will definitely become a regular addition to my baking schedule.
Laura says
Hello, if I can't find the istant yeast it's better if I use the dry one (3grams) or the fresh one (and in this case how many grams)?
Do you suggest adding 3 spoons of sourdough?
Thankyou for your advice
Victor @ Taste of Artisan says
Hello Laura, my apologies for the late response. Hope I can still help. If you don't have instant yeast, you can use traditional yeast but activating it first. Fresh can be used too, I normally use 3x fresh relative to dry yeast. E.g. if a recipe calls for 3g of dry yeast I will use 9g fresh yeast. Adding sourdough starter is fine but account for the added water and flour of the starter accordingly. That said, in this recipe starter is not necessary. Someday I will post my hybrid baguette recipe that uses yeast and sourdough.
Glen says
Great recipe. I hadn't tried the stretch and fold before. Thank you!
Victor @ Taste of Artisan says
You are welcome, Glen.
Anais says
Am I able to use bread flour in substitute for all purpose flour?
Victor @ Taste of Artisan says
I've made my baguettes using bread flour and it worked fine.
sorrin says
The recipe tastes amazing and the dough while sticky is still easy to handle, especially the next day.
The frustration I have after having made these about 6 times now, is that my crumb is dense. I’m struggling with achieving those lovely airy holes you have in your photo.
Otherwise, the crust is golden dark, thin but very crisp without being tough and the bread nicely chewy.
How much does the knead factor into this - am I perhaps over proofing? Not sure what I’m doing wrong.
Victor @ Taste of Artisan says
Sent you an email, I'll need to see some pics, please.
Nina says
Just took the baguettes out of the oven - outstanding recipe, many thanks!
Victor @ Taste of Artisan says
You are very welcome.
Sam says
Victor
Thank you for the amazing recipe!
Have you ever done all of the steps to the final fold, and then put them in the fridge and baked the next day? Do you think it would work just as well or would it slowly over proof overnight? Thanks again!
Victor @ Taste of Artisan says
Hi Sam, apologies for the delayed response. Both fermentation and proofing can be retarded overnight. In this recipe, you do all S&Fs before putting the dough in the fridge to retard overnight. I think that's what you want to do, no?
Vince says
I made 3 baguettes yesterday and they came out rock hard but brown though. I think my Samsung oven is too hot with the heating element on top and with no element at the bottom. I also used convection bake, which might be too dry and too hot too fast. I think I will try standard bake (vs. convection bake) next time, and move the rack lower away from the top heating element. Thanks.
Victor @ Taste of Artisan says
Hi Vince, that makes sense. I would avoid convection and perhaps lower the temperature. A little bit of experimenting will be needed for sure in your case.
Vince says
I made 3 baguettes yesterday and they came out rock hard but brown though. I think my Samsung oven is too hot with the heating element on top and with no element at the bottom. I also used convection bake, which might be too dry and too hot too fast. I think I will try standard bake (vs. convection bake) next time, and move the rack lower away from the top heating element. Thanks.
Dana says
Hi, thanks for sharing your recipe! I am new to baking baguettes, and am excited to try this recipe soon (especially the addition of honey!). Many other recipes that I’ve seen knead the dough before proofing. Why don’t you knead your dough, and do you know how this could affect the texture?
Thanks!
Victor @ Taste of Artisan says
Hi Dana, kneading is a fast way to develop gluten and, unfortunately, kill the texture. S&F and time is another way to get gluten developed without ruining the texture. Kneading will result in a more of a supermarket baguette, with tiny holes and crumbly texture.
Ryan says
Hi victor. Here in Canada we don’t have king Arthur all purpose flour will Robin Hood all purpose flour suffice ?
Victor @ Taste of Artisan says
Ryan, KA is not the only flour that will give you good results. Of Canadian flours, I really like organic La Milanaise all-purpose from Quebec, very nice but grittier than KA. Inexpensive unbleached Baker's Hand AP from Business Costco is very good. Robing Hood is one of the few Canadian brands that I disliked. Haven't used it for many years, perhaps it got better.
Irene says
Thanks for the information about making baguette s. It was very interesting and informative. I will try it out and let you know the outcome .
Viara says
Excellent recipe, thank you! Despite cold proofing in a bowl far too small, and not scoring them deep enough, they turned out very good. I think I'll make four rather than three baguettes the next time to more easily fit them in my oven - but obviously that's just due to the size of my appliance.
Victor @ Taste of Artisan says
Glad to hear about your success, Viara. Happy baking!
Herman says
Hi Victor,
Due to delivery problems, I had to switch flours from Montana AP to Heckers AP, which has a higher protein content. The water amount became a problem, producing a much more hydrated dough. It was so wet that simple tasks like rolling and stretching were impossible. I persisted and made believe the dough was workable. Out of the oven, the baguettes were delicious, with a very open crumb. However, they refused to brown deeply after additional baking so rather than dry them out, we ate them as is.
I’m sure using less water will benefit both the dough and myself next time. Love this recipe! Sending a photo..
https://tasteofartisan.com/wp-content/uploads/2021/10/homemade-baguettes-4.jpg
Victor @ Taste of Artisan says
Hello Herman, that's a very good example of how little is needed to throw off the ratios. One type of flour may be more hydrated than the other and that's sometimes enough to have a significant impact on the dough. When people ask me for measurements in cups and spoons I am terrified to think what kind of unpredictable results they may potentially get as there is so much variance in weight between one cup and another. And that's on top of variances between different flours, as your example demonstrates.
To get a deeper color, you may try dropping the temperature by 25 degrees and bake longer, say 10 min longer. You could also move them up to the top of the oven, which promotes top browning. Another thing is removing the excess flour. Try to brush off as much as you can, that will also help with browning.
P.S. Thanks for sending me your baguette pictures. They look very well-made, with a beautiful crumb. Happy to see those wonderful results you've achieved.
Gun says
Hi Herman (if you get to read this), how did you "save" your dough? I switched flour and ended up with very wet unmanageable dough. Tried to add a bit of flour but I got unsure how much. At one point I put it in the fridge.
Emily says
I've tried 3-4 baguette recipes and this was a total winner. No poolish required. My crust was crisp and the inside was nice and fluffy with good holes. It did come out a bit more brown than I liked, and the second time I only did it for about 10 minutes after turning it. I might try to check in on 5 minutes next time. I don't use a stone or couche. Instead, I have a baguette pan. It stuck to the bottom which my other baguettes didn't. I might want to try to dust it with flour or butter to keep from sticking.
Jeff B says
I have a baguette pan and I spray with cooking spray then dust with flour. I’ve never had one stick.
Jeff says
I have a baguette pan and spray with cooking spray, then dust with flour. I’ve never had them stick.
Emily says
I've tried for recipes for baguette, this is the only one that got me what I wanted! Crispy, and giant holes on the inside.interesting that you didn't start with a sponge and just mix the entire dough. It worked out better, and it was easier!
Victor @ Taste of Artisan says
Hi Emily, happy to hear about your success. Enjoy!
Ira Bernstein says
Victor,
I recently started baking my own bread and discovered your recipe. It came out fabulous and became my go to recipe. Unfortunately I also just had bypass surgery and have to adjust my diet to reduce simple carbs like white flour. I’d like to attempt a multigrain baguette. Do you have suggestions as to how I can modify your recipe? I think I can greatly benefit from your experience.
Best,
Ira
Victor @ Taste of Artisan says
Hi Ira, sorry for the delay in responding to your question. Generally, flours like whole wheat absorb more water so you'd need to bump the hydration up a little. When substituting a small amount of flour for, say, rye flour, I don't even make any adjustments. Whole grain and multigrain breads will have less of an open crumb but they taste great and I bake them a lot. Don't be afraid to experiment, you will discover a lot of cool things. Happy baking!
Leslie says
I'm new to baking anything at all and this was the second baguette recipe I followed, (we won't talk about the first one) they turned out amazing!! Thank you for sharing this. Can this be baked as a loaf and maybe infuse different herbs in it?
Victor @ Taste of Artisan says
Hi Leslie, my apologies for the long delay with responding. Yes, this can be made as a loaf and you can add mix-ins. Take a look at my other recipes, especially the no-knead bread. Perhaps you can use that recipe for your loaves, it's similar. You can experiment with substituting different flours. Rye is a great one. Rosemary and some cream cheese is a fantastic mix-in, as are walnuts and figs, my favorite.
Meg says
Your recipe is spot on - thank you for sharing. I have French neighbors who unreservedly said it was excellent. My family adores both your baguette and advanced no knead bread recipes.
Victor @ Taste of Artisan says
You are very welcome.
Anna says
Absolutely amazing recipe. I don't have baker's couche but I hacked it by reshaping a large waxed-linen (the reusable food wrap from Trader Joes) to become my baguette shape holder which I line with baking paper. I cut the paper as close to the dough as I can to help transfer the baguettes into the over. It makes it super easy to slide it down and position them on the pizza stone.
Not gonna lie, i'm making this almost daily now and can't wait to get tired of it enough that we can start freezing some. So far it's a huge hit with the fam. Thank you!!!
Victor @ Taste of Artisan says
You are very welcome, Anna. Sorry for the delayed response. Happy baking!
Reva says
Hi I’ve just made the baguettes and the top is dark and crispy and yet underneath is so pale. Whatever bread I make the underneath has no colour how do I get the underneath to go darker and crispier?
Victor @ Taste of Artisan says
Reva, can you email me some photos?
Jeff B says
I always turn mine over during the last 10 minutes or so, and the bottoms brown beautifully.
Jeff says
Such a great recipe and instructions! I’ve made these four times now and just love them.
My only problem has been that they are hard to score before baking. I have a good lame, but it seems that the baguettes get dry or develop a “crust” while they are proofing for the oven and the lame cant cut thru the dough well. The dough kind of stretches and rips when I try to slash it, instead of making a ice clean cut. I even cover the dough while it’s proofing. So, I’m not sure what to do about this.
P.S. if you want to experiment, try replacing 10% of the flour (50g) with rye flour—very tasty.
Victor @ Taste of Artisan says
Hi Jeff,
crust during proofing means you need to do a little more to protect them - no drafts in the room, cover with a damp towel, or cover with a piece of Saran wrap. To be honest with you, I never came to like using a lame... I get lame results with it;) What I use now most of the time is my very old Wusthof bread knife - I score everything with it - baguettes, bread... It works very well and it's right there, in the knife block and is easy to clean. Perhaps can you try something like that.
Speaking about adding rye flour, I do it very often. I think I mentioned it in the post or in the comments somewhere. Agreed, rye adds a noticeable flavor boost and subtle sweetness. I love it.
Julie says
Hi Victor. Tried the recipe for the first time and for the most part my baguettes came out lovely. I did have to cut time in the second half of the bake as I think my oven was running hot so the loaves were getting a bit overdone. However, the one thing I'd like to know for my next attempt is the approximate size of the rolled rectangles - mine ended up being very long and skinny rather than a nice uniform shape. I do have to work on my scorning skillz, LOL! Thanks in advance!
Victor @ Taste of Artisan says
Hi Julie, I'd say 9-12 inches long.
Dayna says
What you do if the dough is sticky when it’s time to shape?
Victor @ Taste of Artisan says
The only way is to use more flour for dusting to be able to handle it. Next time drop the hydration. It helps to weigh the ingredients as even 15-20 grams of too much water can make a huge difference. If you did, then drop the hydration by 1-2% next time.
Michael D’Uva says
Thank you for allowing me to join site Victor. I’ve been making no knead bread for a while now with pretty good success. I’d like to try your baguette recipe. Can I make two larger loaves instead of smaller baguette size.
Victor @ Taste of Artisan says
Welcome, Michael. Yes, you can do that, it will work great. You can also try my no-knead bread recipe. It's quick and the bread tastes very well.
Dayna says
Good day, I’m making the baguettes for the first time and I don’t have cloche or a baking stone at this time how should I bake them?
Everything is perfect this far into the baking process light beautiful doughy in just a few short hours baking time can’t wait . Thank you
Victor @ Taste of Artisan says
I used to use a plastic wrap instead of a cloche and it worked great. Make sure to dust with enough of flour to prevent sticking. Paper towels will work too... A kitchen towel will work. You want to keep them very close to each other to keep their shape but without getting stuck to each other. A cloche is useful and easy to work with but is not a 100% requirement. You can get very creative here. If no stone, you can use a stack of baking sheets, unglazed tiles, etc... search the comments below, it's been discussed, should help you.
Dayna says
So do I still need pan of water ? And how many baking sheets?
Victor @ Taste of Artisan says
2-3 baking sheets. You need enough stored heat to give the baguettes a nice oven spring. yes, still need a water pan for the first part of the baking.
Mr Kelly says
Absolutely amazing! Thank you for sharing your recipe! I’m a beginner and your website has help me make some amazing baguettes!!!
Victor @ Taste of Artisan says
You are very welcome. Happy baking!
Tracy Albright says
Can this recipe be halved for smaller loafs and cook in a toaster oven?
Do you have a video avalable for this recipe?
Victor @ Taste of Artisan says
Yes, you can halve it but I have no idea if you can do it in a toaster oven and how it will turn out. No video yet but I am planning on making it soon.
Cat says
How should the recipe be modified if using active dry yeast? Should it be mixed with warm water before adding it to the mixture? Can bread flour be used instead of all-purpose? How would the flour type change the texture? I'm trying to get the light airy inside (with lots of air pockets) and crunchy crust of the 'tradition'. Thank you 😉
Victor @ Taste of Artisan says
Activate the AD yeast, make sure it's alive and very active. I've had much better, more consistent success with instant yeast though. I don't Any flour can be used. More gluten = chewier baguettes. Follow the process in my recipe, you should get a light and airy baguette. Don't be afraid to experiment. Use different flours, change temps, baking time... you will be surprised how texture/taste changes with some tweaks.
Cat says
Thank you for the recipe. I am excited to try it after reading all your replies to questions. I'm a novice and have tried King Arthur and Baking A Moment's recipes without luck. Can you tell me what I can use if I don't have a baking stone (can I invert a baking sheet or use tiles) or couche? Also, can you explain how oven temperature affects the crust? I know every oven is different and I would like to know how to troubleshoot as I suspect my electric oven is hotter than it says. How does opening the door affect the bread? Can I use table salt or sea salt and how would the measurement differ? Have you considered making a video to show the techniques? Thanks again!
Victor @ Taste of Artisan says
Cat, welcome to my blog. Yeah, a video is coming. Search my comments, I've explained how to bake without a stone, it's totally doable. You can use a stack of 2-3 baking sheets to get enough stored heat to help baguettes 'spring' in the oven. A cloche (long one) will work too. With a baguette cloche you don't need to steam either. Tiles, unglazed, will work too. The higher the temp the better the color and the thicker the crust. Lower temps create thinner crust. You can get good color too with lower temps by increasing baking time. Also, make sure that the oven is as dry as possible. Humid air will result in a pale color. You can finish baking with the oven door cracked open, it promotes a very thin, crackly crust. The best way to find out is to start baking and experiment with your oven.
Cherylann says
Hi Victor.
I've successfully baked your delicious baguettes numerous times. Thank you again for sharing the recipe and for the great tutorial that accompanies it. I recently tried the same recipe and technique using French T55 flour. The dough started out much wetter but became manageable and I thought showed promise, being supple and shiny albeit sticky. The resulting baguettes were a disaster! No oven spring, dense crumb and thick, hard crust. Same oven, same stone, same fridge, same water, same yeast. Do you have any thoughts about what could have gone wrong?
Victor @ Taste of Artisan says
Cherylann, drop the hydration by 2-3% and try again. That should work. I've made baguettes with La Milanaise T55 (from Quebec) and it worked well for me. I didn't adjust the hydration. But perhaps yours was very fresh and more hydrated so you'd need to adjust. T55 is grittier, perhaps a little more S&Fing to better develop gluten.
Herman says
Victor,,
The baguettes I just pulled out of the oven are my best ever. Thank you for your well-crafted recipe. These are nice looking and so tasty. No more commercial baguettes for me!
https://tasteofartisan.com/wp-content/uploads/2021/01/Best-baguettes-by-Herman.jpg
Victor @ Taste of Artisan says
Glad to hear it, Herman. We've stopped buying most of the bread products a while ago... not much of store-bought excites us anymore... homemade bread, even if not perfect, still beats commercial bread every time...
P.S. Thanks for emailing me your pictures, I attached one to you comment. Beautiful crumb and the crust, I can feel that crispy, crackly crust... Great job!
Christine says
You had mentioned using a towel, but you never mentioned it t in your instructions?
Victor @ Taste of Artisan says
Christine, I place a towel in the bread pan filled with hot water. Simple as that, nothing fancy here.
Grant says
Very good crust, crumb, and chewy interior. Perfect amount of sweetness.
Victor @ Taste of Artisan says
Glad to hear that, Grant. Thanks for the feedback.
Elle says
Hi! Excited to try your recipe. Quick question: is traditional high-protein flour (approx. 13-14% protein) compatible with this recipe? I see that you use all-purpose flour, which is not traditionally used for baguettes. Why do you choose to use all-purpose rather than a flour with a higher protein content? I'm a passionate but amateur baker, so I'm asking just because I'm curious and I want to make the best possible bread. 🙂
Victor @ Taste of Artisan says
Well, that's debatable. Traditionally, they use T55 and T65 flours to make baguettes. Without boring anyone with details, KA AP is very close to T55. It makes an excelent baguette and is easy to find. I've tried dozens of different flours and this one I tend to prefer when making baguettes.
Olga Woodrow says
These turned out amazing! I used active dry yeast(and activated prior to its addition to my dough), and cheap flour. I used a pizza stone, and I didn't have a bread lame or couche, but it was still good.
My only warning to you if you are novice to baking or worried about trying this recipe: don't rush it, and follow the instructions!
I stupidly ignored instructions and shattered one of my glass pans due to adding cold water to the hot pan:)
Thanks for posting. Truly a great, dependable recipe
Victor @ Taste of Artisan says
Oh-oh, cold water and hot glass don't play well together. You've made a very interesting point - even with mediocre flour and no special tool you can still make a delicious baguette. These are the tastiest when they fresh hot out of the oven. Can't get that in 99.9 of the stores.
Durre says
Long time baker, first comment ever, that’s how amazing this recipe is! I’ve recently started experimenting with bread and had multiple failures, none of them tasting like the baguettes I’ve had in France- this is a winner! Tastes just like the chewy crusty baguette in Panera!
One thing I’d like to add is that when I put the baking tray with water on the shelf above the bread I had much better results than the other way around. I think it makes the oven humid without the steam going up and directly hitting the underside of the tray the bread was baking on.
With regards to the measurements, I used my scales and did exactly as the recipe stated in ounces and had zero issues.
Thank you for this brilliant recipe!
Victor @ Taste of Artisan says
Hi Durre, thanks for the kind words. Water pan above baguettes? Hm, it never occurred to me to try that but thanks for the tip, I will try it.
Elle says
Hi! I'm excited to try out your recipe. I have made baguettes a few times before (using a different recipe) and I'm interested in exploring other takes on the bread. I have a couple of questions for you, if you don't mind!
1. Why do you choose to use instant yeast rather than active dry yeast? I'm a novice baking enthusiast and am slowly learning about the science behind it all. I have been under the impression that active dry yeast, rather than instant, is more compatible with prolonged proofing periods, but perhaps this is not the case. Anyway, just hoping to learn a bit. 🙂
2. Many baguette recipes that I have come across have called for a flour with a high-protein content, like the one I use, https://www.bobsredmill.com/artisan-bread-flour.html. I imagine substituting this for the all-purpose flour would create a chewier, more glutinous texture. Is this true? In what ratio would you recommend substituting, if at all?
Thanks for your help!!
Victor @ Taste of Artisan says
Hi Elle,
I use instant because it gives me consistent results. With AD had hits and I had misses.
Yes, the more gluten the chewier they will be. I've even made baguettes with KA high gluten flour and pizza flour (type 00). Way too chewy for my liking but some people in my family liked it. What ratio to use if you want to sub? It depends on your preference. No right or wrong here.
One variant that I like a lot is 10% rye and 90% AP. It makes a ridiculously flavorful baguette. One of my favorite variations.
Jill says
Wow, turned out FABULOUS! How well do these freeze?
Victor @ Taste of Artisan says
I never tried freezing them, but they should freeze as well as any other bread, which is quite well.
Monique says
Jill, here is what I do and it is working out GREAT. After I bake the 3 loaves, since we can't eat them all that day, I wrap 2 of them SEPARATELY in foil and put them in the freezer.
When I want to eat some great french bread (thank you Victor) I will pull one out, remove the foil, put it on the rack of the cold oven, then turn the oven at 350° and leave it for about 8-10 mn.
The baguette will be crisp and almost like you just baked it. My french sister gave me this tip ! You might have to adjust the temp or time in YOUR oven. ENJOY !!!
Jojo says
Great recipe! Thank you! I’ve been struggling with baguettes using the KAF recipe.. I could never get a good crumb, but no problem following this.
Victor @ Taste of Artisan says
Happy to hear that. Glad my recipe helped you. Happy baking!
Monique says
Victor, your recipe for baguettes is wonderful ! I have made them quite a few times this past month and I am delighted at how well they turn out and the TASTE is delicious !
Thank you! 😊
Victor @ Taste of Artisan says
You are very welcome, Monique. Happy baking!
Callie Hughes says
I made this baguette bread to go along with a French onion soup and overall the bread was a absolute hit. My boyfriend and I both loved it. The only thing I changed is I left the steaming water bowl in for the entire cooking process because it is so dry here in Wyoming and i also didn’t have any rice flour so I didn’t want my bread to dry out too much. Thank you for sharing it!!
Victor @ Taste of Artisan says
You are very welcome.
Thomas says
Great recipe. Out of all of my attempts to produce a great loaf this stands as one of the best. Due to scheduling and wanting to have fresh bread for New Years Eve I actually let the cold ferment go for 25 hours with delicious results. Great crust, crumb and oven spring.
JEFF says
Just like in Paris - maybe better because it is so fresh. Incredible crackling crust! Success the first time and rave reviews from my family. Simple if you follow the steps and well worth the time. Resist the temptation to add more flour. Dough is sticky but manageable. Glad I had a couche for the proofing process.
Victor @ Taste of Artisan says
Glad to hear it, Jeff. Happy my post helped. Couche is very helpful, makes things much easier. They've come in done in price considerably over the past 10 years.
Deborah Murray says
Loved this recipe and planning to make it again this week. The only issue is the top of my oven, turns out, is quite hot - burnt the baguettes within ten minutes. I managed to salvage by moving them down and covering with tinfoil for the remainder of the bake; they were still delicious! Will bake on the centre rack from now on.
Lisa G says
How would you adjust the recipe if you wanted to omit the honey? Thanks
Victor @ Taste of Artisan says
You can use an equal amount of corn syrup or maple syrup. Those work great in this recipe.
Andy says
Hi
Have now used your recipe many many times. Always works great. Thanks for sharing.
Perfecting it, I would appreciate your advise
1. Compared to French baguettes from France, mine still has too firm a crumb. I would to make the a bit less beady.
2. Can you recommend a stand alone half standard sheet size electric oven?
We have a Wild but the measurement is strange and i can only fit a quarter size sheet in there.
Thanks
Merry xmas
Victor @ Taste of Artisan says
Hi Andy, Merry Christmas to you too. To make your baguettes with a softer crumb, try proofing a little longer and baking at a lower temperature. Try mixing the dough in a stand mixer while skipping S&Fs. I am being a little humourous here with the latter suggestion but really, that's how all that soft and airy supermarket bread is made. They mix the heck out of the dough, killing the texture, but it's soft. I am not sure if you are looking for that kind of softness though. I also think much has to do with the ovens - pro ovens have a much better steaming/humidity/temperature control that can produce results not easily attainable in home ovens.
'French baguette' is way too generic of a term... When in Paris, I tried baguettes from over a dozen places, and the differences between them were staggering at times. The very first baguette I tried there was more like a very long sub roll that you would get at a supermarket and my first thought was wow, what a disappointment. I lived in Germany back then and was used to very good European bread that I was buying from local mom and pop bakeries. Then I tried another one from a different bakery and it was love at first bite.
Andy says
Hi
Thanks for your reply.
Well, this has made me think a bit about what I am trying to achieve..
I guess what I am after is more flaky and crunchy but less bready.
Ill try to increase steam and shape them thinner.
Thanks again
Victor @ Taste of Artisan says
Take a look at the last picture of my challah bread recipe. Flaky like that? You can adap that recipe to make baguettes.
Kelly says
Great recipe Victor!!!!! Thank you so much for sharing your knowledge and expertise with a newbie like myself!! It was a total success!! My wife and kids devoured the baguettes!! I'm making them again soon!!
Victor @ Taste of Artisan says
You are very welcome, Kelly. Thanks for the kind words. Make my challah bread for your wife and kids, I have no doubt that they will love it.
Salma says
Started this baguette last evening, baked this morning, ate for lunch. Just too good and tasty and so easy to make. Gave away one loaf. Started again this evening to make another batch tomorrow. Love it. Thank you.
Victor @ Taste of Artisan says
Happy to hear it, Salma. You must try my challah recipe. It's my new hit - everyone keeps asking for it. I am baking 4 today and yesterday's 4 are gone. Most of them I gave away to friends and neighbors. The one that I had left for us yesterday was gone in 2 hours. I will update the recipe though (today or tomorrow) - instead of one large one I am now making two smaller ones and do a 4-strand braid instead of 6-strand. Much easier that way and they look cuter.
https://tasteofartisan.com/wp-content/uploads/2020/04/challah-bread-chewy.jpg
https://tasteofartisan.com/wp-content/uploads/2020/04/challah-bread-2.jpg
shirley says
The salt in your recipe, is it table salt or kosher salt? thanks.
Shirley
Victor @ Taste of Artisan says
I use kosher salt.
grant says
Really nice baguettes, mine were a little bit too brown, but I wasn’t watching them very closely, so that’s to be expected.
Connie says
We made twice already and now addicted to this bread recipe! You've inspired my 12 yr old son to the artistry of bread making. Thank you!
Mila says
Hi Victor,
Can I skip the cold retarding?
Thanks,
Mila
Victor @ Taste of Artisan says
Mila, yes, you can but you will need to make some adjustments.
MONICA says
What adjustments need to be made when not doing the cold method?
Victor @ Taste of Artisan says
Well, the process will be very similar to what I described in my no-knead bread recipe. So, you ferment all the way, cut into pieces, bench rest, shape, proof, score and bake. Since the dough will be warm, all stages will progress faster so you have to see how your dough behaves and go from there.
Bob says
I have two issues - not sure if they are related:
1. Dough was kind of gooey and quite sticky through the entire process, although I used a kitchen scale to measure ingredients. Suggestions?
2. Baguettes were quite golden brown after first 15 minutes baking at 475. I only baked for 5 additional minutes at 450. I don't know my oven to run too hot, but maybe? Was baking on a stone with a pan of water and submerged rolled dishtowel.
Thanks!
Victor @ Taste of Artisan says
Bob, increase the flour by about 2% and see if you are more comfortable with that consistency. If needed, increase some more until you are. Also, try preheating to 485F then bake at 450F and 425F respectively. Experiment. Different ovens bake differently so you may need to find your optimal combination of baking time/temp.
Chris says
can you use bakers yeasts for this recipe and if so how much? this can sometimes be called fresh yeast or compressed yeast.
Victor @ Taste of Artisan says
Chris, I think you should be fine. I rarely use fresh yeast but when I do, I shoot for 3x times the amount of dry yeast.
Charlene says
Followed the recipe exactly and also made sure oven was 475 when I cooked the baguettes in the baking stone. They were dark brown within 7 minutes and I quickly had to cover them in foil. I did not place them too high in the oven or too low. Inside texture was perfect, though.
Victor @ Taste of Artisan says
Charlene, I've never experienced what you have... I am puzzled. No baguette can bake in 7 minutes. It's possible that your oven bakes hotter than it reports. Also, not enough steam in the oven will prevent oven spring and start browning prematurely. But, if they turned out that's all that matters. Enjoy!
Charlene says
Thank you. The baguettes were not done in 7 minutes. Just the tops were dark brown. I had them in the middle of the oven on a pizza stone and baked at 475 degrees F for 15 minutes, then turned the stone and baked another 15. By the first 7-8 minutes the tops were already too brown. I also used boiling water in a pan in the bottom and water misted in the baguette. Advice? Cover loosely in foil until the end perhaps? Also they stuck badly to the stone. I want to do the whole thing over tonight. Thanks
Victor @ Taste of Artisan says
Hi Charlene, I would try dropping the temperature first. Decrease by 25 degrees and see how that works. Covering is best during the first half of the baking... mine are pale brown at 12-15 minutes. Your oven must bake much more efficiently than mine so either decrease the temp or reduce the baking time. Stuck badly to the stone? Hm... try adding more rice flour, that should help. You can also try baking on parchement paper, I do it very often when baking baguettes or bread, no sticking at all and loading in the oven is easy.
Steve Michael says
I’m just a beginner and have only tried 3 or4 different recipes. This recipe sort of put me off because I am lazy by nature. The time and care is worth it in the end. No other recipe I have tried has near the flavor in this one. I recommend you the investment for a superb result.
Victor @ Taste of Artisan says
Thank you for the kind words, Steve. Happy baking!
Sherry says
I love this baguette recipe. The flavor profile is just way better than the done in a baguette. My kids prefer sourdough flavor. How do I modify the recipe for a sourdough baguette?
Victor @ Taste of Artisan says
Sherry, I use the same percentages only incorporate 50/50 poolish and sourdough starter, about 100g each.
Ethan Atack says
This was so incredibly good, I think there was a problem with my oven so I put it on broil quickly at the end to get that dark brown crust shown in the picture and slightly burnt them ..... lol
After all that I screw ur up but thank you so much I’ll be using this again
Victor @ Taste of Artisan says
You are very welcome, enjoy! Let me know if you need any help making that perfect baguette.
Mary says
I loved this recipe ... have been in search of one for ages. But while the crust was perfect shortly after it came out of the oven, by the next morning (to have as my prima colazione) the crust seemed soft and slightly rubbery. Is this a characteristic, or did I do something to make it that way?
Victor @ Taste of Artisan says
I'd say yes, it's a common characteristic. If you want it crispier, what I do is to bake during the second half with the oven door slightly ajar. What this does is it dries out the air in the oven, resulting is in a thinner, crispier crust. It will stay crispier longer and won't be as rubbery the next day. What flour you use may also be a factor. How your oven bakes (too humid) may also have an impact. There may be several factors at play.
Donna says
What temperature is the water you use in this recipe?
Victor @ Taste of Artisan says
Room temp, I use re-mineralized RO water that comes from a tank that sits at a room temp. I'd say about 68F-69F.
Donna says
Thank you victor! I couldn’t wait for your response ... just a little impatient ... I used room temp and the bread turned out fabulous! The only issue I had was that it was baking too fast so I turned the temperature down to 450 after 10 min and then down to 400 after another 10 and it was perfect!
Victor @ Taste of Artisan says
I've noticed that some of my blog readers have had this issue. Different ovens bake differently and some quite a bit differently so it's always a good idea to watch your first batch closely and make necessary adjustments if needed. You did exactly that and the baguettes turned out perfect. Enjoy!
Jane S says
The bread was absolutely delicious! Great recipe. I wanted to eat all three loaves in one sitting, it was so good. Thank you!
Victor @ Taste of Artisan says
You are very welcome.
Lloyd says
Thank you, your recipe worked perfectly.
M3shoes says
Hi there. I absolutely love this recipe and used it over and over again. However, I am temporarily unable to have white flour and only 100% spelt flour. Would this recipe work just as well or would I have to change it as it is a different flour? No worries if you don’t know. Thank you.
Victor @ Taste of Artisan says
It's a good question to which, sadly, I don't have the answer. If you try making these baguettes with 100% spelt, do let me know how they turn out. Good luck.
Patricia says
Hello Victor,
Instead of a couche, can the aluminum baguette pan be used for rising/resting time?
What would be the advantages to using couche over the metal pan?
Thank you!
~ Patricia
Victor @ Taste of Artisan says
Hi Patricia, a baguette pan will work I think but I've never used it. You want the baguettes to hold their shape while proofing. As long as you can do that, it's fine. Also, you don't want them to get stuck, you want to add enough flour to prevent sticking. A couche is great for that - no sticking and you can keep the baguettes tightly together so that they don't spread out and hold shape.
Jean milu says
The best guide ever thank you
Victor @ Taste of Artisan says
You are very welcome.
Patricia says
Victor, can this KAF baguette pan be used in lieu of cloche?
https://shop.kingarthurbaking.com/items/king-arthur-baguette-pan
Btw, those baguettes look scrumptious; look forward to trying this recipe!
~ Patricia
Victor @ Taste of Artisan says
Hi Patricia, looking at the picture, I am concerned that the baguettes may spread out too much while proofing. You want to keep them tight next to each other to keep their shape. I'd rather use paper towels as a cloche, which I've done in the past and it worked well for me. Just cover them with a damp kitchen towel if you do.
AK says
I used that exact pan with this recipe and it worked out well for me. They produced a nice round shape.
Fernando says
Victor, can I use this same recipe to make pain d’epi? Have you tried it?
Victor @ Taste of Artisan says
Fernando, yes, I have made it using this recipe. A long time ago though but it turned out very well.
Ranae says
Hi Victor! Thanks so much for this recipe...I really enjoyed making it! When making a new recipe, I like to follow directions exactly the first time. All went exceptionally well except I feel like I got my baguettes too dark. My oven is testing at correct temp and I followed all directions. Anyway, would you suggest lowering temp some or baking for less time? To give you a better idea...once bread is cool, the outside is really hard unless I dampen and re-warm. I’m just new to making bread so looking for a little insight. Also, I did brush off my rice/unbleached flour before baking but think I could have brushed off more. Could that have added to the extra darkening? Otherwise, taste was good and lots of airy holes inside. I wish i could post pictures! Thanks again...😄
Victor @ Taste of Artisan says
Hi Ranae, you've probably heard this 1 million times but here it goes again - everyone's oven bakes differently. If the crust is really hard, lower the temperature by 25F and evaluate. You can also bake a few minutes less. Or both.
One thing I've noticed is that if you cut baguettes while they are hot and don't finish, they will get a very hard crust. I've noticed the same thing with bread. It's best to let them cool down completely then cut. If you cut it hot, the steam comes out. My theory is that it's that steam that softens the crust from the inside. If you lose the steam, the crust will get hard. So, if you cut that baguette hot, better finish it all;)
Ranae says
Thanks so much for the great advice...I will keep experimenting! 😀
Camille says
Best recipe, I actually love all of your recipes. I made this bread 4 times at a high altitude and added a little extra water and they came out perfect. I just made them at sea level and they really puffed up. I wonder if I should adjust the amount of yeast? Have you heard of that? Still amazing but they were much larger than before.
Victor @ Taste of Artisan says
Interesting, but no idea. When you say 'really puffed up', I wonder what it looks like... I good oven spring to me is a very desirable thing...
Gregory Couture says
This is great recipe. It takes some time to get the stretch and fold down but, as they say, practice makes perfect.
Tasting a nice warm baguette with cold butter reminds me of France, especially good in these times of travel bans.
Julie says
Wonderful recipe!! Makes 3 baguettes that fit in my smaller Miele steam oven.
Jackie says
I'm very new to bread baking. I've used Mark Bittman's no-knead bread recipe several times for a great rustic loaf, baked in my Dutch oven. Someone told me I could use that same recipe for baguettes. Noooo! Dough was way too wet to shape the baguette. So next time, I will try your recipe. My main question: I have an Emil Henry baguette baker, which allows for 3 smaller sized baguettes--about 13" long, I believe. I think this baker is supposed to generate steam similar to how my Dutch oven worked with the no-knead recipe. Are you at all familiar with this baguette baker? And do you think it will work with your recipe? We can't use water in our European oven to generate steam, as it gums up the electronics.
Victor @ Taste of Artisan says
Yes, that baker will work very well with my recipe.
Vernon LeCount says
Hey Victor,
Been using your recipe for awhile now (over a year), but have been experimenting with a Pate Fermentee and Poolish, prior to the main mixing. I took a baguette class in Paris last winter, and their attention to the temperatures of flour, water and the room was intense. (they had a formula). I also found a YouTube video of Julia Child running around a Paris bakery with a thermometer. So I keep experimenting with your recipe, but found I can get a good flavor with your recipe by just doing a poolish, either the night before or earlier in the day. The poolish seems to give a flavor I like. But I think the main thing is the temperature of the room when letting the poolish ferment. Currently for the poolish I am using 70 gram water, 70 gram flour and 1/8 teaspoon of active dry yeast. I subtract the ingredients amounts from your 500 gram (flour) recipe. The length of time I let the poolish ferment is dependent on room temperature. By the way, the bakery in Paris was using your higher hydration proportion. Have you tried a Pate Fermentee or Poolish with your recipe? Have you tried to start the Poolish a day before?
Victor @ Taste of Artisan says
Hi Vernon, you are right, fermentation temps make a difference. Not only with bread but also with any other fermented product, e.g. sauerkraut... higher fermentation temps favor lactic acid production while lower - acetic acid. Different flavor profiles. Different fermentation times. But to be honest, I don't obsess about temps too much. I think bread making must be simple. If it's not, you will get tired of this very quickly. I've been making bread for over 10 years now and every time I do it it's still enjoyable as well as quick and easy. I don't want to make it too complicated.
I would imagine that a highly reputable bakery must maintain a certain standard/taste that can be achieved by a repeatable process that any employee can master. If you know what you are doing you can adjust on the fly. Results may vary. Nothing wrong with that. That's how you discover new things. In a bakery, they want the same result every time. Hence their obsession with temps. Temperature is another ingredient as they say.
As far as using poolish, pre-ferments (Pâte fermentée), I use them too to make bread/baguettes. They do add flavor similar to cold retarding. There are many ways to make a tasty loaf of bread... I try using different techniques.
Fernando says
Hello Victor,
I have been baking baguettes, using you recipe, for about three months. I bake twice a week. I tweaked almost every step in order to get what I want. I noticed that different ovens behave very differently and times vary depending on your kitchen temp and other factors. Note: Even the first time, following your recipe to the letter, the result was very good.
Question: when I increase hydration scoring becomes difficult and I can’t get “ears”. However, if I reduce hydration to 70% I get perfect ears and still get a very airy and good baguette. Is that normal?
Victor @ Taste of Artisan says
Hi Fernando, yes, it's easier to get nice ears with lower hydration. There is no right or wrong here, if 70% hydration gives you optimal results - go with it. High hydration is not just about air crumb and big bubbles. It's more about the texture, that delightful moistness to it... I just love it. 75% for me is optimal for baguettes. Bread - I go as high as 80% or even higher sometimes. I never went that high until I tried one man's bread at a farmer's market in Sarasota, Fl. The bread was outstanding, we had a long conversation about bread baking with him and he shared some tips with me. One was high hydration. That said, tastes differ and what I like may not be what someone else does. Experiment and stick to what works best for you and what you like the most.
George says
At last! A baguette recipe that works and the results are just like proper French bread.
Shawn says
Hi - My baguettes are coming out of the oven with brown spots, rather than evenly browned. I adjusted the recipe to make three 240 gram baguettes. I use a baguette pan with a pan of water in a lower rack and a foil pan covering the baguettes for the first 15 minutes at 450 degrees. Then I remove the foil pan for the final baking time. They taste great, the crumb inside is perfect. I'm not digging that uneven, spotty browning. I'm wondering:
--is the honey not getting evenly distributed into the dough
--or baked too long with the steam/cover
--or something else.
Thanks for any feedback.
Victor @ Taste of Artisan says
Hi Shawn,
I remember seeing that problem too but heck if I can remember why it was and how I fixed it. Perhaps try lowering the temp in the second part of baking by 25F and bake them longer. Shortening the first part and extending the second part of the bake is good idea too. Let me know if either of those work.
Joseph says
I made this twice over the last week, here are my results and minor tribulations.
First effort. I used 2:3 bread flour to all-purpose. I didn't use honey. I don't have a baking stone (I used a baking sheet) nor a sufficiently fine knife for the cuts. The transfer to the baking sheet was a challenge, with some less-than-straight loaves. I feared much, this being my first attempt at making baguettes. I otherwise followed the directions (fridge fermentation etc) up until the second half of the baking as the loaves were looking overly dark, so I took them out after 9 minutes. The results were quite pleasing! My wife said it was the best baguette she's had in awhile, better than she's found at the local farmer's markets. I agree. They were a little over-baked on the outside but all completely edible. They had a nice crust, nice structure inside, a little chewy in a good way and good flavor all around.
Second effort. I used only all-purpose flour and I used honey. I skipped the fridge fermentation (we wanted bread). I let the dough rise in a warm room and this time I made two loaves rather than three in order to have bigger slices. Still not easy to transfer the loaves neatly to the pan! After the first bake of 15 minutes they looked fairly golden brown but I didn't want underbaked bread so I carried on. To try to avoid the over-baking issue I put the oven down to 435 on the second half of the bake. After 5 minutes they were quite browned, and greater darkness on the bottoms so I took them out. The inside of the loaves were *just slightly* underbaked. Again there is a good crust, if a bit softer this time. The inside is overly bread-doughy in flavor, attributable I suppose to the less time baking of larger loaves and perhaps the skipping of the fridge fermentation? And I think I preferred the dimension that a portion of bread flour added in my first attempt. Still, this was superior to any "baguette" at the grocery store and as good as anything at the farmer's market.
I'm not sure if next time I should turn the over even lower or cover the loaves during the second half. But a baking stone and a proper knife are on my grocery list...
Victor @ Taste of Artisan says
Hi Joseph, sorry for the delay with my response.
Yeah, different ovens bake differently so you sometimes have to make adjustments. If yours brown too fast, lower the baking temperature in the second half by 25F. Or pull them sooner like you did if they look and taste great. But 9 minutes sounds a bit fast so I would try lowering the temp and see how that works.
Now, baguettes getting fairly golden brown by the end of the first 15 minutes is not a good thing. It tells me that there was not enough moisture in the oven. You need good steam. Either your are not supplying enough steam or your steam quickly finds its way out of the oven. Mine are pale yellow by the end of the first 15 minutes and bursting/showing nice ears. If there is not enough steam, you will get a poor oven spring. Are yours getting a good oven spring? If anything, you should be covering them during the first half of baking. Back in the day, I would put a foil dome over them to get a good spring, then remove and bake for another 15 minutes. With a foil dome you don't need to steam as there will be enough steam from the dough itself. This way is a bit awkward and limiting but it works.
The transfer has been an issue for me too. I now often bake on parchment paper. Turn them over from the couche onto parchment, score, pick up with a large enough pizza shovel and slide onto the stone in the oven. Simple as that.
Sabera says
I tried this recipe for the first and my baguette turned out perfect! Its definitely a keeper as my grandsons keep asking for more! Thank you so much for sharing this simple yet professional recipe!
Brianna Hodges says
Best baguette I’ve ever eaten- crusty, chewy flavorful. This is my recipe from now on. Tastes delicious and I love the idea of honey, its the subtlest hint of sweetness with the perfect amount of salt to balance it out. Just a classic baguette. Made it for the first time and it came out perfect. Im an avid bread baker so I think that helped but anyone can do this and it comes out impeccable. Look no further for a baguette recipe people- this is it.
Victor @ Taste of Artisan says
Happy to hear that, Brianna. Thank you for the feedback.
Jacquelyn says
Thank you very much for sharing this easy and delicious recipe. Made some with Yeastie Boy, my starter (50% wholegrain flour and 50% water, used a total of 150g and subtracted the flour and water from the original recipe accordingly, which is 75g each). I halved the recipe and made one big baguette, free formed as I didn't have a cloth that I would put the dough on. So it bulked sideways lol. Baked at the same temperature and timing per recipe. I must have been heavy handed while stretching the dough, because mine had small air bubbles. Also didn't have a baking stone, just made do with a regular baking tray. Still, the taste is really good and the crust is superb. My family members say they won't be buying baguettes anymore 🤪 my uncle wants to eat this with a pat of good butter. This bread is the epitome of simple pleasures. I hope those who are experimenting with their starters will give this a shot. If you're not sure about the strength of your starter, or are using unfed/discard, add the yeast the recipe called for.
Victor @ Taste of Artisan says
Fantastic! Glad to hear about your success. I normally make my sourdough baguettes 50/50 starter/poolish for a more airy crumb but 100% sourdough are quite amazing too. They are all different, not better or worse than the other.
Loan Ngo says
Best baguette recipe online! Thank you! They came out crusty, soft and chewy.
Michelle says
Hello from England!! My google app highlighted your No-knead bread recipe to me this morning, I’ve been browsing your wonderful site for the last couple of hours and I’ve come to rest on this one.
Before I ask the questions that have come to mind, I’d just like to say thank you soooooo much for actually providing proper recipes with accurately measured (weighed) ingredients!! I can’t tell you how many enticing sounding recipes I’ve come across, only to find that at best they’re nothing more than a list of “cup” based guidelines. How anyone can think something as arbitrary as a “cup” still has a place in modern baking, I do not know. Anyone would think kitchen scales cost a lot of money!! There’s a reason why every pastry school in the world teaches weight not volume, when it comes to baking, it just doesn’t work...
As is quite common here, my built-in oven is a standard 600mm appliance (not sure of actual oven size), so unfortunately I can’t physically bake anything the size of a full baguette. Obviously I can tweak the amount later, but could you possibly give me a starting point with regards to the dough weight I should portion into in order to make good sized batons out of your recipe?
In England we seem to have a much wider variety of flours than is available in the US, but we simply don’t have APF, in any brand. But Italian Type 00 and French T55 are really easy to come by, and I have a sack of French baguette flour I purchased recently which I’m thinking should be perfect to try in your recipe. Do you think I’ll need to make any adjustments, I believe its protein content is 9.5%?
And the last thing I wanted to ask about is the overnight cold retardation, because this topic continues to confuse me completely...! Everything I read states that yeast is inactivated below 4degC. So does that mean the 12-14 hours in the refrigerator should be at a temperature warmer than 4degC? I ask because I keep my refrigerator set at 1degC, and when I tried doing an overnight proof for 12 hours, when I took the dough out it didn’t look any different to when it went in, it hadn’t increased in size at all. Which I guess makes sense if the yeast gets put to sleep?
Thank you so much for taking the time to read this, and again, thank you for such a wonderful blog. I’m really looking forward to exploring it ❤️
Victor @ Taste of Artisan says
Hi Michelle,
you are very welcome and I am glad to hear that you are finding useful information here on my blog.
My stone is about 21 inches (~52 cm) so I try to get my baguettes about that length. It's about 6 inches or 13 cm shorter than the standard 65 cm. A standard baguette is made of 350 g of dough IIRC. So, if your oven is 56 cm wide inside, you can go for 50 cm baguettes (leaving some space around the stone/baking sheet for air circulation). If you are baking half-length baguettes, shoot for 150 - 175 grams of dough per baguette. You get the idea.
Here in the US and Canada we also have quite a big selection of flours but you definitely need to know where to look. French T55 is what they use to make baguettes, you can't go wrong with it. I sometiems bake with organic La Milanaise T55 from Quebec, its very good. No adjustments needed generally. I find T55 a touch coarser than KA AP. The coarser the grind the higher on hydration you normally go so you may want to bump it up a little. It really depends on personal taste though.
Cold retarding is often misunderstood and sometimes surrounded by misinformation. Retarding is normally done between 35F to 40F (1.7C - 4.4C). Humidity should be around 85F (hence always cover your dough with plastic or a damp towel). Such conditions are not intended to freeze the dough or kill fermentation completely, but slow down its fermentation rate so the dough can remain stable for a few hours and develop complex flavors. 1C is too low, you need to bump it up. Retarding can be very tricky and the temperature plays a big role. Where the dough is in fermentation process is very important too. You want the dough to be partially but well into fermentation before going in the fridge in this recipe. All morning steps are critical too. The steps in this recipe are very specific to, well, this recipe. There are many variations and other ways to incorporate cold retarding though.
Happy baking!
Sarah says
Do you have any tips for baking these at high altitude? Thanks!
Victor @ Taste of Artisan says
Sarah, don't have any experience with high altitude baking but I can suggest this: https://www.kingarthurbaking.com/learn/resources/high-altitude-baking. Hope someone else can chime in and speak from experience.
Jean RB says
Wonderful! I didn’t have some of the special equipment, but used my pizza stone and a heavy kitchen towel and a sharp knife. Cuts were wanting...but bread is very good. Thank you for making this easy to follow and understand. Much appreciated by this rookie bread maker and her bread hound husband!
Peggy says
What brand of parchment do you use? My Reynolds brand is only good up to 425 F. Also, I don't have a stone, but I do have a baguette pan. Hoping that will work until I can find a good stone.
Victor @ Taste of Artisan says
I use PaperChef, it's also rated for up to 425F but it works fine for me in an electric oven. In a gas oven, it's a slightly different story.
Kana says
Used my scale, couche, everything on the recipe except the yeast so I let it proof longer. In a fridge for 15 hours. Baked in a baguette pan with a pan with water for steam. Nah. I see a couple air pockets but that’s all. Not impressed.
meen says
Hello, can i skip honey?
Victor @ Taste of Artisan says
Won't taste as good if you ask me, but sure, no problem with that.
Kana says
I say skip it. I don’t taste any sweetness at all.
Simon says
Kana as an avid and experienced baker, I will say that following this recipe has resulted in spectacular baguettes - I use it almost daily. I put these up against 3 French bakeries in Chicago and they were extremely close if not better - try it again.
Lilith says
I tried like 3 recipes befor this and every time smth was wrong with my baguettes, but this recipe is bomb!!! I love it, my whole family liked it so much, now iam gonna bake baguettes everyday😘Thank you so much
Victor @ Taste of Artisan says
You are very welcome! Happy baking!
Ram says
Hi Victor
Thanks for this recipe. My third attempt and it came out well with that hydration. One thing i am struggling with is, when its hot or warm, there is crunch but after it reaches room Temperature, the crust becomes soft. What should i do in this case please.
Thanks once again
Victor @ Taste of Artisan says
Every bread loses crunch over time because of moisture in the ambient environment. You can slow that process down by letting the bread could down completely then sealing it in a plastic bag, expelling as much air as possible. I've also noticed that baking at higher temperature creates a thicker crust that lasts longer, so that could another thing to try.
Ram says
Thanks will try higher temps. But, am talking about take it out of oven, good crunch. Bow leave it to cool down and it looses crunch. Am talking about few mins after bread is out of oven
Victor @ Taste of Artisan says
Well, all bread loses crunch like that as far as I can tell, that's why many of us like eating bread fresh out of the oven when it's at its freshest and crunchiest. I guess the best way to deal with that is to bake more often;)
Laura says
This recipe was amazing. Very well instructed. I had to make adjustments for high altitude but this recipe allowed me to bake my first successful baguette. Thanks so much!
Kristen McLaughlin says
The adjustments you made would come in handy. I am at 6,000 ft and nit sure how to proceed.
Sylvi says
Thanks for the recipe!!! My baguettes came out great, I forgot to reduce the heat to 450 when turning them so they were a little dark but delicious anyways. 😋
Victor @ Taste of Artisan says
You are very welcome!
Gun says
Hi, I've successfully worked my way up to 75% hydration with what I think is bread flower, not all purpose (I'm in Sweden, it's "special", similar to Manitoba cream). Now I received French T65 and the dough is very wet and hard to handle. Next time I'll lower hydration.
My question, do you know in what manner French T65 is different even to what you use?
And second, are there techniques to handle the dough? I heard if slap and fold? And can I still do something on the second day?
Victor @ Taste of Artisan says
T65 is extra strong bread flour with more mineral/ash content. I've read somewhere that some prefer using this flour for baguettes which supposedly gives you greater chewiness, a more open crumb and a crispier crust but I prefer T55/AP flour for my baguettes. It's a matter of preference though, if you happen to like the results, stick with it.
As to the techniques, there are hundreds 😉 There are many ways to make a good baguette or a loaf of bread. Mine that is described in the post above is just one of them. Happy baking!
Poonam Bhalla says
Awesome Recipe , the baguettes come out perfect . Have made it for others too
Peter says
This is by far the best baguette recipe I've tried. The flavor was perfect. (I did omit the honey, sorry. I'm a purist. I also used Kind Arthur bread flour rather than all purpose. I think the extra gluten really makes a difference).
The only part I had trouble with was the shaping. Apparently I didn't seal it sufficiently after folding because in the oven, it burst out at the score points but burst out even more at the seams. Delicious still, but visually, well a Frenchman would have been appalled. More practice is needed I guess!
Also note I used Active Dry Yeast because I have a huge tub of it in the fridge, but did NOT "activate" it first. Rather I mixed it in with the dry ingredients just as though it was instant / rapid rise, and then made sure the water temp was 120-130 degrees. I also used about 1.5tsp. It rose perfectly and was airy with different sized holes just like I hoped for. Per several sources you do NOT need to "activate" Active Dry Yeast anymore.
Honestly not sure what the difference is from instant if any but it worked just fine and was far superior to dissolving the yeast first - which in my prior attempts resulted in homogeneous texture characteristic of American white bread rather than European artisan bread exactly like you said in earlier comments.
Victor @ Taste of Artisan says
Happy to hear about your results, Peter. Ain't nothing like a freshly baked French baguette on a Saturday morning with a cup of coffee. Never gets old for me. I could eat these baguettes every day;)
Elisa says
Thank you for a fantastic recipe! And I need to add, I am European and very very demanding with my bread. This is truly a French baguette. The recipe is easy to follow (I baked several batches so far and all of them successful) and the bread is incredibly tasty.
I follow the recipe to the letter. I love that I can get the first step ready in the evening, and then I can choose when to start baking; I can time it to have it ready for lunch or for dinner. After trying several recipes, this won by ease and taste.
Victor @ Taste of Artisan says
Hi Elisa,
thank you for the kind words and I am happy that my recipe worked for you. I spent a long time and it took many batches before I could make a consistent baguette that tasted as good or even better than what I tasted in Paris. This recipe works perfectly for me and I am happy that others enjoy it as much as I do. Happy baking!
judy colannino says
Does the Baguette bake with the parchment paper on the stone?
Victor @ Taste of Artisan says
Yes, I bake mine on parchment paper on a stone.
Heather says
Certainly the most delicious recipe I've found and one of the easiest. Requires waiting and patience but it's so worth it.
Question for you: I'm not much of a baker and didn't realize there's a difference between active and instant yeast. I used active yeast and the recipe turned out great, but is there any issue with doing it this way?
Victor @ Taste of Artisan says
Hi Heather, no, not really. If it works, use it. My results weren't very consistent with active dry yeast hence I prefer instant.
Macy says
Hello question about the stone, can I use a regular baking sheet instead? Thanks!
Victor @ Taste of Artisan says
Hi Macy,
yes, you can but it's best to stack a few sheets on top each other to get more thermal mass for a great oven spring. This worked for a number of people, search through the comments below. Also, check my comment from April 2nd 2020.
Dars says
Best baguette recipe I've found so far! I'd love to try it with a poolish. In one of the comments you mention doing so with 50/50 poolish starter. Could you please explain? Are you refering to equal amounts of flour in each? Thanks!
Victor @ Taste of Artisan says
Thank you Dars. I make my poolish of equal amounts to water and flour with some yeast added. I normally do 150g water, 150g flour and 3g yeast. The starter is my usual sourdough starter.
Jim says
Here’s what I’ve learned:
1) this bread is amazing in every way.
2) I’m terrible at shaping loaves.
Gert says
Hi Victor
Thank you very much for sharing this recipe. I have been making it for months now, and every time it gets a bit better. One challenge I have is that I am doing this in a pizza-oven which has it's own challenges, but still great fun. The first time I destroyed half of the dough.
Victor @ Taste of Artisan says
Hi Gert, happy to hear about your progress and improving results. You are doing much better than I did when I was starting out with baguettes. Happy baking!
Stephanie says
Made these today. My daughter who loves french baguettes took a bite and said with joy "these actually DO taste like an actual baguette!" Great recipe and thorough instructions. Mine were done after 15 mins and got pretty dark. Will lower temp and maybe cover with tin foil next time.
Adelina says
This is a great recipe! I made my first batch and love the crumb and crispness of the crust!
Hoping you can help with one thing that I’ve been trying to accomplish. My baguettes always come out with “glued down” ears, instead of the beautiful opened ears. I’ve watched numerous clips on scoring, and believe I’ve followed everything correctly. I don’t think I’m under or over proof the loaves as they do come out with nice crumbs, textures. One thing I notice is whenever I score the loaves, they tend to go flat slightly, but they do spring back in the oven.
Thank you!
Victor @ Taste of Artisan says
'Glued down' ears points to higher hydration, over-proofing/less of an oven spring or sometimes even too much steam in the oven. Some flours may be too fresh and have more moisture in them so I would start with dropping hydration until you get good perky ears, then work your way back up carefully observing the behaviour of your baguettes.
Bonnie says
Wow wow wow!!! This recipe and method was perfect!!! First time making artisan French baguettes and I knocked it out of the park!!! We ate it all before dinner!!! Can’t wait to make it again!!!
Mina says
I have made these twice and they were excellent both times. I am curious about the portion where you let the dough rest 15 minutes and then over the next 1 1/2 hours do 3 sets of stretches. I have been letting it rest for the 15 and then doing my first stretch after another 30 minutes. Then a second stretch after another 30 minutes and the final stretch 30 minutes later. Am I doing this correctly? Thanks!
Victor @ Taste of Artisan says
Yes, that's correct. Happy baking!
Ernesto says
It was excellent! I replace half of the honey with malt syrup.
Three question ref stretch and fold:
1. How long do you stretch and fold each time? 5 minutes? only once? more?
2. Do you do it in the bowl or on the table?
3. What would happen if I do it four times instead of three? Would it hurt the dough?
(I'm just trying to see how to get more tension: the scoring was good, but should have been better.
Shelby says
Can I use a starter in place of yeast? I only have active dry yeast and a starter.
Victor @ Taste of Artisan says
Baguettes using just a starter require a different approach and will be noticeably different. I will make a post on that sometime in the future. Most of the time you will see bakers use a combination of commercial yeast and a starter, this gives baguettes better flavor and the same volume and crumb textures that you get with commercial yeast. If you want to use both, make poolish with the active dry yeast, then use 50/50 poolish and starter. Or just use active dry yeast, making sure to activate it or making poolish with it first.
Hanh says
Felicitations, Victor! I am not a baker, and the bread still turns out excellent the first try, thanks to your instructions! If you have updates to short-cut the stretch and fold, first rise, second rise, etc., pray post! For those of us who are more on the spontaneous side, being able to prep and bake on the same morning would be ideal! That said, I will now prep a second batch for tomorrow. Thank you!
Victor @ Taste of Artisan says
You are very welcome, Hanh. Happy baking!
Lisa Koblentz says
Hi Victor,
Thank you for your recipe and the information. I am going to be making your baguette tomorrow. I have one question for you- Someone recommended placing ice cubes in the cast iron pan in the oven where you use the towel. Have you tried using ice cubes to create steam rather than a kitchen towel? For some reason, the idea of putting a towel in the oven scares me a bit.
I look forward to wonderful results (I hope!)
Victor @ Taste of Artisan says
Hi Lisa, a kitchen towel is fine, I've used it well over 100 times in my oven. If you are not comfortable, don't use it. Its purpose is to regulate steam release - slow and even. I've use water pans without a towel as well and, frankly, the results were kind of identical. In any case, what you want is good, even steam in the oven during the first part of the baking. When my baguettes are going in, the water in the pan gently simmers along the sides of the pan, releasing steam that is barely visible. This works for me.
Ice cubes (or water) on a cast iron pan create a plume of steam, then nothing for a while, until the water heats up and starts steaming again, creating uneven steam. I didn't experiment much with ice but I used to pour water on a hot cast iron pan, empty or filled with lava rocks. I have a huge issue with this method, which I used initially many years ago upon someone's recommendation on some internet forum. First, it creates a LOT of steam, where a lot of it gets out of the oven before you shut the door. You have to be very careful and keep your face/hands away. It may also kill your oven. It did make my electric oven stop working after a few months of steaming this way.
Lisa says
Thank you so much Victor for your response! I did end up using a towel and the results were fantastic! I really love your recipe and am excited to make it many more times in the future. I would like to see a bit more open crumb with slightly larger holes and will increase the hydration a bit as you recommended to see if that works. Thank you again!
Victor @ Taste of Artisan says
You are very welcome, Lisa. Happy to hear about your success.
Bonnie says
This is the BEST baguette recipe! My husband is French, and he said it is even better than French bread since it is still delicious the second day. IF there is any left, that is! And Victor is so nice!
Victor @ Taste of Artisan says
Glad to hear that, Bonnie. Happy baking and thank you for the kind words.
Neda says
Love this recipe. The baguettes turned out delicious. I did buy the baguette pan for oven and love it.
Danesh says
I follow your recipe and the baguette came out just fine, although not as pretty as yours, but very decent. Also taste great. Thanks again, for this great recipe.
Yunxia Lu says
Thank you for the detailed recipe.
Sheryl says
Will I get comparable results with Robin Hood AP flour? My grocery store has never had King Arthur brand flour.
Great blog and great discussions of recipes. Thank you
Victor @ Taste of Artisan says
Hi Sheryl, it's been a long while since I used Robin Hood flour so I can't recall how I liked the results but you should be able to get a comparable outcome. I just came to prefer KA flour seeing slightly better results for my taste. I buy my flour from a wholesaler so it's always super fresh and is quite a bit cheaper per pound too. I've also used many organic flours, including La Milanaise T60 flour from Quebec, which was outstanding, though a little grittier than KA. Baguettes made with it were fantastic, but the flour is quite a bit more expensive. I encourage you to experiment and pick the flour that is readily available to you and which gives you the best results. If the flour is a pain in the back to find, you won't enjoy baking and/or won't do it frequently... where is enjoyment in that?
Mari says
Hi thank you for this recipe. Tried them today and they were great. Wanted to ask how could I get better crumb? I didn’t have as many holes/bubbles as your picture. A few factors I think might be the cause: 1) I used a steam oven and the max temp was 435F - I did have the ability to inject steam and did that for the first 20mins. The loaves all had very nice spring. Crust was thin and crunchy. The only thing was that when cut in half, I didn’t have the holes. 2) I only left the dough in the fridge for about 8 hrs. Should it stay longer? All other rest and proofing times were the same as your recipe 3) I used a baguette pan not a baker stone. 4) used active yeast nor instant yeast. Would appreciate clues on what else I could try. Thank you.
Victor @ Taste of Artisan says
Hi Mari,
seems to me like you have covered all the bases. One thing that comes to mind is the yeast. If you think about it, active dry which is first dissolved in water, will result in very even distribution of yeast cells and leavening of the dough, resulting in smaller very even holes. Instant, on the other hand, will have yeast granules distributed less evenly and more spaced out, resulting in pockets of intense yeast activity. I think that may be the cause. I've seen the same when making sourdough bread - dissolving leaven in water results in smaller, even holes as opposed to mixing the leaven into the dough.
Mari says
Thank you very much - I'll try that out. My kids have declared that I should make a fresh batch of baguettes every other day (instead of daily to give me a break 🙂 ) They love these - thanks for the recipe, detailed instructions, tips and advice.
Victor @ Taste of Artisan says
You are very welcome! Happy baking!
Sheryl says
I have Robin Hood AP Flour. I have never seen King Arthur flour at my grocery store. Can I use Robin Hood AP and get comparable results, do you think?
I have SAF instant yeast.
Thank you and I am looking fwd to trying this recipe very soon. Beautifully written blog and replies to comments.
Victor @ Taste of Artisan says
Sorry, missed this comment but responded to your other question. Yes, that should work. SAF yeast is very good, I use it all the time now. And thank you for the kind words. Happy baking. Let me know how your baguettes turn out. Take some pictures, I'd love to see them.
bonnie says
Should this "3 g instant yeast about 1 tsp; also known as Quick Rise or Rapid Rise yeast" be 1 Tbsp = Tablespoon, not tsp?
Victor @ Taste of Artisan says
No, it's a tsp. A Tbsp is about 9 grams.
Bonnie says
The bread was very good. I wonder if it could have had a bit more flavor. It did rise quite a bit!
Victor @ Taste of Artisan says
You can get more flavor by extending/retarding fermentation or proofing. You can do it by using less yeast or fermenting/proofing in a cooler room, or in a fridge. I also like substituting in about 5% of rye flour, it adds a lot of flavor. Another way to add flavor is to use 50% less yeast and adding about 1/2 a cup of sourdough starter.
Bonnie says
You had warned me that the bread might have a less robust taste since I used 3 times the yeast! I like the idea of using some rye flour. Do you have a recipe for a hearty rye bread with caraway seeds?
Victor @ Taste of Artisan says
I have a few, let me see what I have and I will email you.
bonnie says
Of course, you are correct. For some reason, I got confused by the envelope information = 1 packet (1/4 oz) = approx 2.25 tsp. = 7 g. So, 1 tsp = 3.5 g. I used a whole envelope! The bread did a nice rise! Hope it's good! I'll know why if not!!
Victor @ Taste of Artisan says
Bonnie, it shouldn't be a problem as long as you keep an eye on it. It will be a little more active and ferment/proof a bit faster, that's all. The faster it rises the less flavor you get, that's one shortcoming really.
Peter whiteley says
How was the bread? and how long did you leave the dough to rise for once you used too much yeast ? Reason i ask is becuasr i have just done the same think and the dough has been in the fridge for around 5hrs so far
Nick says
"This bread is so good it tastes like heaven." John, 7 years old
Victor @ Taste of Artisan says
I am very flattered and thank you for your feedback. Kind words like these is what motivates me to write for this blog.
Simon says
I have made this recipe 5 times a week for 14 weeks - it’s a major success. Question: have you ever tried a 36 hour rise - I have someone visiting tomorrow who wants to take the dough home and bake themselves. Does the yeast eventually run out of food leaving you with a giant ball of discard?
Victor @ Taste of Artisan says
Hi Simon, all I can say is WOW! I am impressed. To your question, I've gone as long as 48 hours. The dough gets more flavorful but also a bit more sour. Not bad sour but you can taste it. It's different but still good. I have a feeling that you will like it.
Joy says
Looks like I will love this recipe
Jason says
My baguettes have been splitting on the side when I bake them. Any clues on why that is?
Victor @ Taste of Artisan says
Most likely the scoring on the top is no sufficient. Make longer, deeper, firmer scores, it should help.
Dennis says
I have been trying baguettes recently (not this recipe yet) and while they taste delicious, they are a bit dense and never truly brown. I cook with steam pan, on a stone and at 475 degrees. I did wonder if there might be some adjustments I need to make for cooking at altitude (5280 ft)? My first plan this weekend is to buy new yeast and flour, but thought I would ask about altitude. I want these baguettes with those air pockets!!
Victor @ Taste of Artisan says
Dennis, I don't have experience baking at high altitudes but I believe you need to increase the baking temperature by 25F. No browning may or may not do with the high altitude. The more moisture is in your oven the worse the browning will be. I bake many of my breads with the door slightly cracked-open during the second part of the bake (no steam). This allows for a much better browning and a formation of a thin, crispy crust. If you have convection, you may try baking on convection during the last 10 minutes or so, it helps with browning too. Air pockets - less yeast, longer/proper fermentation, gentle handling, proper proofing, higher hydration... all those contribute. Happy baking!
Diana says
Brilliant recipe! Got beautiful baguettes. Thanks!
Ari says
That recipe was foolproof! Nailed it first try and made 3 amazing baguettes! Will definitely use and share this recipe! Thank you so much-I don’t think I will ever buy bread ever again.
DJL says
Nice recipe!
I had been baking them by the King Flour Recipe and I couldn't get air pockets.
I did it your way and made the best tasting baguettes to date with nice size air holes. First batch didn't look as good as pictured, but tasted perfect.
Thanks. I will be using your method from now on!
Robert says
Thank you for sharing your recipe.
I've been making 80% Hydration baguettes for some time, making a poolish the night before with 1/2 the recipe-in the fridge for 17 hours. The next day the rest of the flour, yest and salt is added and a series of stretch and folds every 45 minutes. I bake it for 25 minutes at 465, throwing about 1/2 cup of water in the oven at the beginning. I use French yeast and usually hard red winter wheat bread flour.
How will the baguettes made with your recipe differ from mine in taste and texture. They look about the same.
Robert
Victor @ Taste of Artisan says
You can answer that question by making both and comparing for yourself. There are dozens if not hundreds of subtly and not so subtly different ways to make a baguette. Neither is necessarily better than the other if made well, just different. Though, Paris’ Best Baguette Competition tries to pick the best one each year out of dozens of submissions.
Sreeram says
I tried once more 🙂 The hydration is high for me to handle. I transferred from the couche to the baguette peel but it got stuck on the peel (even after I threw in some flour) when I tried to transfer it to the pizza stone in the oven. Do you recommend lower percentages of hydration like 62%?
Victor @ Taste of Artisan says
Absolutely. I always recommend starting where you are comfortable and work your way up. Also, it could be that you need to change your technique. When transferring, roll the baguettes off as opposed to sliding. And use enough flour. Rice flour helps a lot.
Ariana says
Hi, great recipe! What do you mean about rolling vs sliding? I have a hard time getting the bread from the transfer board to the stone. I think I have to slide or the scoring will end up on the bottom.
Victor @ Taste of Artisan says
Hi Ariana, I roll the baguettes off the couche onto a piece of parchment paper, turning them upside down, then score, scoop up with a large pizza shovel, together with the parchment paper, and slide off onto a hot baking stone. Does this make sense? But there are many ways to transfer baguettes to the oven. Another way that I used before is to place proofed baguettes on a large thin wooden board, heavily dusted with flour, score then slide them off onto the stone.
Brian says
Really great post. This answered the majority of my questions and my baguettes are better than ever.
Jen says
I might add some vital wheat gluten next time. What do you think? I used a baguette pan to bake them in as opposed to the baking stone. Do you think this is ok? Lastly I found the shaping part to be a little tricky due to stickiness. It didn't roll out thin like those in visits I watched. Any suggestions? Sorry, I know, so many questions. Total amateur here.
Victor @ Taste of Artisan says
Hi Jen, vital gluten is a great addition, I like using it when baking whole wheat and rye breads. Don't overdo it though or your baguettes will turn out too chewy. Baguette pans are fine but I like the stone as gives a better oven spring. The more stored heat the better. Stickiness is a problem but don't be afraid to use some flour when shaping, it helps a lot. Put some flour on your hands too before rolling and stretching.
Jeremy says
So does that mean I shouldn’t use bread flour? I’ve tried another baguette recipe in the past and it called for bread flour. I’ll be using yours very soon, though. Thanks.
Victor @ Taste of Artisan says
You can use any flour you want with the expectation that the results will be different.
Jen says
This was by far the best French bread recipe I have ever tried. The depth of flavor is amazing. It tastes just like bread you find at high end restaurants. I used Miller Milling Co H&R flour. Could this be why I didn't get as many air pockets as you show in your picture? Like others my bread would have burned if I cooked it at the recommended temp, so I had to modify. I am new to baking and have been frustrated with my results with French bread until now. Thank you so much for this fantastic recipe. I hope to keep improving my results.
Victor @ Taste of Artisan says
Jen, it could be the oven. Different ovens bake differently. Steam is also a big factor. Not enough steam and you will get a lot of browning right away. Holes? Gluten, dough strength, handling, proofing and fermentation, sufficient steam, hydration - all play a role. A little of experimenting should give you an indication of what works.
Bunny_tech_support says
It came out amazing! Thank you so much! The best baguette recipe ever I used. I definitely make again.
Emma says
Hello!
I’ve been using this recipe for a long time now and it’s beyond the best! I’ve made slight alterations to suit my oven but other than that it’s perfect.
My mom recently found out she is gluten intolerant and I was wondering if you would suggest a type of flour I could use to sub in this recipe. Any other gluten free recipe I see seems....well not great. They all seem to be more of a white bread version and not the crusty French style.
Any advice would be greatly appreciated. Thank you!!
Victor @ Taste of Artisan says
Sorry Emma, I haven't experimented with gluten-free baking much so can't make any suggestions here... perhaps some else can.
Perry says
This recipe and instructions along with the tips is fantastic. This is my 3rd time baking baguettes and they have turned out perfect. Great recipe.
Alice says
Fabulous recipe - a few hitches in my first attempt (mainly at myself not reading instructions thoroughly/forgetting the time :/) but they are still glorious.
What is the best way to store them? and how long do they keep? (theoretically of course, the reality is they wont last until the end of the day)
Victor @ Taste of Artisan says
You are right, they don't last long. At my home, they are done if not by the end of the day then by the next morning. If you want them to stay fresh and last a few days, cool them to room temperature and store in an airtight container or a Ziploc bag. If possible, refrigerate, they will last even longer.
Kris says
I freeze them, and then lightly toast after thawing. Not exactly like fresh out of the oven, but still tasty. One could put the entire baguette in the oven to warm, but I normally cut a chunk off, split it, then drop it in the toaster. Makes great sandwiches.
Fernando says
After many unsuccessful tries with other recipes my wife found this one. Almost perfect the first time. It was delicious but proper scoring was an issue. I’ll try again. Thanks Victor!
Victor @ Taste of Artisan says
You are very welcome, Fernando. Happy baking!
Cherylann says
This baguette recipe and the included instructions are excellent. I'm a novice bread baker and they turned out amazing. Thank you so much for sharing!!!!
Marian says
Hi, Victor! Thanks for sharing this recipe. Similar to Mayu, my baguettes seemed to be pretty well baked by the end of the first fifteen minutes. In my case, however, my bread was not near the top of my oven, but rather in the middle/bottom area. My personal concern is that by the end of the entire baking time the baguettes began to burn a bit, actually. Luckily, the burnt taste wasn't overwhelming and it was mostly near the ends (I made sure that the ends weren't too thin when I made the point- in fact they were pretty close to the size of the middle portion of the baguette.) I'm trying to think of how to adjust the bake time and/or temperature for next time. So, I'm wondering what your input is! I'd absolutely love to hear it and I'm also open to trying anything new! Thank you, again, for sharing this recipe. It was 100% fun to make and my family loved it! Especially my older brother who is picky about baguettes haha.
Victor @ Taste of Artisan says
Hi Marian,
I can think of three things that could lead to what you described. Obviously, if your baguettes somehow are quite thinner (but longer) than mine, they will bake faster. I know, this is likely not that case but still. Another possibility is that your oven is more efficient and bakes better. I've seen this many times. Or the thermostat in your oven is off, underreporting the temperature. This is also a very distinct possibility. I would get an accurate BBQ thermometer with a probe and test it. Finally, there isn't enough steam in the oven. By the end of the baking with steam, my baguettes are pale, dough-like color. It's only once I remove the steam they begin to brown. I'd suggest first to make sure that there is enough steam that doesn't escape through a vent (I block mine with a kitchen towel), then look at adjusting the temperature. I would drop the temperature by 15 degrees and/or shorten the baking with steam and without one to 12 minutes. Once you start making those adjustments you will most likely see an improvement and jus work in that direction to perfect the results.
Mayu says
Mine came well cooked (nearly over baked) in the first 15mins so I had to cut out the second half completely. My oven had different setting. One with heat at the top, bottom and from both. Is there a specific setting you'd recommend?
Should I still look underdone after first 15?
Victor @ Taste of Artisan says
I can't make an informed recommendation as I don't know what your oven is and what settings it has, or how it bakes. Based on your description though, you should not use top heat. I can see how your baguettes got cooked in 15 minutes with top heat/broiler on. After 15 minutes of baking with steam baguettes should have increased in size, opened up (have oven spring), be pale, have a very thin and soft crust, and not be fully baked. The second half of baking thickness the crust, gives the baguettes the color and finishes off baking.
Mayu says
Hi
I love this recipe and I’ve already made this baguette 4-5 times.
Results were pretty amazing, love this taste but I have a problem with scoring.
The dough was too sticky to cut. I’ve bought a scoring knife but dough stuck to knife.
And even if I could manage to cut, score wouldn’t open like yours.
Could you please give me any advice?
Maybe final proof ware too long or l need more flour...
Victor @ Taste of Artisan says
Mayu, it could be that your dough's hydration is higher than you think, it could be due to more hydrated flour, or because of using cups. You cold drop hydration by 1-2% and see how that works out... as you become more comfortable build your way back up. Proofing for too long can definitely be an issue. All that said, most of my breads have even higher hydration, around 80-82%, but I don't find it particularly hard to score them. What I think helps is to use a firm but very swift motion. When scoring, I also tend to hold my baguettes with the wingers of the other hand so they don't move. Personally, I tend to score with plain blades or a serrated bread knife. Hope this helps.
Bob Taheri says
Hi there,
I am currently trying to make all the bread in the world! I own a food business and have access to commercial equipment. Currently trying to find the right recipe to make in large batches.
I have made this now twice with great results. I was wondering if you have any advice on making this recipe in large scale? are there any tweaks I should be aware of? I will try a triple batch and see for myself but I would like your opinion on the matter if possible. Thanks for your time!!
Bob
Victor @ Taste of Artisan says
Hi Bob, no experience here with large scale production so I can hardly be of help. That said, once you run your triple batch trial and see a problem, let me know, perhaps I can help.
Magdalena says
Absolutely wonderful recipe everyone loved it👍👍😊
Tim says
Exceptional. I gave up on baking bread about five years ago after years of trouble. Each loaf I would make came out dense and had an unpleasant strong yeast taste. With so many people baking bread during the pandemic, I thought I would give it another shot. I watched a number of videos, and read a number of articles, and this recipe seemed to encompass all the tips and suggestions I found. I started the dough at 8 pm last night, put it in the fridge overnight, took it out at 2 pm, and had amazing bread ready by 4:30 pm. Only thing I have to experiment further with is the baking time. My loafs started burning after the initial 15 minutes in the oven. Thanks for such a great recipe and renewing my confidence in making bread.
Victor @ Taste of Artisan says
You are very welcome, Tim. Glad I could help. Enjoy your delicious bread and happy baking!
Wendy says
You may want to get yourself an oven thermometer. They are only around $5 and will ensure your oven temperature is accurate. I just started using one and found that my oven was around 25 degrees cooler than what it was set too, maybe your problem is caused by it being higher.
mary b wright says
Love this recipe and I've enjoyed great results, thank you! I am going to try reducing the honey to 15-20 grams next time...probably in my head, but I think the bread tastes a little sweet (?). It hasn't stopped me from eating it however!
I used 150g of a "European style" flour from a local bakery (it had a picture of a baguette on it) and 350g KA AP for latest batch....wasn't sure of the best ratio so guessed at about 1/3 of the non AP.
I had an oven shelf mishap that resulted in the oven not preheating as I thought and thus my dough proofed for 1.5 hours, seemed to go ok (but I was grumpy at myself for a while).
Thanks so much!
Victor @ Taste of Artisan says
You are very welcome! Thanks very much for your feedback and happy baking!
George says
For the fold section, is it 3 folds every half hour or one fold ever half hour amounting to 3 when don’t with the hour and a half
Victor @ Taste of Artisan says
One fold every half an hour...
Patrick says
Hi Victor,
I have made this recipe a couple times and it is always great with crunchy crust, big bubbles, and chewy inside. My problem is they seem to end up thin which results a larger crust ratio. The dough appears the same size during proofing but yours appears to spread out much more than mine when transferred for scoring. Any ideas on how to make sure mine do not keep ending up thin?
Thank you,
Patrick
Victor @ Taste of Artisan says
Hm... that's an interesting question. I think I've seen this when my dough was a bit underfermented/underproofed or when I didn't give it enough of a bench rest. It tightens when you handle it so if you try to roll it up like that it will be thin. You would also bump up the hydration, it will help. Or try different flour... Or make them shorter - and if that works, increase the amount of dough to get the right length/thickness. Sometimes you have to experiment a little to get perfect results.
Maky says
Hi Victor
I made the recipe a second time, and I love the texture but I seem to have the same issue as Patrick. I don’t get the rise I want; the cross section of my baguette is rather oval than round. Any suggestions? I’m always afraid of over proofing the dough but I did let it proof for almost an hour( I know the temperature is also a factor) at room temperature. Do you think other than something being wrong with what I’m doing, a baguette tray would help?
Thank you in advance Victor
Victor @ Taste of Artisan says
Hi Maky,
there are a few things that cause that. You've been having problems with the dough being too sticky before, have you resolved it? It could be the hydration level. Drop it further and the issue will go away. Some flours are more hydrated so you need to account for that. As well, I heard of people having this issue when baking on humid days... never experienced that but interesting. Overproofing will cause flat baguettes too. Not enough gluten development can also be a factor... hard to say without seeing the whole process. It would help if you took good, well-lit pictures along the way, all the way to the baked product with the cross-section visible, I can take a look. Email the pictures to me.
Donna says
Thank you so much for this recipe! My husband is French and we moved from France to Canada a few years ago. We have been dearly missing fresh baked baguettes from the boulangerie. This was my first attempt at baking a baguette. I've tackled croissants, but I've been hesitant to try my hand at baguettes. They turned out wonderful, with a crisp but not too thick crust. My husband and son were in heaven, and the bread did not last long! My husband was soon making plans for having them again the very next week.
Victor @ Taste of Artisan says
You are very welcome, Donna. Glad to hear about your success. Happy baking!
Maky says
Hello,
I made this recipe today and the outcome was good but the dough was super sticky and out of control and each time i transferred it to a new surface it stretched and got longer and out of shape. Do you have any tips in this regard? What do think about using 30% bread flour?
Your reply is greatly appreciated.
Victor @ Taste of Artisan says
Maky, I would recommend for you to decrease hydration (add more flour) until you get comfortable and get perfect results. It could also be the flour that you are using. Using 30% or even 50% bread flour will definitely improve the structure of the dough. Yes, I would experiment with that as well.
Jeremy says
Can I use bread flour instead of all-purpose?
Victor @ Taste of Artisan says
Yes, you can.
Celestia says
By rotate do you mean flip them?
Victor @ Taste of Artisan says
No, no flipping. Just rotate them 180 degrees so that they brown evenly.
John Calcote says
This is a true French baguette at the required 76% plus hydration. It's also very similar to that shown by John Kirkwood on YouTube, except that his has no sweetener and no overnight retardation period. The hydration is about the same as his if you consider the honey a liquid (which you should).
I can't tell you the number of French bread recipes promoted as baguette - the two are not the same. French bread has a fine texture and soft crumb, whereas baguette has this course open texture with a chewy almost translucent crumb. The higher hydration in baguette dough is the difference.
Traditionally speaking, French baguettes don't have any sugar, but hey - if this was a winning recipe in a French contest, then - who knows? Maybe the French are becoming more open to new ideas! 🙂 Thanks for the recipe.
Victor @ Taste of Artisan says
You are very welcome, John. Thanks for your feedback.
Ram says
Hi
I tried this recipe and cant say how good the bread is. Have few questions though
1) Does the high hydration (72%) have any effect on the spring or how crunchy bread turns out?
2) Why cant we use 62% hydration where the dough is easy to handle? Reason is, my first and second batch both had issues with handling right from S&F all the way to transferring it to the pizza stone.
Victor @ Taste of Artisan says
Ram, higher hydration results in a more open, softer crumb and larger holes. 72% is a relative value. I consider it low as most of my breads are around 80%. For someone new to baking it may seem high as you need to build confidence and the technique to handle higher hydration doughs. If your dough seems too wet for you to handle comfortably, by all means, drop the hydration until you get good results. Then work your way up if desired. Loading is always a challenge, high hydration or low. Try baking them on parchment paper. So, you would put them on your pizza shovel (make a big DIY one with sheet metal) lined with parchment paper, then score and slide them onto the baking stone with the paper.
Cindy says
I am currently making your bread. I am in the stretching and folding stage. I find that the dough is very sticky. Am I able to use more flour to prevent it sticking to to my hands Or will that make my bread dry and hard?
Thank you, Cindy
Victor @ Taste of Artisan says
Cindy, initially, the dough will feel wet and sticky by as gluten develops as a result of S&Fs, the dough will firm up and become much less sticky. That said, you can definitely incorporate more flour. Star with a little, a tablespoon, then evaluate. You want to be comfortable handling the dough. As your comfort grows, you can increase hydrations. Did you weigh the ingredients or used cups and spoons? If you didn't weigh them, it's possible that you ended up with higher hydration.
Victoria says
This turned out fantastic, I’ve never tried a recipe with truer results to the Parisian baguette I so love.
Oven couldn’t get hot enough and used a baking sheet but still, top class baguette achieved. Thanks
Jimmy says
Re: French Baguettes recipe
Greetings from Queens, NY. At the heart of the quarantine currently, my GF and I have been hard pressed to find good quality breads at the store so I suggested baking our own (we’re having a “bake-off” lol). For my first ever attempt at bread baking I found your tasteofartisan recipe and currently I am about an hour from cold retarding.
As I look ahead to what my steps are tomorrow, I was wondering if anybody ever asked you this question, because I didn’t see it in the comments:
Have you or anyone ever experimented with different herbs/spices in the steam water pan instead of just plain water? I don’t plan on it this go around, I want to follow as instructed. But just curious for your feedback.
Can’t wait until tomorrow night to pull my project out of the oven! Thanks for what I’m sure will be a delicious recipe!
Victor @ Taste of Artisan says
Hey Jimmy, welcome to my blog. I hope your baguettes turn out great. Even if they don't get an awesome oven spring, they will still taste great I guarantee you.
>
To your question, I don't think flavoring water/steam will add much flavor to the bread itself, there just isn't enough time. But mixing in different herbs into the dough, or sprinkling them on top is a great way to add interesting flavors.
Jimmy says
As expected it was delicious!
And by stacking my baking sheet on another upside down one, on top of an bottom-up glass Pyrex dish, I actually got a really good oven spring! I think I won the bake-off lol. Thanks again.
Victor @ Taste of Artisan says
Hey Jimmy, you are welcome... glad to hear about your success. There is nothing like freshly-baked baguettes, especially if they turn out great.
Joe says
I followed this recipe to a 'T' and in general it turned out excellent. I should note that I baked in a gas oven and baked on a cast iron griddle (one side has raised ribs to allow grease/fat to drain, but I used the other, totally flat side). I set the oven as directed, to a pre-heat of 500F and then immediately down to 475F after putting the dough in.
As another commenter noted, the bake time was indeed 15 minutes for me as well, with an interior temp of 205F. While the bread was definitely done, it lacked the thick, crispy crust that sends crumbs flying three feet in all directions when you cut it.
I need to experiment with baking times and pans. I can perhaps still pre-heat the cast-iron skillet but then put the dough on a regular baking sheet and then put that on top of the cast-iron skillet, to get that initial spring that's needed. I also have a pizza stone with which I can try the same two combos (baked directly on, or used underneath a baking sheet). Options to try for sure.
But overall the crumb, texture, and taste are terrific.
Victor @ Taste of Artisan says
Thanks for the detailed feedback, Joe. Glad to hear that you achieved good results. Happy baking!
Alex says
Victor, are you using a gas or electric oven? I also find that I can't seem to get a shiny, crispy crust using two loaf pans with towels. I wonder if the venting on a gas oven is simply too much for any open steaming method.
Victor @ Taste of Artisan says
Alex, I am using an electric oven. I have the same problem with the vent though and I plug it with a kitchen towel during the steaming phase.
Mike says
Sceptical at first but followed recipe as written. Results were well beyond expectations and the resultant baguette was crusty with the ‘mie’ soft chewy With incredible taste. Chapeau to Victor!
Victor @ Taste of Artisan says
Awesome! Happy baking! Why skeptical at first, I wonder?
Joseph says
Awesome writeup of the recipe and tools needed.
Jessica says
Can I use regular active dry yeast? I don't have any instant.
Victor @ Taste of Artisan says
Please see my comment below on March 26, 2020.
Richard says
Hi Victor- I loved the recipe, my baguettes had a great lite crispy exterior and a great puff when put into the oven. They tasted great- but did not have the chewy texture- more bread like without all of the holes. Any suggestions? Does bread flour vs King Arthur all purpose make a difference?
Victor @ Taste of Artisan says
You are welcome, Richard. Big holes and chewy texture need sufficient gluten development. Yes, bread flour will help, it will make bread chewier. Perhaps too chewy for some. Insufficient stretching and folding results in poor texture. Overworking dough, on the other hand, leads to gluten breakdown and you will end up with small holes and crumbly texture. I am going to email you, send me a picture of the crumb, perhaps that will give me a better idea.
Josh says
Great recipe, really delicious bread and I’ve never made bread before and I’m enjoying learning. A couple questions: 1) Does the temperature of the water matter and do you dilute the honey into the water before mixing into the dough? 2) I struggle with the “stretch and fold” part the most. Is it one stretch and fold every thirty minutes from one side of the dough only, or do you rotate the bowl around and stretch and fold multiple sides every 30 minutes? Also, the dough is so sticky, I’m challenged to be able to lift the entire ball of dough up to flip it over after each 30 minute iteration even with the help of a spatula. Maybe it’s over mixed or I need to flour my hands more, although it didn’t seem to help that much. BTW, I use a stand mixer and dough hook gently bringing it together just until the flour is fully integrated. Thank you!
Victor @ Taste of Artisan says
Hi Josh, glad to hear about you learning to bake bread. It is immensely rewarding.
>
The temperature of the water matters. Warmer water will kick off fermentation much faster and the fermentation will go much faster. In this recipe, use room temperature water.
>
As far as honey goes, either dilute or just mix in well, squeezing the dough between fingers.
>
S&F - every 30 minutes, pull one corner and fold onto the dough, rotate, pull and fold... do all 4 corners. I illustrated this process in my artisan sourdough bread recipe, check it out, it should help.
>
The dough should be very sticky initially, but over time and as you do more S&Fs, gluten will develop and it will become just tacky to touch, not sticky. That said, different flours behave differently, some (especially fresh) flours are more hydrated so need water adjusted down. You may also be using cups to measure flour and water - expect big variance there that will affect hydration. If you weigh your ingredients and still have the dough that is too wet, or too wet for your comfort level, drop hydration by 2-3%. Once you get comfortable with that dough, start going back up. There is something very special about how higher hydration bread tastes.
Josh says
Thank you for the detailed reply, Victor!
A says
What if my dough didn’t rise in the fridge? What did I do wrong and where can I go from here?
Victor @ Taste of Artisan says
It looks like either fermentation activity did not properly start or the temperature in the fridge is too low. Before putting in the fridge, make sure that the dough is actively rising, has a nice lactic-acid smell. If not, it needs to stay out for longer. Do you bulk fermentation in a warm room. Or keep the dough in a warm place during rising, such as the cold oven with the light on. The yeast may also be the culprit. I've had much better and consistent results with rapid rise yeast compared to active dry. If the yeast is very old or hasn't been stored optimally, that could impact the performance as well. Regardless, what you can do is you need to jumpstart fermentation. Place the dough in warm place, let it rise until it doubles (measuring from the original volume when the dough was mixed), then follow the rest of the steps as in the recipe.
C says
Can I use regular Dry Active yeast in this recipe?
Victor @ Taste of Artisan says
Please see my comment below on March 26, 2020.
Paul says
I only have fresh yeast. What would be your recommendation. I know most recipes call for fresh vs dry @ 2:1. Would I measure 2 tsp of fresh yeast before activation?
Victor @ Taste of Artisan says
Paul, I convert fresh to dry at 3:1 ratio by weight. Not sure about teaspoons but it seems like 2:1 should give the same amount as 3:1 by weight. Yes, you measure before activation.
Cecilia says
I really want to try this - it is a very well explained recipe. I was wondering if I could bake the baguettes in my (combi) steam oven?
Victor @ Taste of Artisan says
I don't see why not.
Juan says
I have not tried this receipt yet but it is so well explained and with high details that my mouth is watering. Why not? Because I understand it will take some more time than usual, but it deserves the try. I have tried the shortest receipts with very low success... :(. Preparation, timing and patience is key for this receipt so inpatient ones rest aside but you can try
Victor @ Taste of Artisan says
Hi Juan, I agree, it takes time to make great bread. Though, the more you bake bread, the easier it becomes. You can slip in mixing of the dough, stretching, etc. in between other things you normally do, so it will become quick and effortless.
Marijane says
I have been struggling with bread-making. It is such an exact art as opposed to cooking, which I love to do. I tried many recipes to no avail but this one came out great. The crust was a bit too crusty and I did worry about the bread browning too much, but put some foil over it in the last 10 minutes so no worries. The inside is divine. Actually going to give away a loaf since it came out so tasty!
Victor @ Taste of Artisan says
Hi Marijane, glad to hear it. A couple notes about the crust. I noticed that if you let the baguettes rest for an hour or so, the crust becomes softer. If you cut in right away, it will be harder. Why? My theory is that it's because of the steam inside the hot bread. Cut the bread immediately, and you will notice a lot of steam come out. That steam is what softens the crust over time. Another thing to try is baking at a lower temperature, e.g. preheat to 485F and drop to 450F in the first half of baking. You can also try shortening the first baking step to 12 minutes.
Marijane says
I will try that! I do love how they came out and they did soften. I also need to get a baking stone - I think that will improve the baking accuracy. I will definitely do this recipe again. It was easy and makes me feel I can actually make bread! Thank you!
Victor @ Taste of Artisan says
You are welcome. Making bread is easier than most people think. But you do need to develop a feel for the process and be able to judge how the dough behaves at any stage of the process. Once you bake one or two great loaves you get a good sense of that. It kind was like that for me when I was starting out.
Frances says
Perfection!!
Nothing to do (COVID crafts) but work on the fickle nature of dough and all the little details. Can you double or triple this recipe and freeze them? As one of your fans pointed out they are eaten within 10 minutes of removal after 24 hours of preparation;)
What are your instructions on freezing the dough?
Specifically do you double the Yeast too?
Or is it best to use less yeast?
Victor @ Taste of Artisan says
Frances, to be honest, I never freeze bread or baguette dough as I find it a LOT easier for me to just make a new batch. I bake some sort of bread every other day. That said, I experimented with freezing baguette dough a few years ago but was never quite satisfied with the results and it was quite a chore to get it to work right... If you still want to pursue this, check out King Arthur's articles, like this Freezing No-Knead Dough, hope you find it helpful.
Elisha says
Just baked my first French baguettes. This is a great recipe.
I have a combo oven, what would you recommend for a setting?
Victor @ Taste of Artisan says
Elisha, I don't have a combo oven so it's hard for me to advise you. That said, you'd want to bake 15 minutes with steam, 15 minutes without.
Mike says
I'm a novice baker and I was able to make this with great results. I don't have a baking stone, so I tried using my cast iron griddle. It worked great, but the cooking time was cut in half - 15 min! (I determined it was done when the internal temp reached about 95 C/205 F).
Victor @ Taste of Artisan says
Congratulations, Mike! Excellent point on the target internal temperature, 205F - 210F is the target range. Happy baking!
Rhianna says
I love seeing so many people try their hand at baking during the Covid quarantine. Has anyone experienced a dryer dough that the one pictured? I find mine to be quite stiff and difficult to stretch and fold. Any help is appreciated. Thanks!
Victor @ Taste of Artisan says
Different flours may have different hydration. Hydration can be affected by storage conditions. If your dough feels too stiff, increase hydration by 2 percentage points, then evaluate. You may need to adjust more. Sometimes adjustments like that are necessary. Also, are you weighing your ingredients? If not, that could very well be the cause.
Paige Dietrich says
I love this recipe, thank you! I have been trying to duplicate the French Baguette and have tried numerous methods, including watching Julia Child videos. This is the best! It was hard to find a rectangle baking stone, even at cooking stores, but I found one online at Home Depot! Take the time to follow the steps--you will be rewarded! My husband would like me to make these every day!
Victor @ Taste of Artisan says
Hi Paige, happy to hear about your success. A thick, rectangular baking stone can also be found at your local pottery supply store, of all the places. It's called kiln shelf. I got a 3/4" thick one, slightly larger than needed and had them cut to the desired size of 16" by 21" that fits my oven perfectly, leaving some space around for air circulation. Makes it convenient to bake three quite long baguettes at a time.
halie says
Hi! I currently have the dough in the fridge. However, I don’t have a stone or a pizza stone. (And can’t get one bc of covid). Would a cookie sheet work? Or is there something else you could use?
Thanks!
Victor @ Taste of Artisan says
To get a nice oven spring you need something that will store a lot of heat that will be transferred to the dough. A stone, especially a thick stone is a great example. But it doesn't have to be stone. I know some people use thick steel for baking bread and it works. Cast iron works too. If you have a cast iron griddle it may be a good substitute. If you don't, stack a few baking trays or sheets and bake on them. The more stored heat you can provide the better. One thin baking sheet will cool down quickly once the dough hits it. If all those options aren't available, bake on a single baking sheet. It will still be a tasty baguette, just won't have the same open crumb and beautiful big ears.
Mike says
I use left-over 12x12 flooring tile (3/8-1/2" thick to line an oven rack
Halie says
I ended up finding an old pizza stone but it was too small to fit the baguettes, so I placed a large pan on top of that. It worked amazingly and my family devoured them! Thank you so much for your help and for posting this recipe.
Victor @ Taste of Artisan says
That's a cool solution, Halie. Glad to hear about your success. Happy baking!
Mandy says
Thank you very much for publishing this recipe. I made baguettes for the first time today, they turned out really well and they were a huge hit with my family.
Victor @ Taste of Artisan says
Hi Mandy, happy to hear that. Glad my post helped you. Happy baking!
Aime says
This was my first attempt at a baguette recipe and I was very pleased with the results. I followed the instructions exactly until the end where I made a few minor equipment tweaks; I don’t have any special scoring tools so I used a knife, I don’t have a couche so I modified parchment paper to act like one and I don’t have an oven stone so I used a pizza stone. This caused my bread to be a little squished looking but it was still the flavor and texture I was dreaming of. You know that “eye rolling good” look? That was my family’s response to this bread. Clear simple directions, easy to follow= a “master” recipe!
Oh I also used the flour I had on hand “central valley milling company” organic white all purpose flour (from Costco)
Victor @ Taste of Artisan says
Aime, I am very happy to hear about your success... yeah, I know that feeling. Keep practicing and soon you will have an amazing looking baguette. I totally understand what you are saying about the flavor and the texture. Even my least successful baguettes, flat, overproofed, tasted so good that not a single bit went to waste. Hard to imagine a better breakfast on a Saturday or Sunday morning than a piece a freshly baked baguette with a thin slice of butter on top and a cup of coffee.
Aime says
Right! The biggest complaint I had about these Is they were devoured strait out of the oven and now I don’t have any left for tomorrow.
Jason says
Absolutely fabulous, beat tasting recipe and method I have made. This will be my new regular ! Thank you.
Victor @ Taste of Artisan says
You are very welcome! Happy baking!
Brit says
Hi, would gold metal all purpose flour which only has 10% protein work? I dont have king arthur’s flour and Due to coronavirus lockdown, I dont want to venture out. Thanks for your help!
Victor @ Taste of Artisan says
Brit, higher protein in KA AP flour definitely helps with getting a better structure but gold medal will work too. If the baguettes don't hold their shape well, you can always drop the hydration by a percentage or two to help with that.
Brit says
Great! Will try that, thank you for responding and for your advice!!
Agnes says
This is my go-to recipe ! So flavourful ....just perfect and so easy !! Thank you !!
Hannah says
Hey there - is 12 hour proving in the refrigerator essential or can we let it prove at room temperature for less time? If so, how long would you recommend?
Victor @ Taste of Artisan says
Hanna, in this recipe, I retard fermentation in the fridge to achieve improved flavor. You can, of course, let bulk fermentation occur at a normal speed and obtain acceptable results. You can even expedite it if you want. Simply place the dough in the cold oven and turn the light on. The timing will depend on the ambient temperature and the temperature of the water. You can also increase the amount of yeast to speed up fermentation. Take a look at my no-knead bread recipe. In it, I explained in detail how I do exactly that, make a very good tasting loaf of bread in about 5-6 hours from start to finish. You can employ the same approach to make baguettes in about the same amount of time.
Karlie says
SUCH a good recipe!! This is exactly what I was looking for in a baguette! Perfect crust, light inside, seriously the best! I omitted the honey (on accident), and it still turned out absolutely perfect.
Marilu says
Excellent recipe.
I have tried 5 times to make french bagettes. This was the only recipe that called for honey and it made me curious.
I can now say that this recipe is definitely the best of the five and it will be the only one I use from now on.
Thank you so much.
Victor @ Taste of Artisan says
I am thrilled to hear that, Marilu. Glad my post helped you.
Joanna says
Thank you for this wonderful recipe! My 3rd attempt in Baguette baking and I am very happy with the result!! I messed up scoring so they look sort of ugly but taste amazing and are so crisp!! After all my research reading and you tubing....your recipe pulled it all together for me!! Thank you so much.
Joanna
Victor @ Taste of Artisan says
You are very welcome, Joanna. Glad I could help out. Everyone should be able to enjoy this wonderful bread without going to Paris;)
Valerie says
I only have Fleischmann's ActiveDry Yeast. How would it substitute for the instant yeast in your recipe?
Victor @ Taste of Artisan says
Valerie, AcriveDry behaves differently, you need to activate it in some warm water (about 95F) before mixing in. I would also increase the amount of yeast by about a third, and increase fermentation time by about an hour or two before sending the dough to the fridge. You want to see some good activity and volume increase by at least 30% before retarding. It may take some experimenting. Instant is more predictable in that respect.
Tari Swenson says
BEST BREAD I'VE EVER MADE!
Ainny says
Hello!
Beautiful pictures and given all the fantastic responses, I can’t wait to try this!
If I want to add herbs, seeds and or malt flour/flakes, what would the process be? I like malt bread so if I want to mix and match different flours, how would I go about doing this? Also, in England for bread making we have something called strong white bread flour, if I use that, would that be okay?
Kindest regards,
Ainny
Victor @ Taste of Artisan says
Hi, I usually add mixins, if using them, during the second S&F. Can't advise on you mixing and matching different flours/malt as I never tried this with baguettes. Strong white bread flour is a high gluten flour, about 3-4% higher gluten than in AP flour. It makes a very chewy baguette. You can certainly use it but I prefer the French T55 flour or similar, like the King Arthur AP.
Rose says
I am trying this recipe but it’s 9.00 in the morning, did not relize it was an overbite in the fridge, will it be ok if it goes in the fridge for 24 hours
Victor @ Taste of Artisan says
You can cold retard for up to 48 hours, but 12-24 hours are more common. You can also skip this step entirely. Just bulk ferment, cut, bench-rest, shape, proof and bake. Flavors will develop to a lesser degree but you can still get a decent baguette.
Jack Kerley says
Following a trip to France last fall, I became rather obsessive about approximating the marvelous bread found in local boulangeries, though my only baking experience had been cookies when about seven years old. I did one batch most weekends, starting with the King Arthur baguette recipe. The results were good, but my crumb was too closed. Continuing to research, I both purchased King Arthur Sir Galahad flour, (supposedly closer to flour used in France), and found your website. The photos stopped me: THAT was what I wanted, crusty, tri-colored, with an airy crumb. After just one batch, it’s now my go-to recipe (slight experiments with raising times, etc.). Judging by reactions ranging from wide-eyed amazement to satisfied moans, I’ve nailed it . . . Le gout de la France! Merci beaucoup, chef.
Victor @ Taste of Artisan says
Hi Jack, I am very happy to hear about your success in making French baguettes. I am glad you found some helpful information here. Happy baking!
Ruth says
Hi Victor,
I got your find your recipe about French baguette, but I do not know what 500 grams of flour it means and the 360 grams of water. I google up and it says " about 4 cups and other sites it says 2 cups. Also how about the water measure it? It says 1.52 cup. Could you specify in cups please. I live in Colllingwood Ontario and I can not find Arthur King flour. I am planning to use unbleached organic flour.
Victor @ Taste of Artisan says
Ruth, I highly recommend getting an inexpensive kitchen scale ($10) and measure out the ingredients. I scooped a cup of flour 4 times and got 4 different results, from 138 grams to 146 grams. Fresh and properly stored flour is more hydrated and weighs more (per cup). If it lost some water, it will weigh less, again, per cup. If you use cups, your results may be very different from mine. I updated the recipe with the U.S. customary units but I DO NOT RECOMMEND USING THEM.
< Unbleached organic flour sounds good.
Jay says
I did it! Wonderful outcome, authentic etc. Thank you.
My only question: 500F put bread in and turn down to 450 or 475 for 15 min?
Last 15 min 450.
The pic recipe differs on oven temp from the “print” recipe. 475 or 450.
Vancouver Island, Canada.
Victor @ Taste of Artisan says
Hi Jay, thanks for pointing that out. I've been baking baguettes at both of those temps so no wonder I made that typo. Both work great. I like the 475F a little better as it gives, IMHO, a slightly thicker, crispier crust. Starting at 450F produces a slightly thinner crust. The color and crumb are practically the same.
elyn tromey says
I am so thrilled to have found this recipe. I used a King Arthur baguette recipe for years, using a metal baguette tray. They were okay, but I thought they could be better. So, I got a couche and a stone and did the KAF recipe as well as this one here. This one makes waaaay better baguettes by far. I'm so thrilled, thank you for sharing it!
Victor @ Taste of Artisan says
So happy for you, Elyn. I know that feeling when you bake or cook something that tastes and looks perfect. I had that feeling just a few days ago when I finally got my challah bread just like the one from my childhood, like the one that my grandpa would get at the farmer's market. It's not rich, has barely any egg in it, intensely colored and somewhat crusty, and absolutely delicious. My family is crazy about it too, they keep asking me to bake more.
le Chef Ian says
Five stars...
Karin Roberts says
This is the perfect ratio of ingredients! I don’t know if it was this recipe or the use of a cloche, but this is the first successful baguette I’ve ever made! I intend to split the dough in 2 parts and try to make a slightly larger loaf but if you follow the recipe and make 3, you will not be disappointed. A cast iron with water in the oven does create a good amount of steam.
Victor @ Taste of Artisan says
Hi Karin, happy to hear that I was able to help you make a better baguette. Thanks for your feedback and happy baking!
Diane says
How high do you want the water in the pan or is there a certain amount of wetness/moisture the towel needs to be for steaming purposes? I haven't tried using a towel before and want to make sure I have the right proportions. Thanks!
Victor @ Taste of Artisan says
The level of water is quite arbitrary, you want the water to remain there for the duration of the initial baking (with steam). If I add the pan closer to baking time, in a hot oven, I would fill it half-way. I would fill the pan almost full, with the towel in, if it goes in a cold oven. This is because a good half of the water will evaporate during preheating. There is no hard rule here. The towel helps with slow, even steam release. Either way, after adding, you need to wait for it to start boiling. You can add boiling water to the pan, or cold, your choice, but that will determine how long it needs to be in the oven before boiling.
Boon says
Dear Victor,
I'm quite new in baking, just tried my first "no knead Artisan Bread" under other recipe before I found yours!
Seeking your advise:
If I do not have the baking stone, is that okay to have only the steam pan under the tray ?
Also, without pizza stone, possible to place the bough on parchment paper and place on the tray?
Many thanks in advance for your advise.
Best regards,
Boon
Victor @ Taste of Artisan says
Hi Boon, welcome to my blog. Baguettes generally don't do well on a baking sheet. They need the stored heat of the stone to create an oven spring, to open up. That said, you can still get acceptable results. Parchment paper is fine. I use it a lot, it makes it easy to slide the breads and baguettes in the oven. As far as the steam pan goes, don't put it under, you don't want the water steam to cool down your baking sheet. Instead, put it to the side of the sheet if possible.
Boon says
Thank you Victor for your great advise!! I will try to make it 🙂
Thank you very very much!
Victor @ Taste of Artisan says
You are very welcome!
Vernon says
I have been using the baguette recipes from Julia Child, Rose Beranbaum (the Bread Bible) and Jacques Pepin, besides watching the episodes of the French Chef where Julia is running around with a thermometer in the French baking school in Paris. (and YouTube videos) I sometimes use a biga or old yeasted dough from the freezer for the first mixing.
Having prefaced this, I think this recipe is the best; having accurate quantity amounts, rise temperatures, times, etc. I could not get the large holes you show in the photograph, but with this recipe I got larger holes than I normally get. Some recipes suggest holes can be increased by a longer original mix of the flour and water, but I think the larger bubbles (holes) in your bread might have to do with a more gentle folding and pinching of the baguette dough? Maybe the room temperature & timing of the final rise? Nice job Victor!
I spend my winters in France and am always sampling baguettes.
Victor @ Taste of Artisan says
Hi Vernon, your comment truly made my day. I've been working on my technique, and the recipe to a lesser degree, for years, and I am happy when someone recognizes that.
>
You are correct in your assessment. Bigger holes, no doubt, have to do with higher hydration, gentle handling, no punching down, proper fermentation, proper bench rest, longer proofing, better oven spring (a function of good steam, good scoring), better gluten development. Frankly, after having baked hundreds of baguettes over years, I don't focus on my technique any more, it sort of became a second nature. I do recall though, that when my yeast during bulk fermentation is not as active as I want, I get smaller holes and less of an oven spring. It most likely has to do with the ambient temperature, or temperature of the water I use. I've learned to let the dough ferment a bit longer, until I see some healthy rise, good sour milk smell and blisters on the surface.
>
The fridge temperature can impact the openness of the crumb too. A fridge is a fridge, right? I though so for some time, and used my basement fridge which is no frost-free and runs cooler than my kitchen fridge. I'd get an OK rise in it. A rise is a rise, I thought, but once I tried my upstairs fridge and saw a big difference in how the dough rose more, was more airy, I moved my operation. I like to see the volume double, if not, I'd let it sit outside until it does, then move on to the next step.
Vernon says
Victor,
I am over in Paris now, and I found a couple bakers that mix their water, flour and a small amount of yeast and put it directly in refrigeration, then the following morning mix in the salt and then let in rise for baking. I have done something similar, that is I mix the water, flour and yeast then let it sit a couple hours before mixing in salt. Then let it rise over night in a cool place. Another baker told me the large holes in his baguettes come from the excessive amount of water in the recipe.
Victor @ Taste of Artisan says
Hi Vernon, you lucky dog... I wish I were in Paris right now 😉 I've heard about that technique, Essentially, it's equally as effective to retard bulk fermentation as it is the proofing stage. I've tried that in the past but I just find it easier for my schedule to retard the proofing stage.
>
About the salt, it inhibits yeast activity so some bakers add it later, after autolysing or, as you mentioned, even after bulk fermentation. I am not sure if it's as effective when using commercial yeast, and most bakers in France use commercial yeast or a combination of commercial/natural leaven at the very least. The challenge with adding the salt way later is that it may not dissolve properly and you may find grains of salt in your baguette. I remember Chad Robertson mentioning that as well in his Tartine bread book. A customer returned a loaf after finding big grains of salt in it.
>
That said, if it works, it works. There are so many great ways to make a great tasting baguette, in many ways it boils down to someone's personal style/preference. And yeah, I totally agree, higher hydration makes bigger bubbles. The challenge is to balance higher hydration/bigger bubbles with aesthetic appearance. You won't care if your baguette has big bubbles if it looks like a long flat ciabatta.
Lori says
I have a Miele combination convection and steam oven. Do you have a suggestion for what percentage steam I should try instead of the towel method. Thank you so much.
Victor @ Taste of Artisan says
Lori, I have never used or even seen that oven, so I can't make any suggestions. I would recommend searching YouTube and Google for 'bread steam combo oven' and try to find that information. I checked a few videos on Youtube, I don't see anyone setting a percentage for steam, rather they set darkness, and the type of bread. Their model are likely different. That said, I don't steam my oven too much. It's more of a gentle, slowly released steam. When I open my pre-steamed oven, I don't get plumes of steam, I feel it but don't really see the steam. Hope this helps.
Kiyo says
Aloha Victor! You mention an oven temperature of 750 degrees however I would like to confirm you mean 450 degrees. The baguettes look amazing! We enjoy making bread at home.
Victor @ Taste of Artisan says
Aloha, Kiyo! Yes, it should be 450F. 750 was just a typo in the body of the post. The recipe is correct.
Guy says
Perfection yo. Simple, classic, and easy to make. The only issue was that I did not know stretching and folding involved pulling each corner over with each iteration and was only doing one single stretch and one single fold per iteration. The texture definitely improved once I actually started doing it the way you're supposed to! they actually do quite well being frozen, then thawed in the fridge overnight and thrown in the oven in the morning before bringing somewhere.
Victor @ Taste of Artisan says
Absolutely, the improvement in texture is very apparent after even two sets of stretch and folds. I applied this technique to my no knead bread and it came out practically a different bread. By the way, at what point do you freeze your baguettes, after they are fully proofed?
Amy Korobow says
Thank you!
Victor @ Taste of Artisan says
You are very welcome!
Camille says
Hello,
this is one of my favorite recipes although I LOVE all of your recipes. I want to make these without putting them in the refrigerator. I have done it before and they were successful but I can remember how much time I let them brook before shaping. Do you have a recommendation if I am skipping the refrigerator step?(I normally always put then in for 12-16 hours but want to make some for today)
Victor @ Taste of Artisan says
Hi Camille, thank you for the kind words. My rule of thumb is fermentation is done once the dough has increased in volume by 2.5 times. That will depend on water temperature and ambient temperature in the kitchen. If you want to expedite this, use warmer water (80-85F) and increase the yeast or ferment in a warm place like your oven with the light on. So, do this instead of the refrigerator step. Good luck.
Elliott says
Hello
Great recipe! I have taken my own journey with baguettes and followed a similar path. In the end, it remains pretty simple.
I noticed a couple of typos: On the printable recipe, step 8, I think you meant seam side 'down' for this scoring step. And on the online recipe, the temperature should be turned down to 450, not 750.
I also had a couple of questions:
You reduced the water recently by 25 g, why?
You are resting the dough in rectangles for up to an hour now, instead of 15'. Why?
And, you made a point of removing the water for the last 15. I tried misting at the beginning and then tried it at the end with a fine water bottle and I get a nice crust when I mist at the end. I will try removing the water as you suggested to see what that does to the crust.
Victor @ Taste of Artisan says
Hi Elliott,
I appreciate your comments and questions. Indeed, they should be seam side down, corrected. The thing with 750 is strange as I see 450. Must have typed 750 then corrected but it stayed in cache. I cleared the cache so that should be fixed too.
I reduced the water as several people emailed me about challenges they were having working with higher hydration dough and baguettes 'not looking as pretty'. This level of hydration still produces excellent crumb and the buguettes hold their shape better. That said, feel free to increase hydration. I go as high as 80% sometimes.
I increased the rest time as I like how much more relaxed the dough becomes and it makes it easier to shape and roll out. If my dough rises too much (sometimes I keep it in a cool veranda instead of fridge) I let it rest 15-20 minutes only.
As far as steaming goes, I suggest go with what works for you. Different ovens bake differently too so one needs to account for that too. But typically bakers steam initially (10-15 min) to get a nice oven spring then dry bake to get the color and crispiness.
Glenn says
I’m getting great results with this method, I have been playing with the rising time since I want a fresh baguette with dinner. I do the stretch and folds in the morning and keep it in the microwave with the light on until I see some rising. I then move it to the fridge taking it out around 4pm, let it warm up and proceed from there. Today I added the honey for the first time, I’m anxious to see how that changes the flavour. I have also found that 80% hydration seems fine. I am using a baguette tray for baking them. I’m curious if they would work out well if I made them in the evening and left them in the fridge for 20 hrs? Also, any idea how mixing them in a mixer would change the outcome?
victor says
Glad to hear about your success with baguettes, Glenn. Honey adds a tiny bit of sweetness, I love it. My family loves it too. I also sometimes add 5% rye flour, what a flavor boost.
You can retard baguettes in the fridge for 24 hours and even longer (I've gone as long as 48 hours). The trick is to make sure they don't over-proof, so you need to tweak the amount of yeast/fridge temperature variables. I would normally do a few stretch and folds, let the dough start rising, maybe get it increase 40-50% in volume, then in the fridge. After the fridge, take it out, pre-shape, 20 min bench rest, shape, proof for 30-60 minutes, then bake.
Mixing in a mixer actually works quite well. When I am busy I simply throw all of the ingredients in the mixing bowl and mix with a paddle attachment (not a dough hook) for 10 minutes on speed 4. This is for 80% hydration, otherwise the paddle attachment won't work. Then shape into a nice ball, throw in a bowl seam side down and refrigerate overnight. Then it's the same routine - pre-shape, rest, shape, proof, bake.
Yasmin says
Thanks for this fabulous recipe.
I am a total amateur from Durban South Africa. I have managed perfect baguettes AT home since I found your recipe..I don't add the honey but they taste lovely nonetheless and usually eaten with 30 mins.
We don't Get good bread easily here..it's all factory produced...so really glad to be able to make these..
Siyabonga ..thank you
victor says
Happy to hear that my blog post on baguettes helped. I love baking bread and do it almost every 2-3 days as here in Canada we also aren't spoiled by good bread. There are some micro bakeries that sell good bread but it's very expensive and a good drive away from me. Also, while their baguettes are good, I don't think they are as good my own in mu humble opinion. I've started a new blog, Taste of Artisan, where I will be posting my favorite bread recipe and more... you are welcome to come and visit.
Veronika says
Hello, great recipe! The only thing is I can't get such massive bubles as you've got on the pictures. Could you perhaps give me some pointers how to make a bugette so emmental-like? 🙂
Thank you.
Veronika
victor says
Emmental-like, ha? I like that analogy. You want to make sure your dough double or even triples during the first rise (bulk fermentation), then you shape and let the baguettes proof. For big holes, try to handle the dough very carefully when you shape it. Also make sure you proof enough. You should have good results. I am planning on re-writing this post as my technique improved quite a bit since. I started a new blog, Taste of Artisan, dedicated to all DIY artisanal foods and will be moving this post there. For now, I'd like to suggest reading this post here, it's about bread but the technique is very similar. I think you should find it helpful. If you have more questions, let me know. https://tasteofartisan.com/artisan-sourdough-bread-recipe/
George says
The Best recipe ever. Bravo.
jasmine says
This was excellent. I am a trained chef and have spent the past few years trying to perfect bread. I make a new recipe every weekend. This was one of the best I have tried-especially without a starter. It has the flavor and consistency of a starter bread without the hassle. I proofed in fridge about 17 hours.
victor says
Thanks for the compliment, Jasmine. This means a lot. Back in the day, I spent months perfecting this recipe and reading every interview with the best French baguette bakers and collecting every tip they shared. I need to retake the pictures, the ones on the post don't do them justice. When I bring these baguettes to work, people fight over them.
Chuck says
Victor,
Thanks for your recipe and techique notes. I tried this earlier this month and had modest success. The bread tasted good but i expected more rise and other signs of fermentation (the dough didn't smell particularly yeasty, there were no surface blisters and the dough balls were not as smooth as your pictures). My kitchen is pretty cool here on the northern California coast- high fifties F to mid sixties F this time of year unless we have the windows closed and the oven is raging, I also had some trouble with the transfer onto the stone, mostly due to too small of a stone (remedied with a new, larger kiln shelf) but also due to inexperience. I often use parchment paper and slide it right on the stone with the loaves. I should have done that, knowing that the size of the landing pad is not very forgiving. As fall progresses, I'll have more time to work on this.
I'm curious where your sausage and salumi pages went? Will we see them ever again?
victor says
Hi Chuck, thank you for sharing your experiences. It took me some practice initially, but once it clicked with me it became quite easy with consistently great results. To help with your dough, try using warm water, about 85F. That should aid with yeast activation. Or use a pre-ferment. The night before, mix 100g each water and flour with 3 grams of quick rise yeast and put in a fridge. This will ensure proper yeast activity even at colder temps. You will have to subtract these amounts from the final dough recipe.
There is nothing wrong with baking on a piece of parchment paper, I now do it most of the time as I find it much easier to transfer dough with it. Breads, pizza, calzones...
For the stone, do yourself a favor and go to your local pottery supply store and get 3/4" - 1" kiln shelf. They can cut to size. I had mine cut to 16x21 inches. It's heave and resides in my oven permanently. Super durable and handles spills without a problem. I've had it for almost 3 years now. I can bake 3 20" baguettes on it without a problem, or two large bread loaves.
As for the sausages, they are still here, just not liked. I've started a new blog, Taste of Artisan, dedicated to bread baking, sausage making, chocolate making and more. Everything for DIYers who love homemade, artisanal food. All relevant content will be migrated there over the next couple of months.
Here is the link to my favorite bread recipe that I make every 2-3 days now. Lot's of details and pictures to help see the process.
https://tasteofartisan.com/bread-recipes/sourdough/artisan-sourdough-bread-recipe/
Cristina Rosu says
Thank you so much for providing this recipe. Today was my second time using it. The first time, I followed the directions but deviated by fermenting countertop for 48 hours, which produced a really amazing flavour but the dough had a bit too much moisture and it didn't hold shape very well. The second time around (today) I felt I had a bit more control because of my previous experience. I added a pinch more flour and rolled out half the dough on a generously floured surface after the 3 - 20 minute intervals. I decided I would just bake it to see what happened. A gorgeous baguette happened. Of course, it didn't have the flavour imparted by a fermentation period but it rose perfectly and got a really nice crust too. Currently devouring it still warm with rilette de canard and feta. I've tried other recipes in the past with little success (a loaf that felt more like a small boulder). This was a revelation. Thank you again so much - you've provided a solid foundation for others.
victor says
Thank you for the compliment. Glad you liked my recipe. I noticed the same thing - no matter what the baguettes come out very tasty. I, on occasion, forget about the dough in the fridge for days, it would rise too much and deflate, and the baguettes would look quite poor coming out of the oven, but they would taste fantastic nevertheless. I like it when that happens, it gives me a chance to experience something new and get inspired.
Doris Wright says
Can't wait to try this recipe!
Povareshka says
Thank you for your wonderful recipe. This was my second time making baguettes and with your recipe and techniques, it turned out wonderful!!
I bake lot,more pastries than anything else,never though I'd be making bread at home!!
victor says
You are very welcome. Glad to hear you had success with my recipe. Baguette recipes are very simple, but it's the process that makes a huge difference. Get the process right and you will see amazing results.
I've been experimenting with higher hydration dough for my baguettes with very good results. I like how the crumb is softer and more open. Try increasing water little by little (1-2%) with each bake and see how you like it. The dough will be a bit trickier to work with, but I find that with experience and practice it's not that big a deal.
Albany Jane says
This is a great baguette recipe! It's been my most successful and delicious baguette to date. The crumb is lovely, and the crust browns up so nicely. Thanks so much for such a straightforward recipe!
victor says
Glad to hear that Jane. I tried many techniques and this one is my favorite by far. Anis Bouabsa really knows his baguettes.
Filomena Meffe says
Today I am trying your baguette recipe for the first time. Unfortunately the pizza stone has not yet arrived from Amazon so I am going to have to compromise by using a baking sheet. I was wondering if I could challenge you with a Sicilian Brioche recipe. I went to Sicily in July for my niece's wedding and one very hot evening, my cousin brought me and my family to a wonderful gelateria that served huge slabs of their famous Italian gelato in as many flavours as you wanted on a deliciously soft and flavourful Sicilian Brioche cut down the middle, much like an ice cream sandwich. My cousin pointed out that there was a method to eating this dessert. You start by eating the gelato first with a spoon and then gradually squeeze the sides of the brioche together until a thin layer of gelato remains. You then give up on the spoon and eat the rest like an ice cream sandwich. It was so refreshing and filling that I simply skipped dinner. I have hunted down a few recipes for this brioche and I think I may have found a few that sound authentic. I was wondering if you'd like to try this one which may be the "one":
Sicilian Brioche:
500 gm white flour with high "w" (Manitoba flour)
15 gm brewers yeast
80 gm granulated sugar
80 gm whole milk
180 gm whole eggs (3.5 eggs)
180 gm softened butter
15 gm honey
7.5 gm Marsala
(mix the honey and Marsala and set aside)
8 gm salt
yolk and milk for brushing
Using Mixer:
mix flour, yeast and sugar and start at low speed
Add milk, then eggs and increase speed to average
work it all in until dough is smooth and homogeneous
add softened butter little by little
add the Marsala and honey mixture
As soon as liquid is absorbed, add salt
Keep mixer going a few minutes more
Put dough on a worktop with flour and form a ball
Bring dough from the edges toward its lower part
Put dough in fridge for 1 hour
Then remove dough from fridge
Take 60 gm pieces and from balls
Put on a tray for baking
Tear off 15 gm balls of dough to make little balls which will go on top of the bigger balls
(these are called the "tuppo" in Sicilian)
Make a small dent in the bigger balls in the centre and place the smaller balls on top of the dented area
Cover the balls with plastic wrap and let rise for 2 hours in a tepid place
The volume should double
Then brush surface with mixture of milk and yolk
Bake at 200 degrees celsius for 10-15 minutes
the recipe does not say how many it would make
Where do you get brewer's yeast and Manitoba flour in Toronto?
Anyway, hope you take up the challenge and let me know how it goes!
victor says
This is quite a challenge, but sounds like something I would love to take on.
Manitoba flour, from what I know, is a flour with high gluten content, made with hard winter and hard spring wheat. No idea where to buy it in Toronto, but since this type of flour is widely used for baking in Italy, I would start with Lady York on Dufferin street. I know they carry some specialty flours from Italy. Brewer's yeast is easy, torontobrewing.ca carries many different kinds. I know many have successfully used Nottingham for baking.
Memoria says
Your baguettes look perfect, but the steps seem so long haha. I've been successful with baguettes only once. I think I followed the Cordon Bleu cookbook. Good job on these and great process photos!
Victor says
A good, flavorful baguette requires some patience and time, but the steps are easy. After a few tries you will naturally feel how the dough behaves and will be able to make a great baguette on a consistent basis. I taught my friend and my father-in-law to make baguettes. Showed them once, gave them a detailed recipe, and after 2-3 tries both of them were able to make excellent baguettes. Nothing hard about it. My father-in-law makes them weekly now and sends me pictures, he loves his baguettes.