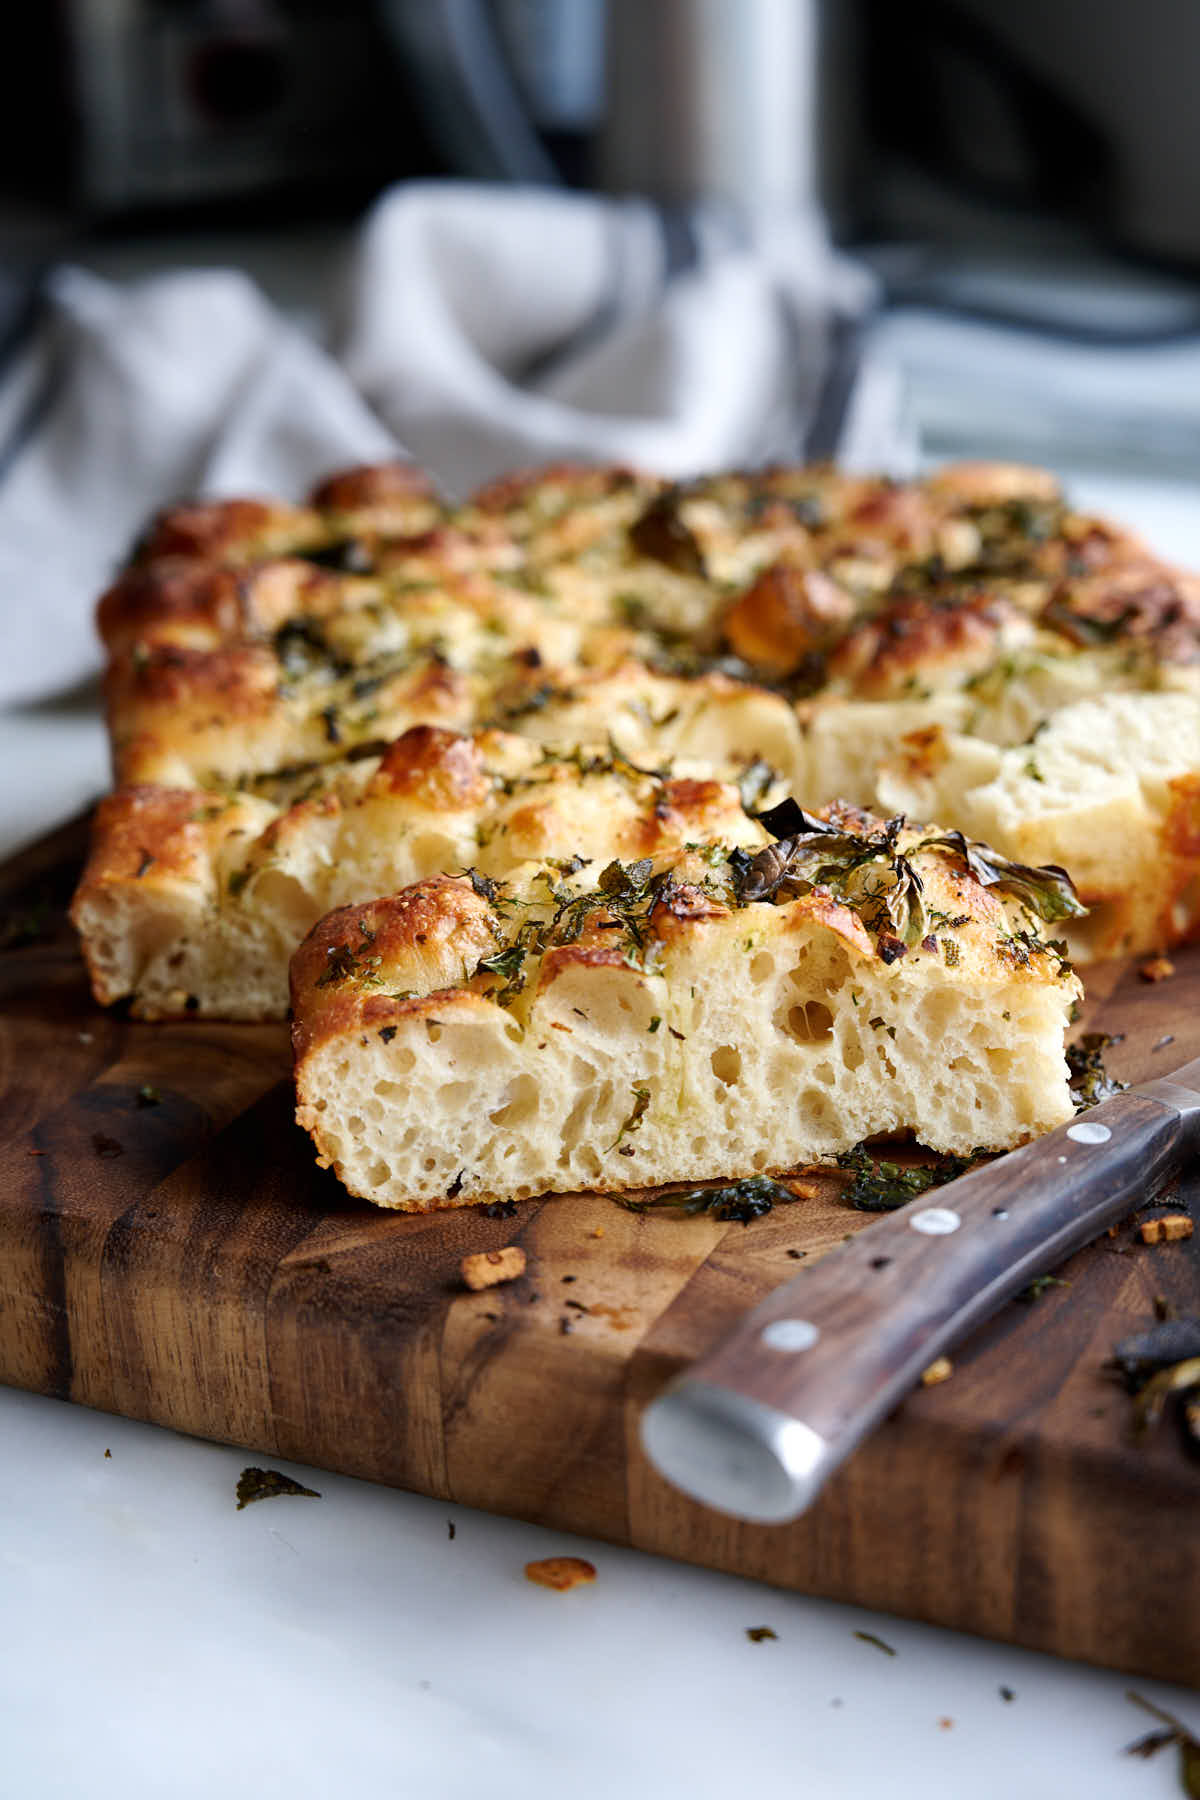
There are gazillion focaccia recipes out there; some are great, and some are less so. But for me, there is only one recipe - my no-knead focaccia recipe that I've developed and improved over many years. I absolutely love this bread, but the best indicator for me is how others like it, and my friends and guests devour it. It's a perfect holiday bread. It also makes a fantastic gift to give to friends, neighbors, and relatives. I may be mistaken, but I think people like this focaccia even more than my famous and highly popular French baguettes. So, you are welcome to try and be the judge and let me know what you think in the comment section below.
My secret to making the best-tasting focaccia bread
I don't know if this can be called a secret, but the trick is... well, there are several tricks at play here. Not even tricks, more like tips. Nuances. Hit them all, thats' the trick, and you will have outstanding focaccia. I learned some of these nuances while working at a small Italian restaurant long ago. Shortly after I started the job, my boss, an eccentric and talented chef from Italy, taught me how to make focaccia. It was an eye-opener. I had never tasted anything like it before. The rest came from experimenting and baking other things.
To make a long story short, what I think is critical for making a really good focaccia is high hydration dough, overnight cold retarding, long proofing, high heat baking with convection, and ... butter.
High Hydration Dough
When I say high hydration, I don't mean the dough becomes almost liquid. I've seen some recipes like that. No, the dough doesn't need to be hydrated to that extent, and there is little benefit to that. But I like the dough to be very soft, and I consider 80-82% hydration ideal for focaccia. I use 80% when using white flour and 82% when adding whole wheat or whole grain flour, as those tend to absorb more water.
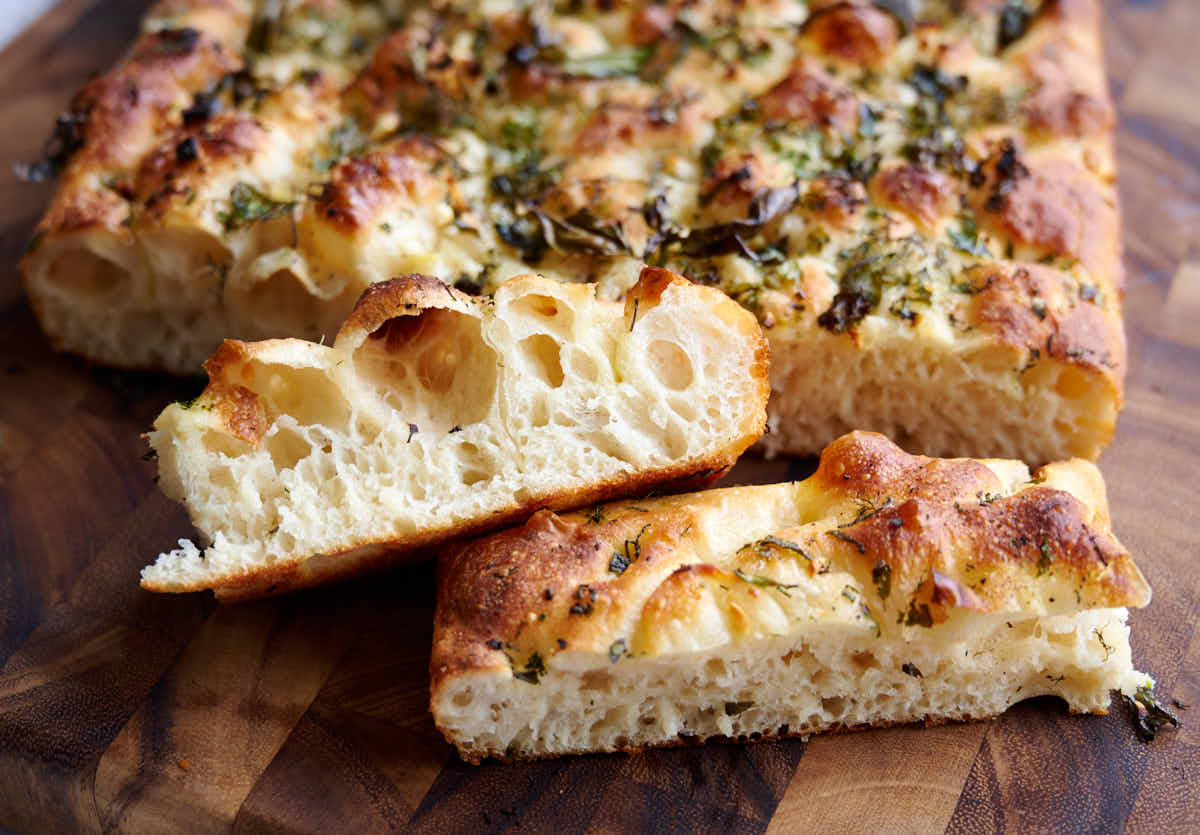
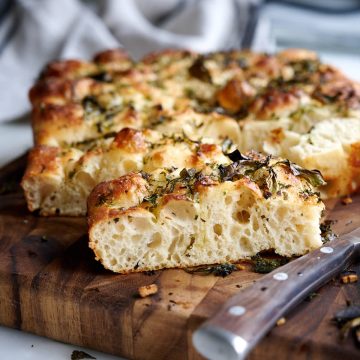
The dough should be soft, and easily stretchable but strong enough to develop soft, open, and chewy crumb with large holes. I've encountered recipes instructing stretching the dough to fill the baking pan in 2-3 stages, as it's so stiff that you can't do that on the first attempt. This is a good indication that the dough is not hydrated enough. Similarly, if the dough can be almost poured into the baking pan and fill it on its own, it's way too hydrated. Neither is good.
No kneading!!!
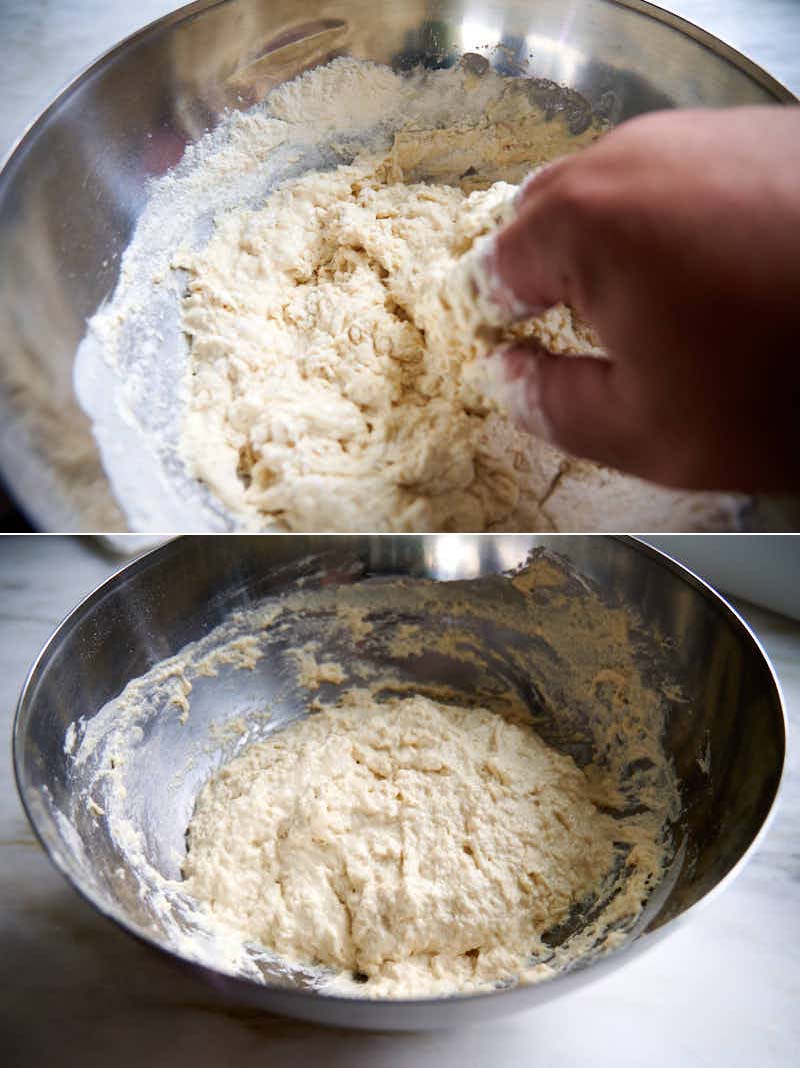
It goes without saying as kneading destroys bread's texture, but still, it's worth mentioning. No kneading doesn't mean mixing the ingredients together and forgetting about them, either. If you want a spectacular crumb, the dough needs to develop strength. Gluten. That's the function of stretching and folding the dough and time. There is no way around it. If you simply mix the ingredients and let the dough rise, you will perhaps get good store-bought-quality bread. But that's not what we are after.
Overnight Cold Retarding
Overnight retarding does magic to bread dough, and focaccia is no exception. Not only is the flavor vastly improved, but the airiness and openness of the crumb too. I find it makes the process much more repeatable and predictable. I think it's easier to get the dough perfectly fermented and proofed when cold retarding is incorporated into the schedule.
High Heat Baking on a Stone with Convection
In my opinion, just like wood-fired oven pizza cooked at insanely high temps, the best focaccia is baked briskly at a high temperature. The gas oven I use these days only goes up to 500F, so that's the temperature I bake my focaccia at. I'd probably go even higher if I could, but I haven't tested this recipe at those higher temps. Anyway, when cooked at high temps, something magical happens to the dough - you get an astounding oven spring, thin, crispy crust, and a chewy, moist crumb. This is how I bake my pizza, too, with fantastic results.
I also use convection to increase the effect of high heat and achieve a crispier crust. Many of my readers don't have a convection function in their ovens, so I anticipate they'll ask me what to do with this recipe if they don't. Don't worry about it if you don't. Just bake it at the highest temp you can achieve. Your baking time may need to be extended a little, but you should get similar results. If the browning is not even, you may need to turn the pan 180 degrees halfway.
Butter
Yes, butter makes everything taste better, especially the crust. Oh my, you should try biting into this butter crust; it's unbelievably good. Back at the restaurant where I used to work, we greased the pans with olive oil. It's cheaper that way. Perhaps even more traditional. At home, I always butter my pans. Trust me; there is a huge difference between butter and oil crust.
Making Focaccia
The process is dead simple; my family and I followed it dozens of times with success. I am confident that anyone, even without any baking experience, can make amazingly tasty focaccia using this process.
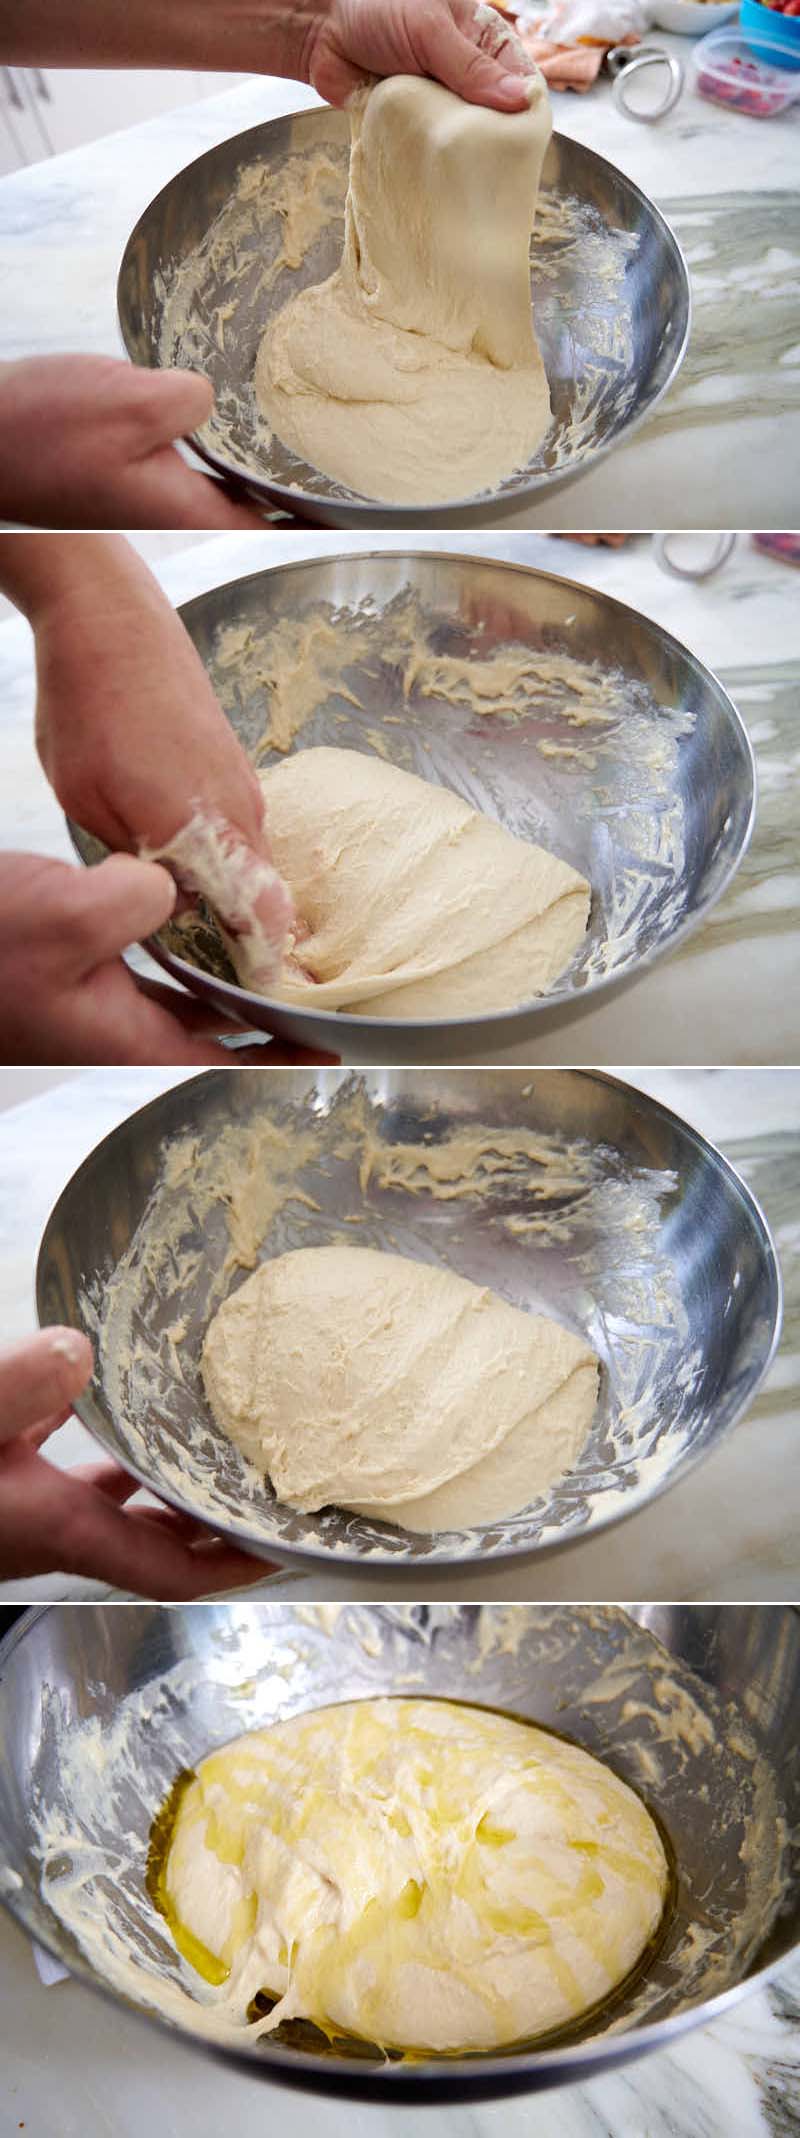
Mix the ingredients together and let them rest
Add the water, flour, then instant yeast and salt so they don't touch each other. The water should be at room temp, around 68F - 70F. Mix well, then cover the bowl and let the dough rest for 20-30 minutes.
Perform 3 sets of stretches and folds
After the rest, perform three sets of stretches and folds spaced about 20 minutes apart. After the last stretch and fold, the dough will become much stronger and tighter. The fermentation process should have begun by then, and you will smell lactic acid. Shape the dough into a ball, liberally cover it with olive oil, and let rest for 20 minutes.
Spread the dough in the baking pan
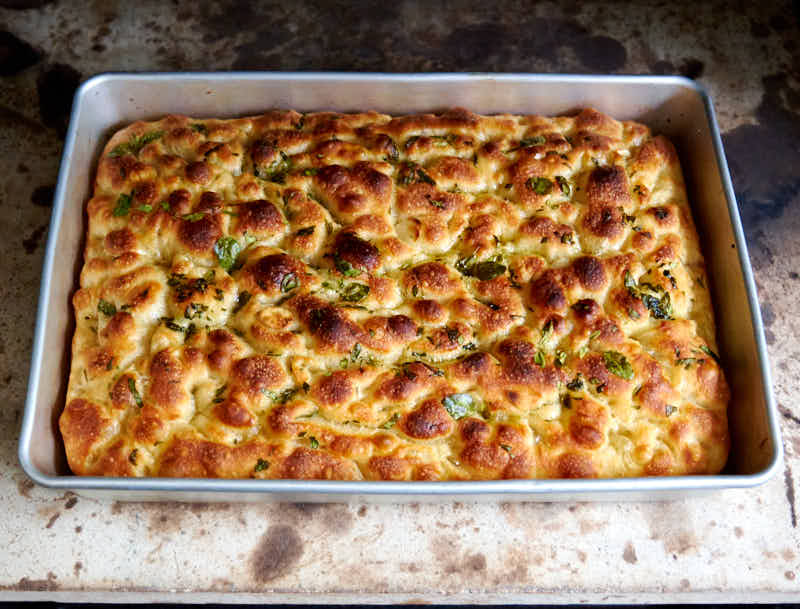
After the dough has rested, stretch it on the bottom of a 13" by 9" baking pan. I use an aluminum cake pan and have had excellent results with it. A disposable aluminum foil pan will work great, too, I always use those when I make focaccia to give away. Make sure the dough is stretched evenly, but that's not critical to stress about. The dough will spread out a little on its own.
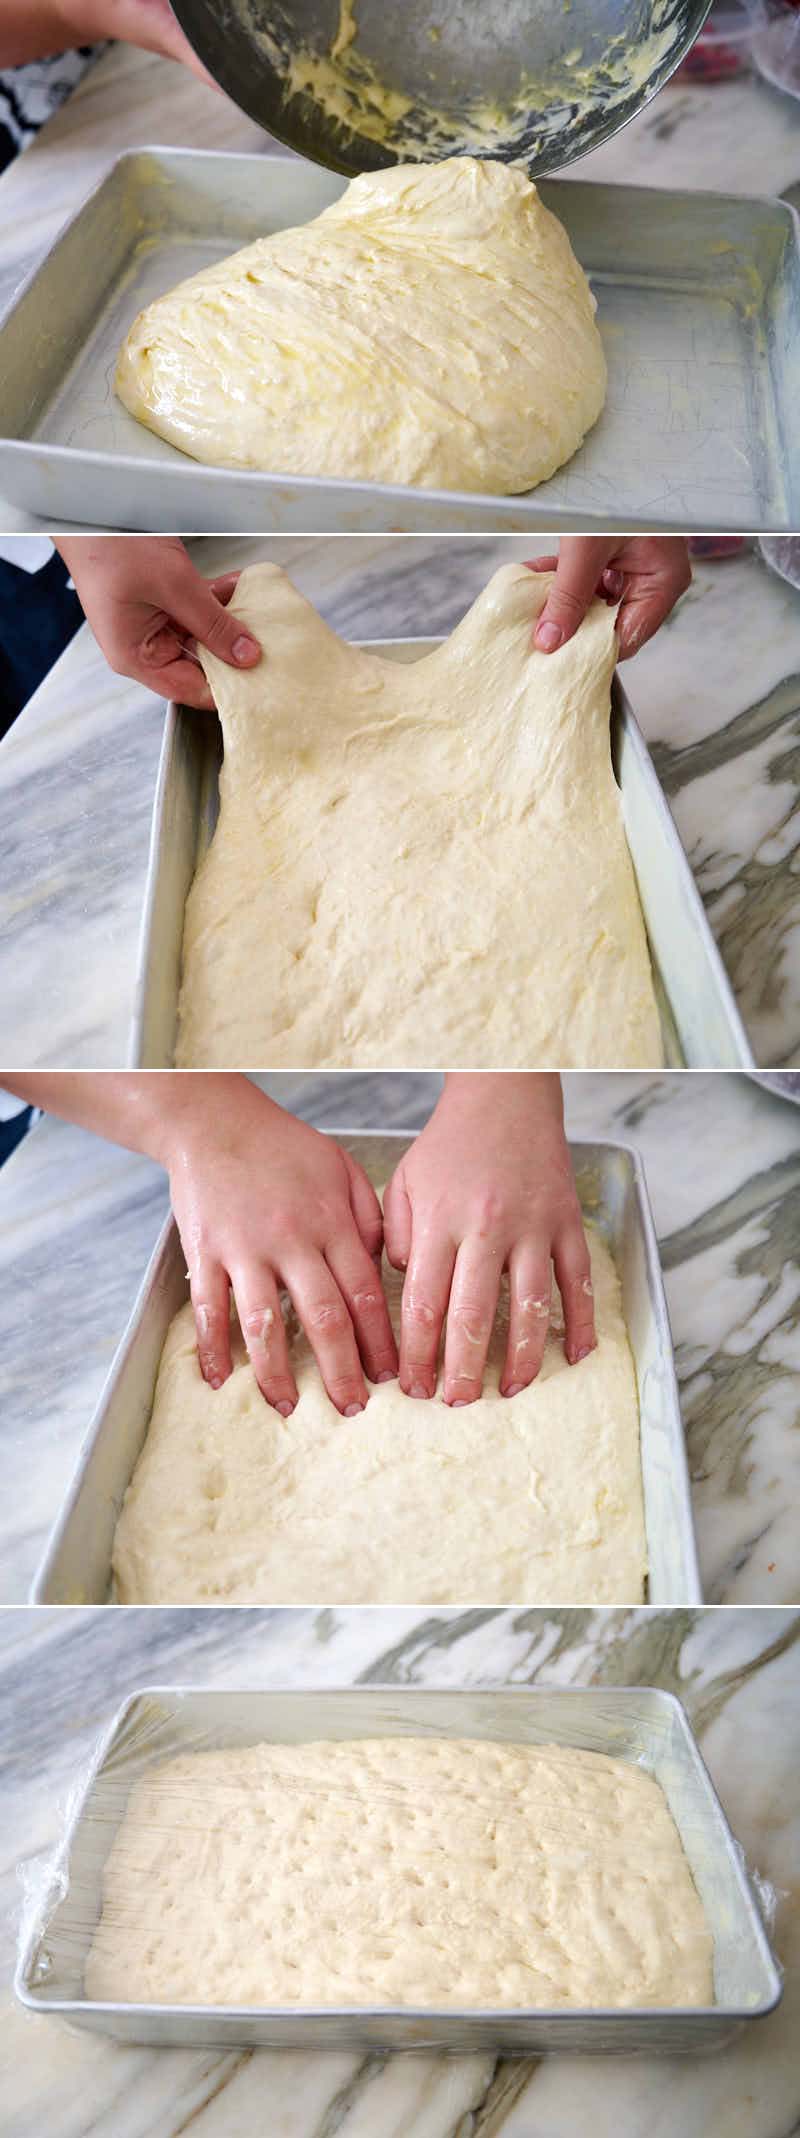
Cold retard for 12 - 24 hours
After stretching, the dough in the pan is covered and goes straight into the fridge. The trick is to make sure that the fridge is not too cold. It should be at around 36F-38F. It can spend anywhere from 12 to 24 hours in the fridge for the best results. If need be, you can keep it in the fridge for up to 48 hours.
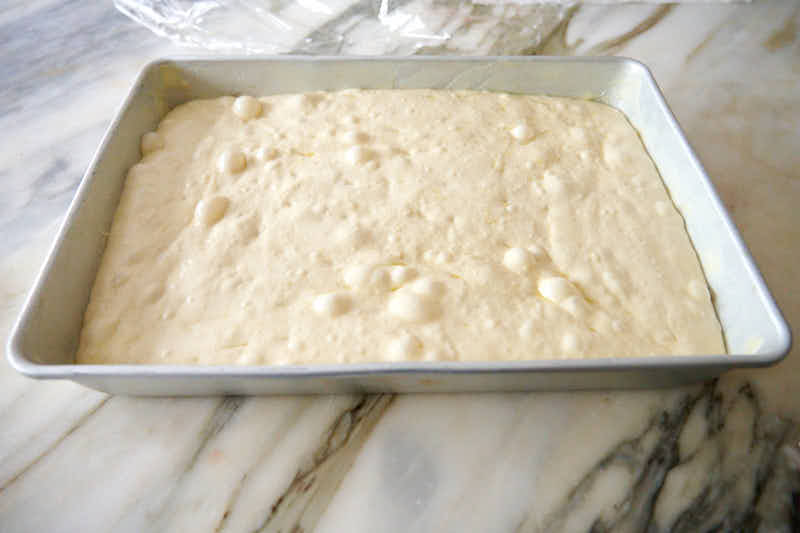
Proof at room temp for 2 hours
Two hours prior to baking, take the dough out of the fridge and let it sit, still covered, at room temperature. The dough should noticeably rise during this time.
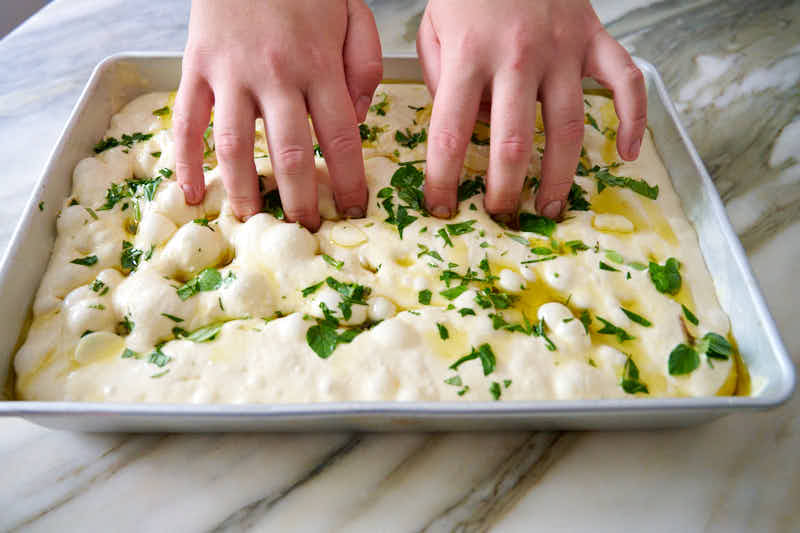
Add oil and make dimples in the dough
Uncover the dough and liberally drizzle olive oil over the surface. With your fingers, make dimples all over the surface, letting the oil collect in those dimples.
Add the toppings
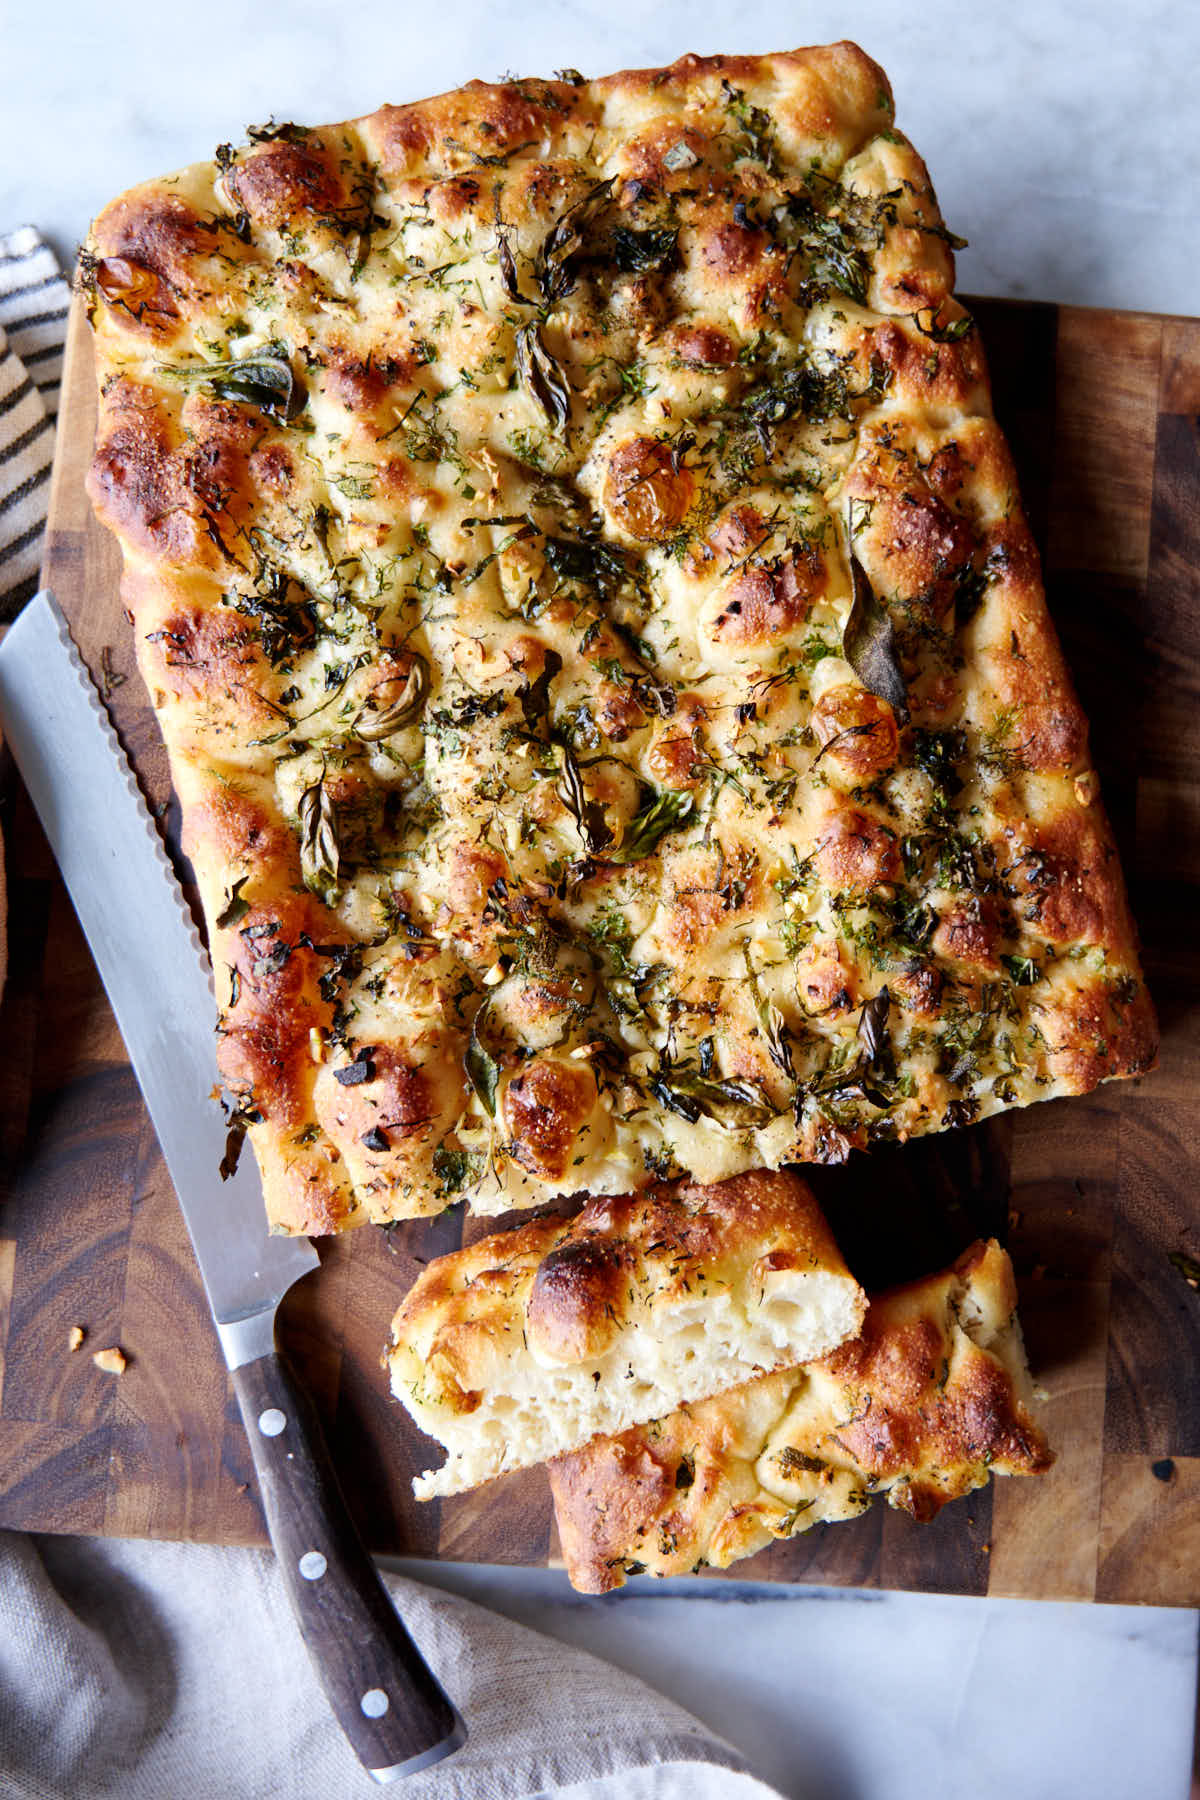
Add the desired toppings and finish with another light drizzle of olive oil. Make more dimples; this will press some of the toppings down. No right or wrong here. The topping can be anything you like. The common ones are chopped or halved/quartered fresh tomatoes, grilled/roasted vegetables, herbs, etc. I like adding thinly sliced garlic. Roasted slices of mushrooms and yellow onion are always delicious on focaccia or pizza.
Bake
Bake focaccia in a preheated oven on a pizza/baking stone at 500F with convection for 12 minutes. Different ovens bake differently, so your time may differ from mine a little, so start checking for doneness at about 8-10 minutes. Focaccia is done when it's crispy and golden brown. I serve it fresh and hot out of the oven. Be careful; it will be hot but so good!
Enjoy!
Ingredients
For the dough
- 500 g all-purpose flour King Arthur flour is my favorite for this recipe
- 400 g water at room temperature
- 3 g instant yeast
- 9 g sea salt
Additional ingredients
- 2 Tbsp unsalted butter softened
- 6 Tbsp extra virgin olive oil plus more if needed
- 2 garlic cloves thinly sliced or minced
- 1/4 tsp black pepper
- 1 cup chopped herbs basil, dill, sage and parsley
Instructions
- Add water to a large bowl. Next, add flour, then the yeast on one side of the flour, and salt on the other, making sure the two don't touch each other before you start mixing. Mix by hand, squeezing the dough between your fingers until a sticky homogeneous mass is formed. Cover the bowl with plastic wrap and let rest for 20 minutes.
- After 20 minutes, perform a set of stretches and folds, then another one after 20 minutes, and another one 20 minutes later. Shape the dough into a ball and rub it with two tablespoons of olive oil. Cover the bowl with plastic wrap and let the dough rest for another 20 minutes.
- Transfer the dough to a 13" by 9" aluminum cake pan greased with two tablespoons of butter. Stretch it to fill the entire bottom of the pan. Cover with plastic and refrigerate overnight and for up to 24 hours.
- Remove the dough from the fridge two hours before baking and let proof at room temperature, covered.
- Preheat the oven with a baking stone positioned on the top shelf to 500F.
- Liberally drizzle olive oil over the top of the dough. Using your fingers, make deep dimples all over the surface of the dough. Spread the toppings and finish with a light drizzle of olive oil.
- Bake at 500F with convection for 12 minutes. Every oven bakes differently so start checking early, your bread may be done sooner, or you may need to add a few minutes to the baking time.
- Carefully transfer the focaccia to a large cutting board, slice, and serve while hot. This is when it tastes best.
Nutrition

Lisa says
I love this recipe but have one crucial comment. The instant yeast that is called for is too much; the 3g is more for cake yeast not instant or rapid rise. This definitely affects the cold rise as well as the final rise at room temperature. Hope this helps!
Victor @ Taste of Artisan says
Interesting, thank you for your feedback. I haven't found that to be the case. The amount of yeast is perfect for this recipe and the process as far as I am concerned, to get the result that I am looking for. You could go lower on the yeast, but that temperature and timing would be affected. Of course, that depends on your timing and ambient and fridge temps and could dictate the amount of yeast. All three are tightly connected.
Maria says
This is my go to recipe when I make focaccia. The texture and flavor were perfect! I follow the recipe exactly using the instant yeast, but I am curious if it would work just as well with fresh yeast, what the conversions would be and if there would be a change for the stretching time (longer than 20 min).
Thank you. 🙂
Victor @ Taste of Artisan says
Glad to hear it, Maria. I don't use fresh yeast. Well, I haven't in over a decade. So, I can't really say. I used to use a 3:1 ratio for conversion. I would start with that. Unfortunately, I don't have any input on the process as I haven't tried it myself so I can't really speak to that. Happy baking!
Don says
I have a Detroit style pizza pan. It’s just a little smaller than the 9x13. Would this work for your recipe?
Don
Victor @ Taste of Artisan says
Yes, that will work. Enjoy!
Kim says
Could you I make this without a pizza stone? Would it need to bake longer?
Victor @ Taste of Artisan says
You sure can. I've even made in my air fryer and turned out really good, only the bottom wasn't crispy - Air Fryer Focaccia. I like baking my focaccia on a stone because it creates a beautifully crispy bottom but it will still work without a stone. I don't know if you will need to bake for longer, it may depend on your oven, but it shouldn't be much longer. I would monitor closely the first time and make adjustments if necessary, then use that for your next bake.
Diana Winfrey says
This dough is beautiful and is in the fridge now for the "cold press rise". Already has many bubbles! Will post finish product. Many Thanks!
Victor @ Taste of Artisan says
Good luck. Looking forward to seeing the final product.
M Trull says
Have you ever made a focaccia /pizza before?? My thoughts are my family loves the texture of focaccia more and I thought to add a thin layer of sauce and cheese. However, I was concerned about it not rising during the bake since it is very short. Should I bake for 5 minutes then take it out and add sauce / cheese? Or do you think it would work adding it at the beginning?? Thank you for this awesome recipe!
Victor @ Taste of Artisan says
I have, but from what I understand from your comment, not in the way you'd like. I think you can pull it off, just go lighter on the sauce and the cheese. Adding the sauce and the cheese a few minutes into baking is a good alternative. I recall us pre-baking a lot of pizza crust on game days at our restaurant to make it easier and quicker for us to serve large crowds of hungry customers. You could barely tell the difference in the end. Good luck!
Jenny says
A beautiful recipe, easy to follow and turns out every time. Thanks 😉
Victor @ Taste of Artisan says
Glad you liked my focaccia recipe, Jenny. Happy baking!
Samantha Martz says
In the past I’ve used this recipe with instant yeast like you called for, but what if I wanted to use my starter? How many grams of starter do you suggest I use or should I skip the starter and just use the instant yeast again?
Victor @ Taste of Artisan says
Hi Samantha, for this size batch, I typically use about 100g sourdough starter. I will post my SD focaccia recipe in the near future.
MB says
Hi, thank you for the recipe! It’s currently proofing at room temperature, is it a problem if the dough is starting to touch the covering plastic?
Victor @ Taste of Artisan says
Good luck. No, it's not a problem as the batter is oiled. If it does stick, next time cover with a layer of paper towels. Good luck!
Claire P says
I'm in heaven. It's been said that we cannot exist on bread alone but I would definitely make a good go of it. I LOVE good bread. And this focaccia is outstanding.
I am a fairly experienced home baker but not a bread maker or experienced yeast-user by any means. But, after a few false starts in that department, my focaccia turned out beautifully! No convection, no stone, and my fridge was apparently too cold because the dough actually took four hours, not two, to reach a reasonable volume to bake. But 15 minutes at 500 degrees and it actually looks exactly like the photo of yours, inside and out - as close to perfection as I could ever hope to get. And it tastes amazing! I can't thank you enough for your wonderful recipe and all the explanations and tips that take most of the guesswork out of the equation. Now for the million-dollar question ...
What is the best way to store and re-heat a full loaf of fresh focaccia? I know that sounds totally blasphemous, but this effort was a practice run for a dinner party and, much as I would love it, I can't make it work to have two gorgeous loaves of focaccia coming out of the oven just in time to serve. I will have to bake them off much earlier in the day and re-heat before serving. But I want to preserve the crisp crust and the moist interior as much as possible. I hope you have a suggestion for me.
Again, thank you, Victor, for this fabulous recipe!
Victor @ Taste of Artisan says
Hi Claire, my apologies for the delayed response. I am very happy to hear about your success. Fantastic! This is what this blog is about.
Now, to answer your question. I normally don't freeze and reheat bread, but a lot of people successfully have. I believe some of my readers mentioned in the comments of my French Baguette recipe that freezing than reheating at 400F worked great and resulted in a crispy crust.
I can also recommend cold retarding the proofing stage. If your fridge is cold, I would almost finish proofing, then put the dough back in the fridge overnight and pop right in the pre-heated oven the next day. I haven't tried this method with focaccia but I have with many of my other breads and it works very well. Good luck!
LB says
3g of yeast seems a lot less than similar volume recipes which come in around 7g?
Victor @ Taste of Artisan says
The more yeast you add the faster the dough ferments and the less flavor it develops. Slow fermentation allows for great flavor development, hence less yeast. That said, there are thousands of ways to make bread.
Brittany says
Hi! I’m hoping to make this as Christmas gifts for my neighbors this year. Have you ever made smaller portions? I’m thinking a double batch of dough divided into 8 7x5 aluminum pans?
Victor @ Taste of Artisan says
Brittany, I tried this recipe but baked in my air fryer in 7x5 pans - https://cravingtasty.com/air-fryer-focaccia-bread/. It worked well. I think it will work fine in the oven as well. Good luck!
Amy says
This recipe is so good! I love it! I usually add onion powder in the dough and it works wonders! Thank you for sharing this 🙂
Tips;
- always weigh the ingredients. Using cup measurement isn't accurate enough.
- I add a bit of sugar to give an extra flavour. A teaspoon
- I mix bread flour and APF together. Bread flour gives a chewier texture
Thanks again!
Victor @ Taste of Artisan says
Enjoy!
Trixie says
I weighed everything but my dough was quite wet so I added as I did the stretching and did an additional stretch and rest while adding more flour....HOWEVER, it turned out terrific...nice and crispy. I used basil from my garden, chopped garlic, and a sprinkle of Maldon salt. Maybe my weight scale needs a new battery.
Victor @ Taste of Artisan says
Sometimes it takes some practice with high hydration doughs... the more you make it, the easier it becomes. High hydration dough produces superior results IMHO. Glad you like the results. Enjoy!
Trixie B says
Thank you -- we had that 2 nights and today I'm cutting up the rest to make croutons...my goodness, those are great as well! Thank you, Chef!
Victor @ Taste of Artisan says
🙂 Happy to hear it, Trixie. Enjoy!
Steffi says
I love using this recipe and it turns out so Welly I put veg or cheese on top and I have tried it with different flours. Always a winner. I would like to bring it to school and have not got time to leave it to wait for 2 hours outside of the fridge. Is there any chance I can leave it in the garage or shed where it is colder but not as cold as I assume room temperature is too warm if I leave it for 6/7 hours overnight?
Victor @ Taste of Artisan says
6-7 hrs overnight at room temp - it will overproof. Somewhere cooler than room temp may work. Good luck.
Steffi Hudson says
Thank you. I will try and leave it outside and hope the UK weather is good to me 🙂
Victor @ Taste of Artisan says
Good luck!
Cynrhia says
Will this work if it is only in the fridge for 8 hours?
Victor @ Taste of Artisan says
I think it should be OK.
marils says
This bread looks delicious. However, I don't have a convection oven. Are there any baking instructions you can give me for making this recipe in a conventional (non-convection) oven?
Victor @ Taste of Artisan says
If you don't have a convection oven, all you can do is bake without one at the same temp. Keep an eye on it, you may need to add a few minutes to get the same level of browning. It should turn out pretty close. Good luck!
marils says
Thank you. Can't wait to try it.
Victor @ Taste of Artisan says
You are very welcome. Enjoy!
Robin says
One of the best Foccacia recipes I have tried!
Victor @ Taste of Artisan says
Glad to hear it. Enjoy!
David Hay says
Hi,
What are you considering room temperature? Fermentation is so dependent on temp - how should I assess whether the dough is ready?
Thanks!
Victor @ Taste of Artisan says
The temps in my kitchen in colder months are about 67-68F, and summer months around 69-70F. You are correct, temp is another ingredient. Very important.
To assess... before the dough goes in the fridge I want to see about a 30-50% volume increase, some blistering on the surface and, most importantly, a strong lactic acid smell. You want the fermentation be under way. By the time the dough should go in the oven, it should have almost tripled in volume and be very light and bubbly. Hope this helps.
Ahmad says
This turned out absolutely perfect. Thanks for sharing.
Victor @ Taste of Artisan says
You are welcome. Enjoy!
Anisha says
Hi! Would it be ok to use bread flour?
Victor @ Taste of Artisan says
Yes, bread flour will be fine.
AJ says
Thank you! Worked amazing with bread flour. I don’t have a pizza stone, found that 20-22 minutes at 500 F worked great!
Victor @ Taste of Artisan says
Glad to hear it. Enjoy!
Toni Hsy says
Spot on recipe. The best focaccia bread I've ever tasted. Such complex flavors and the thin, crisp crust paired with the moist, chewy crumb are just amazing. Thank you for sharing. I will be making this bread again very soon.
Victor @ Taste of Artisan says
Glad you liked it. Enjoy!
Jenifer Benker says
My focaccia came out absolutely perfect. All these tinny details that you provided were very helpful. Thank you so much for sharing this wonderful recipe. I tried other recipes but I never enjoyed focaccia as much as this one. It's perfect. Thank you again!
Victor @ Taste of Artisan says
Glad you liked it. Enjoy!
Klaire says
Can you double or one and a half the recipe? I have a 12 x 15.5 pan I would like to use.
Victor @ Taste of Artisan says
The area of you pan is about 1.6x larger so 1.5x recipe would be preferred. Good luck and enjoy!
Hillary Ilyniak says
Hello,
What adjustments would I make if I only had active dry yeast to work with instead of instant?
Victor @ Taste of Artisan says
Hillary, you will need to activate the yeast, make sure you see a nice foam cap form, then use it in the dough. Good luck!
Sonal says
Hello, I followed all steps . I used microwave convection mode at 200°
for 20 minutes but the base didn't turn brown. What to do??
Victor @ Taste of Artisan says
I don't know how well in theory this recipe and similar will work in a microwave oven with convection, I've never tested. I developed this recipe for a conventional oven with a stone, which is how you get the base/bottom get nicely browned and crispy. I tried this recipe in an air fryer, and it worked, but as in your case, the bottom was soft and pale. It's a limitation of the oven, I don't think there is a way around it.
Gabriella says
Wow! Amazing! I have tried several recipes in my life, and I must say, yours beats them all! The only “correction “ I would make is the portion number. In my circles the single recipe only makes 8 portions. Thank you for sharing!
Victor @ Taste of Artisan says
Happy to hear it. Thank you for the kind words, I really appreciate it. Yeah, portions are very personal. Sometimes I feel like eating half of that focaccia all by myself LOL. Enjoy!
Jill Boyd says
This is the last word on focaccia. Absolutely delicious.
Victor @ Taste of Artisan says
So happy to hear that, Jill. I am glad that you liked my recipe. Please, try my baguettes, pizza dough and other goodies. I am sure will like them too. Happy baking!
Derek A. says
My cooking pan is only supposed to be used in an oven up to 450 degrees. How long should it cook at this temp?
Victor @ Taste of Artisan says
Hi Derek, I can't say without some testing. I'd recommend that you bake until the crust is nicely browned as in the pictures above. Maybe 15-16 minutes? Just keep checking every 2 minutes or so after about 10 minutes into baking and you'll see when it's ready. If possible, get yourself an inexpensive aluminum pan and baket at the highest temp that you oven can do. That's the best way. Hope this helps. Good luck and happy baking!
Napassorn Hoebeke says
This recipe is superb. The result is beyond expectation! We got the air bubbles inside the bread throughout and that makes it very light.
Thank you for sharing !
Victor @ Taste of Artisan says
I am very happy to hear that. Enjoy and try my other recipes; there is plenty of great ones here.
Amalie oftebro-ernst says
Hi,
I am considering making this for a birthday celebration, do you have experience with freezing the break and reheating it?
Best,
Amalie
Victor @ Taste of Artisan says
Hi Amalie, I rarely freeze bread so I don't have much experience with it, but if you Google for freezing bread, there are a lot of article on it. It looks like many people do that. Good luck!
Hannah says
Do I need to use a baking stone?
Victor @ Taste of Artisan says
A baking stone helps with an oven spring and you get a crispier bottom crust. But you should get decent results without one. You could use a stack of baking sheets insted of a stone, they should provide enough stored heat.
Sarah says
This is the best bread i ever made. Everything was perfect, flavor, texture, crispiness! Amazing! Thank you so much for sharing.
Victor @ Taste of Artisan says
Happy to hear it, Sarah. Enjoy!
Becky says
Can I use my sour dough starter to make this focaccia? If so, do you know how I would go about it?
Thank you
Victor @ Taste of Artisan says
I don't see why not, though I haven't tested it. I would simply substitute the equivalent amount of water and flour of your starter in the dough. I wouldn't change the process as your main leavner would still be the commercial yeast given the process heavy on cold retarding. Good luck.
Michael says
The best easiest recipe with great results, yum. This focaccia is so good l have to hold back on the temptation that l don’t eat the whole thing in 1 go
Victor @ Taste of Artisan says
Happy to hear it. Thanks for feedback. My daughter made this focaccia topped with drops of cream cheese and sliced fresh strawberries. It made a great dessert. Enjoy!
Meg Howes says
Once again another delicious and easy to follow bread recipe from Victor. Thank you so much for sharing. You make bread making delectably possible!!!
Victor @ Taste of Artisan says
You are very welcome, Meg. Thank you for the kind words. Enjoy!
Ken Barlow says
I look forward to making this tomorrow. By the way, it's unnecessary to worry about salt and yeast coming in to contact as the salt will not kill the yeast. It's been proven many times in YouTube videos.
Victor @ Taste of Artisan says
Good luck.
P.S. I would take most of YouTube videos with a grain of salt. Here is what King Arthur says: 'Salt has a retarding effect on the activity of the yeast. Salt by its nature is hygroscopic; that is, it attracts moisture. In the presence of salt, the yeast releases some of its water to the salt by osmosis, and this in turn slows the yeast's fermentation or reproductive activities.'
Le says
Is it possible to double the recipe?
Victor @ Taste of Artisan says
Yes, just double the ingredients. The pan size should double too or use two pans.
Paolo says
As expected, wonderful…. I always look forward to your new recipes. Do you do a Sicilian and Grandma pies?
Victor @ Taste of Artisan says
Glad to hear it, Paolo. I do, actually. Will post when I get a chance. Enjoy!
Giovanna says
My favorite focaccia recipe!
Victor @ Taste of Artisan says
Happy to hear it, Giovanna. Enjoy!
Patti says
I started this bread last night and finished today. It is amazing and so beautiful. I have tons of herbs growing so added some fresh oregano as well. The large amount of herbs on top is the best. So much flavor! I used 3 cloves of garlic as well, forgot the pepper.
I followed the photos and video from this post. They were invaluable and so appreciated. My dough seemed wetter but I did not have the nerve to add more flour, and Victor's recipes have taught me to handle very wet sticky dough, so that's what I did. It rose beautifully on the counter. My convection bake sets 25 degrees less than you start it at. Convection roast stays at the chosen temp. So what to do. I had to pick bake since I sorta was baking and I set it to 525 and when I hit start it went to 500 so that's what I did, which was good. I actually had to cook it at least and extra 5 minutes or more.
I tasted it with some very nice garlic oil and it's out of this world. Actually I tasted it plain, then with butter, then with the oil if I am to confess! Again and always, THANK YOU Victor! You are my bread mentor to be sure but all my friends love you because they get some of these amazing breads!
Victor @ Taste of Artisan says
Hi Patti, I am super excited about your success, and I am happy that you liked my recipe. Thank you for the kind words and for the detailed feedback; it will be helpful for my other readers for sure. Enjoy the focaccia. I don't know if you've ever made my French baguettes; you must try making them if you haven't. I have a strong feeling that you will love them too.
Dominic says
My wife will be making this for us. I just wanted to compliment you on how you show your recipe with both the full explanation, the ability to print the recipe and also the video of the actual steps in the process. You set a standard for the way recipes should be made. Thanks enjoy all your material.
Victor @ Taste of Artisan says
Thank you for the kind words, Dominic. Happy you enjoy my work. All the best, and enjoy the focaccia.
Emma says
I started the dough last night, baked it this morning, and, oh my, it turned out amazing. It's so easy to make and tastes wonderful, so soft inside and crispy on the outside. I'm in love! Thank you for this recipe!
Victor @ Taste of Artisan says
You are very welcome, Emma. Enjoy!
Lauren says
I’ve made focaccia several times but this is simply delicious. I used bruschetta seasoning and diced tomatoes! My whole family loved it.
Victor @ Taste of Artisan says
Glad to hear it, Lauren. Enjoy and stay tuned for more of my favorite recipes.
Tiffany says
Another mouth-watering bread recipe. I am definitely going to try this one. Thanks for sharing, Victor.
Victor @ Taste of Artisan says
You are very welcome, Tiffany. Happy baking!
jesus cristancho says
excelente, mil gracias
Victor @ Taste of Artisan says
Enjoy!