I have been curing meats at home for almost two ten years now. Time really flies! As many of you know, my initial results seemed encouraging, but then it all quickly went downhill. The biggest problem was the high humidity. I tried many things to fix it, but nothing worked. About a year and a half into my hobby, I made a change to my meat curing chamber - I added a peltier dehumidifier. It helped me start getting consistent and predictable results. I was in charcuterie heaven! My curing frustrations were officially over. Since then, I have implemented a number of additional changes that have made my curing chamber even more consistent, predictable, and versatile. I hope this guide will help you build your dream meat curing chamber, too.
Building a meat curing chamber
Building a meat curing chamber at home is ridiculously simple and will not break the bank. All you need is the (now revised) list of things listed below.
- A full-size frost-free fridge ($60-$120 on Craigslist)
- A temperature controller ($50-$130)
- A humidity controller ($50-$130)
- An ultrasonic humidifier ($30-$50)
- A peltier dehumidifier ($40-$80)
- A heating mat ($10-$30)
Ten years ago, I started off without a dehumidifier. Such a setup works. That is, if all planets line up perfectly or you happen to live in an area that is conducive to meat curing. Otherwise, you are going to face challenges controlling high humidity.
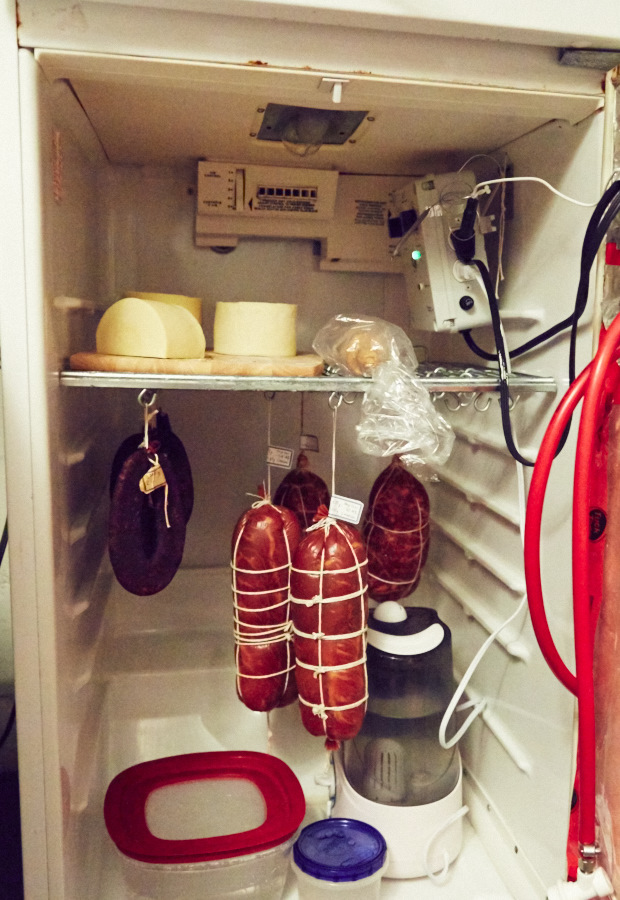
My first meat curing chamber was about as outlined above but with a less-than-perfect controller and without a dehumidifier and a heating mat. I also added a digital Extech 445715 Hygro-Thermometer for easy monitoring of internal temperature and humidity. The controller I picked was the analog C.A.P AIR-2 temperature/humidity controller, which controlled temperature and a de-humidifier.
My first batch of meats turned out fantastic; I could not be happier. No store-bought salami would come even close. Michael Ruhlman's sopressata was the star.
My meat curing chamber challenges
The next batch I made a few months later didn't fare so well. My salamis would keep developing some sticky grey coating on them, which impacted drying and resulted in spoilage. Wiping off that sticky mess with water and vinegar solution would only work for a couple of days. Then it was back again. I figured I must have done something wrong and made another batch. It turned out not too bad, but not nearly as good as the first one.
Then I realized what the problem was. It was the changes in the ambient humidity that affected the humidity inside the meat curing chamber. When the ambient humidity was suitable, the internal humidity in the fridge stayed in the desired range, and I would get perfect results. If not, I would get junk.
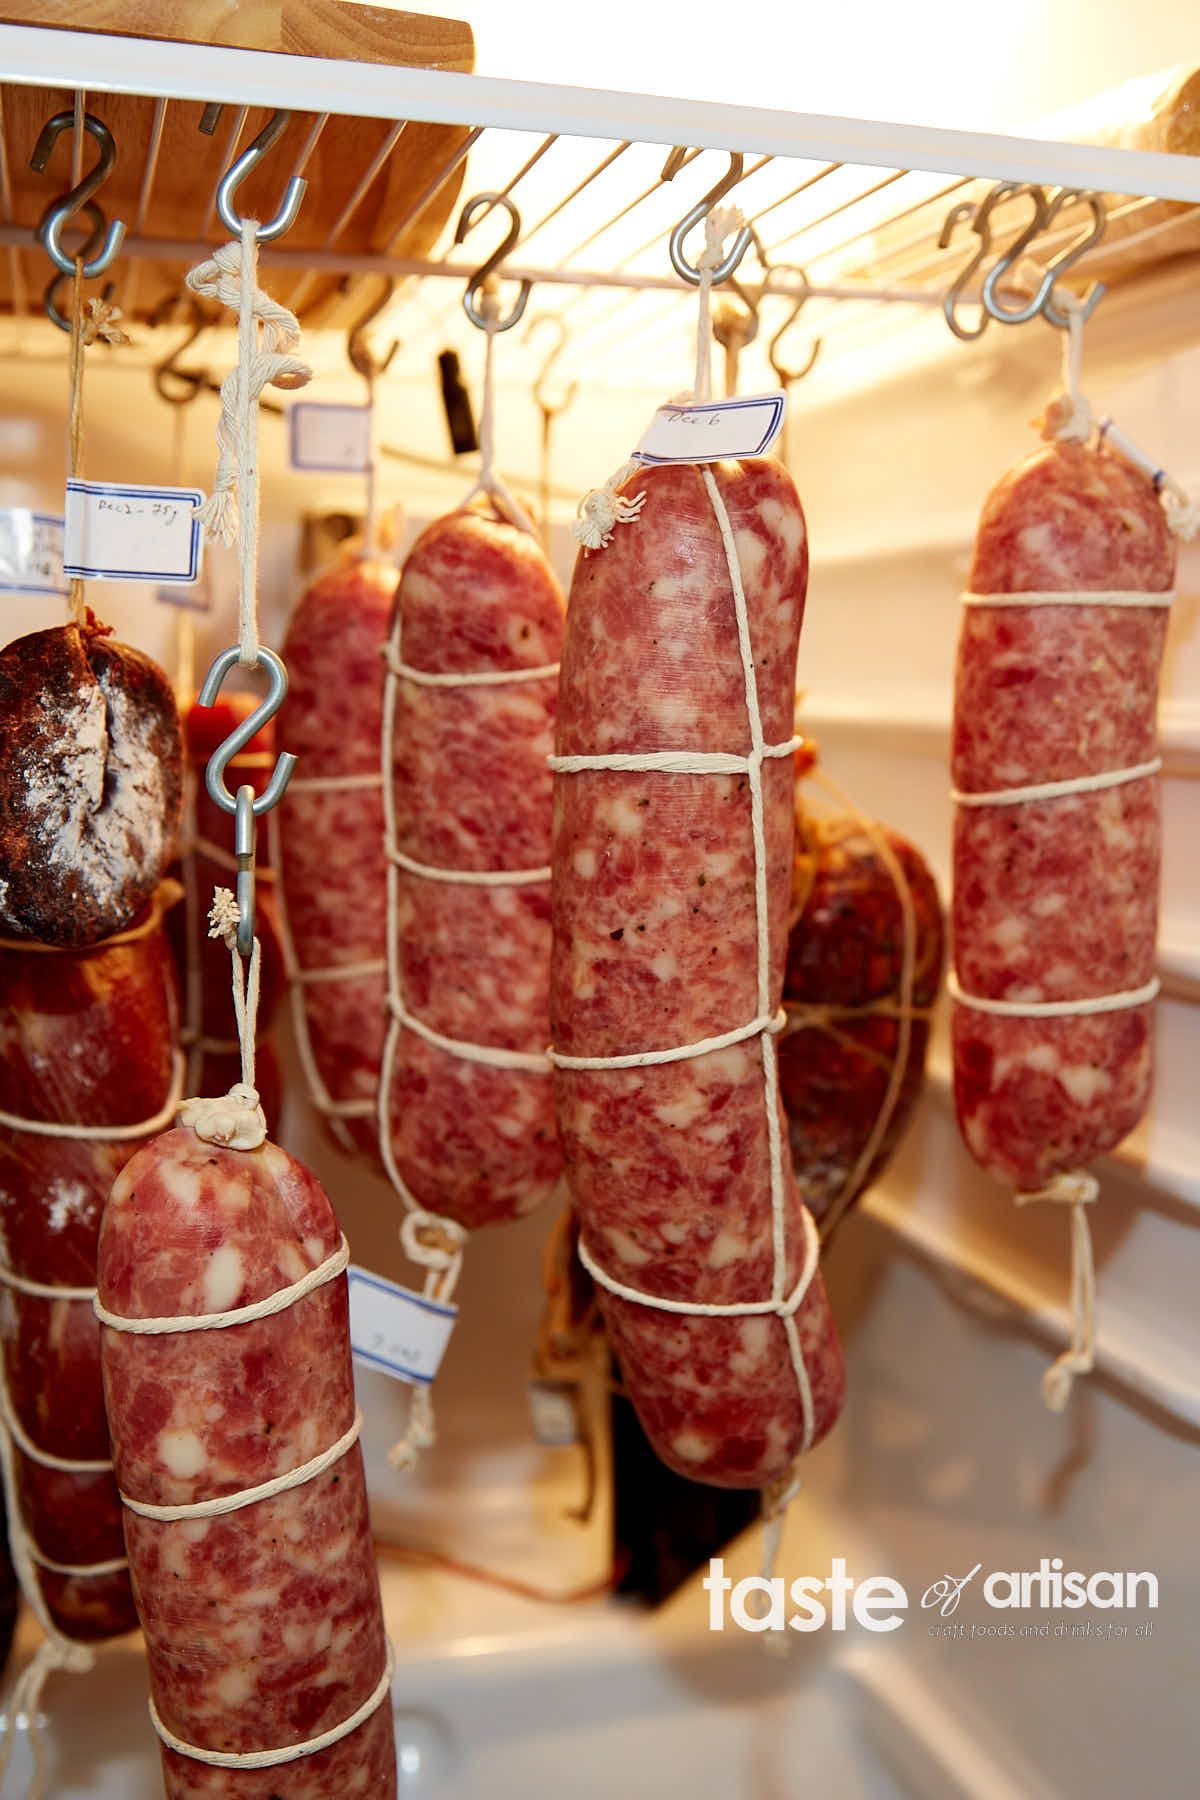
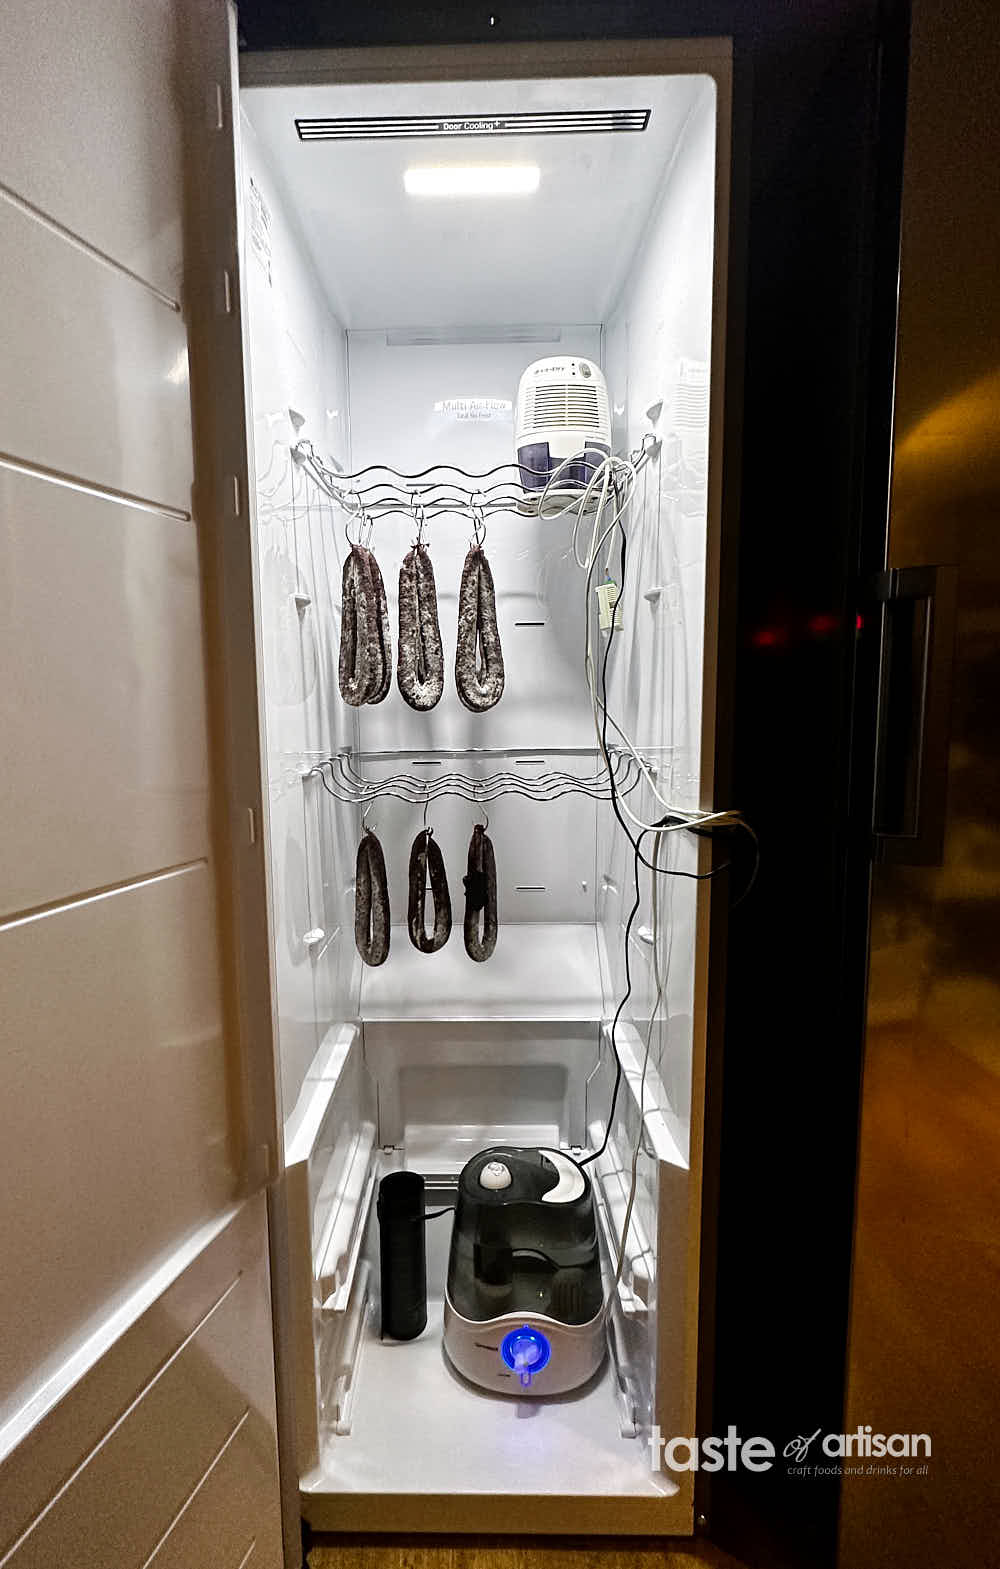
Around that time, my very old fridge died, and I was able to replace it with a practically new one that I picked up for $110 on Craigslist. Below is a picture of my second curing chamber.

The same problems continued, and I was pulling my hair out, figuring out how to bring humidity under control. Specifically, I needed to be able to bring the humidity down. Low humidity was not a problem, as I could use a humidifier to take care of that.
Solutions that did not work
The Internet is full of information and misinformation. Sometimes, the information is correct but does not necessarily apply to your conditions. As a result, you take someone's advice, but it does not work for you. You probably have been through that many times.
One recommendation was to control the humidity in the meat curing chamber with a tray of wet salt. It should provide a perfect 75% RH. That did not work for me at all.
Then, I made a big tray of sodium acetate, which I read about in one of Stanley Marianski's books. This method worked fine, but only for a few days. The acetate would quickly get moist, and I would need to dehydrate it in the oven. It proved to be too much hassle.
I now understand that these methods work well when you have relatively low humidity. When the humidity is high, these methods are ineffective. You'll never know for sure unless you try yourself.
Later, I stumbled upon Marianski's recommendation to use an exhaust fan to get humidity out of the fridge. There are two ways to implement this solution.
- Set up the humidity controller to run the fan when humidity rises above a certain threshold.
- Add a timer to activate the fan at a predetermined time.
I cut two 4" holes in my new fridge, one at the bottom to take air in and one at the top to get the humid air out.
This worked for a short period of time. The humidity would still be fairly high when I would add new sausages but would come down a few days later. Unfortunately, two months later, this system started to struggle. Humidity would not get below 85%, and the fan would be running almost all of the time. A couple of weeks later, I noticed that when the fan would start running, the humidity in the meat curing chamber would increase. What the heck?
During that time, the ambient temperature got noticeably higher. When warmer air with the same or higher relative humidity is introduced into the cooler fridge, it causes internal RH to increase. That's precisely what happened to me. So, this solution works when the ambient temperature is low, or the ambient RH is much lower than the one in the fridge. Otherwise, you will be getting the exact opposite effect.
Now, some have been saying that 85% RH is perfectly fine for curing meats. I can tell you that it's not what my experience has been. Sticky goo and nasty molds would attack my meats at high RH. I also noticed quite a bit of case hardening. That was surprising as you are more likely to get case hardening at low RH.
I kept looking for other methods. Some are using ceramic heater lamps, which are discussed here. This method can be dangerous and, frankly, does not make much sense to me. Why would you want to heat the fridge to make it circulate more often? I also noticed that as soon as the fridge stopped running, the RH would shoot back up within 20 seconds. Somehow, the moisture needs to be removed. That seemed like a more practical solution for lowering RH inside the curing chamber.
The solution that worked
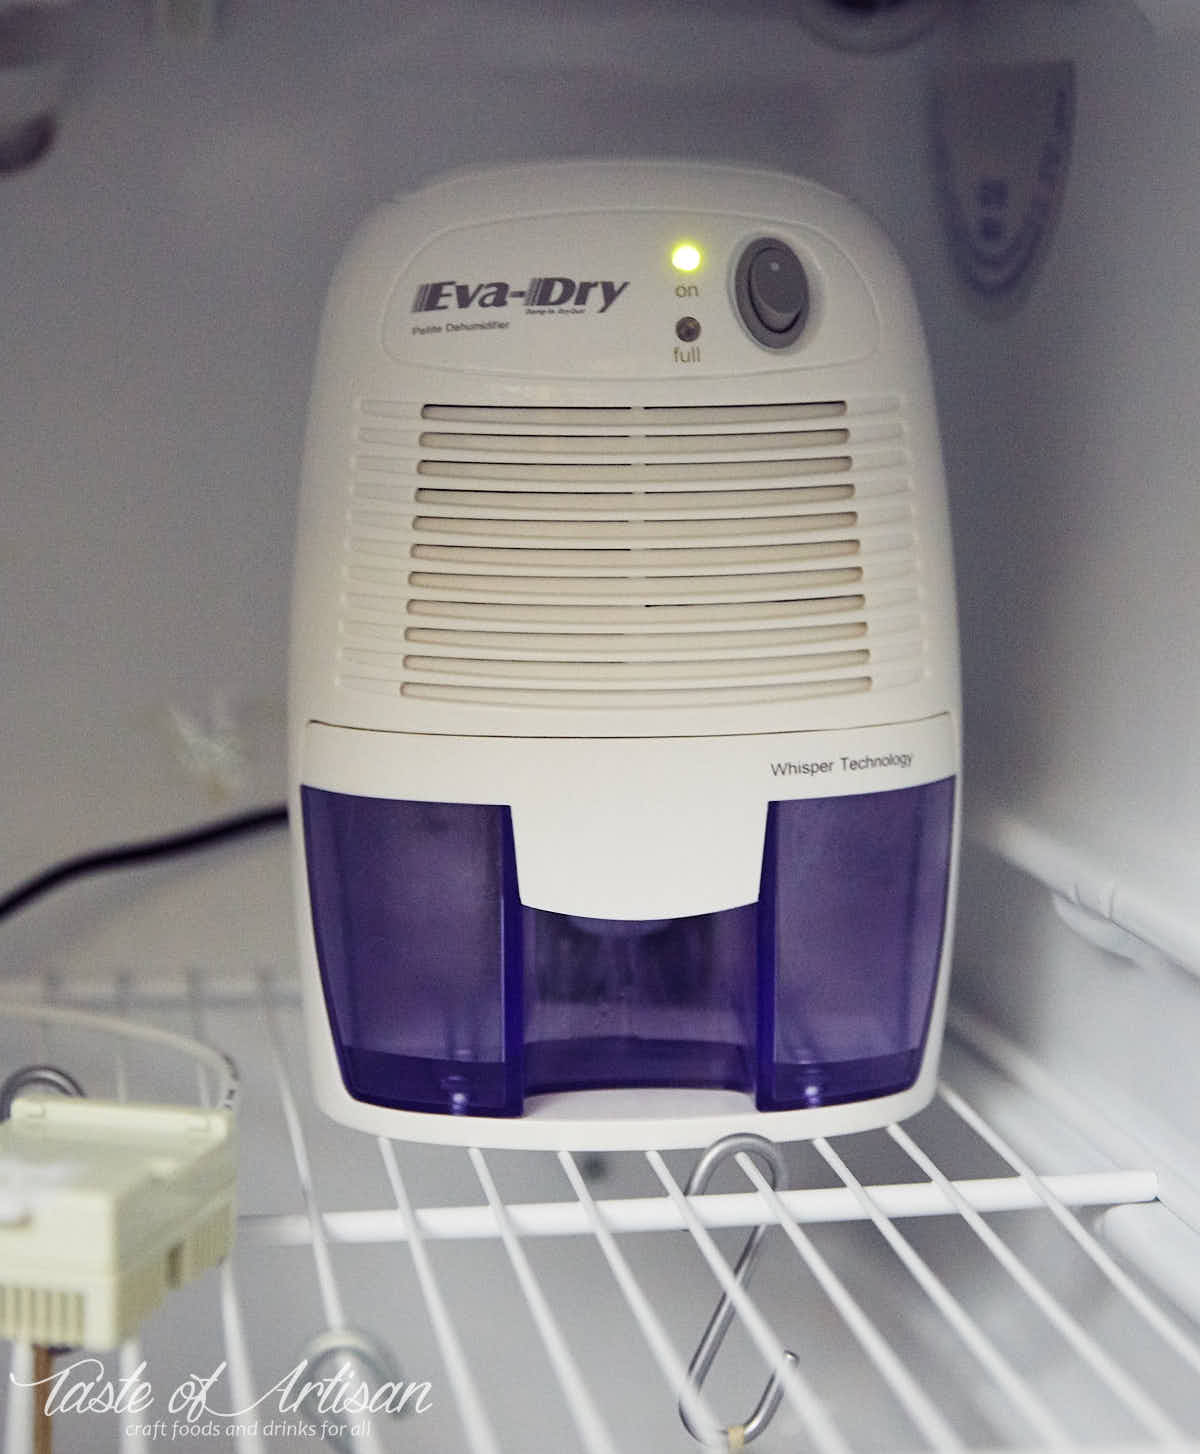
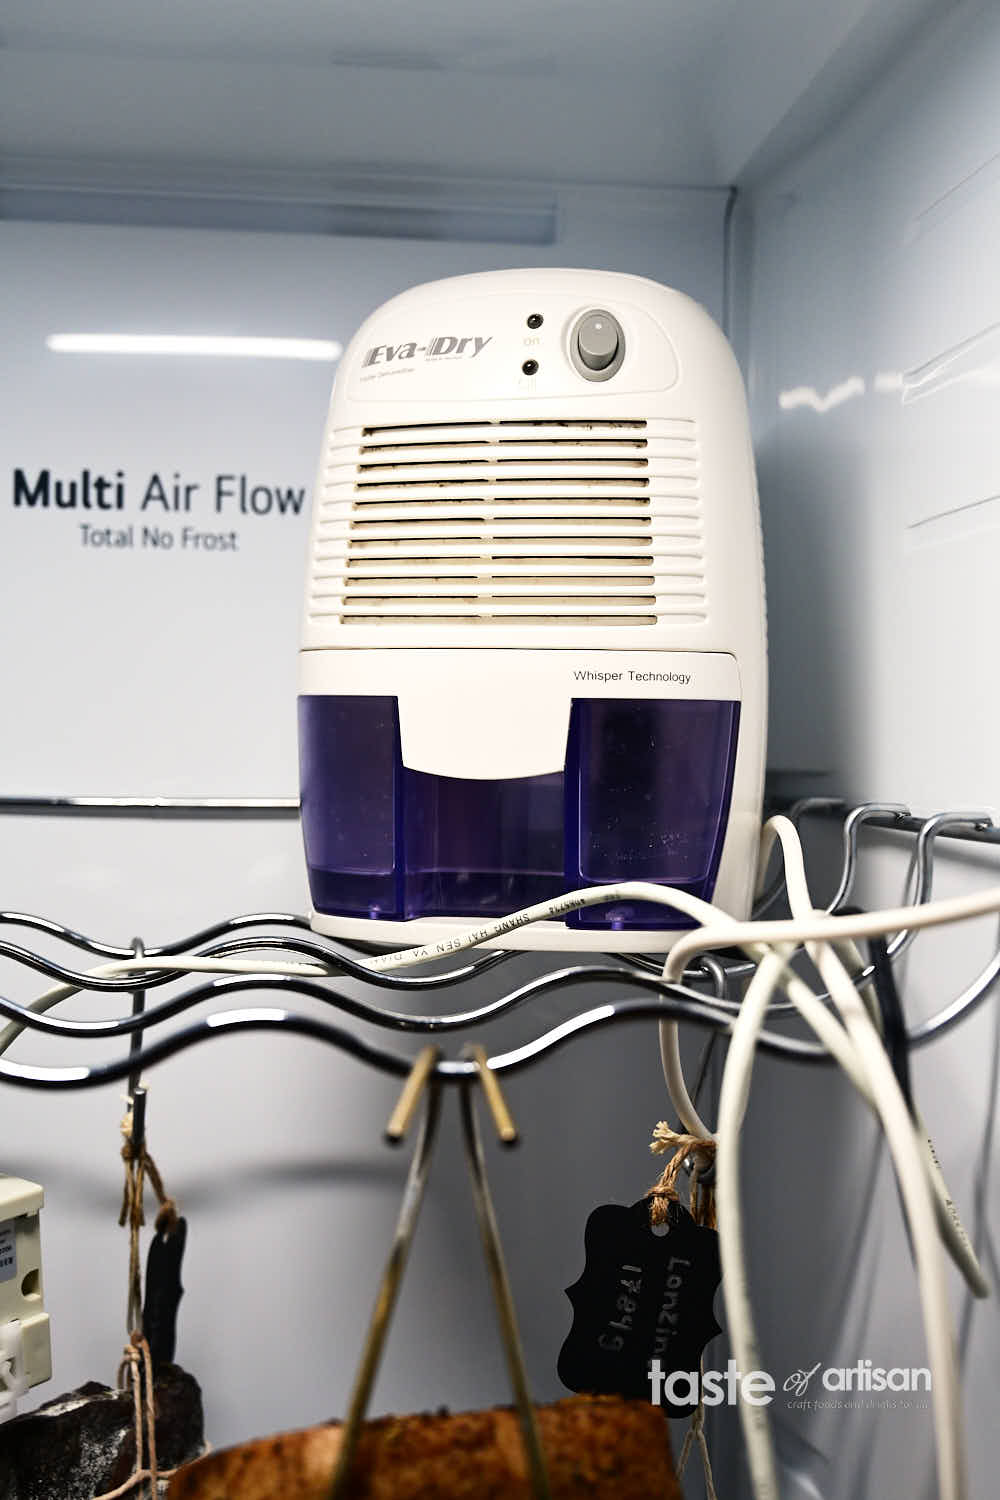
This all led me to look into installing a dehumidifier in the meat curing chamber. I thought that maybe that would be the solution. Any small-size dehumidifiers I was able to find were using Peltier technology. I've seen numerous posts on various forums stating that these types of dehumidifiers don't work at curing chamber temperatures. Darn!
Luckily, one person on Reddit forums reported using one of these dehumidifiers with great results. I took the plunge and bought the Eva-dry Edv-1100 Dehumidifier, and I am glad I did. It worked, and it worked exceptionally well. It's still going strong after ten years of use, by the way.
This is a smaller version of the one that the poster from Reddit had, but it worked just as well, from my experience. Another benefit of the dehumidifier was that it provided some air movement when it was on.
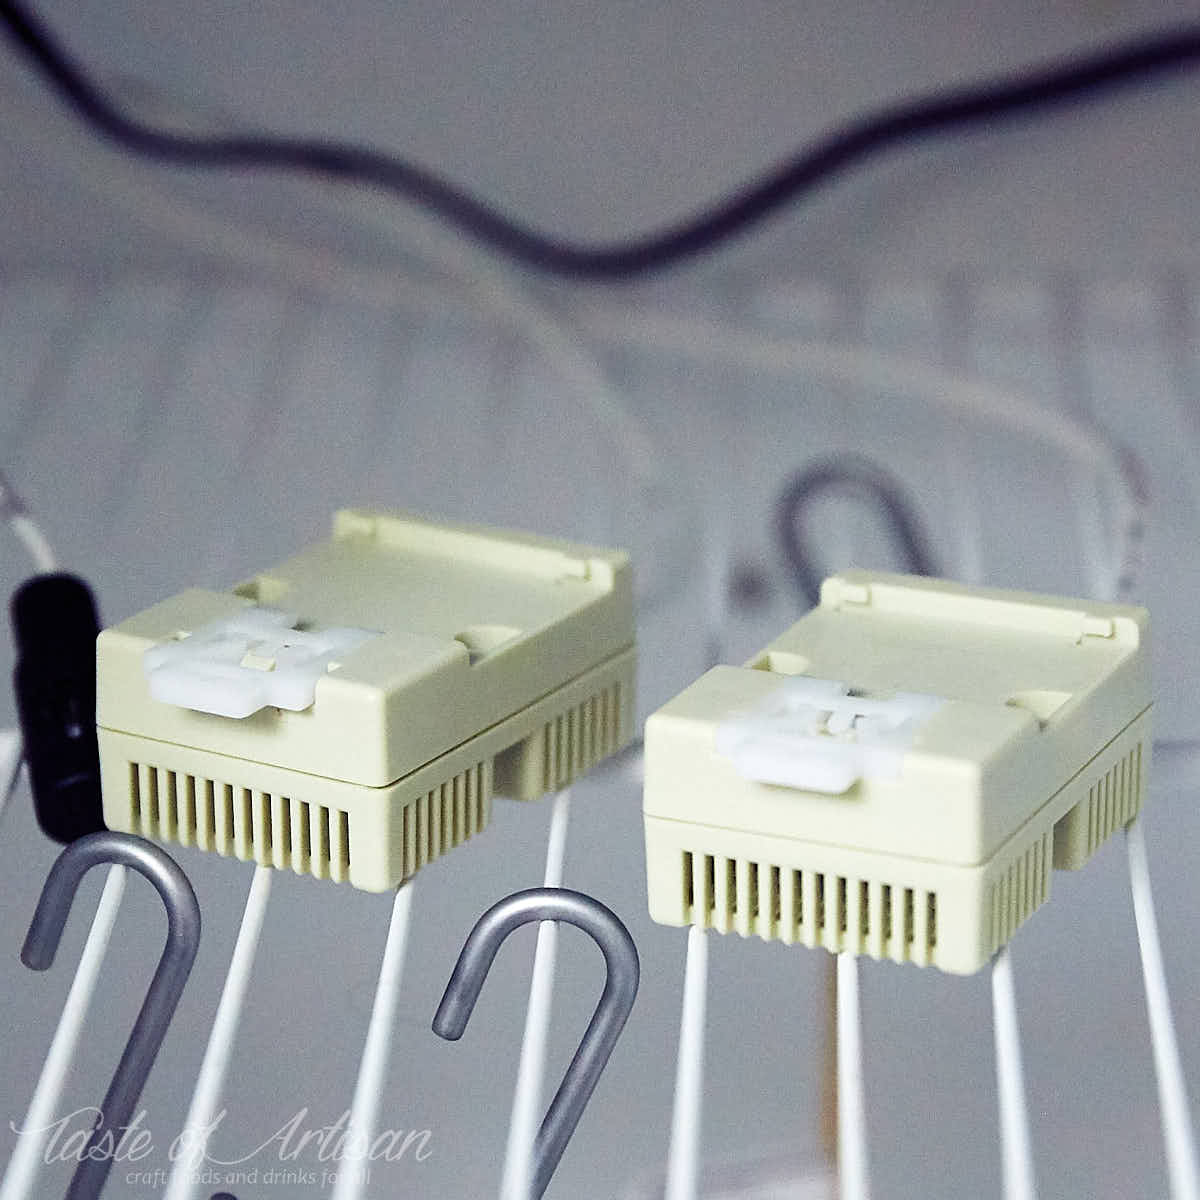
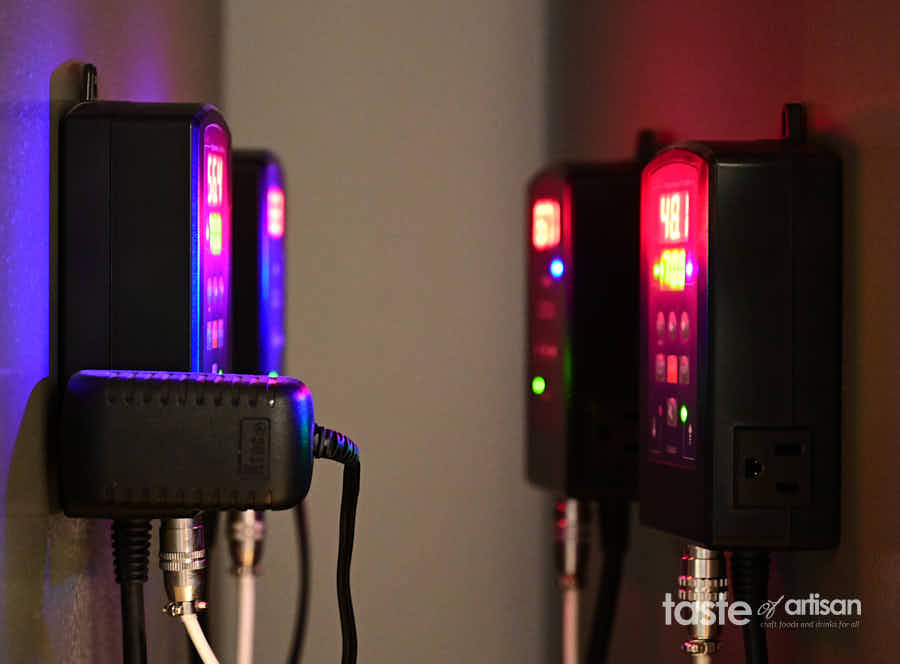
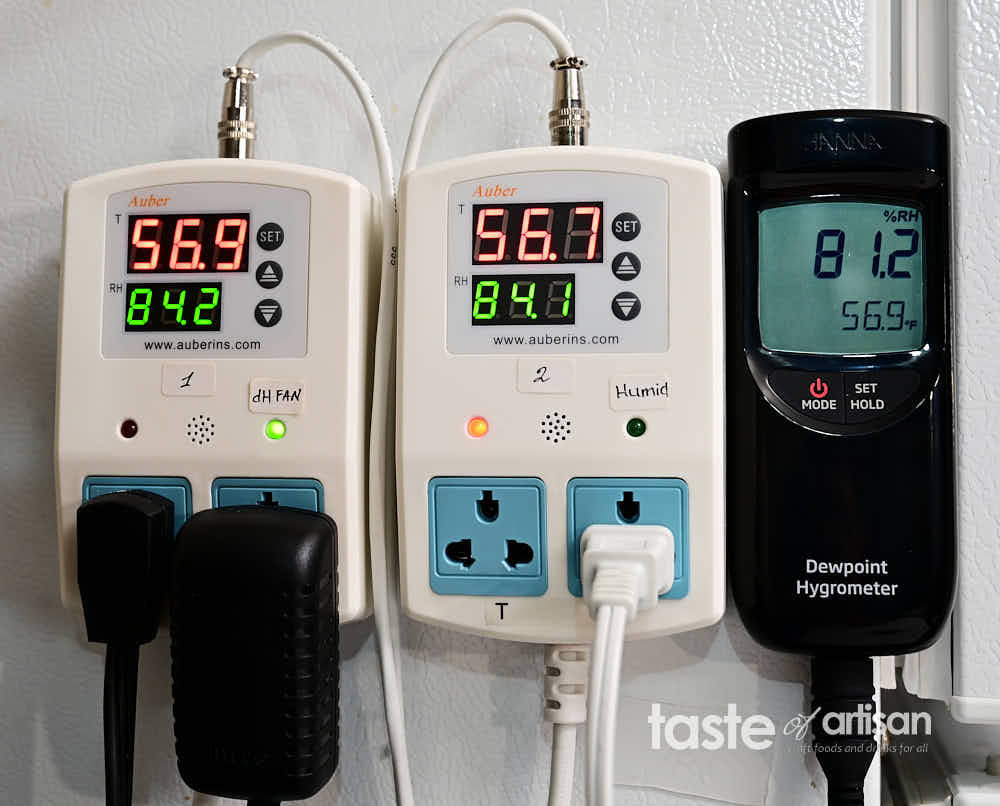
I replaced my less-than-stellar analog controller with the Auber TH210 Temperature and Humidity Controller for more precise temperature control.
This controller also controlled the Optimus Cool Mist Ultrasonic Humidifier in my setup. Later, I added another one to control the Eva-dry Edv-1100 Dehumidifier. I also had an exhaust fan plugged in, but I quickly stopped using it as I realized I didn't need it. I took two pictures as the numbers on the controller flickered when I took the shot.
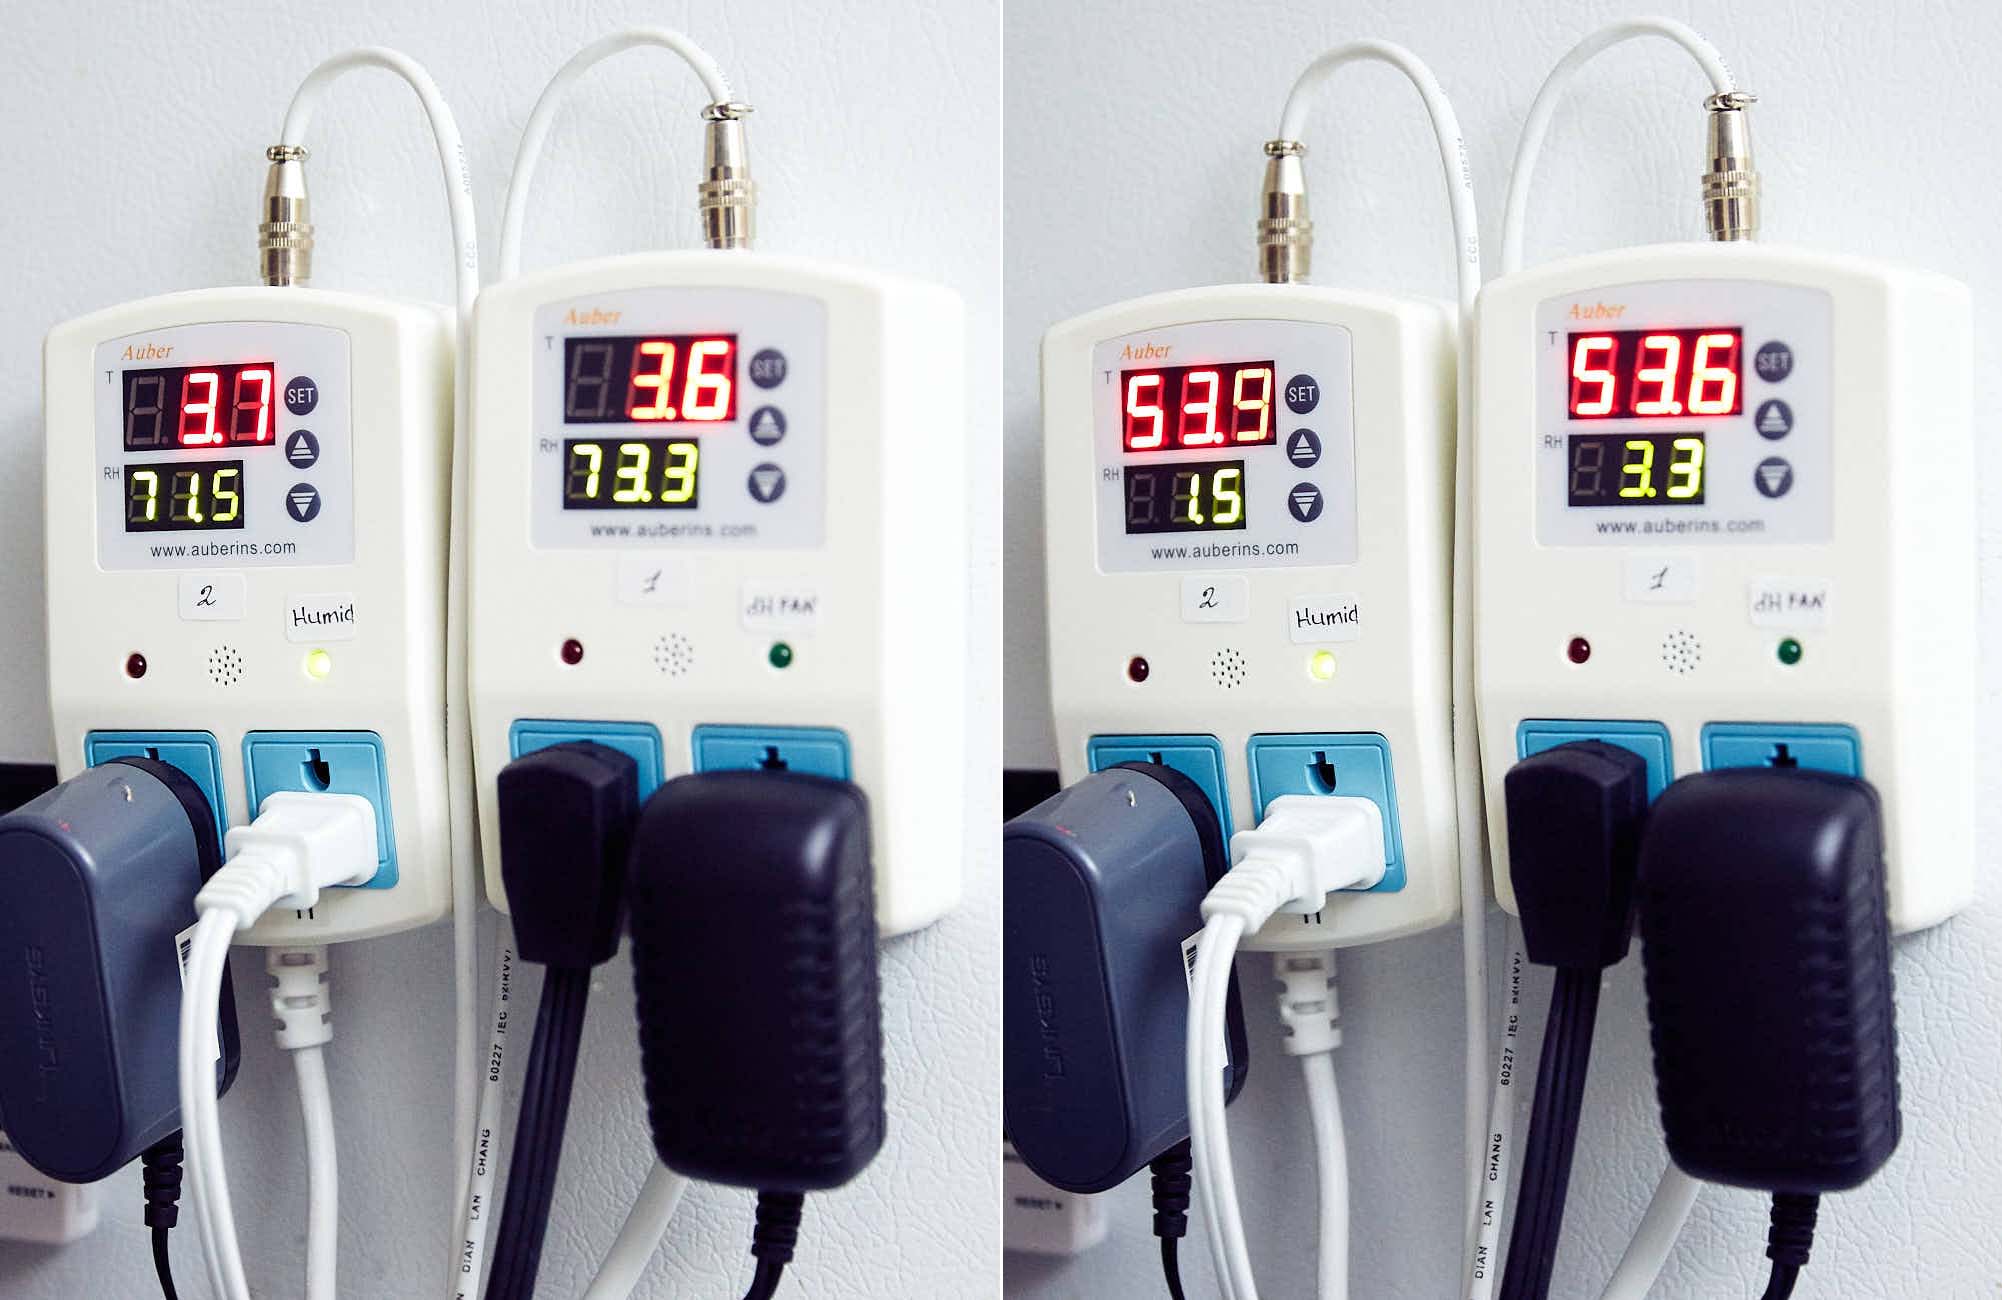
There were slight differences in the temperatures and RH reported between the two. I think it was the result of sensor placement and air movement. I could especially notice the difference when the fridge was circulating and cold air was blowing inside the fridge. When there was no air movement inside the fridge, they had almost identical readings.
The way this setup worked was one controller was set up to start the humidifier when RH dropped below 72%. Because of a slight lag, the RH drops to about 70% before the humidifier is able to start bringing it back up. Still, this was sufficiently fast.
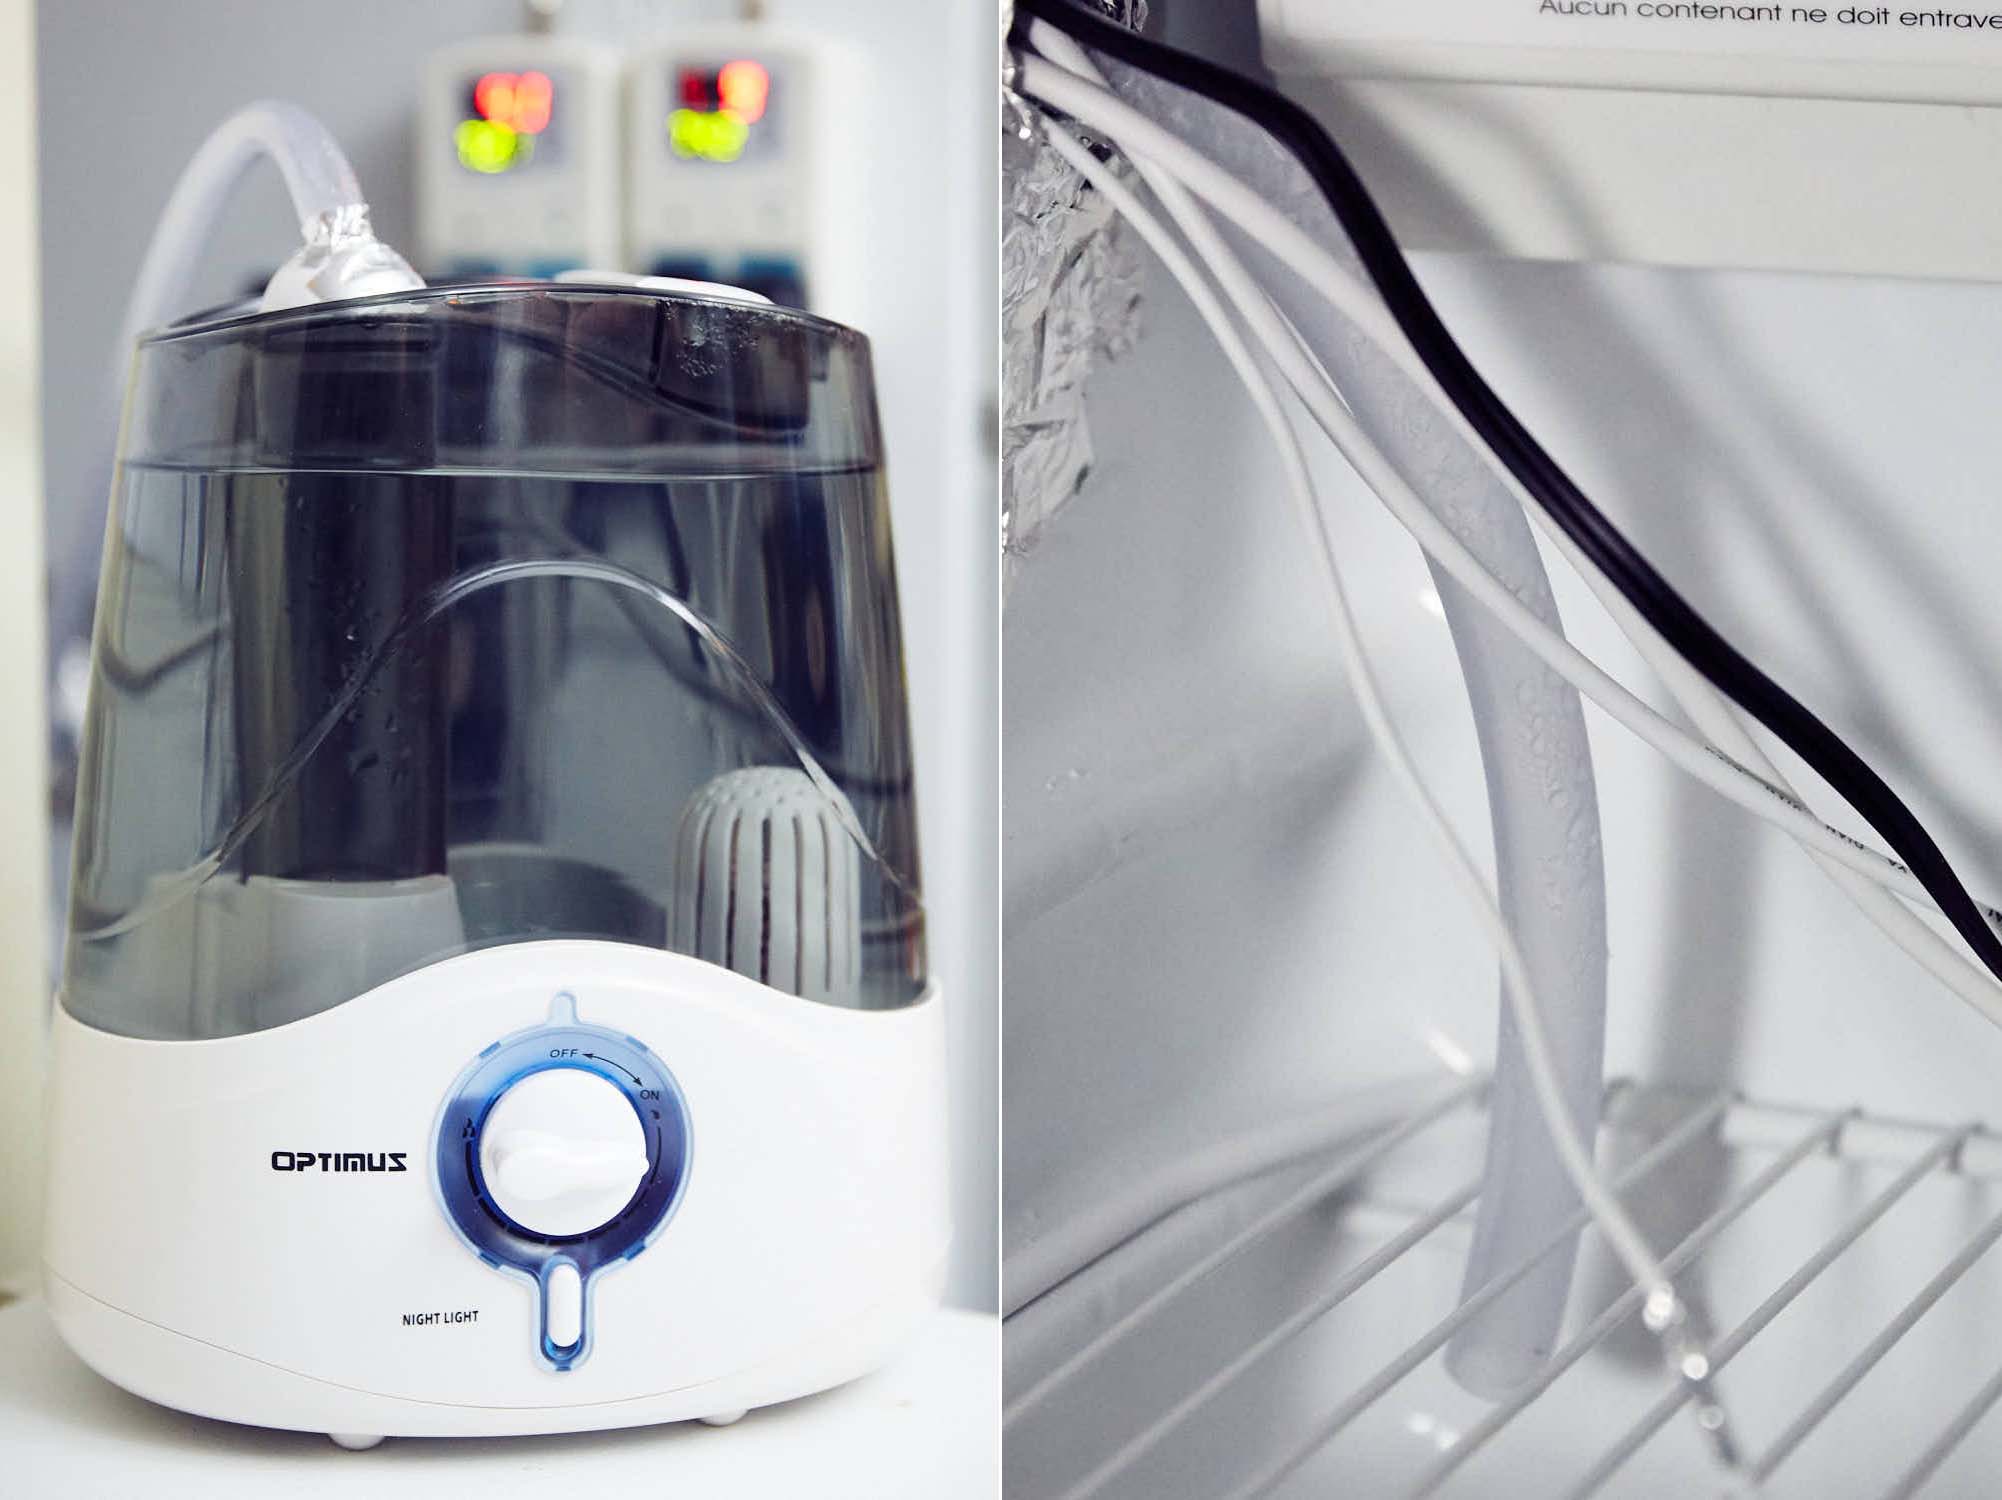
You may have noticed that I moved the humidifier outside the fridge in the new setup. The reason behind this was that it was easier to control humidity in larger spaces. The humidifier was pretty bulky and took up a lot of space, so it made sense to move it out.
The other controller controlled the dehumidifier and kicked in when the humidity went above 78%. Again, due to a lag, the RH briefly would go up to about 80-81% before it was brought back down below 78%. The average was about 75% RH, which is precisely where I want it to be. I could tighten the range down to a 1/10th of a degree, but that was not necessary. I didn't want the humidifier and dehumidifier to start competing with each other in a vicious cycle.
Like I said, I felt like I was in charcuterie heaven.
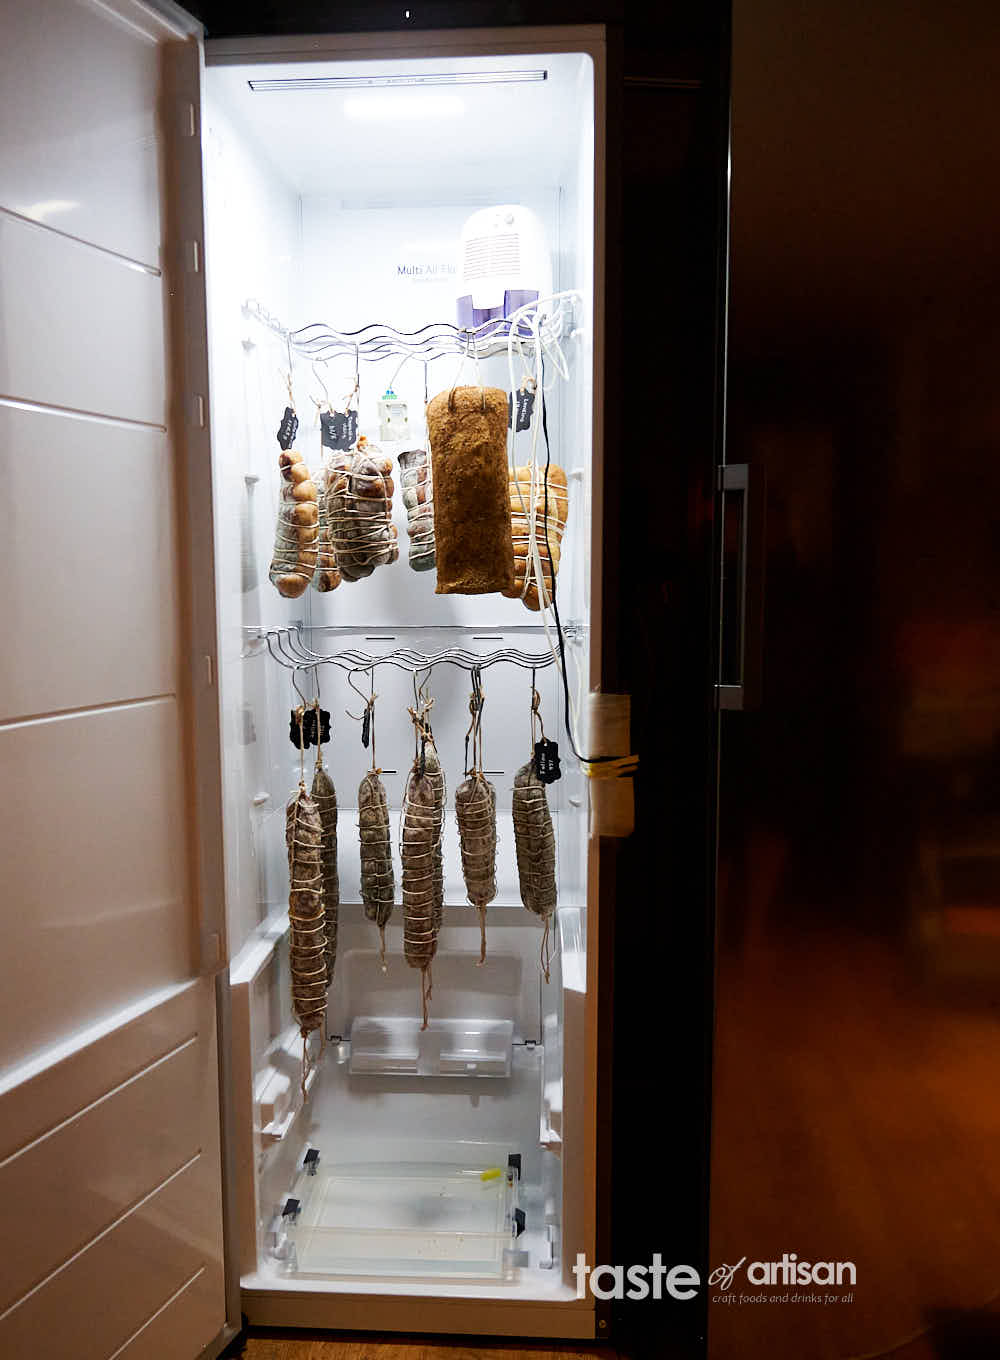
Fast forward to today. I've learned a lot over the years. Charcuterie is my passion, and I still make cured meats on a very regular basis. My curing chamber looks quite different from what it looked ten years ago, but the idea is pretty much the same. Even the dehumidifier is still the same.
My updated curing chamber setup (as of 2023)
One of the most asked questions I've been getting over the past couple of years is what my current curing chamber looks like. I apologize for the delay; I should have done this well over a year ago. You know how it is; things constantly get in the way. I also had some challenges running electrical wiring to where I needed it. My setup is still evolving, but I've come to realize that it is a part of this hobby. I will constantly be modifying and improving it. For now, here it is, with all the details that will help you build your own fantastic curing chamber. I think I am 97% there.
The architecture of my new meat curing chamber setup
If you do a good amount of meat curing at home, you've no doubt run into a problem where you need to do fermentation/drying for a new batch while your curing chamber is occupied. I've had this happen to me so many times that I got really tired of it. And I got tired of fermenting my meats in make-shift fermentation 'chambers,' such as coolers, bathrooms, in front of a fireplace, etc. They kind of work but not very reliably and have limitations. Besides, seeing sausage hanging in your bathroom is odd, to say the least.
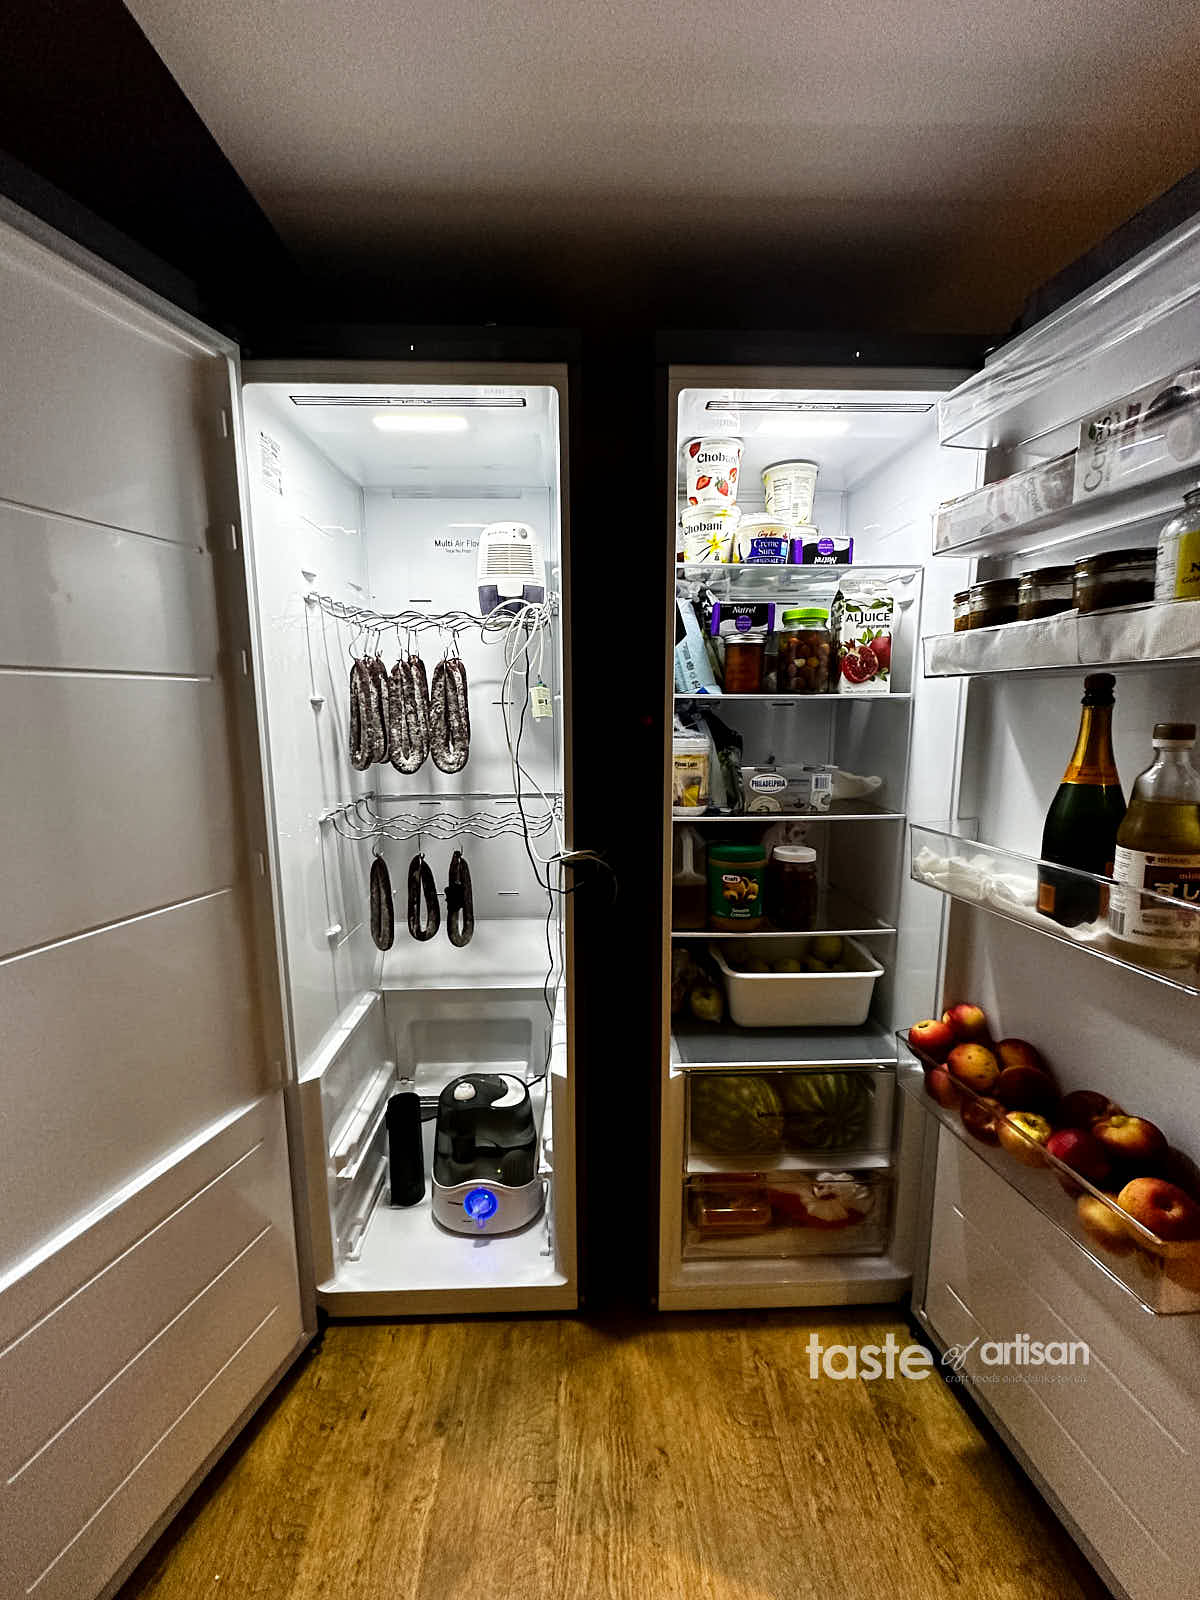
So, I decided that a dual-chamber setup was what I needed. I was not wrong. I am truly in heaven now. With this setup, I can ferment new batches at their own pace, temperature, and humidity in one chamber while older batches are maturing in the other chamber, undisturbed.
Another thing that is cool about the new architecture is that it's multipurpose. I can use one of both fridges as a curing chamber, fermentation chamber, or plain fridge. My wife is particularly happy about that. There are no holes in the walls of the fridges, and the switch-over literally takes less than half an hour.
Below is the diagram of how all the curing chamber components interconnect with each other, something some of you have asked me to do.
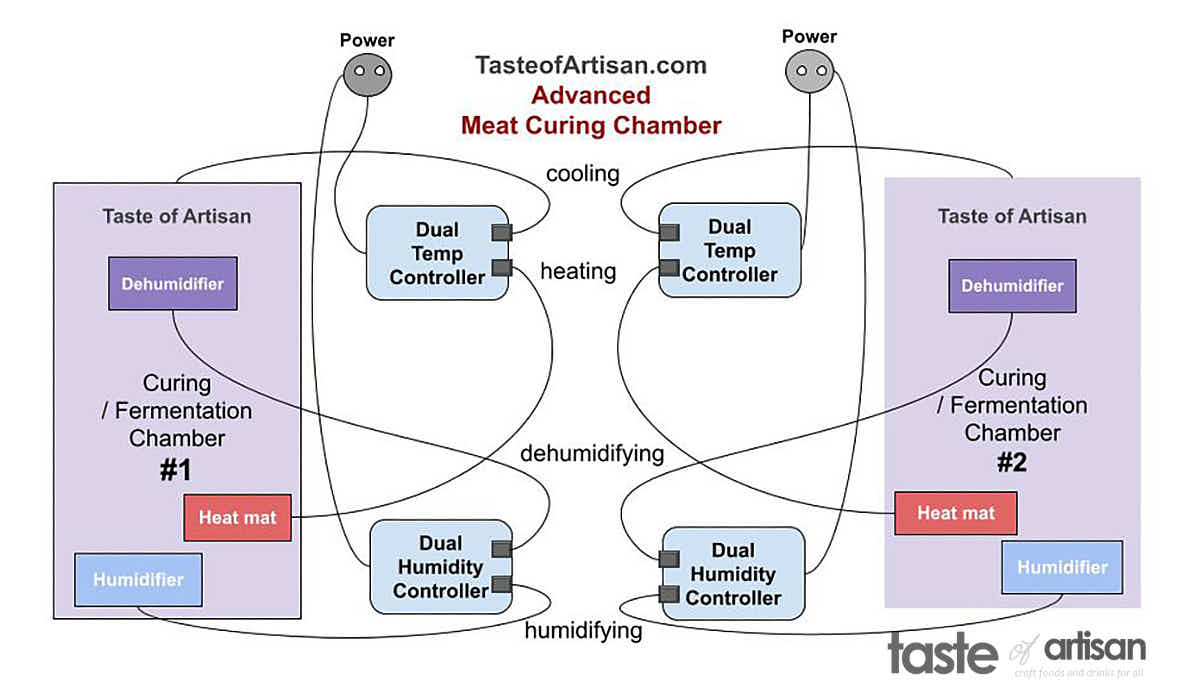
The fridges
I had a hard requirement to make the new meat curing setup look nice. That meant that I needed identical fridges. My other hard requirement was to use only freezer-less fridges. Over the many years of curing meats, I've learned that more space inside a curing chamber means better and easier humidity control and more space for meat. I settled on LG LRONC1404V fridges, which are freezer-less, spacious, and have been doing a great job as curing chambers.
Humidity & temperature controllers
I am still using Auber Instruments temperature and humidity controllers. The fridge on the right in the picture above uses the newer AW-HD330 (humidity) and AW-TD130 (temperature) wireless controllers, while the fridge on the left uses the older model HD220-W (humidity) and TD120-W (temperature) wireless controllers.
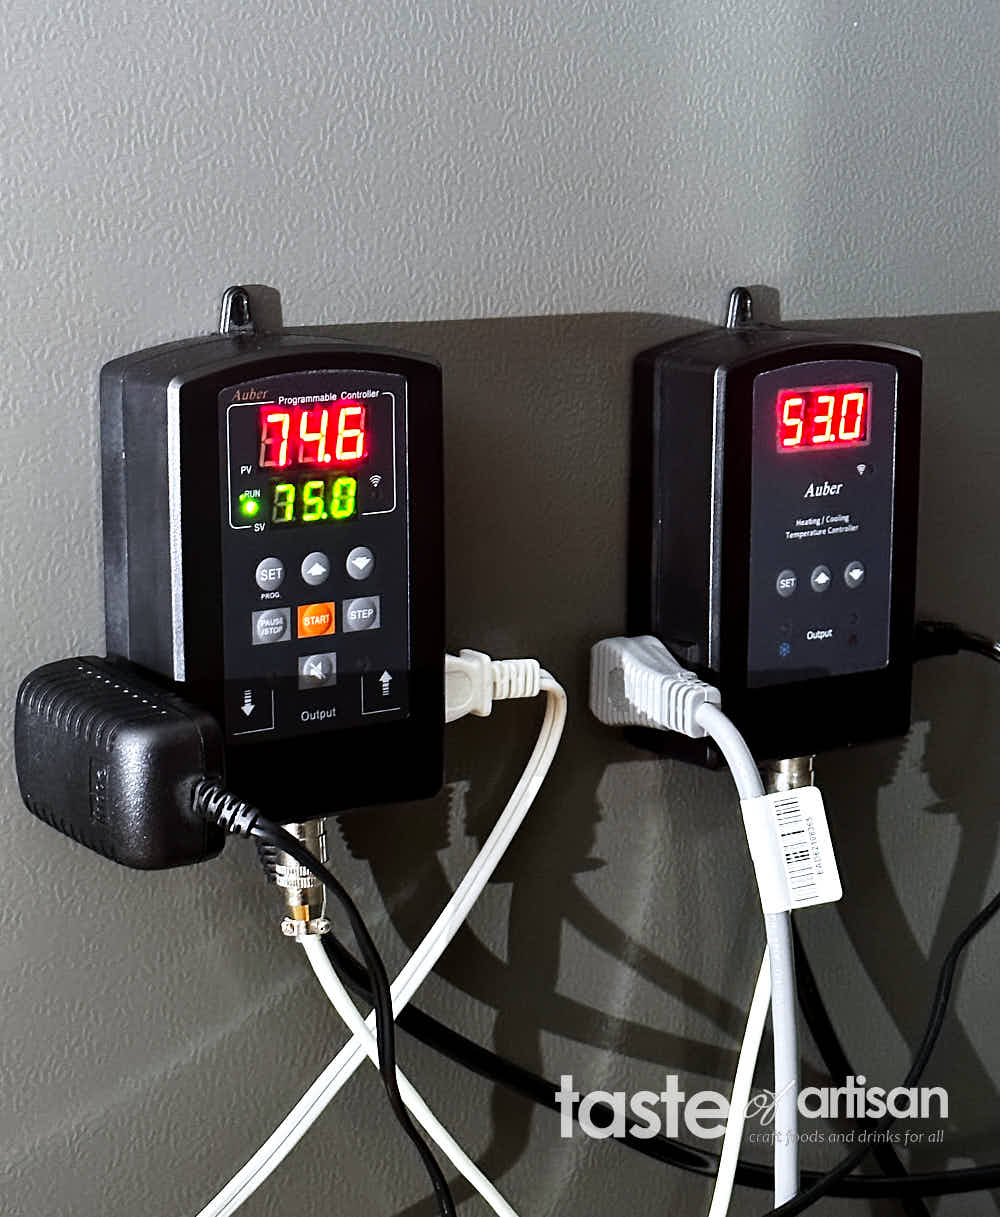
The controllers are attached to the sides of the fridges using 3M VHB Tape 4910 1" double-sided tape, which holds them very securely. Also, these Auber controllers have very short power cords, so I had to add 6' heavy-duty 15-amp extension cords.
Additional thoughts on controllers
I thought I'd elaborate a little on controllers. The most obvious and popular choices are Auber Instruments and InkBird (Humidity Controller IHC-200-WIFI and Temperature Controller ITC-308-WIFI). Both are popular, WiFi-enabled, feature-rich, and both do the job.
Back in 2020, I tested both brands, see my Best Controllers for a Meat Curing Chamber post, and found that, at that time, Auber controllers seemed to be optimized for the curing temperatures of around 55F, while Inkbird seemed to be more accurate at higher temps and vice versa. Both Auber and Inkbird humidity controllers were not perfect and need to be calibrated. The deviations that they showed were significant enough to have a noticeable impact on curing results.
If you calibrate them at 55F, will they still be accurate at 70F-80F during fermentation? This is where a reference hygrometer like Hanna HI9565, discussed below, becomes useful.
Dehumidifiers
I've been using Eva-Dry peltier dehumidifiers for the past eight years or so, and they proved to be working well, without breaking, and doing exactly what they are supposed to. I started with one and added another dehumidifier later as I needed it for my make-shift fermentation chambers. Now, it sits in the new curing/fermentation fridge when needed. These dehumidifiers, the specific model and look, haven't been sold under the Eva-Dry brand for many years, but you can buy them under different names/brands. It's the same dehumidifier. Eva-Dry now has new restyled models, EDV-1200 (similar size to mine) and a twice as large EDV 2500, but I have not tested them yet.
Humidifiers
Of all the parts in my meat curing chamber setup, a humidifier has been the least important one. I can cure anything without a humidifier. In fact, I've been doing exactly that for the past two years or so. Meat constantly releases water during the fermentation, drying, and maturing phases. There is plenty of humidity in the curing chamber at any given time except for a brief time when the fridge cycles, after which it quickly recovers.
In my setup, the only time I want to add humidity is when the meat is quite dry and doesn't release water. That's when I turn on the humidifier. The humidifier that I bought in 2013, 10 years ago, and am still using, is the Optimus U-31001 1.5-Gallon Cool Mist Ultrasonic Humidifier.
Alternatively, I simply place a tray of water to provide a little bit of humidity, and it works reasonably well for me.
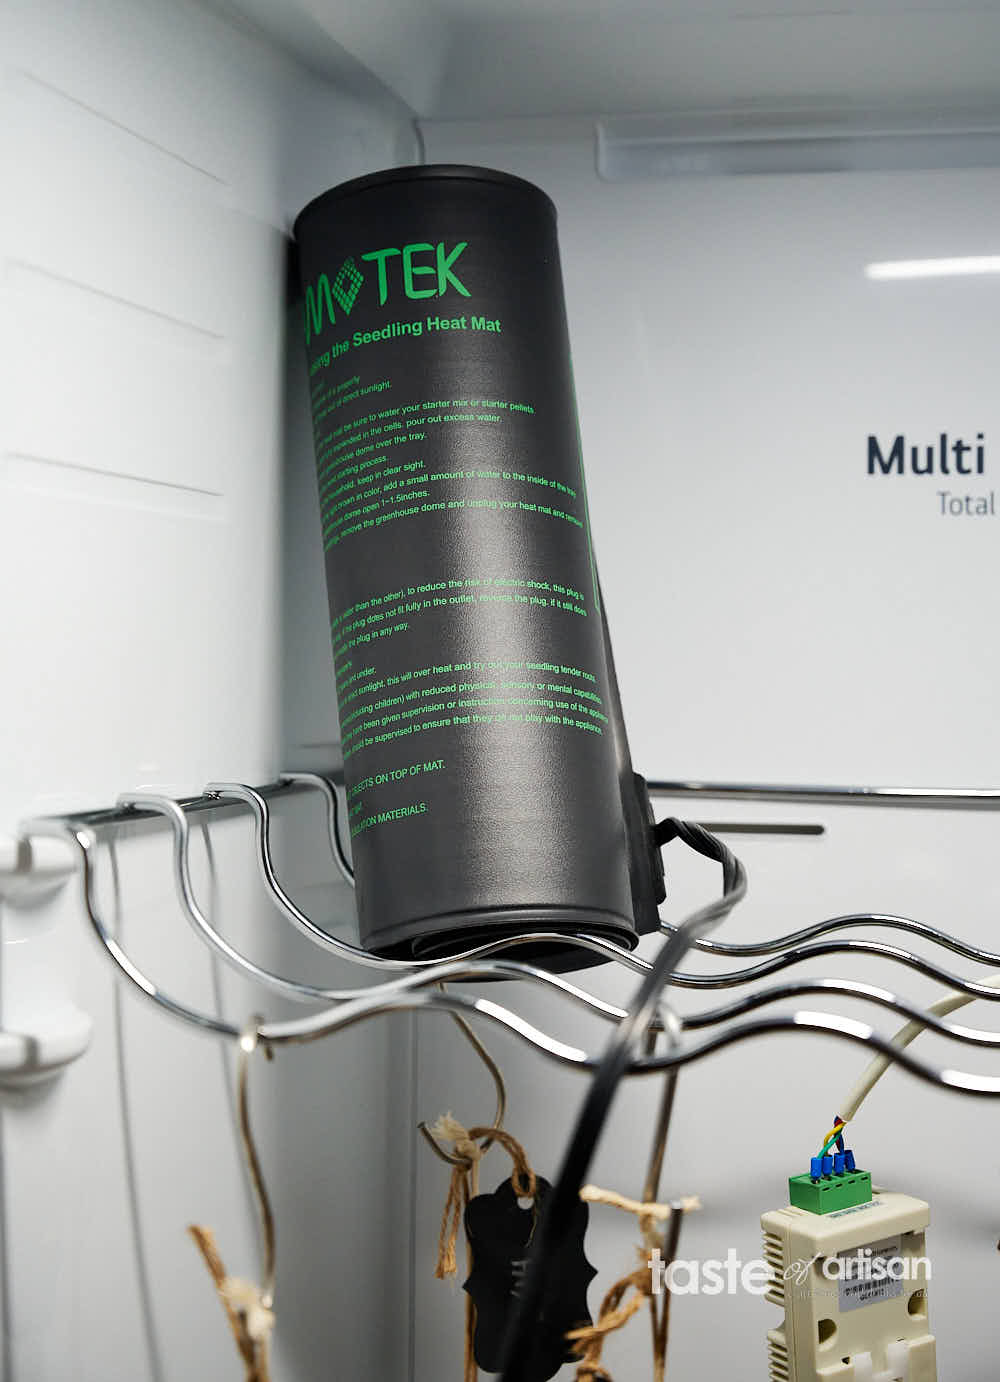
Heater
Since I use my new curing fridge(s) for fermentation, I need a reliable but safe source of heat. After testing a number of heat sources over the years, I've come to really like 10"x 20.75" seedling heat mats. These work exceptionally well in my fridges, and I feel safe using them as they don't get hot and are reasonably waterproof. I have several of them. Every time I buy them, they seem to be sold under a different brand name, but they are exactly the same.
Reference Hygrometer
This piece of equipment is optional but very useful if you want to keep your temperature and humidity controllers perfectly calibrated and accurate. It's Hanna Instruments reference Thermohygrometer HI9565, shown on the right in the picture below, next to my old Auber controllers. I've been using it for many years, and I find it quite useful as I like precision.
Airflow and ventilation
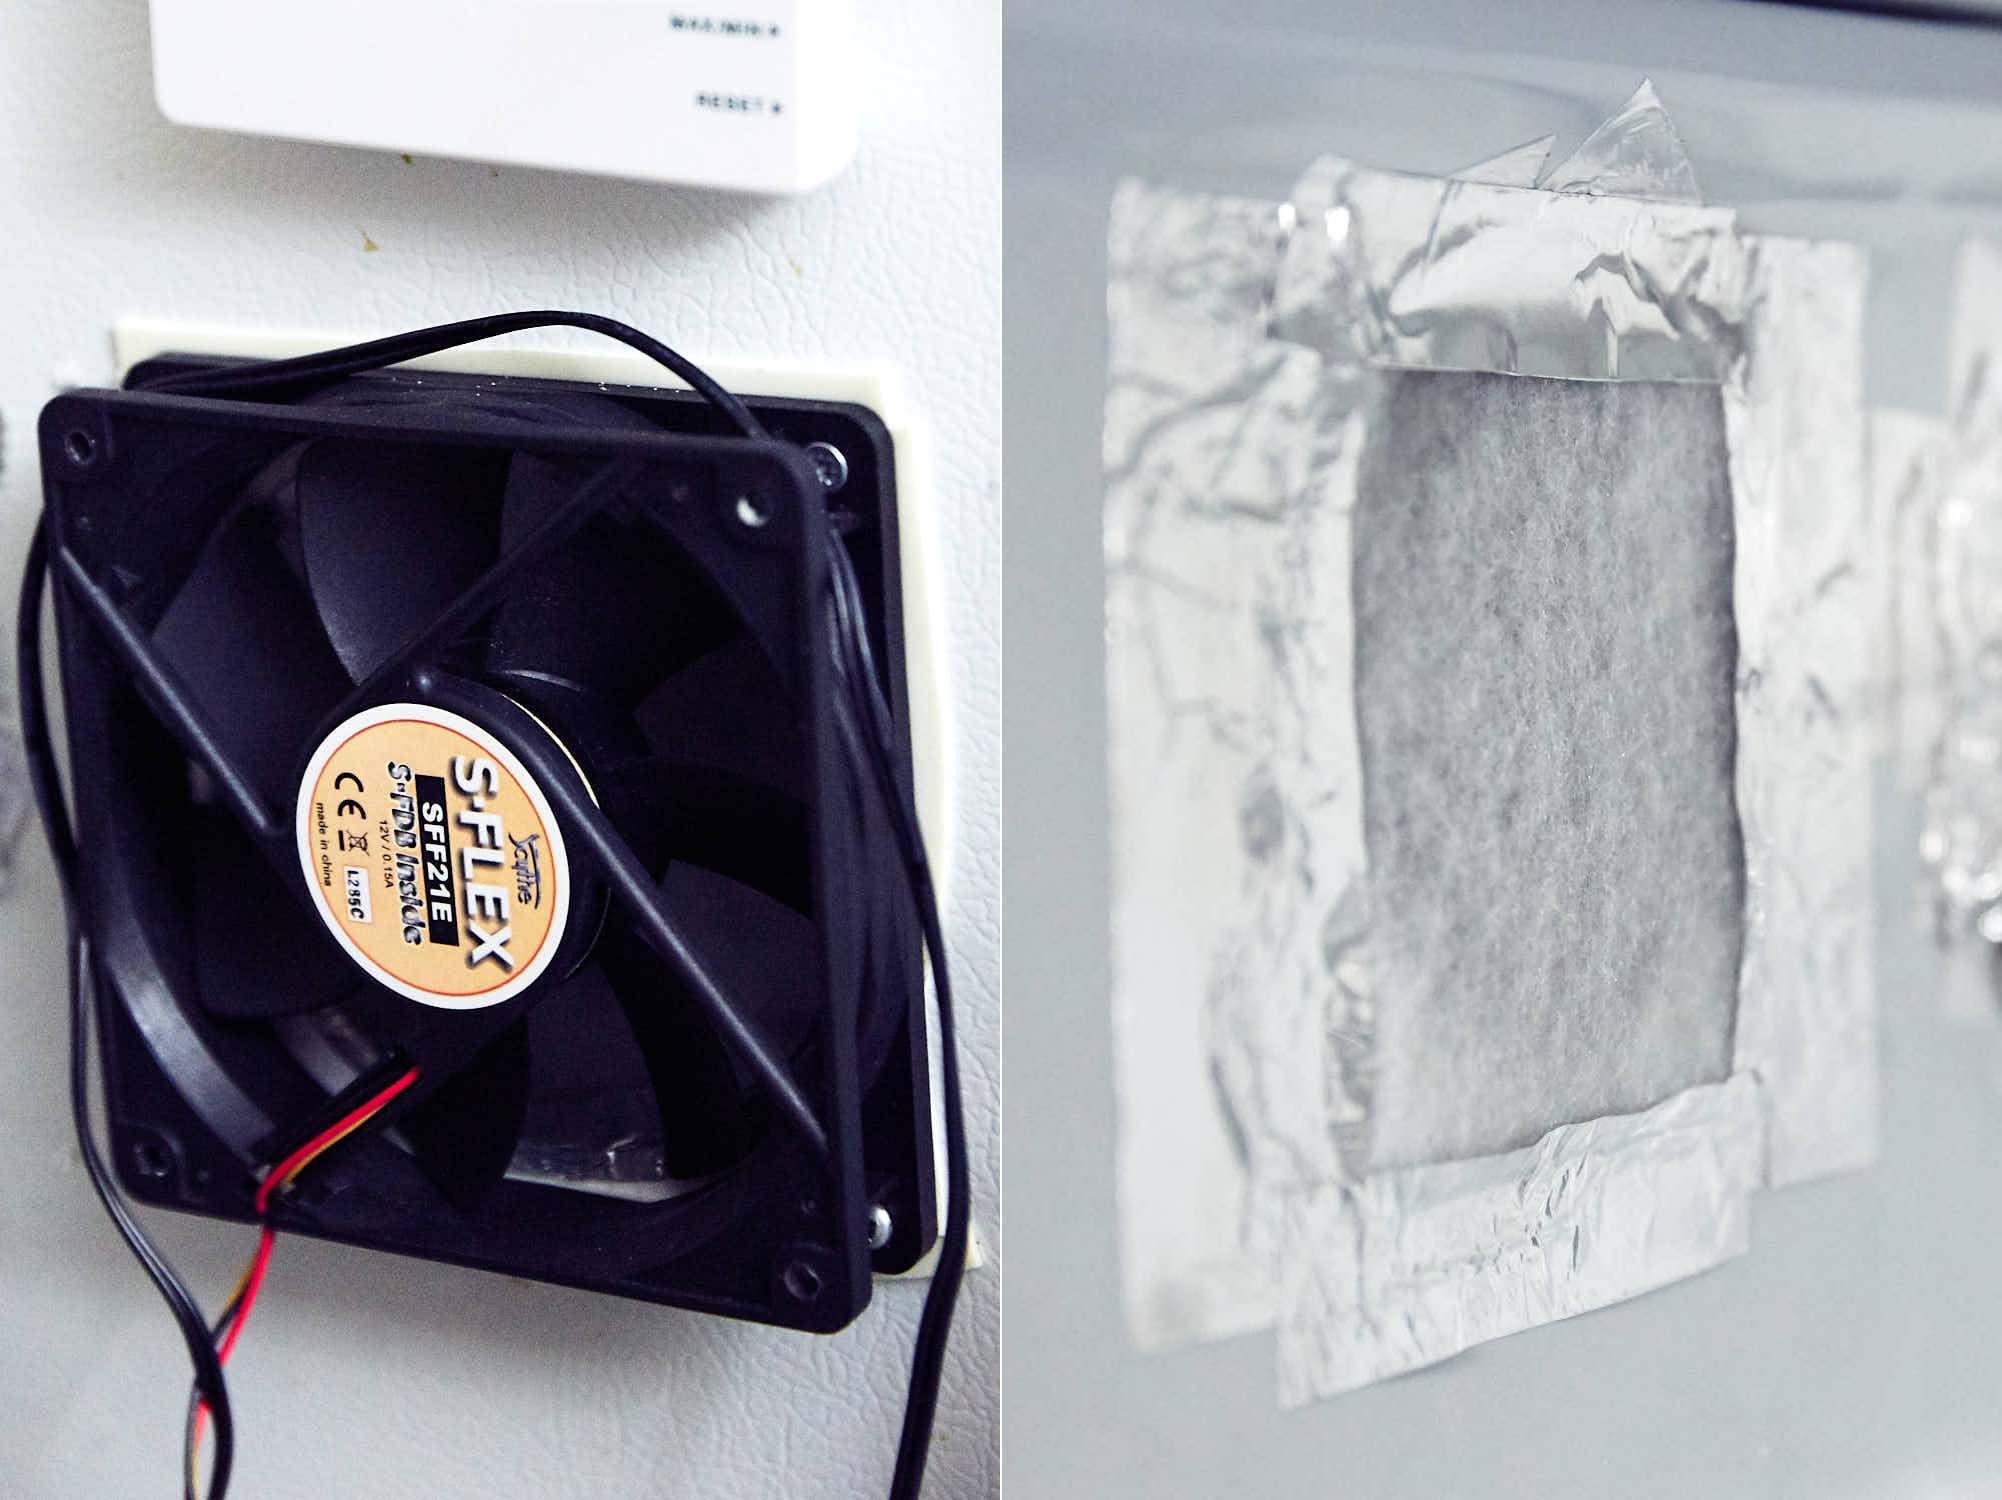
Since I am not making any holes in my fridge, the question is, what about airflow, letting fresh air in, etc.? Airflow is important. In my old curing fridges, I had exhaust fans and an internal fan to blow the air around. Quickly, I realized that it caused more harm than good. My results have been much better without them. The dehumidifier turns on frequently, especially during the initial stages, and provides enough air circulation from its built-in fan. Additionally, when a fridge circulates, it brings in ambient air (which is cooled down first) and pushes out some of the stale air from the fridge. I find that this is sufficient to make excellent cured meat.
Helpful Relevant Resources
Green Mold on Salami - Good or Bad?

Barney says
Success!
G’day Victor,
I think we figured it out. It was the original InkBird (IB) hygrometer that was the issue as the other two hygrometers I used, whilst having small variations between them, they were both significantly lower than the original through. Over the last couple of weeks they averaged readings of around 70-78%, whereas the IB was a good 10-15% higher.
I pulled the salamis out on the weekend, and for a first attempt, I’m pretty bloody happy with them. I’ll try to attach a couple of photos on here. I had them spread over three levels in the fridge, and with my setup I found the highest shelf, closest to the de-humidifiers, they lost between 43-45%, the middle level lost 37-39%, and the two single salamis at the very bottom lost 48%. Not sure if that’s because there were only two of them on that shelf, or because they were closest to where the fridge air comes in. Given the temps in there it was rare for the fridge compressor to kick in. I kind of don’t mind how it worked out as it allows us to try them at those different stages of drying so we’ll be able to figure out which we like most.
I have one last question here. If using natural casings, as I have this time, do you need to skin them before vac packing them, or could I have just wiped them down with a water-vinegar solution, or wine as some recommend?
Notice I said “last question here”, that’s because I’ve got a few more based on other recipes you have on here that I’m attempting next. I’m tacking the pancetta, capicola, and two big salamis next. I was thinking the Tuscan and Calabrese.
Thanks again for your direct advice, as well as the advice and instructions on the website. It’s top notch.
Cheers,
Barney
Victor @ Taste of Artisan says
Hi Barney, glad to hear about your success! I am not surprised, these relatively cheap hygrometers can be unreliable. I tested many of them and not a single one has been bullet proof. My Hanna reference hygrometer is probably the only one that's reliable, but sometimes I feel that it may be a few degrees off at certain temp/humidity levels. Once you do more batches, you will learn to 'feel' the correct humidity. Make a lot of observations and take a lot of notes initially. Correct humidity is when the skin is just slightly moist, not wet and and not dry. It's not hard to see. Then adjust your controller to increase or decrease the humidity accordingly.
Variation in weight loss in different parts of the fridge probably indicates humidity variability in the fridge. Humidity rises, so it's natural to see my drying at the bottom of the fridge and less at the top. A stronger air flow can fix that. Also, rotating the meats.
You can vac seal with a or without the casings. If they have a lot of mold that got grey and unsightly, you can wash it off, dry and vas seal. Or you can remove the casings and seal without them. I've done both ways. I think I prefer without the casings, as I batch process all of them once and not have to deal with them later over and over again. If it goes in the fridge, unsealed, I always keep the casing on to slow down drying. I just wash the mold off, soak in a little bit of wine, dry with paper towels and refrigerate.
Hope this helps. Apologies of the delay responding, I missed your message in the pile of spam.
Best,
Victor
Barney says
G’day Victor,
How long should it take for the humidity to get down below 80%? I’ve made a 12kg (26.5lbs) batch of salami on Saturday and put it into a curing chamber built as closely to yours as I could. I’ve got two of those same (looking) dehumidifiers in a large drinks fridge, but I can’t get the humidity below about 90%. Today is their fifth day in the chamber.
When the fridge kicks in it drops to around 72%, but the temperature in the garage is only around 12.5 degrees C (54.5f) so it rarely has to.
Thanks for your help.
Cheers
(I sent a much more detailed initial message, but it didn’t post).
Victor @ Taste of Artisan says
Hi Barney, I got your previous comment and responded to it. They don't post automatically as I have to approve them manually. Too much spam gets in the queue. Sometimes I don't see legit messages right away as they get buried in the spam. But I do my best to go through all of them and make sure I don't miss any.
Barney says
G’day Victor,
Thank you for your response. I hadn’t noticed the little message about waiting to review the comment until the last shorter version, so I thought perhaps there was a character limit. Thanks again, I’ll respond to your answer to my question below.
Cheers,
Barney
Victor @ Taste of Artisan says
No worries, Barney. Hope we can figure this thing out for you.
Barney says
G’day Victor,
Firstly, thank you for combining your knowledge and experience and making it available on this platform for newcomers like myself. It’s the clearest, most in-depth resource I know of on the internet, and it’s a credit to you.
I’m very new to this and have a question for you regarding the humidity of the chamber.
I was invited to a families salami making day (my first), and in preparation of that I built a curing chamber, as closely to your latest build as I could. The people I made it with just hang theirs in the sheds/garages, but that’s not an option for me.
All went well through the fermentation stage with temperatures staying close to 22C (71.6f) and humidity at 97% plus for those 48hrs or so, but since moving into the drying/maturing stage with the temp set to about 13C (55.4f) and humidity to 75%, I have not been able to get the humidity below about 90% for most of the time, despite having two de-humidifiers that look the same as those you use in the chamber. When the fridge kicks in it will reduce to around 72%, but it quickly rebounds when it stops. The fridge kicks in infrequently because the temp in my garage is only getting to about 12.5C (54.5f) max. at the moment.
I’m trying to tell my rational self that I’ve just put about 12kg (26.5lbs) of wet salami into the fridge and it’s going to take some time to dry out, but being very new to this I’m also mindful that I don’t want humidity above about 80% as per most instructions I’ve found. I’m like a bloody nervous parent watching over them like babies at the moment. They’ve been in the chamber just over four days now.
What I’m wondering is, is this all very normal and I should just let it go and the humidity will eventually drop as they dry out, or should I try to do something to drop the humidity, and if so, what? I could drop the temp threshold setting down so that the fridge cycles more often, but is that necessary?
Thank you for your help, I’d be happy to read whatever recommendations you can make.
Cheers
Victor @ Taste of Artisan says
Hi Barney, thank you for the kind words and welcome to this new and exciting hobby.
Humidity not dropping can be caused by two things: 1 - too much meat, which loses a lot of water in the first week. 2 - your dehumidifiers either aren't powerful/efficient enough to extract all that humidity, or they don't work properly. Another underlying cause can be the fridge itself. Is it frost-free? I assume so based on what you said. If not, that makes it much harder to control humidity. Is it large or small? A small, 5-11 CF, fridge will be much harder to control humidity in, while a large 15-25CF fridge will be much easier.
The frequency of circulation can be good and bad. Good as it helps bring the humidity down. But the more often the fridge circulates, the most risk for case hardening, depending on where the cold air blows.
I often tell those who are new to this hobby to expect to tweak their setups initially. If you replicate my setup perfectly, there is no guarantee that it will work just as mine as your environment will be different, and that makes a difference. Hence, it's a good idea to start with a small batch, observe, make notes, tweaks, then increase your batches as you go.
But, we are where we are, so how do you deal with that? Well, if I were in your shoes, I'd probably keep the door of the fridge cracked open for a week or two to bring the humidity down. Is that possible? If so, that's a great solution as the ambient temps are where you want them to be. I assume the humidity in the garage is lower than 80%. Once the meat loses most of its water, you can close the fridge and it should be much easier to control the humidity.
Now, in parallel, try to figure out why your humidity doesn't drop. I normally have no issues with that and my batches are around 18-20 lbs I would say. It varies though. Do you see a lot of water collected in the tanks? You should see at least half a cup per day to a cup at those levels of humidity. If not, maybe consider replacing them.
I would definitely try a smaller batch next time to give yourself more room for dealing with various quirks any new system will have. Once you have figured it out and make it work, increase your batches and see how your system behaves. Hope this helps. Let me know if you have more questions and good luck!
Barney says
G’day Victor,
Thanks again for getting back to me. Curing meats at home is something I’ve wanted to do for years. You’re right, I probably should’ve started with a significantly smaller batch, but the people I was doing it with had bags of minced pork ranging from about 11-15kgs (24-33lbs) there, so I just grabbed one and went with it.
The fridge is a large single door frost-free drinks fridge, with internal dimensions approx. 1420mm high, 620mm wide, and 550mm deep. The two dehumidifiers both have about 40-50mm of water in their collection tanks right now. I’ll probably empty them tomorrow.
For the last couple days I have been leaving the fridge door ajar through the day, but I have to close it overnight as the dog goes in there. Most days it has helped to drop the humidity down to around 76-78% when the door is open. It is a bit more humid than normal at the moment as we’ve had a fair bit of rain. When the door closes though it’s up again at 90+%.
I may have hopefully found the solution. Today I got a second small thermometer/hygrometer and put the sensor next to the InkBird sensor and right now it’s reading 77% while the InkBird is reading 86%. I’ll be interested to see what happens when I close the door up. I’ll buy another separate hygrometer and put that in to see what it has to say. Hopefully it’s closer to the new one than the InkBird. Temperatures are almost identical across both.
The InkBird was unused, but I have had it for a couple of years. Like I mentioned, I’ve wanted to do this for a long time but haven’t had it opportunity until now.
I’ll keep you posted. Hopefully I’ve been worried about nothing all this time and the humidity was always okay. They look pretty good with a decent covering of bright white mould, with no greys or greens. Let’s see how we go.
Thank you again, Victor. You’re going above and beyond to help people like me, and it is appreciated.
Cheers,
Barney
Victor @ Taste of Artisan says
Glad to hear it, Barney. Looks like you are on the right track. I hope your first batch is a success. I totally get why you went with a large batch as you first very adventure into it. It's hard not to. I remember my first batch. I geez. It was a mix of many things as I wanted to try everything right away LOL
Ah, I should have thought about your hygrometer. Yes, they can be quite unreliable sometimes. At one point I got me a Hanna reference hygromter to test all of my controllers and other hygrometers and I saw some big deviations. That said, I rarely rely on humidity readings alone anymore. Let's say I want humidity to be 75%. I set my controller to 75% but I also monitor the surface of the sausage. I want it to be hydrated, but not wet. I also don't want it to be dry. If it's dry, I bump up the humidity. If it's wet/sticky/slimy, I drop the humidity. That's the best way IMHO.
Anyway, good luck and keep me posted. I'd love to see some pictures too.
Dave Nussbaumer says
Great job, quick question. In your opinion will a Pepsi cooler in great working condition work?
Victor @ Taste of Artisan says
Dave, I've seen people use just about anything. The question is how well it will work and how big of batches you can cure. You best bet is to use a frost-free refrigeration unit. The second most important thing is to use a large unit. They larger it is, the easier it will be to manage humidity. In small units, humidity may be too difficult to manage. It also depends on the amount of meat in the fridge. The smaller the fridge, the less meat you'd want to put in it to be able to effectively manage the humidity. I wish I could give you a simple answer, but it's impossible. Too many factors to consider and deal with.
Joe says
Hello, I've been curing meats for over 4 years now and one trouble I keep on getting is that my freezer (controlled by my controllers) dies , time after time, evaporator got holes in them (as per the technician) even after being replaced twice, and wondered maybe if the humidity (80%) is causing that for any of you.. or heard of it
Victor @ Taste of Artisan says
Hi Joe, sorry to hear about your troubles. So far, I only had one fridge die on me and it was a very old fridge. One day, it just stopped working. There was no point in repairing it so I replaced it with another, newer fridge I found in local classifieds. My other fridges, including the brand new ones, did not have any issues. Knock on wood.
I am not a fridge technician by any means and know very little about the mechanics and how to fix them, etc. But a couple of things immediately come to mind, so I will share them, perhaps that will help. One is that your unit may be faulty and just needs replacing. Dah.. LOL Anyway. The second is... you said it was a freezer. I am not sure how suitable freezers are for this task. Aren't they designed for sub zero temps? Perhaps running them temps well above freezing temps may be the problem. Also, is it frost-free? Non-frost free units aren't well-suited for curing as maintaining proper humidity levels is a huge challenge with them, as I've learned from my own experience.
John says
What a great resource. Thank you for putting all this together. I'm looking forward to building my first curing chamber and learning to cure my own meats
Victor @ Taste of Artisan says
You are welcome, John. It's a very rewarding hobby that doesn't seem to get old. I've been curing meats and sausages for well over a decade and I still do it and love doing it. Good luck!
Julia says
How do you use the heat mat? Do you turn your fridge off temporarily to raise the temp, or do you let it compete with the mat?
Victor @ Taste of Artisan says
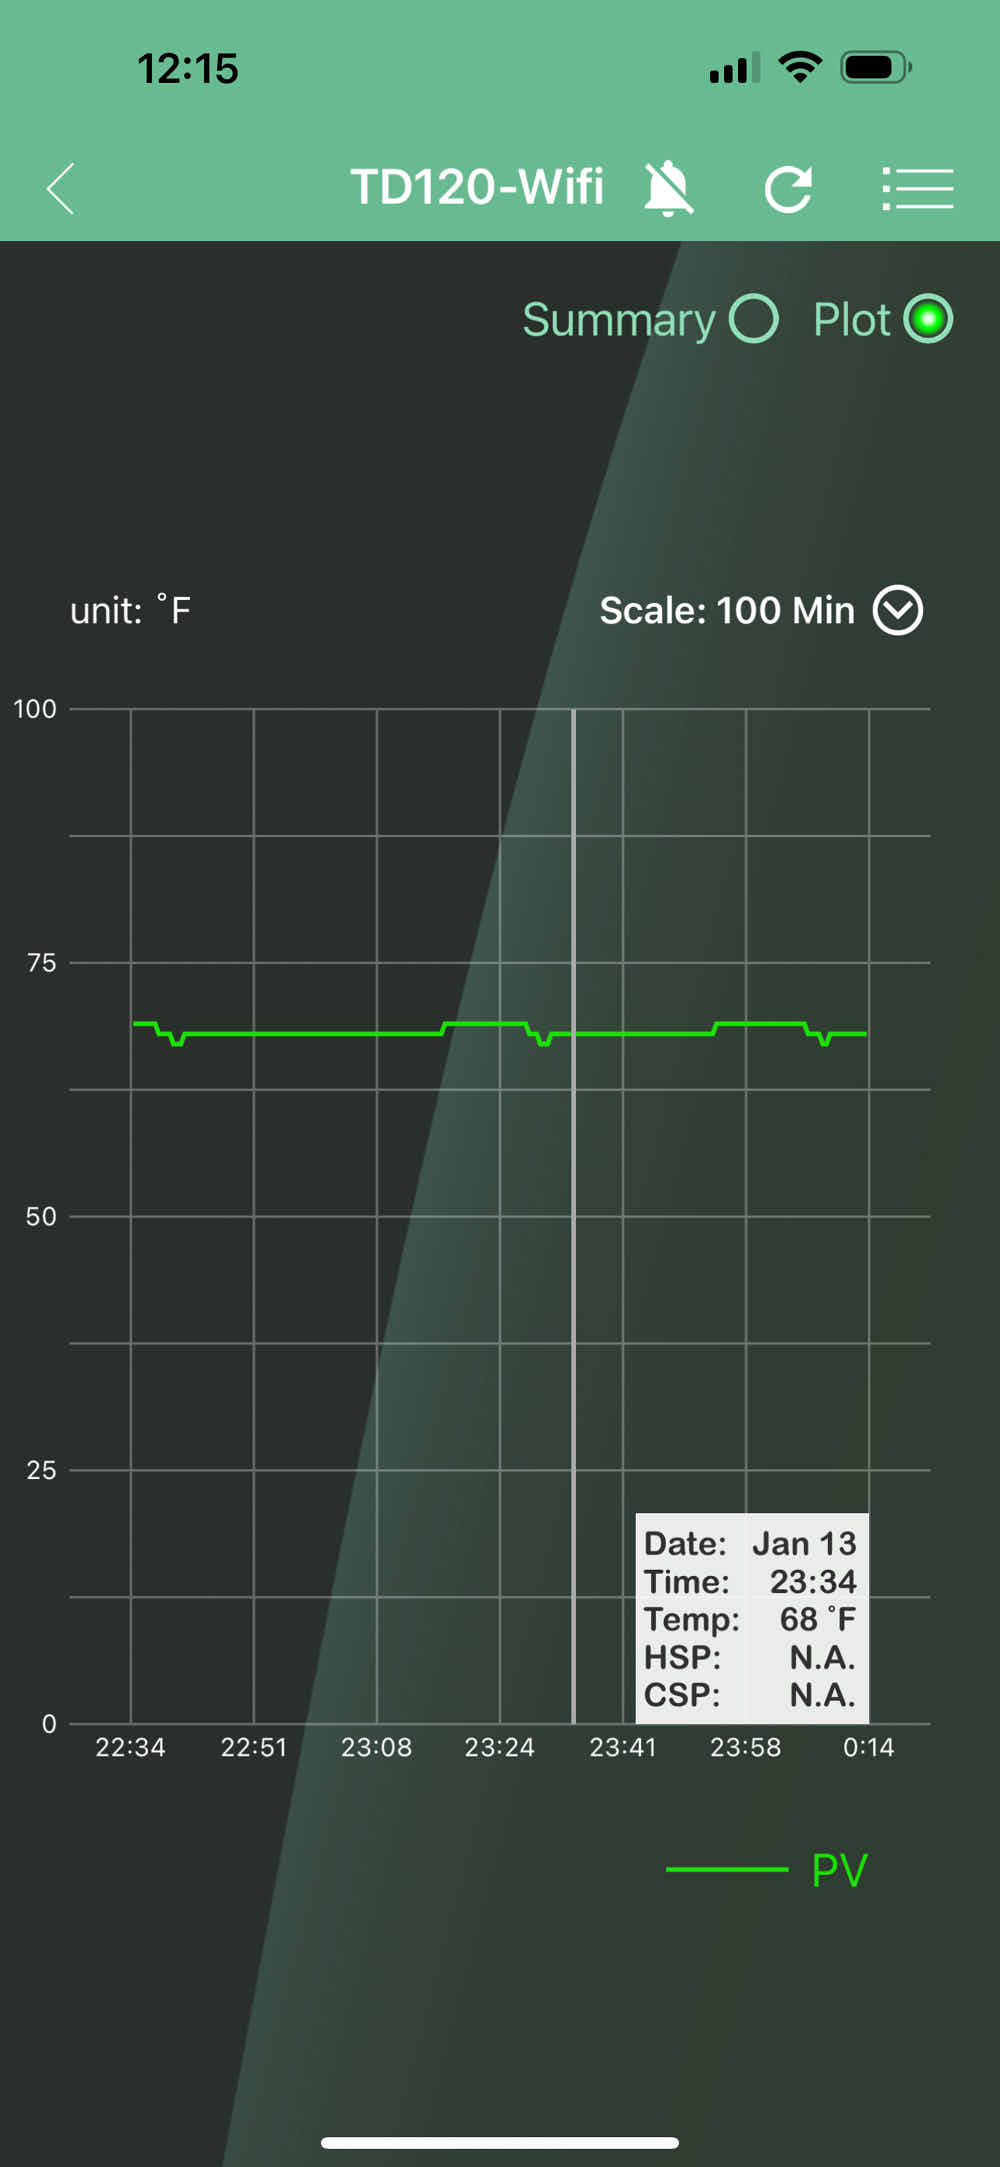
No, the fridge and the heat mat are both plugged into the temp controller simultaneously. I don't want them to compete. The set points for heat and cooling are 3 degrees apart (68F for cooling and 65F for heating) with a 1 degree differential for cooling 2 degrees for heating, which ensures that they stay out of each other's way.
I am fermenting a batch of salami right now, needing to keep the temp at 68F for a certain period. Here is what temp plot at those settings looks like:
M says
Hi,
how many mm is the outer and inner diameter of the tube that you used for the humidifier? i connected a 8/6mm tube to my humidifier but condensation gets stuck and it stops working after a minute or two?
Thank you.
Victor @ Taste of Artisan says
5/16" ID x 7/16" OD or 8mm ID x 11mm OD
M says
Thank you ordered one of those now. I also have a issue with my curing fridge (frost free). The humidity near the back wall of the fridge is higher and causes drying issues. Do you face this problem as well? If you don't mind can you please also share clear pictures of the humidifier tube entering the fridge and the location of it in the fridge? Thank you.
Victor @ Taste of Artisan says
I got rid of my older fridge some time ago an only use my two LG fridges as my curing chambers. Neither has any holes in it. Since these new fridges are freezerless and quite tall, I keep the humidifier inside. Also worth pointing out, I really only use the humidifier toward the very end of the maturing period, then the meat and sausages are dry and don't release much water into the air. Until then, I only use my dehumidifier. I seem to have plenty of humidity in my chambers so I don't need to add any more.
If you have issues with humidity in some part of the fridge, it means you need to improve internal air circulation. Install a small fan. I used to use a fan but now it seem that my dehumidifier's fan does a pretty good job. Also, it may not be humidity in the back causing case drying issues... Do you mean the casings don't dry in the back? Or do they dry faster and harden? If the latter, you may have cold air blowing there when the fridge circulates. YOu can shield that area or re-arrange the meat. Hope this helps.
Chris D says
I set up a curing chamber with your equipment suggestions. I am using the Aubur AW-HD330 for humidity control. I have my humidity set at 80%. The controller is calling for the Eva-Dry EDV 1200 to come on as the chamber humity climbs above 90%, but the dihumidifer won't turn on without me manual pressing the on/off button. I have tried taping the button in the depressed position when the machine is on, but when the controller shuts it off and then calls for it to come back on it won't start unless I uncover the button to release it and press it on again. Is there a trick to get the Eva-Dry to come back on with the Aubur turning it on and off?
Thanks
Victor @ Taste of Artisan says
Hm... that's puzzling... I have three Eva Dry or similar to Eva Dry (same design, different brand) dehumidifiers and none of those behaves the way you described. I don't know, maybe the newer designs need to be manually activated. I don't have a solution for your problem as I never had to deal with it, but if you purchased yours on Amazon, Id return and replace with a different model.
rebecca says
Sweet Setup! Do you have any suggestions for dealing with mites in your cave? I've got a case of mites on some of my older whole muscle cures (6 months old) Ive treated them with wine and dry brushing.... any suggestions for how to treat mites? also deep cleaned the curing cave with vinegar. Thanks in advance!
Victor @ Taste of Artisan says
Apologies for the delay responding to your comment. I had no idea you could get mites on cured meats. I've only seen them on my plants, which I treat with sulfur/castile soap, but I wouldn't use that on cured meats. If you google for 'mites on cured meat', you will see many resources pop up with recommendations for how to control them/get rid of them. Good luck!
Mathieu Caron says
Hi, thanks for all those information, im wondering if an electric wine fridge/cooler would be simplier than building from a fridge? since on some model you can choise the desired humidity %
Victor @ Taste of Artisan says
Hi, the biggest challenge for me was controlling humidity. I found that the large the space the easier it was to control humidity. Frost free fridges are much easier to control humidity in. Once you start loading a small fridge with meat, humidity shoots up and becomes harder to control. So, my recommendation is a frost free fridge with as much volume as possible. That said, if you can find a small wine ridge with humidity control, and you don't anticipate large batches, it should work. Good luck!
Leo says
Great article. Why are you using a heating mat in the refrigerator? I only guessing that it's to prevent the temperature from continuing to drop after the refrigerator reaches the set low temperature threshold?
Victor @ Taste of Artisan says
No, I use a heating mat for fermentation and initial drying when temps need to be above the ambient temps.
Mike says
Thanks for sharing your experiences… It is very useful. I am in the process of putting together a curing chamber, using a wine cooler. I have decided to introduced humidity from the outside to save space. What do you think would be the best location to introduce the humidity into the chamber. What I mean is high or low or front or back?
Thanks again for all the helpful information. Mike.
Victor @ Taste of Artisan says
Welcome to the hobby, Mike. Your question requires a lot more background info that you gave me to give you a proper answer. How big is your wine cooler? Frost free? Frost free are best, non-frost free ones will be hard to control humidity, smaller ones will be next to impossible. Adding humidity to a small non-frost-free fridge sounds like a really bad idea to me. I rarely use a humidifier with my frost-free fridges. The biggest challenge is to remove humidity, so I'd be concerned with getting a good dehumidifier first. That said, I'd get an accurate hygrometer and test your fridge first and go from there. Different devices may act very differently so there is no universal answer. The best way is to test and tweak. Hope this helps.
Mike says
Thanks for the quick response Victor… I have a small wine cooler 6 ft.³ I believe. It is frost free. I did hang some strings in it and it does not appear to be blowing around a ton of air. I live in a smaller condo, so I don’t have room for anything much larger.
My first thought was like yours that I would not probably need to add humidity, but the more I read the more it seems like that would be necessary. but I now think those people were talking more about larger set ups than mine. I did buy a small dehumidifier that fits nicely inside the space.
I have a thermometer – hydrometer connected via Bluetooth and when the temperature ranges between 62.5 and 64.5 the Rh goes from about 40% up to as high as 85%. Obviously in the opposite direction of the temperature. And this is with no product inside and the dehumidifier not running and not hooked up to its controller.….just a trial run. I am dropping that temperature down to see if I can get it to sit in the 55° range or so… I do have a controller for the Refridge as well, but may not have to use it unless I want to use the alarm function.
We are at this time in a pretty hot/humid slice Of ambient temperatures right now.
I guess, as you suggest, I’ll go without humidification at this time, and just tinker with it to see what works and what doesn’t. That’s part of the fun of it I guess.
I am planning to cut my teeth on some kind of whole muscle cure… Perhaps Bresaola? Any recommendations? Or any thoughts on my above comments?
Thanks again…
Mike
PS. Any tips as to where to locate my temperature and humidity probes?
Victor @ Taste of Artisan says
Sounds like a good plan. Observe how your setup behaves and tweak it, that's the best way. When you add wet meat/sausage, it will be a different story. Especially a sizeable amount. I don't need to run a humidifier until almost when the sausage is done maturing. Until then, whatever is being released by the meat is enough. Of course, that's very setup and ambient environment specific. In dry areas, that probably will be different. If the fridge is not well insulated and need to to circulate frequently, that will keep the RH very low. If the ambient is low, the fridge won't circulate as often, when high, it will and the RH will be kept low, so in those scenarios you will need a humidifier. Sizewise, the large the fridge, the easier it is to keep RH stable.
Bresaola sounds great. Lonzino or capicola are also good ones to try.
I hang my probes where my meat is/will be. Don't want to hang too low or too high.
Ken says
Hi Victor
I am trying to cure prosciutto and I started with a 21+ lb rear leg in November. I followed the instructions exactly, with salting the leg with cosher salt and putting in the refrigerator with a cutting board on top and weight to press it, day 4 removed and drained water and re-salted, back in refrigerator for a week, pull repeated last step, back in refrigerator for another week, repeat last step again, at day 21 removed and brushed off salt and rinsed with 2 to 3 cups of red wine, then wrapped it in collagen sheets. This is when I weighed it and it was 21 lbs. I then put it in my curing cabinet built with your specs and have been running it since December, started out at 80% humidity and 55 degrees, over the last 7 months I have been dropping the humidity because I cannot get it to drop the 30% weight to finish the curing process. For the past 3 months or so I have had it at 68% humidity and 55 degrees, and I am still a little over 2 lbs from hitting the 14 lbs that I need? Any suggestions I would greatly appreciate. Thanks again for such a great job on this website how to build the curing cabinet. Ken
Victor @ Taste of Artisan says
What jumps out at me is wrapping in collagen part, this is not a how prosciutto is normally made. It could have played a part. Another thing I notice is how short the salting step was. Usually, salting, reposing, and ripening/drying takes up to 12 weeks at various levels of humidity. Only after that the exposed flesh is traditionally covered with a mix of flour/fat for further maturing.
There isn't much you can do at this point other than keeping the humidity at the level where you continue dropping hydration and weight until you reach your target. Good luck!
Tim says
Actually the typical curring stage rule of thumb is 1-2 days per kilo so 10-20 days. So he was good on the cure. The issue is moet likely as you first alluded to the collegan wrap. It absolutely decreases the rate of moisture loss. Its how it works well in dry aging meats in normal frigs with no humidity air flow control. He needed as you stated to have only covered the exposed ends with the lard flour mixture. As he has done he has added an entire layer on top of the skin layer thus greatly reducing dehydration.
The question is what to do? As he has cured it for the times I have eeen listed per lb it should be throughly cured so spoilage should not an issue. Really its just doing a much slower aging at this point. My guess and I am a rank amaeture at all of this would be to do as he is and keep RH low. No matter what its goimg to lose water over the next yr + of aging.
He could pull the wrap and put on the flour lard paste which then should allow normal rate of water loss. Actually that might be the best choice. Good news is as long as it was cured and temps were not too high I doubt there is a negative effect on the meat. I would go with pulling the wrap and getting the paste on
Oliver says
Hi
I saw in the photos that you run the cables underneath the door seal of the fridge (the fridge on the left, on its right hand side).
Do you ever have any issues with the cables keeping the door seals open a little too much?
I wonder whether I should cut the seals around the cables, or try going through the walls.
Olly
Victor @ Taste of Artisan says
Hi, no, no noticeable issues so far. I spread the cables so they are not stacked. I am sure there is a bit of an air exchange but it hasn't been an issue.
Pavel says
Hello! please tell us how you do the ozonation procedure during drying and after
Victor @ Taste of Artisan says
Hi there! Ozonation treatment is a non-thermal method for disinfection of meat products. I don't do that. It's one of the cool new tools for sausage making but I don't have the need for it nor resources to implement at home.
Dallas Grgic says
Victor thank you so much for this article. You inspired me to make a curing chamber and make salami. Something I have wanted to do for years. My chamber consists of a frost free fridge with two inkbird controllers with a humidifier, dehumidifier, heat mat etc. Temp and Humidity control in my fridge works well. My first batch of salami was the traditional Italian way with 2.5% salt, ground black Pepper, fennel seeds and capsicum sauce, 8.5kg of minced pork shoulder. This was fermented at 80% humidity 20 degrees c for 2 days then turned down to 75% humidity 13 degrees c. For the drying phase. The first day the salami lost liquid and smelt sweet. I quess that is from the capsicum sauce. The second day of fermentation strong odors of egg and sulfur. I am on day 4 now and still have very strong sweet smells of egg & sulfur. The salami looks fine. From your experience do you think the salami has gone bad or have I just had good fermentation? Due to the enclosed chamber the smells will be more concentrated as oppose to drying in a larger area. What are your experiences with odors out of your curing chamber? I don't have a PH meter. As the drying progresses I expect the smell will reduce? Not sure if I should toss the lot or just see it through till the end. Any help greatly appreciated.
Victor @ Taste of Artisan says
Dallas, congratulations on the new setup! I don't recall smelling sulfur/rotten eggs on my salami, that smell isn't common, nor is it good. I think that indicates spoilage activity. I am wondering if what you perceive as sulfur may be the smell of ammonia. Ammonia smell is quite common. It happens when molds oxidize lactic acid, producing ammonia. Ammonia doesn't smell bad though, it' pungent but not terrible. Rotten egg smell is nauseating. If the smell makes you feel sick, that's a pretty good indication that the meat is spoiling. I had a couple of batches like that. Somehow, the meat meat got infected and by day 5-6 the smell was so revolting that I had to throw the whole batch away. So, use the smell as the queue.
I would recommend investing in a good quality pH meter to make sure you hit the target pH level, that's an important safety hurdle. 2.5% salt for traditional salami is lower than the recommended 3% - 3.5%. Salt is another important safety hurdle. You don't mention use of bacterial cultures and curing salt/nitrate. If you don't use those, it's easy to have spoilage bacteria take over and ruin your batch. Hope this helps and good luck!
Dallas Grgic says
Thankyou Victor for taking the time out to reply to my message. I'll purchase a PH meter and up the salt %. Also reduce the amount of capsicum sauce. Once again thankyou for the inspiration.
Victor @ Taste of Artisan says
You are very welcome. Please, check out my salami recipes, some of them are very detailed and I hope you find them helpful.
David Steel says
This is by far the finest article I've read about DIY curing chambers. I've been trying to hobble together a list of part and there it is. everything explained with the parts you used.
The internet is a God send for sharing information.
Thanks,
Dave
Wilmington, Delaware
Victor @ Taste of Artisan says
Hi David, I am glad you found my article helpful. Good luck with this hobby!
Mike Buser says
So you are using the actual compressor for the cooling....controlled by the controller and not the internal dial on the refrigerator?
You are using a heat mat to raise temp controlled by the controller. Am I correct so far?
Next question is, I see you are using a humidity controller for humidifying and dehumidifying.
You had links for both, but when I clicked on the links, I only saw the humidifier and controller. What are you using for dehumidification?
Victor @ Taste of Artisan says
If you want to look at it that way, yes. The external temp controller supplies or cuts the power to the fridge depending on the internal temp. So, as you put it, it pretty much controls the compressor coming on and off.
Yes, I use a heat mat to raise the temp during fermentation or drying.
No idea what happened to the link to the dehumidifier, I fixed it. I use the Eva-dry Edv-1100 Dehumidifier. I have two of them, one is enough for a 1-fridge setup but I sometimes use two when the batches are especially large.
William Alexander says
Victor your website and how to build rocks but I’m mechanically challenged. Plus I am So pressed for time. Do you have any sources you could recommend who sell curing chambers that are not the size of a large fridge? I’m looking for something the size of a wine refrigerator that has all the components built into it. I know given several days and hours of anguish I could maybe complete it myself but building things like you’ve outlined is a gift I was passed by on!
Victor @ Taste of Artisan says
William, I've never seen one like that, let alone a properly functioning one with those parameters. The smaller they are, the harder it is to control humidity in them and that is the most important thing. Your best bet would be Umai bags, which you can use to cure meats right in the fridge. Some people tried and swear by them. Easy. You should try and see how that works for you. Good luck!
Lorin Chak says
I've been using a wine cooler to age pancetta, as that was what I had. However it ruined my wooden floor because it dripped a lot of water. Someone on reddit said this problem could even kill the compressor because theres a humidifier inside adding extra moisture. I noticed you advocate a frost-free fridge. Is that precisely the fix to this problem?
Victor @ Taste of Artisan says
Lorin, a frost-free fridge is required because it effectively removes moisture from the chamber. A non-frost free one keeps it in, which makes it hard/impossible to properly control humidity inside the chamber.
As I mentioned above, in my post, I barely use a humidifier as I don't have a need for it with my setup. Meat in the ciuring chamber will be releasing enough water during drying to keep the humidity up. Even more so if using a non-frost-free fridge. At least in my climate. In very dry climates, it may very well be different. I'd add a humidifier only at the late stages when the meat is very dry and doesn't release sufficient amount of water into the chamber to keep the humidity up. The rest of the time, I use a dehumidifier only.
As far a water leaking on the floor, I can't answer that question as I don't know how your wine cooler works and how the rest of the equipment works. It's possible that your humidifier was working overtime and release too much water, or maybe the wine cooler was not operating properly, or something else was the problem. It's hard to say without a proper investigation.
Lorin Chak says
This is what someone on reddit said and the result of dripping water under the cooler matches my situation so I feel this is me, but was wondering if you can confirm: "The unit runs dry because the water will stick to the condenser during cold cycle then drip outside via the gutter underneath. With a humidifier inside, that will just create more ice on the condenser and it'll eventually lead to a dead compressor (happened to me!)."
I don't understand physics well but what sticks out is that my wine cooler also has a compressor. During my maturing phase I have it set to 50-57F, and targeting RH of 70-90 with my added humidifier. Sometimes after the compressor runs to cool down unit, I hear dripping underneath the unit, as I've placed a pan underneath to catch the water. I've bandaged the dripping of water for now but hope the compressor wont die. Let me know if I can clarify my set-up further!
Victor @ Taste of Artisan says
Lorin, humidity of 90 is too high. You should target 70-78 at the most, depending on the drying stage. It's actually a little more complex. Initially, the meat releases a lot of water so I drop the humidity even lower to keep up with the removal of extgra moisture. Once the water loss stabilizes, I go to about 75-78. Then drop to 72-75. The goal is to keep the surface slighly hydrated, not wet/sticky/dry.
What controls your humidity? The humidifier? Or do you have a separate humidity controller that controls the humidifier? I would recommend an accurate hydrometer to validate your RH levels. Do you really need a humidifier? As I mentioned before, I don't need one until the sausage is pretty dry. Most of the time, I need a dehumidifier to bring the humidity down.
Lorin Chak says
Thanks for digging deeper. So I have the inkbird temp controller, and the inkbird humidity controller hooked to the same eva-dry dehumidifier and a vicks humidifier. I have the drying phase down pretty well and it mostly focuses on the dehumidifying.
Then in the maturing phase, that is where I get this wine cooler leaking water from underneath and outside the unit where I have to use a pan to catch drippings. During this phase I mentioned I have RH set between 70-90RH (which you recommended for Pancetta). By the way 70-90 is a big range. I don't know if it matters so I have the difference values on the controller set at 80RH with ~5-7RH so actual values swing from 73-88.
Lastly I have been researching between frost-free and automatic defrost fridges. They are not the same but both supposedly do the same thing. For charcuterie, will automatic defrost work just as well?
Victor @ Taste of Artisan says
No worries. I am not an expert in how fridges work but it seems to me that auto defrost fridges may not have the same advantage as frost free where the moisture is constatnly removed. It seems that in auto defrost they let ice accumulate and defrost it at pre-determined intervals. If that's the case, battling humidity will still be a challenge. I did some partial drying / maturing in a small non-frost-free bar fridge and it was a huge challenge. However, that was a small fridge; they larger they are, the easier it is to manage humidity. I would still recommend going with a frost-free to make things easier. Much easier I should add.
Yeah, I see where you are coming regarding the humidity levels of up to 90%. I thought you were going that high for salami and solid muscles. 70-90% was described in the Pancetta Piacentina PDO. I imagine that may be the natural range of humidity in their cellars. I'd imagine 90% is more of occasioanl peaks, while the averages would be lower.
Try dropping the humidity to closer to 70%. Pancetta can take it easily and won't dry out. Also, dial down your humidifier's mist release. I recall having mine once set to high and I had condensation all of the chamber. That wasn't pretty. Can that be the case with your setup? Also, non-frost free fridges have drip trays underneath to catch water. Do you have one of those? If not, maybe you should add one to protect the floor. Hope this helps.
C says
If you don't drill holes into fridge how do you run all your cables from in to out? Does the multi air flow of this LG unit blow too much air onto meat causing case hardening?
Victor @ Taste of Artisan says
The cables run between the door and the fridge, as shown in the pictures. Here is a close up:
https://tasteofartisan.com/wp-content/uploads/2023/12/curing-chamber-1.jpg
As far as air flow and case hardening, it's no different than my previous two fridges. I am happy with it.
Victor @ Taste of Artisan says
For those of you who have been asking for an update on my curing chamber and more specifics about my current setup with part/model numbers, a diagram of how the components are connected, etc. - your wish came true. I updated the post with all the details and hope I addressed all of them. If I missed something that you wanted me to address, let me know in the comments below. Cheers!
Kevin says
Victor, I will pre apologize for this inquiry. I have read every word that you have posted several times and have only increased my confusion. Would you please repost your latest equipment (brand, model, what I it's use is)you are using for your chamber. I have some experience building this sort of equipment so I'm confident with the correct list of equipment the construction would need relatively easy. I have built controller boxes for all my smokers using all Auber electronics inc pid's . I would agree Auber products fall a bit short on calibration but they have always been available for help (sometimes communication is an issue tho). Price is not as important as a qualify set up(not wealthy but willing to go an extra 1/2 mile for quality. Thank you very much
Victor @ Taste of Artisan says
Hey Kevin, no need to apologize. If it's confusing, just ask. We all learn here. Some confusion may have resulted from the fact that I've updated and refined my equipment and the process many times to optimize it and perfect the results. I will update my post with the most recent equipment in the near future - like, I will do it by end of this month. Stay tuned.
Lorin Chak says
Not much is said about how to cool the fridge to exact temps such as 71 or 65F. Are we assuming the obvious that the fridge itself is connected to the temp controller to cool down when needed? I am using a compressor wine cooler and its temp can’t be dialed. Will connecting it to the temp controller damage the compressor if constantly triggered on and off?
Victor @ Taste of Artisan says
Yes, the controller will either initiate the fridge to bring the temp down or the heating pad to raise it. It's important to dial in the controller such that it cycles less frequently. The controller has a safety setting that prevents starting the fridge again within a preset time, usually 5 minutes to allow the compressor to decompress and hence prevent damage. There is always risk of damage of some sort, but that's the nature of this game game and that's why it's a good idea to get a used fridge for $50 - $150 bucks. I've been doing this for over a decade and I've used several fridges over that time; so far haven't had issues with compressors.
Darko says
Hello Victor,
Thank you for creating this article and sharing your very valuable experience on meat curing at home.
I have always wanted to make my own salami and pancetta and your article inspired me to dive in and give it a try!
I live in Florida so I will have to deal with high temperatures and humidity almost all year round. I am planning to install a fridge in the garage where the temperature ranges from 80F-100F and the humidity is up to 95%.
I love smoked meat and I was wondering if smoking the salami and pancetta first would help with the curing process?
I noticed that you have tested many different temperature, humidity and ph controllers over time. My hobby is electronic projects and I was thinking of building my own controller that would control temperature, humidity and ph, be programmable and send information and alarms to my phone. Over time, the software could be further customized to support different programs depending on the required meat curing process. There is also the possibility of developing a Temp/RH sensor that can be inserted into the salami to get real-time information on whether curing is progressing at a good rate or fridge temperature and humidity needs to be adjusted accordingly.
To do this I will need help with the fermentation/drying schedule that needs to be programmed into my controller. If you are interested in this project, please let me know and we can get in touch via email.
All the best and I look forward to hearing from you.
Victor @ Taste of Artisan says
HI Darko, welcome to my blog.
Hi temps and humidity aren't your frinds when it comes to curing meats but with a fridge, that's not that big of a problem.
Smoking meats and sausages before curing is not an unusual thing. Smoke adds flavor and also serves as a preservative. You'll notice that mold doesn't form on smoked surfaces or there is very little of it. That's about it. It's not going to aid in any other way that I know of.
Wow, that's an ambitious project. Real time measurting of temp/RH inside meat, ha? Meat temp can be calcualted by approximating the average temp in the fridge. Not sure how helpful it will be. PH inside meat? This won't apply here. You will need to measure Aw, or water activity. This is a common measure to assess the dryness of meat. Aw can be very different if meat dries unevenly, e.g. when there is case hardening. A good Aw meter is in the thousands of dollars. That's goon be a huge challenge.
Anyway, thanks for offer but between work, family, my blog and other commitments, it's going to be tough for me to find enough time for this project. But I wish you all the best, perhaps you will revolutionize home curing. Good luck!
Ken says
Good evening again Victor
Someone I saw and I am not sure if it was in one of your post or not, but a way to measure botulism with an electronic unit? Any suggestions? Thank you
Ken
Victor @ Taste of Artisan says
Hi Ken, I have never heard of such a consumer-grade device, but technically, it should be possible to measure the amount of b. toxins in meat.
Ken says
Good Evening
I have been doing smoking and making Salami from wild game for almost 10 years and trying to get into curing of some of the meat that I harvest. Thank you for your very informative post here. The frigerator that you use, is it a working fridge and do you run it to keep the 55-degree temp? Appreciate your help.
Thank you.
Ken
Victor @ Taste of Artisan says
Hello Ken, yes, this is a working fridge where you need to maintain 55F most of the time. The temp will be higher during fermentation and drying, and will gradually decrease to 55F for maturing.
Roger says
Hello Victor,
I am just getting started in the sausage game & was wondering if you could tell us exactly what you are using & how your humidity cabinet is set up. I was looking at the commercial ones & they are way to much money.
I came across your web page & thought "Brilliant".
Thanks in advance!!!
Victor @ Taste of Artisan says
Hello Roger,
I am putting on the finishing touches so to speak on my new two-fridge setup, which I will write about in the neat future. Meanwhile, it's all the same that I described in the post above. My setup includes a medium-size frost-free fridge, two Auberinc controllers - TD120-WIFI and HD220W, a peltier dehumidifier, an ultrasonic humidifier, a small seedling heating mat. That's it. Nothing special. If you have any specific questions, let me know.
Daren says
I'm doing a build right now. With the new Auber humidity controller, do you still recommend getting the Hannah hygrometer?
Thank you, I can't wait to get this up and running!!
Victor @ Taste of Artisan says
Hi Daren,
In my experience with Auber controllers, they are pretty accurate so no, a Hanna hygrometer is not needed. It's nice to have for double-checking but not absolutely required. Also, it helps to think of relative humidity as, well, relative. Say your meter says the RH is 75% but the meat surface is too wet and you observe excessive mold formation. So, you adjust the humidity until the surface of the meat is just slightly hydrated and the mold is a thin layer of white powder. It's nice to know that your 75% or 80% RH are true 75% and 80% RH, but in real application you'd need to make adjustments based on how the meat behaves.
MA Graffigna says
I have looked at alot of sites about these issues for curing. To-date yours has been the most straightforward and yo the point. I want to thank you for all of your time you spend sharing this information. I have been wanting to dive into curing for at least 2.5 years now. I feel like I can finally get started. Thank you so much and I wish you an even better future in curing. Michael G
Victor @ Taste of Artisan says
Michael, this is a very exciting hobby, good luck to you. I've had many hobbies over the years that came and went but this one has stuck with me for many years and I still enjoy it as much as I did in my first year. Thank you for the kind words. Curing cab be straighforward and relatively easy, I think I can say that by now, if you 'crack the code' so to speak. There is a lot of limited information and misinformation about curing on the Internet and many books too. I followed them and my results were hit or miss. It shouldn't be like that. The biggest thing that helped me produce consistent results was understanding the process. The second was to have the right equipment to support that process. Once I had both down, the rest of the pieces just fell in place.
By understanding the process I do not mean knowing the steps. That's what's wrong with most of the information/books on home curing - they just give you steps. I mean really understanding that the heck is going on under the hood. Fermenting at room temp and 100% Rh for 2-3 days, then curing at 55F and 75Rh rarely produced results that wowed me. Fermenting at decreasing Rh was a huge struggle and never really worked for me. The key was in the simple physics - rate of evaporation must equal rate of diffusion. I used to quote this myself but I never really understood it hence I never had a process in place to support it. But once I did, things changed in a big way. How that will work will depend on your setup and everyone's setup will be different. That's what it's also impossible to give a universal advice on this.
John says
Hi Victor! More questions for you please!
To start with, my home curing (based on your instructions for a chamber – thank you again) has been pretty successful to date and I have managed to produce one parmello salami and one chorizo. Both tasted great, and I followed your recommendation and bought a PH tester so felt a lot safer eating them!! However, whilst both were delicious, both were hollow even though I only went for 40mm casings – I evidently need to improve my stuffing skills as well as building that cold smoker! 😊
I now want to try something different! I have always loved merguez sausages, so thought I would try a merguez salami!! I have found a recipe but had always thought that lamb was trickier to cure; so, please, any tips/advice? Do you have your own proven recipe/Instructions/drying times?
And secondly – the ‘recipe’ I have calls for a B-LC-007 starter culture, which I’m having trouble sourcing in the UK. Alternatives seem to be the F-LC culture, the T-SPX one, or the Bessastart one that I have already used – but the question has led me to realise that I don’t know the pros and cons of each, or even the difference between ‘traditional’ curing and fast curing!! So – please – can you enlighten us all on starter cultures?
Thanks Victor! (And apologies if I have posted this to the wrong page)!
John.
Victor @ Taste of Artisan says
John, glad to hear about your successes. Hollowing inside, I think, is the result of one or a combination of insufficient mixing, not enough fat, loose stuffing, and insufficient trussing. You don't need to truss smaller caliber sausages but it helps.
Never tried curing lamb, maybe in the future I will, so can't advise you on that, not yet.
B-LC-007 is not my favorite. I've used it a few times, check out my Fuet recipe here on the blog, the sausage came out a little too acidic for my taste. I much prefer T-SPX as I like the taste of traditionally fermetned sausages. B-LC-007 has a number of bio-active protective properties but it's really not a substitite for T-SPX, it looks like it was designed for more quick-fermenting sausages. To me, it's more like F-RM-52 as far as resulting taste. If that's what you are after, sure, it's a good choice. Here is a good discussion on that. F-LC is simiar to T-SPX but ferments at wider temps (T-SPX is ideal for under 75F/24C), and has a bi0-protections against Listeria. Hope it helps.
Paul says
Hi Victor,
Can you plug both your humidifier and the dehumidifier into the one Auber HD220-W humidity controller, or do you need two controllers (one for each)?
Thanks,
Paul
Victor @ Taste of Artisan says
Hi Paul, yes you plug in both into the same controller. One plug is for humidifier, one for dehumidifier.
Paul says
Hi Victor, I just found your site and am loving it. I'm currently spending a month in the Dolomites and was so inspired by the speck that I decided I want to make may own when I get back home to the states. Thanks so much for sharing your knowledge and the details of your set up.
Question for you - do you think the Mini Big Green Egg would work? I'm not really ready to buy a new MiniMax Big green egg so I'm looking on FB marketplace and found a 7 year old mini that I could probably buy for $150. Wanted to see if you had any thoughts on using the Mini instead of the MiniMax. Thanks!
Victor @ Taste of Artisan says
Paul, you are talking about the smoking part, not the curing one, right? I guess your comment is more appropriate under the DIY smokehouse post. I don't know how you want to use it, but if your plan is to use it as I do, sure, you can use the Mini instead of MiniMax. I've had speck cold smoked, warm/hot smoked and fully cooked. All tasted really nice, though the texture was different.
Paul says
Oops. Yes, I was talking about the smoking part. Should have posted it there! Thanks for the reply!
Victor @ Taste of Artisan says
The most critical part is to supply good smoke. As with anything smoked, be it brisket or kielbasa, or speck, you want the proverbial 'thin and blue' smoke. Smoke that is clean and nice smelling, free of unburnt particles that carry unpleasant smell and bitter taste, which is not good for your health either. All green eggs that I've cooked with - large, medium and minimax, excel at producing amazing smoke once you learn how to use it. It's not hard but takes some getting used to.
Manuel says
Man, got my first batch of salame (salumi in my native spanish), coppa, bresaola and chorizo out of my first curing chamber project and I'm very happy with the results. Thank you so much for this post, has been a true guide and inspiration, specially on the basic principles of humidity management.
Victor @ Taste of Artisan says
Congratulations, Manuel. Happy to hear about your results. Enjoy! I am getting very close to finishing the electrical work in my basement and setting up my two new fridges. Can't wait to make a few batches of new things I have already planned. Chorizo sounds great, haven't made it in a while.
Manuel Campos says
I also skipped the drilling, packed the cables with duct tape, perpendicular to the gasket. No loss of temperature or humidity. I did two sets of cables, one for the appliances, another for the sensors, separated by about 60 cms.
Victor @ Taste of Artisan says
Thank you for confirming that, Manuel. I suspected that it would work fine. I just can't make myself drill holes in my new beautiful fridges that cost me a small fortune;)
My electrical cables are finally pulled, took me a loooooot of work, for the new fridges and for other purposes, hoping the electrician will install power outlets and connect them to the panel this week. Can't wait to test out my new setup.
Simone says
Good morning, how did you fit the cables in the fridge? Did you drill from the side or did you make a hole on the door? Did you seal the opening with silicon or similar?
Thank you for your help.
Regards, Simone
Victor @ Taste of Artisan says
Simone, in my first fridge, I drilled a hole in the door, that was an old fridge that I had used for beer/cider. It's not best way to do it as the cables are always in the way. In my second fridge, I drilled a hole in the side (make sure there is no piping or electrials there). The hole is covered with silver tape on both sides. I did not want to use silicone or something permanent as I experiment and tend to put things in and out through that hole.
In my newest setup - two new freezerless fridges - I don't feel like damaging them so I will be running all the cables through the door opening, with the door closing on them. The gasket is soft enough to wrap around them to create a nice seal.
Attila Nagy says
Thank you for your research!
Have you ever built a curing room? I'm thinking to convert a large container size walk in cooler. It's more challange to control humidity evenly in this kind of large space.
Any recommendation?
Best regerds: Attila
Victor @ Taste of Artisan says
Hi, you are welcome. No, I've never built a curing room/cellar... there was a discussion on this in the comments below if you search for it. I have a cold room and an unheated garage that I sometimes use for drying/maturing when the temps are acceptable but nothing more than that. Controlling temperature should be a little more challenging than in a fridge but doable. Controlling humidity by virtue of large size of the room should be much easier though. But the most important part is insulation and use of proper materials that don't absorb humidity easily. Insulation will stop humidity traveling in and out of the room. Good luck!
Gigio says
Hi! What a great work you are doing! Congrats!.
A few months ago I made my own Cure Chamber, but totally smart. I use some sonoff switches and sensors, allied to scenarios configured directly in Ewelink application, and can be connected to alexa, google home, but avoid this connections because sometimes the devices don't respond because they are in use in Alexa.
Next week I will replace the wifi sensors and switches by zigbee devices and connect to a home assistant local installation(to avoid the need of cloud service by internet).
Your chamber have a original cooler to distribute the cold air? I ask because my fridge have this and some pieces of salami who was putted to cure near of this cold air exit had case hardening.
Thanks for all your explanations, you have a good didatic.
Cheers
Victor @ Taste of Artisan says
Hi, that sounds really cool. I can't yet wrap around my mind around how I could automate my curing chamber but I am sure there are cool scenarios. I recently bought two new large freezerless fridges to completely revamp my setup but just need to put it all together. I need to run electrical wiring in the finished basement to plug in the fridges but that has been a bit of a challenge. Hope to finish it soon. Very excited about it.
Yes, in my chamber that's the original cooler. It's really nothing more than just an old fridge that I got second-hand. But it does the job well. Will probably be retiring it once the new fridges are up and running.
Mike S says
Thank you for the article, also waiting for an update. Wanna try to build curing chamber as well
Victor @ Taste of Artisan says
Mike, I have been crazy busy here so I am quite late but getting close. The preferred location of the new fridges has no power source so I am running new power cables and that's a challenge in a finished basement. There is nothing out of ordinary here with the new setup, except I got two larger 'all-fridge' fridges. One fridge is too limiting for me. Two will allow me to have one do primarily fermentation/drying (and maturing when needed and possible), the other one will be strictly for maturing or it can be used for fermentaion/drying as well when possible. That flexibility is what I've been missing.
Don says
It would really be great if you had a list of the things you ended up using after all of your experimentation. I'm just getting started and have to build something that can be used for my meat drying experiments and the wife's cheese making facination. I have read that these both use near the same environment so if Im going to buils something I want to have the best control I can.
Victor @ Taste of Artisan says
Hasn't changed much but I am redoing some things soon and will be posting an update in March. Nothing that would change how my setup works, just expanding it. For now, it's still the same frost-free fridge, an Auber temperature (heat/cool) controller, an Auber humidity (humidify/dehumidify) controller, a seedling heating mat, a Peltier dehumidifier, and an ultrasonic humidifier.
Compared to before, I don't use a humidifier at all until about a month - 1.5 months into maturing. There is plenty of humidity caused by water released from the meats until then. Once that water release slows down, I turn on the humidifier. Running a humidifier until then causes more problems than it fixes.
Meats and cheese should not be in the same chamber. The environmental requirements are similar but not the same. I've tried, it didn't work.
Nik Petro says
Did the March post happen yet? I tried to find an update. Just making sure I didn't miss it. Thanks, Love your site!
Victor @ Taste of Artisan says
It's on my to-do list. I have been very busy lately but I hope to finish the post in the near future.
John says
Hi Victor,
Firstly, thank you so much for such an informative, detailed, and fascinating site. I was recently challenged by my children to start making my own charcuterie, and so finding your pages has been a Godsend! I have only managed droewors and biltong so far, but my end goal is our favourite Hungarian winter salami / teliszalami so I am now graduating to Chorizo and an Italian parmanello as my next challenge whilst I build a cold smoker!
And so, please, can I pick your brains on one point? I have already built a curing chamber very much along the lines of yours (thank you again!!) but based on a wine fridge rather than a regular fridge. My thinking was that since it heats as well as cools and can maintain a steady temperature anywhere between 5C and 18C it would require one less external controller and no heating mat. BUT….. all of your recipes suggest dripping and drying temperatures (at least in the first few days) of up to 25C.
So …. Will it be OK to have a slightly longer drying time at 18C (until I hit the 16% weight loss mark) rather than starting at 25 and decreasing it to 18 over time - or will that harm the ‘fermentation’ process?
Thank you!
John in the UK
Victor @ Taste of Artisan says
Hi John,
Welcome to my blog and to this exciting hobby.
The idea behind higher initial temps is to warm the meat up to kickstart fermentation, the thicker the meat/salami the higher the temp and the longer time needed. Of course, there are many ways to skin the cat, so yes, you could do it but make sure to stay within the optimal temperature for the culture you will be using. In the end, you want the sausage to be safe, you will be looking for the pH drop to 5.3 or lower... how you get there may take different paths but you want to get there... it would be nice to have a pH meter to tell you that. Of course you'd want to get there sooner than later... Back in the day, I had good results with fermenting a room temp for 3 days. Humidity in the house would be fairly low (50-65%) so that helped with drying too.
I wouldn't get hung up on the weight loss during drying, it's a secondary thing. The primary thing is getting the water out of the sausage as efficiently as possible. The meat will lose a lot of water and you want the amount of water moving up to the surface to equal the amount of water leaving the surface. I.e. the rate of diffusion to equal the rate of evaporation. This is what the drying phase is about. If the water is not removed quickly enough, you will get bad mold, slime, sticky goo, and the smell of ammonia. If the water is removed too fast, you get case hardening and stalled moisture removal leading to a hard exterior and soft, moist, mushy interior that may harbor bad bacteria.
Good luck and do send me some pics of your final product.
Tom Bachey says
There is some excellent info here! Thank you!! I have archived this site and I am looking into getting into fermenting/curing as I have been making sausage for several years now. My goal this year is to make some great salami. I appreciate your thorough documenting of your process!
Victor @ Taste of Artisan says
You are very welcome. Enjoy! I'd recommend starting with thinner caliber salami, 38-40mm or so. Good luck.
Victor @ Taste of Artisan says
Posted update #9 with a link to my recent post – Salami Sticks where I go into some detail about my new fermentation/drying process which has shown some really good results.
Michael says
I am getting the bug! I'm fixing up my shop so I can build a couple of curing chambers in it to do what your doing. I have been reading alot of things about curing chambers and I am thankful that I saw yours. I am taking my time to get the things I need to start curing. I look forward to your new additions to this blog. Thanks again.
Victor @ Taste of Artisan says
You are welcome! And welcome to the hobby, Michael. More stuff is coming for sure;)
Anthony says
Hello, Iam very interested in building a chamber. I have been wanting to make dry aged salami for a while. I have been on many forms and sites looking for a dry ager I can make at home. Like you say a lot of misleading info. I have been interested in your set up. Would I be able to get some info on what units I should buy. It’s oct 2021. You have tried a lot, I just wanna make sure I buy the right stuff to make my chamber. Iam in Saskatchewan, Canada. Hope to hear from you.
Victor @ Taste of Artisan says
Hi, welcome to the hobby. You really need 6 things:
a large(er) frost-free fridge (get a used one for $100 - $150 or so from craigslist or kijiji),
a peltier dehumidifier,
an ultrasonic humidifier,
a 10x20" seedling heating mat
a temp controller (Auber highly recommended)
and a humidity controller (Auber highly recommended)
I wrote about all of this in the post above, nothing has really changed or when it changes, I post updates. So far, this setup has been performing well for me for many years. It works great and I spend most of my time in this hobby creating and trying new recipes as opposed to messing with the setup trying to get it to work. When resources permit, I will add another fridge like this just so I have a separate fermentation/drying chamber which I can use as a separate curing/maturing chamber when not needed for fermentation/drying.
Ty says
Really glad I found this blog - so much good info!.
I don't have much room, and had hoped to go with a mini fridge to make a curing chamber, but many people have warned me against it because they typically aren't frost free - any tips on a compact fridge model that could work and not break the bank?
Victor @ Taste of Artisan says
Ty, it can work but won't be easy. Take a look at my panchetta post. I dried it in my bar fridge and was able to keep the humidity between 60% and 80%.

This was during the drying phase, when the meat releases a lot of water during the first week.
Another example was one of my capicolas.

Also not bad during such a critical drying stage.
Here is the picture of the make-shift chamber that I used - it was actually my kegerator (you can see the CO2 tubing at the back).
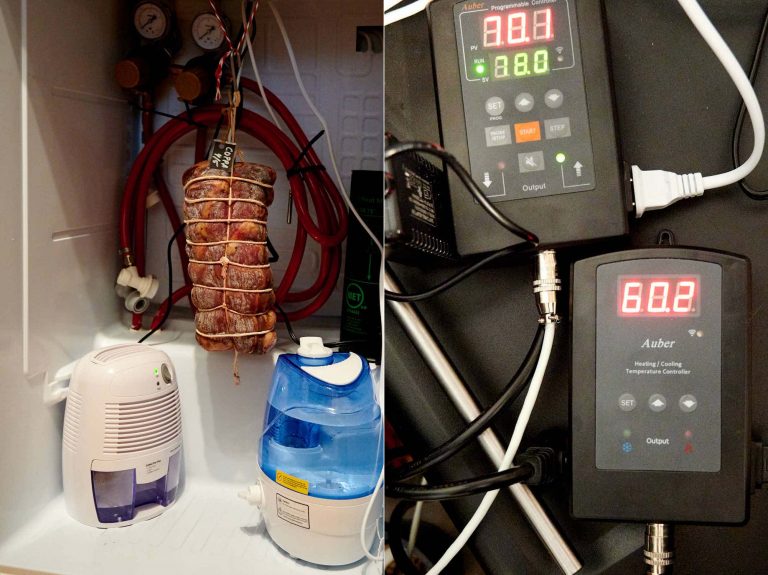
However, this humidity was with the temps staying between 60F and 72F, where there was a frequent alternation between the cooling and heating cycles (note the little roll of the seedling heating mat in the fridge there).
Once you drop the temp to 55F, the RH will go up substantially. The relation between humidity and temperature is inversely proportional - the temp goes down, the humidity goes up. It will become harder to control it in a non-frost-free fridge.
That said, it can be done though. The trick is not to overload the fridge. I don't think you can dry/mature 20 lbs of meat in it, even 10, but 2-3, maybe 5 lbs may work. I remember seeing some do it but he had a couple of thin sausages in the chamber.
Some food for thought. Cool weather is coming which can be very helpful. I once made a batch of thin salami, like fuet, fermented at room temp than hung it in the basement with the window open for about a week. The temps were about 55F- 60F and the RH was about 60% - 65%. It looked really good but was drying way too fast I thought. I think the weight loss was about 25% in one week. I then moved it to the curing chamber and matured at 55F, 75% RH. It lost 35% at 3 weeks but I let it mature for another week to have a total of 4 weeks (research I've read showed that you need a minimum of 28 days of drying to effectively deactivate any potential harmful bacteria). It was once of the best sausages I made, nice texture, and, surprisingly, no case hardening.
Ty says
Thanks. I live in southern az, so the temperatures and humidity swings aren't conducive to open air curing; nobody here has basements.
After messaging you,someone recommended a wine cooler instead of a fridge because they're naturally frost free and meant for temperatures more in line with the temperatures needed for charcuterie. Thoughts?
I think my biggest concern now is picking the right size chamber. As mentioned, I don't have much room - a full size fridge is completely out of the question - but I also want to make sure the effort is worthwhile...maybe it's not?
Victor @ Taste of Artisan says
If a wine cooler is frost free - I've never played with one - then things are looking up. In general, the larger the space the easier it is to control humidity. I'd say you should see success with a smaller fridge but with smaller batches, 5 maybe even 10 lb batches. I can't really say as I've never tested one. BUt it looks like there is potential.
I don't know if this hobby in general is really 'worth it'. It's a passion. I've made things I could never buy and my cured meats now are way more economical than buying and I know it's made of highest quality ingredients with no chemicals added other than nitrites/nitrates. And I've actually made a few batches using the old style, low sodium, no nitrates when using heritage pig meat straight from the local farm. You can't buy that. But if you consider the time spent to get this going and to get it work right, and the money spent on various controllers and accessories... and quite a few early batches that were trashed... There is definitely a learning curve to this hobby. I find it extremely satisfying and I think I enjoy making cured meats way more than eating them. If you are like me, it will be worth it, do it without any second thoughts, even with a small wine cooler, you will make it work. If you just want to make a batch of sausage, hang it in the fridge and come back a month later to enjoy some charciuterie, it's probably not.
Mike O says
Hi Victor,
Thanks for this comprehensive guide and for keeping the art alive. Just a quick question, can I use a (no frost) fridge that has a freezer on the top? We previously used it as a keg fridge so it has holes drilled in, already. Seems perfect, if possible. Thanks again!
Best,
Mike
Victor @ Taste of Artisan says
Hi Mike,
apologies for the late response. Yes, you can use a fridge with the freezer at the top, mine is like that too.
John Renner says
Hi Victor, I hope that all is well with you. I have made a first batch of land jaeger that was 100% spot on! I now have venison peperone and a bresoala (beef eye round) in my chamber. I have a humidifier and dehumidifier along with a 3x/day small circulating fan. I placed the last peperone stick (only6") directly above the DEHUMIDIFIER. In 9 days, the outside is dry and firm and the inside is much softer. The other links are 12" and were not directly above the dehumidifier, they have more moisture and feel consistently soft throughout. I'd like to be able to send you a picture via email if possible. A couple of questions: if I need to spray outside surfaces of meat with water, should I be using distilled or tap (chlorine in tap may impact)? Lastly (for this inquiry!); at what point can you attempt to taste/eat a peperone or any cured meat? Appreciate your time!
Victor @ Taste of Artisan says
If you need to spray water on the surface, I'd use distilled water.
When the sausage is ready to eat - it's not a simple question to answer as there are quite a few factors to consider. In general, provided you handled the meat safely, the acidity drop was sufficient and the sausage/meat dried evenly - it's when the desired target weight loss has been obtained. For salami for example, it's 35-40%. To complicate things a little, it's also time. I wait at least 28 days before consuming dry-cured meat/sausage as I've read several studies that showed the relationship between the drying time and the reduction/deactivation of harmful bacteria in meat over time. The studies seem to point out that contaminated meats were able to deactivate harmful bacteria to safe levels at about 28 days and longer drying reduced contaminants to an even greater degree. So, that's what I use as a guideline. But be careful, if your meat didn't dry evenly, you may have pockets (at the center for example) where water activity will be higher, still harbouring live harmful bacteria. Hope I didn't scare you too much whith this. This is a great hobby. I've been doing this for over 10 years without getting anyone sick, knock on wood.
John Renner says
hello victor, i tried to leave an inquiry yesterday but may have been unsuccessful. i'd like to send you a picture of venison peperone that i deem to have case hardened. it was the last link that i made and was only 6" compared to twelve others gt 12". I placed this small link directly over the DEHUMIDIFIER and it lost 35% in 8 days. outside was quite firm and seemed dry. center is quite soft. The other links had more outside moisture and are softer outside as well, so these seem ok. At what point are these peperone safe to taste/eat? Also, if I have to spray water on the outside of ANY sausage, should we all be using distilled water to prevent chlorine attacking the surface? Appreciate your time!
Victor @ Taste of Artisan says
Hi John, I sent you an email. 35% weight loss in 8 days even for a small caliber sausage is too fast. As I mentioned in my prior response, you should avoid hanging any meat over the dehumidifier as it's where it blows out air.
John Renner says
Hello,
I am a beginner. I made 5lb. Land jaeger 100% successful. I now have venison peperone in my curing chamber for 9 days. I had one 6 inch link directly over the dehumidifier. Much drier than the dozen other 12 inch links. I have a picture of the 6 inch link as well as a cut section from a 12 inch link further away from the dehumidifier. I believe that I have case hardened the small one hanging directly over the dehumidifier. I want to share a picture with you - how can I do that?
Victor @ Taste of Artisan says
Hi John, I emailed you so you can send me your pictures. The dehumidifier blows the air up so it's not surprising that the meat directly over it would get too much air movement and hence abnormally fast drying/case hardening. Just move it to a different spot. I keep my dehumidifier at the top of the chamber so it doesn't blow directly over meat.
Antonio Castaldo says
Hi, i have a magic chef wine refrigerator and was wondering if I could use that as my meat curing chamber for curing hard salami's?
I would appreciate any advice and guiding instruction you can pass along, as to the modifications equipment i need to make it work; such as controllers, dehumidifiers, humidifiers and fans.
Also how do you wire in the equipment without losing much of a seal?
Our family does enjoy charcuterie meats, and considering to built a curing chamber similar to what is working for you.
Thanks so much,
Tony
Victor @ Taste of Artisan says
Hi Tony, I recently had to turn one of my 4.5 cf bar fridges into a fermentation/drying chamber as my curing fridge was occupied and it kind of worked. At some temp levels I was able to maintain a good rH range, like this:

https://tasteofartisan.com/pancetta/
at other temp levels, I struggled. Where my room temp was a little colder than the target temp (I was doing fermentation), the heating pad and the fridge cooling alternated which allowed me to keep the humidity within the desired range. But when the temperature began to drop, it became harder and harder to maintain target humidity. This was yet another reminder to me that these fridges are NOT GOOD FOR CURING.
I've seen some people claim that yes, you can use those, look at my salami and such... I know you can't as I tried and couldn't. Expectations vary too... some may be happy with the results that others will find unacceptable... who knows... The amount of meat matters a lot... If you cure 1-2 lbs of meat in a small fridge you may get OK results but that won't fly with 10-20 lbs of meat...
That said, if you ask me, forget that wine fridge, get yourself a frost-free unit of at least 15cf in size and equip it with a humidifier, dehumidifier, and a heating mat, just like I described in my post. You don't need a fan. After you fine-tune it, you will start getting great results. With a bar/wine fridge, it will be little more than constant frustration.
Radu says
Hello Victor!
Thank you for keeping all this excellent information available and updated to help so many people across the globe getting the best of their hobby!
About six years ago, I made one curing chamber out of a frost-free freezer, but I was not satisfied with the results. Now, after reading your posts, I also understand why – humidity was the issue, as I used to overload the chamber with meat and sausages and for dehumidification I have only relied on the freezer’s compressor (forced to cycle more often by a heater), without having a dehumidifier.
Thanks to you, I decided to try this again and at the end of this week, I will have ready a new curing chamber which is similar to yours: it’s a frost-free fridge (only fridge, no freezer) of 380 L (~13-14 cf), with the humidifier placed outside of it and a dehumidifier with a double capacity than yours.
Before starting it up, I would appreciate very much if you could tell me what your opinion on the following points is:
1. As I will have only one controller for controlling all equipment (heating, cooling, humidifier and dehumidifier), I cannot have different set points for humidifier and dehumidifier or for cooling and heating. For example, when the temperature will be equal to the set point + offset value, the controller will start the compressor and will stop it when the set point is reached; when the temperature will decrease to the set point minus offset, the controller will power up the heater and will stop it when the set point is reached. The same for the humidity. My question is, based on your experience, what should be the offset values in my case for temperature and for RH%? At least to start with, because I’m aware I’ll have to fine tune it myself in time...
2. What would be your recommendation for the maximum quantity of meat/sausages to be placed inside this curing chamber?
3. Because the products with bigger diameters dry slower (the water needs more time to diffuse from the center to the surface), can I think that is OK to put inside the curing chamber a bigger quantity than in the case of smaller diameter products? Think of coppa vs. fuet, for example.
4. Is it a problem to load at the same moment the curing chamber with big diameter and small diameter products? I would expect the big diameter products may need longer exposure to higher humidity than the ones with small diameter. Or, maybe for such a small curing chamber I should not bother?
5. If using a separate fermentation chamber, would it be OK to mix in the curing chamber fresh products, just out of fermentation, which require high initial humidity with products which are toward the end of their curing/drying period?
Many thanks in advance for your answer! I hope it might help others too.
Victor @ Taste of Artisan says
Hi Radu, good luck with your new build. Hope it turns out to your satisfaction.
To answer your questions,
1 - To be clear, what you refer to as 'offset' is called 'differential' on Auberins and Inkbird as well IIRC, and 'offset' refers to calibration difference between reported and actual values. I am going to use this terminology if you don't mind. My differential on temperature is 1.5 and 1.5 - 4 on humidity. The temperature stays unchanged most of the time... the humidity differential changes depending on two things: 1 - processing stage and 2 - how the meat looks. During fermentation, humidity is free (99%), during drying, it fluctuates between set values so my differential can be up to 6, during maturation I vary it between 4 and 1.5. I'd say 2 is a good start.
2 - The chamber of your size, which is similar to mine, can do up to 20 lbs. I had to use two of my dehumidifiers to handle 20lbs. One dehumidifier can handle 10-12 lbs. The more meat you have the more challenges you will have. I'd say stick to 12 lbs or less. Do thinner meats with shorter maturity, it will be easier. Start small, then add to your batches.
3 - Doesn't matter that much. With thicker salami and solid meats you will still have a heck of a water loss initially so humidity control will be a challenge. If you want more meats, stagger them. Look at my recent salumi recipes, all my meats now go through a drying phase... you can dry in a separate chamber then add to the maturation/curing chamber. That will let you have more meats in it... but as I said, don't try to go big from the get-go. Do a small batch. Once you are happy with it, go a little bigger. I've lost a lot of meat by going way too big without knowing how to control humidity and how to identify problems and course-correct.
4 - Initially, do them separately. Once you are comfortable and have had consistently good results, you can mix and match, I do all the time. It's doable. But like I said, I now ferment and dry before maturing. Thicker and thinner salami require different drying cycles so I always ferment and dry them separately, then mature them together. There are some compromises you will need to make though. Ideally, I would mature them separately too. I am actually considering adding another fridge to my arsenal. One will be for maturing thicker salumi, the other for fermenting/drying and maturing thinner salumi. Ideally, I'd like three fridges but not sure how feasible it will be.
5 - I wouldn't the way I do it now. Thicker and thinner salumi require different fermentation temps and durations. The goal is to get the meat heated to the right temp in the center, so obviously, fuet can achieve that much quicker and a lower temp. Similarly, drying will require slightly different temps and humidity regimens. That's why I am adding a new fridge soon to have a dedicated fermentation/drying chamber that I can also use as a maturation chamber for small caliber salumi when not used for its direct purpose (only a few days a few times a year). After drying though, yeah, you could mix and match them, I do, but as I said, you will need to make some compromises depending on what types of salumi you are maturing there. Some need lower humidity (pancetta, guanciale) and some higher humidity (salami).
Hope this helps.
Radu says
Victor, thank you so much for taking the time to answer all my questions! It really helps me a lot!
Victor @ Taste of Artisan says
You are welcome.
Chris says
Victor
Great stuff, I won two busy restaurants and I find your attention to detail to be refreshing. You are from the old school, which is the best school. I built a nice curing cabinet for one of my places, I used your basic structure to model it after. THANK YOU.
I have one simple question, on the dehumidify side....
I purchased a EDV-1200 since my cabinet is a decent size. When the atmospheric controller energizes the socket for the dehumidifier to turn on, the unit must have a control switch that you must physically turn on the unit for it to work, which defeats the purpose.
Does your EDV-111 simply work when the electricity is put to it, then shut off then back on properly? My model cant do that. Before I call EVA DRY, i figured i would first off thank you for the passion and the dedication it takes to be this good.
If you have time I would love to know how you worked around this issue.
I start filling the cabinet soon!!!!
Happy Thanksgiving Sir!!
Victor @ Taste of Artisan says
Hi Chris,
my apologies for the delay with the response. Congratulations on building your curing chamber, I am sure you will have a lot of fun with it.
As to the dehumidifier, I have two and both work the same way - there is a on/off switch. As long as the switch is 'on' position, supplying power/cutting power off to it from the controller will turn it on and off respectively. You are correct, the way your unit operates makes it useless for the application in a curing chamber. It looks like it's 'feature'... don't know what Eva would do about it, I would consider returning if you can and getting a different one. Not the most elegant solution, but I run two smaller ones together for big batches, you can try that if you can't find a big unit without the 'feature'. Finally, if you are technically inclined, you could rewire your dehumidifier to always stay on.
Juha says
Thanks Victor for a lovely blog. I am a beginner and trying to build my first meat curing chamber. I've acquired Inkbird IHC-200 and ITC-308. As you have used these, can you post the exact settings you used (TS, CD, PT, HS, HD, DD and PT). It would be enormously helpful getting started.
My previous reply seemed to get deleted somehow.
Victor @ Taste of Artisan says
Hi Juha,
welcome to this fantastic hobby full of delicious meats. Yes, I've tested those controllers but I don't run them on a da-to-day basis so I don't have the exact settings for you. As well, some of those settings will be very specific to your environment/needs. Most of them are self-explanatory... like TS is the target temperature, which would be 55F in most cases, PT - delay protection should be the default 1 minutes or a few minutes, HS is your humidity, which will vary depending on your recipe/fermentation/maturing stage... normally 75% to 85%... HD is the differential of HD, 5% is a good start... Same for DD - dehumidifier differential.... if you have any questions about specific parameters, let me know.
George Lathrop says
As a followup on a previous thread. The post about Cool Bot got me to thinking about my attempt to turn My old furnace room into a curing chamber. it is small about 50 sq ft. so the Idea of modifying an A/C to cool it to the mid 50*s is attractive. I have fairly extensive experience working on electrical and electronic systems. So I bought a window AC and built a plenum so I could use My unused chimney flu's air flow to cool the unit. I then Bypassed the built in Tstat. and connected it to an external thermal controller. It is working reasonably well. air temps are down from an ambient of 64*F. to ~54*F in about 18 hours. I have an unusual environment in that 3 of the 4 walls are largely concrete. Only 1 is largely an out side wall. Partially below grade. So a lot of thermal mass. I will try to do some foam insulation but for now it seem to be working.
Victor @ Taste of Artisan says
Sounds interesting and encouraging. We just moved to a new place and it has a small cold room, nearly identical to yours - 3 concrete walls and about 42 sf in size. I am looking forward to trying it out this fall/winter as a maturation cellar and hopefully next spring I will add some equipment to control temp and rH.
Chris says
Amazing blog! Thanks Victor.
I've been fiddling around with a curing chamber for a few months, but I really wish I read your blog earlier. I understand
now that my biggest issue is that I don't have a frost-free fridge. The humidity has been manageable, but not great. I built my own controllers with a Raspberri Pi and I'm using a Blynk interface to control everything from my phone. I can set the humidity and temperature to the required ranges. I have a humidifier, dehumidifier, heat lamp and fan inside the fridge. I'd love to send you some pics?
So far I've successfully done a few batches of biltong (South African dried venison). Mostly Bluewildebeest. And dried sausage, also venison. I've also dry-aged a few batches of strip loin, about 5kg each. These turned out great. I was worries about the big humidity swings in the fridge (which I now understand is caused by the NON-frost-free fridge I have. Even though humidity would AVG around 85% over the course of 3-4 weeks, it would swing from 65% to 95%. I am doing som planning and want to try some salami soon.
Sorry, this is turning out to be a long post. I have a few questions for you:
1. I have a tray of activated charcoal pellets in the fridge to help absorb smells. I've been reading contradictory views on this. Not sure what you thoughts are? Helpful or useless?
2. I also have a few big 5kg blocks of Himalayan salt in the fridge. I read this helps when dry aging beef? Not sure if you have a view on this and if it will interfere with making salami?
3. I also used a very big 75W flourescent germicidal UV lamp that shines through the glass door of the fridge from the outside. I was hoping this will kill any bacteria in the fridge. I suspect this might also kill any mold growth, including good mold growth?
Victor @ Taste of Artisan says
Hi Chris, welcome to my blog. Yes, a frost-free fridge, as large as you can get, is best for curing. Looks like you've got the other pieces of equipment in place but I would advise against a fan as I had nothing but issues with mine.
Activated charcoal is not required and I am not sure of its efficacy in the curing chamber as I've never used it. Meats do tend to absorb ambient odors so you want to make sure that there no bad smells inside. Bad smells typically are caused by too high humidity. Open the fridge twice a day to refresh the air and that will suffice.
Don't know about the value of salt in a curing chamber other than when you have a tub with wet salt which helps keep humidity at around 75%. A much better solution is a humidifier and a dehumidifier though.
I'd be careful using UV light which causes most lipids break down and degrade causing rancidity.
Peter Z. says
Have you heard of figatelli? It has liver in it. They make an exceptional one commercially in Montreal.
Victor @ Taste of Artisan says
Yes, Corsican pork and liver sausage. Love it.
Ronnie says
In update #8 you talk about your new preferred curing method. Where do I look for that? Thanks
Victor @ Taste of Artisan says
Ronnie, check out any of my most recent dry-cured recipes, I am using the new process in all of them.
Flash says
Hello. What do you think of making salami with caribou? Ian in Alaska. I know I’ll need to mix pork fat with it but see no reason it shouldn’t work. Hunting season is around the corner so I am now looking for a used fridge. Thanks for your posts Flash
Victor @ Taste of Artisan says
I see no reason why it shouldn't work either. In Eastern Europe horse salami is very popular and it tastes very good. The meat is tougher than pork but the salami, thinly sliced, is very tasty. Who would have thought, right? I would you pork fat though, 25%-30%. Back fat ideally, or pork belly.
Mike says
Thanks for this post and keep us updated over the years!
Rafael says
Hi victor;
I have read a bunch of your recipes and posts; so I decided to drop you a note and thank you.
I am a retired Army officer and like you I love to cook and make things up. I started curing meats about 2 years now and I am very happy with my results so far. I have 25 lbs of you salami Milano recipe fermenting as we speak.
I built a curing chamber (two) following your instructions and they worked great. Been gritty and bored with he Covid pandemia I decided to build a walking cooler to cure more stuff. Have you heard of Cool Bot? google it. I built a 58" x 55" x 75" high cooler using the cool bot, I have an issue controlling the humidity but I am working on it.
Anyway I wanted to thank you for your ideas and recipes and do not want to take more of your time.
Victor @ Taste of Artisan says
Hi Rafael, thanks for your feedback. I am happy to hear that my blog helped you. Never heard about the Cool Bot but looked it up - sounds like a cool device. I've been toying with the idea of building a cellar, using a wine cellar cooling unit. Boy, are those expensive! Cool Bot sounds like a reasonably priced alternative (along with an inexpensive AC unit). About your humidity challenge, I've been experimenting with my cellar idea and found that humidity was very hard to control. So I did some research and found that in order to control humidity successfully you need very good insulation, a vapor barrier all around, and the materials inside the room should not absorb water (e.g. carpets). Good luck with your build. I'd love to hear how it turns out.
Tony says
Victor, want to start by thanking you for all the info on this site. I’ve been inspired to produce my own sourdough starter, just baked you cinnamon buns yesterday and recently purchased a commercial soda fridge and I’m about to embark on a Curing. Hammer build. So far I have humidity and temp controls, Humidifier/Dehumidifier but I’m curious about a few things I’m hoping you can help with:
1. How will I know if I need to add a fan to circulate air.
2. I’ve seen some posts on seed heating mats to add the fermentation step. Is this a highly recommended addition or can I skip.
3. How should I think about managing different cuts and types of salami and the timing of when each is introduced to the chamber. Do I need to Focus on batches where the drying conditions and timing is similar or can I introduce different products to the chamber at different times.
Any help is appreciated and thanks again for all of this great content. Much appreciated!
Victor @ Taste of Artisan says
You are very welcome, Tony. This website is my passion and I am very happy when it inspires others to make tasty, artisan food at home.
To answer your questions:
1. Air circulation serves a very important function: to help with the removal of moisture from the surface of the meat/sausage to facilitate drying. It works in tandem with relative humidity to accomplish that. You are asking the right question - 'how do you know that you need to add a fan?' as opposed to 'do I need a fan or not?'. I alluded to this in my comment earlier today. What you are looking for is dry but hydrated skin. It should not be wet or sticky/slimy. Wet, sticky or slimy surface is an indication that more moisture comes up to the surface than it is removed from the surface (i.e. diffusion > evaporation). This necessitates decreasing humidity and/or increasing airflow. If your humidity is already at the lowest you want it to be, increase air circulation. I find that the airflow created by my dehumidifier and by the fridge itself when it circulates is plenty.
2. I use one and find it very useful. You need one every time you want to raise the temperature in the chamber. It could be used at any stage, fermentation (more likely) or maturing (say if your fridge is in an unheated garage in winter).
3. It helps if they require similar maturation conditions but I mix and match and it works out well since most of the time those are quite similar. My new approach is to subject salumi to a week of extensive drying when the meat loses the most water, then mature in the curing chamber at about 78-85% rH and 55-57F. If my curing chamber is empty, I do it there. If not, I ferment/dry in my bar fridge, then move to the curing chamber. If you want to see how I do that, I provided a lot of details on that in my most recent salumi recipes - capicola, finocchiona, Bergamo, pancetta and other.
Take a look at my curing chamber today, there are various salumi pieces in there, introduced at different times and happily coexisting with each other and maturing quite well.
Tony says
Thank you and I can’t wait until my chamber looks like yours.
George Lathrop says
what is the procedure for testing the ph in sausage using a meter. I read that you need to make a slurry of a test sample. a related question is there a relatively affordable tester on the market. Most seem to be for water testing.
Victor @ Taste of Artisan says
Hanna is the best way to go in my opinion. The pH meters used to be bigger and more expensive but lately they've released several inexpensive meters. Their Meat pH Tester is $99, I've been using it for the past 2 years and like it a lot. Another one I have and like a lot too is their HALO Wireless pH Meter. Also have been using it for 2 years. It's more expensive at about $200 but I like the wireless feature and the ability to take snapshots of the readings on my phone. Both are for direct measurement (you stick it in meat or sausage), no need to make slurries. Both are highly accurate and will last a long time with proper care (I have an older, bulkier Hanna model that I had used for over 6 years and the electrode is still working fine). They have a meat tester with a blade tip before the conical electrode for easier penetration of solids but that's unnecessary at home, just make a small nick with a knife then stick the pH meter to get a reading.
George Lathrop says
Thanks for the tip. I have ordered Kent's book. It should be here today. I will definitely check out your recipes. if I can.
Nick says
Thank you . Very clear and all the info in need to start the process of making my own cabinet.
Victor @ Taste of Artisan says
Share some pictures when you are done.
Patrick says
Hi there i really love the time and effort you have put into this page. It’s really helpful and full of great information for the avg meat curer. I am starting my first every curing chamber set up and have follow tour setup. My issue at the moment is first day in the humidity rose up super high and dehumifier couldn’t get it down . Around 90-95 . I had to open the door. The ambient temp outside is 75-80. Any suggestions I’ve cut no holes I glass door fridge as was too paranoid I’d cut into the cooling piping. It’s winter here also so haven’t been using the temp side of things as temp is perfect 8-15c.
Victor @ Taste of Artisan says
Hey Patrick, congratulations on starting this new and exciting, and very tasty hobby. If you want me to help you, I need more info as I have no clue what your setup is like. How big is the fridge in cubic feet? Frost-free? What dehumidifier? First day of what? Empty fridge or loaded with meat? How much meat? So many variables can affect humidity.
Patrick says
Well I’m using my fathers bromic 660lt glass door fridge. I started with a small Hysure dehumidifier. And a rimposky humidifier. I live in Australia and it’s winter here with really nice cold weather and reasonably high humidity levels around 60+. So Last Saturday we made around 30kg of salami, and I decided to put around 12 kg In my new curing chamber. As soon as I closed the door the humidity spiked out of control going up past 80. Even to as high as 90 and 95. I’m using inkbird plug and play controllers to control My units inside the fridge and that little dehumidifier was not coping. So I just had to open the door and it would drop from high 90 to around 80. I wasn’t overly concerned at this point as I have read in many case that 80 for the first few days or first week is ok but I was impressed on having to have the fridge open to achieve this. So I purchase a bigger dehumidifier and some computer fans to help assist With air circulation and dropping the humidity. Well this helps a little more as I can get it down to 74-75 and after I have wipes my salamis clean with a water and vinegar Soloution from the first week of higher humidity but again only with the door open as if I close it even with all this prevention the humidity still climbs over 80. Unread somewhere that maybe to cut a hole in the side of fridge pane and use one of those fans to extract the air from inside. Will the help me lower and coNtrol the humidity with being able to close my door ? My fridge is in a garage which I monitor it’s humidity and temp and the garage sits at 77% when the fridge with door open and both dehumidifier going and a fan circulating the air inside at 74.5%. If I turn it all off and leave the chamber door open it will slowly go up to 83-85 % . I do realise it’s going to be a lot of trial and error to find out what works but hopefully you can steer my in a quicker path to success as I read all of your posts and pages and love what you do thanks
Victor @ Taste of Artisan says
Hey Patrick, you started too much too fast, like I did back when I was got into this hobby. It will be very tricky. First, forget about the holes in the fridge for intake/exhaust fans. Read my post, I ditched them very quickly. Whoever started that idea either tested it in very peculiar conditions or pulled it out of thin air. It may be a great theoretical idea but it did not work in my case. At all. I think this may only work well if your ambient temp is around 55F (12-14C) and the humidity is lower than in the fridge. As soon as the ambient temp drifts away, up or down, it starts to cause more problems. In my post I also talk about fans - I removed them as well after I tried for a while. They cause case hardening. In a tight space, they are of questionable value. You get enough air circulation from when the fridge circulates and from the dehumidifier. That's been my experience. If you do add a fan, make sure it puts out the flow of about 0.5 m/s. I got that by undervolting a computer fan to about 3-4 volts.
>
About your batch. I am not surprised you are seeing rH spikes like that. 26 lbs of meat is significant for this relatively not very big fridge. What is it, about 15-18 cubic feet? I recently did a similar batch, it was about 13 kg in my curing chamber. I had to add a second dehumidifier to bring the humidity down. That's what I would recommend. If you are inclined to drill a hole, try first running your fridge with the door just slightly cracked open to allow for RH to equalize with ambient but not loose too much chill so your fridge will have to circulate non-stop. When the ambient temp is around 12-14C, open the fridge, let the meat breathe. Many cure meats in their basements with great success, assuming the right ambient conditions. 80% rH initially may be good, but I use a different approach now which gives me superior results and more consistency, and no case hardening so far. The approach is widely used in Italy, it involves intensive drying during the first week, then maturing at around 80-86% rH. Kind of backwards to what you will read in American books. But it works very well. Initially, meats lose a lot of water. Lowering humidity only makes sense as you want to remove as much of that water from the surface of the meat as possible. If not, you get slime and various bad molds developing. As well, removing all that moisture quickly results in more even drying and creates less favorable environment for pathogenic bacteria growth inside salami. Check out my most recent salami recipes, they all use this method, which is described in PDO (protected destination of origin) Italian recipes of various salumi products (I have links in some of my posts).
>
In the end, whatever you do, try not to go by what humidity you have (by the way, your hygrometer may not be showing correct rH anyway, as I mentioned in the post above), but rather by how the skin looks and feels. You want dry, but well-hydrated skin. It should not be wet. It should not be dehydrated (case hardening). It should not be slimy, or have weird molds growing. You want white or greenish mold (read my post on green mold) that evenly spreads across the skin. You do not want spotty, nasty looking green or other color mold. The smell should be earthy, like mushrooms. Bad smell is a sign of too much humidity/moisture on the surface.
Patrick says
I have a bromic 660lt glass door fridge . I’m using a small and large hysure dehumidifier, an internal 120mm computer fan to circulate the air inside. And a rimposky humidifier. They are plugged into inkbird ihc-200 plug and play controller. When I close the door the humidity goes up super high like 90-95. Especially the first few days I put my fresh batch or 12 kg of salami. Now it’s been a week and still have the door open but can only achieve 74% lowest. If I close the door it spikes straight back up to 80-85.
Victor @ Taste of Artisan says
Too much meat, my friend. It loses a lot of water initially so your humidity will be very hard to control. As I mentioned in my other comment, add a second dehumidifier or run the fridge with the door cracked open. If the ambient temp is right and the rH is 65% - 75%, open the fridge or even take the meat out of the fridge. I've dried a couple of batches in my basement in winter with very good results. My humidity was a bit low though and I had to finish curing in the curing chamber but the salami turned out very good.
George Lathrop says
you mention Ruhlmans salami recipe. He has 2 books Salumi ans charcuterie. which one do I need? I have a fairly extensive collection of books on the general subject already. thanks for the Recommendation of Bertolli as I have really enjoyed it.
Victor @ Taste of Artisan says
George, only you can decide what you need. Both books are good and complement each other. He has good recipes and a few not so good in each. You make your judgement after you make a few of his recipes and compare them to other recipes. No other way to go about. I'd get both. I did. Hector Kent's Dry-Curing Pork: Make Your Own Salami, Pancetta, Coppa, Prosciutto, and More is an awesome book. I'd get his book first if I were just starting out. Charcuteria by Jeff Weiss is a very good book with beautiful illustrations. Lately, I am making a lot of PDO salumi recipes. Those are readily available online, also check out my recent salumi recipes, they are based on PDO recipes. For the most part, I prefer those to most book recipes. But you have to start with the book recipes and move on to PDO ones after you gain experience as those provide only general guidelines and not specific steps.
Pepo says
Amazing website, indeed.
Thanks a lot for sharing these experiences and good info.
Just starting my own salami thing in Buenos Aires,
We have some northern Italy tradition in salami and the like as for Colonia Caroya (Friuli) , Oncativo (Marche and Piedemonte), both in Córdoba.
And Tandil and Mercedes from Buenos Aires province.
Still waiting the arrival of the T/H controller.
I've done some Bondiola though and came out just fine.
Cheers
Victor @ Taste of Artisan says
Hi Pepo, you are very welcome. I am glad to hear that you are finding some useful information on my blog. It's very interesting how Argentina is so keen on salumi making which makes perfect sense on account of considerable European migration to Argentina from Italy and Spain. Very cool. Argentina is one of the top places I want to visit someday. Good luck with your build, I am sure you will enjoy this hobby.
Robert says
Thank you for inspiring a lot of people to begin their own fermentation experiments. Here are my questions:
1) if I buy Auber Hd 220-W and Auber TD 120-W and a humidifier would that be enough?
2) How many holes do I need to drill in the fridge? top or bottom? is that for the humidifier?
3) Is there still a need for hygrometer?
4) If I chose to use this chamber to heat to 140 F, for example making garum can I do that?
Victor @ Taste of Artisan says
Hi Robert, apologies for the delay with my response. To answer your questions:
1 - you need to add a DE-humidifier to the mix. High humidity is the biggest problem that you will face. With large batches (about 20lbs) I run two of those. You can get a larger de-humidifier, that's what I would recommend now. If you plan on fermenting in this fridge, which I do often, add a seedling heating mat (see above in my post), it's cheap, safe to use and works exceptionally well. Those are very fine controllers that you want to get, I love mine.
2 - I have one hole (about 1 inch or 1.5 inches, I can't recall). Through it, I run the dehumidifier power cable, two sensor cables, heating mat power cable, and the humidifier hose. I had more holes before, intake and exhaust fans but covered them up pretty quickly as that was only messing up my temps and humidity.
3 - If you read my recent updates above, all controllers / sensors I've played with report different humidity and temps. Temps are less of a problem, but deviations in humidity sometimes are quite big. For someone new to this hobby, I highly recommend that you get a reference hygrometer. The Hanna one that I have would probably have saved me a few batches initially and would have paid its cost in saved meat in spades. Even if you are experienced, still get it. I feel like I don't really need it now as I can feel my salumi and tell if it needs lower or higher humidity. But that came after dozens of batches and by using a hygrometer to validate my assumptions and quantify my observations. I still find it very helpful. I would definitely get one.
4 - I would most certainly not recommend that. I don't know what it will do to the fridge's internals as they were not built for that temp. Will the plastic melt? I wouldn't even try. Need 140F - use something like this. I use it at 140F most of the time. It's built for this temperature.
P.S. Never heard of garum. Sounds interesting though and something I'd love to try making.
George Lathrop says
It is common to make smokers from old fridges so !40* F. should be safe.
Victor @ Taste of Artisan says
Yeah, I've heard of that but still don't feel comfortable... Will the plastic inside the fridge break down and emit harmful chemical elements into the air? That said, I don't base my take on this matter on any scientific data so my concerns may very well be baseless. Take them with a grain of salt.
John A says
Hi Victor:
I am setting up my curing chamber and have an observation that might save others some time. The dehumidifier must be able to come back on after a power failure as the controller cycling looks like a power fluctuation to the dehumidifier. If the dehumidifier is not equipped with a simple on/off switch it will wait for someone to turn it on again, ignoring the controller sending it power. The Eva Dry that I just ordered is on-off. My earlier dehumidifier had a capacitance switch that defaulted to off every time the controller interrupted power.
John
Victor @ Taste of Artisan says
Hi John, that's an interesting piece of information to keep in mind, thanks for sharing.
George Lathrop says
Great blog. I just bought a cheap stuffer on amazon which had good reviews. as always with cheap it may or may not work out. I plan to start with a kosher style smoked salami. ad will use a cold room in my basement. ~50*F. right now. As I am a ways away from the meat dryer build. I have a really big dehumidifier but It only works full tilt so will be of limited use. I have a modified cabinet smoker which was originally charcoal fired. It has been modified to use either electric or propane. Electric works well for cold smoking. Propane for Hot smoke. I use a separate external smoke generator and pump the smoke in using a n aquarium air pump.
Has anyone used a peltier cooled cabinet for a dryer build?
George Lathrop says
have question about stuffing tubes. I would like a salami of ~ 1" to 1.5" finished. most of the stuffers I am seeing max at 1" or less tubes. I have seen pics of sausage stuffing where the tube size seems smaller than the sausage as stuffed. how do I choose a stuffing tube size.
What stuffer do you recommend.
Victor @ Taste of Artisan says
Hi George. You asked an interesting question. I prefer tubes that are slightly thinner than the casings. If the casing is too tight, it's will be hard to put it on the tube. Any air trapped in the meat will come out and create big bubbles, making it hard to do the stuffing. Too small of a tube relative to the casing is not a huge problem though, you can squeeze the tube at the opening and control how tightly you want to the casing to be filled.
>
But, ideally, about 3/8" - 1/2" under is what I prefer. Check out the beginning of this video - https://www.youtube.com/watch?v=0B5WvT_sWBY - (one of my favorite smoked kielbasas, I posted the recipe on the blog), this is kind of what I am talking about.
>
That said, I use 1" to stuff 4-5" salami with no issues.
>
As far as the stuffer goes, I own a manual LEM 5LB stuffer and a LEM 20lb motorized. Love my motorized stuffer. A lot.
George Lathrop says
Very informative. I especially liked your discussion of the humidity and temp controllers and the hygrometer. while doing a bit of research on humidifiers I noticed that at least theoretically they are available with a humidistat. have you found a small/travel version with that feature?
Victor @ Taste of Artisan says
Thank you. I never researched humidifiers with a humidistat but I would imagine something like that exists. But here is some food for thought - how accurate will that little humidistat be and how responsive? Will it coexist nicely with the controller that will control your dehumidifier? I know some seem to get away with just a humidifier by virtue of living in a dry climate perhaps, but most will need a dehumidifier as over the past 8 years or so I've spent way more focus on keeping humidity down as opposed bringing it up.
Astrid Gearin says
Hi, do u do more than salumi. I am a embarrassed novice and haven’t yet started anything but reading/ but am hoping I can create a system that makes a few things. Do I think ur system would support growing mushrooms? And also ferments like koji rice/barley To Make miso sourdough, cheese and breads, ????
‘Matt ?’ was on This thread talking ferments also l. Blue prints? Sketches , lists.
Victor @ Taste of Artisan says
Astrid, I primarily make salumi but I've also successfully made cheese in this curing chamber as well. Ideally, you'd want to have a separate chamber for cheese and salumi, or other products you plan to make. This curing chamber allows full control of temperature and humidity, and can go from low 30s to 80-90F if you need to, and humidity can range from 40 - 50 % to 99%. There are some caveats but in general, it can handle growing mushrooms and making other things. I've checked a few sites about growing mushrooms and none mentions humidity. If the right temperature is all that's required, you job will be much easier, you'll just need an old fridge, a heater (if you need temps above ambient) and a temp controller. For other things, you may need to introduce humidity control.
Rob says
Thanks for the updates Victor, especially your April 17th post with info regarding variations in humidity readings. I also found my two Inkbird controllers read low out of the box, so I've programmed them with +5.4% and +7.4% RH correction factors. Got a question for you - in your latest curing chamber photo above, what's the black "MOTEK" (spelling?) next to your Eva-Dry?
Victor @ Taste of Artisan says
No problem, Rob. The variations are quite significant, so not to be taken lightly. My current batch is quite large so I keep a very close eye on it and what I noticed was that even a 1-2% change makes a noticeable difference. For example, at some point, I set my humidity to run between 80 and 86% and noticed the development of green mold and strong mold odors. The green mold seems to be the bloom of nothing more than Penicillium nalgiovense, which I wrote about here, and it disappeared shortly after I dropped the high limit to 84%. On the low end, I noticed that the skin on my salami was a bit too moist/soft, so dropped the lower limit to 78% and the next day I noticed a slight hardening. So I moved it back up. Perhaps I am getting a little nit-picky but those were my observations.
>
That said, even if you reading on RH is off, you can get away with it by not focusing on the number so much as on how the casing feels, while monitoring weight loss. Of course, you need some experience to guide you.
>
The device next to the Eva-Dry is a rolled-up 10" x 20" seedling heating mat. I found that they work very well and I've tested this one and the large one in both my curing chamber and the small 4.4 cf fermentation chamber. The large 48" one is way too big even for my curing fridge so I go this little one and It works very well too.
Victor @ Taste of Artisan says
Heads up, I posted several updates at the end of the post. I hope you guys find them interesting. Enjoy!
DeadEye says
Great post, great post, thnanks. in regards to the humidfier outside the curing box: I may have missed it, but is this setup inside or outside a controlled room? I plan on putting mine inside a butcher room that is controlled by an air conditioner and I don't really want to put a humidifier in there.... I could also put it in my walk in cooler, but again I would not put a humidifier in there?
Victor @ Taste of Artisan says
My curing chamber is in the basement which is not controlled. If your curing chamber is large enough, there is nothing wrong with putting the humidifier inside it.
Steve Denvir says
Hey Victor, the curing chamber is a great success. I’ve done lonza, coppa, and just today pulled sopprosetta out and you’re right. I used Ruhlman’s recipe and it’s fabulous. Laid off the spice just a little and added a little more dextrose and extended the fermenting time by about 12 hours.
It’s got a subtle tang and just enough heat to be interesting.
So thank you for all the guidance.
But here comes the 64 million dollar question.
How do I store all this stuff? Wrapped in plastic wrap? Tinfoil?. In t(e regular fridge? The curing fridge?
Help!
Steve
Victor @ Taste of Artisan says
Awesome, Steve! You are very welcome. Email me some pictures. I have 4 types of salami and a few other goodies that will be joining them soon. Will be posting pictures and recipes once they are ready. I am testing out a slightly different approach too...
>
Storing - I've done it three ways: keep at 55F/75%, freeze or vac seal and refrigerate. All three have pros and cons but vac sealing and refrigerating seems to be my favorite method. Freezing is my least favorite.
Steve Denvir says
Hey Victor, one off-topic note. I did up 10 lbs of bacon in the smoker on Sunday.
But once it was done, I took a couple of slices, chopped them really fine, and mixed them into the ground beef we were using for burgers that night.
Best burgers EVER.
This may be old news to you, but if it isn’t, I can’t recommend it highly enough.
Victor @ Taste of Artisan says
Hey Steve, thanks for the idea. No, I've never tried that but I will now that you recommend it. I do like to mix things into my burgers, I do it all the time - crumbled or chopped cheeses, caramelized onions, sauteed mushrooms, and other things.
Rob says
Victor, please fill me in on the pros and cons for those 3 storage methods. I've always vac sealed and frozen my meats that won't be consumed soon, so I'm curious why vac sealing and refrigerating is your favorite. I'm giving that a try with some salami I just made. Except for some that I experimentally vac sealed and froze with the white moldy casing still on - to see if the salami might absorb more of that nice mold aroma/flavor with time. I'm pretty sure if I tried vac sealing and refrigerating salami with the moldy casing still on, the mold would die and turn nasty.
Victor @ Taste of Artisan says
Die and get nasty, ha:? I just pictured those little buggers in there... lol... As far as the three methods go, I don't like the 55F/75%RH method as the sausage continues to dry and eventually gets brick hard. I can't remember who suggested it, may have been Marianski or Ruhlman... I saw it many years ago. It's good for short-term storage, about a month or so. The freezing method, you get a couple of years of storage easily, I once found a salami in my chest freezer that was 3 years old. Unpacked it, it was still good. The problem is occasional frostbite, drying out, sometimes as a result of the seal loss, sometimes just because. But more importantly, I feel a change in the texture. The fats taste differently, the meat has a different chew... It's hard to describe but I taste it. The vac seal and refrigerate method - it works best for me as there is no change in the texture. If the product is dry enough it shouldn't even need refrigeration, take sujuk for example, or a salami with a 40-45% weight loss. Seal it and put it in the fridge and it will last there for a year easily, without further drying out. I don't seal with moldy casings though, I remove them before sealing. I think I started doing that after I purchased several Italian-made salamis that were packaged like that.
Joe says
Im wondering if an upright freezer would work the same as a fridge for this build. Im thinking it should and I can get an upright freezer for cheaper than a freezer less fridge
Victor @ Taste of Artisan says
If it's frost-free it should work.
Kayla says
Great article Victor! I’m new to this, having only cured my own bacon prior to entering the world of sausage making. I do have a spare fridge in my basement but when you mentioned controlling the RH of the room outside of the fridge, it got me thinking. I have a small cold storage room, all walls are concrete except where the door is and the ceiling. If I seal off the ceiling & door, Sterilize everything inside, do you think I could make that as one giant meat chamber? It always sits 12-14C, I’m from AB so it’s usually dry here.
Victor @ Taste of Artisan says
Kayla,
That will work as long as you can control the humidity. Temperature is easy to control, humidity is not. I've been looking into building a curing cellar myself and learned that you have to install a vapor barrier and insulate that room very well. If you don't, you will end up having water condense on the walls instead of staying the air. Insulations will affect the temperature. It will be a vicious cycle until you get a cooling unit for your insulated room and a humidifier. I'd say, if your the temperature and the humidity there is fine, then go for it. If the humidity is low (below 72%-75%), it will be very hard to bring it up. I tried it in my basement without any significant success.
>
On the other hand, many cure sausages in their basements during colder months. Some days have better humidity, some worse, but it kind of averages out. I experimented with curing salami in the basement a few times. My personal take on that is that it's doable as long as you keep a keep eye on them. I.e. if they get a little dry, you spray them with water, if they get too wet and moldy, wipe them off with vinegar. It's a hassle though. Having a large dedicated curing chamber provides a much better and, importantly, much more predictable results.
Steve Denvir says
Hey Victor, the lonza and coppa were great successes. I now have some sopprosetta in the fridge..
But I’ve noticed that it has an inclination to overshoot the mark when himidifying. Set for 75, it’s not uncommon for it to run up to 80 or 81.
The humidifier shuts off at 75, so that’s not the problem.
Do you think perhaps I just need a more powerful dehumidifier? (Mine are the same as yours).
Thanks in advance
Steve
Victor @ Taste of Artisan says
Hey Steve, happy to hear about your success. About your issue with the humidifier - I rarely use mine these days. The sausages and meats put out enough water to raise the humidity to where you need to dehumidify the chamber. My controller is set to 66% RH now, only then the humidifier kicks in. That's usually when the sausages are quite dry. Otherwise, it stays put. If the humidity intermittently drops below say 72, or 70, that's not a big deal based on my observations. It's a good thing, it allows the meats 'breathe'.
>
As far as getting a more powerful humidifier, there is a scenario for it - more meat and sausage in the chamber. I have a second dehumidifier of the same size and use it when I push 15-20lbs of fresh meat or so. 10 lbs or less - one is fine. I think a bigger dehumidifier is a good thing to have though. Better yet, two smaller ones like the one you and I have. With two, if one goes, at least you have the other one to tide you over until you get a replacement.
Steve Denvir says
Thanks, Victor, I think I may have fixed it (mostly). I put the humidity sensor closer to the humidifier output, and that seems to have moderated the humidity swings. We’ll see.
Steve
Victor @ Taste of Artisan says
Great! Little tweaks like that can go a long way.
Steve Denvir says
Hey Victor, fired up the charcuterie fridge yesterday, and it’s working perfectly. Lonza, coppa/capicollo, and two duck breasts for duck prosciutto.
Couldn’t have done it without your help.
Thanks
Steve
Victor @ Taste of Artisan says
Good to hear it, Steve. Good luck! Keep a close eye on them for the first week. This is the most critical time.
Frank says
Good evening. I just started this new hobby. I made my first batch sopressata. I purchased a mini 3 foot fridge. Next I purchased a Johnson control temp plug and play module. I plugged the fridge into the module and set the temp for 55. My temp is 54 degrees consistently. Before I put my meat in the fridge the r/h was about 65 percent. I kind of knew it was going to go when the meat was added. But I went up to 90percent. So I found a pretty strong computer fan put it on one door shelves and ran the plug outside the door and plug it in. The fan runs continuously at the moment. But it brought it down to about 83 percent. I just ordered a dehumidifier. A small one made by Eva. I am hoping I can get it down to 75 percent and maintain. Like I said I am new to this and it’s trial and errs. I don’t believe I need a humidifier . I need the opposite. Another question I wanted to ask. Should install a small vent on the side of the fridge so the fan can blow the inside air through the fridge and out of it.
Victor @ Taste of Artisan says
Frank, congrats on starting a new, exciting and ridiculously rewarding hobby. I advise everyone not adding any holes unless absolutely necessary. Over the years I've learned that the best way to control humidity is when it's contained to a specific area. Ideally, you'd want to have a large, fully insulated space. As soon as you open up holes, the system will go off balance. Ambient humidity and temperature will affect the temp and humidity in the fridge. It may become much more difficult to manage. Ambient humidity may change quite a bit from day to day. If the air outside is warm, your fridge may have to run constantly and may even struggle to maintain the necessary temperature. I'd start without any holes and try to make it work. A dehumidifier will help but be careful with the air flow from its fan, it can cause case hardening in such a small space.
>
If the ambient humidity is consistently lower than, say, 60%, opening up holes can be helpful. They will allow humidity from the fridge to escape and balance off with the ambient humidity. Don't rush adding a fan though. I've done that in the past and it caused significant case hardening. Just having the holes should be enough for humidity to escape into less humid air. The rate will depend on how dry the ambient air is. Id the differential is small, this won't be effective. If you do decide to add a fan, use it initially but as the meat loses less water, consider removing it.
>
Everyone's system is different and needs experimenting and tweaking. If I were just starting out, I wouldn't rush in, like I did, and start very small. Make sure the setup works, then add more meat. I lost quite a few big batches initially. But it's hard to go small. I don't have much patience for it. Batch size is important too. I've learned my fridge's capabilities. Anything more and I can't control humidity effectively. With your small fridge, you may learn that you can only dry, for example, 5-6 pounds of fresh meat or else the humidity can't be controlled.
>
Also, consider adding to the bottom of the fridge something that easily absorbs moisture, like charcoal briquettes. That should help remove moisture from the air and drop the RH.
michael travis says
I initially set up my curing chamber in a mini fridge and had similar problems with humidity. It was impossible to keep it where i wanted. Mini fridges are cooled by the freezer chamber on the top of the mini fridge. When the temperature regulator turns off the fridge condensation forms on the freezer chamber causing your humidity to skyrocket. I dont believe a curing chamber can be set up in this type of mini fridge.
Victor @ Taste of Artisan says
I guess we shouldn't be so categorical. I think I linked in one of my comments to a blog where some guy successfully cured salami in a small bar fridge with a glass door. The key was that he did that with one tiny sausage. I can guarantee you he'd have vastly different results if trying to dry 10 lbs of meat or more. Even 5 lbs would seem a tough task for that fridge. I suppose you can make anything work if you can spend enough time and resources. The question is, do you have other options? A large frost-free fridge will be fairly easy to work with. If you have that option, go with that for sure. If a mini-fridge is your only option, perhaps it's worth playing with it. A good alternative would be to try curing in the basement if you live up north. Mine stays cool, 50-60F pretty much November to March. The humidity is pretty low in there but I suppose a humidifier can fix it if I could find a room that could be isolated from the rest of the basement. This will be more feasible IMHO than trying to make a mini-fridge work.
Michael travis says
Hey Victor,
I’m not sure if this is the proper thread for this question but I need some advice. I’m currently making a cured sausage in my newly constructed curing chamber. My process was I. made my sausage then realized my mold 600 needed 12 hours to soak. So I got that going and placed my sausage in my fermenting chamber. I sprayed my mold on the sausage the next day, let it sit until my ph was around 5.3 and then put it in the curing chamber. i realized when soaking my mold the instructions said to use distilled water so I made another batch of mold 600 and sprayed it on there. It’s now been curing for two weeks and there is no mold growth. I don’t know if the chlorine in my tap water has inhibited mold growth or what. Will this ruin my sausage? Any advice?
Victor @ Taste of Artisan says
Michael, this WILL NOT ruin your sausage. I wouldn't sweat it. You don't have to inoculate with mold 600, good white mold should develop from the spores present in the air. I've made quite a few batches without inoculating with Bactoferm 600 and they were fine. You won't get a nice, thick white coat, it may be a bit thin and patchy, but it looks more natural, rustic. I personally like it. Your mold may still grow. If it doesn't, it's not a problem. The problem is when other, nasty molds start to grow. Simply wipe them off with a mix of distilled water and vinegar, that's easy to deal with. But if you keep the environment clean, chances are you won't see any black, green or blue mold.
Michael travis says
Thanks a lot for the help!
Victor @ Taste of Artisan says
You are welcome.
Tony says
If using a converted refrigerator, do I still need to add some sort of fan to manage air flow or can i skip that step. I'm planning humidifier/de-humidifer, and controls for that along with temperature -- so the setup you've described but I'm not clear on your reco for a fan or not?
Victor @ Taste of Artisan says
Tony, I used a fan initially but stopped soon after as, no matter how low it was running, it was causing case hardening. I figured, between the fridge, when it circulates, and the dehumidifier, when it's on. there will be enough air movement. Now, if your fridge is huge, adding a fan may be beneficial but this needs to be tested in each individual situation. For me, it was causing more grief than benefit.
Mike says
Agreed. I quit using a fan. The dehumidifier lets off enough air to cause circulation.
The fan running was causing drastic decreases in humidity and cool air.
Bill McMahon says
Thanks so much for the great info. Does the set up you use have a fan that runs all the time as part of the refrigerator.
I have a newer large beverage style that was given to me. it has a fan in the top center that runs even when the refrigerator has reached temp and shuts off.
Victor @ Taste of Artisan says
Hi Bill, no, I don't run the fan. For me it was causing case hardening. I tried initially but removed it later. There is enough air movement from the fridge itself, when it circulates, and from the dehumidifier's fan. That said, everyone's fridge is different. I went from one fridge to another and they behaved very differently for me, and I heard of the same observations from others. What I am trying to say is that you will need some tweaking to do to get it run properly. That tweaking may include adding a fan. Perhaps you can restrict the airflow by adding a shield so there is no direct flow toward the meat. If you have a very large fridge you may benefit from a fan running at low speed. In general, the bigger the area the easier it becomes to manage.
Daren says
Are you using a refrigerator/freezer or just a full size refrigerator? Can a full sized freezer work?
Victor @ Taste of Artisan says
I use a fridge with a freezer that is a separate chamber. Anything large and frost-free will work.
Daren says
Ok, thank you!! Will an upright freezer work or is it too cold?
Victor @ Taste of Artisan says
Daren, you need a controller to regulate how cold your fridge or freezer gets. It will only get as cold as the regulator will let it. But you must use a frost-free freezer or else you will have a heck of a time getting humidity down.
Daren says
Perfect, thank you!!
Daniel Ullfig says
I've been wondering about the need for the dehumidifier. Do the frost-free refrigerators not pull enough moisture out of the air to make a difference? Do you still need a dehumidifier if your fridge is frost free? Just wondering. Kinda making mental notes of what supplies I need to get.
Victor @ Taste of Artisan says
Daniel, frost-free fridges work by blowing in cold, dry air. They don't necessarily remove humidity. As soon as the temperature goes up the humidity quickly rises. Also, fresh meats will be losing a lot of water initially, tons of water. It needs to be removed somehow. That's where the dehumidifier comes in handy. That said, try without one, start with a small batch, 2-3 lbs, see how it goes. Different fridges work differently, even if they are frost-free.
Matt Keys says
Hey Victor, I saw this guide last September and have been pondering building my own chamber. Last weekend I finally did! I wanted to write in first of all to say thanks for putting this together and staying active in the comments, you have been really helpful to me and many others.
In my setup I am using the inkbird temp and humidity controllers, looking through the comments I see they have been mentioned a few times already. I am really happy with them so far, and got a bundle with both controllers for $70 so feel like they are a great value.
Rather than have a separate cooler for fermenting I decided to put together a small 'heater' for the chamber that I could use to ferment with. I landed on a 50 watt ceramic heat lamp. I built a small wooden enclosure that safely holds the lamp in place and circulates the air using an old computer heatsink and fan combo. I have some pictures of this I can share if anyone is curious to see it. My build may have been overkill, but I feel good about leaving it on and walking away from it, and it provides a very gentle heat to the chamber.
For the fridge I had a not-to-old frigidaire upright freezer (Model GLFH21F8HBN) that was perfect for this use. The way that this freezer is built there is a small panel in the back bottom of the interior of the freezer. I was able to temporarily remove this panel and route all of my wiring for the inkbird probes in a way that hides all the mess. With everything wired up it is really clean looking.
One last thing I wanted to mention, I decided to get a pH meter, and I found one I don't see mentioned elsewhere. It is the Milwaukee Instruments MW-102. The cost for the meter + food probe was $180 shipped, much more affordable than I've seen other similar products list for. I calibrated and used it for the first time earlier today. So far so good, I will try to update in the future and let people know if it is still working well for me.
I just made up 5lbs of sopressata from the recipe you have here on the blog, it is currently fermenting in my chamber, will check back after 12 hours and see if it is ready for the next step.
Thanks again, and shoot me an email if you'd like any photos!
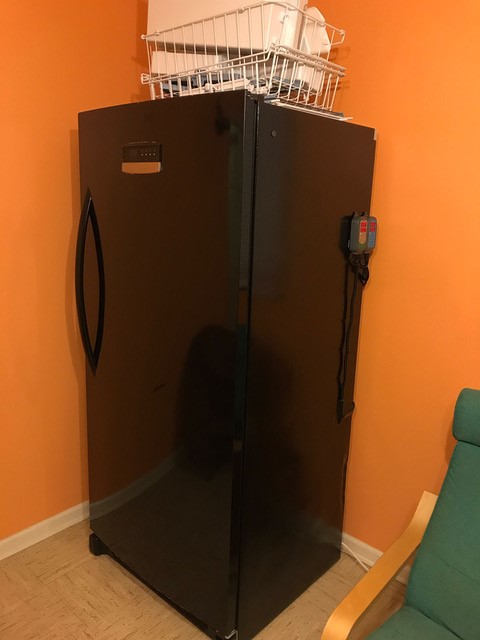
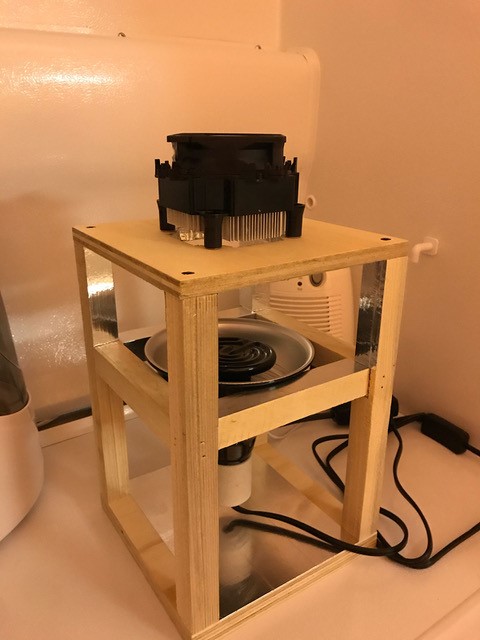
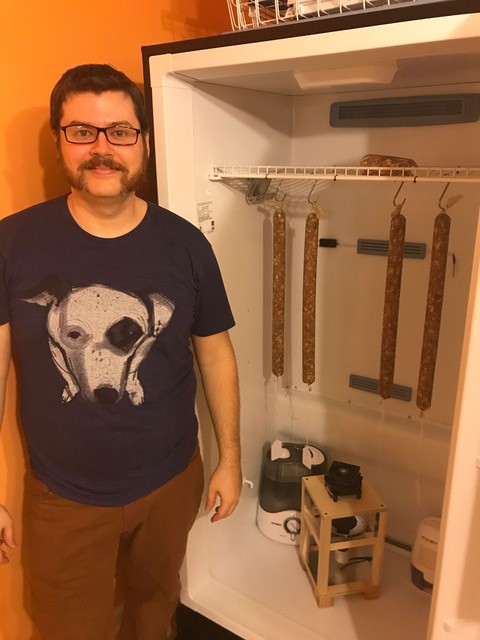
>
>
>
Victor @ Taste of Artisan says
Good to hear that, Matt. Congrats on your new build and good luck with the first batch, hope it turns out great. I bought two Inkbird controllers 2 years ago hoping to test them out but got so busy that I haven't even taken them out of the boxes. One may say it's a good thing because it means that my current setup is good enough form me to not need experimenting with something else. But I will, soon.
>
You are right about the pH meters, they are very helpful and even mandatory if you want to ensure a safe product. And even for troubleshooting. I have accumulated three of them. I got a Hanna Instruments HI 99161 back in 2015, then HI10532 HALO Wireless and HI981036 last summer. The last two are way more portable and easier to use. I like using them. I use them also for making beer, cheese, and jam.
>
Would love to see your pictures. I will email you about that.
>
Pics attached. Beautiful setup you got there, Matt. Very spacious. I'd love to see some pics when you cut your first sopressata.
Aimee & Dan says
Question - We built a curing chamber out of an old side-by-side fridge with the controller, humidifier, ventilation holes, and all that good stuff that all the blogs on this topic recommend...but so far the temp inside won't go above 45 (humidifier works like a charm). Fridge is in our uninsulated garage on the Oregon Coast, and it rarely gets below the 40's in the garage. Thoughts?
Victor @ Taste of Artisan says
Your outside temperature is about 45F and so is the one inside the unheated garage. You have holes in the fridge. You can't expect the temps inside the fridge to go higher than the ambient. Plug up the holes, add a heating pad and should be good to go.
Aimee and Dan says
But all of the instructions for these curing Chambers say to drill a hole in the side for ventilation... How will I have ventilation if I plug up the holes?
Victor @ Taste of Artisan says
I can only talk about my setup because this is what I know well and I know it works. I don't recommend drilling holes unless there is a good reason for them. Ventilation is a meaningless term when it comes to meat curing. To get a good product you have three environmental variables to worry about: temperature, humidity, and airflow speed. To control those three you may or may not need to use holes in the fridge. It all depends on each unique setup. Say your ambient temperature is 80F. Opening up hols will result in your fridge running non-stop to keep the temperature low. It may not even be capable of cooling down to the needed temperature. If you have a non-frost-free fridge and live in a dry climate, those holes may be quite helpful for removing excess humidity. Many people drill holes and then cover them with filters to keep bugs away. I did it a long time ago. I found them useless as they provided barely any airflow and were messing up my temperature and humidity.
Shane says
How often do you need to add water to the humidifier and remove water from the dehumidifier?
Victor @ Taste of Artisan says
Oh, that really depends on the cycle you are in, and the amount of meat in the chamber. 10-15 lbs of fresh meat in the chamber and I am emptying the dehumidifier once every 2-4 days. At the end of drying when very little water comes out and I do it once every two weeks or so. I add water to the humidifier once a month or so.
Blake says
I noticed there are 2 plugs on the temp/hum c ok controllers, why do we need to controllers if we are only plugging in a humidifier and dehumidifier? I feel I'm missing something here. Could you provide a complete list of your set up? Please and thank you for your time!
Victor @ Taste of Artisan says
You need two controllers because one controls a humidifier and a dehumidifier, hence two plugs, and the other one controls the fridge (cooling). The extra plug on that second controller can be used to control a heating pad to raise the temp, say when you need to ferment at higher temps, or when your ambient is below the target temp, say when your fridge is in an unheated garage. Or you can use it to run a fan for air movement, I used it for that initially but later stopped as it was causing case hardening.
Michael travis says
Hey Victor,
Thanks for sharing your knowledge. I’m having some difficulty setting up my curing chamber. I’m using a larger mini fridge that has a small freezer at the top that is used to cool the whole fridge. I’m using the auber temp and humidity controller with a humidifier and fridge power attached. I also have a small fan and dehumidifier(eva-dry) inside running all the time. The issue I’m having is when the fridge is off and temp is stable my set up can control the humidity perfectly but when the fridge powers on the humidity drops significantly causing the humidifier to turn on. It stabilizes the humidity properly but then when the fridge powers off the humidity skyrockets I think from condensation accumulating on that freezer portion of my mini fridge. The dehumidifier is unable to lower the humidity for probably 20 min. Do you see this being an issue when curing meats? Do you have any suggestions on how to control my humidity? When I leave the fridge constantly powered on it controls the humidity great but my temps get to around 45F. I honestly don’t know where to go from here and would really appreciate any advice.
Thanks,
Michael
Victor @ Taste of Artisan says
Hi Michael, sorry to hear about your challenges but not surprised at all. Temperature and humidity are inversely related, that's why humidity drops as the air in the fridge cools down. The more moisture you have in the fridge (liquid or solid form) the more water molecules will be in the air as it (fridge/air) warms up, the more difficult it will be to control it. Add some fresh meat and you will lose that control entirely. For those reasons, you must use a frost-free fridge. It makes things much easier. Also, the larger the fridge the better.
>
In your situation, ideally, you'd want to switch to a different fridge. If you want to try to make the existing one work, get rid of the humidifier, you won't likely need it as there will be plenty of humidity. Run the fridge at a lower temp, like 53F. Go with smaller batches. I suggest you make one sausage, about a pound, ferment, then dry cure it in the fridge. See how that goes. Nothing else will tell you better what works and what doesn't.
Jack clarizio says
Hello
Starting a new family tradition curing Italian style meats at home! Very excited. I was going to cut out the flooring of the freezer compartment to increase space but didn’t know how temperature can be controlled in the separate areas since one is so much colder... help!
Victor @ Taste of Artisan says
It's a great hobby, Jack. I find it immensely rewarding. About your idea, it's an interesting one. Provided in your fridge there are no coils at the bottom of the freezer and you can cut the bottom out, your whole fridge will be turning into a freezer. But that's not a problem, technically, as you will be running it on a temp controller. In my fridge, the freezer isn't even a freezer anymore (doesn't get down to freezing temps) as I run the fridge at around 55F. I didn't expect that to be the case and only found out later on. How will the humidity and the cooling be affected in yours? It's hard to say without testing the idea out, or without having the technical knowledge. If you can accept the loss if it doesn't work, there is no harm in trying and testing your idea out. Before you start, find the schematics for your model to make sure you know where you should and shouldn't drill.
Fritz says
Hi Victor
I'm over in Oakville and just building my 1st curing chamber out of a wine fridge. Thank you very much for your very thorough and detailed article covering your experiences. I have the Inkbird controllers for temp and humidity, Eva .Dry dehumidifier and ultrasonic humidifier. I will be putting it all together this weekend . Would you suggest still cutting a vent hole with hepa filter (even without installing the exhaust fan) for some fresh air to be able to circulate when the humidifier / dehumidifier are running? thanks again for your time.
Victor @ Taste of Artisan says
Hi Fritz,
Congrats on starting a new and exciting hobby. I am sure you will love it. About the 'fresh air' part, I don't recognize it as a 'thing' when it comes to curing. What matters to curing meats and sausages is air temperature, air RH, and airflow/air speed. You can make those holes a part of a balanced system to control the three parameters that I mentioned, or not. Hepa filters will provide a very restricted airflow, if any without a fan, so their value is questionable. I would suggest starting without them. If later you feel like you need extra airflow, you may think about how they could help. As well, those holes will significantly impact your temp and RH, depending on ambient parameters. That's extra load on your fridge and humidifier/dehumidifier. Better exclude those if possible, at least initially.
Rob says
I recently switched from using a small (30" tall) wine cooler with an Inkbird temp/humidity controller to an upright freezer for fermentation and drying. I kept getting soft spongy product in the wine cooler, whether it was salami or solid muscle coppa. Some showed signs of case hardening and had to be pitched. I learned to salvage most of the soft meat by vac bagging or transferring to Umai bags and storing in the fridge until they hardened up. I had no issues with high humidity, I only needed to use a humidifier, probably because humidity in the house is <50%. The electrical cords running through the wine cooler seals meant some air would leak out, causing the humidifier to cycle fairly frequently (maybe every 15-20 minutes). I would get pretty rapid drying, despite no built in or supplemental air fan in this wine cooler, so I kept humidity at 80-85% to try and keep this under control, and didn't have any issues with slime or unwanted mold (I used Mold 600). Drying temps were around 55 degrees.
I decided to try an upright freezer located in my garage to see if I could get better drying. My first batch of salami and coppa have been in it now for about 3 weeks. After fermentation was done, I quickly found I couldn't get humidity down to 75-77% (due to exposure to outside higher humidity air), so I bought a second Inkbird controller and a Gurin GHMD-210 dehumidifier, which is identical in appearance, dimensions and specs to the Eva Dry EDV-1100, it just has a different name on it. At first it was located under my Inkbird sensor, and that didn't work - the outlet air would hit the sensor, and it would only run a couple minutes before cycling off. Then on again, etc. By moving it to the back corner of the freezer, I can get it to run 15-18 minutes a time before the freezer kicks on. It kicks on because the Gurin heats the air slightly (outlet air is about 5 degrees higher than inlet air), causing the drying chamber temp to rise 2 degrees, which turns the freezer on. During that 15-18 minutes, the Gurin only decreases the drying chamber humidity by about 1.3%. In effect, it seems to be acting more like a heat source than a dehumidifier, causing the freezer to cycle on/off every 45 minutes or so. It's doing some dehumidification, but it only collect about 1/3 a container of water after a week of operation. Does this sound similar or different to how your Eva Dry works? I haven't been impressed with mine so far. I'm considering running the Gurin exhaust air through an insulated container with plastic ice cubes in it to try and keep it from heating the drying chamber. I'm worried that excessive cycling creates too much air flow (freezer fan blows when on) which could cause issues with proper drying. Due to these concerns, I've been drying mostly in the 80-85% range with no issues, although I lowered it to 79%-81% recently. On my small diameter (32-25 mm hog casings), I got almost 40% weight loss in 19 days, which concerns me. My larger diameter casings are drying slower, but still plenty fast enough. Too early to tell if I'll have the same soft product issues, but it feels pretty soft so far.
Any thoughts?
Victor @ Taste of Artisan says
Rob, everyone's setup will behave differently so there isn't a universal answer. Experimenting helps a lot. Start with a very small batch and observe. Personally, I've been quite happy with my dehumidifier, I actually have two of them now. I empty water every 2-3 days initially when water loss is the highest, then it's down to about once every week or longer. I find that the most optimal drying approach is to start at 85-88%, then gradually lower to about 75-78%. Getting a good coat of white mold helps with proper drying as well.
>
40% loss in 19 days doesn't sound too bad. I'd be more concerned if the water loss is too slow. Water loss primarily depends on RH. If it's too high, increase the RH. The culture you use, the PH will also influence the water loss rate. Here is an interesting dry curing resource to read. Water loss will also depend on fat content, fat smearing, etc. Lot's of factors at play here. Bottom line is, inspect the sausage. Is the casing fine? Is the center firm? If yes, there isn't a reason for a big concern here.
Rob says
Thanks Victor for your comments and the technical resource on drying. That article will challenge me to understand some of the more technical aspects of this hobby, which has been pretty frustrating so far. I had soft product issues with 5 out of 6 batches made in the wine cooler drying chamber. On the other hand, Umai bag drying in the refrigerator is easy. I've made very good coppa with Umai, and good salami (like Metturst, Landjagger, etc.) where a strong spice or smoke flavor predominates. But I'm really after traditional Italian salami aroma/flavor, which I haven't achieved yet with Umai, probably because drying at refrigerator temps inhibits aroma/flavor development.
I'm hoping my switch to an upright freezer drying chamber will reduce or eliminate my soft product issues. As you suggested, I'll keep experimenting. On the bright side, in the last 3 days my small diameter salami has started firming up nicely. My coppa and larger diameter salami are still very soft, but may firm up with time. Coppa that I made at the same time that has been drying in Umai bags in the fridge are much firmer, despite almost identical weight loss as the coppa in the drying chamber. Go figure.
I was going to attach a couple pictures of my new freezer drying chamber for general interest, but couldn't figure out how to do this. Wishing you the best with your characuterie efforts, and thanks for maintaining this forum for us.
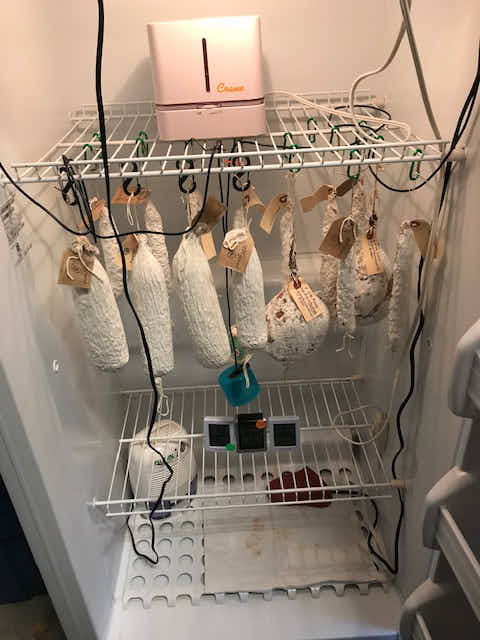
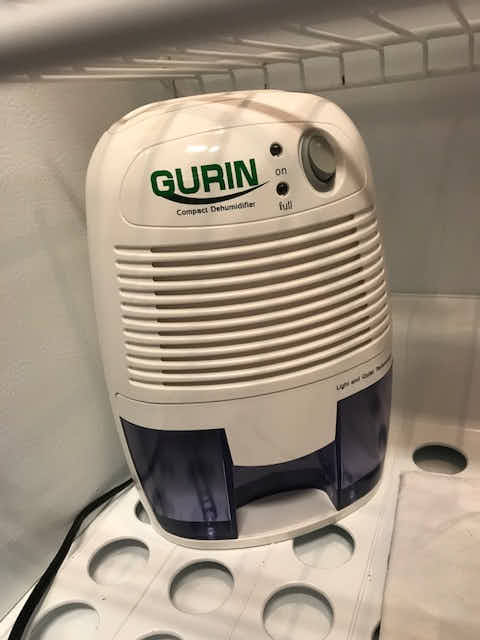
>
>
Victor @ Taste of Artisan says
Hey Rob, I will email you, just reply with your pictures and I will attach them.
< Just a thought, if you are farther North, you may try drying in your basement or garage, see how that goes. I've made a few baches like that and all except one turned out quite great. A lot of Italians here in Toronto make salami in their basements around this time of the year. I have a batch of smoked kabanos and swojska kielbasa drying in my unheated veranda, they are doing exceptionally well. The problem with this type of drying is that the conditions don't last long.
>
Pictures attached. Your curing chamber looks good, the meats look very healthy.
Fritz says
Thanks Victor!
So I made what turns out to be a common mistake ...and that is not realizing how a small fridge works !. I drilled a hole in the side for my humidifier tube and hit a cooling line. At least it was q cheap used fridge...so I now got another one on kijiji and have it set up ( after seeing and reading your kegerator section) . It seems to holding the RH at a steady 80% which I will then decrease to 65 % over a week once I add my cured pork loins . Wish me.luck ! Thanks again for all the advice I will.touch base once my meat has been curing for a while .
Victor @ Taste of Artisan says
Hi Fritz, sorry to hear about your problem. You can find diagrams online for pretty much every fridge, I always recommend people to check those before doing any drilling. I posted a link in one of my posts or comments some time ago, but if you Google, you will find a few sources.
>
Another common mistake is to get a non-frost-free fridge, keeping humidity down in those is an enormous challenge. The same goes for small fridges. Anyway, best of luck and let me know how it goes.
fritz vatter says
Hi Victor
Got my next wine fridge set up on the 24rth and after getting the temp and humidity level set I hung the pork tenderloins I had been curing for a simple Lonzino . Today the smallest loin hit the 66% mark of original weight. I took the plunge and tried my 1st home cured / hung product ! Well 5 hours later I feel fine hahahha and the texture and flavour is nothing I've had before from store bought product!!! The thickest part of the loin was a tiny bit soft but still good to the palette texture wise. The remaining 5 I will leave a little longer . I did theae without trimming and trussing so they are not uniform... for drying . Next batch I have curing are trimmed at the ends and I will tie them up for more uniform drying . Thanks again for all your help! PS I do have to figure a way to drain more water from the condensation reservoir as its filled over 12 days .
Victor @ Taste of Artisan says
Happy to hear about your success, Fritz. This hobby is very rewarding. Like you said, commercially made meats and sausages can't even compare. I've been experimenting with curing bacon over the past few months and the results far exceeded my expectations. I had no idea that homemade bacon would be that much better than commercially made. Everything, the texture, the color, and the taste.
>
As far as draining, I am sure you could drill a small hole, attach a thin hose and run it outside the fridge. I've thought about doing it too. Maybe some day.
fritz says
Hi Victor
Doing your own bacon is amazing !! I've been curing and smoking my own bacon for 2 years and havnt purchased grocery store bacon since. Have fun making the bacon ! It is so versatile!! I always use the off cuts from the slabs that don't fit in my slicer for making nice pancetta type cubes to add to other dishes . Which really makes the pork belly used to its fullest . So many amazing flavoured bacon to make . Using a little bourbon in my cure and a few brushings of it during the smoke makes for super flavour depth. I'm sure your so well versed in all this but I was just happy to talk bacon . Thanks again. For your amazing website and recipes...they are all greatly appreciated. !
Victor @ Taste of Artisan says
Thanks for the tips, Fritz. Now that I've got my base curing mix and curing time down, and I love the results, I will be experimenting more with different flavors.
meat guy says
Victor, excellent work and great write up. I wish I had found your blog before I purchased my future curing chamber. I have done my best to read through and understand your comments. Your are suggesting a frost free fridge, and one of a decent size to make a good curing chamber. I have a 75 bottle wine cooler which equates to approx 11 cubic feet. Mine is labeled as "auto defrost" - i'm not sure if that is bad or good. I hung small pieces of toilet paper in the chamber and when the compressor runs, I see slight movement. I also notice the humidity drops significantly when the compressor runs. I was not able to find the dehumidifier you have in my area(eva-dry), the only small ones are thermo electric, I hope that will work. I was able to find a misting humidifier. Also for suppresata, you are running around ~75% @ 55F correct? Thanks again!
Victor @ Taste of Artisan says
What you described points to a frost-free fridge, that's good. 11 cf is not big but should work if you don't load it too much. Start with a few pounds, make sure you know how it works, and that it WORKS, then start increasing the load. Yes, 55F/75%rH is the target, but I start with higher humidity and lower it as the sausage loses moisture, to end up at about 75-78%, but all depends on how the meat is drying. You kind of have to look and see, and adjust as needed.
Joe Magaro says
Thanks Victor. What exactly do you look as good/bad signs when the meat is drying?
Victor @ Taste of Artisan says
If it looks good, smell good, then it's good. And vice versa. Dry, white powdery mold is a good sign. Wetness, slime, bad smell, green, black, blue molds - not a good sign.
bryan swanson says
I agree with everything but what you said about the mold. I've used mold 600 for years but dont use it much anymore because let's all be honest, it has a very offensive smell and I wouldnt give any meats covered in it to anyone. I've been using a mold that I inoculated from some salame I purchased from a very reputable company in California which stresses how proud they are of their house flora and even made videos about their mold. It starts off looking exactly like 600 but after about 4 days it looks like the statue of liberty. It's actually a beautiful teal/ patina /blue color that I'm very happy to be using and doesnt smell offensive at all. Only problem is, most people see blue/green mold and get freaked out, but I know that this particular mold is food grade. It is a kind of peniciliom if I spelled that correctly. The owner talks about it in the videos. Another thing to mention is that molds dont touch the meat inside the casing anyway because they need oxygen to grow. Check out the calabria pork store in ny and you will see hundreds of sopressata hanging over your head when you walk in, totally covered in green bubbly looking mold, and it's some of the best you will ever try
Victor @ Taste of Artisan says
That's true, glad you pointed that out. I've actually been to several salumerias where I saw salami covered in green mold. But frankly, I've also seen green mold on my sausages, it looked different and I suspect it wasn't a good kind. If it was, how do I tell that it's harmless? I still don't like anything that isn't white on my sausages, and I would really freak out if I saw black or yellow molds.
>
I stopped using mold-600 a while ago as well. I agree, it does have a very strong, unpleasant smell. One of my sopressata batches developed a very nice, pleasantly smelling white mold on its own, and that's what I've been using ever since.
Victor @ Taste of Artisan says
Hi Bryan,
I thought you'd be interested to learn that I've grown to like green mold, I just posted my experience with it - Green mold on Salami. I suppose it takes time/certain experience for one to get comfortable with it.
Meat Guy says
Victor, I got the chamber setup today, and has been holding temp at 52.3 to 56.2F, and humidity has been between 72.6 to 75.6%. I'm going to watch for another day or so. The humidifier and dehumidifier seem to be dialed in now and working well. A few questions if you could answer.
My humidifier does not have a % switch rather an output level. On high it seems to push a lot of water out. I'm worried it would soak the product a bit much. I see you now move yours outside, but that may not be an option for me. Do you have yours pointing at the meat product or do you diffuse it some how?
Also, my dehumidifier shoots air directly up, im worried it could cause some case hardening. Wondering how you deal with that?
Victor @ Taste of Artisan says
Hi Meat Guy, happy to hear that, fun times are coming soon.
>
I find that setting up a curing chamber is as much art as it is science, in home conditions at least. You will have to experiment and expect to make a lot of adjustments as you go, at least initially.
>
I moved my humidifier out simply because I wanted to have more space in the fridge, to have better air circulations there, to have better control over humidity. But it's not absolutely required.
>
My humidifier is ultrasonic, which means it produces ultra fine mist. One like that should not push water, but rather fine mist. Is the one you have like that? I have a tube going into the fridge, pointing down and next to the opening where cold air comes from, so both cam mix together when the fridge circulates. I don't point toward the meat. You can point the nozzle on your humidifier in the same direction. But remember, initially the meat itself will be losing a lot of water so a humidifier's job will be minimal. You will have to set the output level to low. Mine's on low too, actually.
>
All that said, start with a small batch, observe and adjust as you go. You will learn a lot by doing it. Expect to have good and bad batches as you learn, it's just a part of this amazing hobby.
Bill says
Fibrous casings are made with and without adhesion. You need casings with adhesion to shrink with the dry cured sausage. S
As well, stuffing pressures are very high in commercial dry cured sausage facilities.
Marco says
Are there any downsides to having both salami and cheese in the same chamber?
Victor @ Taste of Artisan says
Not really, other than sometimes target temps and humidity will may be different.
Hugo says
Hi! Just wondering if I understand correctly.
The 1st TH220 is controlling power to the fridge and the humidifier, while the 2nd one is controlling power to the fan and the dehumidifier.
Also, if I understand correctly, you're not using the fan anymore, correct?
Victor @ Taste of Artisan says
That's correct, Hugo. And yes, I don't use a fan any more. The dehumidifier has a fan by the way.
Matt Keys says
I wonder if you are still running this? Have there been any changes? Also an oddball question maybe, but do you have any idea how much electricity this setup uses to run? I'd like to do something similar but am fearful it would really drive up the electric bill. Hooking a Kill-A-Watt up to this would be might interesting.
Victor @ Taste of Artisan says
Yes, still running. Haven't really felt the need to upgrade so still same setup. Newer fridges don't draw much energy. Besides, at 55-58F the number of cycles will be lower compared to a regular fridge, especially in winter. The humidifier and the de-humidifier are fairly light users too. Never really measured how much the whole setup consumes but I wouldn't imagine much more than a regular fridge.
Matt Keys says
Thanks for the reply! Outside of my food hobby, reducing our homes energy consumption/trying to go net-zero is my other hobby. Sometimes those two things are in conflict with one another 🙂
Matt Keys says
To answer my own question here, I've been monitoring my first batch of Sopressata, and have been maintaining 55-60F degrees, using a 20cu/ft upright freezer in a cool (65-70F) basement, also running a dehumidifier, and humidifier. It has used on average 0.4 kWh per day to run.
Victor @ Taste of Artisan says
Thanks for the info, Matt. It looks pretty negligible.
Duggan says
Hi Victor, great article but maybe a rookie question to ask you as someone interested in getting into homemade charcuterie. Does the fridge need to be in working order for this project? I have a nice big frost-free fridge that kicked the bucket and need to replace that would be perfect to try this with, but it does not blow cool air... I was trying to see anywhere in your article discussing in detail about temperature which I didn't see you leaving much emphasis on as much as the humidity, but I assume it has importance too? If so is there any kind of work-around you're aware of that brings cool air to a dead fridge? Thanks for any advice!
Victor @ Taste of Artisan says
Hi, sorry about the delayed response, you message was lost in a pile of spam. Yes, the fridge sure needs to be in working order as how otherwise would you be cooling the air inside? The emphasis on humidity is because it's usually very easy to control the temperature but controlling humidity is very challenging.
Erik says
I really enjoy this site!
Question: I just build drying chamber out of old fridge. When humidity sensor goes turns on humidifier turns on properly but shuts off right away. I use an Auber sensor and Taotronics humidifier.
Any thoughts? Thx
Victor @ Taste of Artisan says
Not clear what turns off, the humidifier or the controller? Is the light on the controller on? Is the humidity above the target or below when that happens?
Erik says
Oh yea sorry
Humidifier turns off
Light is on - on the controller
Humidity is above target
Victor @ Taste of Artisan says
So this still makes little sense to me. If the light on the controller is on, meaning it's powering the humidifier, it means the sensor is sensing humidity as below the target or at least within the set offset range, e.g. +- 1%. You need to check the settings to make sure that the offset is set correctly. The light on the receptacle that powers the humidifier should only be on if the humidity is below the target or above but within the offset range.
Assuming the controller and the sensor are fine, it may be a faulty humidifier. I don't see another explanation as to why it would be turning off so quickly. Unplug the humidifier and plug in another appliance there. As soon as the light goes on on the 'humidifier' receptacle the appliance (e.g. desk lamp) should be on while the humidity is below the target. If it is, it's your humidifier. If it quickly turns off, it's probably your controller.
It's also possible that your humidity shoots up too quickly and the controller cuts the power off to the humidifier. Which explains everything except the light. When the humidifier turns off the light should be off on the controller (for the humidifier). The problem could be that the tube that blows humid air inside the fridge is too close to the sensor. Move it to a different spot.
Erik says
I wonder if I need a simple on/off humidifier— the one I have only has controls to set a specific RH or use a timer
Could that be the issue?
I tested a lamp in the sensor and it works accurately and I also tested humidifier outside of sensor and it stayed on
Thanks again, Erik
Victor @ Taste of Artisan says
Well, that explains it. Yes, you want a humidifier without a 'mind of its own';-)
Matthew Gander says
Fantastic article and you've got me well on my way to building my own curing chamber. A couple questions I'm hoping you can help me with:
1. Do you ferment and dry in the same chamber or will I require a separate fermentation chamber? Space is an issue for me so I'd like to all in 1 option if it's safe to regulate the temperatures like that.
2. Can you use a frost free freezer in place of a frost free fridge given you're going to bypassing the controls of the unit with an outboard controller? Only ask because I can't find a full fridge without a freezer component and I'd rather a full fridge or freezer unit.
Thanks in advance for the answers!
Matt
Victor @ Taste of Artisan says
Thanks Matt.
If my curing chamber is free I will ferment in it otherwise I do it in my fermentation box. For fast fermenting sausages you may need to add a heating pad to raise the temperature otherwise it will handle the task just fine.
I've never tested a frost-free freezer so I can't really comment on how well that will work. I can tell you one thing though - you won't find a frost-free fridge without a freezer section as in a frost-free fridge cooling in the refrigerator section comes from the freezer section. It's all one system.
Matthew says
Hey Victor,
Take a look at this unit and let me know your thoughts when/if you have a chance. It's not cheap but it looks promising.
"https://abbotsford.craigslist.org/ppd/d/chilliwack-convertible-14-cu-ft-all/6941645496.html"
Victor @ Taste of Artisan says
Matthew, it looks very good. I like the fact that there is no freezer compartment in it so you will have more usable space. More space = better humidity control.
Erik Skorupka says
Hello
Great post!
Question from someone who wants to build a drying chamber — can freezer portion of fridge be disabled so only fridge runs?
Thanks so much
Erik
Victor @ Taste of Artisan says
Erik, freezer and fridge in a frost-free fridge is one system. The refrigeration section gets all the cooling from the freezer section. One won't work without the other. When trying to maintain 55F there won't be much freezing in the freezer. Mine is cold but not sub zero.
Tim Skate says
Do you still have the exhaust fans running in addition to the humidifier/dehumidifier? A follow up question to this (if the answer is no) - is there any issue with not introducing fresh air into the curing chamber?
Victor @ Taste of Artisan says
Tim, I don't use those fans as they were causing excessive air movement.
The question about air movement is a tricky one. What is fresh air anyway? When your frost-free fridge circulates it blows cold air taken from the outside. The system is not sealed by any stretch.
Andrew Diggory says
Hi Victor,
I cannot understand why my RH drops from 76% to 60% when the fridge cooling comes on, the unit is an ex wine 54 bottle fridge with a Purematic Humidifier set at 75% RH which comes on automatically quite well. The warmer my house the more drop outs I get due to the fridge having to work harder, I have increased my temperature from 12oC to 14oc so the air can hold more moisture and its not as bad (drops from 75% RH to 66%). do you have any suggestions on how to maintain a consistent RH please. My meats (COPA/Pastrami) dry and loose weight very quickly, currently the unit is set for Salami. I am also running 2 x 12v PC fans set to low voltage 3v for circulation, one mid height and 1 low in fridge. Thanks Andy
Victor @ Taste of Artisan says
Hi Andy,
What's happening is quite normal. Cold air holds much less moisture so when your fridge's cooling comes on the fridge gets an influx of cold, dry air. This quickly lowers the RH in the fridge. I experience the same fluctuations and I have my humidifier come on as soon as RH drops below a specified threshold. If your humidifier comes on well as you say, it should be sufficient. The drops are temporary and don't last long enough to cause negative effect. Do you experience case hardening?
Michael A Policastro says
Victor
Nice job. I have a question. Is a frost-free fridge necessary or mandatory? I am in the middle of a build. Doing test of temp & humidity control now. I have a non frost-free fridge, temperature controller, dehumidifier, humidifier and a Auber HD220-W humidity controller with Wi-Fi connectivity. It contains one humidity sensor and two independent outputs. One output is for humidifying and the other is for dehumidifying. I can maintain any temperature I want. I can adjust the humidity anywhere from 30% to 95% (empty chamber). My concern is airflow. I would like to know your opinion. Thanks Mike Poli.
Victor @ Taste of Artisan says
Hi Michael, sorry for the delay with my response - your comment went into spam and I just discovered it. Frost-free fridges are better for curing meats as they remove moisture and provide cooling that is more evenly distributed and more consistent. Conventional fridges, on the other hand, tend to accumulate moisture which you will then have to remove. It's a lot easier to control humidity when there is less of it. Speaking of which, controlling humidity in an empty fridge is quite different from when you've got 20 lbs of meat in it. At early (critical) stages meat loses most of the water so it becomes a real challenge getting all that water out and keeping humidity in check. As to air flow, your dehumidifier will be providing some and I find it sufficient for my needs. You can also put a computer fan inside but I experimented and did not like the results (case hardening). There are other options as well.
Michael A Policastro says
Thanks Victor, I will look to get a frost free refrigerator. I want to do it correctly and not lose any meat. Thanks for the clarification.
Victor @ Taste of Artisan says
No problem, Michael. I think the decision to go with a frost-free fridge is a sound one though you probably will lose meat and likely more than once. I did many times. No matter how well you plan and prepare, sometimes things will go wrong. Everyone's environment will be different and will present slightly different challenges. My advice is to start very small. Small batches will cost you less if have to trash them. They are also much easier to dry. I once lost a 20lb batch simply because my fridge couldn't handle that much meat.
Mark O Grater says
I'm a new comer that has just come across your site so I am already hanging my first ever batch in a cool room near a slightly open window. They have been hanging about a month. I am now worried about the issue of hardness on the outside and softness on the inside. Will occasionally squeezing the sopresetta while it is hanging help prevent or lessen the exterior hardness problem by facilitating the drying on the inside? Right now they are still sqeezeable. Also, is there some other technique to help avoid softness in the middle to a batch already hanging? And finally, is the a maximum time one should hang them before starting to worry about spoilage?
Taste of Artisan says
Mark, a lot of good questions but maybe hard to answer. Squeezing won't do nothing to help with case hardening. Think of it this way: water (diffusion) -> sausage surface -> water (evaporation). The trick to keeping your sausage casing moist is by making sure that diffusion rate equals evaporation rate. If the humidity outside is too low, or air flow is too high, the casing will start to dry out. Simple as that. As soon as you see that the casing feels dry, make adjustments. You can also wipe it with a damp cloth. A thick layer of white mold also helps a lot.
As to spoilage, there is no simple answer. Fuet may take 3-4 weeks to fully dry, while sopressata may take 4-6 weeks. A thicker one like Genoa will take 2-3 months to fully dry. If they haven't dried properly by then - they may never will. It's a sign of case hardening. And not just the case, it's also the meat near the surface. You may not see any obvious signs of spoilage as that will be prevented by pink salt and regular salt, but any harmful bacteria may still be active due to high water activity. It wouldn't be safe to eat.
Grady says
Hi Victor,
I stumbled across the blog while doing research for my curing cabinet. I live in an apartment so the best i could do is a wine chiller with Thermo electric peltier cooler. Which I've hooked up to a cooler thermostat to keep the unit off until it reaches above my set temp. It has just enough space to have a dehumidifier which arrives tomorrow. I'll have that hooked to a humidity controller as well. I know, crazy amount of work for a space only big enough for 2-3 salumi's at a time. Yet i'm hooked.
My question for you, for humidity I'm out of room for a humidifier and haven't gotten around to cutting a hole in the new unit. I've seen a few videoss of this and I'm wondering your thoughts on this. if I just cut holes in a Tupperware bowl and keep fiddling with the hole sizes and fill with salt water to add humidity for the humidifier to later remove when it gets to high, you think that might work?
Victor says
HI Grady, it's best to work with what you can have then not to do it at all. It's a great hobby. For humidity, with such a small space I would be surprised if you actually needed a humidifier. Start off without one and see how it goes. The salt water method works under some conditions but it won't work efficiently with a dehumidifier in the equation. It simply won't be able to compete and won't respond to rH changes nearly as fast. Start with just one thin salami, like fuet, observe, make changes, improve, then increase the batch once you get predictable results.
Joe says
Hi Victor, A few months ago I built my chamber and experimented with Calabrese and Soppressata. There was certainly a lot of interesting smells going on as it was fermenting and curing. What disappointed me was that even though I had a nice white mold, the whole chamber smelt like ammonia and even though I tried to air it out, the smell impregnated into the salami and I'm thinking I have to throw it out. I have an exhaust fan that removes excess humidity but really nothing to bring in fresh air. In your chamber, did you have an opening in the bottom that constantly brought in fresh air or did you install a controlled fresh air intake that would run for a certain length of time every day. Thx,
victor says
Hi Joe,
Many Internet resources talk about stale air and fresh air but what are those, really? Do they really matter? When curing sausages, we are primarily concerned about three things: temperature, humidity and air movement. There is no 'freshness' per se. Freshness can be viewed as the air that is of the right force, temp and humidity. Stale air becomes the air that is too humid and without air movement, for example. Get those three under control and you won't need to worry about freshness. When the fridge cycles plenty of outside air comes in. I used to have an opening at the bottom when I was running an exhaust fan, but have since closed it. It only messes up my humidity.
The smell of ammonia should not be a concern. Stanley Marianski in his book The Art Of Making Fermented Sausages, section 3.12, states that 'similarly to yeasts, molds oxidize lactic acid and other acids, and produce ammonia which increases pH'. My experience is that once the sausage is dry enough, the smell decreases substantially. Mold is anaerobic, it grows outside the casing. Once you remove the casing there should be no smell. If you do, it's possible that the meat did not dry properly and there is something else that's causing the smell.
joe says
Thx for the info. So i dont have fan that is inside the chamber to circulate the air. Would that help? Also, the salami, when the casing was taken off, it did have the ammonia smell, however it wasnt cured all the way through plus it exibited case hardening, even though I had it at 80%RH and 12C. If I keep it in the chamber longer, do you figure the smell with dissipate from withing the salami and become edible?
victor says
Joe, a fan inside a fridge is a double-edged sword. I've tried but couldn't run it at low enough speed to not cause case hardening. Marianski suggests that air speed should be about 1-2 meters per second during drying IIRC. I did some calculations back a couple of years ago, can't remember the exact figures but the speed of a heavily under-volted fan was still much higher than recommended and I did have case hardening problems. In my case, my dehumidifier serves as a fan but it blows air up and does not cause any problems for me. As you can imagine, it's impossible to say if a fan would help without knowing its position, flow speed measurements and some testing. Since you've experienced case hardening, a fan will only make things worse. At 12C and 80% Rh you should not experience any of it. Something else is the matter - it could be too low Rh during fermentation (Marianski suggests 95% Rh), fat smearing which prevents water to easily travel to the surface, etc. You really need to pay attention to all possible factors and find the culprit.
As to whether your salami will become edible, I don't know. No harm in trying. If you just want to start over and OK trashing this batch, do it. I've done that a number of times. Start a new batch but make it small, like two lbs. Thin sausages for a quicker drying. Like fuet. Pay attention to all little things and keep good notes. Each setup is different so hard to recommend something that is guaranteed to work. I can tell you one thing, once you get it to work, most of your batches will be fine from then on.
Sam Harbison says
I have so many questions. I have a room in my basement that I don’t use and was wondering what I could do with that? Or do I need the temperature control of a refrigerator?
victor says
Oh, that depends on so many factors... Do you want to cure for 1-2 months a year or all year round? Do you see where I am going with this? You answer will tell you whether you need a controlled fridge or not.
Eric says
One thing I found with the dehumidifier was the high amount of heat it introduced into the chamber. As an alternative, I picked up a peltier kit on amazon so I could keep the heat side outside the chamber, and the cold side inside with a little drip pan underneath connected to a drain line.
Great write up!!!
victor says
Not really an issue in my setup but thanks for the idea.
George says
Hello again Victor!
I want to know more about the meat casings. I was wondering if when we make bresaola, it should be put in a case or is not really necessary. And can you tell me what kind of material should that case be made from? I saw that many people use the collagen one. Can I use a plastic one or a natural one made from animal's intestin?
Also, I would like to know if there is any difference in taste, or something else if you put the meat in the casing and spray it with mold culture and if you don't.
Thank you.
victor says
Hi George,
As was mentioned above, you can easily get away without a casing for solid meats. I find that a casing adds a protective barrier that helps regulate drying process a little better and keeps the mold away from the meat. Does the meat taste better with it? Not really. You may notice a slightly 'moldier' smell perhaps. I like it though.
I certainly would not use plastic, but natural or artificial (collagen) casings are fine. I moistly use natural casings simply because I am a traditionalist and I have an Italian grocery store nearby that has a good supply all year round, from hog casings, to sheep casings, to beef bungs and even salted veils (pig stomach lining). Beef bungs and veils are what I use to cure solid muscles in. Those work great for me.
You may also try UMAi, perhaps these are the one ones you were referring to as 'plastic', well, they are. But they are made in such as way that they allow the moisture leave similar to natural casings. These don't even need a curing chamber and meats can be dried in a fridge. I've never tried them but I've heard positive feedback about them. They are not cheap though.
victor says
Posting this message from Guy here, along with the pictures of his awesome brick oven and a perfectly cured coppa that looks delicious. Thanks for sharing!
Hi Victor
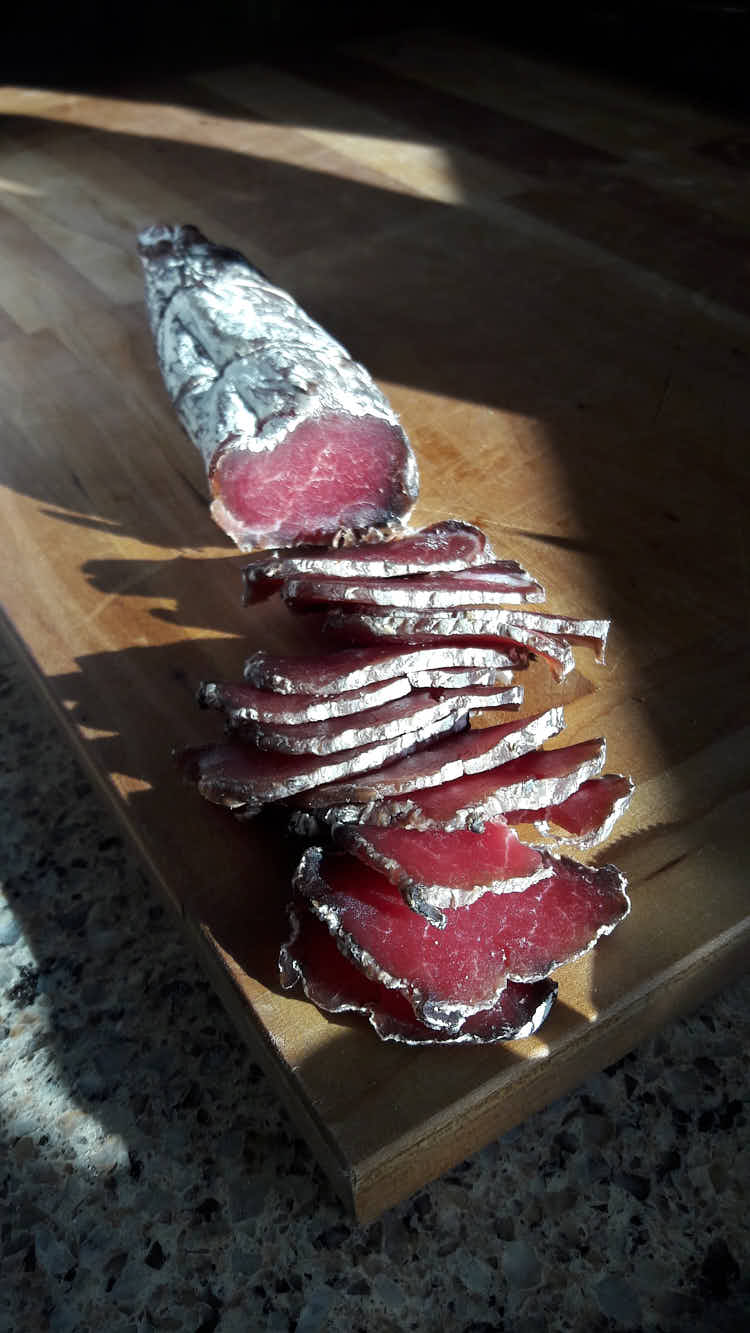
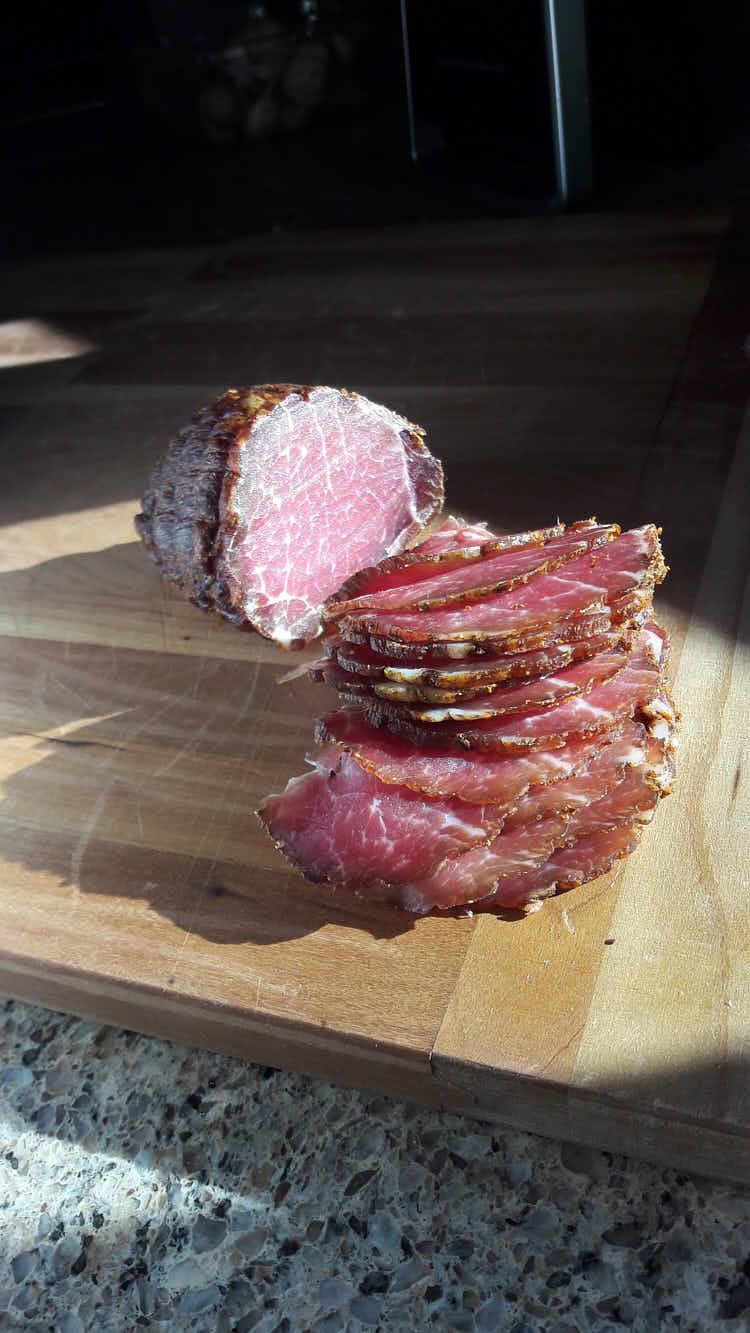
I got a seedling heater mat and a dehumidifier for this last batch. I converted my older 20.6cuft fridge into my curing chamber. I know that when the humidifier shuts off the humidity doesn't just stop rising. With the addition of the dehumidifier it does get the RH back to my presets fairly quickly. Enjoy your site and comments. Putting the thinly sliced coppa on pizza is delicious. It crisps up and has a wonderful pancetta/bacon flavor with a little kick because of the spices.
Fun hobby.
Guy
Guy says
Sounds great. May have to tell all my friends to start saving their casings for me. Thank you and have a great Thanksgiving.
victor says
Have a great Thanksgiving too!
Guy says
Victor you mentions using the bacteria from a store bought salami etc. Do you scrape off the mold and put in warm water for the same amount of time that you would with the Bactoferm 600? I think probably not because the 600 needs to be re-hydrated. How would you recommend using it?
How do you post pix to this site?
victor says
Hi Guy, I scrape off the mold into a 1/2 cup of warm water and add 1/4 tsp or so of sugar or dextrose and let sit for anywhere from 20 minutes to several hours. If I remember, I do it in advance, if I forget, that's when it becomes 20 minutes as I do it the last minute. Didn't see much difference. I then dilute this in a couple of cups of water and spray after casing and tying is done. To post pictures, email them to me and I will attach to your post (victor at ifoodblogger dot com).
George says
Hi Victor,
Do you think is it ok to spray bactoferm 600 directly on the meat without any casing?
victor says
That's totally fine. You can later eat it - it's harmless - or scrape it off.
Guy says
I do that with my lonza and just wipe some of it off and it tastes great. I don't on my coppa because it is in a casing
George says
Hi Victor!
I've been doing coppa and pancetta so far but both of it (especially pancetta which is more fatty) seems to me too "porky". I mean it has that raw pork smell, even the taste as well. And I would like it to be let's say...not so raw in the taste and smell, but more flavored. I mention that I used only salt and insta cure #2 in the meat and some spices for initial curing. But I didn't use any spices after rinsing the meat for the final rub because I wanted that original taste of the meat. I usually cure the meat at 55 F until it loose 30% of the initial weight.
So can you tell me what can I do for my meat to be more flavored? Should I try some spices for the final rub? But I am afraid if I cover the meat whith spices, the meat can not breathe or loose water and molds can apear.
Thank you.
victor says
Hi George, glad to hear that you are still working on perfecting your recipes and technique. To be honest, I don't think it matters much as to when you apply spices. Many Italian products are cured with just salt and pepper, like prosciutto or culatello. I've cured solid muscles by curing them in just salt and pepper and applying herbs later before drying, and by curing with spices and rinsing and then drying. Both ways work fine. Now, I think your raw meat flavor may come from problems with drying. Is the meat drying evenly, does it have a soft, mushy texture in the middle? I've had that happen to me before, I cured a few tenderloins and they had that 'porky' smell that you are describing.
George says
Hi Victor,
I think my meat dries evenly. It starts to have that hard case after let's say 10 days after hanging(the case is not so hard,it is just the beginning ), and after 20 days it becomes harder. So I think it dries in the right way...not too fast and not too slow.And it has the same texture everywhere(except that 1mm case).
Another thing which happened to me was that,as I told you,I put togheter in the chamber a piece of coppa and one of pancetta and the coppa,being so thick and being let in the initial cure in salt only two days using salt box method, it began to catch fuzzy white mold and even if I wipped out with vinegar,the mold kept to appear again so I tossed it. I should have let coppa more time in the salt. For me, 2kg=2 days rule works fine. But the coppa had more than 2kg and I let it only two days to see if I can make it less salty.
But the big question for me is why my pancetta which had only 1.3 kg and was way less thicker than my coppa began to catch the same white fuzzy mold. And it was cured in the salt two days as well which I think it is more than enough. Anyway, I wipped out with vinegar and it was fine after all. Is it possible for pancetta to have caught the mold because it was in the same chamber with coppa?
Next time before I put meat in my chamber, I will try to wippe the whole chamber with vinegar to make the place cleaner.
victor says
Hi there George... so many variables here. First off, 2-day curing may not be enough. If you look at Marianski's recipes, it's 10-15 days usually. Ruhlman suggests a couple of days, but his curing is done under an 8lb press. Before the meat goes into a drying chamber in must feel firm. So just make sure it's the case. In general, I would recommend starting with a very well tested recipe (Marianski is the gold standard here, but his products do tend to be saltier) and make sure you get a solid result, then you can tweak it. Otherwise it's hard to say whether it's the recipe, the process, the equipment, or the environment.
White fuzzy loves humidity so make sure your humidity is under control. Make sure you don't overload your chamber. Start small and see if it make a difference.
I would also recommend inoculating your meats with a good mold, it will keep bad molds off. Bactoferm 600 is highly recommended and I used it way back when. You can try it. Better yet, go buy a piece of salami with nice chalky mold on the skin, then use that mold to inoculate your meats and sausages. I save skins from every batch and freeze them to reuse later.
Guy says
Angelo. I have only been making cured meats for about a year now. I have a 20.6cuft single door refrigerator with the freezer on top. I didn't want to drill any holes in it or cut away the freezer door because there have been times where I needed it to use for food. I finally purchased a seedling heat mat and a Pro Breeze Electric Mini Dehumidifier, 1200 Cubic Feet (150 sq ft). I did make a difference. My temp stays between 54 and 57degs with a RH of 61% - 70%. The refrigerator has its own build in fan that circulates the air when it goes on. That and the cooler temp will cause the humidifier to go on. It does shut off at my pre-set but obviously the humidity continues to rise. The mini dehumidifier does a nice job bringing the humidity down to what I want. It's not instant but well within an acceptable time. I have only been making Lonza and Coppa but will probably start making other product in the near future. So far so good and everyone seems to be enjoying the "fruits of my labor". Hope this helps.
Guy
Angelo says
Great article on the advanced curing chamber. I recently made some sopressatta. When I put the meat in the curing chamber, the humidity inside just shot up to 95%. How long does it ussually take for the moisture in the sopressatta to dry up before my humidity will start to go down? I currently don’t have a de humidifier in my chamber because it has been pretty consistent until I put the meat in it.
les robinson says
hi sorry if i've missed it somewhere in you blog but I was wondering what temp do you cure your meat at & how do you control this. please use my email address.
regards,
les
victor says
By curing, do you refer to fermentation or drying stage? Fermentation takes place at around 68-85F, depending on the style you are going for, and the culture you use. Drying takes place at about 52F-60F, again, depending on the recipe. You control this with a temperature controller.
Luke Bazely says
Hey Victor,
Great read. I wanted to build a cold room or 'cantina' but can't in my basement because we have high risk of water getting in. This setup will be perfect. What are your thoughts on using a commercial fridge with glass sliding doors on it? I'm worried about air flow and light. It would make an awesome piece where you could see the food curing inside.
victor says
Hi Luke, welcome to my blog. A commercial fridge like the one that you described should work fine with a few assumptions.
Assumption 1 - it's big enough. 15-18 cf or larger. If it is, air flow should not be a concern. You'd typically have an air flow and humidity issues with smaller fridges, 3-8 cf. I've seen a few curing chambers converted from those and the guys had good results.
Assumption 2 - the fridge will be in a dark room, or a room with controlled light. When showcasing it, the light (artificial or natural) will be on. Otherwise, keep the light off or very low. The reason for that is that light promotes fat oxidation and rancidity.
Other than that you should be fine.
Morgan says
What did you use for a filter over the air flow holes.
victor says
I bought an air filter at HD and cut it to smaller pieces.
Marty says
Hi Victor,
Nice blog. Thank you.
I've been dry curing salami for about 15 years. I built a root under the front stoop of my house when it was built. The conditions in the cellar during the 3-4 Wisconsin winter months are idea for curing meats. So I don't have any questions on curing chambers. But I do have a question on recipes.
Growing up in Chicago there was an Italian deli that sold delicious Sopressa (not Sopressata). This is the meat that you press between boards and then bathe in olive oil, etc. I've always wanted to make it, but I don't have a recipe or curing instructions. Would you happen to know where I might find a recipe/instructions.
Thank you!
Marty
victor says
Hi Marty, my apologies for such a long delay with responding. Sometimes legitimate messages make their way into spam and get lost there. I do my best to check spam regularly, but with dozens of those a day it gets easy to miss proper ones.
Sopressa bathed in olive oil? Sounds interesting, but I've never encountered this particular technique/recipe. I will let you know if I do. I will check some of my sources.
Wendy says
http://lpoli.50webs.com/index_files/Salami%20Soupy.pdf this could be the recipe for you.
Ruchi says
Hello Victor
Thank you for prompt reply. I have different "brand" mini dehumidifier quite smilier to you have. Do you think any dehumidifier will do the job or do i need to buy same as you have.
How long did you took to cure your last batch of salami?
Ruchi says
Hi victor
RUCHI
This is fascinating and well documented artical. Thank you for sharing with us.
Now I have few questing about controlling humidity. Could you please clarify because I smile bit confused.
1. you have mention you introduce humidity to chamber via external humidifier. (With tube)
2. You have a dehumidifier inside to controll high humifity
My questions are., why you introduce more humidity when you want to controll high humidity inside the chamber??
And the other question is when runing dehumidifier and fridge fan inside the fridge will easy to lead case hardaning.
Can you please answer fot thease ASAP.
By the way I am from melbourne Australia.
victor says
Well, Rh changes constantly, depending on ambient humidity, amount of meat in the chamber, whether the meat is fresh or nearly dry... under some conditions you fight high humidity, under other conditions you need to bring it up. When the fridge circulates the Rh drop so the humidifier helps bring it back up. I try to have a stable Rh at all times, that's why I need both.
I don't run a fan in the fridge, but the dehumidifier has a fan that points up. No issues with case hardening.
ronnie says
Hello Victor,
I have a 5x5x8'tall smoke room. I have a small window a/c controlled by a coolbot controller. I have a humidifier and a dehumidifier controlled by and Auber humidity controller. The Auber controls the humidity perfectly until I turn the a/c on. The humidity then swings from 55 to 85% in a 5 minute cycle. Any ideas how to get the yoyo under control?
ronnie says
sorry for the double post.
victor says
Ronnie,
Did you notice any adverse effects on drying as a result of these swings? All other things equal, a drop in the air temperature (from ac) will raise relative humidity. Shouldn't be a biggie as this is a temporary occurrence. Auber (and other) sensors are very sensitive to this. I can open my curing chamber under certain conditions for a few seconds and the controller is instantly showing Rh of 99.9. I know it's not true but humidity condensates on the sensor and trick the controller into thinking the air is very humid.
Also, try placing the sensor where it's not in the direct line of ac air flow. You should see a difference.
ronnie says
Hello Victor,
Back again. I have a smoke room 5x5x8'tall. I have a small window a/c controlled by a coolbot. I have a humidifier and a dehumidifier controlled by a Auber humidity controller. The controller keeps the humidity in a very tight range until I turn the a/c on. Then is swings from 55 to 85%. The cycle is about 5 minutes. It just keeps yoyoing up and down. Any ideas?
Guy says
Thank you Victor. thinking of making a sopressata. Do I have to use Bactoferm F-RM-52 starter culture to lower the ph and get it a little more acidic or can I just cure it after the initial warm cure as I would a coppa. Also hog middles or collagen. I am using collagen sheets for my next coppas.
victor says
I would definitely use a culture.
Guy says
Well the first products are done and they turned out really good. Last night I had a bunch of people over and we tried the coppa for the first time. Very impressive. Black pepper and cayenne made it a hit. Is there a bigger bung or other way of being able to fit a whole coppa rather than having to slice it length wise? The coppa was approx 4.5 lbs. I was thinking of not putting it in a beef bung and just a net. Any thoughts?
Oh, how do you post pictures on this site?
victor says
Glad to hear it, Guy. Yes, there is a way. I use what here they sell it as 'salted veil'. These are large thin sheets of pig stomach lining. You can wrap a very large piece of meat in one or two of those. I think I have a picture, need to find it. Speaking of pics, send them to [email protected] and I will attach to your post.
ronnie says
I have been reading that meat should be near freezing when grinding and stuffing. Do you concur with this?
victor says
I do. This is especially true for fat to prevent fat smearing.
Guy says
Thank you for the info. I will certainly check that out. Have probably read through excerpts. Guess what is going on my fathers day wish list. Thanks again.
victor says
No problem.
Guy says
Cut open the Lonza last night . 3 1/2 weeks because it was not very big. It was a tenderloin weighing in at around 404grams. Lost a little over 30% weight. It was moist and the outside was not hard at all but firm. What I will do different is not ferment it for a week I did. Should have been more like 3 days. A little saltier than I like. Also I would eliminate the Juniper. It's ok in my gin but not in my meat ingredients. One of the coppas is about a week out. Will try and post a picture.
victor says
Good to hear that the drying went well. Tweaking ingredients is the easy part.
Guy says
I have read that people will buy a salami that has mold on the casing and use that with great results. As for the cure#1 and #2 some of the articles mention a "long cure" such as prosciutto as opposed to shorter cure times in a refrigerator for up to 8 weeks or a little longer. I feel pretty confident that all will be fine. If it looks or smells bad I obviously will toss it. Between the cure#1 and the salt I think all will be good. The next go around I will use the #2 to see if there is in fact a difference in color. I know it is all about botulism so I'll air on the cautious side next time.
Thanks Victor
Great website
victor says
Not exactly. Cure #2 is used for curing raw meats, while cure #1 used for meat that are cooked long and slow, like smoked chicken or smoked sausages. Here is a good read: https://www.smokingmeatforums.com/ams/prague-powder-1-vs-prague-powder-2.9693/. Also, Marianski's books are very good at explaining everything you need about curing, smoking, drying and much more. I think I have links somewhere in the post above.
Guy says
This first go around I was up in the air as to Cure#1 or #2, I read more about this than I read through out college. I decided to go with #1 because the meat is refrigerated and will not be in there for more than 6- 8 weeks tops because of the size. When I made my very first one last year that was just air dried I had no problem with any type of mold and that was before I new what mold 600 was. Any thoughts?
victor says
I don't use commercial mold cultures, haven't for a very long time. I once got a beautiful chalky white mold naturally on my soppressatas so I froze the casing with the mold. Now use those only. I harvest from new batches every now and then and freeze for later. But that's just one way of doing it. As to cure #1 vs #2 there should be absolutely no guessing here as the guidelines are pretty clear I think.
Guy says
Victor,
Thanks for getting back to me. I do in fact do the initial fermentation in a regular refrigerator. I do all the necessary turning etc. Glad to hear your thoughts on the dehumidifier. I think you are spot on. I have read that some people are putting small computer fans on a timer in their chambers. I was thinking about it but my curing chamber is a standard size refrigerator that has a fan inside as most fairly modern ones do. Also I check on my meats every day and just the flow of air that gets sucked in by the opening and closing action I would think would be sufficient to keep the air from becoming stagnant.
On a forum technical note: I clicked on the "click here to reply" and it brought me to the home page that had the forum only up to April 19, 2018. Is there an additional page that I am not seeing or am I not on the correct menu page. I will keep you up to date as we get closer to the prize.........eating.
victor says
I look forward to hearing from you, Guy. All the best! And thanks for pointing out the technical issue… I see it too… if you scroll down you see the rest of the comments though… I don’t know why it’s doing it but I will investigate.
Guy says
Seems to be working smoothly now. Thank you. What goes in the "website" box?
victor says
You website's, blog's URL if you have one. If not, just leave it blank.
Guy says
Hi All, First time adding to this blog; which I think is great. A lot of practical knowledge from everyone. that's the way I like to learn. Made sausages many years ago with my folks and cousins. Quite a lot actually. We some how got away from that. Have always been into the Italian traditions of making wine and grappa, mushrooming, building a pizza oven etc. I tried my hand at making a lonza last year and just cured a pork tenderloin in herbs and then after several days washed it in wine, wrapped it in a brown paper bag, trussed it and hung it in my cellar in Feb. I came out just ok because of case hardening. Well.....I decided to take an old refrigerator and make a curing chamber and do it for real. Blogs like this along with articles makes it a lot easier although I do still check it everyday. I purchased the Inkbird temp and humidity controllers and a small Geniani humidifier. I have two coppas and one lonza curing now. I used the bactoferm600 and after 4 days my lanza has a nice coating all around. The coppa had to be cut in half the long way because it just did not fit in the 4" beef bung. That's why I have two. They went in two days later and are just showing signs of the
white mold covering. I do notice I was going to get a dehumidifier but I don't know if that is really necessary. The controller shuts the humidifier off at 75% but the posture obviously can't stop rising immediatly like the unit does. I compensate by setting the target temp to 68% with the +/- settings a few degrees on either side and the alarm setting substantially higher. What I found is that the average humidity seems to stay at around 75% which I believe is what everyone says is good. The temp is set at 55degs and that stays pretty constant. I did find that when I first put the meat in the chamber I wanted the inside temp to be 80+ degs with a 80%RH so the mold would take. After 3 days I reset everything to the present settings. I had a hard time getting the initial temp to 80degs so I would open the door and blast a heater for a couple of minutes and then close the door. I think the average temp turned out to be only 65degs. The next time I do this should I get a seed propagating heat mat. I don't want to get a heat lamp or a ceramic heat fixture. Any thoughts. Also do you think I should get a small dehumidifier or I am good the way it is now. Sorry for the long blog but this is my way of introducing myself. Will be less lengthy in the future.
victor says
Looks like you are off to a very good start. Congratulations! Many of us do fermentation in a separate unit, it can be a large cooler or a warm room. I now do it in a small fermentation fridge that I use for beer and sausage fermentation. I also use a heating pad in it - it's a must. As far as a dehumidifier goes, if your readings are correct, you don't need it. Do you live in a dry climate? Where I live humidity tends to be on the higher end and I do need a dehumidifier. Most of us do. You can get away without a dehumidifier if you cure in a large room, but in a small area of a fridge all the moisture released by meat and sausages immediately brings humidity way up.
rick lawrence says
Here is a 6 week later update. My first lonzino came out yesterday and it is gone. I waited for 35% weight loss. It was ok but I'm going to do a 40% weight loss on the second one. The lonzino was placed in beef bung. I kept the salt and spices very mild on this first batch. My wife liked the not concentrated salt content, I think the spices could be more, of which I did on the second batch of lonzino. I made some salami with some already ground pork from a heritage hog. The salami should be ready soon. I did a second batch of lonzino about 3 weeks ago, so now I know it takes about 6 weeks. I would send you some photos but I don't see where to add them.
Thanks again Victor, I'm having fun with this new adventure. I also cured 13# of pork belly in the last couple of weeks too
victor says
Glad to hear about your success, Rick. I know the feeling, this hobby is very rewarding. I have several very good recipes that I am going to share in the near future. Fennel salami is one of them. Thick, about 4-5", smoked and cured for 4-5 months. One of the best I've ever tried.
victor says
Hi Rick, meant to suggest this in the previous response of mine and totally forgot. Email the photos to victor at ifoodblogger dot com and I will attach them to your comment. Thanks!
John Cardamone says
Hi Victor just wondering if you still need to use curing salt even though you use a curing chamber by the way your products look amazing... Cheers John.
victor says
The chamber is to control the environment in which curing is done. The curing salt is needed to control pathogenic bacteria growth, it also adds color and flavor.
Roland says
Hello, great post.
I have exactly the same problem with too high humidity (living in Thailand).
I was about to give up...
But after reading this article, I immediately ordered a dehumidifier.
I hope this finally works. 😉
victor says
I am almost certain it will, Roland.
Vin De Pasquale says
Hello there! Great read!! There is book from I guy who lives in Australia and I can not think of the name. It's a very rare book and almost no one has it. Do you have any idea what the name of this book is. The author and artisan is Italian. I had it saved and can't find it. Any ideas. He was is considered a renowned expert with many many years under his belt in making various Italian cured meats.
victor says
You got me intrigued... but, no, never came across a book like that.
Zach says
Victor,
Looks like you recommend a humidity level of 75%. I have Ruhlman’s book and the more popular cured meats call for a range of 60 to 70% humidity. Why do you prefer a higher level?
victor says
Zach, I go by what works in my environment. I actually tend to stay closer to 78%. Lower - and casing start to become harder than I like... Who knows, maybe it's my sensor...
rick lawrence says
I asked questions 3 weeks ago and was answered, thank you Victor. Now, I though I would send an update. I pushed buttons on the Auber controllers and think I have mostly figured them out. I spice aged a couple of lonzinos for 10 days and they went into my curing chamber on Tuesday, this week. My curing chamber looks very much like yours Victor, except I had cut out the bottom freezer, which is where my humidifier lives. I had my Auber sensors on the same shelf as the dehumidifier. But in the last week, even though the controllers are reading in the 65-70% humidity range, my chamber was really really wet, to the point, I had moisture leaking out the bottom door. This afternoon, a little lightbulb went on. I moved the sensors off the shelf with the dehumidifier and lowered them closer to the middle of the box where the meat is currently hanging. Wow, within minutes, the humidity shot up to 80% and now the dehumidifier is running. I'll see how long it takes to purge the moisture out. So in my case, the sensors were really happy reading what the dehumidifier was doing but not an accurate reading in the middle of the box.
And as breathe taking the price is, my hanna ph meter came yesterday, no deals, $445. Salami is next. With both of my batches, lonzino and the soon to be salami, I am doing everything according to the 'book' to make them successful but also to get everything working properly I'm also will to throw them away if need be.
I also sprayed my lonzino with bactoferm 600 this morning, I am waiting patiently to see the pretty white mold start forming.
Thanks again.
victor says
Hi Rick, good to hear from you. Like reading people's updates so keep me posted. Good luck and hope everything works. You are in a much better position that I was when I was starting out - I did not have a PH meter, my curing chamber was not adequately controllable, my fermentation was done without much thought to it. I wasted a number of batches of meat and scrapped a useless $100 controller. It certainly makes more sense to invest in proper equipment from the beginning if you are going to be serious and long-term about it. Problem is - few know from the beginning how serious they would be about this hobby.
George says
Hi Victor,
Please explain me something based on your experience: if I use salt box method, the meat will lose more water than the equilibrium method. I use salt box method and keep the meat covered in salt for about 6-7 days. If you consider this time to be too long, I do it because I applied once equilibrium method (with 3% salt) and kept the meat in the salt for about 1-2 days and I got bad mold on the meat. My question is: when I put the meat to cure in the chamber when used salt box method, is it more difficult for the meat to lose 30% water than for the meat where it has been used equilibrium method? Because in the first meat, the amount of water remained is less than the other one. I hope you understand me what I mean. When using salt box method like in my case, can there be a danger to be impossible for the meat to lose 30% water because it ran out of water?
Thank you.
victor says
Hey George,
I think I got your question. Think of it this way - for salami to be safe to eat it needs to drop water activity (aw) to at or below .87, proscuitto - .85 for example. You want also want the drying to be even throughout. Now, how you get there is technically irrelevant. Also, water loss is calculated by subtracting final weight from green weight, which is the weight before the meat enters salting or fermentation stage.
George says
Hi Victor,
Thank you for your quick response about water activity which I didn't know about. But I am still a little bit confused. If you mean that fermentation stage is when you hung the meat in the curing chamber, please tell me which mathematical formula is correct: water loss = raw,fresh meat weight - final weight or water loss = weight after salting - final weight.
victor says
That would be the former - raw meat less final weight. Also remember that meat loses a lot more weight initially and barely any towards the end. And the 30% rule is not a gospel, it really depends on your taste. I dry my sujuk to about 45% weight loss, sometimes even 50%. Meat can lose a lot more weight on account of it consisting 75% of water.
ronnie says
Victor,
I am having a problem with case hardening. I know about humidity and air movement. Are some types of casings more conducive to case hardening?
Ronnie
victor says
Ronnie, I can't really compare casings simply because I use natural ones most of the time. I think it's more about the environment rather than the casing though. Try to observe how your sausages behave and make adjustments. Once you get it right, it should be a fairly simple and smooth sailing after that for the most part. When you experience case hardening, don't just leave it as is and see what happens. Increase humidity, decrease air flow. Wipe the sausages with wet cloth. Spray with Bactoferm 600 to get a thick layer of white mold going which helps with case hardening. I once read on an Italian charcuterie forum that a salami is like a small baby - it needs constant care and attention. That's very true. We try to minimize the level of involvement by introducing helpers like humidity and temperature controllers and so on, but that won't solve it 100% all the time. Especially initially.
Eric Pousson says
Hi,
Great Blog. I have a quick question as far as your dehumidifier goes. Now that we are 2.5 years later do you still recommend the same dehumidifier. The reason I ask is because I just got my setup running, based off your blog I bought the dehumidifier and the humidifier. I have my chamber packed with 35 kilos of product. When my fridge turns on the humidity plummets from 85 to roughly 70. Then it fixes itself when the compressor stops. I think that because of the amount of meat in the chamber my RH wants to stay at around 88%. Is that a problem? My little dehumidifier seems to not make that big of a difference in the number but I do see it pulling water from the chamber.. Have you tried the 2200 model? Also would you recommend having 2 separate humidity controls rather than 1 with duel ports?
Thanks Eric
victor says
Eric, I rarely go over 15-18 lbs of meat so my dehumidifier handles that just fine. As a matter of fact, I recently picked up another one of those to be used in a fermentation chamber I am putting together.
For your needs, I'd say the 2200 model would be a better fit.
As far as two separate controllers vs one - I don't see an advantage of one vs the other. Theoretically, one should be better as you won't have the humidifier and dehumidifier fight each other. This can happen if you have two controllers with targets set pretty close to each other and one sensor is slow and the other is fast. Practically, that's not an issue. I have one fast and one slow, so I set them up such that they'd never overlap and compete.
ronnie says
Victor,
So the HD 220 can be used to control the humidifier and the dehumidifier, and a second control would control only the temperature?
Ronnie
victor says
Yes, that's correct. The second cannot be another HD220 though, obviously.
Mick says
Victor,
Thanks for the excellent article and lengthy responses on all the comments.
Quick question:
In the thread you mention that the Auber TH220 is the follow-up and more recent model of HD220 (August 4, 2016).
However, when I look at the Auber website (link at bottom), I noticed that HD220 actually has two outlets, one for humidifier and one for dehumidifier. While TH220 has two outlets as well, but one is for temperature and the other one for either/or humidifier/dehumidifier. So if using the latter, one would indeed need two TH220's. But perhaps the DH220 was updated since the comment a few years back ?
Since I already have fully temperature controlled fridges (yes...plural) as a homebrewer, I'm thinking of just re-purposing one of those and adding the HD220 with a humidifier and de-humidifier plugged in.
Thoughts ?
victor says
Mick,
I just checked the model numbers on my controllers, they are TH210s. So, the new model that replaced TH210 is TH220, which has a dual temp/humidity controllers. For temp you can use to cool or heat, while for humidity you can use it in humidify or dehumidify mode.
You are correct, the HD220 controls humidity only and can be hooked up to both a humidifier or dehumidifier.
Really, you can use two TH220s, which is what I use, only with older, TH210 models. Or you can use an HD220 with a TH220, or a TD120 which allows for heating/cooling control. I actually use one of those in my beer fermentation chamber.
ronnie says
Thanks for the quick response. I have built a smokeroom based solely on your recommendations. Saturday will be two weeks I have had some venison sausage hanging. Looks great. Finding your blog was like finding treasure. I also refer to the Marinanski book. Thanks for the great info.
victor says
Good to hear that. Thanks for the kind words. I find this hobby very relaxing and very satisfying... Love every minute of it.
rick lawrence says
Thank you again for responding. I keep pushing buttons on the Aubers and it seems as though some things are happening. Maybe as you said, no raw meat, and things won't really stabilize until the refer gets some product. I did change differentials on cooling, heating, humidify and dehumidify to 0.
Also the humidly readings are different on both controllers. Do you use the temp and humidity calibration to set them the same?
And I just wanted to comment on buying good tools. I'm a builder/carpenter and I spend money on tools that work and work for a long time. I asked my electrician about building a controller, such as some have done here and showed him the Auber. He said don't waste your time building, buy the package that works out of the box, no fussing around (well maybe a bit of fussing learning how to use the new tool)I will let my refer curing box run for a few days and see how things settle down. If I feel confident the fermenting box and the curing chamber will work properly, I'll start paying more attention to stuffing some casing. I have most of what I need to process the stuffing except for a ph meter. Hanna instruments prices are breathing taking, but again, I'm in this for the long haul.
Another 10 inches of snow Monday night. My garage has a bit of heat but not enough for good curing temps.
Thank you again
victor says
Good to hear that, Rick. But change the differentials from zero to something more appropriate like 1.5 -2.
I too have the controllers report different temps and humidity, but the difference is minimal for me to bother. I've noticed too that once the fridge stops cycling and/or the dehumidifier/humidifier stops running both settle to within 1 degree or so. When the fridge is cycling and, say, the humidifier kicks in, the Rh on one responds and changes very quickly while the other reports changes much slower, with about a 3 degree lag at some point. It just depends on the sensor, I guess. I have a spare sensor just in case, bought it 2 years ago, want to test it and see how it behaves. I use that to my advantage, actually, the more responsive controls the dehumidifier as humidity is my bigger issue, while the other one controls humidifier and I don't want it to kick in too quickly.
I am with you on your philosophy about buying tools. I am not a carpenter/builder but I am very handy with my hands and do most of the work around the house, and I am very good with electronics. I too had an idea of building my own controller using Raspberry Pi, which I ended up tossing as it was a pain to get to do what I wanted it to do. I've seen some other projects too but they look big and aesthetically unpleasing. I also went through several controllers before I bit the bullet and bought the Auber. I could not be happier with it.
Ph meter is a must. I decided to not even think about it much and went straight for the Hanna. eBay has good deals sometimes, I believe I got mine for $360. I have had it for about 4 years and use it all the time for cheese making, sausage making, brewing beer and more. With good care you shouldn't even need to replace the probe too often. I haven't had to do it yet, knock on wood. I did buy their overpriced solutions for calibration, cleaning and storage, but those 500ml bottles last a long time.
ronnie says
After you have cured and dried the sausage, under what conditions do you store them?
victor says
Ronnie, same conditions as drying are typically recommended, i.e. 55-60F at 75Rh. You can also simply refrigerate. That's what I do. I used to freeze but don't do that anymore as the texture changes slightly even if defrosted slowly in a fridge. And who wants to wait a couple of days for the salami to defrost? I would end up dropping it (vacuum sealed) in cold water for a quick defrost.
rick lawrence says
As everyone says, thank you. I am days or hours away from getting my curing chamber running. I'm using a rubbermaid box for my fermenting. My question, I have to Auber th220 controllers for cool/humidity and heat(if needed in my Colorado garage, 12 inches of snow outside the last 3 days) and dehumidifier. I'm pretty good at reading instructions but Auber's are a bit confusing to me for my initial setup. I have plugged in the different temps and humidity based solely your observations/ recommendations but the controllers are not sending power to the pieces of equipment. Do I also have to set differentials for each piece of equipment? I've looked on line for some sort of tutorial for these but haven't found anything yet
victor says
You are very welcome. Congratulations on your new build and best of luck with it.
Now, to your questions. The controller can be operated in either heat or cool mode. You want to be in cool mode. If you set it to 55F in heat mode and the temperature is rising above 55F - nothing will happen. So, check that first. It happened to me too. The differential would be the second thing to check. If the differential is (DEFAULT), and the target is 55F, nothing will happen until the temperature rises past 58F. The same applies to humidity, but obviously your target will be different, say 75%.
It's also possible that your temp and Rh are inside the range you are targeting, and stay there, that happens too especially without any raw meat in the fridge. Try setting an extreme target that will for sure trigger a response, say 80F for temp (cooling) and 90% Rh for the humidifier, or 30% for the dehumidifier.
Try these steps and let me know if it worked.
George says
Hello Victor!
I've been trying to make some cured meats in my small wine cooler but no success so far, so I appreciate if you tell me where I'm wrong. I hope you don't mind because of the length of my message but I have so many questions to clarify. So, to begin with:
I have a small wine cooler with buit-in thermostat but without fan. I don't know what type it is but I will explain to you: it has a compressor and when the mist comes out from my humidifier, it (the mist) freezes in the form of drops on the back wall of the wine cooler. Then, when humidifier stops, that frozen mist begins to melt, the back wall starts to lick and the mist is collected at the bottom of the wine cooler in a hole where is taken out.
The humidifier I use is ultrasonic with built-in hygrostat. It goes around between 65-75% RH because of its lag, so an average of 70% RH which I think is ok for cured meats. It starts to run let's say every 5 minutes. When it doesn't run, it continuously blows air inside the chamber. My ambient RH is around 60%.
So the only cable which I have inside my wine cooler is the plug in for humidifier also used to make a crack for the fresh air to get inside.
I read on forums and a book about charcuterie and I started to make my own cured meat. And then, the problems appeared:
Firstly I used the equilibrium method for salting the meat (with 3% salt) using the 1 day/kilo rule. I did this with lonzino, lonza and guanciale. Very small amount of water drained from the meat. I did all by book and put the meat to hung in the wine cooler with no casings or mold culture on them. I checked my meat every day and I've noticed it was quite wet especially at the bottom. Every day the meat was licking fluids through the bottom side. When I put direct light on the meat it sparkled. So far so good, but after one week white fuzzy mold started to show up. I wiped the meat with vinegar but after two days, more mold shown up and I tossed the meat.
Thinking that using only 3% salt, this was the reason the mold appeared, I tried the salt box method for bresaola keeping the meat in salt for 6 days so as much water as possible can release the meat. Way more amount of water has drained from the meat than the equilibrium method and it is way firmer. I put bresaola to hung without casing and mold culture. Every day the meat was licking fluids through the bottom side and was quite wet like in the first method. I think that "fluids" are just the water coming from humidifier not from the inside of the meat because after a week I weighted the meat and it gained (not lost) about 10 grams more. So far there is no mold but I'm worried my meat will not decrease in wight. My temperature inside the chamber is 13°C which I think is OK and I open the door 1-2 times a day to let the fresh air to come inside.
So please tell me where is the mistake here. Is it because of high RH? If YES, how can I control it better? Is it because I don't use casings or mold culture for extra protection against molds? But I can't use them for pancetta or guanciale for example.
Thank you.
victor says
Hello George! Sounds like you are having issues with humidity, although it's hard for me to be 100% sure without knowing your system in detail. One thing I will say, and I've said it many times here, is that controlling humidity in a non-frost-free tiny wine cooler is practically impossible. At early stages meats lose a lot of water very quickly so you main issue at this stage is removing water quickly and efficiently. That you have a humidifier blowing mist inside an already humid environment makes thing worse. My suggestion is to read the post above - I've described my system in detail - and at try to get a similar setup. You will need a dehumidifier for sure. You will need a humidity controller with a good sensor rated for high humidity environments. That will get you off to a good start. Dual controller is what I would recommend but you can add it later. That will eliminate a lot of guesswork you are doing right now.
George says
Hello Victor!
Thank you for your quick response. I have a few more questions in order to make a decision about my equipment.
If you were me, would you give up wine cooler (despite the fact I spent some money on it) and buy a full size frost free fridge? In my country we use the term "No frost". Is there any difference between Frost free and No frost? Or they are just synonyms?
You said your fridge blows cold air inside it. How? Through a ventilator? Because if yes, I am a little bit confused because you said you don't use a fan anymore.
Is it ok to buy a full size frost free refrigerator with a freezer on top because in my country I don't find too many of them without integrated freezer.
Thank you.
victor says
Hey George. Frost free and no frost are the same thing. These are the fridges that use a heating element to defrost their evaporators and remove/drain the water out. Most refrigerators use a fan to move the cold air in the freezer into the evaporator and then push it into the fridge compartment to keep it cool. At least that's how they work here. I don't know, in your country (where are you from if you don't mind my asking?) they may have a slightly different design but I suspect they would work very similarly. The advantage of these fridges is that they remove moisture and humidity by removing water and by blowing cool air, which is dry, when they cycle. Non-frost-free don't do that, so you will have a lot more moisture to deal with, on top of the moisture leaving the meats in your curing chamber. In a small space this becomes a huge battle, that's why I said controlling humidity in a small wine cooler would be practically impossible. I've seen people try it but I have yet to see good results with those.
Now, of course, everything is relative. Somewhere above I commented about a guy using a wine cooler and provided a link to his blog. His has a larger cooler which makes a difference, and he had good results it seems. But, if you notice, he only dried a small sausage in it, again, that makes a huge difference. Drying a small sausage at a time is kind of wasteful - lot's of effort for little return. You can try that with your wine cooler and see where it takes you. If you are not getting the results you want you can always upgrade to a frost-free fridge. Speaking of which, they all come with a freezer by virtue of frost-free design. Just don't drill any holes in it just yet.
You are correct, I don't use a fan anymore as I was doing more harm than good. I am not saying it's a bad idea to use one, it's just that I could not make it work in my setup, but that may change in the future. However, the fridge has own fan that blows cool air in when it cycles. There is also a small fan on the dehumidifier that blows the air up so between the two of them they generate some air movement and I find that it's sufficient.
Cal Eng says
Thank you Victor for your blog on setting up my curing chamber. I was a little nervous about curing meats and some of my friends think it's nuts. I looked on Craigslist and Ebay for old refrigerators. There was really no good items for sale so I ended up getting a smaller chest freezer from Sears for a great price. I built a wood frame that fits inside the freezer with removable cross pieces that fits across the top where the meat is hung. I bought a Auber temp controller and separate Auber Humidity Controller. The first dehumidifier and humidifier were returned since the models I got never turned back on once the controllers shut them down. I ended up getting the exact humidifier and dehumidifier you ordered with the "flip up on/off button". I live in Phoenix and found I do not need to set up the humidifier so far. The humidity ranges from 77 to 80 and the meats are looking good. Now I need to find a butcher shop that sells entire pork neck muscle for coppa. Depending on how I do I may start curing sausages.
victor says
Awesome! Hope all goes well from this point on. It can get a little stressful initially but once you put all pieces in place and learn to manage them - it's a cake walk from there.
Mike says
Thanks Victor. The UMAi bags work well, but they are pricey. $4-5 ea depending on size, about half that if buying in bulk. I've not been able to find another domestic supplier, if you know of one please share. I ordered another Humidity Monitor (AcuRite with Indoor Thermometer, Digital Hygrometer and Humidity Gauge Indicator) from Amazon, but was also thinking the wine cooler is just tool small.
I found a tall glass door beverage cooler, you know the type you see in pizza shops for around $100. Thinking about converting something like that since it would be larger but I don't know if it's frost free. What do you think, is frost free a must for a larger unit?
victor says
That IS expensive. I read somewhere that UMAi is basically repackaged Tublin 10 bags, http://tub-ex.com/products/tublin-2/tublin-10/. Maybe buying those in bulk would be cheaper. In fact, I am sure it will be cheaper.
On the beverage cooler, whether it will work for you it will really depend. Look at this guy's curing chamber: http://foodielawyer.com/2011/12/home-cured-salami/ - seems like he is pretty happy with the results but its hard to say without testing for yourself. I am certain though that if you add a dehumidifier you should be fine. Also note that this guy is curing about, what, 3 lbs of meat? The results will be hugely different when trying to dry 10-20 lbs of meat. It's all relative. I just started drying 11 lbs of meat and my curing chamber is barely breaking a sweat while trying to maintain target RH but it's starting to work hard when approaching 20lbs. My typical batches of fresh meat are almost never that big so I don't worry about that scenario.
Mike says
Hello,
Great work on your curing chamber. I’ve been making capocollo and pancetta for a few years using dry age bags in a standard refrigerator with good results, but the drying time has been long (75-90 days) due to the cold temp and low humidity in the fridge. I now have a wine fridge which can maintain temp in the 50’s and installed a dehumidifier to bring the humidity down (it approached 90% when adding meat). The cooler is 17 x 19 x 33 inches and is in the basement where temp is approx. 65. I added approx. 9 lb of meat and the dehumidifier running bringing the humidity down as expected, but I needed to monitor it and turn the dehumidifier on/off as needed. I was planning on adding a Dayton dehumidifier controller. This morning I checked the temp and humidity and the temp was fine but humidity was high 80s with the dehumidifier running and little water had been collected. I’m puzzled, expected the humidity to be lower. Any thoughts?
victor says
Thanks, Mike. And I've been thinking of experimenting with UMAi bags myself but haven't got around to doing it.
Incidentally, I recently started a new batch myself - I loaded 5 kilos (11 lbs) of meat in the chamber just yesterday morning. All are different types of salami, stuffed into same thickness (2") natural casings. So far I see about 100 ml of water accumulated in the dehumidifier, which represents about 1% weight loss and is consistent with what the weight loss should be at this stage. Mind you, thicker salami and whole muscles will lose weight at a slower rate based on my observations. I set the temp to 55F and RH to 88% on day 1, and dropped it to 85% today. Today, my dehumidifier cycles about every 8 minutes and runs for approximately 4 minutes each cycle.
Provided you use the same dehumidifier as I do, you should be seeing similar behavior, except there are a few important factors to consider. Humidity control in a small fridge such as yours will always be significantly more difficult. Frankly, I have yet to encounter someone who has been able to reliably control humidity in a 4-5 cu. ft. chamber. If you can't go up to at least 15 cu. ft. try dropping your batch sizes accordingly. I don't think there is another way. Or try a bigger dehumidifier, it may help but I can't be certain.
Another thing to look at is whether your fridge is frost free. From what I've seen most wine coolers are not. Those just accumulate moisture and make it that much harder to control humidity.
The humidity sensor may also be the culprit. Any frost deposits on it will drive the readings (incorrectly) way up, especially if the sense is not rated to 99%+ RH.
Take what I said with a grain of salt as I never really tested a small fridge like your wine cooler. Start experimenting and changing one variable at a time until you find the culprit. Everyone's system is different and it takes some tweaking to fine tune it.
PETE says
hi first time blogger.i built a dry curing chamber out of a coca cola cooler.have auber HD220W controller controlling humidity and dehumidity.th220w controlls heat.im trying to keep my humidity between 80-85%.my problem is when the DEHUMIDIFIER turns on at 85.5% it wont shut off until about 1% before the humidifer comes on at 79%.i would like it to shut at 84% if possible. looking forword to a reply.
victor says
Hey Pete, not sure I understand your problem fully. What did you set the dehumidifier controller to and what is the differential set to? It might need to be tightened up. If you are saying that the controller lags, then you need to move your sensor where there is a better air movement so it catches humidity changes quicker.
Russell says
Hey there’re! I’ve used your system to get started. I don’t have your exact controllers but I do have a question about your humidifier before I buy it. I guess it automatically humidifies when the controller provides the power? Problem I had with my previous humidifier was that, when my controller tripped it ON, it would send power to it, but would not humidity until you touched the button. So, obviously it didn’t work. I’m guessing that your humidifier actually starts humidifying when the controller kicks it on. Thanks!
victor says
Correct, no manual intervention is required once set up. Otherwise it would have been a big NO for me. Or anyone.
George says
Victor, I live in eastern Europe where normally, humidity has to be increased. So technically I don't need a dehumidifier. I want to buy a small wine cooler for curing meat which has no holes in it or built-in fan. You said that you don't use a fan at all, only circulation coming from humidifier or dehumidifier. My questions for you is: is this enough for air circulation? Nothing bad will happen with my meat? Because I can open wine cooler's door once a day to get some fresh air inside and to get rid of the stale one, advice you already gave to someone else. But how can I do this when I am gone in holiday let's say for ten days and there is nobody to do that for me?
victor says
Hi George, sorry for the delay with my response, your message went into spam and I just found it.
In my experience air circulation is less important than temperature and humidity. In small, confined spaces proper air circulations is hard to achieve and a fan in a home curing chamber will be more harm than good if you are not very careful about it. I turned my fan off as I was getting case hardening from it even though it was undervolted to the point where it won't start on its own - I'd need to give it a nudge. You want an equivalent of a very gentle, intermittent breeze. Many people simply open the fridge a couple of times a day to let stale air out and that seems to work for them just fine. But I would not stress out about it. Leaving the fridge be for 10 days is not an issue as long as your temps and humidity are in check.
Now, what I said about my curing chamber may not necessarily apply to your wine cooler. Is it frost free? I believe most wine coolers are not. Frost free fridges blow cold dry air inside the fridge when they cycle - this provides air circulation, refreshes air in the fridge and lowers humidity. Non-frost-free coolers and fridges don't remove humidity. Wine coolers also tend to be small, too small actually, to effectively control humidity. When humidity is high ice and frost build up. Don't forget that when you add 10-20 lbs of meat into a small confined space your humidity will skyrocket regardless of what you ambient humidity is. Meat loses a lot of water during the first 1-2 weeks of drying. All that water needs to be removed somehow.
Mike McGrath says
For what it's worth... I'm now an expert on recharging LG refrigerators with Freon. The irony is that at a steady 41 degrees, now I need more equipment (temp controller) to get it back to the sweet zone.
"If I claim to be a wise man, it surely means that I don't know" - Kansas
victor says
Sorry to hear that, Mike. I think having a controller is a good thing regardless as it can alert you when the temperature is off. How expensive is it to do one refill? I'd think that replacing a fridge would be cheaper, you can easily get a good fridge for less than $100.
Mike McGrath says
I'm graduating from wine cooler to fridge model. I got a great deal on a 7 year old LG French door, bottom freezer for $75!! It doesn't cool real well, (57- 61 degrees) which I knew. I think it needs a Freon charge. This is where I need some help. Do ALL refrigerators need a piercing valve to add Freon? How do I tell what size line I have to get the right valve?
I guess I'm looking for a simple step by step tutorial if any of your other readers have one or a link.
Thanks for your thoughts and inspiration.
victor says
Quite a technical question but I hope someone with the knowledge here can advise you.
Patrick McLaughlin says
Viktor
You mentio that ambient humidity was messing up your internal rh. Whis was before your current setup? What was the actual effect of the ambient humidity?
I know its a simple process of curing meats but the science is amazing. I manage a whole animal butcher shop in Manhattan and just finally built a box. In a smaller chamber, how important do you feel air flow is? I open daily sure but when it comes to diffusion and evaporation it seems having some air movement helps. I've looked for a fan with mpre controll than just slow medium and fast but to no avail may have to hookup some type of dimmer switch to a fan motor.
Thoughts?
victor says
Yes, this was before my current setup. If you think about, the curing chamber is not a closed system - if the ambient RH is high the fridge RH will be high. Simple as that. That's why I have a dehumidifier running in the fridge.
Air flow is important, it promotes removal of moisture from the surface of the sausage. Turning the fan on for a few minutes every now and again really accomplishes nothing in my view. The airflow has to be constant. I believe I read in one of Marianski's books that it needs to be about 2-3 meters per second or so. Now, in a small chamber that air flow can be hard to achieve, I had case hardening from running a computer fan undervolted to a point where I had to start it by hand. It's best to put some barrier between the fan and the sausages to lower the drying rate.
Then again, every setup will be unique as even small things may have significant impact. You need to experiment and figure out what works. My setup may suggest what can work, but you can build a different one that is just as effective in your environment.
I don't use a fan at all now, but I get air circulation from the dehumidifier. It's not on all the time, but is quite frequently. I get the results where I am very happy and don't want to change anything. It just works.
Guy says
Hi Victor. I did more reading today than I did in 4 years of college but enjoyed it more. My family has made quite a lot of sausage in the past. It was always made and stored in the freezer. We would take some of it and just hang it in a fridge. My folks didn't check humidity or temp. They just felt it and when it was almost hard they decided it was time. Because of the salt inside the mixture and the natural casings I don't think they ever lost a batch and it was great. They actually made a prosciutto that came out very good. This I know was done in the colder months (CT) and hung in the wine cellar., I made a lanza last winter and was tasty but was too dry on the outside. All that being said (just a quick intro) I thoroughly enjoyed your article and can see and understand how the humidity combined with temp would, if done properly, produce really good consistent results. I was thinking about getting a wine re-fridge to start off with but that may just be a waste of money when you consider I have a full size re-fridge sitting in the basement dong nothing. I have a humidifier running now in my basement because it gets pretty humid without it in the summer.
1. Do you think I should keep that running and put a smaller unit in the re-fridge?
2. Do you have to ferment salamis first or can you let the moisture add to the humidity in your curing chamber?
3. Are nitrites and nitates really necessary when you consider you are using 3% salt to meat.
Any info is always appreciated.
victor says
Hey Guy, thanks for stopping by. It's fascinating how older folks can make sausages by feel, without any equipment, and get fantastic results. I guess it comes with experience. I've been noticing that I don't sweat about my batches any more and just do it. But, as you pointed out, in CT as in many other places, this can only be done only in certain months, which is a limitation of course.
As to whether you should put a smaller dehumidifier into your fridge, it's something that you need to investigate. Really, meat curing is super simple. We tend to over-complicate things that we are not familiar with, but as we gain experience we realize that simplicity is the key. All you need to be able to do is control temperature and humidity. That's all there is to it. If you can start at at 95% and gradually bring it down to 75-78%, or perhaps to 80% (different folks have their own preferences, I tend to finish at 78%) with an external de-humidifier, than that's all you need. If not, then get an internal one for the fridge. Many recipes advise to ferment at 90-95% RH then dry cure at 75%, without the gradual reduction. If you can do that with your external unit, try it. You may like the results. Everyone's setup and environment is different and slight variations in setups are to be expected.
Fermentation and drying are two very different process and are accomplished at different temperatures and humidity levels, so yes, you have to ferment first, but you can do that in the same curing chamber if you don't have previous batches in there.
Are nitrites and nitrates necessary? Let's put it this way - I am much more comfortable eating products that are made using them than not. It's about health safety. I would not risk feeding my family with products that I don't consider 100% safe to eat. I also find that products that contain curing salt taste and look better. Now, here is really cool read on the effects of salt levels and presence/absence of nitrites/nitrates in cured pork meat - https://www.ncbi.nlm.nih.gov/pmc/articles/PMC1255518/pdf/cjvetres00049-0082.pdf.
Thor says
Hi there! First of all, many thnaks for publishing this guide, have recreated your curing chamber almost to the letter.
After firing it up, I have been able to maintain a stable temperature, but the humidity has some pretty large swings.
The RH can swing from 91% to 76%.. The variations usually have a cycle of 45 minutes.
I have two new Auber TH-220W controllers set up with the following parameters:
1) Sandy - only controls dehumidifier
HSP-80
HCM-DEH
HDF-3.0
HOF-1
HAH-99.9
HAL - 10.0
HAS - 0
HSF- off
2) Gusher - also runs the fridge
TSP-55
HSP-78
Humidity
HCM-H
HDF-0.1
HOF-0.0
HAH-99.9
HAL-10.0
HAS-0
HSF-Off
Temperature
CF-F
TCM-Cool
TDF-1.0
TOF-0.0
TAH-95.0
TAL-32.0
TAS-0
TSF-Off
I have also posted pictures of the temp/humidity plots on Imgur.
My thoughts were that perhaps I could decrese the output of the fridge so that the decrease in humidity that seems to be associated with the fridge turning on is blunted, as well as shorter in duration.
Thanks in advance for your thoughts!
-Thor
victor says
Hi there. It's just a matter of tweaking to reign it in into an acceptable range. Make sure your Hu sensor is located where there is most air flow. I place my sensor in front of the opening where cold air blows, with the dehumidifier hose in between. This way air and vapor get mixed in and I get better and almost immediate readings.
The hdf on humidifier seems low, try 0.5 or higher. That may actually have an adverse effect.
In general, temporary swings are OK as long as you average is within the range.
Brian says
Victor,
Thanks for your quick response. Perhaps cloudy is too strong of a word. I have to hold the container up to a light and swirl to see little whispy microscopic things that are swirling in the water. I am drying at 58 degrees F and my humidifier is in the chamber. Perhaps that makes a difference. Anyway, I've got to figure this one out. Thanks for letting me know your experience. Take care.
Brian
victor says
Brian, not to downplay the issue if there is one, but I would worry less about that and more about the meats in the chamber. What I mean is that if you get no bad molds, no off smells in the chamber than there is nothing to worry about.
I do dry at 53F-55F range though.
Brian says
Thank you for the information in yout article. Thanks to you and others, I have successfully made many batches of cured whole muscle and Salami. My question pertains to how you keep your humidifier from growing mold or bacteria in it. Despite bleaching my cool air humidifier and using boiled distilled water, If I don't clean it out every few days, I get cloudy water, which I find concerning. Perhaps it is just mold 600 since that stuff is going wild on my meats, but I still find it concerning and think this could be a serious issue that home sausage makers need to pay attention to. Thanks.
victor says
You are very welcome, Brian.
As to your question, I am puzzled and have no idea what to tell you as I have never experienced the problem that you are describing. I've had my humidifier on in the fridge for over a year and never cleaned it even once. The water seems crystal clear and clean.
Angelo says
Do you ferment in the curing chamber also ? or do you ferment elsewhere ?
victor says
Hi, I do both. If the curing chamber is free I will do it there, otherwise elsewhere. Look through my responses above, I've mentioned about the ways I ferment.
P.S. Sorry it took me a while to respond, you message ended up in spam for some reason and I just noticed it.
larry fee says
Hi - just getting into curing meats. Would appreciate your input regarding cultures. B-LC-007 seems to be an ideal culture, given its protection against Listeria. Could I/should I use this in all cured sausages? T-SPX seemed like the standard before, but it seems to have been replaced by B-LC-007.
B-LC-007 also seems to be able to be used at room tempurature, which would seem to eliminate the need for a fermentation box?
Thanks in advance for your reply.
victor says
I like B-LC-007, started using it last year. The results are similar to those of T-SPX - Europen style with very low acidity. Going forward I am planning on using it instead of T-SPX. Wish it were less expensive though. But I wouldn't use it exclusively, my wife and kids love the tanginess that FR-M-52 produces. The sausages made with it are noticeably less salty too, can't use the same low levels of salt with traditionally made salamis.
Matt says
Victor,
I've been referencing your blog for a couple of months now. My family has been dry curing soppresata for over 50 years. The past two years I've been learning this tradition from my uncle as we process and dry all the sausage in his basement. The method we use for controlling humidity is drying the sausage in his basement by letting cool air in Feb-March, as it is cold and relatively low humidity. We hang our meats freely in the basement or garage. The meat comes out great. The one thing I was curious about was if you thought introducing mold would be more beneficial to our drying process? We use natural casings, pork, salt, and 2-3 spices, but we never get mold on our sausage. I'm looking to purchase Charcuterie by Ruhlman to further my knowledge on this awesome skill as my only teacher is in his 80's. Is there any other books you recommend? Thanks for this awesome blog.
victor says
Matt, if what you are doing works, I wouldn't change a thing. White mold is beneficial for keeping bad molds off and preventing the casings from drying out. Clearly, you don't have either of those problems so keep doing what you are doing. As for the books, read all of the Marianski's books and Charcuteria. Those are a must read for anyone who is into home sausage making. Ritek Kutas's book is a good read too, though I am less inclined to use his recipes.
Erik Skorupka says
Hi loved reading your post! I am new to home curing and have a quick question (don't laugh too hard).
Would it be possible to place a humidifier in a dedicated bedroom or would the humidity be too difficult to control in this setup?
Thanks
victor says
Well, we all work with what we have, no shame in that. Hey, I sometimes ferment my salamis in one of the bathrooms where I can easily get the temps to 85F and humidity to 95%. Which brings me to your question. Technically you can use any room or any enclosed space, as long as you can control the temp and the humidity in there. Based on my experience and the experience of others, controlling humidity gets easier in larger enclosed spaces.
But, of course, there are caveats. What's the normal average humidity in the room? If you live in a very arid area, you will have a heck of a time raising RH in a bedroom. If it's too high, dropping it with the help of a dehumidifier would be relatively easy. If you ambient RH is close to 70-80% to begin with, you are in luck. I think controlling the temperature in the bedroom would be harder than contorlling humidity. But then again, I've never tested that. Do some testing and you will get the best answer to your question.
Steve Decatur says
Love the article Thanks for all the info, I probably missed it as I'm still reading but what do you plug the fridge into, a separate temp controller or one of the Auber Temperature and Humidity Controllers
victor says
The fridge plugs into one of the two Auber controllers.
Andy says
Thank you for your prompt reply. Maybe I should have asked a different question. Does the tube between the humidifier and the refrigirator form a "U" (down, and then up again)? The reason I ask is because I wanted to do something similar, but the only access into the inside of the refrigerator (without making holes into unknown areas) is in the back, above where the compressor sits, and which forms a sort of platform inside the fridge. This means, in my case, that the tubing will form this "U" shape which I believe will accumulate water in no time. I guess that in your case, if it is straight up, the excess water will just run back into the humidifier.
victor says
I see. No, no U shape in mine. Mine just goes straight up and into the fridge.
Andy says
Hi Victor,
I have a question about your humidifier being outside the fridge and pumping humidity through a tube. I assume that your humidifier is placed higher than the point of entry into the refrigerator, and that at no point, the tube curves upward, otherwise you would have water condensation accumulating inside the tube, which would eventually block the passage. Is this how your setup is?
victor says
Andy, my humidifier sits on the floor and the tube enters the fridge about 2 feet above it. Works for me.
Chris V. says
This looks awesome. Nice job! I've been working on my design for one. Going to build one from scratch using the cooling system of a mini fridge. I do have a question, do you think it would benefit from a fan constantly circulating air? How much water did you go through in the almost 2 months of curing? I had bought a mini ultrasonic humidifier and wonder if it is too small. https://www.amazon.com/Bell-Howell-Ultrasonic-Personal-Humidifier-Cool/dp/B0074KC5CA
victor says
Chris,
I am afraid that you will be setting yourself up for a difficult uphill battle with a mini fridge. They are not frost free, which in addition to very tight space makes it practically impossible to adequately control humidity inside them. You will need a dehumidifier, possibly a bigger one than I have.
The dehumidifier that you linked to is fine, especially with your non-frost-free fridge. It will rarely engage as your biggest hurdle will be humidity, not lack thereof.
With my frost-free fridge that blows dry air inside and my tight settings on humidity, I go through about 1 gallon of water every month or month and a half or so. It really depends on where the drying stage is- less initially, more later as the meat dries and releases less liquid.
As to having a fan, my experience is that they are more harm than good in tight spaces. Beside, if you are running a dehumidifier it will provide air circulation.
Guigo says
Hi. Very good system. I belive it will help a lot. Just one question: my goal is to age cheese and not curing meat. I believe the system might be the same though. Do you know smth about it? Cheers.
victor says
Funny you should ask. I am just finishing dry aging a nice strip loin roast in this very curing chamber. I've also aged cheese in the past with great success. It doesn't matter whether you do cheese or sausage or aged beef, it all boils down to maintaining a specific temperature and humidity. Too bad you can cure meat and age cheese at the same time as most of the time the required temps and humidity are slightly different.
Frank Centanni says
I have a kool air cooler in my cell at that keeps my cellar at a temperature of 57 deg far
And the humidity at around 60-65% should I shut my unit off in the winter when I am curing my meats and put in a humidifier or should I leave the kool air on
victor says
Well, that depends. Ultimately, you want the temperature around 55F, plus-minus 2 degrees, and the humidity at around 75%-80%. You also want some air movement, like a light breeze. These parameters should guide you with regards to operating your equipment. And make sure to do regular checks. If you notice case hardening, reduce air movement and increase humidity, and vice versa.
Doug says
Thanks for the article.
Can you tell me the unknowns? For example. I understand there should be a 5 minute delay so the compressor doesn't go bad. Where should the refrigerator temp be set, not the temp on controller. Any other do & donuts are appreciated. I'm trying to understand what a properly set up frig runs like. How often should it cycle on/ off etc. thanks in advance
victor says
I don't think there are unknowns here. This particular Auberins controller has a built-in Anti-Short Cycle Delay function that prevents turning the compressor again when it's under high pressure. IIRC, you can set it from 0 to 12 minutes, but usually a 5-6 minute delay is enough to de-pressurize a compressor. The same function is built in for the humidifier/dehumidifier control.
I set the temperature on the controller. That's where you want it set, not on the fridge.
My fridge cycles anywhere from every 20 minutes to every hour or longer, depending on ambient temperature. In winter when its get cold I barely hear it cycle.
Doug says
Thanks for the article. Buying parts now to make my chamber. Can you tell me the unknowns? For example. I understand there should be a 5 minute delay so the compressor doesn't go bad. Where should the refrigerator temp be set, not the temp on controller. Any other do & donuts are appreciated. I'm trying to understand what a properly set up frig runs like. How often should it cycle on/ off etc. thanks in advance
Desmond de Villiers says
Hi, As far as your article is concerned, you have covered virtually everything and compliment you on the depth and persistence that you applied, although it does fall short in that to finish it off for those that are only limited in their electrical knowledge, and would welcome a schematics of the electrical components and wiring.
victor says
Thanks for the compliment. I'll add a diagram in the near future.
Mapache says
Too much+ I still don't know how to make!
Nobby says
Hi.what a great and comprehensive article,well done!
Regarding your trials and tribulations I hope you could help me in my some what more antique methodology.
I have recently cured some gianciale and lamb pancetta(rolled) using the dry cure/resultant liquid brine in bag method, with curing powder for the lamb, and pigtails and back fat by the excess salt method.I hung the products in the local pub cellar as a trial as it seemed suitable with a large fan and temp at a regular 11.c.
I figured the beer splashing on the floor would provide humidity and any residual yeast in the air may even help.
Before long things looked great,the gianciale firm with a pelicle and the pancetta firm. The tails were rock hard. Then on my next visit I discovered all products to be soft and almost a little soggy. A simple meter read the humidity at 85percent. As the cure had origionally worked then will the products reharden safely and thoroughly? And should I move them closer to the fan? Also I have a simple food dehydrator,could I blast the items in that?or is the heat with no fan problematic?
Also I can tell you that I had no scales available so cant monitor the process by weight loss.
Thanks for any info friends.
Nobby.
victor says
What you are describing is symptomatic of case hardening. I see two problems. One is humidity is too high. It was good for the initial stage of drying, I start drying at about 85% RH then gradually lower to about 78% RH, but then it became too high to effectively further remove moisture from inside the meat. You need to keep diffusion rate equal to evaporation rate, check out the link in my post on that.
The other problem is the 'big fan'. I can't be certain how much it affects the drying because so many factors are involved - cellar size, direction of the air flow and strength of the air flow when it hits the meat - but if you have strong draft hitting the surface of the meat it will harden the sausage.
If you are stuck with this setup only, I would try two things. Hang the meat as low as you can - humidity rises, so less humidity at the bottom. The other is hang the meat away from the fan. I think it does more harm than good in your case.
Moving the meat closer to the fan or using a dehydrator is exactly the opposite of what you want to do, as counter-intuitive as it may sound.
Nobby says
Thank you very much for your prompt and considered reply Victor. I will continue tinkering.
All UK books on the subject just advise hanging our cured meats in a draughty outhouse and play the waiting game!
Continued success victor.
Regards, Nobby.
Big jim says
Great stuff I've just ordered the Eva dry dehumidifier I'm on my second curing chamber build and having trouble getting the humidity below 85% I think this is going to do the trick.
Ps moveing my humidifier out side as well.
Thanks for the tips
Nice looking sausage
atila says
Thanks you! exactly what I have been looking for. I got the fridge, now onto other stuff in your list. The salami looks great!
victor says
Right on! Good luck with your build!
Blaine Spellman says
I really enjoyed you taking the time to illustrate how you controlled the temperature and humidity with this set up. It seems fairly inexpensive and precise. I think I would like to do a similar set up for making cured meats. Would you be willing to talk about how you were able to attach the plastic hose to the humidifier? All I can see from the photo is a tube and tape. Thanks for any insight.
victor says
No problem at all. I drilled a 1/2" hole in the cap through which vapor is released, and pushed a 1/2" OD hose through it. I then secured it with a piece of silver tape. The tape also covers the original vapor slot.
Patricia Zimmerman says
I would love to make my own salami and dry Italian meats...where do I begin.
After all of your trial and error, please help.
Thanks,
Patricia Zimmerman
victor says
The first step would be to build a curing chamber with accurate humidity control. You are welcome to use my approach, it works really well. Once you do that, let me know and I will walk you through the actual process. You can search my site for salami recipes, I go in detail how to make certain types of dry cured sausages.
If you are not ready to make an investment into a good curing chamber, you may want to check out the UMAi Dry Cured Sausage Kit. With it, you can dry cure sausages in your fridge. It won't be the same as traditional Italian salami, but many people like the results. I am even thinking of trying it out myself. Curiosity is getting the best of me.
Nick says
How do you control the temp?....I am building a room in my crawlspace...ambient temperature is right around 60...I am going to control humidity with the same setup as you....
victor says
It's all in my post. Dual controllers. One controls temperature.
Jason says
Hi Victor, hope all is well.
You mentioned a separate fermentation box. Can you explain how you have yours set up? maybe even some pictures. I have gone thru the internet and found a couple example. As your post on your curing chamber is so informative I would love to see & read the results of your fermentation.
Thanks again for all you do to help us out.
victor says
Hi Jason,
I've been planning on writing a post with pictures on my fermentation box, just need to find time for that. I hope to do that within the next month or two. For now, let me quickly explain what I do. There are several ways I do fermentation.
Say, I need to ferment at 68-70F and the ambient is in that range, which is most of the time in my house, other than during summer months when it can get hotter. I would hang the meat/sasages in a large cooler and cover the top with Saran wrap, leaving an opening on each side. That allows for some air circulation. The humidity inside the box is normally 90-95%.
If my curing chamber is not used I would simply ferment there, by setting humidity to 90-95%, depending on the recipe.
When I need really high fermentation temperature, say 80F, I would hang my sausages in the bathroom in the basement. I would use a heater to bring the temperature up and a humidifier to get the humidity up to 95%. Both are controlled by a temp/humidity controller. You can do the same in the curing chamber by using a small heating pad and a humidifier.
So, as you can see, nothing crazy or elegant. Just some resourcefulness and creativity to come up with suitable conditions.
Luigi says
Hi very nice article! But it gets a bit confusing for me. I'm Luigi and I've just begun curing meats at home.
I have a question about what do you think will be the best fitting for an old commercial 5ft refrigerator? I live in florida so it's pretty humid all year round. Plus I'm working on curing first some small charcuterie then I'll try to some bit bigger ones.
Best regards and thank you
victor says
Hi Luigi and welcome to the exciting world of home curing. Small or big meats, the curing will be the same, only smaller will take a shorter time to cure. A 5 cu ft fridge is not something that I would recommend as it's hard to control humidity in small curing chambers. The bigger the better. But that's not to say it can't be done. The chamber design principles will be the same as I described in the article. You WILL need a dehumidifier given that your ambient humidity is very high, and the fridge is small and it's probably not frost-free. You may or may not need a humidifier. I would try without one, see how it goes and then add one later if needed. You will need to ensure air circulation so I would add an exhaust fan that runs 2-3 times a day for 20 minutes to get stale air out. Frankly, get a bigger fridge, it will be a LOT easier for you to get best results, or even acceptable results.
tino says
Kickass article, loved it.
victor says
Thank you. Glad you liked it.
Henry says
And one more (hopefully not too daft) question Victor.
I've read we should aim to keep temp between 10&12C. I'm getting a spike in humidity (up to 81%) when the temp comes back up - about twice an hour. I think that keeping the temp closer to 10 than 12 would manage this better and reduce the spike. ie targeting a range of 10-10.5..
Is that too cold though. am I better to keep it closer 12 than 10C?
nb. 10 = 50F and 12 = 53.6
victor says
I like to keep the temperature on the colder side for several reasons - better control over bad mold development, the sausage won't be drying too fast, less likelihood of case hardening, etc. If you are using a peltier dehumidifier too low of a temperature may make it stop working. So, there short answer colder is generally better. But you have to monitor your progress. If the sausage is not drying fast enough, you will have to increase the temperature. Also, intermittent spikes in temp is not something I would worry about.
Henry says
Thanks Victor for such a quick response. Its the spikes in humidity that I was concerned about. The temp is a smooth curve. But re-read your above and you have spikes to 80% as well.. so I'm probably fussing about nothing!!
thanks again
victor says
You are correct, not reason to worry about those. It's all relative. Just monitor the progress and evaluate. If you start feeling the casing getting harder, bump the humidity on the controller. If the opposite - stickiness, wetness on the surface, drop humidity on the controller by a point or so and go from there. It's the average over a long time period that matters, not intermittent spikes.
Brandeeno says
Regarding removing the humidifier... does that mean you now have a have a tube that goes from outside humidifier to inside the fridge? does that small tub get enough moisture in?
victor says
Yes, that's exactly what I did. I mentioned that in the post, actually and posted a picture of the tube that goes inside the fridge.
Jason says
Thank you for the quick response. Your advice and mentoring is invaluable for novices such as myself.
So if i run w/the devises that i described above w/out any vents I should be right on track?
I forgot to tell you i live in New England if that makes a difference.
victor says
I actually do think that you won't need a vent with the setup that you described. But, you will only know once you are up and running and can test it out. You can a vent later if needed.
Jason says
Hi Victor
Ok So I have been collecting items for about 6 months to make my curing chamber.
I did not see your post till about a week ago. It changes the way I want my chamber to be. I will now do as you. The difference will be the devices I use as I already have a few things that i have invested $$ in.
So w/that said this is what I already have:
I chose to us a upright freezer
A cool mist Humidifier
Johnson Freezer temperature control
A Dayton 1uhg3 humidifier control
What i think I still need is a:
Dayton 1uhg2 dehumidifier control
a dehumidifier
and a hygrometer.
Can you please clear something up for me, Do i need to cut in some type of fresh air vent? I may not open the door everyday. Is a fan needed?
I look forward to hearing from you.
I will have more questions soon I am sure.
Thank you
victor says
Jason, I think an air vent is important when humid air is not removed, especially when you deal with non-frost-free type cooling aggregates. Humidity must go somewhere or it will cause problems. With the dehumidifier inside that becomes a non-issue.
A fan is typically used for either internal air circulation and/or stale/humid air removal. Since the dehumidifier has a fan and runs quite often, you can easily guess that an additional fan is not needed. I doubt a fan can even be used successfully with fairly small home fridges. I had one 120mm fan undervolted to 5V running at all times, barely any feel of air movement, a few days later I notice case hardenining. Go figure. Maybe that's the reason some have fans on a timer to come on only 2-3 times per day for 20 minutes or so. With my current setup I get almost perfect results so I don't see a value in a fan.
Henry says
HI Victor,
love your work! I've copied your set up.
One question, any reason for the dehumidifier to be at the top?
And i guess the same re the humidifiers output - does it matter where that blows?
instinct is telling me neither should output directly on the meat.
thanks in advance,
Henry
victor says
Right on, Henry!
I placed the dehumidifier on top because, well, humid air rises to the top.
The humidifier hose end is right next and slightly below where the cold air blows from the fridge. The reason is simple, the humidifier comes on mostly when the dry cold air is blowing. I want the both to get mixed and move around the fridge. This humidifies the air more evenly and the humidity readings change almost instantly and are more accurate.
Correct, you don't want the moist air blown directly on the meat.
Great questions by the way.
Henry says
i knew there'd be a good obvious reason for that!
cheers Victor
I've actually ended up with a non-frost free fridge - by accident, was advertised frost free but seller evidently didn't know the difference.
so far the readings seem to be really good (avg. temp. 11. RH. 76%) using your combo of humidifier and dehumidifier and other reading i've done suggests that if i open the door often enough (which i do) then circulation, combined with the dehumidifier should be ok..
proof will be in the pudding (or cure) i guess!
but any suggestions for how to tell if there is enough airflow?
thanks again
victor says
With the dehumidifier inside the fridge you will get enough air flow in the chamber. Opening the fridge once a day to let some fresh air in should suffice. How to tell if there is enough air flow? If the sausages look healthy and appetizing, then all is good.
Henry says
Apologies - I missed replying to this. Thanks again Victor!
victor says
No problem.
Freddy says
Victor, thanks for the great info! I got everything last week and set up the fridge. prior to putting anything in, the Temp was holding at 55 and RH was only at 66, I put around 6 pounds in and RH went to 95 and between yesterday and today it lowered to 85 and holding, but the temp is doing opposite it went to 65 and I cannot drop it, I put a bag of ice but no luck, any experience or tips?
victor says
Congrats on getting your curing chamber up and running, but looks like your fridge is having trouble keeping cold. Adding a fresh batch of meat at room temperature or higher will raise the temperature in the fridge but you typically see it stabilize near target temperature within a day. Give it a bit more time. If the temp does not drop you need to your fridge inspected and possibly repaired.
Jesse says
One more question. Initial fermentation temperatures vary between Stanley Marianski's book, The Art of Making Fermented Sausages and Polcyn's book Salumi. The former recommends starting in the high 80's and gradually decreasing temp and RH, whereas the latter recommends starting at 80 degrees, then dropping immediately to around 60. This throws me off because their recommendations don't line up. In every other way they recommend the same conditions. Which method do you follow? It seems like you follow Marianski, which is the one I'm leaning towards. Thanks
victor says
My honest opnion - Ruhlman and Polcyn's books are written somewhat carelessly and have many inconsistencies. Check out my post on Homemade Sopressata, I speak about one of them there. Marianski is much more precise and accurate. I trust his recipes but approach Ruhlman's with caution.
That said, I normally drop the RH gradually but the temperature immediately. Simply because if my sausages reached the desired pH, I want to stop fermentation asap.
Jesse says
I have been drilling down on the temp and humidity drop and see you said you drop immediately. Marianski dedicates pages 126 and 127 to show the gradual drop in temp and humidity over 20 days, yet his recipes in the back detail an immediate drop after hitting the desired pH. I think I'll follow the method of dropping the temp down after fermentation since it has worked well for you. I wonder why Marianski included the gradual temp drop table without explaining why his recipes in the back deviate from that. Confusing. On another note, does your humidifier hose enter your chamber at the top or the bottom?
victor says
It's hard to say. Frankly, I have yet to see a recipe for a fermented sausage that specified gradual temperature drop after fermentation. Besides, it makes not sense to me so won't even try it for that reason alone. Gradual pH drop does, and it works based on my experiments and observations.
My humidifier hose enters at the top of the chamber but then faces down to let condensation drop to the bottom. There is barely any of that.
Jesse says
I think your slow drop in RH is precisely why you have no case hardening in your latest batches.
victor says
You are absolutely right. The key is to keep diffusion rate close to evaporation rate. Drop RH to fast and evaporation rate will get greater than diffusion rate, causing the casing to dry out and harden.
Jesse says
Your blog is the most detailed and informative that I have read and I have scoured the web in preparation for my first chamber. I bought a wine cooler. I had suspicions too much humidity would be the issue with this cooler, so I'm installing a dehumidifier straight away, with the humidifier outside as you have done. One question: does the dehumidifier heat up the space much? I'm guessing the cooler can counter any heat coming off the dehumidifier. Thanks.
victor says
Thanks for the kind words, Jesse. I've had many problems and frustrations to deal with as I was starting out, and lot of those dealt with little things, the details. In my post I wanted to hit all those details so anyone who is venturing into this hobby has a good foundation to build upon and perfect the skill from there, not constantly fight problems.
I did not specifically measure how much heat the dehumidifier outputs and whether it causes the fridge to circulate more often. One thing I know is that it must be fairly benign as the fridge is not running constantly or even perceptibly excessively frequently.
Anthony Maggert says
Brilliant explanation of a home made Curing Chamber!
victor says
Thank you, Anthony. Hope it helps you get better results.
Rob says
Hey Victor. At risk of sounding like a parrot, this is an awesome post! I'm new to this hobby and have a few questions for you - hope you don't mind.
1) Did you use grocery store pork for that first Ruhlman's Sopressata that turned out so good? Ruhlman and others have said grocery store pork doesn't turn out real good salami. Curious what your experience has been.
2) Do you grind or hand-cut your back-fat? What grinding plate size (hole diameter) do you usually use? (I cleverly snuck in 2 questions here)
3) I noticed that Sopressata recipe uses Bactoferm F-RM-52. Most books seem to reference T-SPX - I'm using that for my first batch. Any comments, do you like -52 better?
4) Since the Auber TH220 is pretty pricey (especially if I'll need 2), I plan to try the Inkbird IHC230 temp and humidity controller ($50). It can control up to 99.9% humidity, although the specs say to store it at "0 to 85% humidity - no condensate". I have doubts if will last. But if not I'm only out $50. Not really a question here, but any comments are welcome.
Since I'm brand new to this hobby, I decided to try Umai bags first since they're so easy. And I wanted to see how refrigerator cured salami and coppa turned out. I figured I'd get a little experience with the easy stuff first before trying curing chamber salami. But I didn't get that great rich raw meat aroma I'm after with my first batch of Umai Soppressata. Not too surprising I guess since those great aromas & flavors can't develop properly at refrigerator temps. I've also got a Umai Saucisson Sec salami and a Coppa brewing but they haven't finished yet.
My next step with be to try Umai bags in my curing/drying chamber at 55 degrees. This so I don't have to worry about case hardening and other potential issues. One poster had mold issues with Umai bags in a curing chamber at 85% humidity. I'm going to try around 55-60% (lower than the 75% with natural casings), since case hardening won't be an issue. I didn't get over 75% humidity during drying Umai salami, so maybe I'll avoid the high humidity issues that have caused such challenges. But my girls won't be as pretty as yours since they won't have that pretty white mold!
Again no question, but any comments welcome.
I'll probably graduate after all this to doing salami with regular casings. But I'm having some fun so far with the simple stuff, so no rush.
victor says
Rob, I use mostly grocery store pork. I buy from a store called Coppa here in Toronto. Their meat department is very good and they always have very fresh meat. I go and tell them what I need and cut it for me. The meat is never pre-packaged. They also sell some cool stuff like beef bungs and salted veils (pig stomach lining) that are great for wrapping coppas. That said, I would be reluctant to buy meat for salami from most other local grocery stores.
I both grind and cut pork fat, it all depends on the sausage. When grinding, again, it all depends on the sausage. Most of the time though I use smaller diameter hole grinding plates, like 3mm or 5-6 mm - my wife doesn't like large pieces of fat in the sausage.
T-SPX and F-RM-52 are very different. The former is used to make traditional style salami, the latter is used to make fast fermenting sausages. Be aware that salt requirements differ between the two. If you use T-SPX in Ruhlman's recipe you need to adjust salt content to 3% or higher, according to USDA safety requirements. I used both. I like both for different reasons.
I've been reading about Inkbirds. They seem like something I would love to test out. I am planning on doing that in the near future. But I can say that Auber units are super reliable and durable. I've been using them for years and have not had a single problem. They recover from condensation like champs. Sure, they are expensive, but I wish had bought them from the start sicen I threw away good three batches of sausage that cost me about the price of one Auber controller. I also could have saved what I paid for the CAP AIR-2 controller. So, it's all relative.
I've been curious about Umai myself and have always wanted to try them. Interesting comment about the aroma. I guess you can't take shortcuts if you want to make the real stuff.
Rob says
Thanks for the quick response, very helpful. Coppa looks like a great store, kind of a cross between a large grocery store and a Whole Foods.They probably use more locally sourced pork than a regular store.
I'm mostly after that slow-cured traditional Italian salami style , so it sounds like T-SPX is a decent first choice.
Will let you know how the Inkbird and Umai salami in curing chamber idea works. I'm going to try a smaller humidifier inside my chamber instead of putting it outside with tube. We'll see how that works.
Thanks again. I've got 4 different homebrews in the fridge with your name on them, next time you're in Augusta, GA. Would only be a 950 mile drive!
victor says
Not a problem, Rob. Coppa has knowledgeable butchers, at least some of them are, very fresh meat and very reasonable prices. Can't complain about that. I am not sure where they source their meats but so far I've never had any problems with meat quality.
So, fellow home brewer, ha? I am not surprised. Many guys I know who make salami also brew their own beer. I just finished a keg of Chimay Red that was aged for 8 months. Truly great beer. That said, I will take you up on your offer when I am in your neighborhood 🙂
Dave Zier says
sorry I meant to say if I set the RH to 60% the actual humidity level at 55degrees is at 80%
victor says
Interesting question, Dave. When someone talks about humidity in meat curing chambers, they mean relative humidity (RH). No need to worry about absolute humidity.
Dave Zier says
Victor, do you measure the actual humidity level, or the relative humidity. If I set my controller to 60% RH the actual humidity level in the chamber is 90%plus. That is at 55 degrees.
MarcT says
OMG....thank you so much! I stumbled onto your page completely by accident and you answered every single question I had (Clear and to the point)!!!
I can't wait to explore the rest of your site.
Thanks again Victor!
MarcT
victor says
No problem. Glad you found the information useful.
Kyle says
It's been said before, but you deserve to hear it again. Thank you for taking the time to share your experiences, providing clear and concise links, and keeping up with folks' comments. I work on a pastured livestock farm, am excited to begin curing, and will be following your chamber design in the coming weeks. After reading through the comments and exploring the links, I have a few lingering questions.
First, In the hopes of using as little gadgetry as possible, can you think of a system where a single Auber TH220 could be used instead of two Auber TH210's that I believe you are using? The chamber will be located in the basement of a split-level home in Virginia. Although the outside atmosphere varies greatly in both humidity and temperature, the basement remains relatively consistent.
Which leads into #2... I've read that the chamber itself (it's composition, mold history, air flow, etc...) plays the largest role in flavoring cured meats. If we take this to be true (for discussion's sake), do you have any thoughts on how the chamber's external environment (aka the basement) and it's atmosphere effect the flavor of the meat? For example, my basement in question is dusty, houses the washer and dryer, a toilet, a work sink, tools, paints, etc... I'm envisioning a cave / basement in Italy and comparing that with what I've got.
Finally, I've noticed that the Extech hygrometers (which I like) have a +/- 5% RH accuracy range. When we're worried about single percentages worth of humidity in our chambers, do this margin of error come into play? Or, do you just operate within that margin of error, making adjustments as needed (assuming this, but still curious)?
Again, thanks for hard work.
victor says
Thank your for the kind words, Kyle. To answer your questions,
1) the Auber TH220 is the newer model that replaces TH210 that I am using. Functionally both are the same - they both have the same high RH humidity sensors, and both can control either heating or cooling and either humidifying or dehumidifying. Which means that if the environment you are curing sausages in has fluctuating humidity, like in a curing chamber, you will need to use two controllers. You can only use one controller if the curing environment is either mostly humid or mostly dry, where the sausage itself does not impact the humidity inside the chamber (think of a wine cellar or a cooler room) and you only need to increase or remove humidity. This is not typically the case with the (relatively small) curing fridges, but can be in case of using a (relatively large) wine cellar.
2) I think comparing our basements with the curing rooms in Italy is quite a stretch, we don't have nearly the same environmental conditions (average temperatures, humidity) or naturally occurring bacteria and molds that impart desired flavors. That's why they can make salamis in basements and we need curing fridges. That and predictable results. Even in Italy, after speaking to several Italians who make salami, they have good batches and bad batches that they have to throw out. That said, if you basement meets temp/humidity conditions needed for curing, go for it. You may have a short window though, like a couple of months per year.
3) Extech's fairly accurate. When the fridge is not circulating the readings on my Auber controllers and the Exech are withing 1 degree / percentage point or so. I keep it just for monitoring purposes. It was more relevant when I had an analogue temp/humidity controller which did not have a digital display. Now it's not that relevant with two controllers. You can easily do away without one. I would recommend using one though if you only have one controller to notice and investigate large deviations pointing to possible malfunctions.
Kyle says
Thanks for the prompt reply, Victor. The basement air affecting flavor even when using a refrigerator-come-curing-chamber was just something that crossed my mind.
I do like the idea of being able to monitor RH/Temp without opening the chamber. Also, I guess this as much an art as it is a science.
victor says
No problem at all. The air in the basement should not impart any flavor on the sausages to any large degree as they will be protected by the casing and the white mold. I once put two smoked finocchiona salamis in the fridge with sopressata. The next day the whole basement and the curing fridge reeked of smoke. Then the smoke smell mellowed out and went away. Several weeks later I pulled sopressatas out and they did not have any smoke smell at all.
And you are right, curing salami is as much art as it is science. Just make sure you have an easy to control and predictable setup going, then the art part will be fun. Otherwise most of the time you will be thinking about saving the batch, not perfecting it.
Tarus says
Thanks so much for a great explanation and tips on the process and explaining some of the pit falls to avoid. I am just in the process of setting up my first chamber. Just wondering have you had any experience in using the cheaper temp/ humidity controllers you can buy on ebay, no name products but they have a grey face and orange clips on the side. I have seriously been looking at the Auber ones but living in New Zealand by the time i factor in exchange rate and freight 2x gets fairly expensive or is it just not worth playing around with cheap stuff? i,m thinking i will just have to bite the bullet and go for them 🙂 Appreciate any input cheers
victor says
You are very welcome. No, I have not had any experience with other controllers, except the analogue controller I mentioned in the post. But I can certainly share what I think about using them.
Technically, any controller will do, as long as it is 1) accurate 2) reliable and 3) can control a fridge, a humidifier, and a dehumidifier. You will need two controllers for that, for sure.
Then there comes the icing on the cake, such as offsets, fine adjustments, sensor speed, and ease of use.
I think that Auber is all of the above and I like that. I have three Auber controllers, two used for my curing chamber and one that has heat/cooling control that I use for sausage and beer fermentation. Been using them for a while and could not be happier with them all.
What I like about the Auber controllers the most is their high humidity sensors that go up to 99.9% RH. I have read too many stories about sensors failing on people. When you open a fridge in summer even for 10 seconds you immediately get condensation on the sensor. A good sensor will recover many times, then will often fail. A bad sensor will fail sooner than that. So far, I have not had a problem even though I open the fridge daily to check on my sausages.
So, what I am saying is you don't need Auber controller. Auber is good, reliable, easy to use and has fine adjustments that make my job super easy and lets me focus on meat curing process and its refinements instead of adapting to / messing with my controller and figuring out shortcuts. But, any controller with a high humidity sensor will do as long as it allows you to do what you want it to do. I am sure if you are tech savvy and have some time to invest into this, you can buy a fairly inexpensive controller and program it to do everything that Auber does, maybe more.
Jan says
Victor these sopressata look absolutely beautiful. You've done a excellent Job.
Where does the white mold come from?
victor says
Thank you, Jan. The white mold comes from the Bactoferm 600 culture I used to spray the batch with when it went into fermentation. I have to clarify here. I originally used Bactoferm 600, it's not cheap. Later I would just save the casings with the mold on, put them in a plastic bag, seal and freeze. Next time I make sausages I would scrape about a teaspoon of white mold into a glass filled with distilled water and let it sit overnight. Then spray the sausages with that solution. You can buy a piece of salami with the mold on from the store and reuse the mold.
Charlie king says
Hi mate, im about to make my first curing chamber, do you have a diagram of what you had and where it was placed in your final set up?
Many thanks charlie
victor says
Hi there, all the components I have and how they are connected are described by images I provided and descriptions in the post. I don't have a diagram for that, but it's all pretty easy. Two controllers, one controls the fridge and the humidifier, the other controls the dehumidifier. That's all. The exhaust fan is not being used as it has no real value in this setup.
victor says
Thanks. My temp is set to 54F with a 1 degree differential (starts cooling as soon as the temp goes over 55F and stops cooling when it hits 53F). Most sources recommend 55F though, but I find that I get better results with my temp just a little bit lower. Of course, it's a purely subjective perception.
Ray says
Great read, what was the temperature though?
Jan Heijstek says
Very well documented!
victor says
Thank you!
Paul says
I learnt a lot from this, thanks for sharing.
Im just starting to look into building a curing chamber.
Could I ask why you have two seperate sensor/controllers in your pics, I dont really understand?
Thanks
Paul
victor says
You are welcome, Paul. I have two controllers because it allows me to precisely control humidity and keep it at a certain level. For that you need both a humidifier and a de-humidifier. There isn't a single controller that can control both a time. Hence the need for two.
Jerry says
Hi Victor, I just wanted to thank you. I copied your design, (somewhat) And followed your advice on humidity levels. I just finished a Ruhlman / Polcyn Coppa. It came out way above my expectations. The spices are integrated throughout the inside and the flavor is spot on.
victor says
Hi Jerry,
glad to hear about your success and happy to know that what I shared was useful. This hobby can get a bit frustrating if things don't go well, but once you have everything set up properly you will be rewarded very handsomely.
Martin says
Victor,thanks for sharing the great info.I am reading Marianski's book now,and I am hoping to start my first batch of fermented sausage.I hope to use my Bradley smoker as a fermenting chamber since I can control the temp well. How much of a concern was humidity during the incubation period for you?I read that you kept the sausage at warm room temp for 12 hours.Martin
victor says
Hi Martin,
Marianski stresses the importance of maintaining high humidity during fermentation. Somewhere around 90-95% is ideal. He then recommends dropping it gradually over a few days after fermentation is done and drying begins. Frankly, I did not keep good notes initially and did not take measurements. I did most of my fermentation at room temps and room humidity, sometimes it worked, sometimes it did not. I attribute the failures to the drying stage deficiencies, but who knows. But let me tell you, several really great batches I had initially (when I used my old curing chamber), all were fermented at room temperature and humidity, which was far lower than 90-95%. Then again, I had a few bad batches too.
Lately I am following a much more controlled approach and have had great and consistent results. For fermentation, I place the products into a big cooler and cover it with a plastic wrap such that there is a small opening on each side of the box to allow for some air circulation. I have a hygrometer in the box to measure humidity and make sure its close to 90%. With a wet product in a closed box it won't be hard at all to achieve. You just need to find a way to circulate stale air. When I have nothing in the curing chamber I use it as a fermentation box. In winter I use a heating pad to keep the temp up. This setup works really well for that.
Your Bradley smoker should be fine as long as you keep the temp and humidity right where they need to be. I would not stress out about it too much. Your primary goal is to keep the surface hydrated to prevent case hardening and fast moisture removal. This is also very important for proper growth of lactic acid bacteria. If the surface feels moist and hydrated, you are doing fine. If it starts to feel dry, see how you can bump up the humidity. Let me know how it works out. I am very curious.
Martin says
Hi Victor,I worked out a solution for a curing chamber: I set up a small humidifier to discharge vapour into my Bradley smoker cabinet,and monitored it with a humidistat,This managed to keep things around 95% RH. Coupled with a temp controller I can keep it in the exact range I need. Hopefully the humidity isn't detrimental to the Bradley. Martin
victor says
Sounds like a great solution, Martin. I like it when I can use things for multiple purposes to minimize the number of gadgets/tools in the house. I already have too many.
Martin says
Hi Victor,how fast is the RH drop with the Eva dry 1100,mine seems to be on a long time,yet the RH doesn't seem to drop below 88%, in a few days I'll have to get it lower,is it an issue,or will RH drop as the sausage dries? It drives me nuts...Martin
victor says
Hi Martin, I would not worry too much about it. The fresher the meat the faster is the water loss. As the sausage dries it will be losing water less rapidly so RH will be easier to control. It won't drop down on its own based on my experience though. You need the dehumidifier.
Now, I remember my Eva Dry working almost constantly to lower RH initially, then it would come on every few minutes, then even less frequently than that. With pretty much all of my batches I had no problem dropping RH from 88% to 85% after a few days and then down to 83, 78 etc... That said, with some of my large batches I recall having some challenges. I now limit my batches to 5-10 lbs the most. How large is your batch?
Also, what temperature range does your fridge run at? Are you running your humidifier at all?
Marko says
I have built pretty much the same setup you have there, humidifier outside of the fridge, dehumidifier inside.
Just one question - I find that the humidifier tube thats inside the fridge drips from condensation over time - leaving water at the bottom of the fridge (my fridge does not have a bottom drain or anything) which to me is a bit undesirable. Also, i think the environment itself provides some condensation that adds to this.
Did you find you get a bit of water pooling due to condensation and do you think it is an issue?
Thanks!
Marko
victor says
Yes, I see the same thing in my fridge. I wipe the water with a piece of clean paper towel every so often. By itself it's not an issue as it does not affect humidity in any significant way.
Just a thought, what if you pointed the tube up? Would condensation damage the humidifier?
Marko says
Victor,
Thanks for the reply - so some of the condensation is captured in a little cup I put underneath the tube (the tube is nearer the bottom of the fridge rather than the top - not sure if that matters).
I thought about facing the tube upwards in the fridge, but then, eventually, the tube to fill with water, most likely then restricting or stopping the incoming "humidity".
One off topic question though - when curing your solid muscles (ie, Lonzino's, Breasola) is it NECCESSARY to put them in a beef bung or something similar, or have you ever just tied them and hang them without putting them in something?
Again, thanks for your reply!
victor says
Hey Marko,
somehow I missed your question. No it's not absolutely necessary, and I've seen people do it without any casings at all, but it appears as though the meat toward the surface would dry out too much. The casing the the white mold act as the regulator of humidity exchange between the meat and the outside environment.
I've used with very good results beef and pork bungs, as well as veil, pig stomach lining. In my local grocery store it's sol under 'salted veil' name. It's very thin, about 1.5 x 2-2.5 feet, and stretchy. It's big enough for two coppas. Once wrapped, I would tie it with twine and prickle all over to remove air pockets.
I think you can use fibrous casings, larger sizes, by cutting them lengthwise and wrapping the meat.
Martin says
Victor,is that cheese I see in the first photo, and if it is, does that affect or help the products in the chamber?
victor says
Martin, yes, that's my first attempt to make cheese. I made two heads of Gruyere cheese. It did turned out tasting really well after 12 months of ageing, but formed about a 3/4" thick hard crust due to low humidity. Cheese needs higher humidity than what salami does, about 88% RH. I stopped making cheese for now, but will definitely go back to it once I have a separate chamber for it.
Tim says
Nice work Victor. We have a very similar set up that I have been using for a long time. One suggestion for those wanting a variety of cured meats. If you are strapped for room and use 1 unit from start to finish try different cured meats that have the same processing times and specs. There are several that are very similar, in many case exactly the same and it is a nice way to have some variety. I have never found cross flavouring to be a problem with this approach. Just 2 cents. Again nice work.
victor says
Thanks Tim. Interesting thought about crosss-flavoring. I never thought about it until you brought it up, simply because I never had that problem. Now that I think about, I had regular meats and heavily smoked meats in the same chamber for months. Curiously, regular meats did not acquire smoky flavor at all.
Joubert Lotz says
Hi
I am just starting the hobby of meat curing. I have a big walk-in chamber and can control the temperature exactly. I also have a hygrometer. But the natural humidity in my chamber is 88. how do get it down? I am under the impression that a humidifier will only increase the humidity. Is that correct?
victor says
That's correct. The humidifier will increase humidity, the de-humidifier will decrease it. If the humidity in your chamber is constant 88% (lucky you!) all you will need is a de-humidifier. One controller will suffice. Since you will be reducing humidity in a larger space you may want to consider a larger dehumidifier that the one that I use, like the Eva-dry Edv-2200.
In my frost-free fridge humidity tends to drop very low as the sausage dries, causing surface to harden and result in very poor final product without using a humidifier.
Goran says
Many thanks for your excellent article. I'm drying my very first peace of meat, coppa (pork neck) in a fridge equipped with thermostat, humidistat and ultrasonic humidifier. I keep the temperature around 13-14C (55F) and humidity between 70% and 80%. You are right, humidity often goes to 85% and above, then I open the fridge door slightly and that lowers the humidity. So far it works and I believe the range of 10% humidity variation is acceptable. I have another problem. When I took the meat out of the dry cure (4% salt to meat, two weeks) I noticed that the surface is soft and mushy. I hang it to dry in the fridge and after 4 days I checked the meat. It lost some 8% of the weight and the surface was still soft and now sticky. I don't know if it is normal or not, if meat was of a poor quality (although it produced very little liquid in the cure) or something else is going wrong. Do you have any idea, any suggestions?
victor says
Hey Goran, there are many variables in every individual system and it would be impossible to give the right answer without doing some testing. I did, however, experience similar symptoms when my humidity was higher than it should be. It has to do with diffusion rate being greater than evaporation rate. There is a very good link toward the end of my post, check it out. If that's at the root of your of your problem, find a way to precisely control your humidity, adjust and the stickiness will go away.
john gobee (ret.) says
Hi Victor, let me start off by saying that I am OVERLY impressed with your site, your knowledge about curing, and the way you articulate about the events you ran into when chamber curing.
I also want to start chamber curing, and how to build my own chamber. But I am only at the starting line of this project; gathering info about this subject is where I'm at right now.
I have done curing (i.e. bacon, summer sausage, etc.) and hot and cold smoke, but I want to get into doing prosciutto, sopresatta, and other hanging things....lol.
I am sure I'll be asking you questions when building the chamber. Here's question #1. Do you use fan inside your chamber for air circulation?
victor says
Hi John. Welcome to the exciting world of home curing. You are going to love it. To answer your question, no, I don't use a fan any more. The reason is that I had more harm than benefit from it. The problem was case hardening. That's said, I think there is enough air circulation in the fridge as is. One is when is when the fridge circulates and blows cool air inside the chamber. The second source is the dehumidifier which has its own fan. With this set up I am very happy with the results and no case hardening to report.
Doug says
Awesome, I wish you were my neighbor. Been making sausage and wanted to try but lack the equipment. You put it all in perspective. Searching for a fridge now so hopefully I can update you in a few months. I live in a hot valley in the summer, no humidity and cold and damp in the winter so all of your advice is appreciated.
Ben Ayres says
Hi:
Your salami looks fantastic (just what every man likes to here), and all of you trials and errors to come to these results is great, but is there any way that you could summarize the results of what you built and the ultimate temperature and humidity set you that you came up with? Trying to piece it all together by following your timeline is a little confusing.
Thanks!!
Ben.
victor says
Hi Ben,
It's a constant work in progress, making tweaks along the way, trying to improve the curing process with every new batch. That said, pint taken. I will look into adding an updated summary to keep things easy to follow.
Scott Conner says
Victor, Great looking sausage! Currently constructing a curing chamber myself. A couple of questions: Are all your controllers located on the outside of the box? Does your secondary hydro-Temp gauge have a probe, or is it mounted inside the box?
Thank you,
Scott
victor says
Hi Scott. Yes, both of my controllers are sitting on the outside of the curing chamber. Each has a temp/humidity sensor, both sensors are inside the fridge. If you look at the pictures above, the sensors are those little beige rectangular boxes sitting on the top shelf.
Thibaut says
Hello, great post, thank you!
I set up my drying chamber a few weeks ago and tried to make Saucisson Sec, per the recipe in Charcuterie book. Turned out really nice however nothing exceptional. I am currently drying a batch of salami which seems to be suffering from casing hardening. My fridge is set at the lowest (highest temp) setting and I am able to maintain a steady temp at around 52 F. I am controlling moisture by adding a large pan of heavily salted water. Moisture has remainded steady at around 55%
I read this post yesterday and subsequently added a humidifier that I used in my kids bedroom. The humidifier is a cool mist humidifier with a built in fan. Seems like it provides air circulation + moisture. The moisture went up to about 75% so I will try a fresh batch of salami and see the difference between salami batch 1 at 55 % moisture and 52 F temp, and batch 2 at 75% moisture and 52 F temp.
Quick question: how do you get your salami to be covered in that white mold? Looks gorgeous !!
victor says
A humidifier will definitely help if your RH is 55%. 55% is way too low. In my recent batch I noticed a bit of case hardening at 75%, so I increased it to 78%, which seemed to work perfectly well in my setup. I had one sopressata remain at 78% RH and 53-55F for 3 months. It lost 49% of it's weight and tasted exceptionally well. I actually liked it that dry a lot more. The casing did not dry one bit and came right off.
The white mold came from Bactoferm 600 that I purchased from sausagemaker.com. I bought it a number of years ago, used on the first two batches. After that I just save the moldy casings and store them in the freezer. Before a new batch, I scrape about a 1/4 tsp of mold into a 100 ml of water, add 1/2 tsp of sugar a let sit at room temperature for a day. Then use that solution to spray new batches.
Brandeeno says
does that mean you are not using real animal casings? i am asking because i assume that affects taste... eating a real animal casing, with the outside mold, versus removing it. i plan to ferment soon, so just looking to learn as much as possible right now
victor says
Not sure how you concluded that. I mostly use natural casings for most of my cured meats and sausages.
Dustin says
Just curious as how you maintain your heat. I like the sound of this setup and think this is the route I want to take in setting up. But a hard salami needs to range in 70-80 degree temperature. Really curious to to get more info from you.
victor says
I am not sure I fully understand your question, but I think you are referring to fermentation temperatures, not curing/drying temperatures which are typically in the 55-60F range. Fermentation temperatures range from 70 to 85F, sometimes higher and not only for hard salamis. Fermentation usually lasts from 12 to 72 hours.
I use this curing chamber for curing/drying primarily and I do fermentation in a separate fermentation box. That's not to say that I can't use it for fermentation, it's perfect for it as well. The only caveat is that it needs to be empty. If you have meats already curing in there, it will be a problem. This dual controller set up allows for one controller to control cold (your fridge) and heat (a heat pad). The idea is the same as with the humidity control I described in the post. If the temperature drops below your target, the heat pad will get activated to bring the temperature back up. If the temp creeps above the target, the fridge gets turned on to bring the temperature down. It (the heat pad) will be plugged in where I have the exhaust fan plugged in the pictures I showed in the post.
You can purchase an inexpensive heat pad from any local pet store, or from Amazon.
Jarret Bowers says
I know this is an old thread, but I had a quick question. Are you controlling temperature using the refrigerator, or do you have a temperature controller turning fridge on and off. From what I am finding will be hard to maintain a correct temperature with a fridge controlling itself as they are not designed to maintain warmer temperatures. So, do you have a temperature controller actually turning the fridge on and off to maintain temp. If so, is that hard on the compressor. Seems like it would be really hard on it and causing compressor failure. Great thread by the way. Your sausage looks amazing.
Victor says
It's evergreen post, relevant at any time so ask away. The fridge connects to one of the two controllers, you may want to re-read my post for more details. The controlled does not turn the fridge on or off, it only supplies power to it. The fridge itself will then turn on or off. Most fridges have a built-in safety mechanism which prevents it from turning on before the compressor decompresses. Just so you feel even more comfortable, get a used fridge for $50-$100. If it croaks, no big deal. That said, my fridge which I bought used has been up and running for years without issues.
David Necoechea says
Great post this will help me out so much
gabriel says
sorry just saw all the replies and your responses!! thanks!!
gabriel says
Wow! This is the answer i've been looking for. The RH in my chamber is always running high. The only problem I have is i'm using a smaller dorm style chamber and there is no space.
I really like how you removed the humidifier and placed it outside. I'm assuming you cut a hole in the box and ran some tubbing? Do you think this would work for the dehumidifier and fan in a small chamber like mine? Maybe i could have everything outside the box and run tubing for either putting h2o in or taking it out. Not sure about the fan part?
Anyway your photos are great and feel free to contact me with any suggestions on my email. Nice work!!!
Gabe
victor says
I can't imagine a way to have a dehumidifer outside, but it's fairly small actually. Controlling humidity in a small bar refrigerator has been a big challenge for everyone who tried using it. The smaller the space the harder it is to control humidity. However, with the addition of a dehumidifier I think it should be feasible. I haven't tried, but I would say it should work. Before drilling a hole in the fridge, just place the dehumidifier inside and run the cords through the door opening as a test. See if you can stabilize and keep humidity at a desired level. If it works, then drill a hole for a permanent installation. Don't worry about a humidifier too much, you may not even need it as these little fridges are not frost free and low humidity is never a problem.
Doug says
Thank you for posting this. A few questions:
Did you physically remove the humidifier, meaning you no longer use it? It appears you have it set up to cycle by the controller. How does it works outside the refrigerator?
Can you please explain the plastic tube hanging and not connected to anything? Is this the tube from the humidifier no longer being used?
Tenth and eleventh picture up from the bottom.
victor says
You are very welcome, Doug. I re-positioned the humidifier, but still very much use it. A humidifier is absolutely essential. I placed it outside the fridge primarily to free the space inside the chamber and get a better control of humidity as the smaller the space the harder it is to control it.
The way it works is quite simple. I drilled a 1/2" hole in the cap of the humidifier where the vapor comes out and inserted a 1/2" beer hose (picked it up at the local beer supply store). The hose is about 5 feet long and runs from the humidifier straight into the fridge through a 2" hole I drilled. Both ends are secured with foil tape. The humidifier is connected to one of the controllers and turns on when humidity drops below 71%. Why 71% is because the target humidity is set to 72% with a 1% offset. You can change the offset in 0.1 degree increments. I find that 1 degree offset works the best for my needs. When humidity drops below 71%, the humidifier gets turned on and cold vapor gets released. It then travels through the hose and into the fridge. I placed the hose end near the opening where the fridge blows cold air when it cycles. This helps with moving the vapor around the chamber together with the dry cold air.
So, that plastic hose is where cold vapor comes out. Hope this answers your questions.
Jerry says
Victor, I finished setting up my curing chamber and I must admit , after reviewing many curing chamber configurations, I copied your design. I am using a larger 2 door True refrigerator . When the compressor kicks in and it starts cooling , the RH drops to 51 and takes 2 1/2 minutes to get to 70 RH. Do you think this will matter. It only cycles every 30 minutes or so. Any input will be appreciated.
victor says
Jerry, congratulations on your new build. I think that impact of 2 1/2 minutes of low relative humidity every 30 minutes should be very minimal, but I have never tested that scenario and can't be absolutely sure. If possible at all, I would avoid it. I have the humidifier kick in at 72% to bring the RH back up during cycling. It takes about 10-15 seconds to bring it back up, and it usually only drops to about 69-70% at the lowest. Do you have the humidifier plugged in? What settings do you use on the controller?
Jerry says
Thanks Victor, I have the Humidifier controller set at 60 RH . The dehumidifier set at 65 RH . The humidifier only comes on when the compressor kicks in. I will raise both and see what happens. .... results are in. Only staying in the 50's RH for < 1 minute now. I do not have anything curing yet. I think I will see what happens with moist meat inside.
victor says
I see. Will you be raising the humidity when you add the meat in? 60-65% RH is very low for most cured meats, you will most likely get pretty bad case hardening at those levels. My last batch I started at 88% RH and stopped at 78%. The results were quite amazing. At one point I lowered the humidity target to 75% and felt the casing was a bit dryer than I liked it to be, so I bumped it up back to 78%. That said, humidity becomes less of a problem the lower your curing temperature is.
Kevin says
So, you have 4 things plugged into your controllers. A humidifier for when the humidity is too low a dehumidifier for when it is too high, an exhaust fan that doesn't come on much...and what is the 4th thing?
Do you store this inside or is this in a garage? I live in Oregon where extra humidity is not a problem but I would be planning on storing this in my garage where it may get too cold.
I am just getting started in curing meats...trying to read and learn as much as I can.
Thx.
victor says
The fourth thing is the fridge itself, also controlled by one of the controllers to keep it within the desired temperature range. 53F-55F or so in my case.
The curing chamber is in my basement, so it's inside. Relative humidity becomes a problem once you start adding meat to your curing chamber. Once you add 5-10 lbs of meat it will shoot up and will most likely have to be controlled as in my case. The fridge is an enclosed area, and the meat that will be releasing moisture will drive relative humidity up. In arid areas you can use an exhaust fan to remove it and replace with dry air, but it has to be pretty dry to get 75-80RH with wet meat inside and the temperature of 53-55F.
In your case, where it will get too cold, as in below 52F, you will need to consider adding a heating pad to bring the temperature back up. In my setup shown above, I would unplug the exhaust fan which is not needed and not being used, plug in the heating pad and set the controller to turn on the heating pad when the temperature falls below, say, 53F. This particular Auber controller allows easily switching between heating and cooling functions, which is a nice feature if you need it.
Good luck with your build!
Jerry says
Victor, Thanks for clarifying . I am sure I will run into the same situation.
victor says
No problem, Jerry. In my experience, it happens all the time. I like to make small batches every 3-6 weeks, so I am often adding fresh meat to the partially dried meat. Never had any noticeable issues by raising RH for the initial period.
dgisch says
Awesome post on your new and upgraded chamber. If you were to do it again, would you still put the vents in the sides with the small fan? I want to mimic yours and was thinking about putting a computer fan on a timer but wanted to know your opinion if it was needed or not. Any information is greatly appreciated. Thanks!
victor says
Thanks dgisch. Glad you found the info useful. I suppose, the general answer would be 'it depends'. Maybe.
Specific to me, no, I would not drill the holes if I were to do it again. Not for the purpose of controlling humidity.
In a nutshell, if you live in Arizona where your ambient RH is very low, and provided your ambient temperature is low, the holes will be effective at removing moisture and dropping RH. Otherwise you will be increasing relative humidity in the fridge. I once had the right ambient conditions, last February I believe, but the fan would be running non-stop and I had pretty bad case hardening because of the strong air movement. RH was not perfect either, bottoming out at only about 81-83%. I personally would not use this approach in any situation. Even if you remove all the moisture and stop the fan, I noticed, the RH creeps back up within a minute.
The only good reason to have the holes would be to put the fan on the timer to remove stale air. I would run the fan not more than once a day and only for 5 minutes or so. That said, if you open the fridge daily to check on your sausages like I do, it will accomplish that. If you will be running a dehumidifier I am not even sure 'staleness' of the air is even something to worry about.
Dennis says
Again, awesome post! In your most recent post (Nov. 14) you said, "I bumped the target for the dehumidifier to 80% and 78% for the dehumidifier." I know you meant to have one be the humidifier. Could you clarify for us rookies? Thanks again for such great examples to follow!
Rob says
Hey there.
Great post. Just wondering if this same set up can be used to dry age meat as well? Things like prime rib?
victor says
Rob, yes, this set up will work 100%. Dry aging is all about temperature and humidity.
victor says
Hi Dennis. I hope your curing chamber is ready to go by now.
Yes, that was a misprint. I corrected it. I set the dehumidifier to 80% and the humidifier to 78%. The band is tight and I noticed that I am going through water in the humidifier a lot faster now. Not a big deal, but I think I could get away with 77% target for the humidifier. I love the results though.
Dennis says
Victor,
Finally got my fridge set up and controls really tuned in. I have my first batch of salami in there now. Quick question...how do you go about introducing a fresh batch of meat into the curing chamber when you are trying to age some that have been in there for awhile. The meat that has been in there for a couple weeks has the humidity down around 75% and the new meat needs to be closer to 90%. I hope this makes sense. Thanks again.
victor says
I think it will be impossible to perfectly accommodate both at the same time. If pressed hard and to compromise, 90% RH is better than 75%.
Jerry says
Victor, I think making a separate fermenting chamber for salami would solve your problem. Ferment the salami then move it to a curing/drying chamber. Thoughts, as I am new to Charcuterie and think I read this somewhere.
victor says
Jerry, Dennis's question was about making a fresh batch and a partially dried batch of salami coexist happily in the same curing chamber. It is assumed that this is after the fermentation has been completed.
My response was that I would go with higher RH to accommodate the fresh batch. Fresh salami is much more prone to case hardening so I would start off at 88% and gradually decrease RH to 75-78%. This short term increase in RH won't impact the partially dried salami too much, so I would not worry about it.
Angelo says
Great article on the de humidifying aspect of a curing chamber. I recently made a batch of sopressatta and built a curing chamber without a de humidifier. Everything was really consistent until I loaded the fridge up with the sopressatta. My humidity hit 95% instantly. I was wondering how long it ussually takes for the moisture to leave the meat before the humidity starts to go down.
victor says
I can't tell exactly but as long as the meat is losing moisture the humidity will stay up if it's not removed. The biggest moisture loss will take place during the first 2-3 weeks of drying, depending on meat/sausage thickness. It will start to go down after that. Again. it also depends on the amount of meat in the chamber and the size of the chamber.