I've been asked numerous times to post the design plans of my DIY smokehouse, so here it goes. Unfortunately, I didn't keep all the details, or took precise measurements, but I can give you a pretty good idea. It should be enough to get things started and finished. If you have any questions, don't hesitate to ask.
Smoking sausage requires low temperatures, 95F t0 185F-195F. For cold-smoking, you need less than 80F. For a while, I tried that with my Weber Kettle Grill, Big Green Egg, and Masterbuilt Propane Smoker. I could get OK results, but each smoke was a struggle to maintain low temperatures and generate sufficient and clean smoke. So I decided to look for an off-the-shelf sausage smoker.
There are a few choices out there, electric, gas or charcoal, take your pick. Some are made for commercial purposes, so they are bulky and expensive. I wanted something as close to a traditional smokehouse as possible. I also wanted something relatively small and portable. Something that would make a sausage that tasted just like the one that my grandpa used to make. He used a big drum with a hole in the ground for the fire pit. He made incredibly tasty kielbasa, but that set up wasn't portable, looked ugly and required constant tending and a fair amount of skill.
Then one day, I was admiring the pleasantly-tasting, 'thin and blue' smoke coming out of my BGE. It would be perfect for smoking sausages, I thought. Hours of clean smoke without tending. And if I could capture the heat coming out of the chimney, I am all set. That's how the idea of building a smokehouse with a BGE as a fire pit was born.
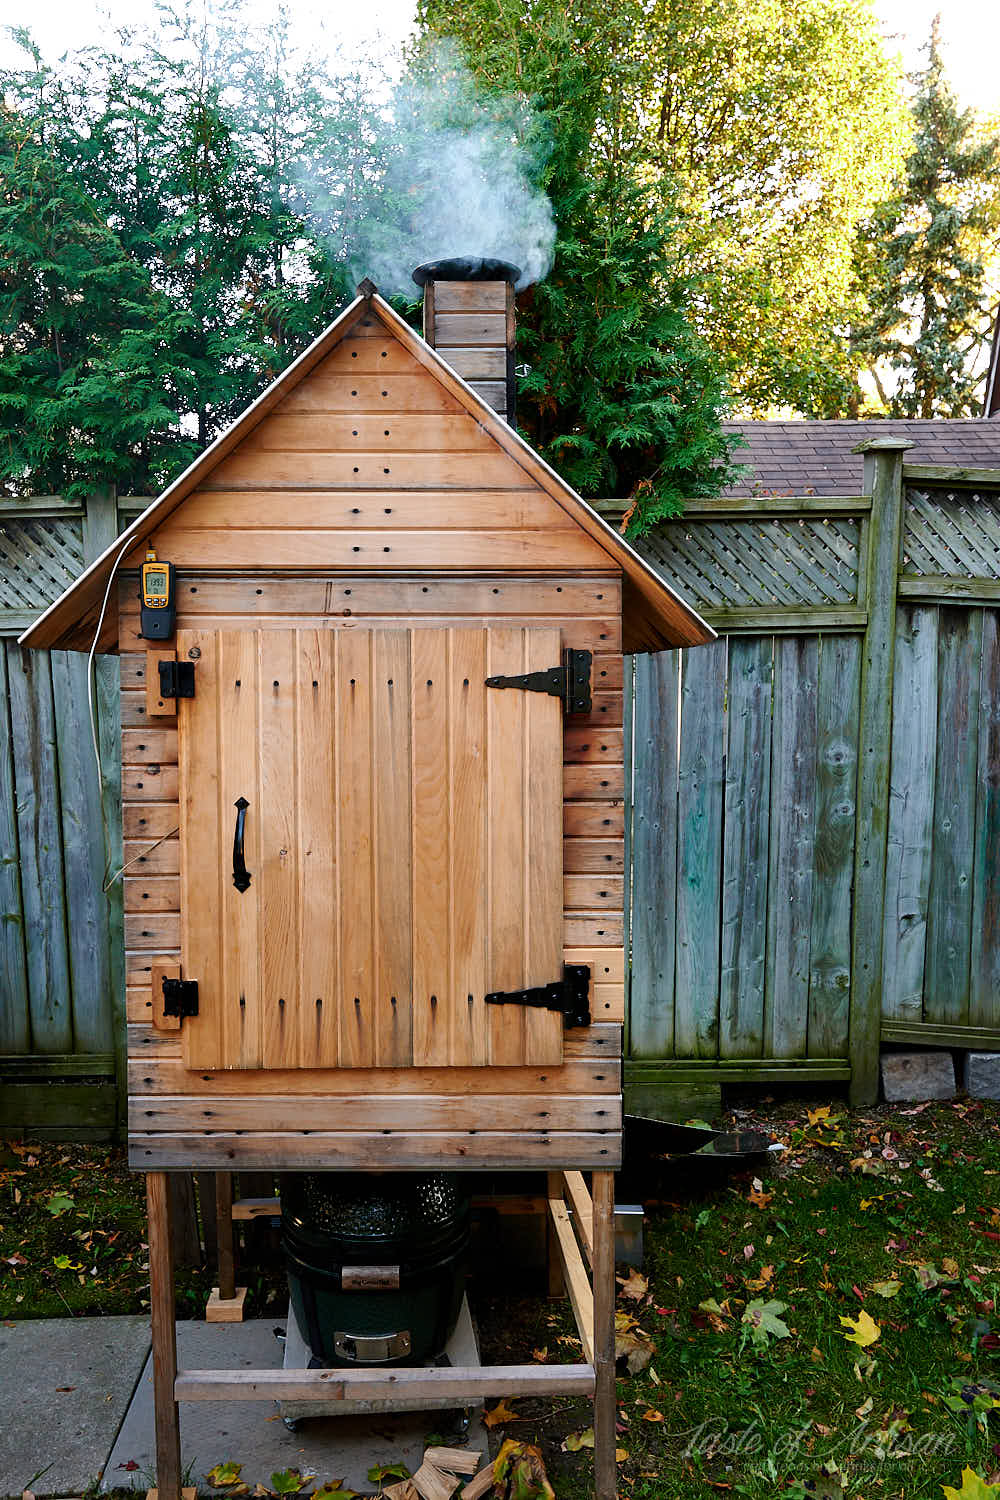
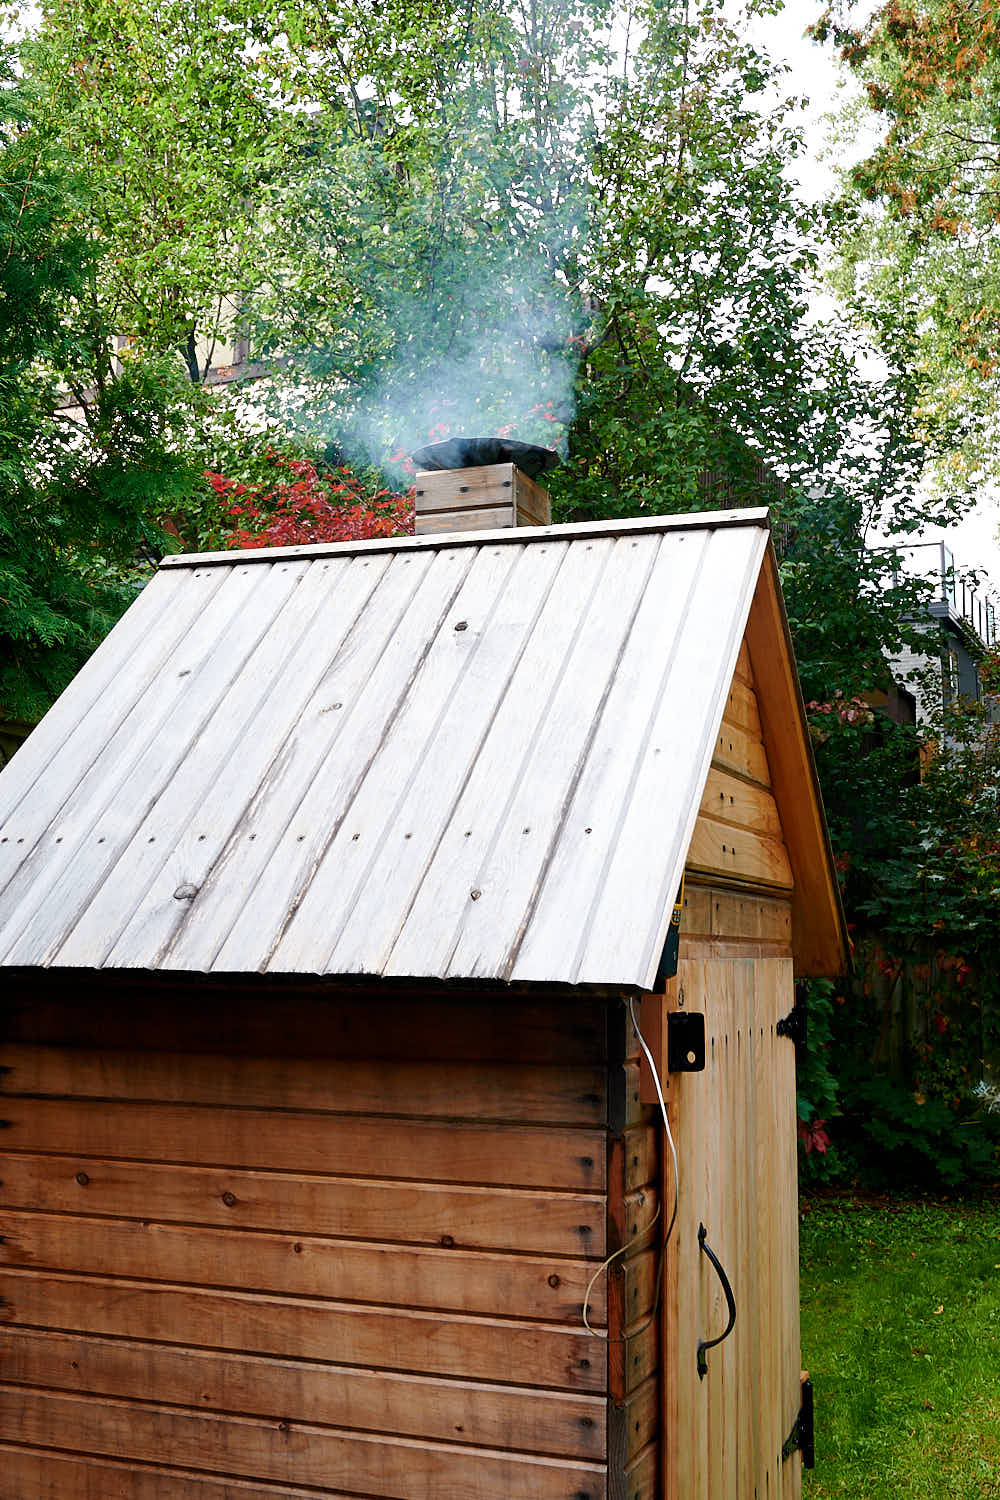
So, here it is, my modest urban smokehouse that uses a MiniMax as a fire pit. After three re-designs, it finally works to my satisfaction. Though, after having smoked over a dozen batches of sausage in it, there is one improvement that I will make to it. More on that later.
This setup is exactly what I was looking for. It's tidy and requires little tending. It's portable. It uses little fuel. I use charcoal to generate heat and wood chunks to produce clean, pleasant smelling smoke. All in all, I am very happy with how it turned out, and I am using every excuse to fire it up and smoke something.
Smokehouse design
For the materials, I used primarily 2x2s and 'tongue and grove' boards, with 2x4s to support the roof. The wood is all pine, as that's what was readily available at Lowes/Home Depot. The ducting on the roof consists of three 4" aluminum 90-degree elbow from Home Depot. Inside the top elbow, I added a 4" cast iron damper that I bought on eBay.
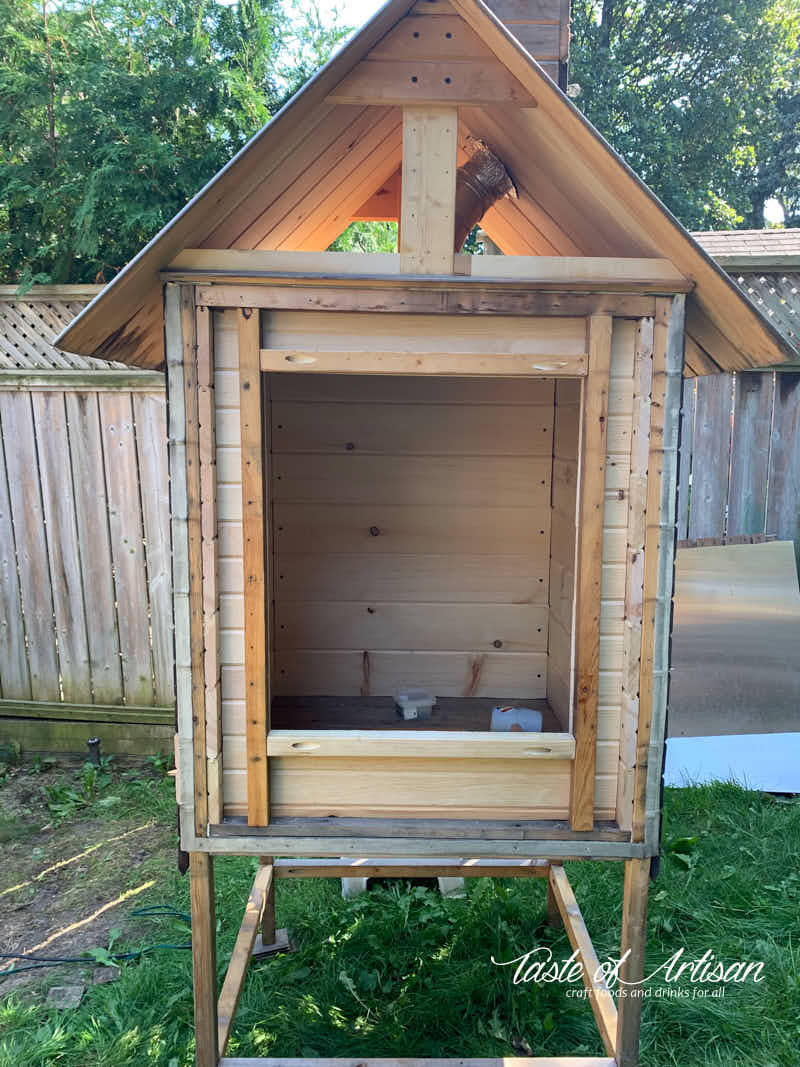
I started off with building a frame with 2x2s, about 65" tall. In hindsight, I should have gone with 2x4's to make it more sturdy. Though, using 2x2s made the smokehouse lighter and easily portable. The legs are not as sturdy as I would have liked them to be, but I am planning on putting the smokehouse on a metal or a wooden frame on casters, so that will take care of it.
One thing that I realized immediately upon firing the first version of my smokehouse was that it needed insulation. Without it, I could not get the temperature above 105F. So I insulated it. Now the smokehouse has tongue and groove boards on the outside, 1" thick Ceramafiber blanket, then another layer of tongue and groove boards on the inside.
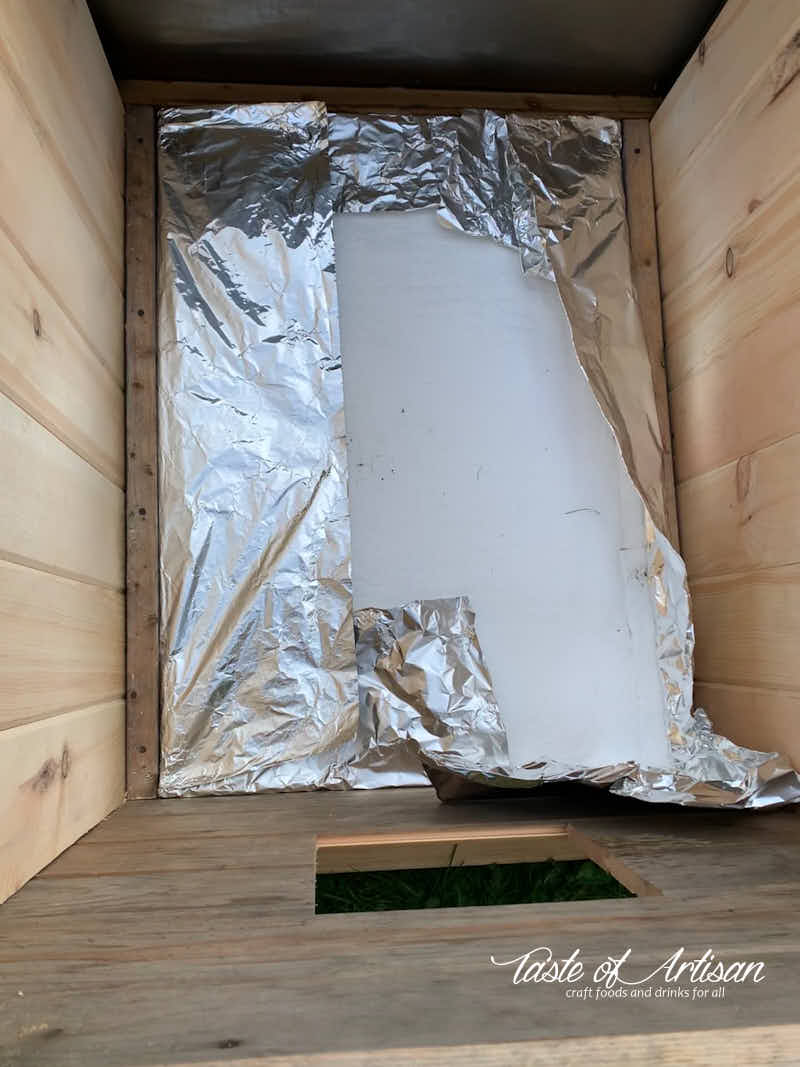
I enclosed the Ceramafiber blanket in heavy-duty foil to keep the microfibers from getting inside the chamber through any cracks.
I insulated the walls, the ceiling, the door and the spaces around the door.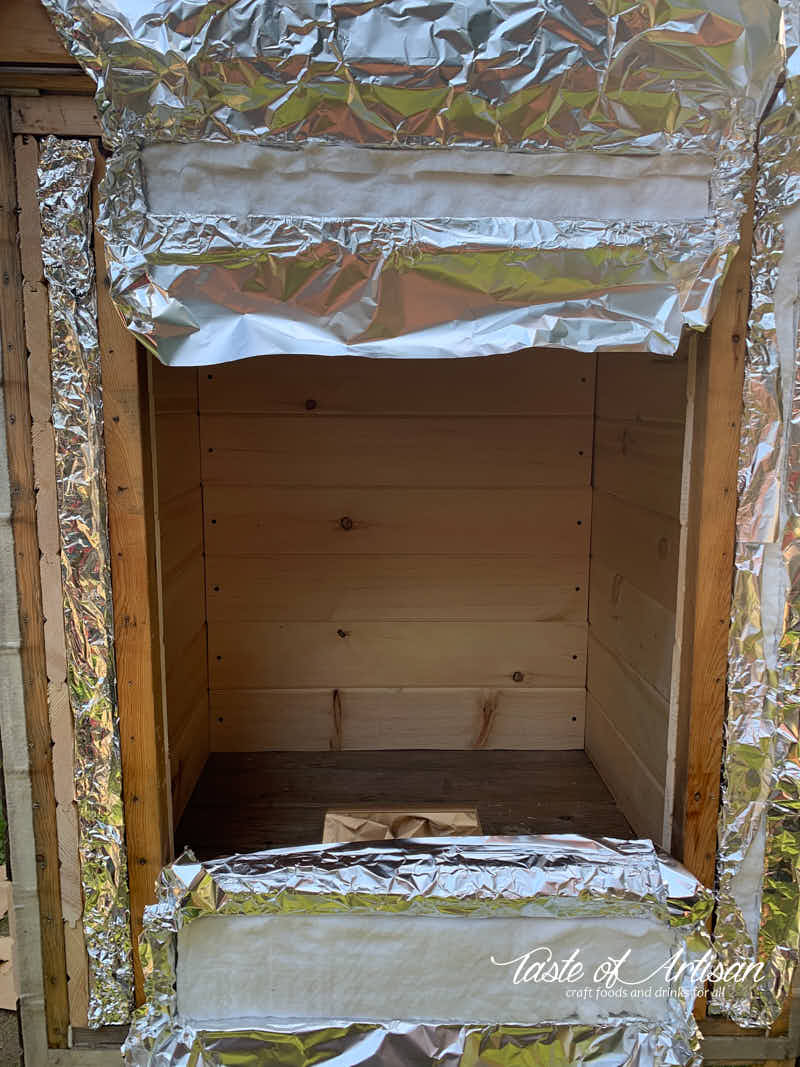
After adding the insulation and a layer of 'tongue and groove' boards on the inside, I ended up with the internal dimensions of 26" x 28" x 37" (depth/width/height). On the outside, the main smoking chamber measures 31" x 34" x 41" respectively. The legs add 25" extra, and the roof is 19" tall.
To connect frame pieces, I used pocket holes. The tongue and groove boards were secured with 2" black wood screws from Lowes.
There is a clear benefit of the screen/baffle to evening out heat distribution, especially when the chamber is full side to side. It helps eliminate cold/hot pockets.
If you are not planning on 'baking' sausage in the smokehouse, the screen/baffle is not really necessary. Most of the time, I skip the 'baking' step and finish smoked meats and sausages by poaching. Super even heat distribution is of little benefit in this case.
I have another small, non-perforated baffle right above the heat/smoke inlet, which does a good enough job at evenly distributing heat and smoke. Another purpose of this little baffle is to collect any unburnt smoke particles, also known as soot. After a while, it gets pretty dirty, while other parts of the smokehouse remain pretty clean. It seems to do a pretty good job at it.
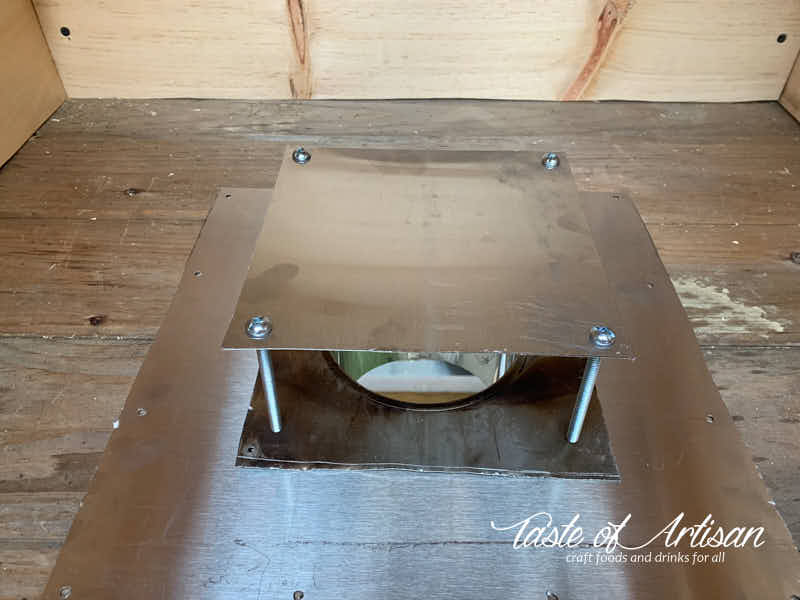
This baffle is an 8"x8" piece of stainless sheet metal with 4" bolts in each corner. It's not attached to the bottom of the smokehouse, so it can be easily moved to allow adding wood and charcoal to the egg.
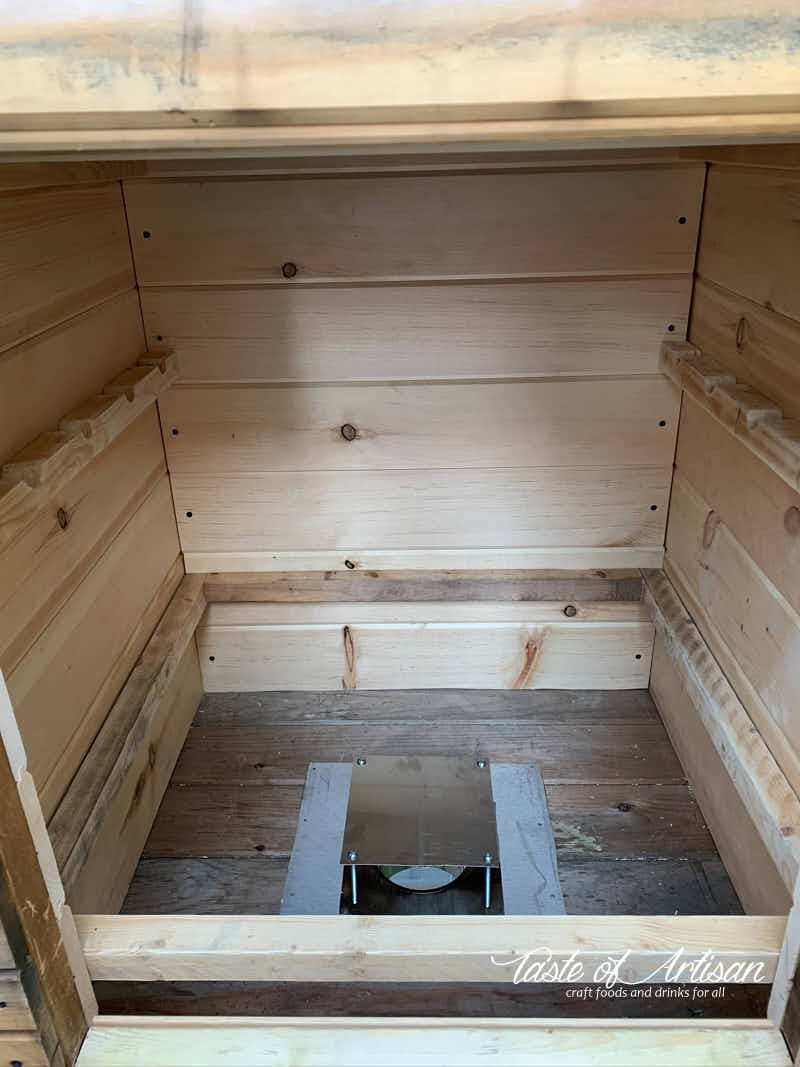
At the bottom, I cut out a 13" x 13" square hole and covered it with a SS plate with a cut out for a 4" (120mm) SS chimney flashing. This was done to distance and insulate wood from the heat of the MiniMax. The temperature at the inlet is quite low; if you put your hand over the hole, it feels hot but not 'burning' hot. But I'd rather be safe, and that little extra protection gives me additional peace of mind.
As I mentioned above, the inlet hole is covered with a removable, table-like heat shield/baffle. It disperses the heat and collects creosote/soot. The more obstacles are on the way to the sausages, the more any creosote present in smoke will get collected on them. As you can see, it gets pretty dirty, despite my efforts to smoke with the clean 'thin and blue'.
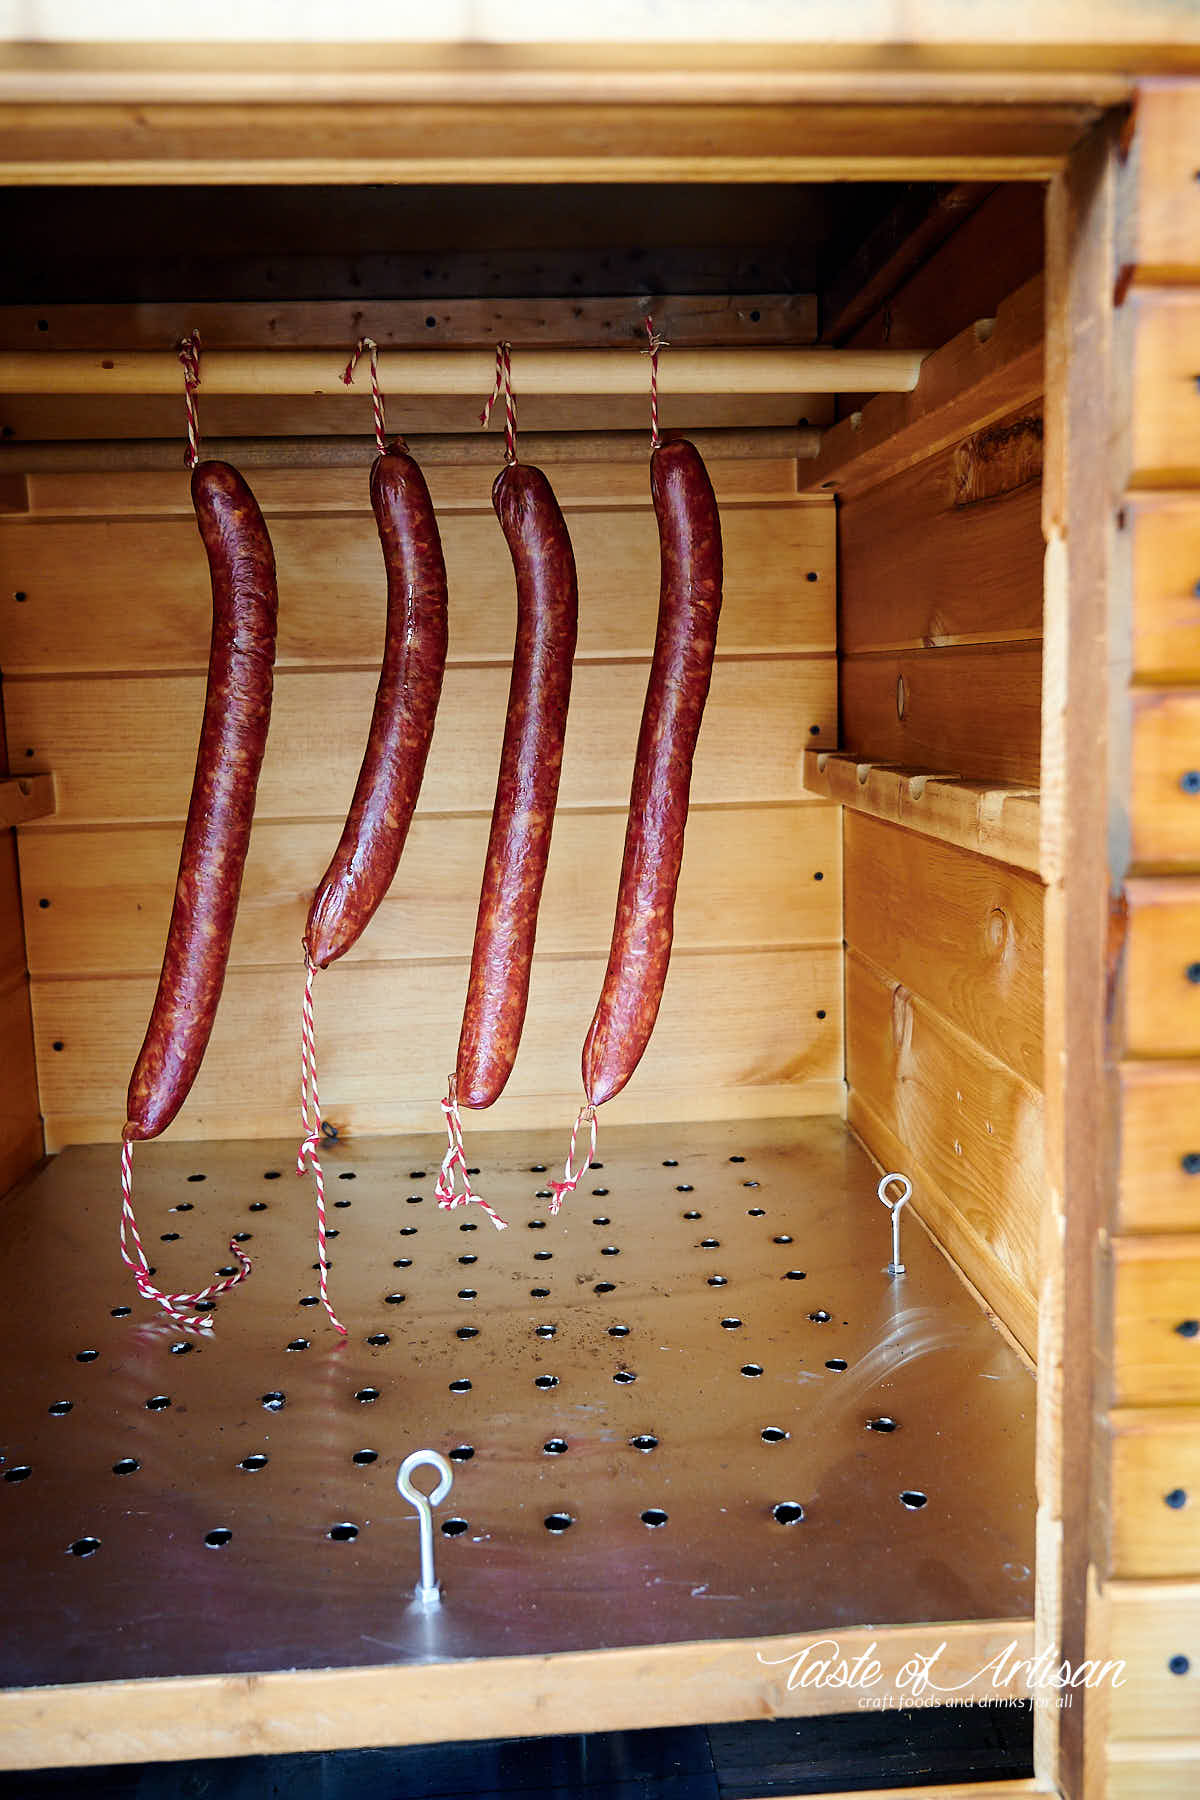
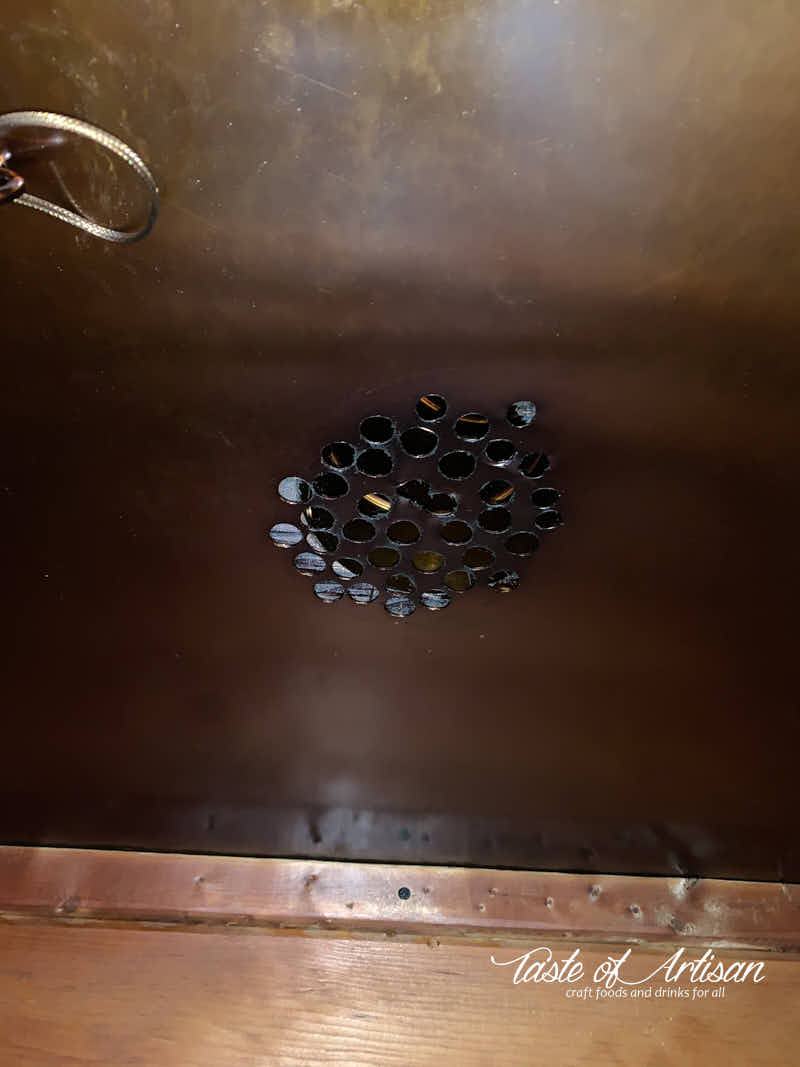
At the top of the chamber, I covered the ceiling with a sheet of stainless steel where I drilled a cluster of 3/8" holes in the center to let the smoke escape. This isn't required but I had some SS sheet metal left over so I thought it would be nice to have an easily cleanable surface there. Not that it needs cleaning. There is no black soot on it, only dark brown patina.
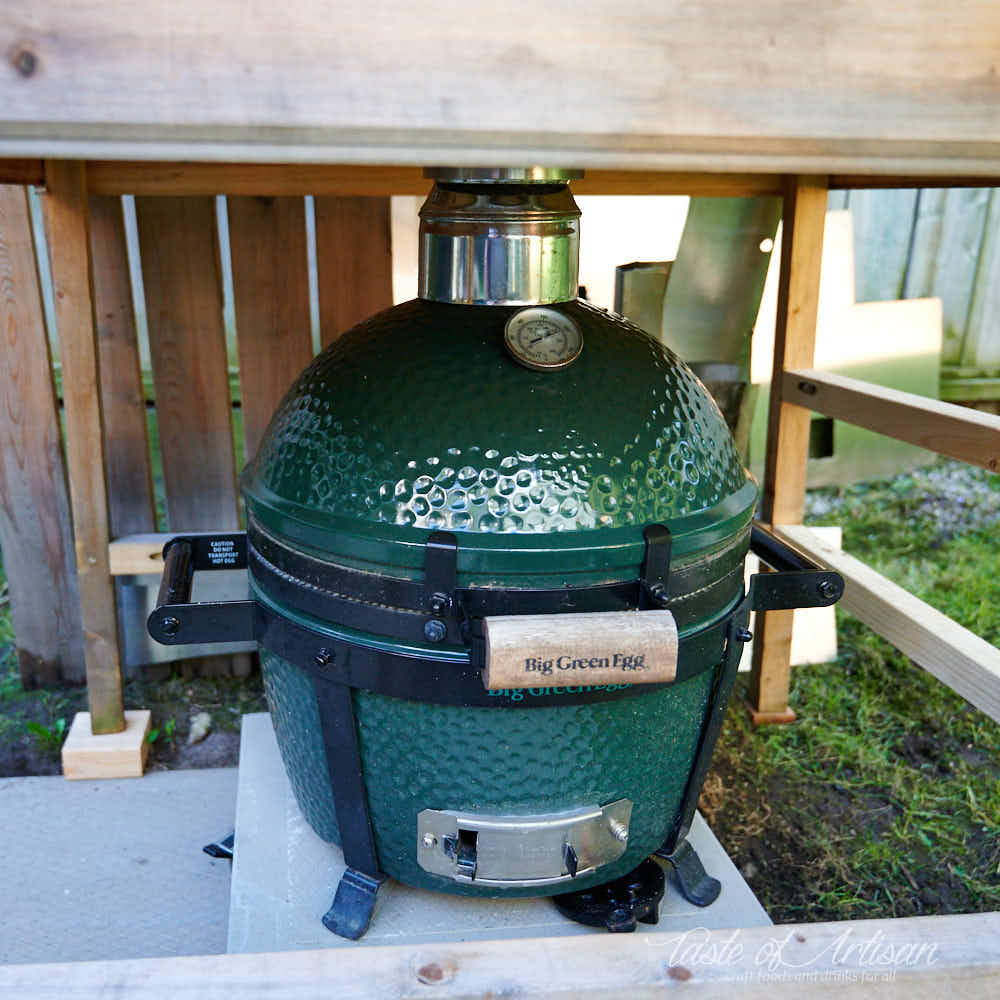
The BGE MiniMax fire pit
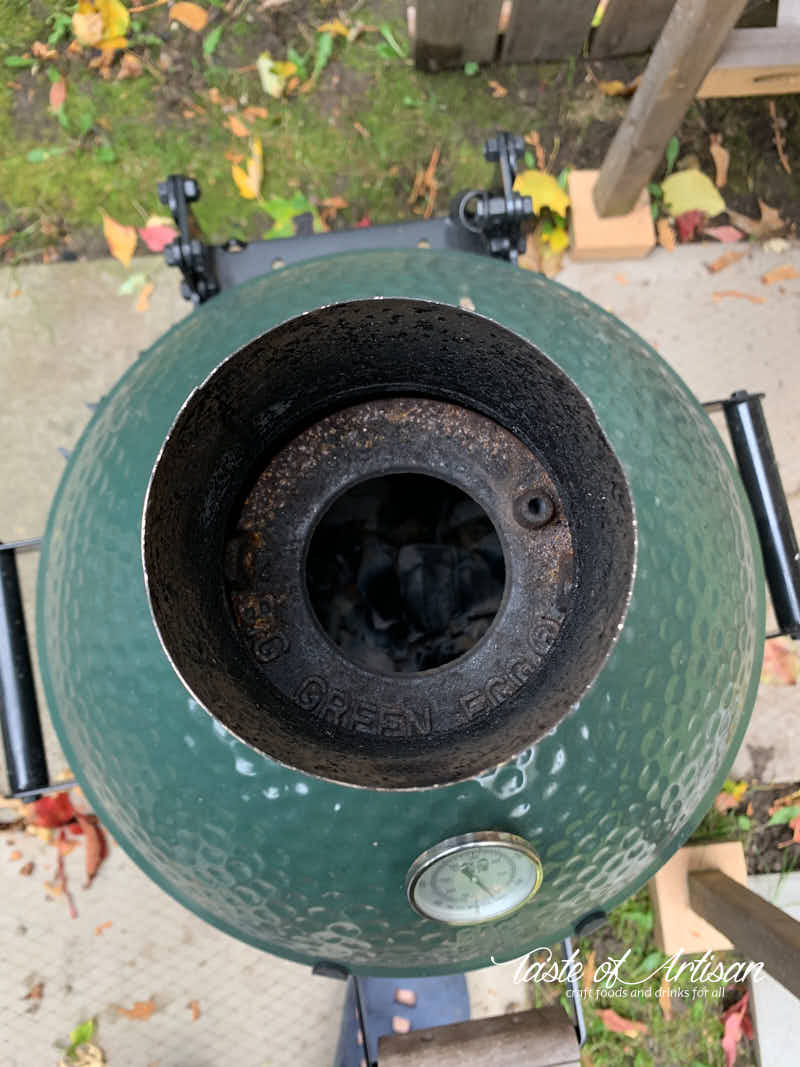
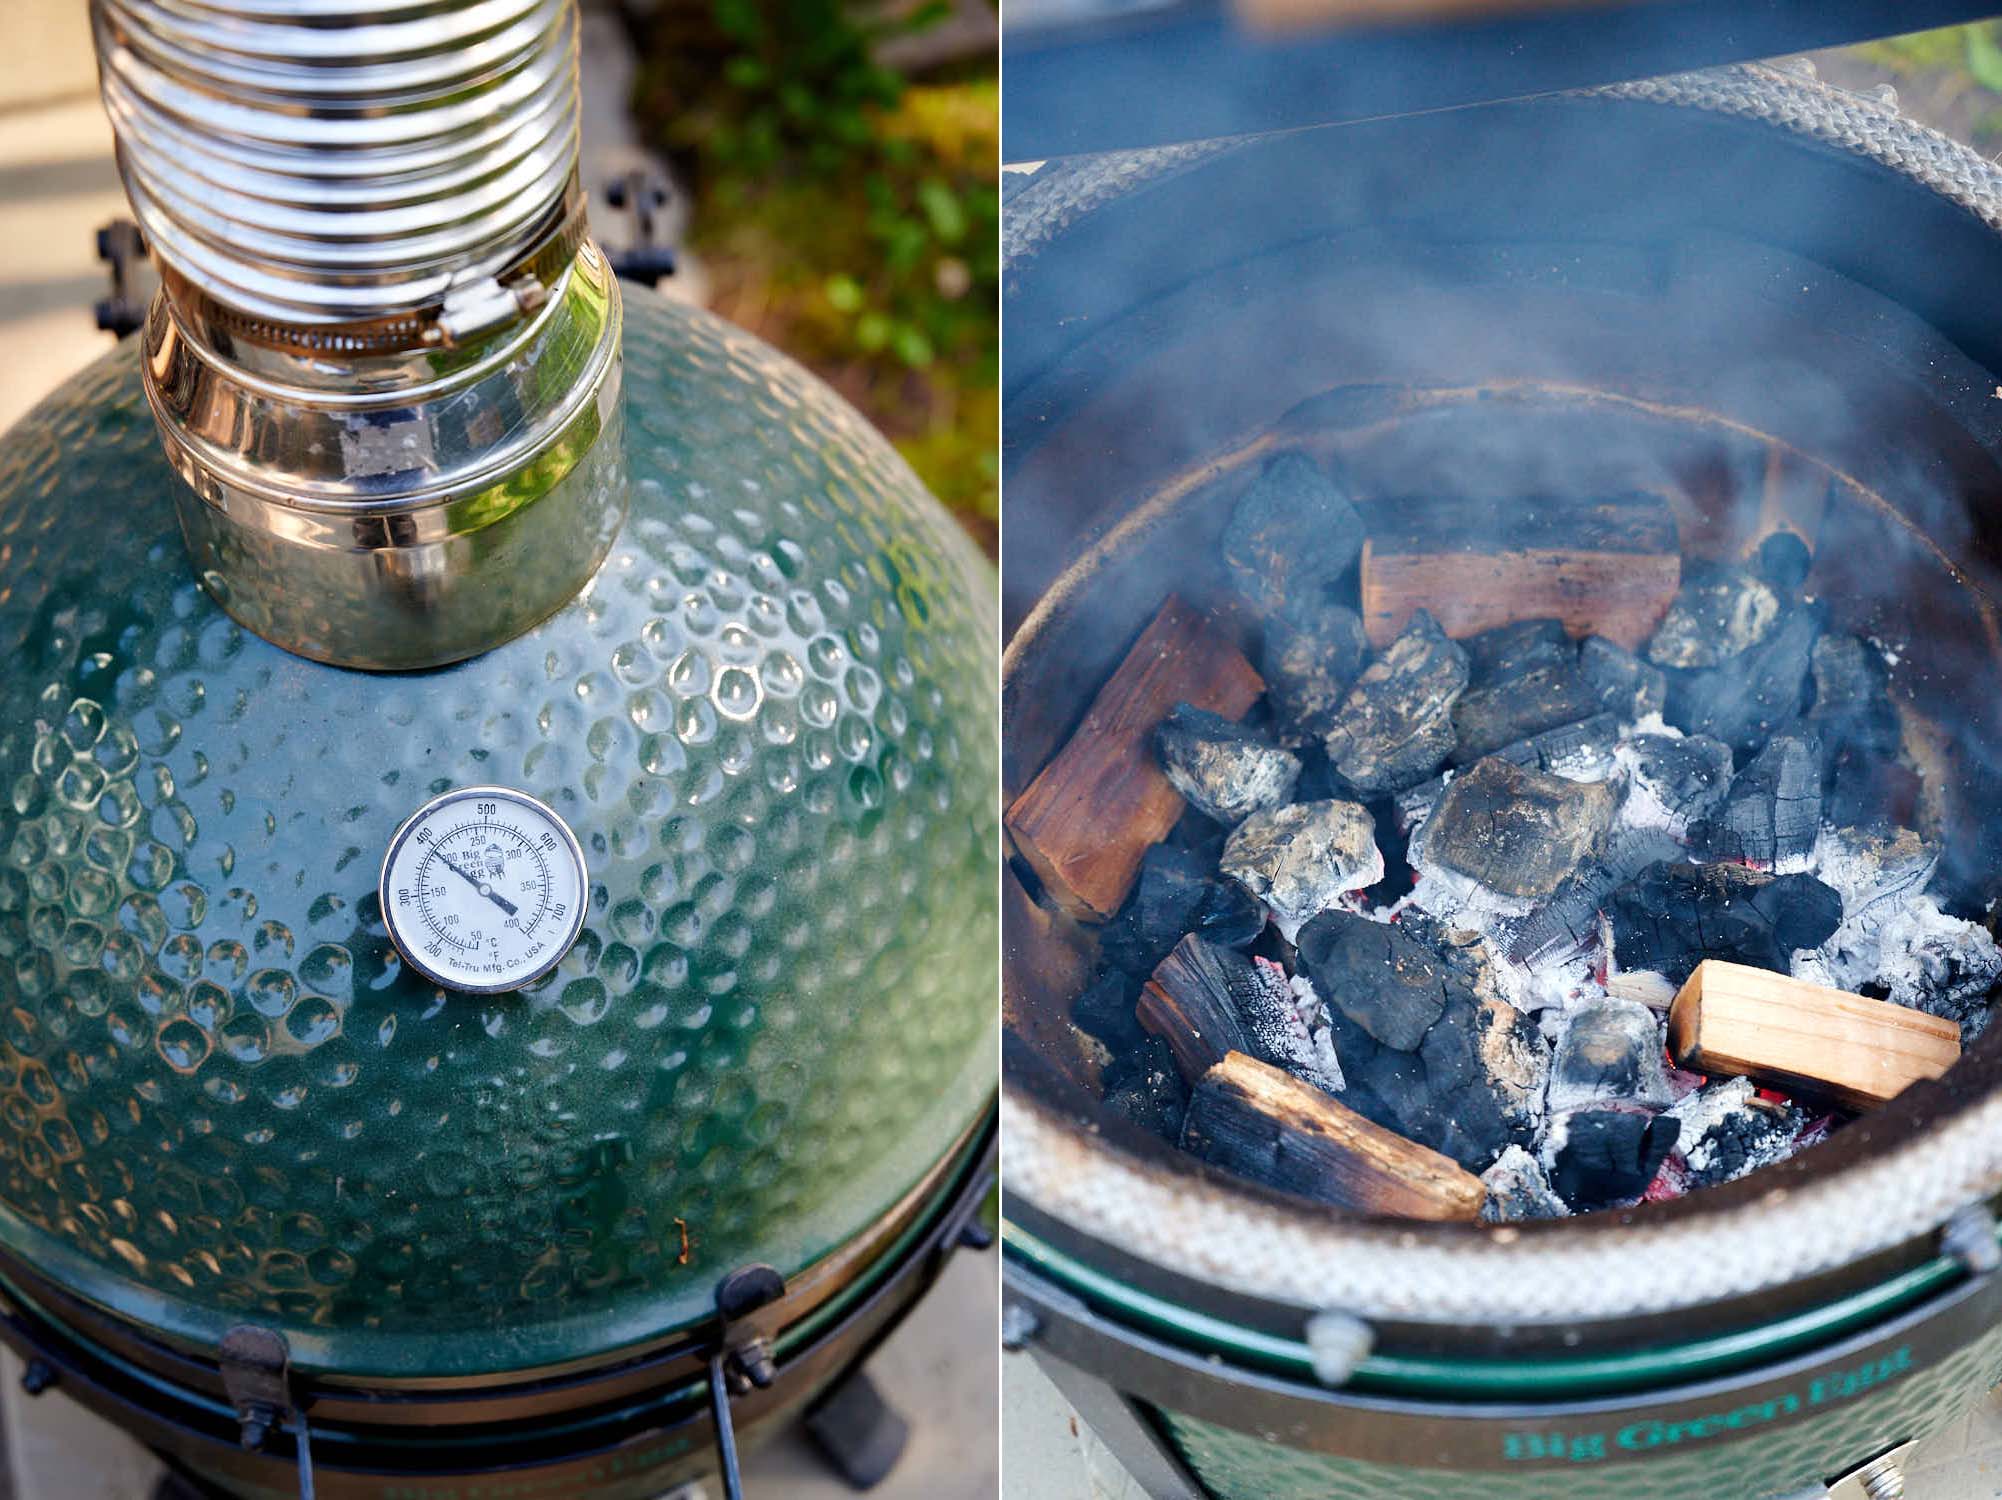
For the firepit, I use a BGE MiniMax with an upgraded fire grate for better airflow. The egg connects/delivers heat and smoke via a 100mm to 120mm SS flue liner reducer purchased on eBay. The seller is in the UK, so the measurements are in millimetres. The 120mm size fits over the cast iron top on the MiniMax quite snuggly. I also have a 125mm one which can work, but it sits a bit loose. The right size is not always available, but the stock comes and goes, so keep an eye on it.

The 100mm end of the reducer goes up inside the 120mm SS chimney flashing, leaving a small gap around as you can see on the picture above. This wasn't intentional, but the setup works well as is, so I am not in a rush to change it. I have perfect control over the temperature, and the temperature range is perfect. Besides, that air gap is just another layer of insulation between the hot chimney and the wood. I thought I might need to close when smoking on very cold days, but that did not prove to be the case. I could still hit the target temps with ease. On the other hand, closing that gap may result in running the MiniMax at a lower temperature.
On the egg, I removed the daisy wheel from the cast iron top for better airflow. Removing the top altogether caused the temps to shoot up way too high.
The MiniMax sits on top of the 16" x 16" paver, which sits on top of a wooden board of roughly similar size, which has heavy-duty casters with brakes attached to it. This makes it very easy to move the egg around.
Smokehouse performance
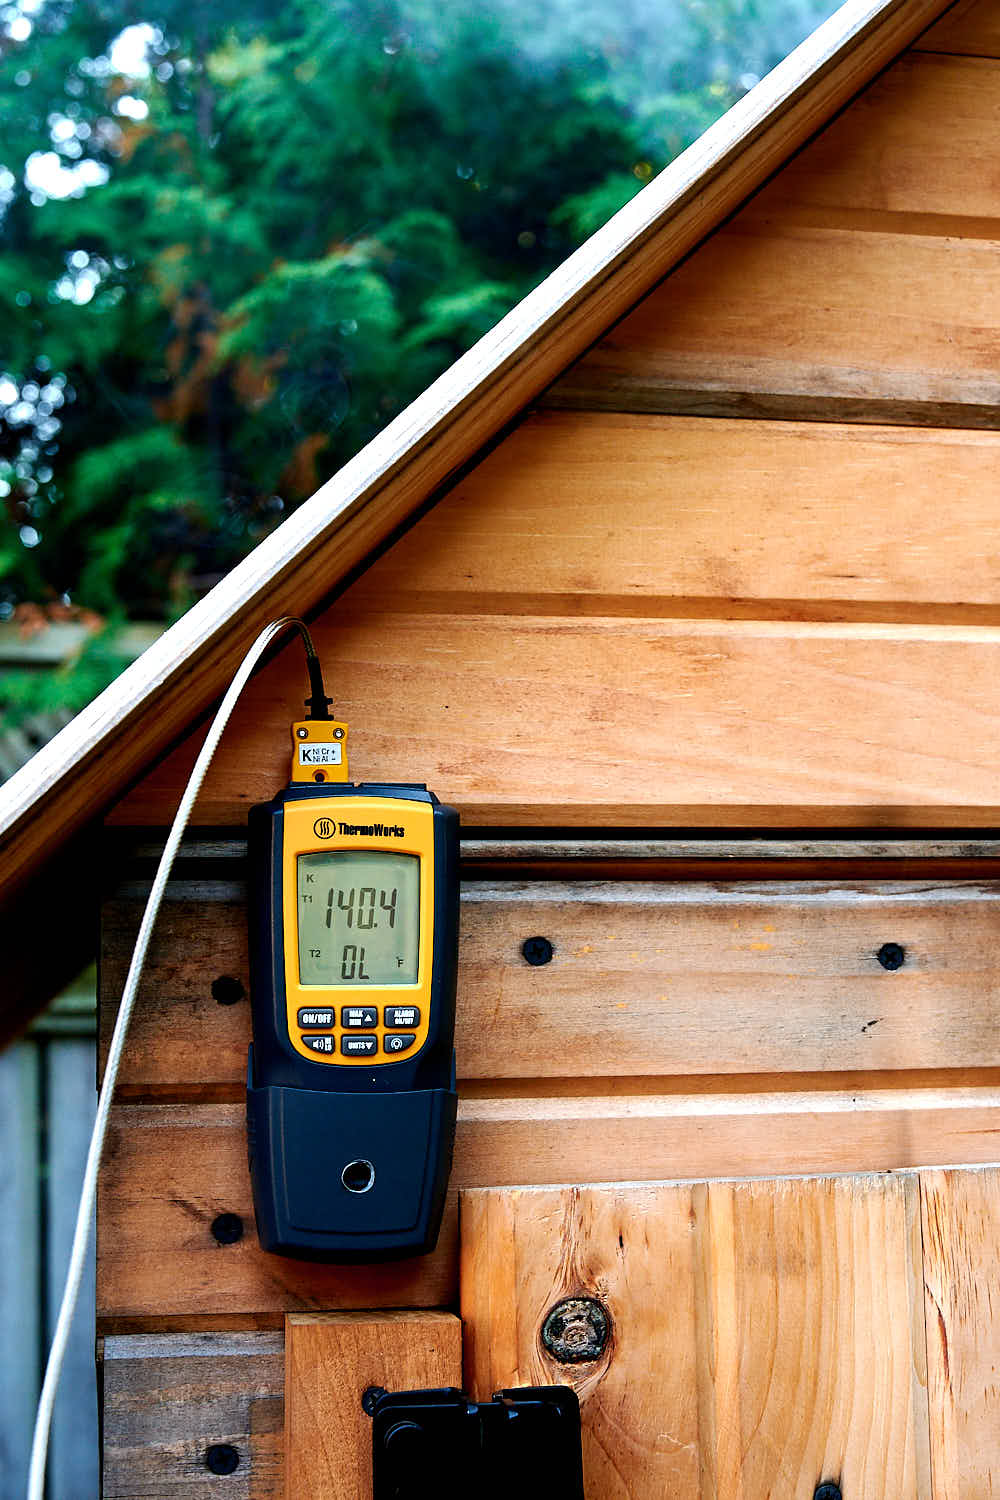
I do most of my smoking at 130F - 140F, preceded by drying at around 115F - 125F.
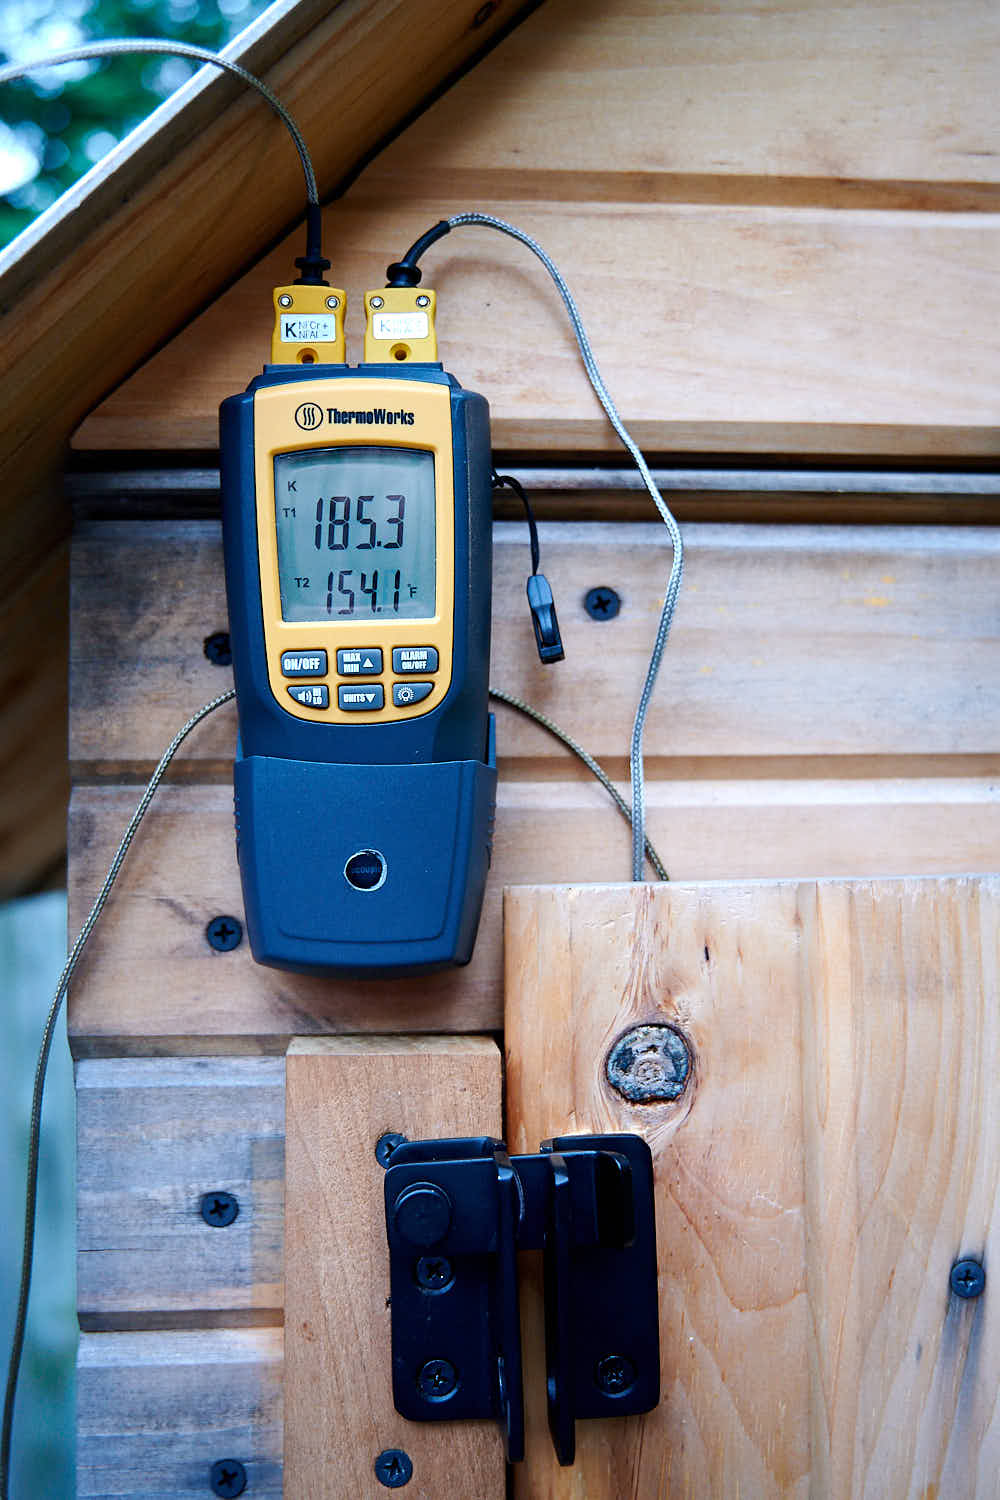
This smokehouse makes it very easy to get those temps. With the bottom damper open about 1/3 of the way, I get about 130F-140F inside the smokehouse. The temperature at the dome of the MiniMax is about 600F.
When opened 1/2 way to 2/3 way, I get about 165F - 200F. This is all I need for smoking and finishing (baking) sausages, solid meats, bacon, etc.
I can push it to go to about 220F but the temperature inside the egg gets too high for my liking (close to 1000F).
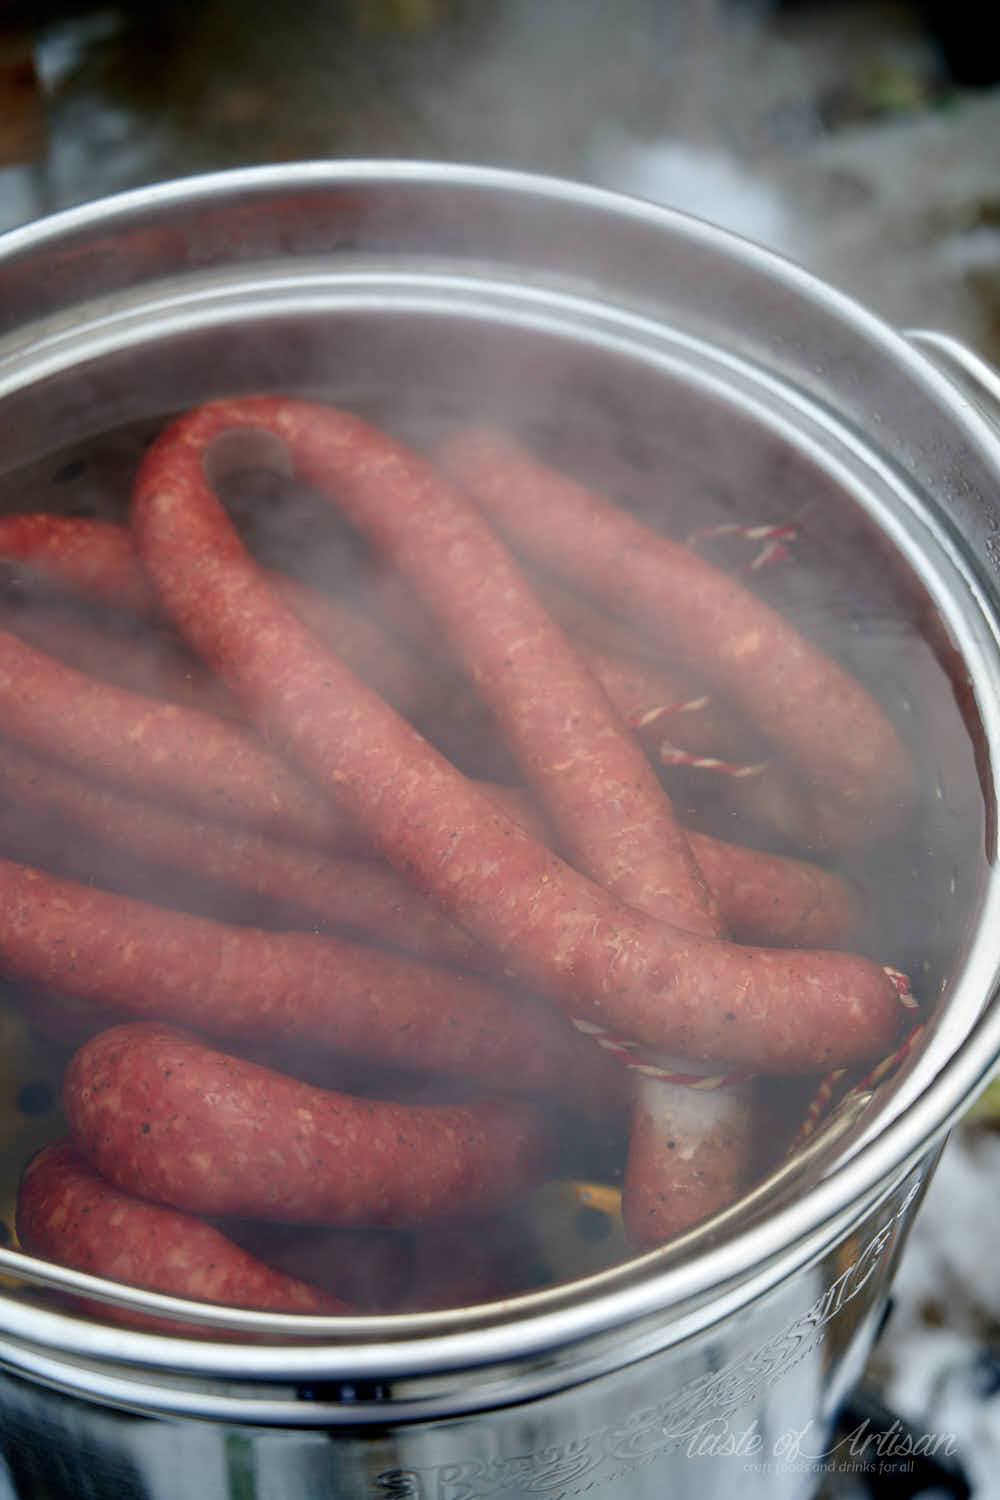
Nowadays, I mostly dry and smoke in the smokehouse, and finish by poaching in a Bayou Classic 36-qt Stainless Stockpot with Basket. This means that I stay mostly within the 115F - 140F temperature range. This smokehouse handles this job like a champ.
After drying is done, I just drop one wood chunk down the BGE's chimney. One chunk produces smoke for about 15-20 minutes in winter and about 30 minutes in summer (as the damper is less open).
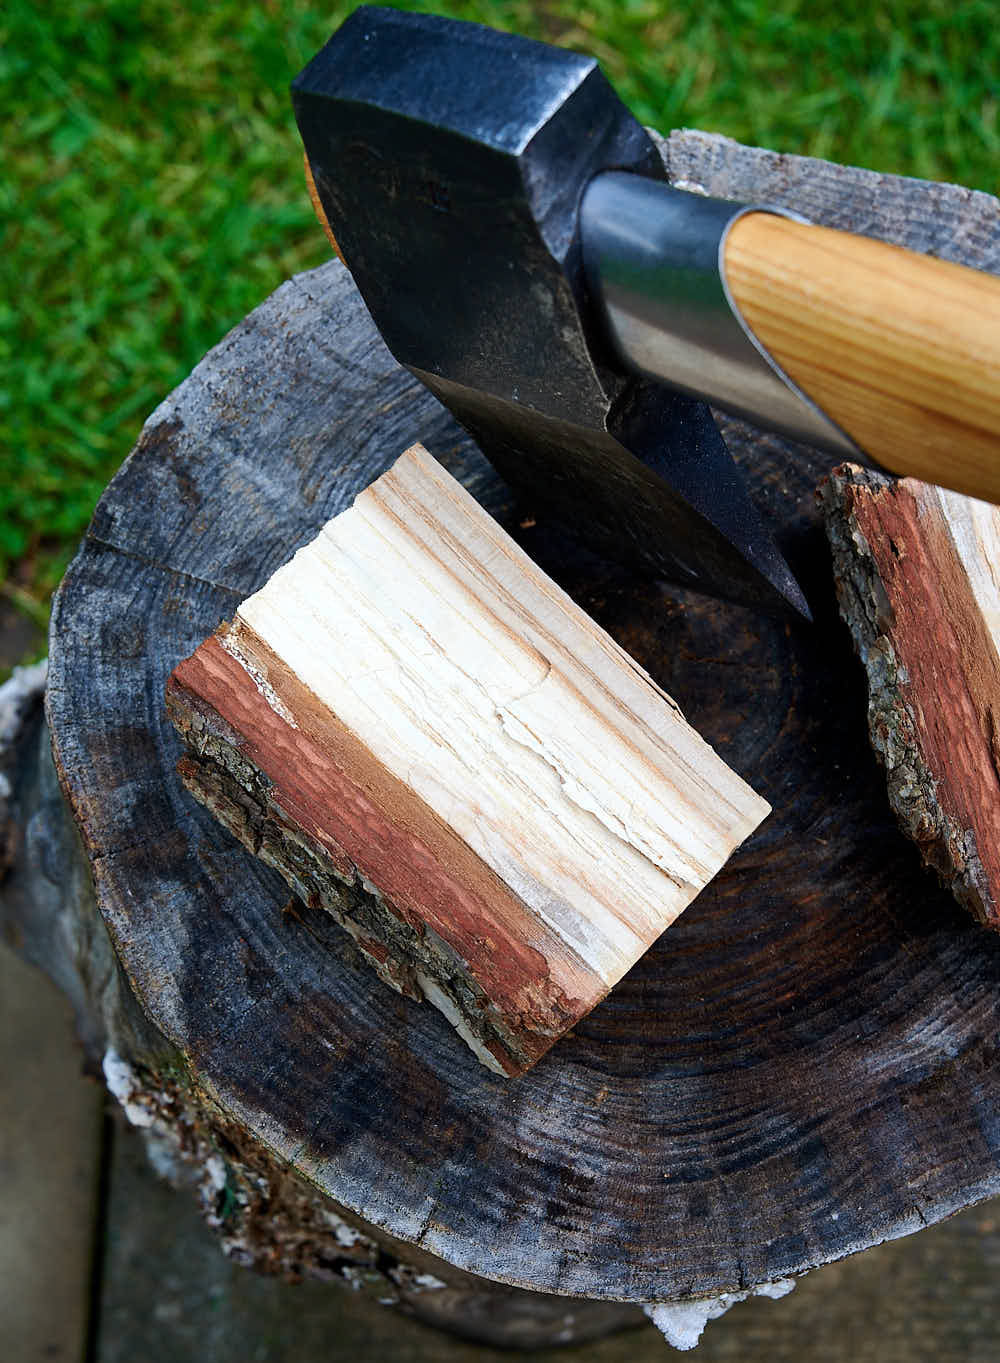
More chunks don't translate into longer smoke time. Instead, they cause thick, white, billowing smoke. One chunk produces a nice 'thin and blue' smoke.
Smokehouse capacity
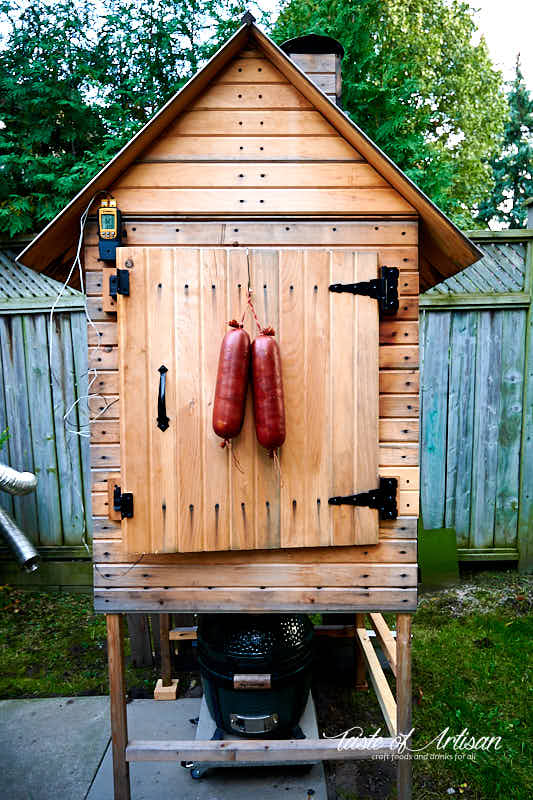
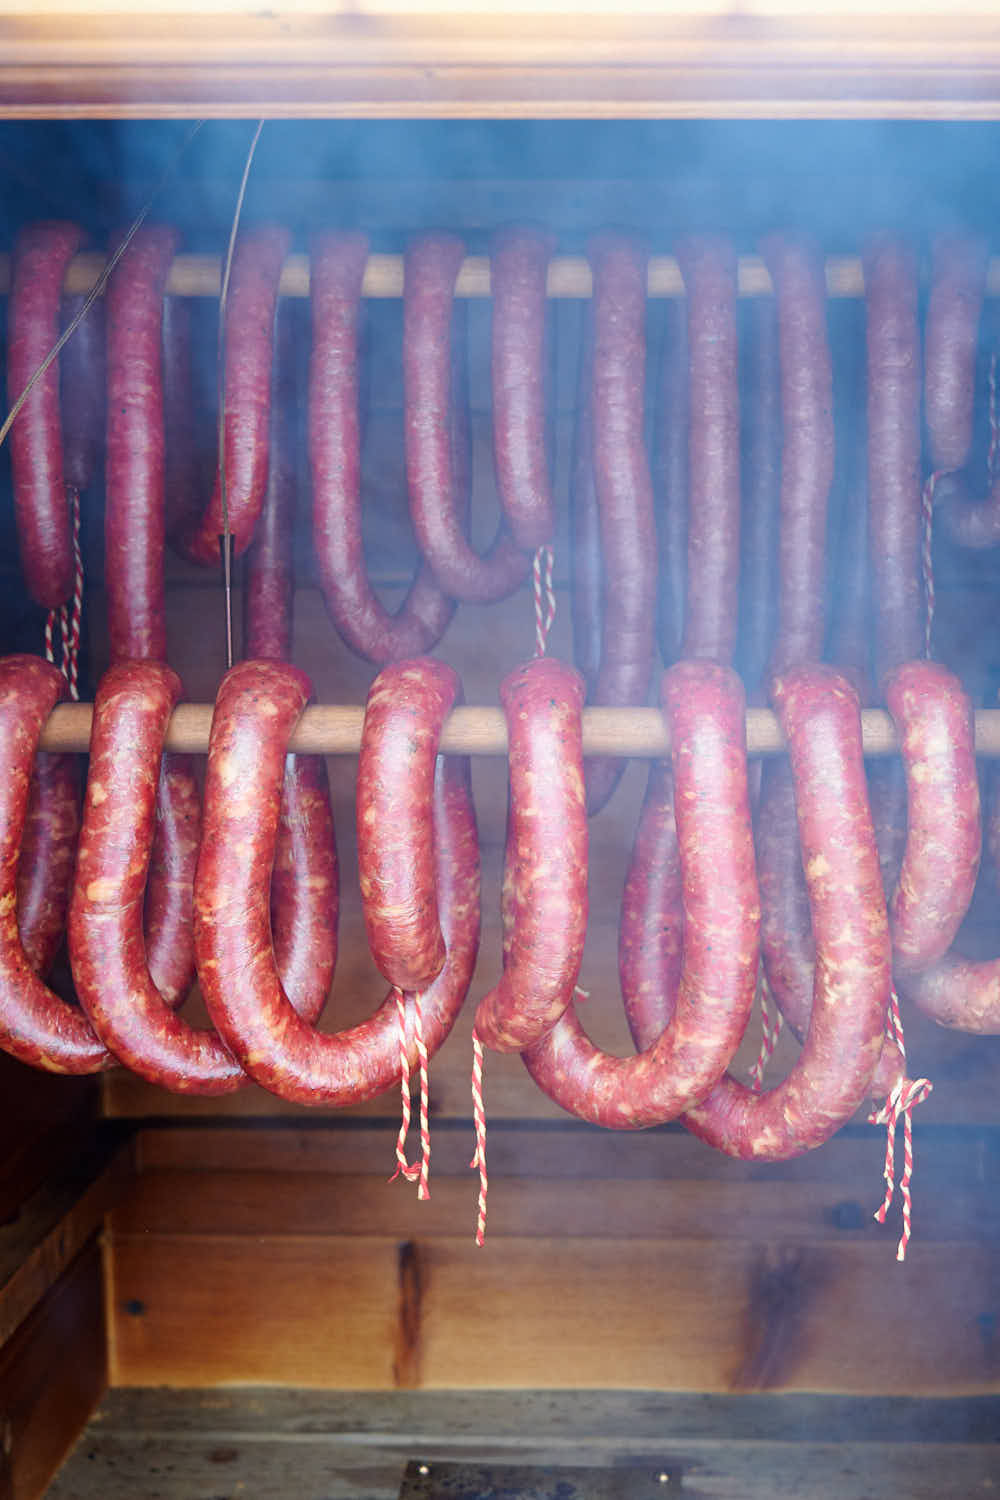
The largest batch I've made so far in this smokehouse was about 30lbs of sausage. It fit in very comfortably on three dowels. Another 10 would fit easily. I estimate that I could fit in up to 60 lbs of sausage if necessary with proper space management.
Cold smoking
For cold smoking, below 80F, I move the MiniMax out and use a 6-8 ft SS chimney flue. By the time the smoke gets from the egg to the smokehouse it cools down to pretty much ambient temperature.
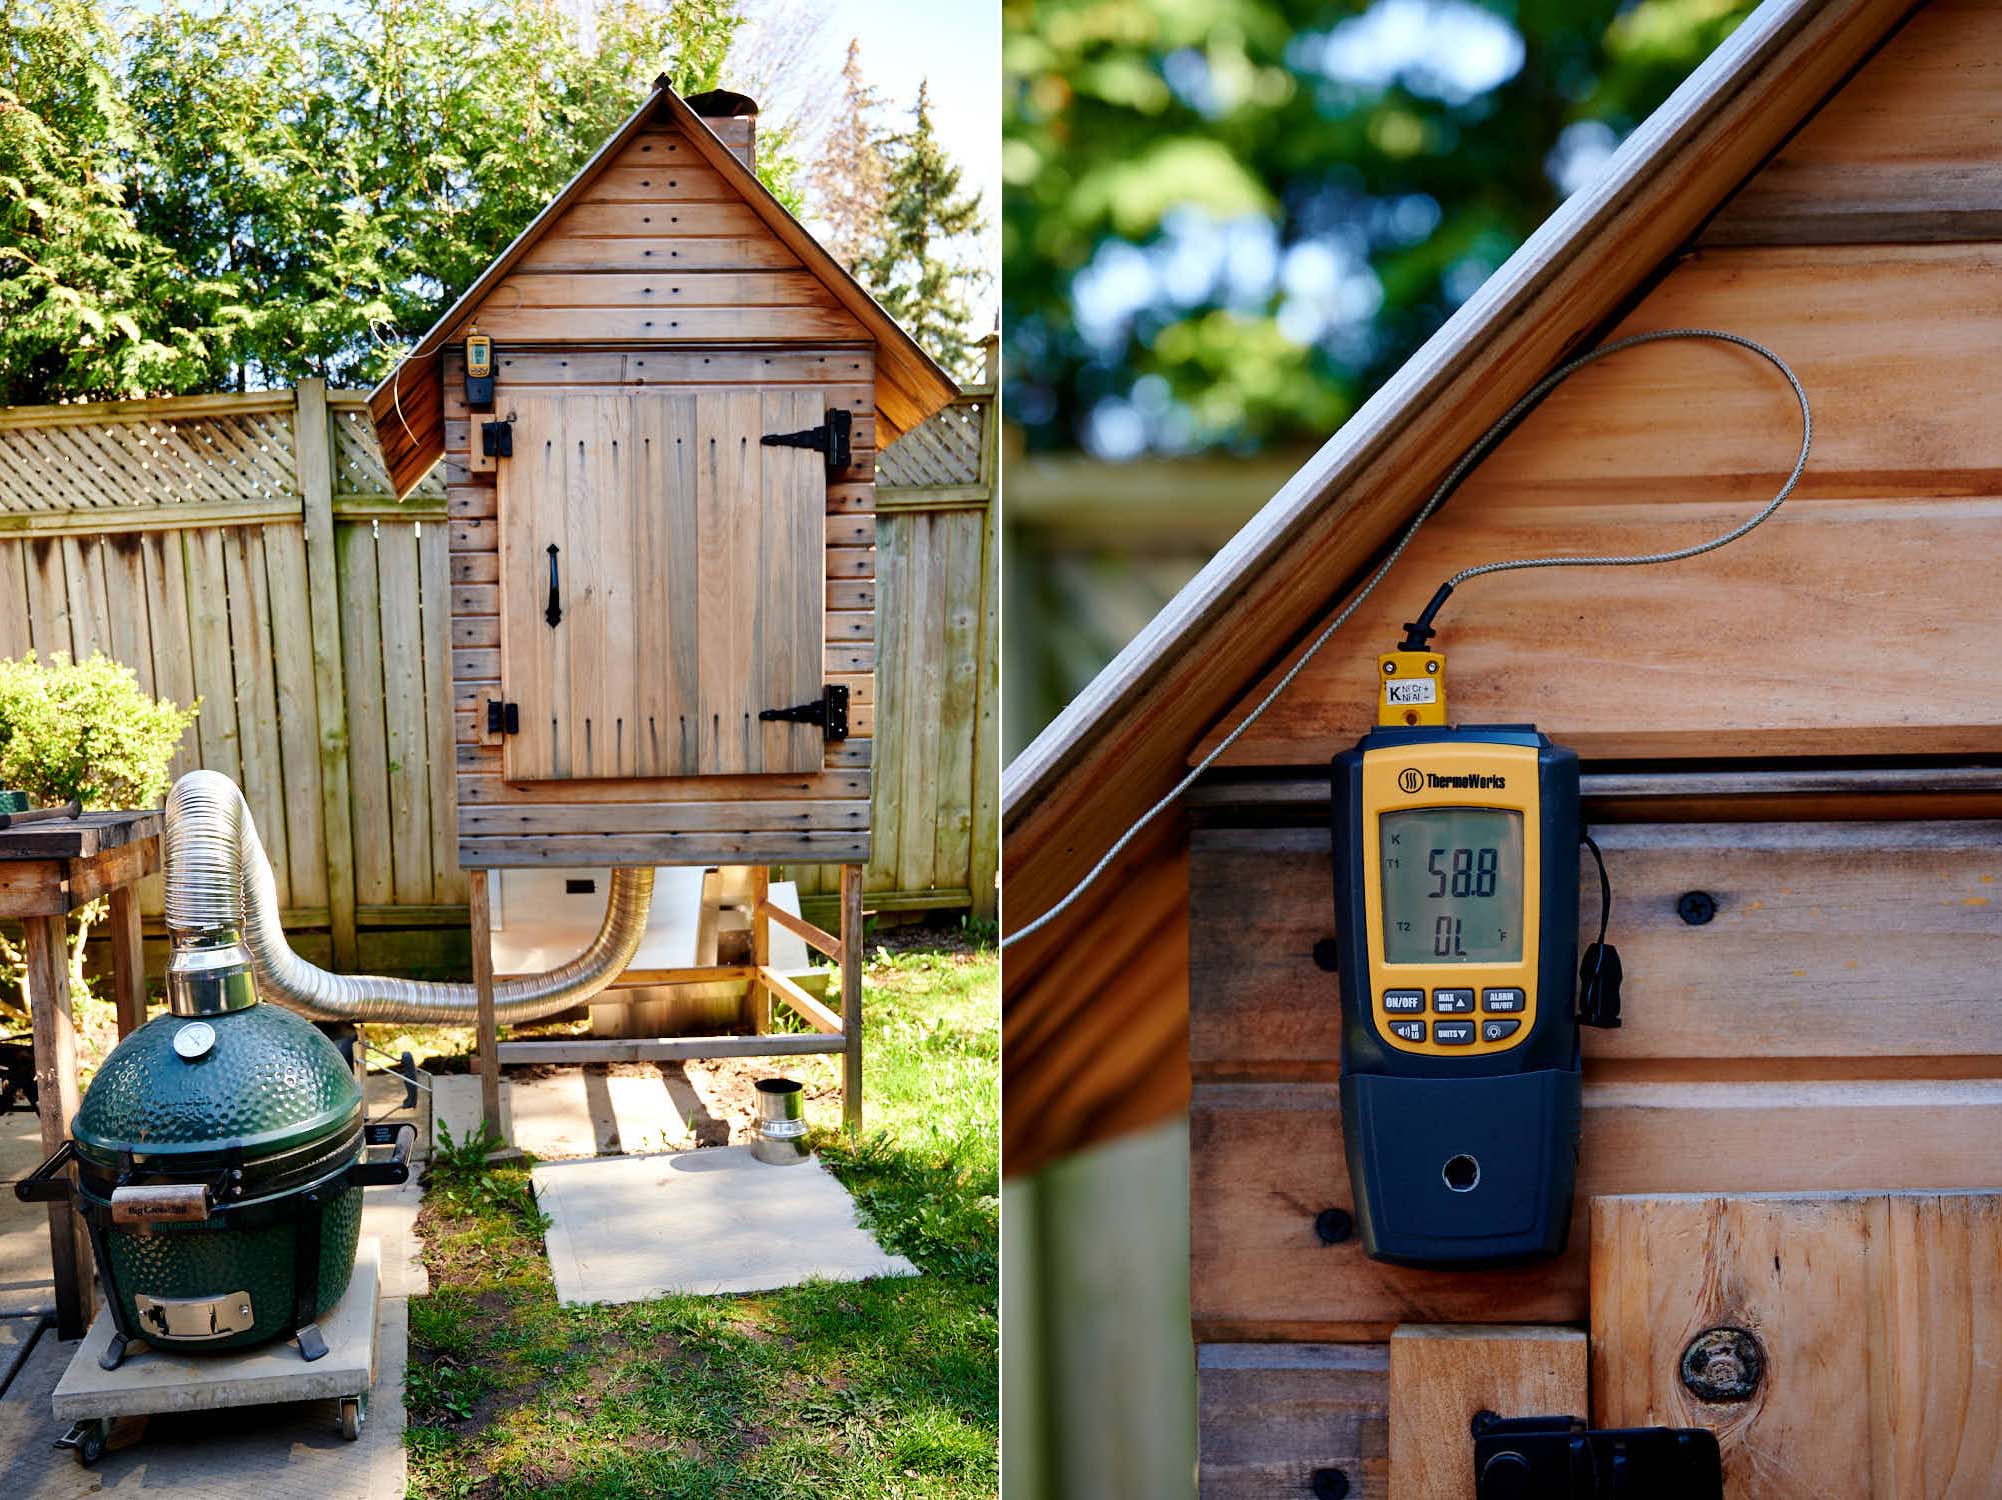
I run the egg at a lower temperature when cold smoking, so it puts out a lot less heat to begin with. With this setup, I get about 2-3 hours of consistent, thin and blue smoke.
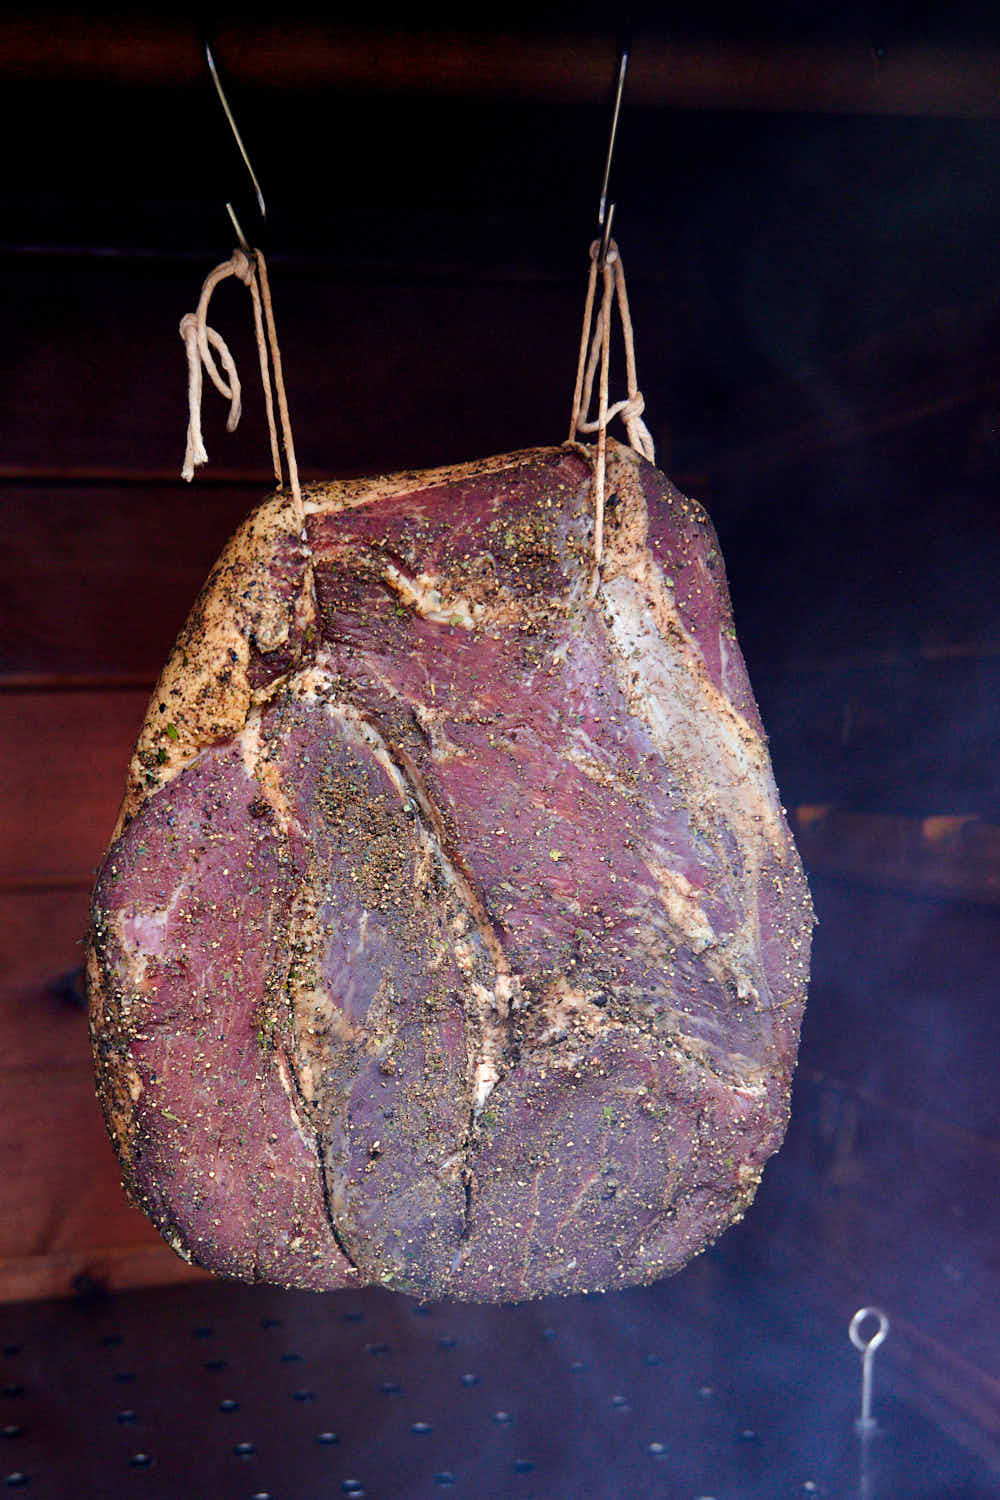
Here is a picture of cold smoking speck. I ended up smoking it for 4 hours and only added a few pieces of charcoal and a few wood chunks after two hours.
As a side note, when cold smoking, be sure to run your smoker at the highest recommended temperature. Say, a recipe calls for smoking at no higher than 80F, so you should try to smoke at 80F or just under. If the recipe calls for 60F - 70F, run the smokehouse at 70F. The reason is that cold smoke doesn't rise up well enough to ensure proper airflow and removal of stale smoke. Another reason is that the colder the smoke, the harder it is for it to penetrate food.
I am 100% happy with the cold smoking performance. I get beautiful thin and blue smoke that has a pleasant smell. I can easily get 2-3 hours of consistent smoke out of it but I am sure I could even push it to 4 hours with some thoughtful charcoal and wood chank rationing and placement.
Future improvements
After a large number of smokes with this smokehouse, I am generally very happy with it. The quality of the kielbasa that comes out of it is outstanding. I can't see how it can get much better. The operation is easy.
If there is one thing I don't like it would be having to add wood chunks every 15 minutes (in winter). In summer, as I don't have to open the damper as much, I get about 30 minutes of continuous smoke. The temperature in the Minimax is too high, and the wood chunks burn out quite quickly. It's not that big of a deal, but I would prefer to have at least 2 hours of tending-free operation. So the plan is to eventually add another inlet for smoke only and use the MiniMax for heat generation. I can get 2-3 hours in winter and 4-5 hours in summer of consistent heat from it before I have to add more charcoal. I am considering connecting my large BGE to supply smoke, which can produce great 'thin and blue' smoke for hours.

Rick says
Right on!
frances macculloch says
Looking forward to more wonderful ideas on your smoke house and brining recipes
Victor @ Taste of Artisan says
Hi Frances, a lot more will be coming... I've tried many new things, some were outstanding, just need to find the time to take pictures and write everything up... and that takes a lot of time... but I will do my best.
Beanz says
Hello Victor... Enjoyed reading about your DIY smokehouse. Now my thoughts are using a Bradley smoke generator for the smoke and adding an oven element 220/240 from an old stove for the heat which can be controlled. Grab a beer and sit and analyse the design of the Bradley which I have in Thailand, me being from Alberta. This same principal could be added to your design.
Now I will wait for your thoughts. Your using power and the wood hockey Pucks are not cheap I understand.
BTW to your design I would have it on a cake and crank lift system similar to Argentinian bbq grate. Lift and lower onto your egg
Keep up the great work.
Victor @ Taste of Artisan says
Hi Beanz, apologies for such a long delay in responding. Over time I've found that it's very hard to advise on something like a smoker. It's very subjective and depends on so many factors. Electric power and wood hockey pucks will do the job but the question is - will you like the results? Some may argue with me but there is a distinct difference in the taste of kielbasa smoked in an electric smoker vs gas smoker vs wood/charcoal smoker or smokehouse. The flavor and the texture of kielbasa are influenced by the heat, the humidity, the duration of smoking, the temperature, the airflow, the evenness of heat/smoke flow, and the quality of smoke. Different kinds of smokers smoke differently. So, if you think you will like the results, it's hard to beat the convenience and ease of low temp maintenance of an electric smoker with an automatic smoke generator. I was planning on going down that path myself, I was about to buy a used commercial electric smokehouse for a very good price but the seller treated me to some sausage made in it and I changed my mind. Don't get me wrong, it wasn't bad at all but it tasted so different from what I recall my grandpa's kielbasa tasted which he made in a big drum over an offset firepit and I was all set on replicating that taste.
Beanz says
Hello Victor, and thanks very much for your thoughts. I will consider this being you can't beat the old country thinking, methods, and flavors that have us all hooked on charcuterie, smoking, and curing... if it's not broken as they say 🙂
A German boy never uttered a single word growing up. Then, one day, aged 5, while sitting at breakfast, he looked up from his plate and said in perfect German "The toast is burnt" .to which the family was amazed. 'You can speak, that's amazing, why have you never spoken until now?'
He replied: "There was nothing wrong until now"
Beanz
Victor @ Taste of Artisan says
😉 Indeed. Words of wisdom.
That said, I added a bowl of hot water while finishing my last batch of Chicken Andouille and was able to get the sausage to temperature relatively fast. I am considering making a hole at the bottom through which I will be supplying hot steam while in the 'baking' phase. That should help I think. That's one thing that IS broken, LOL.
Philip says
Hi victor, I have a quick question about smoking in the smoke house I built last fall. I did a batch of garlic sausage and smoked it for three hours and then poached. Then I smoked some summer sausage and peperoni sausage for about six hours till the were cooked. i have notice a strange flavour in them almost like a feezer burn taste. It is much stronger in the summer and pepperoni sausages I am assuming because they were in longer. I use charcoal for heat and wood chunks for smoke. the inside is spruce plywood and i did season it for several hours before I started smoking meat in it. This never happened in my bradley smoker so i am not sure what is going on. Any thoughts on why this is happening. I tried to attach a couple pictures but can figure out how to do it here. thanks
Victor @ Taste of Artisan says
Hi Philip, sorry for getting back to you so late. That's quite interesting, I don't know if I know exactly what freezer burn tastes/smells like, but sounds to me as though something is imparting that smell on your final product. It could be the wood or the smokehouse/firepit (gaskets or any other parts that may give off smell). The wood itself if not fully burned out will impart a chemical smell, which is what I think may be the issue in your case. How does the smoke look? Is it thin and blue (good) or thik and white/grey (bad)? I will email you so you can send me some pics.
Victor
Ben Shomshor says
I've just read the description of your smokehouse. Truly written by someone who grew up in Eastern Europe. Thank you for your exceptional website, Mr. Vitaly.
Victor @ Taste of Artisan says
You are welcome.
Clayton Schoepp says
Love your site, I was hoping to get some information on the smokehouse your have in the Krakow Sausage post. I would love to upgrade to something like that over my electric smoker. Looking for plans and how you heat it.
Victor @ Taste of Artisan says
Hi Clayton, have you checked out my DIY Smokehouse post? If you have additional questions, don't hesitate to ask.
Barry says
Can you comment on making low sodium meats? Many people are on salt restricted diets. Is it possible to cure meats or smoke them for safe consumption, without salt, nitrates, or nitrites? And if so, how long would the shelf life be and what method of storing and consuming them would be the best (i.e. refrigeration to store for short amounts of time, cooking to consume).
Victor @ Taste of Artisan says
Hello Barry, my apologies for the delayed response. Marianski has a very good book called Making Healthy Sausages, take a look. His view which I fully support is that it's not the amount of salt in sausage that is bad but rather our eating habits. He also goes on to say that that while commercially made sausages are loaded for salt, homemade sausages are surprisingly much lower in sodium. For example, a typical homemade sausage contains anywhere between 1.5 and 2% salt. My smoked sausages are even lower in salt, take my smoked Swojska kielbasa that has been very popular here. It's roughly 1.4% salt content. It tastes great. It keeps well in a fridge for weeks and even months. You can dry it a little and it will store even longer. In general, I make fresh sausages with about 1.2-1.3% salt content, smoked 1.2-1.4% slat content and dry-cured - 2.5-2.8% salt content. It can be lower if the acidity is high enough (fast-fermenting salami). I consider this low. Any lower and it won't taste good or won't be safe to eat.
Now, one thing I would never do is smoke or dry-cure without nitrites/nitrates. I won't risk eating or feeding someone sausage that will potentially make them sick. If you want very low sodium, fresh sausage is best. You can go as low as you want, but the keeping qualities will diminish significantly. Hope this helps.
Matt says
Awesome. I made essentially the same thing from an old cedar playset. Consider using an Amazing Smoker tray or tube to generate additional cold smoke without tending it. They use pellets.
Victor @ Taste of Artisan says
Awesome. I'd love to see some pictures if you want share... i can attach them to your comment.
Philip says
Hi victor
Thanks for answering my questions on building a smokehouse. I got my smokehouse built and it is amazing. So much nicer than the little electric one I started out with. I ended up putting the firebox off to the side like you suggested and put firebricks inside to insulate it. It works like a charm. I have one question. I am using charcoal lumps for heat and some wood for the smoke. On the couple batches of sausages I have done so far I have noticed soot on them. Not a big deal on sausage because I just wipe it off but I want to do ham and bacon soon and am not sure what that will do to the meat. Is that normal or if not how do I get rid of the soot. I did build a baffle in the firebox just under the chimney and put a little “table” like you did inside the smoke house.
Victor @ Taste of Artisan says
Hi Philip, congratulations. Send me some pics.
Some soot is inevitable but you definitely should not see it if your smoker is running optimally. If you do, there is an adjustment to be made. First, let's understand why we get soot. The quick explanation is the combustion inefficiency. Somewhere during the smoking process, wood/charcoal is burning with less than the optimal amount of oxygen. This results in some of the elements not burning out fully enough and they get deposited on the smoked meat. A baffle will help a little but won't stop all of it. I see some soot accumulation on the back of my baffle but don't see it on meat. I have seen it before though. One time, this was my first smoke in my new smokehouse. I raised the temp to over 1000F inside the egg to get the temp inside the smokehouse to 140F. This caused the gasket in the egg to burn, causing barely noticeable black smoke and my sausages came out looking OK-ish looking but when I touched them, they left a lot of black residue on my fingers - no good. This was my first prototype where the egg was outside the smokehouse.
The other times I've seen soot was when I saw dark white, even grey billowing smoke for prolonged times. White or grey billowing smoke is an indication of a lack of oxygen. You can fix it by one or a combination of the following:
1. Use larger lumps in the pit so you have more airflow
2. Use less charcoal
3. Use one wood chunk at a time. I've noticed that when I drop a few, I get thick, billowing smoke. One chunk - and the smoke is thin and blue.
Perhaps in your case, it is something else, so try to experiment a little, I am sure you will figure it out pretty quickly.
Matthew Gander says
Hi Victor,
I've been strongly considering abandoning my electric smoker for sausage in favour of your smokehouse design. Love the idea and with what looks like a bit more tending and care... much better results. Better results for me would equal less frustration and far less meat being thrown in the garbage due to too much heat during the smoking process.
My question is this... have you considered using (exclusively) a larger Kamado so that you can get longer smoke times? I was considering using a Kamado Joe Classic I or II for my smoke and heat. Any reason why you feel that wouldn't be a great option?
The Kamado Joe Classic II sits 48.5" high compared to the minimax's 19.5" but beyond a difference in height would you expect a change in results? Would it be Harder to regulate temps in the smokehouse due to the larger basket of coals?
Another option I've been thinking is, like you mention, using a small Kamado like the minimax for heat and rolling my Kamado Joe Classic III over and using a second intake for it to provide just smoke.
Thoughts?
Victor @ Taste of Artisan says
Hey Matt,
So, what I’ve learned so far is that it’s the temperature inside the egg that’s an issue, not the egg’s size. An egg sitting next to the smokehouse and connected via a heavily insulated 4” flue had to be run at over 1000F to deliver 140F inside the smokehouse. I moved it under the smokehouse to prevent any heat loss and was able to run it at 650F to get 140F inside the smokehouse. That’s during moderately cold weather. In summer, I ran the egg at about 400F to get 140F in the smokehouse. How does that impact smoke production? The higher the temp inside the egg the faster the wood chunk burns out. At 650F – about 15-20 minutes. At 400F – 30-40+ minutes. Add more than one chunk and you get a billowing white smoker that has an unpleasant smell. That’s the reality of how my smokehouse operates. Love the results but yeah, it requires more tending than one would sometimes like.
To get longer runs, I am thinking of insulating the connector between the egg and the smokehouse. Mine still isn’t so I don’t know how much of an improvement that will be in winter. Ideally, I think I’d want to put the egg inside an insulated smokehouse. There will have to be some sort of a metal liner at the bottom of the smokehouse for safety reasons. An air duct of some sort would supply fresh air into the egg’s damper. That would enable running the egg at much lower temps and it will increase the smoke time to hours.
I am actually thinking about making a cut out at the bottom of the smokehouse large enough to insert the egg, you know how they insert eggs into cedar tables… That way the damper will be on the outside, getting a supply of fresh air and can be easily adjusted as needed. Cleaning out ashes will be very easy too. The top 2/3 of the egg will be inside the smokehouse and there will be practically no heat loss, allowing for much lower temps inside the egg and extending the smoking time. I’d need to test this, and I am actually very excited to test this out in my smokehouse, but I suspect I should get a couple of hours if not more. I think with this setup I can get 140F in the smokehouse by running the egg at about 250-275F. There you have it, great thin and blue smoke for hours, as well proper heat.
So, to answer your questions, I don’t think the size of the egg matters, it’s only going to impact the cost and convenience (moving/accommodating a larger egg will be a bit tricker). Regulating temperature is easier in a larger egg, I think, based on my experience with Large BGE and MiniMax. But I’ve never really had any issues with that with the MiniMax. Cleaning ashes is harder with Minimax is the damper opening is very small.
A two-egg setup? I strongly considered it but never got around to testing it. Yes, in theory, it should work great. I would put the small egg at the bottom to supply heat and a large egg next to the smokehouse to supply smoke only via an un-insulated flue. It’s just that now you have to tend to two eggs… hm… adding chunks every 20 minutes in winter / 40 in summer vs starting and running two eggs… don’t know which one I like better. But I am considering moving the little egg inside the smokehouse… I think that will give me the best solution. I will probably have to extend the smokehouse by about 10-20 inches but that’s not a problem. I’ve been meaning to put the smokehouse on a sturdier platform with casters anyway so it will be a good opportunity to tackle both in one project, maybe this winter.
Matt Gander says
Thanks for the reply. You've given me a lot to think about. I built a table for my Kamado Joe and I never thought to complete a similar design so that 2/3's of the Kamado would be in the smokehouse. I'd build mine a little bit taller then to ensure I don't miss out on hanging space. Would be much easier to add extra wood to the unit as well if need be. I've got some time before I pull the pin on a new design so please keep us all updated if you do this modification. VERY curious to see how it turns out. I would imagine you would keep the daisy wheel intact as well to allow for better control of the heat going into your smokehouse. very interesting design idea and yes... probably a lot easier than managing two Kamado's.
Thanks again and look forward to your results if you get into this modification!
Matt
Victor @ Taste of Artisan says
No problem. Yes, the daisy wheel will be a must to keep the temp inside the egg low. For sure, I will post an update once the new mod is done. I can't wait to find the time to do it but, honestly, I am quite happy with the current designs as, even with some tending, I get the results I am very happy with.
Philip says
I am going to be building a smoke house this fall and i really like what you did. just a few questions. I was thinking of welding up a fire box to put underneath like you do with the egg so i can feed charcoal and wood from the side through a door. with your experience do you see any issues with that. Also why did you go with charcoal as a heat source instead of a propane burner. I have seen some smokers built that way and to me it seems that it would be easier to use. 1 final question. where do you get your wood chunks. i am from Alberta and we don't have orchards here and the little bags of chunks are very expensive in the store. you have a great website. keep up the good work
Victor @ Taste of Artisan says
Hi Philip, thanks for the kind words. Interesting questions, they will require extensive answers so prepare for a long read;)
A firebox underneath a smokehouse is a typical configuration but there are some important considerations.
Insulation - uninsulated metal firebox will get very hot and will lose a lot of heat that could have been sent to the smokehouse. That's why a green egg works so well here if you want a portable smokehouse like mine. For a permanent installation, it's best to have the firebox in the ground.
Fire hazard - in a firebox/firepit, as it's uninsulated and needs to run hotter, you can have flames reaching 4-5 feet so you need to have a 5-foot pipe between it and a smokehouse. This is based on Mariansky's statement in his book on building smokehouses. In a green egg, at the temps that I am running it, I've never seen any flames coming out so I am comfortable putting it under the wooden smokehouse. All that's coming out of it is smoke and moderately hot air. So, be careful if you put yours under the smokehouse... One way would be to connect the firepit to a 5-foot SS chimney flue and coil it at the bottom of the smokehouse. This way you won't lose much heat but also won't have the issue of flames reaching the wooden structure.
Why not propane burner? Two reasons. I can smell propane in food when using it as the heat source. Reason number two is the superior smoke quality with the charcoal/wood. I've tried many ways to generate smoke and by far the best that I was able to get was the smoke from my green egg. Thin and blue and pleasantly smelling. My grandpa smoked over alder and cherry wood, his sausages had an incredible smoky smell. He never had white billowing smoke, it was always thin and blue, barely visible. I get pretty close to that with the BGE's charcoal and wood chunks. In my propane Masterbuilt smoker, I used sawdust and wood pellets in an A-MAZE-N smoke generator and wood chunks in a metal plate over the burner. Sawdust and pellets smoke well but the smoke is thick, white, almost grey, oxygen-deprived and hence strong and unpleasantly/chemically smelling. The chunks worked better but were unpredictable. Sometimes they would give off thick dark smoke, sometimes the smoke is fine, sometimes they would ignite and burn off quickly, raising the temperature in the smoker. Kind of a pain to make them work well consistently. But yes, propane is easier to use though once you the process down with the charcoal it becomes pretty easy.
Our wood chunks at the BBQ store or Home Depot / Lowes are pretty expensive too. I buy mine on kijiji.ca though. There are a couple of sellers near me that sell big bags of various woods at reasonable prices. I bought 6 large bags 2 years ago and I am only on my 4th bag now... it doesn't take much wood though... a few small chunks per session is all that's needed. I could buy a full cord or a half cord of wood at even lower prices per pound but storage becomes a problem, and I want to have a variety of woods while they sell cords/ half-cords of the same wood usually.
By the way, I switched to Kamado Joe's charcoal a few months back and love it. The lumps are huge and made from hardwood. They burn slowly but generate good heat and because they are large, I get better airflow and hence better smoke quality. Not that you can't get that with other charcoal but I just found it much easier to get optimal results with it.
Tim says
Mate,
That is an outstanding setup. I have just been through it once and a have a lot of re reading to do to make sense of all the information in your post.
I’ll bet Dave Grohl is a fan of yours, I know he loves his BBQ.
I sure am.
Many thanks for sharing your recipes, experience and wisdom.
Tim O’Brien
Margaret River
Western Australia
Victor @ Taste of Artisan says
Hi Tim,
thank you for the compliment. David Grohl, ha? I had to look him up...:) I'd be very proud if he were, but I am just as proud that you are. If you have any questions, don't hesitate to ask, I'll be happy to help out.
Victor
Steve Denvir says
Just as you did with explaining your process and setup for dry cured meats, you’ve saved me an immense amount of trouble. I’ve duplicated your smoker almost exactly, and it works like a charm. My maiden voyage was 9 lbs of summer sausage, and it’s the best yet. Can’t wait to get to the Krakow kielbasa.
One small point. I went smaller (and cheaper) on my “egg”. It’s a little green egg knock off, and I’m guessing it’s a little smaller than your minimax. It maxes out at about 600 degrees at its top, with a resultant upper limit in the chamber of about 160-165. I’m actually fine with that, because you’ve also converted me to finishing by poaching or baking.
I got to thinking though. You’ve simplified all these things for me. Would you be interested in taking a look at my taxes? 🙂
Victor @ Taste of Artisan says
Hey Steve, happy to hear about your success with the smokehouse and your first batch of smoked sausage. Your smokehouse looks awesome! Poaching all the way for me. The difference is minimal but the saving in time and stress is huge. Poached kielbasa also has thinner and softer skin which my family prefers. Taxes? No problem:-)
Steve Denvir says
Hey Victor, just starting construction of my version of your smokehouse. And once again, thank you for all the guidance.
Quick question regarding cold smoking. Given that it’s insulated, what kind of ambient temps can you tolerate? I have a black, sheet metal smoker. When the sun hits it, the outside temp had better be less than 60 degrees, cause otherwise, it’s gonna get up over 90 in a big hurry.
Does your insulation protect against heat, or is it primarily designed for cold?
Thanks
Steve
Victor @ Taste of Artisan says
Hi Steve, the jury is still out there on that one. I haven't tried cold smoking in my smokehouse in the middle of a hot summer day. Did it last winter and spring when ambient were below 60F. Insulation was added primarily to fight the cold outside as I couldn't get my temps above 110F without a huge effort and blazing heat inside the egg (above 1000F). With the insulation, I only need to run the egg at around 350F in summer and 500F-600F in winter to maintain 140F smoking temperature. In general, cold smoking is best saved for cold weather - late Fall to early Spring.
Heinz says
A very good website with awesome recipes, smokehouse looks good as well, I will try your Krakauer, sounds good, have you got a recipe for Extrawurst by any chance
Heinz
Victor @ Taste of Artisan says
Haven't tried making Extrawurst but my family likes Doctor's sausage, a Russian variant of Extrawurst that is very similar and similarly very good.
Steve Denvir says
And while I’m here 🙂
Why would you go to the trouble of distancing the eg for cold smoking? Could you not just use the Amazen smoke generator for that?
Again, thanks.
Steve
Victor @ Taste of Artisan says
Distancing is to get smoke without heat. The quality of smoke coming from the egg is vastly superior. It's the thin and blue kind, sweet and with a pleasant smell.
Steve Denvir says
Hey Victor, if imitation is the sincerest form of flattery, consider yourself flattered all to hell and gone 🙂
I’m doing a pretty faithful replica of tour smokehouse. Some minor variants, but pretty close.
A quick question. The ducting between your egg and the body of the smoke house. How is that disengaged? Can you do it while it’s running and generating heat?
Thanks in advance
Steve
Victor @ Taste of Artisan says
Hi Steve, long time...
I am, indeed, flattered. The ducting is a loose reducer that can be lifted up at any time and the egg can be rolled away. Yes, you can do it while it's running, I've done it many times.
Jon says
That smokehouse looks awesome! The sausage looks great too.
Victor @ Taste of Artisan says
Thanks Jon.