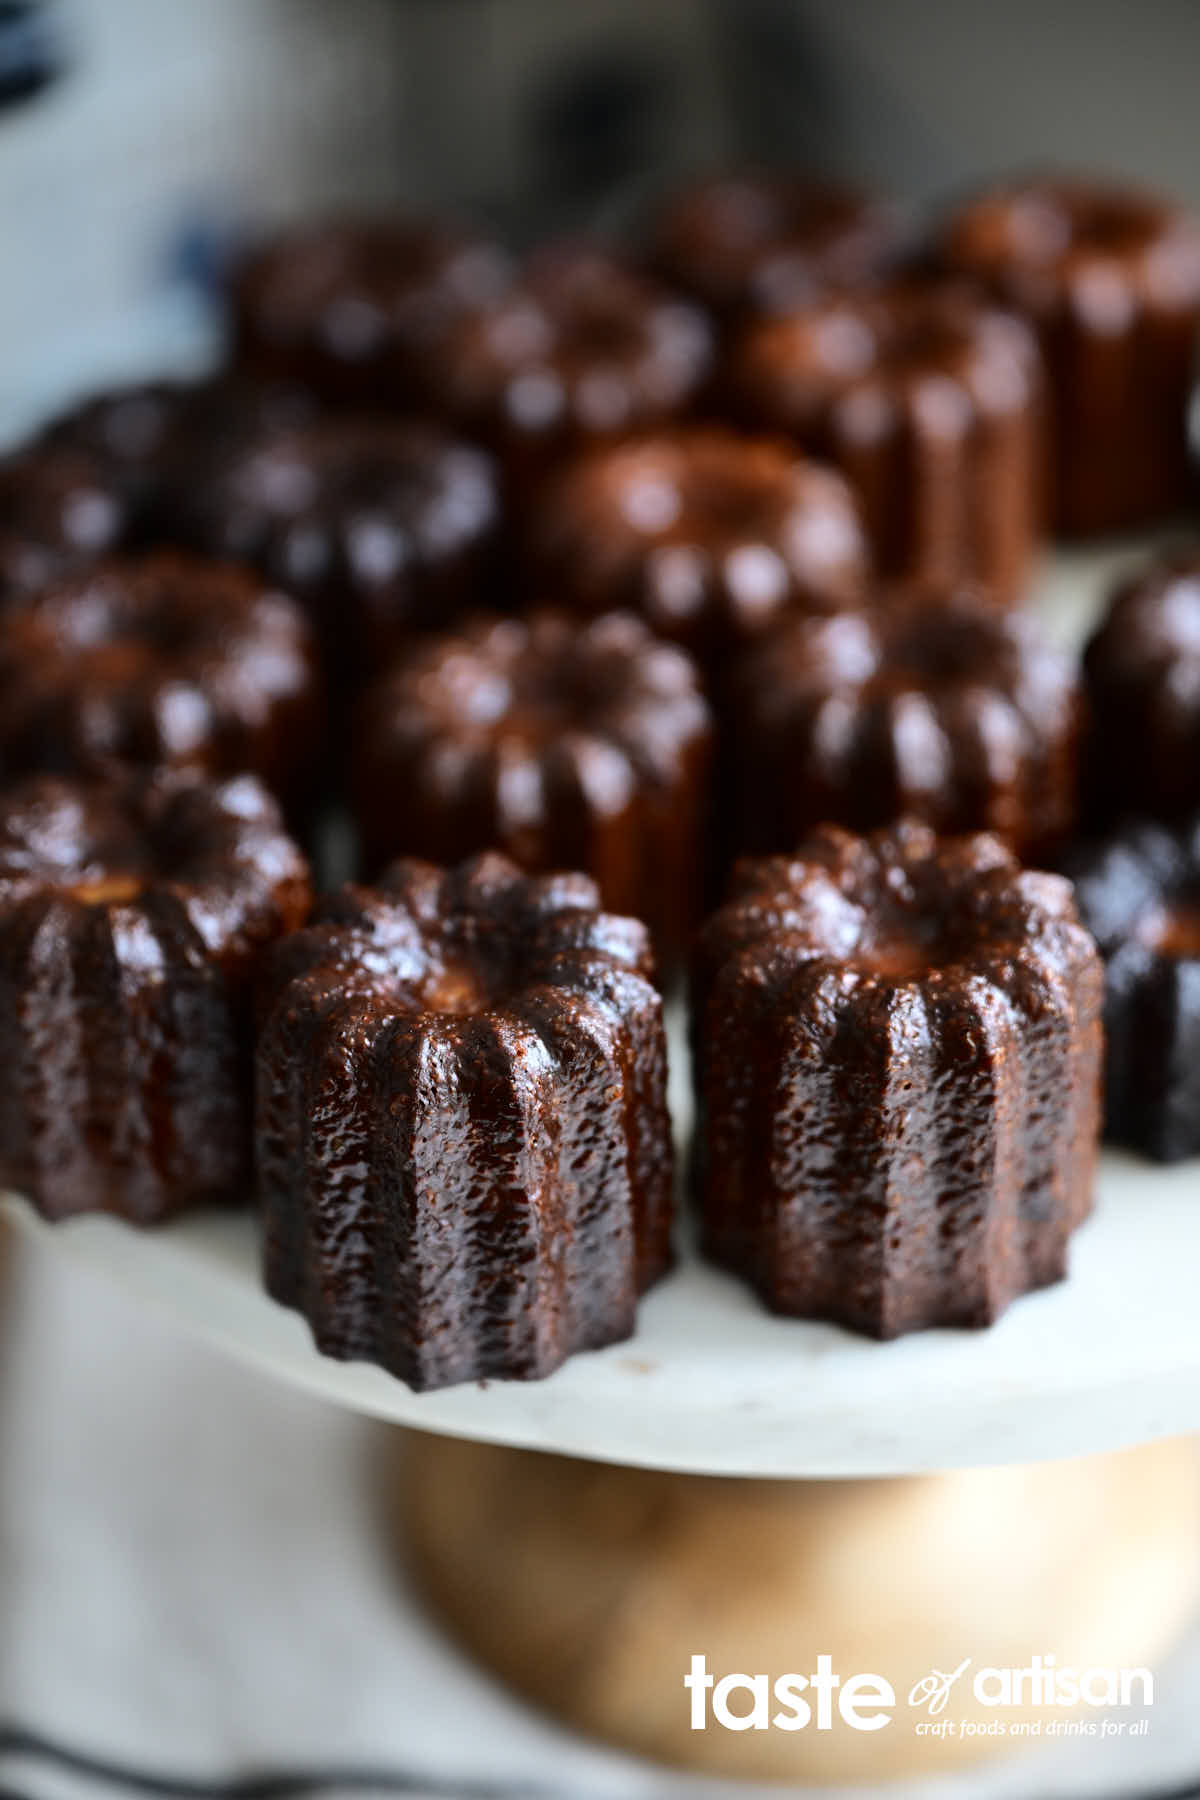
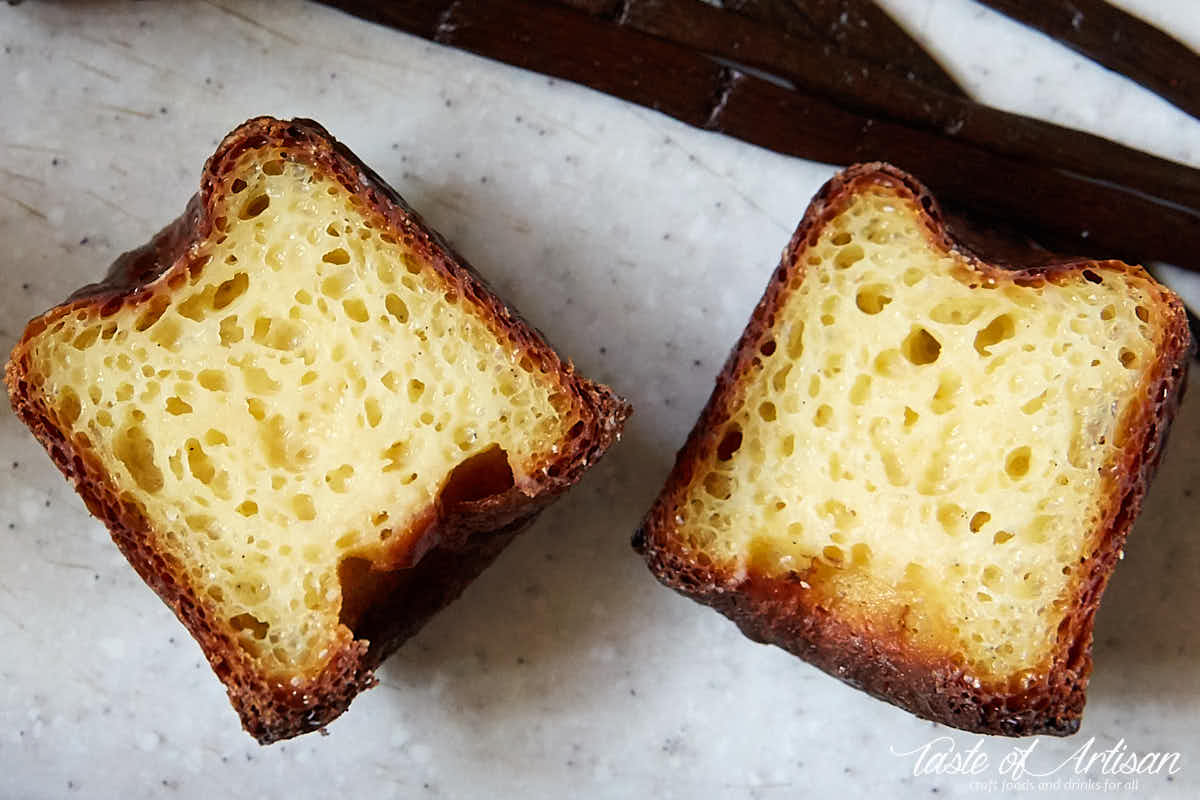
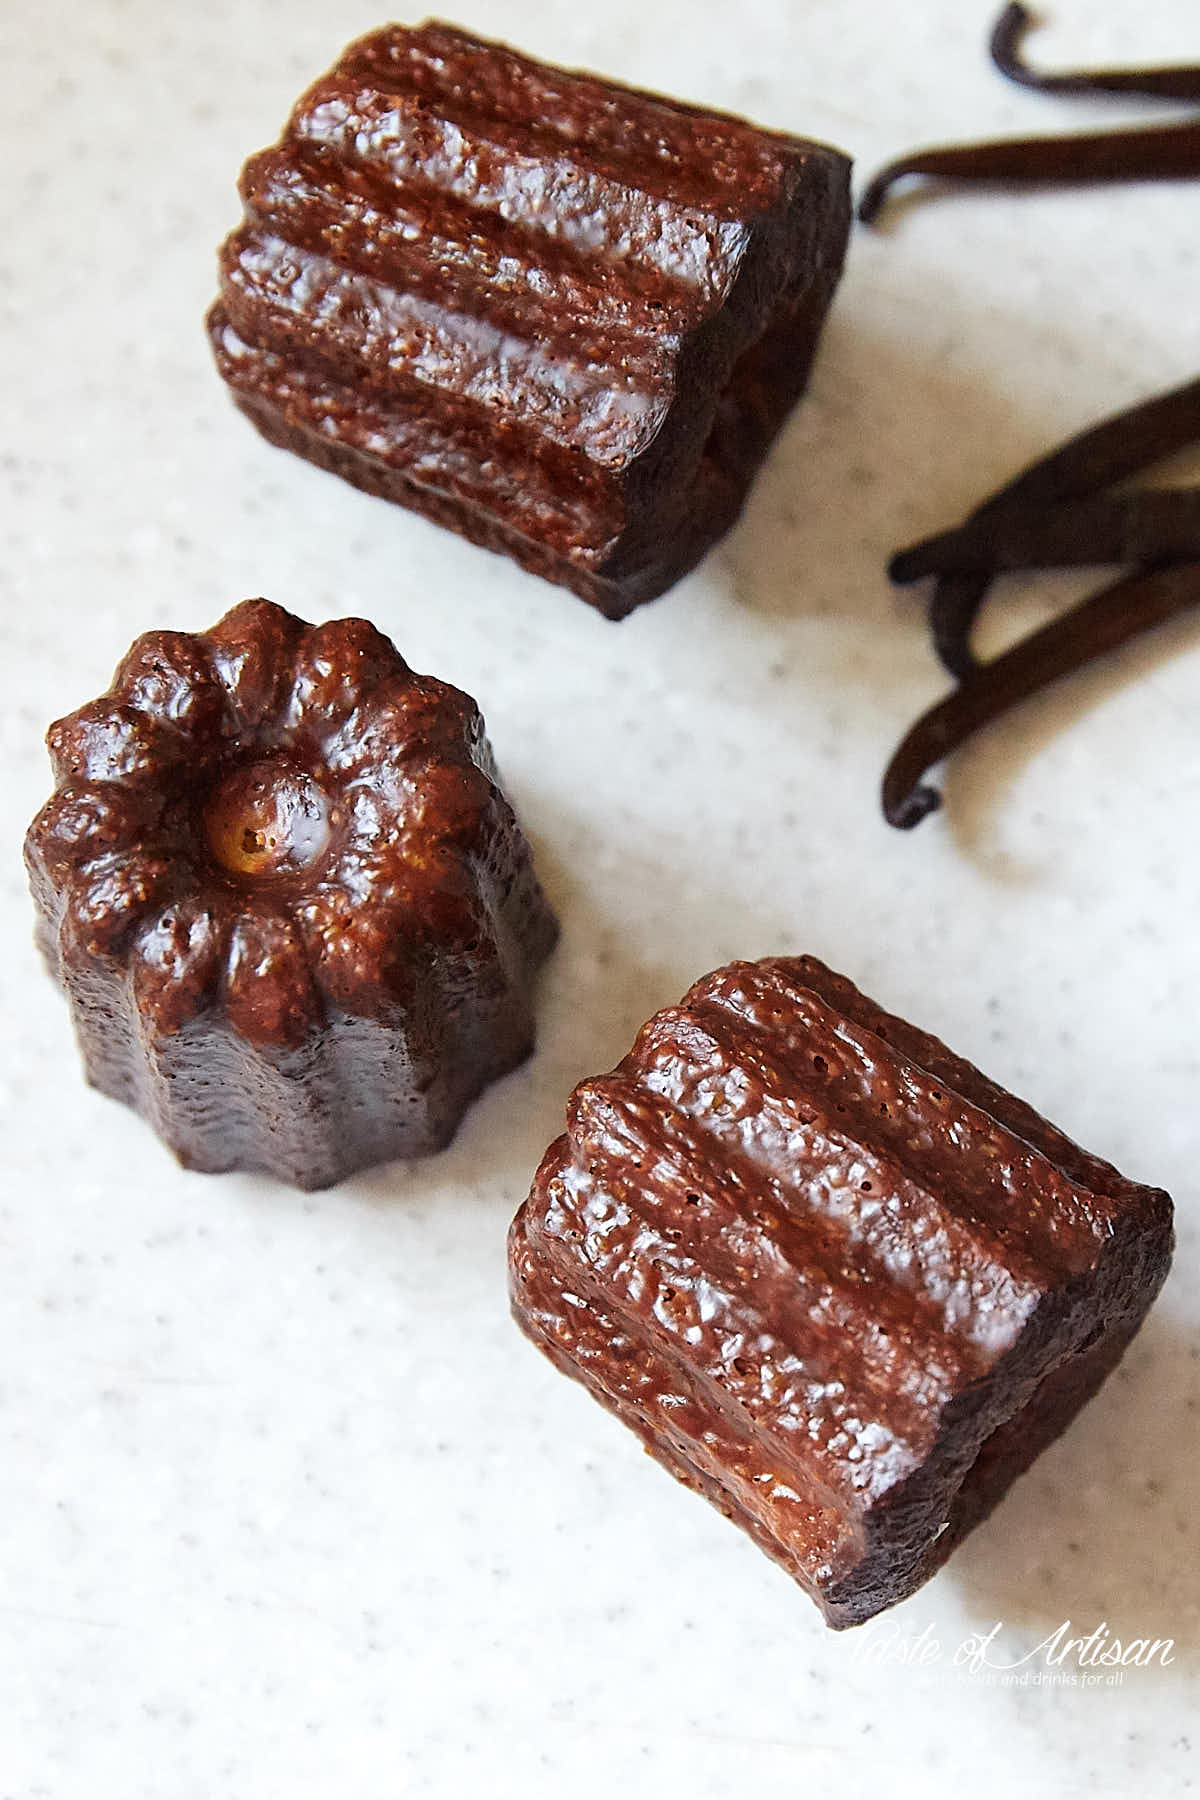
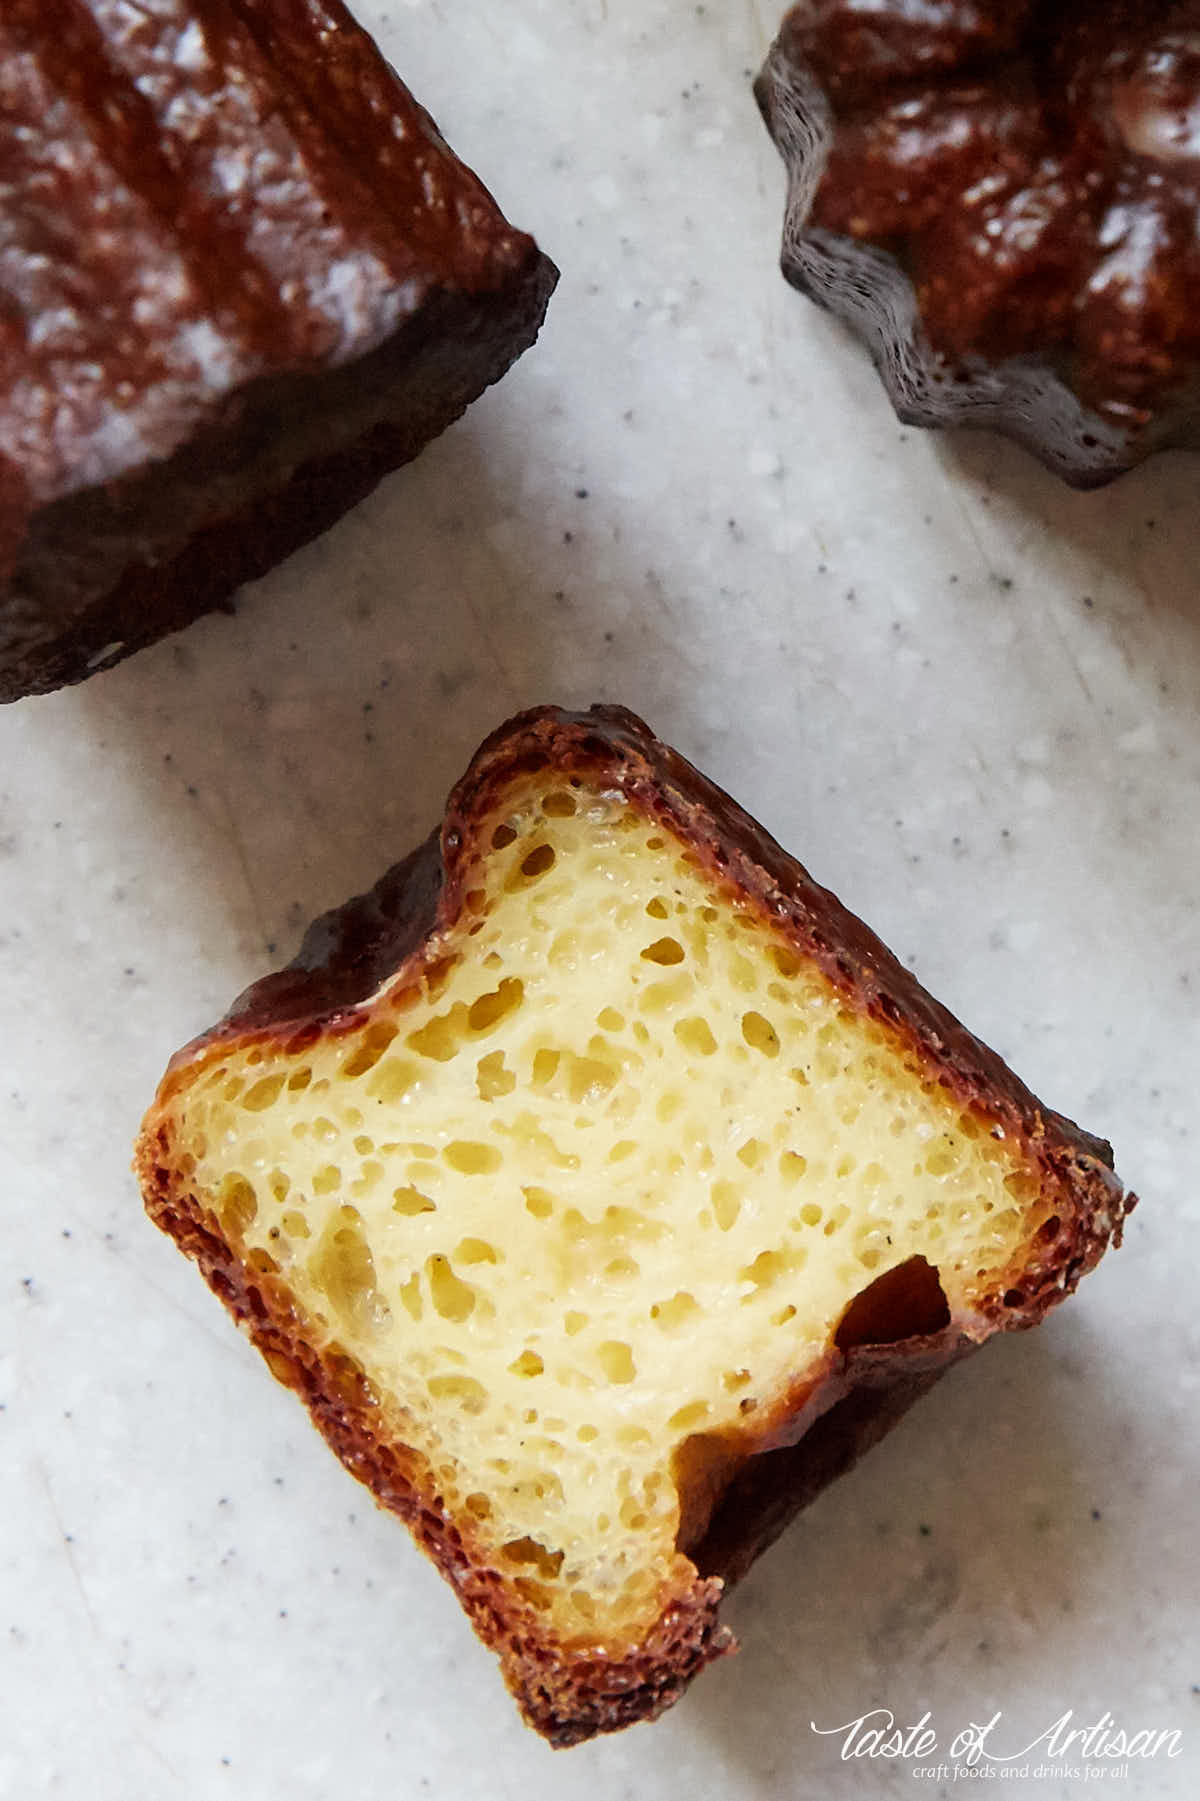
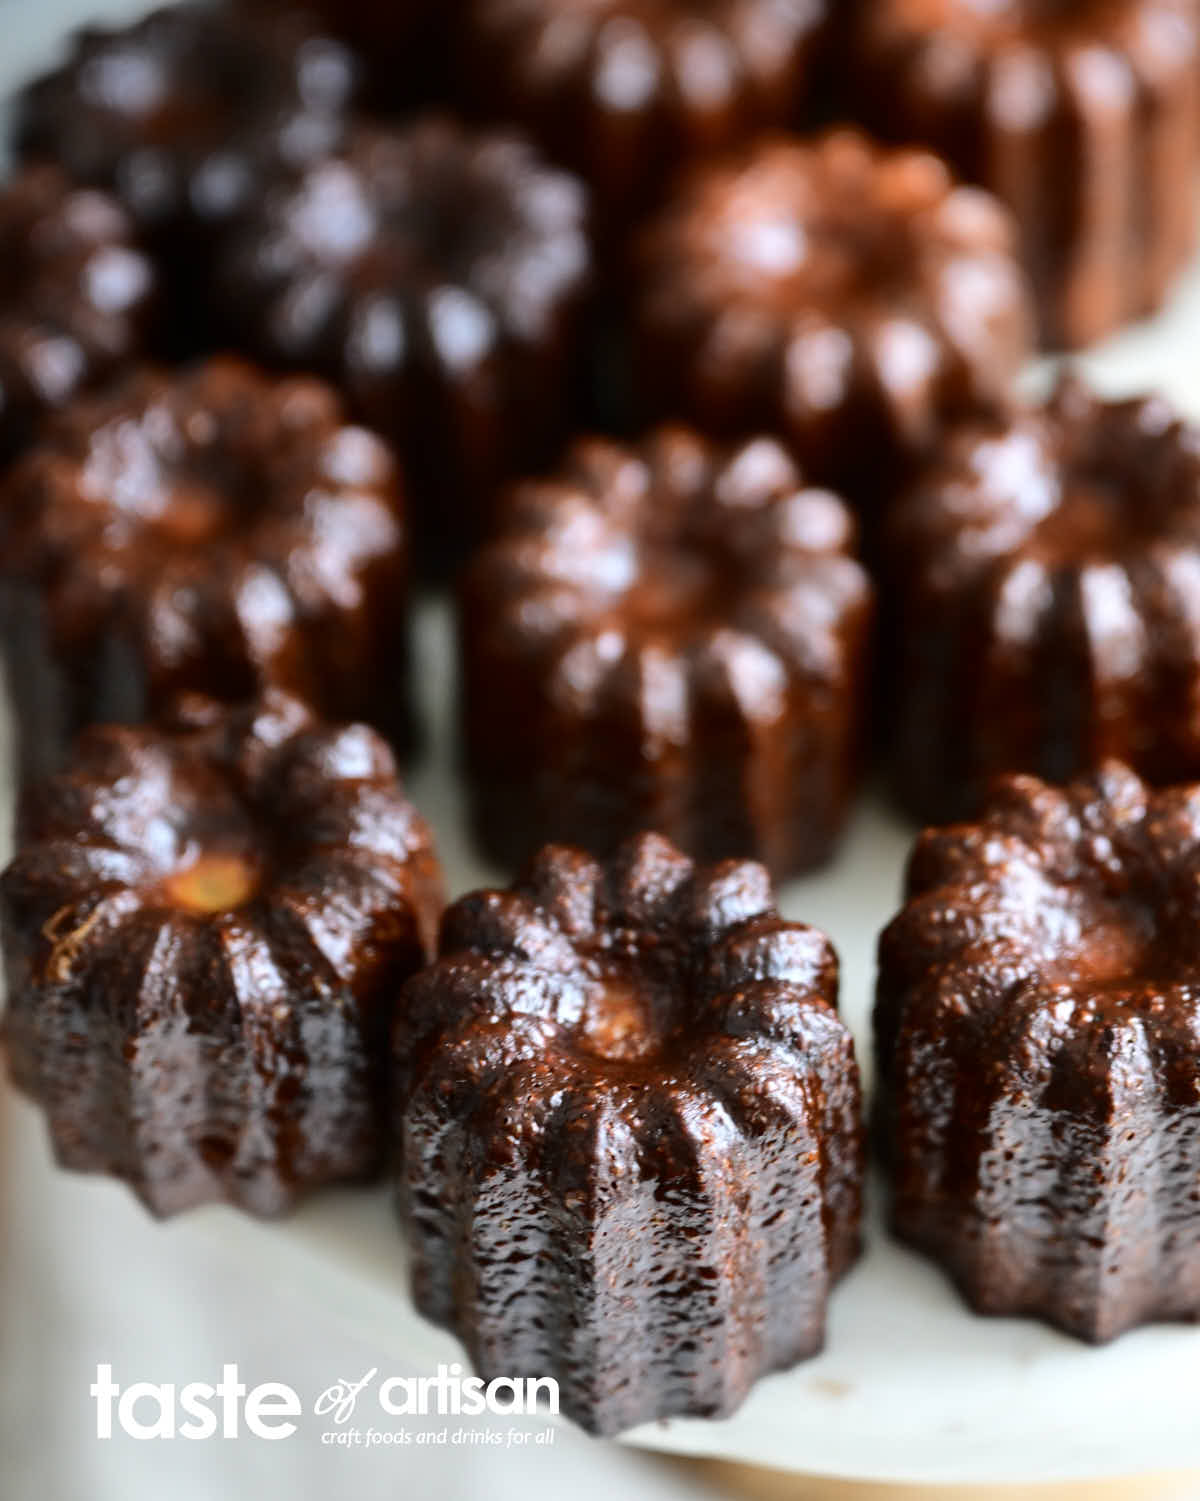
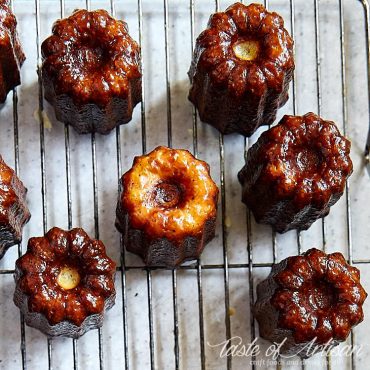
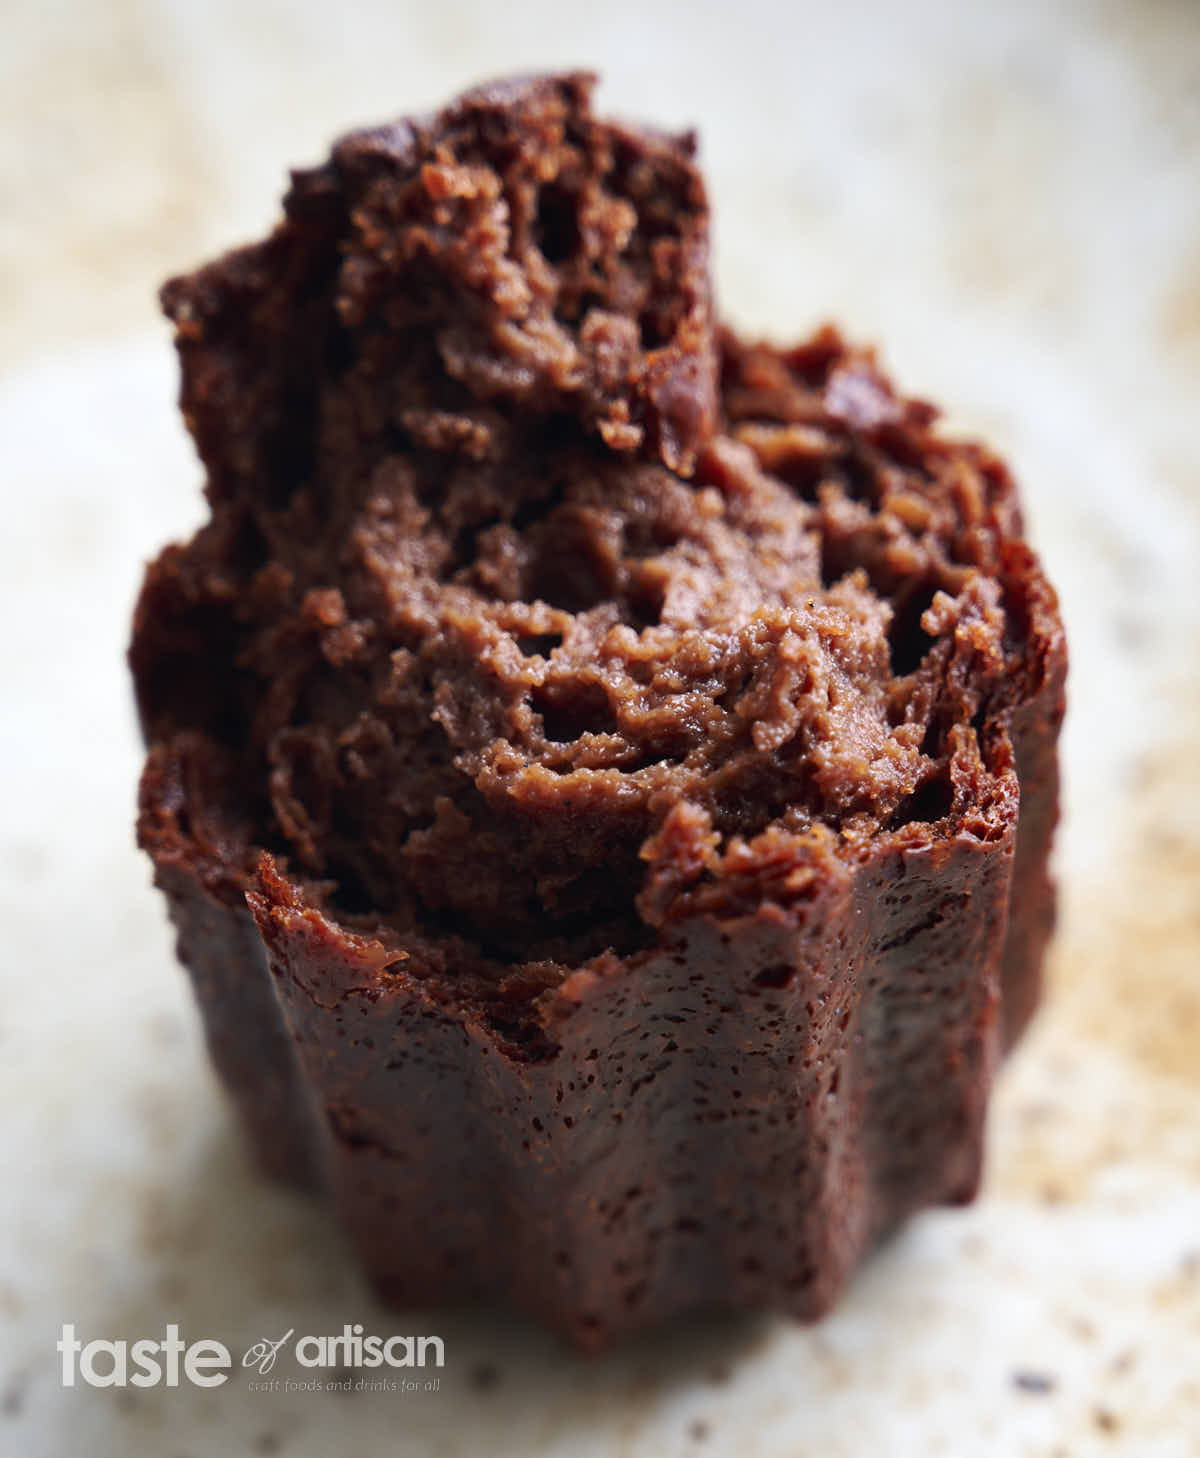
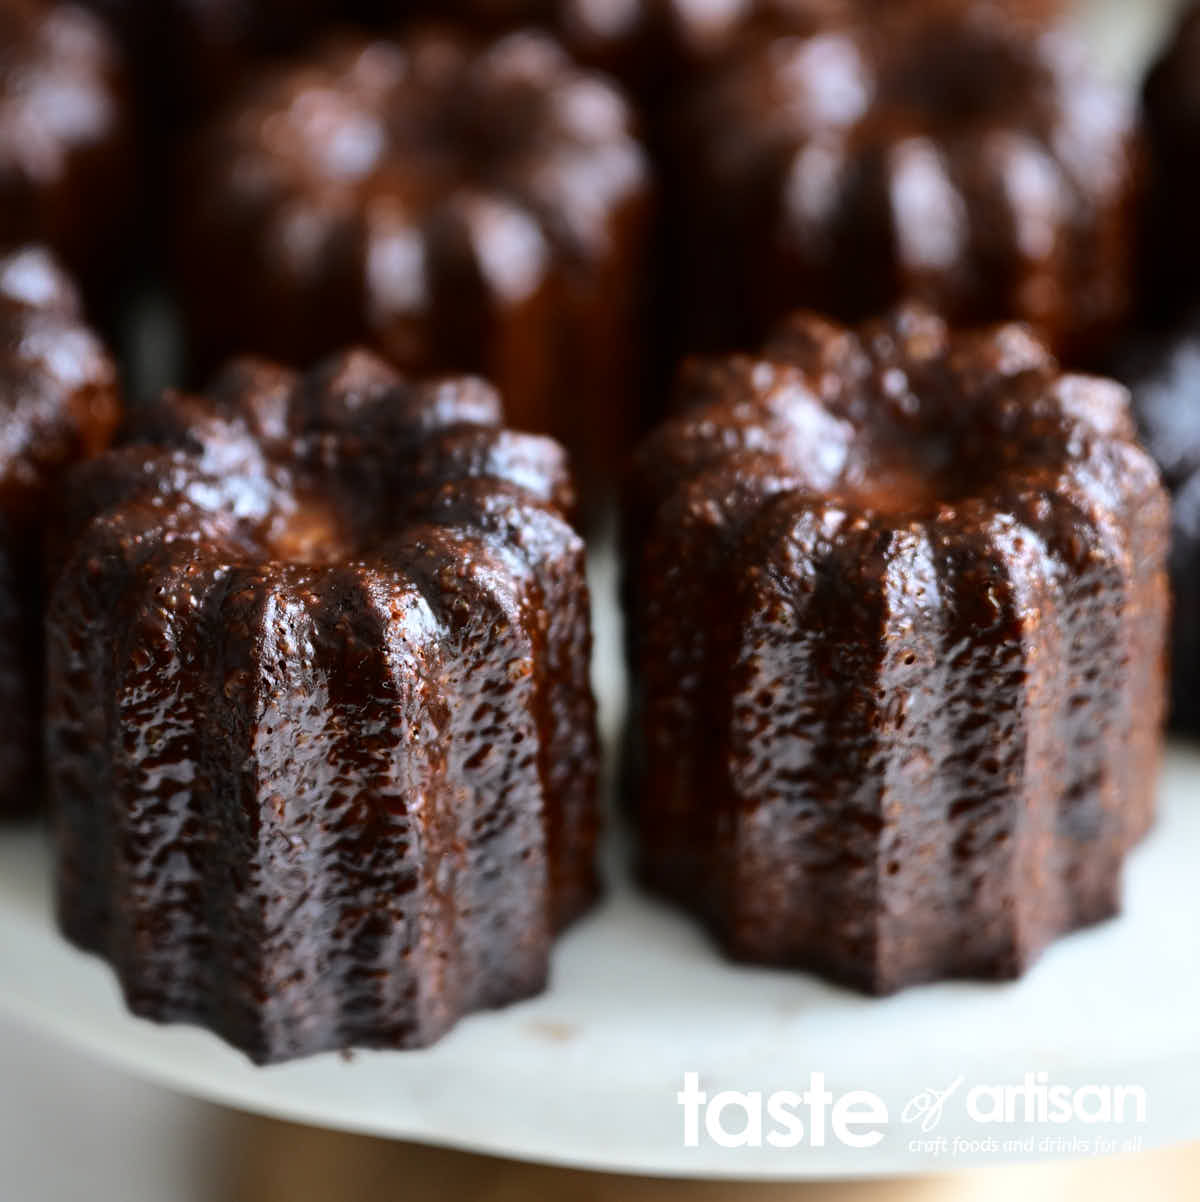
I had never tried a French pastry called canele (canelé) until just a couple of months ago, and I realized that I'd been missing out big time. These little morsels are nothing like anything else I've ever tried. Rich, moist, custardy interior is sealed into a thin, crispy, caramelized shell. As you bite into them, there is a distinct crackling sound; then your teeth sink into soft, sweet, and custardy goodness. They are as beautiful to look at as they are delicious to eat.
I have to tell you, though, making canele proved to be one of the biggest culinary challenges I'd ever faced. I went through one canele recipe after another, making a dozen batches before I got the results that I would consider decent.
As I read various recipes and instructions on the Internet, I concluded that it's not the canele recipe that makes a great canele; it's the process. Most canele recipes are fairly similar, to the point where they look practically identical. What differs is how you mix the ingredients and how you bake your caneles. I am convinced that the baking temperature was the biggest success factor for me.
The canele recipe that I posted below evolved from a few recipes that I came across during my quest - books, forums posts, and blogs. It works perfectly for me.
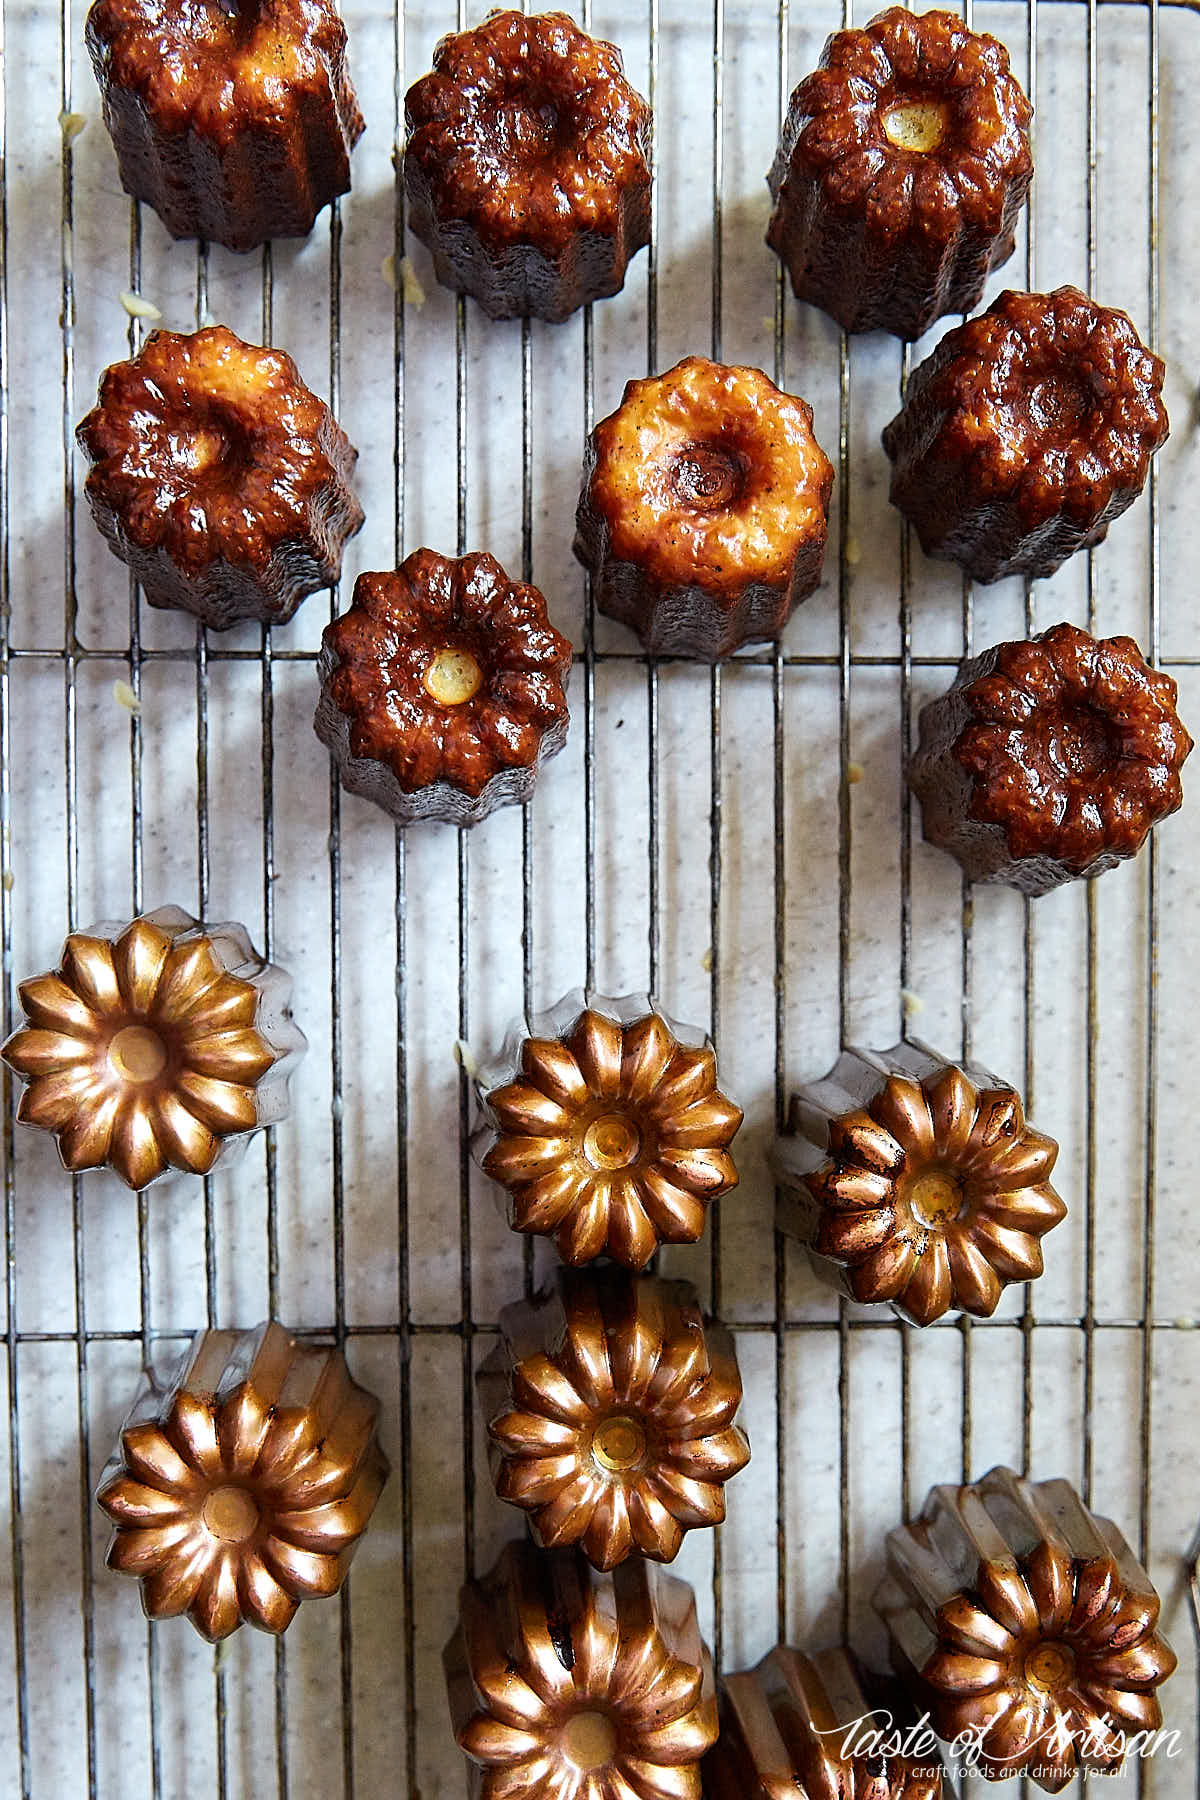
Going for canele authenticity - using copper molds
From the get-go, I decided to go for authenticity and the best possible results. This meant not wasting any money on silicone and aluminum molds and immediately going for the real deal - the copper canele molds. Pierre Hermé himself suggested that it is imperative to use copper molds, which ensure the ideal cooking. And who wants to settle for less than ideal?
Update on copper tin-lined canele molds - June 23, 2016
I read through various reviews and ended up buying eight 2-inch Matfer Bourgeat canele molds. They cost me a small fortune, but I absolutely love them. Mauviel M'Passion canele molds are very similar. Both brands are very popular and make excellent quality canele molds, so I would go with the cheaper ones you can find.
These molds are by no means cheap; they typically sell for about $20-25 a piece. However, I noticed that recently Amazon started having some really good deals on these, such as this one.
This is half the price per mold than what I paid when I purchased my first eight canele molds. These are neither Matfer nor Mauviel, but they look like the real deal. Here is what I think: I recently got additional 12 canele molds that came from Bordeaux, France. They were no-brand, generic tin-lined copper molds from Bordeaux, but they looked identical to the 8 Matfer molds I got here. The molds in the link above are also said to have come from Bordeaux and look very much like mine.
Coating canele molds with beeswax and butter mix
To get a beautiful, shiny exterior, you absolutely must use beeswax and butter mix to coat the inside of the molds. You may want to go with organic beeswax, but I went with a regular one due to the significant price difference. You can get it from any health food store or on Amazon. In any case, you want pure beeswax, with no additives, like this organic beeswax.
I tried both with and without, and the decision was a no-brainer for me - canele with butter and beeswax mix had that lively, glossy sheen that made them much more appetizing and elegant. The typical ratio used is 50/50, but I found one recipe on a French forum that recommended 3/2 butter to beeswax ratio. I tried it and liked the results better - it produced less waxy and thinner coating.
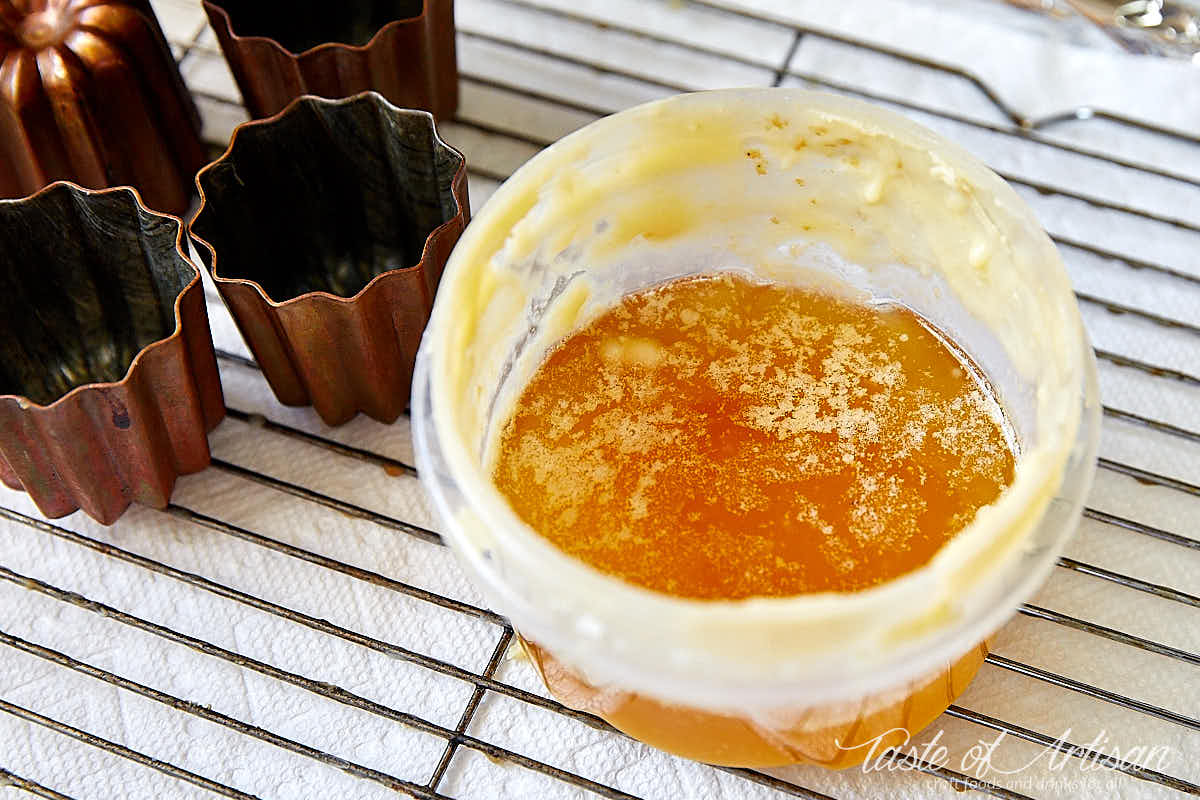
A simple and effective way to apply beeswax to molds
I've seen some very complicated methods for applying beeswax/butter mix to the molds, but through experimentation, I realized it was not necessary. My very simple method involves heating beeswax and butter in a microwave until liquid, then pouring the mix into molds and immediately pouring it back into the original container. This way, I get full coverage and a very thin and even coat throughout.
Brushing turned out a bad idea as the wax hardens quickly on the brush, resulting in a pure mess. Cleaning the brush afterwards was something else, too. I mean, you could preheat the molds and then brush, it would probably work too, but that's just another extra step, and you have to target the proper temperature and wear mittens. Who wants that? And you need to clean the brush anyway.
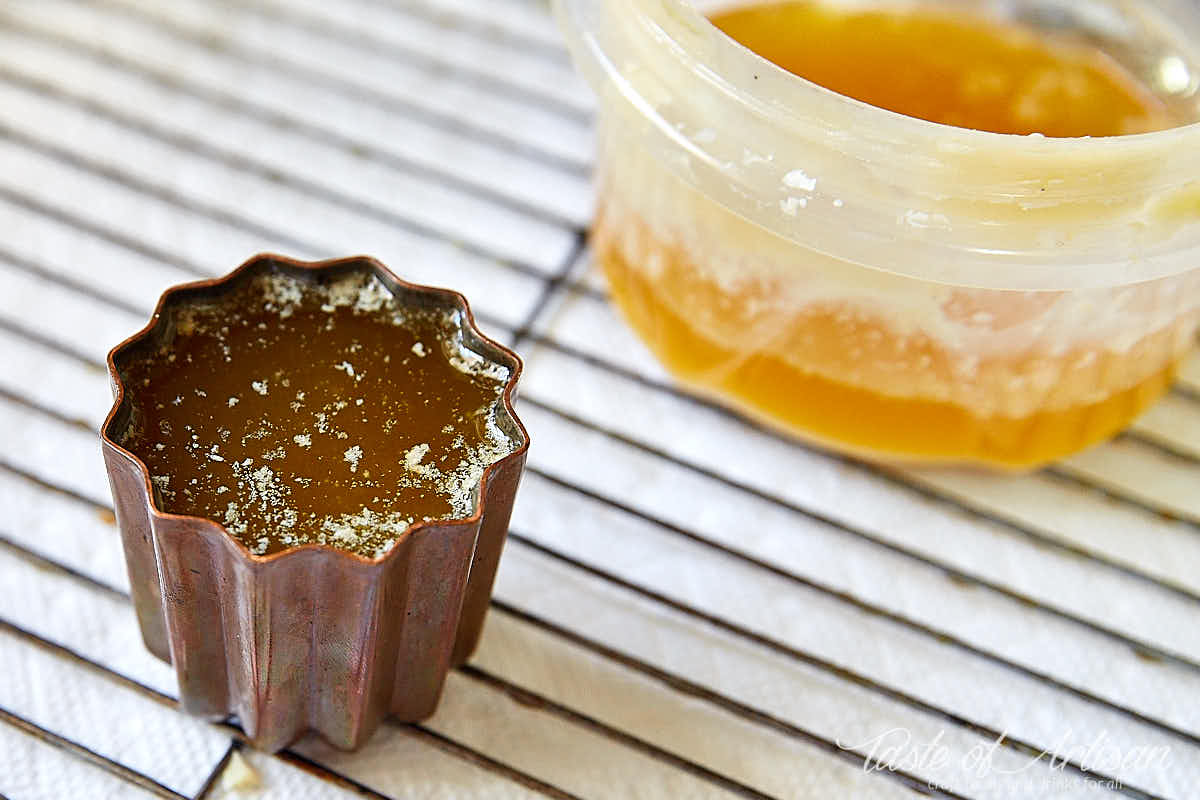
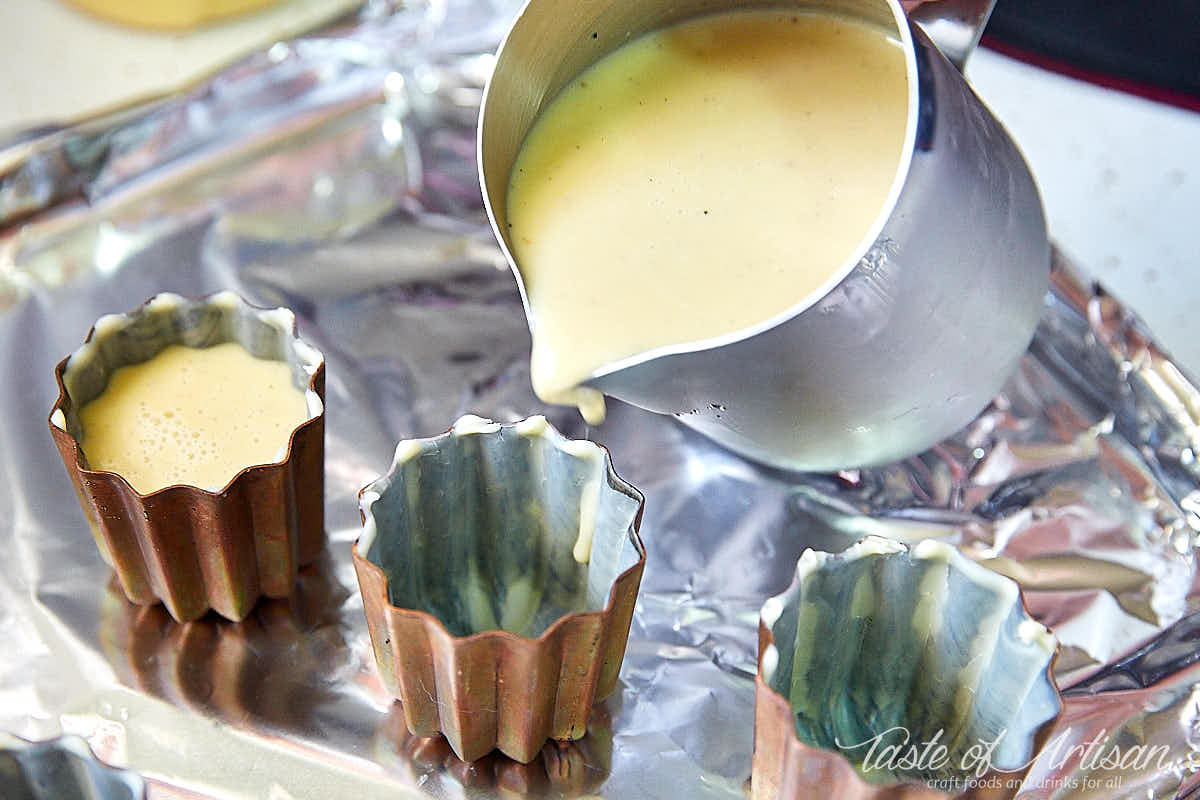
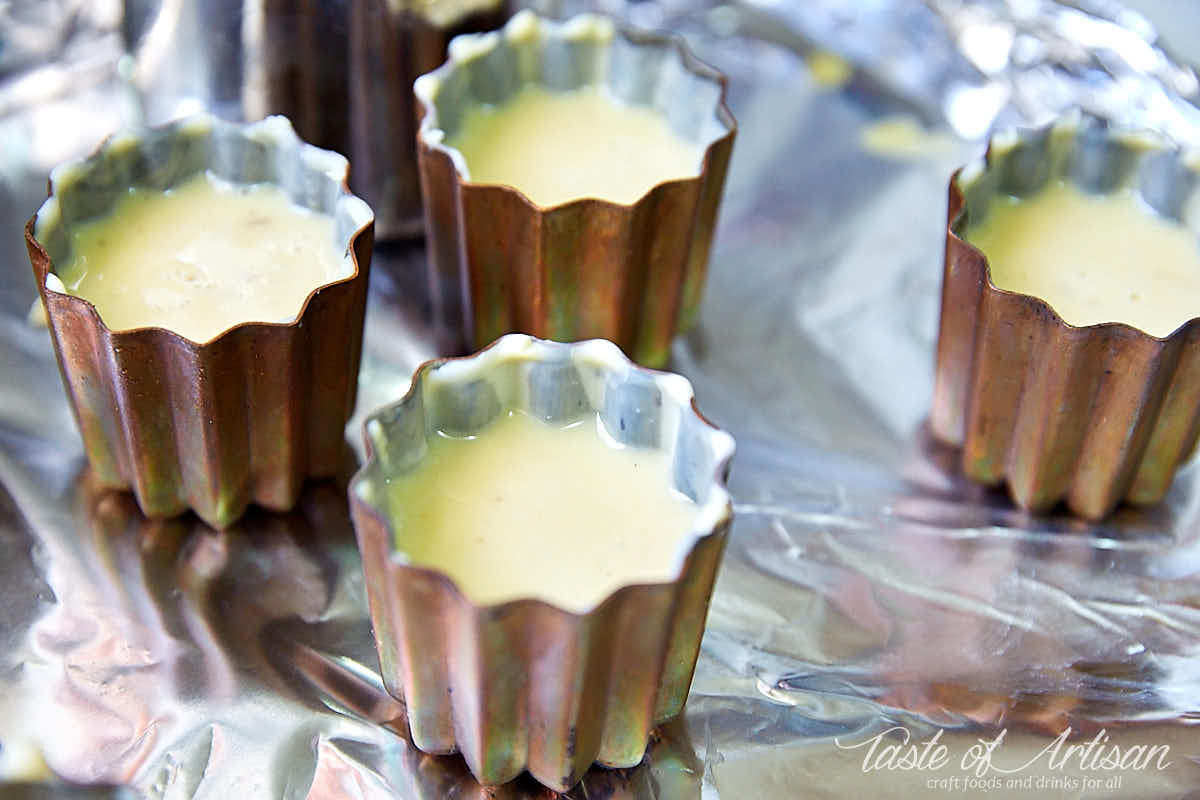
After pouring the mix back, I placed the molds upside down on a cooling rack with paper towels underneath to let excess drip down. I would then chill the molds in a freezer for about 10 minutes, fill them with batter to about 3/8 inch from the top.
The problem of canele 'mushrooming'
My biggest challenge in the way of getting decent caneles was that they would rise out of the molds, grow a big mushroom head and never sink back in. They would look unsightly and grotesque. There would be no beautiful sheen, and the bottoms would be white and under-cooked. A number of bloggers on the internet suggested that this puffing up was the result of too much air being introduced during mixing of the batter. I tried no mixing at all, pushing all the ingredients through a sieve following suggestions, a very laborious and messy task, but the end result was all but the same. Then I also watched a few videos, and some French bakers don't seem to care about air, vigorously whisking their batter away.
Possible solutions
Some authors suggest watching caneles closely for the first 30 minutes and taking them out of the oven as soon as they start to rise from the molds, and keeping them out until they would sink back in. Hm... I tried that, but it's too complicated and laborious for my liking. Frankly, it did not work too well either. As soon as you put them back in, they would start rising again. You need to repeat this step multiple times to get them finally not to mushroom, and that was just not for me. I wanted a perfect canelé without all that nonsense and trouble.
Another 'trick' I tried was to do with the temperature. Some canele recipes suggested starting the bake at a higher temperature for the caneles to form a hard surface which would prevent mushrooming. Some start at 450F, some at 500F. I tried both, and it did not work for me. Still mushrooming like crazy and never sinking back in. Using the convection function kind of worked, but the tops turned out too burnt.
The solution that resulted in a perfect canele
Then, it finally all clicked into place. I visited a French forum (thank you Google for the 'translate' feature) and noticed that practically every canele recipe there calls for starting temperature of 270C to 290C, that's 520F to 550F. Some even go as high as 300C! Maybe that was my problem? That my oven wasn't hot enough for the outer shell to form quickly enough and prevent mushrooming? I preheated the oven to 550F and baked caneles at this temperature for 10 minutes. Below is what I saw - some rising but no crazy mushrooming. Yet. I turned the heat down to 375F and let caneles bake for another 50 minutes.
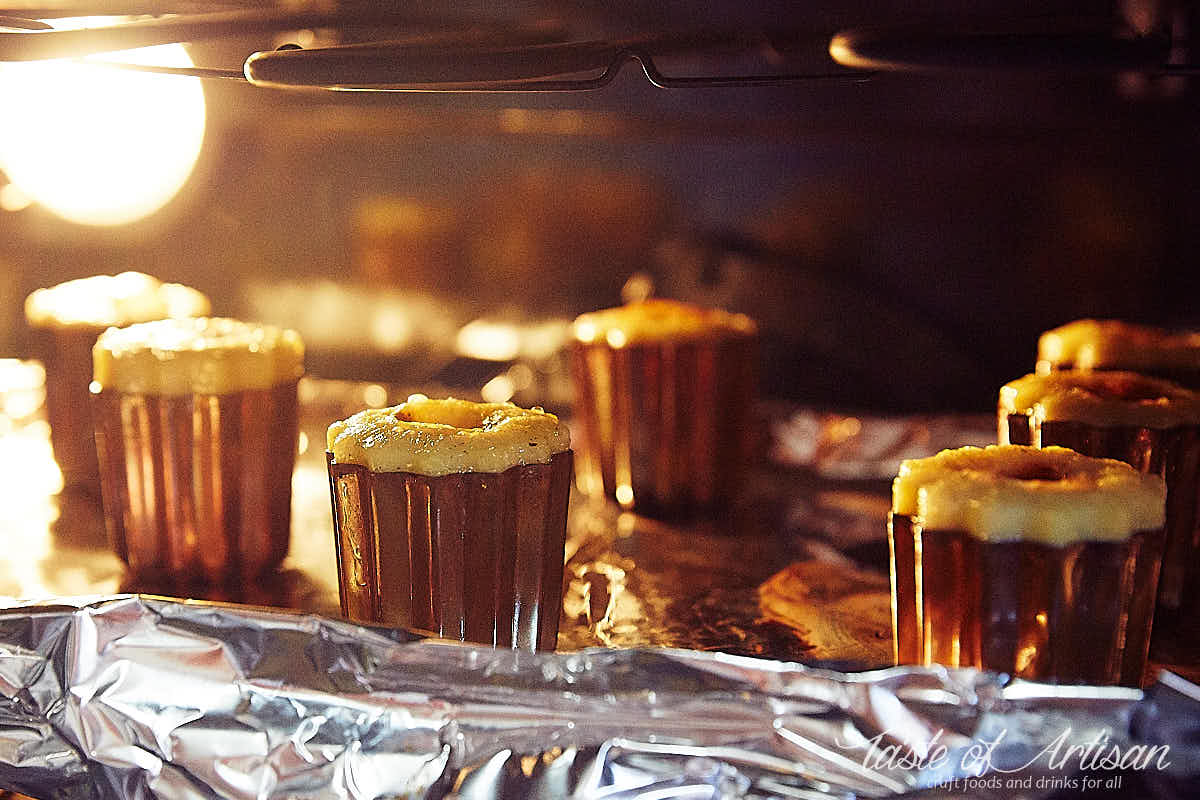
They came out perfect. Hooray!!! Finally!!! I did it!!! They sank back in and came out exactly how I wanted them.
Occasional 'white butt' problem
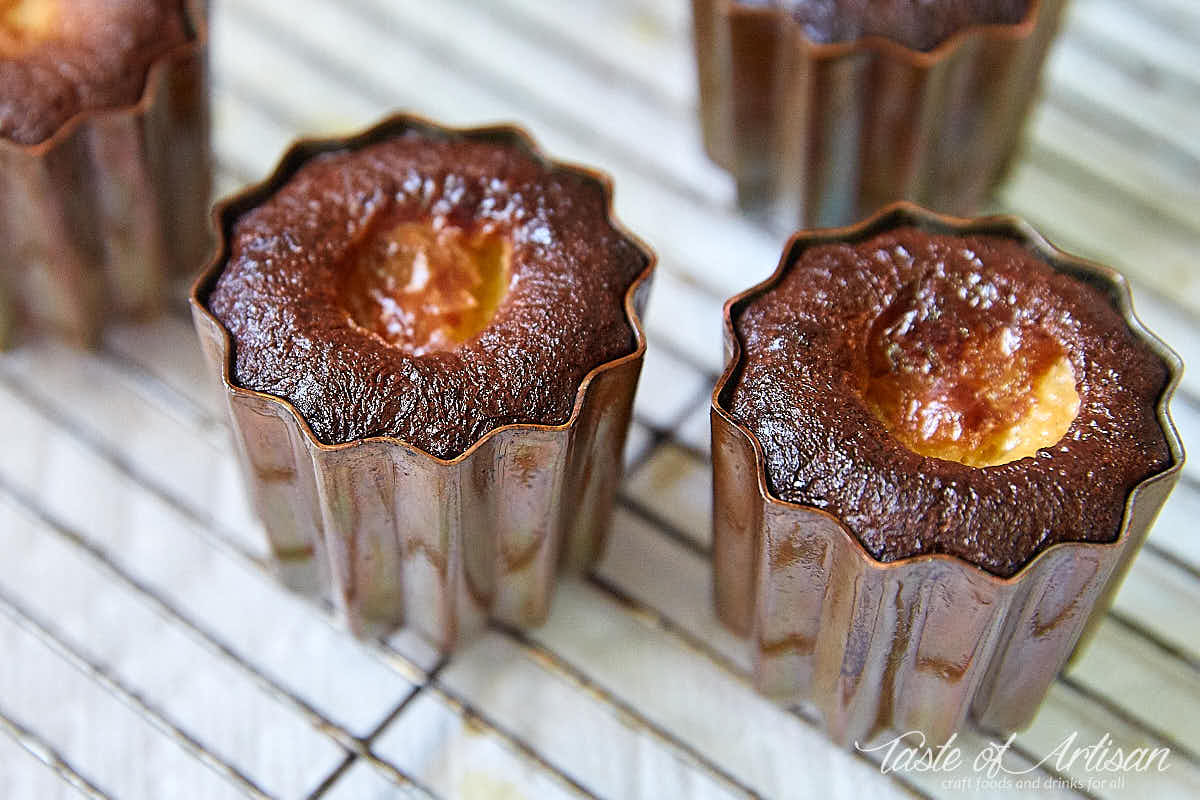
I tried the method described above several times afterwards, and it worked perfectly well every time. At the very least, it works with my oven. Sometimes one or two little buggers don't sink back in all the way, and you would get what French call the 'white butt' problem - caneles that come out with white bottoms. You can see a couple of those in the picture below.

It seems that it happens when you fill the molds a tad too much, causing caneles to expand at the top during earlier baking stages which prevents them from dropping all they way back down and touching the bottom of the mold at a later stage. How much is a little too much? It's more than what you see in the picture below.
Perfection
With time and practice, I seem to have perfected the skill of making French canele. They seem better and better every time I make them. My latest batches have been nearly perfect, if not perfect. I now bake them in my gas oven, which only goes up to 500F. But what I do is bake them at 500F with convection for the first 10 minutes, and that works perfectly well. I couldn't be happier with the results.
This post was updated on January 1, 2025.
Cannelés (Canelés) de Bordeaux Recipe
Ingredients
- 2 vanilla beans (preferably Madagascan)
- 500 ml milk (cold)
- 200 g cane sugar (250 g if you want more sweetness following traditional recipes; I use 200 g)
- 100 g all-purpose flour (you can also use bread flour)
- 50 g butter (melted)
- 2 eggs (large)
- 2 egg yolks
- 60 ml dark rum
For the mold coating:
- 40 g beeswax
- 60 g butter
Instructions
- Slit the vanilla beans lengthwise, and scrape the seeds from them with a small knife. Put the seeds, vanilla pods, and milk in a saucepan, and bring them to a gentle simmer, and then turn off the heat and let sit for two minutes.
- In a separate bowl, whisk sugar, eggs, and egg yolks. Add melted butter and whisk more until combined.
- Remove the pods from the milk. Add 1/4 of the hot milk into the egg mixture and mix well. Add flour and continue mixing until combined. Then slowly add the remaining milk while continuing to mix until all ingredients are mixed well. Add rum and mix. This way, you will avoid lumps and will end up with the perfect consistency of the batter. (Note: this step is very important. Adding hot milk to the egg mixture will temper the eggs and create custard, which will ensure the perfect consistency of your caneles).
- Refrigerate for 24 to 48 hours. This is non-negotiable. The texture and flavor improve dramatically by the second day and third day. So, 24 hour rest is mandatory. 48 hours if you want amazing canele. The batter may be kept in a fridge for up to 4 days. Each time you use the batter, stir it well and work it for at least 2 minutes with a whisk.
- For a smooth, shiny surface that accentuates the dark brown color of the caneles coat the molds with a mix of 40 g beeswax and 60 g butter melted together. For this, melt the beeswax and butter together, quickly pour the mix into a mold, and then back into the original container. Turn upside down on a cooling rack with a paper towel underneath to catch drippings. Once cooled down, chill in a freezer or a refrigerator until ready to bake.
- Preheat oven to 550F. Fill the molds with batter to 3/8 inch (1 cm) from the top. Place them on a foil-lined baking sheet and bake them at 550F for 10 minutes. Without opening the oven, drop the temperature to 375F and continue baking for another 45-50 minutes. Every oven is different, so your baking times may need to be adjusted.
- Remove caneles from the oven. Quickly unmold them and place them on a cooling rack upside down. Caneles usually slide right out of their molds, but if they don't, turn the mold upside down and knock on a hard surface, such as a cutting board.
- Let cool for 2 hours at room temperature. Caneles must be eaten on the day they are baked.
Notes
Nutrition
Make sure to also try this chocolate canele recipe. If you love chocolate, you will love chocolate caneles.
Updated on March 19, 2019

Graham Williams says
Just made my first batch of your Caneles. They are absolutely wonderful. A little bit of effort, but the results are superb. Thank you so much for the recipe. Think I might have to try the chocolate versions next 😉
Victor @ Taste of Artisan says
You are very welcome. Enjoy! Chocolate caneles are a must if you like chocolate.
Kali says
just to confirm - Take the prepared canale molds straight from fridge/freezer with cold batter straight from the fridge goes in to oven? Or bring to room temp first?
Also, did you make all 16 at one time? Or would you recommend doing smaller batches at a time?
Thanks, excited to try your recipe!
Victor @ Taste of Artisan says
Correct, take the batter and the molds from the fridge, place the molds on a baking tray, fill with batter and straight into the oven. I've also been experimenting with coating the molds and keeping them at room temp until ready to fill with batter and bake. I struggled to notice much of a difference. Yes, I bake 16, well now 20, at a time. Good luck!
Katie says
I just made these using copper molds. They did not come out glossy. I started with oven temp at 500 degrees (my oven’s max temp), then lowered to 350 (I used convection). I am wondering if the wax running over the top edge while cooking may have had something to do with the lack of shine. Perhaps leaving the batter a little lower in the mold would help so that the wax wouldn’t run over the edge? They are dark brown, just not glossy. Any suggestions?
Victor @ Taste of Artisan says
My current gas oven maxes out at 500F so that's not an issue. I would definitely try filling the mold less next time to see if that helps. Also, trying baking without convection at 375F, as specified in the recipe. Sometimes a small change may lead to unexpected results. Good luck!
Katrina says
Hello!
Are the kcal mentioned above per piece or per 100g?
Thank you!
Victor @ Taste of Artisan says
Hello, it's per piece assuming 16 pieces per batch.
Helen Stone says
What are your instructions for using a silicon mould which makes mini canellés?
Victor @ Taste of Artisan says
Helen, I've never used those so I would be guessing and I don't want to do that. I hope one of my readers has used them and can comment. Good luck!
Tanja says
Can we use only butter for the molds instead of beeswax and butter? any advices on that topic, please? Thank you so much
Victor @ Taste of Artisan says
Yes, you can use butter only, I've seen people do that and they liked the results. But the pastry won't have the authentic gloss, aroma and the texture of the crust will be impacted. I am not saying it will be bad, just different.
Susan says
Can I use vanilla bean paste instead of a vanilla bean?
Victor @ Taste of Artisan says
Yes, that will work too.
Rosita Carbone says
This is my favorite canale recipe. They turn out just right!! My grand niece had canale in Paris, and returned saying mine were better and she wants to learn how to make them!
Victor @ Taste of Artisan says
Glad to hear it, Rosita. Enjoy!
jerome smith says
Absolutely the best site I have every seen for these tricky little treasures. It has solved all my problems and I will continue working towards perfection... Huge thanks.
Victor @ Taste of Artisan says
You are very welcome, Jerome. Enjoy! The most exquisite pastry in the existence. 🙂
Jasmine Thoo says
When do I put rum in
Victor @ Taste of Artisan says
Step 3.
Gerry Ferraro says
This will be my first time making canele, I have copper molds, my question is this: do I coat with butter/beeswax just once or before I use them each time?
Victor @ Taste of Artisan says
Gerry, you need to coat them before every bake. Good luck!
Olya Dupuis says
Could you help with the instructions for seasoning the molds for the first time please? I got my first set for my birthday and ready to make them ! Batter is in the fridge already.
Questions :
- do you season just with coating of melted butter, our butter out and then into oven for 20 minutes ?
- do you put them open side up or for butter to drip out while in the oven ?
- do you repeat the process or is once ok ? ( so many opinions online, some say to do 3-4 times )
Victor @ Taste of Artisan says
Sure. I season exactly as per P. Herme's instructions that I provided in Note 1 below the recipe. Butter only, as specified. I brush with melted butter then season in the preheated oven for 20 min. Once is enough. Every now and again, when I experiment with new recipes, I get batter stick to the molds, which requires cleaning then re-seasoning. Otherwise, season once and never do it again. The molds get additionally seasoned every time you bake canele in them. Hope this helps.
Olya Dupuis says
Thank you ! Do you season them upside down with the remnant of butter dripping out on the cookie sheet ? I looked on Mauviel website and they do not have any info on seasoning at all. The only info they provide is that it the tin will melt at 460F.
Victor @ Taste of Artisan says
No, I season mine right side up. After seasoning, I let them cool off a bit and then wipe with paper towels.
I've heard of people having issues with tin melting an so forth, so I'd say to be on the safe side, go with what the manufacturer recommends. I'll just say that I have 20 Mafter tin lined molds that I purchased from two different reputable sources and I seasoned all at 500F for 20 minutes and never had any issues related to tin melting. A number of my molds had to be cleaned and re-seasoned 2-3 times as they got dirty while I was experimenting, and they held up quite well. I think it's possible that different manufacturers use different processes, alloys, thicknesses of copper/tin, etc. which would impact their temperature resistance. So, yeah, when seasoning dry molds (not filled with batter), I'd follow the manufacturer guidelines.
Shirley Yeo says
I don't prefer the taste of rum or any alcohol. Is there anything I can substitute it with by any chance?
Thanks so much! 🙂
Victor @ Taste of Artisan says
You will barely notice it. If you read the comments, there was a discussion where some argued they didn't notice any flavor of rum after the pastries are baked. That said, you can skip the rum altogether, there is no need in a substitute.
Ren says
Just tried these using the metal muffin-like pan with 12. I only buttered the pan and did not use beeswax. 490 degrees F for 15min and 380 for 40min.
They turned out perfectly. Amazing!
Thank you!!
Victor @ Taste of Artisan says
You are very welcome. Enjoy!
Denisa says
Is the seasoning with butter an alternative to the coating with beeswax + butter? Or do you need to do both steps?
Victor @ Taste of Artisan says
To get that traditional look/sheen and aroma, you need both, but some have tried only butter and reported it worked for them. I always use both as I want to have as authentic a pastry as I can.
Andi says
Denisa, my understanding of Note 1 is that (A) The butter *seasoning* is once at the beginning after washing the newly received molds. Then, as people traditionally did with cast iron, don’t wash the molds after use, just wipe them out unless batter gets stuck on them in which case wash and re-season;
(B) Butter or butter and beeswax *coating* you do every time.
Victor @ Taste of Artisan says
That's correct.
Tom S. says
I just made these it was my first time attempting them and I was fortunate to be gifted a set of molds from Paris. I followed your recipe to the tee and they turned out perfectly thank you
Victor @ Taste of Artisan says
You are very welcome, Tom. Enjoy!!!
Anna says
I have a batch in the oven now, they’re looking good already. This will be my second time using this recipe, and I love it! The last time I made them they didn’t mushroom up or anything, the texture and taste was amazing, the tips and how you explained everything made them perfect and easy to make!
Victor @ Taste of Artisan says
Glad to hear it, Anna. Thank you for your feedback. Do try the Chocolate Canele recipe, I like a lot. I also have another really good one, Hazelnut and Aged Rum Canele recipe, I will post it when I get a chance. Happy baking!
Rhonda Cherevaty says
Hi! I am thrilled that I have finally found someone who can explain the Caneles process in simple terms. Thank You!!
My next issue is that I want to do a savoury Caneles using French goat cheese, rosemary (fresh) and a liqueur called Pastis ( anise flavoured spirit)
not sure on the ratio that needs to be done or when to add them in the mixing process.
Substituting the vanilla, rum, and some of the sugar for the above mentioned ingredients.
Have any suggestions? Would greatly be appreciated.
Victor @ Taste of Artisan says
Oh wow... savory caneles... yum! You know, back when I was just starting out with caneles, I did make a few batches of savory caneles as an experiment. I recall they mushroomed, just like my classic caneles at that time, but tasted really good. I am not sure I saved any notes and it was too many years ago to remember the details, but I know it's doable and if I find some details I will definitely let you know.
Connie says
This is an incredible recipe! I just about never rate recipes because most people change recipes around and rate it based on their changes, positive or negative.
This is a 5 star rating based on their changes way the recipe is written.
These are incredible! Make them, you won’t be sorry.
I will make one change next time… since the mix has to rest in the fridge for at least 24 hours anyway, next time I will leave the vanilla beans in the mix until right before I bake the Caneles.
By the way… I have made these before and used Whiskey instead of rum, and they were still absolutely delicious.
I made a double batch yesterday for a party we attended. I got so many requests for this recipe and referred everyone to this website. Def a keeper recipe.
Victor @ Taste of Artisan says
Glad to hear it, Connie. Enjoy!!!
Michael says
Your recipe has become my go to reference for my Cannelé.
Thank you for that!
Victor @ Taste of Artisan says
I am glad you liked it. I made many batches over the winter holidays; this one and chocolate and hazelnut. Friends and family go straight for canele, no matter what else is on the table 🙂 This pastry is divine. Nothing is like it. Enjoy!
Robbie says
Hi, thanks for the detailed recipe.
Quick question - what temperature should the canele batter be when it goes in the oven?
Should it still be fridge cold following the 24-48 hour rest or should it be brought up to room temperature?
Thanks!
Victor @ Taste of Artisan says
It should be chilled. I take it out of the fridge when ready to fill the molds, stir making sure not to introduce bubbles and pour. Good luck!
Connie says
This recipe is spot on!!
I fell in love with Caneles at our little French bakery in town and googled for a recipe upon which I came to this site. This recipe tastes almost exactly like the ones from the bakery.
So far I have made the recipe three times . The first time I let the mix rest for 24 hrs, the 2nd time for 48 hours and the last time I made then right away. It is true that the texture improves slightly when rested for 34 hours or more but we found the caneles still absolutely delicious even when baked right after mixing and filling the little canele pan. By the way, I did not want to spend the money on really copper molds so I order a 12 canele pan on Amazon that is very thick and heavy. It’s non-stick. Works wonderful! I only used melted butter to coat the inside and turned it upside down for a moment to let any excess run out. I believe my French bakery used the butter/ bees wax combo to coat but I just didn’t want to buy bees wax. Slightly difference taste wise but not enough to make a huge difference. This recipe will be on my top 10 baking recipes.
Victor @ Taste of Artisan says
Thank you for the detailed feedback, Connie. Glad to hear about your success. Enjoy!
Dolly says
2 questions:
1. Before pouring in the butter/beeswax mixture, should/can I chill the molds first to help it stick better and then chill the molds again?
2. If I have leftover butter/beeswax mixture...I'm assuming I can keep any leftover in the fridge and just heat it up again for another batch the next day?
Victor @ Taste of Artisan says
Hello Dolly,
1 - No, do not do that! It will result in a VERY THICK coating, you don't want that. That's when people complain about wax being stuck between their teeth. I actually do the opposite, I warm up my molds in the hot oven just so I don't a thick coating. You don't need to chill them. Just pour in the hot wax in warmed up molds and quickly pour it out, then flip the mold upside down and place on a cooling rack positioned over parchment paper of paper towels (less mess to clean up).
2 - Yes, I always save the mix and reuse it. I've kept in the fridge for much longer than a day and found it to be just fine.
Good luck!
Yati Hamid says
Hi,
Can I reduce the sugar in the recipe by half?
Victor @ Taste of Artisan says
I haven't tried doing that with this recipe, though I often reduce sugar in many dessert recipes. It usually works fine, with some rare exceptions. If you try, do let me know how it works out for you. Good luck!
Dao Nguyen-Howell says
I don’t have molds? Can I use muffin pan?
Victor @ Taste of Artisan says
You can try, I believe a few of my readers did. It should work, but you won't have the same results as in copper molds. Good luck!
SusanInNZ says
This is a great recipe -
I don't use beeswax anymore - my trays are the much less expensive carbon steel 9X canele pans (MasterCraft)- they don't warp and cost a lot less than copper pans and molds and no fussing with bee's wax. The crunch comes from the high temperature and resting and carefully following the recipe - though they might take a few more taps to come out of the tray.
As for muffin tins - yes but you will get muffins. Delicious muffins yes but not canele. There is too much room for the canele to spread and too much top surface area relative to the sides where the crunch happens- so the lovely custard inners will be less creamy less dense more cooked - but still yum.
B says
Hello, just sitting with my first batch in the oven. One lesson learned, one question.
Lesson learned: a 12-tin pan makes lining with beeswax/butter very difficult and I had too think a lay inside the cups. I'll be investing in the individual molds.
Question: is the 1oz of beeswax by weight or volume?
Victor @ Taste of Artisan says
I can imagine how difficult it would be, though never tried. You can try brushing the insides with the butter/wax mix, I know some (many?) bakers do, but I seem to always miss a few spots, which resulted in sticking and me having to clean the molds and re-seasoning them. Needless to say, I stopped brushing.
Individual molds are definitely the way to go. If you are serious about canele, I'd highly recommend investing in copper molds made by Matfer. That's what I've been using since 2015 and I LOVE them.
1 oz by weight.
Mark Warren says
£112 per mould 😮
Victor @ Taste of Artisan says
That's a rip off. Since you are in Europe, try ordering from Labo & Gato in France. They sell the 55mm molds for 16.9 euros - https://www.laboetgato.fr/en/moules-a-canneles/7417-cannele-moulds-copper-o-55-mm-h-55-mm-3334493404173.html. That's less than what I paid for mine 10 years ago... I think I paid $21 per mold.
b says
I must say my nonstick 12-cup mold made EXQUISITE caneles!!! After freezing the molds, I used a paper towel to rub away some of the excess butter/wax. The finished product had a light and delicately crispy exterior.
I'm going to explore ways of coating the mold more gracefully before purchasing the individual molds - mainly due to price.
Victor @ Taste of Artisan says
That makes sense. If you are happy with the results and find a good method of seasoning you 12-cup mold, then stick with that. Buying used can be a good alternative option. I bought a 12" tin-lined Bourgeat copper frying pan on eBay for $50 shipped last year. It didn't look great but the lining was still fine and and all it needed was some cleaning. Couldn't be happier with my purchase. Nothing comes close to tin-lined copper for temperature control and evenness of heating.
Tsan says
Obsessed with caneles and just tried your recipe! I only had a silicon mold and wanted to do your pour-in method so I cut the molds apart to make them individual and then coated each separately. The coating process was flawless. thank you.
Because the silicon was only approved for 450 degrees, I (sadly) had to update your recipe a bit. 450 for 30 minutes and 25-30 at 375 (this based on another recipe I found). Baked on a cookie sheet.
The good news: perfectly colored and uniform outside. And thar chewy/crunchy texture. inside, the classic pudding cakey texture. and the taste was perfect.
Other good news: no "muffin top."
Bad news: they were 2-2.5 cms below the rim when done. they rose in the oven to the top (and about 1/2 cm above the rim), but fell a long way. Evenly, but still.
Overall, a big hit and pretty proud of the results.
Victor @ Taste of Artisan says
Hi Tsan, happy for your results. I just made another batch, probably my 5th batch in the past two weeks LOL... OK, it's holidays, I am allowed :)... and this batch is almost gone. My family loves them. Every now and again I ask my wife what's her favorite dessert and she immediately says canele without any hesitation. No matter what I make, and I try to make really cool, interesting desserts, this one is always her favorite. I wish more people tried it. It's a crime that this dessert isn't as well-known and enjoyed by the masses. We need fewer cupcakes, doughnuts and muffins and more ceneles 🙂
Victor @ Taste of Artisan says
I made a 20 canele batch for New Year's Eve and they were all gone before 8pm. What a bummer! But everyone enjoyed them so much, and that is what mattered the most to me. I received requests to make more, so I am making a batch right now. No chilling time. I'll bake them as soon as the batter is ready. I hope they turn out as good as yesterday's. I've always made these with at least a 24-hour chilling time.
Emma says
My first time making them and I have to say they were just perfect I’m so so surprised!!
Victor @ Taste of Artisan says
Glad to hear that. Enjoy!
Elena says
Any idea why they might not easily come out of the mould? Could they be overbaked?
Victor @ Taste of Artisan says
Mine pop right out, some need a little tap to come out. That's how they should behave. If you are having a difficulty getting them out, that's usually because the molds weren't adequately seasoned or the butter/wax mix wasn't applied properly (I tried brushing it on and found that batter stuck in some spots, so I don't brush anymore). I think it's possible that you will get sticking due to overbaking, but I've never experienced that myself even though I tried baking longer to get a darker color during my tests. Hope this helps.
Belinda Hart says
Has anyone tried using gluten free flour? Please let me know. Thank you!
Barak says
i have and it work wonderfully, but I baked at lower temps, 220C (15minutes) -> 180C (40 minutes) (and once I had to cover with foil so it wouldn't burn too much
Lizzie says
Hello Chef, I have a tricky question. I bought a mold that has 12 cups. How do I pour the beeswax butter mixture in the mold? One or two at a time and turn over and then continue until I do 12? Help sil vous plait.
Lizzie
Victor @ Taste of Artisan says
You got it, Lizzie. That's exactly what I would do, one or two at a time. Probably one. Two may become messy. Make sure to warm up your molds and keep the beeswax very warm too, or else the wax layer will be too thick. Good luck!
Maree says
I did that today one at a time and it was really easier than anticipated. 🙂
Suzi Spinner says
The only moulds I can find are tin lined. Tin cannot withstand temperature of over 450 degrees. Please advise. Thank you!
Victor @ Taste of Artisan says
The best I can advise is to follow the manufacturer's instructions. Mine are also tin lined. I don't think I've seen SS lined canele molds. I use Matfer Bourgeat (model 340415) Canele Copper Tin Lined Molds. Never had any issues with them.
Nancy says
I love a recipe that starts out, “this recipe is a compilation of dozens of recipe trials in order to perfect the process”. It means I’ve found a winner and I don’t have to test a dozen recipes. I was not disappointed. I had close to perfect results on my first attempt at these babies.
I’ve had some beautiful copper moulds that I purchased at E. Dehillerin on my first trip to Paris in 2014. I’ve mastered many of the complicated French patisserie but the canelè really intimidated me for some reason. Every month or so for 10 years my son would ask me when I was going to make them. Finally, this year he asked for them for his birthday dinner, and I’m not allowed to refuse a birthday request.
I read the recipe through with all the notes at least twice. This morning after seasoning, coating, resting I slid the canelè into to oven with bated breath. My oven only goes to 500 degrees so I was a bit worried. They rose up above the moulds and I held my breath. No mushrooming! They settled back down after the first 10 mins. After another hour is so I took them out and they slid out of the moulds so easily! They are a beautiful shiny, mahogany colour!! And they smell heavenly!! Sadly, I have a couple with not white butts but slightly tanned butts but most are perfect.
Thank you so much for all your work to put together this concise and detailed recipe. I’m going to look like some kinda French chef tonight when I present my tray of French desserts with my shining canelè as the centre piece!! Thank you, thank you❤️❤️❤️
Victor @ Taste of Artisan says
Hi Nancy, thank you so much for the detailed feedback and the story. I am very happy that my post helped you get the results you were looking for. I love canele, there is something magical about this pastry. If you like chocolate, please try my chocolate canele recipe. It's divine. I love it too. I may be posting another canele recipe - hazelnut and aged rum... I have to see how I like it and if I need to modify it to suit my taste. So, subscribe if you haven't and stay tuned. Happy baking!
Nancy says
I meant to update you on how the canèle was received. As I mentioned, I had a large tray with seven different French pastries, macarons,
Créme brûlée
Chocolate pots de crème
Chocolate profiteroles
Flan pâtissier
Tart au citron and
Canèle.
It was a special birthday, his 30th so I worked hard. All that to say that the canèle was his favourite! There wasn’t a single one left. Everybody loved them and I did feel like some kind of French pastry hero. Again, I appreciated that I didn’t have to try a dozen recipes and could transition straight into success! Thank you again. I have a feeling I’ll be making these again! I’ll definitely try the chocolate version. Merci beaucoup.
Victor @ Taste of Artisan says
Amazing! He is a lucky man 🙂 I am very happy to hear about your success with canele. Thank you for sharing your feedback and happy baking!
By the way, please try my macarons with which chocolate ganache and let me know what you think... I think those are insanely, ridiculously good LOL
Ruby says
What to use instead of rum, not alcohol?
Victor @ Taste of Artisan says
If you don't want to use alcohol, just skip it, no need to substitute with anything. Most if not all of it will evaporate during baking anyway, leaving only a faint aroma.
Michele says
Victor,
Thank you for your in depth instruction and observations on making Canlé.
I just ordered new tins from Amazon per your recommendation.
Previously, I had used the silicone
type which never really resulted in the desired results.
Today I will make my batter and wait for my Amazon order to arrive!
I do have a question about flour.
In my pantry there is a bag of Italian flour which is very fine and used to make pasta . "00" semolina
Have you ever tried a fine flour for Canlé?
I'm just curious...
Thanks for sharing your gastronomic knowledge with us all.
Michele
Victor @ Taste of Artisan says
Michelle, I am excited for you. I think you will be happy with the results from copper molds.
About your question - I've never used 00 type flour for canele so I don't know what the difference in taste/texture would be if one used it. That said, the ratio of flour to other ingredients in this recipe is rather small, so I wouldn't expect to see a drastic difference. If I was stuck with 00 type flour and wanted to make canele, I'd go for it. Good luck!
Jess says
Hi Victor, I read some of the comments here and some people seem to be having the same issue! My canelé doesn't rise to the full height that it's supposed to be (it seems to rise to the full mold size during baking, but it shrinks back down to almost half the height) - would you know what's causing the issue? Maybe I need to bake longer for the middle section to harden enough and not collapse? Any thoughts would be appreciated 🙂 (p.s. taste is just perfect with your recipe! thank you thank you)
Victor @ Taste of Artisan says
Hi Jess, I am a bit stumped as I've never had that issue. I am guessing one of three things could have led to that: 1 - underfilling the molds, 2 - batter splashing out of the molds during vigorous boiling, 3- batter losing a lot of moisture due to excessive evaporation leading to pastry shrinking.
Do you know which of those three scenarios applies to your situation? Normally, my fully baked caneles come out about the same volume as the batter inside the molds, if not a touch larger. If yours shrink, something must be causing that, I don't know what.
So, how much do you fill the molds? Did you change the recipe at all? Are pastries dry inside? That lost volume has to go somewhere... Could be because of high temp, so maybe baking at a lower temperature could help. You could also take pictures of the all steps, including the fully baked pastry cut in half so I can see the interior. Maybe I can see better where things deviated.
Kevin says
I have a question about the temperature. The copper moulds the I could find were all lined with tin, as were the ones you recommended, and the melting temperature of tin is about 232°C (450°F). If you use a temperature of 550°F, have you had any issues with the tin melting? Perhaps there isn't enough time for the tin reach the same temperature as the oven when filled?
Victor @ Taste of Artisan says
Kevin, I've never had any issues with my molds and I've made dozens of batches. With the liquid batter inside them, IMHO, the tin won't reach the melting point in 10 minutes. I think the liquid would need to evaporate before the temps of the mold lining would start going up to reach the melting point. That said, if you are concerned, start at 450F and see how it works for you and go from there. Good luck!
Shawn says
Hi Victor! I made these and it was beautiful. The thing is, my copper moulds are not well taken cared of. How do I clean black streaks of oil? Any tips with cleaning my copper moulds?
Victor @ Taste of Artisan says
I am not concerned with some minor black streaks, I don't think you can keep them squeaky clean. The concern for me is to prevent any sticking. If the pastries come out nice and clean, it's good enough for me. However, if you want to clean them, you can wash them with warm water and soap, maybe soak them in warm water and soap solution, then wash with a soft sponge, than re-season.
amber says
In the notes section, you say to preheat the molds just until they are warm to the touch before filling them with the hot beeswax/butter mixture. But I don't see this step in the recipe method...
Victor @ Taste of Artisan says
I think that's because I put that in the notes.
petra sunner says
hello, my caneles didn't mushroom at all, and basically didn't raise ...what did i do wrong? thanks
petra
Victor @ Taste of Artisan says
Hmm... Mushrooming is something you don't want to happen. Mushrooming is a bad thing. It took me a while to figure out how to prevent mushrooming.
petra sunner says
hello again, i had about a half year of not doing Caneles. When i restarted doing them recently i was successfull with 2 batches, but then caneles of yesterday's attempt didn't mushroom, and in fact didn't raise much, maybe during baking for about 1 centimeter but when they were done and i took out of oven they were the same height in the form as the liquid-ey batter was. what could i have done wrong this time? thankyou
Victor @ Taste of Artisan says
They aren't supposed to mushroom. Did yours look like mine in the pictures in the post? I may be wrong, but what you described is how they are supposed to look... or perhaps I misunderstood you.
Nat says
Flavour and texture just like the ones in Bordeaux! I just need to get my oven settings correct as I managed to burn them slightly, so bear in mind that each oven is different and may need to spend more or less time at the high temp.
I have a Le Creuset canele tray, so I wasn't able to use your technique of pouring the butter/wax mix from one mould to the other - I found that brushing the mix into each indent using a silicone brush, then placing the tray into a warm oven for a few seconds, then tipping the whole tray out onto some old newspaper to let the excess wax drain out worked well for me. The caneles popped out easily from the tray, had a lovely crust and no excess wax.
Victor @ Taste of Artisan says
So happy to hear it, Nat. Enjoy!!!
Better than Bordeaux! says
This is just as good, if not better, than the real deal in Bordeaux. The exterior is a perfectly dark amber, and the interior is chewy, moist, and has the perfect bite. I used a canele pan from Le Cruset (not traditional copper) and they turned out great, with no mushrooming. I baked them for 10mins at 550 and then 50 mins at 375, and it was perfect.
I also did not have beeswax, but the butter did the trick just as good. I am curious to try this again with beeswax to taste the difference. I also used 2Tbsp of high-quality vanilla paste and it worked great.
Victor @ Taste of Artisan says
Wow!!! I am very happy to hear about your results. It cab be tricky to get there but once everything clicks in place and you get this perfectly baked little gem of a pastry, you realize how exceptionally good it is. There isn't anything quite like it. Be sure to try the chocolate canele recipe that I posted not long ago. It's worth it.
Beeswax, I think, is essential as it gives the pastry its distinct glossiness and aroma. The trick is to not overapply it. You want a thin layer, otherwise you may feel some that wax on your teeth when you eat the pastry. Good luck and thank you for the detailed feedback.
James Waters says
Le Creuset canele molds??? Where did you find those? All I see on the website is cake molds.
I've had ok success with the "inexpensive" canele copper molds from Amazon. Regardless, I am interested in the Le Creuset product if I can locate the molds.
Brian says
Update again:
Finally nail CANELE!Found out the perfect temperature and time for my oven! No mushrooming!
Mold: Mater 2-3/16" dia.
Time: 220 C (430 F)for 15mins, 190 (375F)for 45 mins, with fan on.
However, this doesn't work for Mauviel 2.2-in mold, which may take at least 15mins to umold (and even has white bottom).
Victor @ Taste of Artisan says
Glad to hear it, Brian. I use a gas oven now and I am finding that it bakes differently, more efficiently compared to my old run of the mill electric oven; I do the first part at 500F as the oven tops out at 500F and it works great for me, no mushrooming.
Your observation regarding Matfer and Mauviel molds is quite interesting. Clearly they are manufactured differently, and that's not a good thing for us bakers. Makes me wonder how those cheap copper molds sold on Amazon perform. I wouldn't be surprised if those are primarily the ones that can't take high heat. I messed up a bunch of my Matfer molds during a recent trial of a new recipe and had to clean and re-season them. As usual, per Herme's recommendation, I seasoned them for 20 minutes in a 500F oven and they all held up with an aplomb. I think I fully re-seasoned them at least 3 times of the years and noticed no issues. Happy baking!
Brian says
I watched many videos on Youtube and it looks like they can also yiled successful caneles with cheaper molds (not copper), which made me more confused: is it really worthy to buy these expensive copper molds?...
10 mauviel molds got damaged since I seasoned them under 500F /cry, tin layers obviously melted, so I didn't dare to season matfer molds with 500F (here is how I seasoned: 200 C for two times, one time for 1 hour, take out and rebrush oil then bake for another 30 minutes). One more thing, layers of matfer and mauviel molds seems different, mauviel has just tin layer while matfer has more.
The oven I use is Bosch built oven, since last time i baked caneles, every time I use it, I can smell the airborne grease, have no idea how to clean it...Probably won't make canele in a short while, so exhausting, lol.
Victor @ Taste of Artisan says
I can't say as I went for the real deal from the start, thinking that cheap often ends up being more expensive in the long run. Back when I was just starting out with my canele adventure, I also reviewed many sources of information and the agreement was that copper was the way to go if you wanted to get the authentic texture/taste/color. Perhaps things have changed and there are products that can attain similar results. One thing I know is that I am super happy with my Matfer molds and I would not trade them for anything 🙂
Nowadays, I would season copper molds strictly per the manufacturer's instructions as there are clearly big variances in how they are made these days. Cooking at 500F should be fine as they molds are filled with liquid batter which will prevent the molds from heating over the liquid's boiling point and it's only for 10 minutes.
Sorry to hear about your Bosch oven. I wonder why you 'smell airborne grease' after baking caneles. I've never had this issue, either with my electric (Kenmore I think) or my new basic gas oven. If you get the smell from canele linger, wouldn't that be happening after roasting/baking just about anything else greasy, like chicken, turkey, etc.? Puzzling. Too much technology in everything these days. Then again, I am not too sensitive to any potential residual smells or some grease here and there. I cook too much to keep my oven and other appliances perfectly clean all the time. LOL
Happy baking!
Brian says
So nice that I can talk about baking with someone in detail.
Will dig more on this website.
/shakehands 🙂
Victor @ Taste of Artisan says
You and me both 🙂 Anytime. Happy baking!
Christina says
So I tried your recipe this weekend and first of all: They are deeeeelicious! I love your recipe!
I have some copper molds (just a few) and bought a silicone mold as well.
The canele made in the silicone mold were not really dark and just a light crunch - still super tasty though.
The one I made in my copper molds are also not that dark and crunchy - I don`t know why.
The batter rested for almost 72 hours, so aromatic.
Maybe someone has an idea why they weren't that dark? I baked them 10 minutes at 250 degrees and 50 more minutes at 190 degrees.
Will def try again!
Victor @ Taste of Artisan says
Christina, glad to hear it. About the dark color, P. Herme said once that canele are done baking when they are black. I think baking them to that color may involve some experimenting with your oven. Different oven cook differently, so there isn't a universal advice. Generally, you could increase the temperature (e.g. 200 instead of 190), increase the baking time (may or may not work), place them closer to the heat source (move lower if the heating element is at the bottom), or use convection during some part of the baking process. I am sure one of those or a combination will give you the desired results. Good luck!
Christina says
Thank you soooo much for all of your time and effort sharing this and also answering to all comments. Wow! I will try your recipe soon and give you a feedback after that. So excited!
Victor @ Taste of Artisan says
You are very welcome and good luck!
Jessica Dowdy says
I am trying your recipe for the first time this weekend and I live in Colorado. I am so afraid of this failing from baking at high altitude. Any recommended adjustments for this recipe? Thanks!
Victor @ Taste of Artisan says
Sorry, I have no experience with baking at high altitudes. I hope someone who does will chime in. Good luck!
Jessica Dowdy says
Additionally, how do you know when the canele is done? It gives baking times and says they vary, but doesn’t specify how to tell if they’re done.
Victor @ Taste of Artisan says
I would start with what's in the recipe and adjust if needed. P. Herme says they are done when they are black. Good luck!
Erica says
I also live in Colorado up in summit county at 9000 ft. Did you had any success?
Aimee says
Hello,
I'm keen to try your recipe, but I have a question about the beeswax. Can you taste it when you're eating the canelé? Or does it give them a strange texture? Is it definitely safe to consume? Sorry for all the questions, I've just never known it to be edible.
Thank you!
Victor @ Taste of Artisan says
Hi, I am going to resist talking about the safety of eating beeswax as I am not an expert on that, but, according to Healthline, all of the honeycomb can be eaten — including the waxy cells and raw honey they contain. I suggest you read their article on that. As a kid, one of my favorite treats was eating the whole honeycomb. IMHO, it's insanely delicious! We still buy it every now and again.
Yes, you can taste a little bit of beeswax when eating caneles, and that adds to the unique taste of this pastry. If you coat the molds too thick, you may even get some wax stuck to your teeth, but if you are careful and coat the molds with a very thin layer, that won't happen, but you will feel/taste its presence. This pastry is like no other. Once I tried it, I was hooked forever.
Eddie says
Hello, question: salted or unsalted butter?
Victor @ Taste of Artisan says
Hi Eddie, it's unsalted butter.
Eric says
Thanks so much. I've made these a couple of times and they've come out well. They are the ideal I shoot for: chewy-caramely crust and a creamy interior. I like the custard-like approach of whipping the hot milk into the yolks. It's a technique I'm familiar with from making ice cream.
Thanks for providing such great info and insight.
Victor @ Taste of Artisan says
You are very welcome. Glad my post helped, Eric. Enjoy!
Bea says
I love your recipe. They come out perfect every time. I use copper molds I've never tried anything else. I use a brush & just paint the butter/beeswax on. I don't heat the molds up prior & it works fine. When baking I just bake at 425° for 50 to 60 minutes, usually just 50. I don't move the temp up or down. I find they come out perfect doing it that way & I get a beautiful rich dark brown crispy exterior. I'm so curious about the chocolate cannelé recipe! I've definitely got to try it. Thanks for sharing such wonderful recipes.
Victor @ Taste of Artisan says
You are very welcome!
Bea, I seem to get a better coverage and no sticking when I pour the wax instead of brushing it on. I get a bit of sticking especially when making chocolate caneles. I tried brushing, seemed to like it at some point, but then went back to pouring. No sticking whatsovever. I know many professional pastry chefs brush the wax on, so it must be my brish or technique, or both. I guess the point is to use whatever works for you. There are many ways to do a perfect anything, so we pick what suits us. Oh, I heat my molds because if I don't, they coating is too thick for my liking. When I warm them up, I get a very thin and even layer. Happy baking!
Cynth says
Thank you for this! This is a fantastic recipe! They came out perfect on the second batch. First batch burned because of the temp and time. My oven needed less temp/time. Second time it was absolutely great! Like professional! Thank you
Victor @ Taste of Artisan says
Glad to hear it. Make sure to try the chocolate canele recipe - they are scrumptious. I made a 12-piece batch today and it was gone in 20 minutes:)
James Waters says
I baked your version of caneles last night. As I have never had one baked by a professional, I am not certain as to what they are supposed to be, particularly as to texture. I've used a different but similar recipe in the past with ok results by my standards ... meaning that the taste was good and the form held up. But, the difference that I noticed between the recipes was the texture of the exterior. In the past, I got more of a chewy experience for the exterior using the other recipe. I definitely got "crunch" using your recipe. Creamy interior. And, I had only one "white a$$" situation, LOL.
What rum do you use? I used O.F.T.D Plantation. I'm looking for more rum flavor so next time I'm going with Myers Dark. Thoughts?
Victor @ Taste of Artisan says
Big thumbs up! Glad to hear it about your success and that you liked this recipe.
I have used a few different brands and have a couple on hand that I use. Myers's Original Dark is a very good one. Rich flavor. Goslings Bermuda Black Seal is another one that I like. It has a very rich butterscotch, caramel, and vanilla flavor. Try adding rum just before baking, that seems to leave more residual flavor.
petra says
Hello again, another question please-
it seems the wax/butter spills out of my moulds - because after the caneles are baked there is a pool of brown greasy stuff in the tray bottom.
Likely the butter/wax has turned brown from the heat.
Can this be collected and re-used next time, or does it have to be fresh wax/butter mix in the moulds only?
thankyou
Victor @ Taste of Artisan says
Too much wax/butter. Next time, try to coat very lightly. Make sure to keep the molds warm, almost too hot to touch so the layer of wax doesn't get too thick.
I reuse but only what's left from coating the molds before baking. Anything that's been baked in the oven is wiped off and discarded.
James Waters says
I see that there is no salt in this recipe. Is that correct?
Victor @ Taste of Artisan says
Correct.
petra sunner says
Hello, getting back here because i saw your newest post about chocolate canele....i WANT to try these, but i guess i have to get my classic canele right first, i posted here the process of making my first Caneles, also the results, but it seems it never got published. Didn't keep the text of my post so cannot go back to it for find out what i am doing different now. In the meantime i tried various other ways, but that very first try turns out was the most acceptable result. Since then i just have not gotten any crunchy outside again. Had some burnt tops, exzessive mushrooming, and most times my canele are in the oven for 100 minutes until they are a dark brown outside. Always using the same oven and always putting pizza pan underneath the baking tray, but i changed from my highest possible temp to 450 two times baking them. I am a little at a loss as to what i can do to get a good outside, the inside is always nice!
Victor @ Taste of Artisan says
Hi Petra, sometimes it takes a little experimenting to get it right. How your oven bakes could make a noticeable difference. I did not see the post you are referring to, sorry to hear that it got lost. We get a lot of spam, it could have been lost in the spam, or didn't go through.
I tell you what, having made both recipes dozens of times, I feel that this chocolate canele recipe is easier to make. Why don't you try this one and see how it turns out for you. Good luck!
Louise Allen says
I apologize if this is a duplicate comment. I tried to reply your response but it does not show under comments.
First, is it ok to use yellow beeswax. The foodgrade beeswax I have found is yellow.
Second, I am the one who asked about the chocolate canele…… I am hoping to make it for Sunday …….. any chance it could please be posted today. If not, my guests will have to have a traditonal canele and they will still love it!
thanks! Louise
Victor @ Taste of Artisan says
Hi Louise, no worries about the duplicate comment. We get a lot of spam so I have to review comments and manually approved them as the anti-spam software still lets a fair amount of spammy comments through or removes good comments. Nothing is pefect.
Yellow beeswax is perfectly normal, that's how mine looks and, to be honest, I don't think I've seen natural, food-grade bees wax that's white.
About posting the chocolate canele recipe, I need to go through my notes, write it up, make it and take good pictures - I won't be able to do it until next week. But I am sure your guests will love the traditional ones and will look forward to trying chocolate canele next time. Good luck!
Bea says
Hi Victor, I get my food grade to beeswax from Amazon & it's always white. I was buying the bar until I decided to buy the tiny little pellets...GAME CHANGER! Those little pellets are awesome, no more shaving off that beeswax. Try them & you'll never go back.
Bea
Victor @ Taste of Artisan says
HI Bea, thank you for the tip... I never questioned this, I would just buy what they have at the local health food store. I am ok with the yellow color but let me tell you, the shaving is a major workout and a mess on top LOL I could totally live wihtout it. I am going to try the pellets. Thank you.
Victor @ Taste of Artisan says
Posted. Just in time if you still want to serve them on Sunday. The batter for these requires only a 12 hour rest.
Louise says
Love this recipe - bought the molds and love to impress my friends with a dish they have never heard of! I follow all of your tips and tricks! Any suggestion on how to make them chocolate?
Victor @ Taste of Artisan says
Good luck! I have a great chocolate canele recipe that I've been meaning to post... Glad you asked.
Cicka says
Da li možete gospodine da napišete kratko uputstvo i jednostavno u vezi pod 1. prve upotrebe modlica,pod 2. šta uraditi nakon pečenja sa modlicama pod 3. kako premazati i ostaviti do sledeće upotrebe i pod 4. kako ih tada upotrebiti , najjednostavnije što može biti , pod 1, 2. 3. i 4 . Ovo mora da je fantastično i prvom prillkom ću probati jedini je problem što nemam takve kalupiće, dok Vi napišete to kratko uputstvo u vezi premazivanja dotle ću ih nabaviti , puno pozdrava iz Srbije .
Victor @ Taste of Artisan says
Hi Cicka, copper molds need to be seasoned before the 1st use. What you do is wash them with a warm water with a little bit of soap to remove any oils left from the manufacturing process. Dry with paper towels. Next, brush them inside with some butter and put in a hot oven for 20 minutes. Use the temperature recommended by the manufacturer. After that, let them cool down, wipe with paper towels and put in storage until ready to use. This is your #1.
#2 - After baking, simply wipe with paper towels and put in storage. That's all.
#3 - Before baking the next batch, coat them with a mix of butter/wax, as described in the recipe instructions.
#4 - After coating with butter/wax mixture, pour in the batter and bake. Very simple.
Good luck!
Shodai Enters says
Best canale, so good!
Victor @ Taste of Artisan says
Enjoy!
petra sunner says
just made the batter to keep in fridge for at least 2 days, as recommended by you. the milk i poured into the eggs and sugar mix wasn't boiling hot, just very warm. My batter is more liquid than it would be if the eggs had thickened the milk (custard). is that ok? or should i warm up the mix, stirring, wait for thickening then remove from heat source?
Also i figure from your recent reply to one of my questions that when you or Herme talk about putting butter into the molds what you mean is the butter/wax mix. At no point do you line the molds with just butter, correct? (or even clean with butter as Herme's first sentence made me think is meant).
Victor @ Taste of Artisan says
The milk should be hot, but not boiling hot. I bring it to simmer, infuse with vanilla for two minutes, then begin tempering the eggs with it.
If the batter is too thin because the milk wasn't hot enough when you added, then yes, I would raise the temp to thicken it.
Correct, every time you bake you coat the molds with a mix of butter AND wax.
petra sunner says
another question if i may:
below your recipe you have 2 notes, in note 1 it says this:
"Pierre Hermé recommends that before you use your copper canele molds for the first time, clean them, and then season them by coating them with butter and placing them for 20 minutes in a hot oven - 250° C (500° F) or more. Remove them from the oven, clean them with a paper towel while they’re still hot, and allow them to cool before using. Never wash the molds, simply wipe with a dry cloth or a paper towel after each use."
So cleaning before first use is NOT the same as seasoning the mold (with butter and wax). But why should i coat them with butter after cleaning the molds, then place the cleaned molds with butter coating into the oven....AFter they come out of the washing i am supposed to wipe the butter inside off when they are still hot...? mmh. and then also 'never wash the molds... So in the first sentence when hermes/ you write clean before first use, that's not WASH them,.....but wipe with cloth.
I am somewhat confused, maybe you can elaborate on this note a little more, thanks so much
Victor @ Taste of Artisan says
When you first get the molds, they may have the residual oils from the manufacturing process, it's a good idea to wash them with soapy water, dry, then season as per your molds' manufacturer instructions. After using the molds, wipe them with paper towels. Washing them at this point will remove the seasoning which helps preventing sticking. Hope this clarifies it.
petra sunner says
Thankyou once again for your time to advice, I read most comments going far down to ALL comments. I thought you and others just use different words for one thing and seasoning=lining=coating. Then i read your post from july 23 2020 you say seasoning must be done before coating with wax/butter.
Then i googled 'seasoning molds' and things became eye opening. Seasoning is JUST butter (or at one point it was discussed to use vegetable oil) and should be done to many pots and pans, - what i still don't know, as there are no manufacturer's instructions with my molds, is on the HOW-to season.
As i had already coated the moulds with the butter/wax mix i removed that again. then brushed the molds with melted butter, and after reapplied butter wax mix.
with that last step i must say that at the bottom of the molds the mixture pooled, although molds and butter/wax all was pretty hot....i doubt my canelles will be being nicely shaped at their tops. but if i find the time i will give it my first go tomorrow.
Victor @ Taste of Artisan says
You are welcome. As I explained before, seasoning is just a hardened oil (butter, vegetable oil, etc.). Canele molds are typically seasoned with butter. Cast iron pans with veg. oil. You rub them with a bit of melted butter and 'cook' empty in the oven. The oil hardens and creates a non-stick lining.
Good luck with your canele. Let me know how they turn out. Don't worry about pooling at the bottom - next time turn them upside down after coating with butter/wax mixture- it will all melt during baking and the batter will fill the mold and the shape will be just fine.
Wendy says
Thank you SO much. I have only eaten them once from a market in Australia and loved them and was determined to try them. I bought copper moulds at great expense from France, but didn’t know how to make them. The seasoning and then wa ing is fiddly BUT SO worth it! Your instructions were so clear. Thank you again. I love them.
Cheers from down under, Wendy.
Victor @ Taste of Artisan says
Glad to hear it, Wendy. Enjoy! I agree, this pastry is so worth the effort.
Victor @ Taste of Artisan says
I have another French pastry that I absolutely LOVE. I've been meaning to post my favorite recipe for it for ages... ok, will try to do it in the near future.
Lee says
Hei
My oven unfortunately can not reach 270 C ? Max 230 degrees 🙁 any tips? thanks
Victor @ Taste of Artisan says
Not much else you can do here but to use 230. It may work. Good luck!
k Liang says
Perfect recipe and baking tips
Victor @ Taste of Artisan says
Thank you. Enjoy!
petra sunner says
sorry, i reposted just now (oct 15) an earlier question,but meant to ask this:
Do i understand correctly that on top of seasoning the molds one has to still cover them inside with some butter before each baking session?
hopefully you can remove the mistankenly doubly posted comment - i couldn't delete it.
Victor @ Taste of Artisan says
No worries. Yes, you need to coat the mold with a butter/wax mixture. It's covered in the recipe so don't worry, you won't miss anything. Good luck and happy baking!
Coatney Carson says
Successful first attempt using this recipe and tips! Thanks!
Victor @ Taste of Artisan says
Good luck! Let me know how they turn out. Would love to see some pics too.
petra sunner says
hello - coming back to 'seasoning' and "re-seasoning".
Do i understand correctly
a) seasoning is the process of putting the butter/wax misture inside the molde
b) this outlasts (u
sually) the baking, in other words the non-stick film of butter and wax inside the molds should last several baking sessions. Thus the seasoning doesn't have to be done for each baking.
thanks again 🙂
Victor @ Taste of Artisan says
You are absolutely correct. In fact, every time you bake the molds will get more seasoning from the butter you are going to coat them with before baking. That said, things happen and you will get a bad batch, or a few bad pastries, where the pastry will get really stuck to the molds, which will require thorough cleaning, which will remove the 'non-stick film', which will require re-seasoning. Same as cast iron pans. Good luck!
petra sunner says
so to understand it precisely: you say "...every time you bake the molds will get more seasoning from the butter you are going to coat them with before baking".
so DO i coat the molds every time before baking? - and with butter ONLY (no additional wax)? because the first time seasoning with butter/wax mix outlives many times of baking. But every baking process needs additional butter coating.... Correct?
Victor @ Taste of Artisan says
Correct. You season once, then coat with butter/wax mixture every time you make a new batch, as per step #5 of the recipe.
Queenie Lim says
Hi, Victor, I am Queenie from Taiwan and have been baking canele since last year. The first, second, and third bakes came out just perfect until I baked recently and came out sticking into my copper molds. I have read comments already relating to why batter sticks on the mold and how to season them. As per my canele mold instruction, says, to bake for 10 minutes with butter at 100 degrees Celsius and then remove from the oven clean with a paper towel. Is this instruction too short time for the baking process to let the oil coat the mold? As you had mentioned "Pierre Hermé recommends that before you use your copper canele molds for the first time, clean them, and then season them by coating them with butter and placing them for 20 minutes in a hot oven - 250° C (500° F) or more. Remove them from the oven, clean them with a paper towel while they’re still hot, and allow them to cool before using". Or can I follow Pierre Herme instructions on seasoning the molds?
Victor @ Taste of Artisan says
Hi Queenie, glad you've had success. Canele is a divine pastry.
About seasoning your copper molds, 100C/212F does sound too low to me and 10 minutes is a very short time. That said, I don't know the characteristics of your specific molds so I can't really advise you. Perhaps the manufacturer just wants to be a very safe side. You see, I've seasoned my molds at least once, some were seasoned 2-3 times due to mishaps. I've always done it at 250C / 500F for 20 minutes and never had an issue. I've also heard people having problems with tin lining melting at high temps. If I recall correectly, some molds come with a recommendation not to season at higher than 450F. The recommendations are all over the place. So, back to your question. I'd start with what the manufacturer recommends and see if that does the trick. Good luck!
Ann says
Hi Victor -
Your detailed information, tips, and recipe appear second to none. I can't wait to try your recipe. But first, I need to purchase the canele tins. I would appreciate your thoughts on oven temperatures, given your 550* oven setting.
From Mauviel's website: "Maximum temperature. Copper products with tin interiors can't exceed 440°F. Tin starts to melt at approximately 445°F."
Do your tin linings remain intact because you turn the oven temp down after 10 minutes?
Many thanks!!
Victor @ Taste of Artisan says
Hi Ann, I use Matfer molds and they've held up well to dozens of batches. Back when I was starting to make canele and went through a ton of resources to figure out how to fix the mushrooming problem, I did not see high temps being an issue for anyone. Maybe the molds 10 years back and older were made differently. Anyway, you don't want to ruin your investment. I'd say go by what the manufacturer recommends and see how that works for you. You can make adjustments later to address any issues. You can also try the tips some of my readers posted on how to eliminate mushrooming even with lower oven temps. Good luck!
John Taylor says
Hello again,
I'm getting there. I found that the butter with the wax caused a tremendous amount of smoke. For me: no butter, no smoke! With that solved, I still have two irksome issues: 1. And most importantly, the canelés always stick at the shoulder and I have to run a wooden skewer all around to break the attachment near the bottom of the mold for them to eventually release. And 2. The canelés do not really have the nice form of the mold. The sides seem more uniform than fluted. I am using Mauveil molds, which are not as angular as Matfer. Would that be an issue? Been at this for a couple of weeks and could use your help!
Victor @ Taste of Artisan says
Hi John,
I wonder why you are having what you descibed as 'tremendous amount of smoke.' That's ususally not an issue. I'd try to fix that as lack of butter is probably what is causing the sticking. As far as issue #2 goes, I'd like to see some pictures. If you could email them to me, that's be great. I will reach out to you.
Melissa Lin says
Hi Victor,
I had tried quite a few caneles recipes without success until I found yours. Thank you.
I just baked the latest batch in a new oven and unfortunately, it burned horribly. (still learning about how hot the new oven gets, and hot spots in the oven, etc) There is quite a bit of stuck on canele in the copper molds. I was wondering if it would be ok for me to wash the molds in warm soapy water and season them again?
Thank you.
Victor @ Taste of Artisan says
Hi Melissa, sorry to hear about your mishap. I would definitely experiment a little and try with lower the temperature and/or have a shorter bake time. Checking the temps with calibrated BBQ thermometer (with a probe) would be a good idea. I've never had a problem with canele burning but I did have a few odd batches where the batter got stuck in some molds. To fix that, I poured hot water in them, let them soak a little, brushed with a tooth brush, then washed them with a slighly soapy water and rinsed well. You will need to season the molds again otherwise the pastry will be sticking to them. Good luck and I hope your next batch comes out perfect. Happy baking!
petra sunner says
hello, i love the way you describe your path to perfect canneles, teaching and encouraging at the same time.
Are the ingredients in your recipe for 20 or for 6 about 5cm high molds?
Also: i heard somewhere that only egg yolks should be used, but you use 2 yolks and 2 eggs, ...Can you comment on that please?
Victor @ Taste of Artisan says
This recipe is for sixteen 55mm molds.
Adding egg whites produces a sturdier pastry that helps achieve successful unmolding. Good luck!
John Taylor says
Hi, me again, Followed your recipe exactly. Seasoned my Mauveil molds with butter as per the company's instructions. First batch was pretty good...No mushrooming. Some wax/butter poured out as I tried to release the canelés. Several were very difficult to release from the molds and I had to slide a wooden toothpick down the sides. Overall the crust was a bit heavy (maybe 1 hour total is too long in my oven?). They seemed a bit shrunken - is this normal? Thank you for your great work - I never would have tried this without your support!
Victor @ Taste of Artisan says
Hi John, glad my post helped you attempt making this delicious pastry. It's hard to know what you mean by heavy. This isn't you typical pastry and the crust isn't your typical pastry, that's why I love it so much. I believe it was P. Herme who said that this pastry is ready when it's practically black on the outside. No, 1 hour shouldn't be too long. A bit shrunken - hm... I don't know about this one, mine don't seem to shrink much at all as you can see in the pictures above. But what I know for a fact is that this pastry can be a bit tricky to make and and it took me many batches to get it where I was happy with it. I'd recommend practicing and making tweaks until it's perfect for you. I think that's the best way. Good luck and happy baking!
John Taylor says
HI, Just bought some copper molds from Mauveil and am ready to season them and start baking. Your information looks like the best I've found. One question: Mauveil says not to go above 230˚C as the melting point for tin is 231˚C. I suppose that with the molds and batter chilled, the tin would not get too hot after only 10 minutes, after which we drop the temp to 375˚F. Is this correct? Thank you for your thoughts!
Victor @ Taste of Artisan says
John, that's exaclty what my line of thought is and I've never had any problems with any of my molds. Even when the batter begings to boil, it won't exceed around 100C/212F until most of the water evaporates. Until then, the heat transfer between the tin/copper won't allow the tin to exceed the boiling temperature by much. And it's only for 10 minutes. My molds even even took 20 minutes of seasoning at 250C/500F like champs. Some of them I had re-season so I did it twice, no issues.
That said, if you don't feel comfortable, don't exceed the recommended temperature. Try baking at the lower temp and see if you are having issues. You may also try the other tips recommended here before trying the higher temp.
Good luck!
John Taylor says
Thank you!
Victor @ Taste of Artisan says
You are very welcome!
petra sunner says
which part of the baking process do you call 'seasoning' pease?
Victor @ Taste of Artisan says
Seasoning is done before and separately from baking. You season, per your manufacturer's instructions, to create a non-stick film inside the molds to prevent sticking.
Julia says
Hi Victor, I apologize I posted earlier without scoring the stars. As I said after researching for a couple of years on Canneles I found your site. Your explanation was wonderful and without a doubt I plan on making your recipe. I’m still a little nervous and also waiting on my vanilla beans to arrive.
I did ask if you know of another recipe that uses the butter and beeswax combination. I’m just curious.
I also asked if you ever have put your mind and hands to perfecting Kaiser Rolls.
Thanks for reading. I hope my post is up to the standard for posting
Victor @ Taste of Artisan says
Hi Julia, LOL, you don't need to apologize for that, I respond to all comments, only simetimes not as quickly as I would like as other things get in the way. I responded to your questions in the prior response. Happy baking!
Julia Uz says
Hi Victor. I found you when I was researching Canneles and can’t wait to make them from your recipe.
However I have another question. Have you ever set your mind and hands to making Kaiser Rolls? They are my favorite but I think my home oven may be hampering my attempts to get bakery results.
Also are you aware of any other recipe that utilizes the beeswax and butter mixture?
Thank you in advance for reading this.
Victor @ Taste of Artisan says
HI Julia, I have a good Kaiser roll recipe somewhere in my notebook, but I haven't really made it in a long while. I may post it someday. No, haven't really encountered any recipes othere than Bordeaux cannele that use butter/beeswax. Happy baking.
don says
This is by far the most thorough and complete recipe I've found for making Canelés. I appreciate your easy to follow, and complete, instructions. I've made them several times, but usually with abysmal results - lacking in every way. These are prefect in every way!
Thank you so much!
Victor @ Taste of Artisan says
Don, thank you for the kind words. I am glad you are happy with the results. Enjoy!
russell irving says
I only discovered the joy of Cannele's in a french patisserie in Switzerland while visiting my son for my 60th birthday when they offered one as a free aside to our order. I was hooked and immediately started researching how to bake them, including ordering 12 authentic copper moulds from Labo&Gato in France. I just wanted to pass on my gratitude for your generous sharing of your experience and tips, which I followed to the letter. It was slightly stressful given all the potential pitfalls, I hardly took my eyes off the oven as I watched with immense relief as the butter and beeswax bubbled and the caramalized mixture slowly formed - inside the moulds! I am now sitting down to enjoy my first home baked Cannele back in Australia!
Victor @ Taste of Artisan says
You are very welcome, Russel. Thank you for your feedback and the kind words. Enjoy!
Nikki says
Can I make this with vanilla bean paste instead of the vanilla bean method you have listed? They're very hard to find where I'm at but I keep VB Paste regularly!
Victor @ Taste of Artisan says
Vanilla paste of extract will do just fine. Happy baking!
Eli Becker says
Spectacular recipe. I followed the recipe to the letter BUT used the Chefmade 12 cavity carbon steel non stick mold instead of Matfer individual molds. I also simply sprayed with Pam rather than trying the melted bees wax/butter coating. AND, because my pans box said the highest permissible temp for the Chefmade pan was 450F, I did 10minutes at 450F (not 550F) before dropping to 375F for the bulk of the bake.
I let batter age 36 hours and then 4 days. Both batches were perfect!
No mushrooming. Great color. Great crunch outside and custardy inside. A wonderful recipe and I hope my success was not just beginners luck. Will be making again and for the rest of my life! Big hit with discriminating eaters.
Victor @ Taste of Artisan says
Thank you for detaialed feedback, Eli. Glad to hear abour your success. Enjoy!
Frances says
I just baked my first attempt in an oval muffin tin and without the beeswax (sorry!). They came out really nice, though I have no point of reference.
No white butts, no mushrooming, crispy exterior with fluffy custard inside.
Thank you so much for the recipe!
Will share with a colleague who have been raving about caneles. Fingers crossed!
Victor @ Taste of Artisan says
You are very welcome. Enjoy!
Kat Brown says
I noticed that with your recipe for Portugese Custard Tarts you included the quantities in tsp and cups as well as grams. Is it possible for you to also do that with this recipe? Thank you!
Victor @ Taste of Artisan says
Kat, measurements in cups and spoons are very impreciese with potentially big variations from one to the next. I suggest weighing your ingredients for all baked things, it makes a huge difference. I included a US Customary system conversion but I stayed with ounces where there could be a meaningful variation.
Surajkumar Madoori says
Thank you for this recipe! I'm preparing to attempt it and had questions about the molds: the mauveil mold has a temp limit of 450 F at which point the manufacturer says the tin melts. I know you use matfer, but was the melting point of the mold ever a concern with respect to your recipe? Especially with the initial bake of 10 mins at 550 F?
Victor @ Taste of Artisan says
I suggest following the manufacturer's instructions. IMHO, the first 10 minutes is where the molds are filled with cold liquid and it's highly unlikely that the temperature of the liquid and the mold would get over 450F in those 10 minutes. I don't know how Matfer molds are different from Mauviel, but I've never had any issues baking at these temps and I've seen many bakers use the same approach by starting at higher temps without any issues. But, if the manufacturer instructs against baking at above 450F, I would suggest that you go by what they recommend. Hope this helps.
Yvette Carling says
Hi. Thanks for sharing your recipe, experience and tips.
I’m preparing to make these delectable bites, after falling in luv🥰over them in France! Never tasted anything like them and they made my heart go pop!
Have you experimented with different dark rums, since it’s such a key component? Unless mistaken, Rum isn’t generally associated with French cuisine, further adding to the mysterious origin of these precious bites. Did a convincing charming Jamaican pirate or explorer impress the Boulangeries or nuns?! That could add a neat wrinkle to the tales, eh?!
Which dark rum have you used?
Sincerely,
Yvette Carling
Victor @ Taste of Artisan says
Hi, I can't recall what I was using and I can't go luck up as I am out...;) yeah, I use it a lot in my baking and neeed to go buy more. That or cognac and brandy. Nothing fancy. But I fee like they do add flavor if when not cooked or not cooked a lot, or enhance the flavor of other ingredients. There's been a lot of discussion on that in the comments below, can you actually taste the flavor of rum after such intense baking. Happy baking!
El says
I’ve been wanting to make canelés for years and finally decided to go for it!
They turned out absolutely PERFECT using this recipe- I can’t believe I made them!!
My oven doesn’t go so high, but I did 10 mins at 250c then down to 190c and no mushrooming, or white butts!
Thank you for such a great recipe. Looking forward to making them again.
Victor @ Taste of Artisan says
Happy to hear it. Enjoy!
Brian says
One more thing:
The last reciped I used is almost the same as this recipe, and I couldn't agree more on t his, lol:
Most canele recipes are fairly similar, to the point where they look practically identical. What differs is how you mix the ingredients and how you bake your caneles. I am convinced that the baking temperature was the biggest success factor for me.
Victor @ Taste of Artisan says
Glad to hear it. Enjoy!
Joanna says
Hello.
Do you use salted or unsalted butter?
And what type of milk?
Thank you.
Brian says
/thumbsup and /shakehands
This article is definitely helpful because I've went through like exactly the same:
Firstly, I started with 230 C but there was still mushrooming and problems
Then I thought could it be because of some pressure problems(maybe too high) or temperature was too high? So I lowered the temperture, folded a piece of towel and put it in the oven door gap(=_=), also tried taking canles out of the oven (only a few times...) as soon as rised too high, jesus, mushrooming, white butt, all of these "solutions" didn't work. I almost spent a whole day doing these stuffes last last Sunday, ending up like this really frustrated me.
Last Sunday, I repeated the steps above, taking caneles out and putting them back in for like a thousand times...at last, they didn't rise too much, and result was barely satisfying. With remaing batter(about 2 caneles), I preheated the oven with 270 C and started baking with 250 C for 15minutes, hooray, no mushrooming! after 45 minutes 190 C, some of them had white butts, i put them back in and baked for another 10-15 minutes, white butts disappeared.
However, I kind of suspected that tops of the caneles were not baked enough, maybe because i placed the baking tray on the lower layer? And color of canles sides seemed like not consistent enough, maybe because I didn't turn on the fan or turning the baking tray 180 degrees or something?...
So I'm gonna try again this Sunday, the 3rd time to figure out how to make a perfect canele...Hope the stubborn me will find the answer...
Victor @ Taste of Artisan says
Thank you for the detailed feedback, Brian. I like reading about other bakers' experiences. Yes, if you oven is bottom-heating, you will get poor baking/browning of the top part if baking on the lower rack. I personally bake my caneles in the upper part of the oven. Convection can help as well. Happy baking!
Victor @ Taste of Artisan says
Thank you for the detailed feedback, Brian. I like reading about other bakers' experiences. Yes, if your oven is bottom-heating, you will get poor baking/browning of the top part if baking on the lower rack. I personally bake my caneles in the upper part of the oven. Convection can help as well. Happy baking!
Joe Sotham says
I have copper molds and have made 1000s of cannelé over the years. I use almost exactly the same recipe and always on the hunt for improvements. This is the best description of the process I have read online. Copper molds, beeswax, and resting the batter are critical non-negotiables. As well the two problems and solutions are unique to this recipe and spot on.
The only addition is that I pour the batter through a sieve before resting.
Victor @ Taste of Artisan says
Glad my post provided new information to you, Joe. Thanks for the tip about the sieve. Happy baking!
Jacque says
Brilliant recipe! Love all the tips. This is my 3rd time making them and they are PERFECTION!!!!!
Victor @ Taste of Artisan says
Enjoy!
Sarah says
Thank you so much for this recipe and all the very useful notes! I haven’t tried it yet but absolutely plan to once my molds arrive. You’ve been so generous with your insights and I feel so lucky to - hopefully - not have to go through all the trial and error, on account you having done it for us. Thanks, again! Sending you lots of good (canele) karma;)
Victor @ Taste of Artisan says
HI Sarah, thank you for the kind words. I will be very happy if you succeed on the first try. Let me know how they turn out. Good luck!
Tarah says
Which molds did you buy and where did you get them?
Jack says
Hi, surely heating the moulds to 250C would melt their tin lining since tin’s melting point is 230C. Is that a possibility?
Victor @ Taste of Artisan says
Jack,
Pierre Herme recommends seasoning at 500F/250F for 20 minutes. This comes from THE MAN himself. I don't know any better than that. I've also seasoned this way the 8 molds I got here from Amazon, they looked like Matfer, and the additional 12 canele molds that came from Bordeaux, France. They were no-brand, generic tin-lined copper molds from Bordeaux, but they look identical to the 8 Matfer molds I got here. Not a single issue. I've also messed up a batch after which I had to soak and wash a bunch of those molds with soapy water and a brush, and re-season. No issues.
I can't advise any more on this other than what P.Herme says and from my experience. It's possible that not all molds are made the same, or even the same brand changed something in the manufacturing process so the molds are less heat tolerant, I don't know. It's best to reach out the seller/manufacturer and ask them for the best way to season their molds. Good luck!
petra sunner says
what is meant by 're-season' the mold?
Victor @ Taste of Artisan says
Meaning season again. You don't normally have to do it. I did it because I had so clean off stuck pastry bits so had to season again to re-store the non-stick layer.
Mohamed says
Is there ant substitute to rum?
Victor @ Taste of Artisan says
Mohamed, you can skip the rum without any ill effect, many people told me they never taste it in the final product anyway. Or you could substitute it with your favorite flavor essense if you'd like some fragrance. Good luck!
Erin says
How many does this make? I can’t find where it says it on the recipe. Thanks!
Victor @ Taste of Artisan says
It's at the top of the recipe card - servings - 16. Enjoy!
Emily says
If I have the 4.5 cm molds (one size down from the 2inch) do you have any recommendations for timing adjustments? Thank you so much for this post!
Victor @ Taste of Artisan says
I can't be sure as I've never tried baking with that size, but 45mm is not much different from my 55mm so baking times should be close. I'd start the same way and watch them closely the first time, checking for doneness 10-15 minutes earlier and go from there. Happy baking!
Lena says
Hi, do you bake all 20 moulds at once on two baking trays, or do you bake them in two batches of 10? Thanks!
Victor @ Taste of Artisan says
All 20 at once on one large baking sheet, I believe it's 20" by 16".
Bea says
Hello, it's easier to paint the warm beeswax & butter into the cold molds then add the batter & bake. I make these almost weekly & they're so easy. I don't use that much sugar & I got the recipe from a little French chef many years ago who only used cake flour. Try it, you'll be pleasantly surprised.
Victor @ Taste of Artisan says
Hi, thanks for the input. There are lot's of techniques for sure.
Cyrus says
Wow! You have done a lot of research. Thanks for that!
I had 2 questions:
- would the temperatures and timings be the same if I use a silicon mold?
- what kind of milk do you use (2%, 3.5%…)?
Thank you so much.
Victor @ Taste of Artisan says
Can't really comment on using silicone molds, perhaps someone else can. I use 2% milk.
Chris says
I use silicone molds and the timing fits for me. 10 min at 250°C (max my oven is capable of) and then 50 (to 55) min at ~190°C.
However, I feel that for silicone molds it is of crucial importance that the canele cool down a few minutes before getting them out of the molds. And I avoind knocking them on a hard surface, otherwise the get condensed (especially when they are still warm).
Diane says
OH. MY. GOD!
I have been making Caneles for 7 years and have ALWAYS struggled with them jumping out of the molds! Following your tip, I heated my oven to 550, adding a baking stone covered in foil and NO JUMPING!
Seriously, you have absolutely made my day...maybe my year!
Victor @ Taste of Artisan says
😉 Glad I could help. Enjoy!
Darren says
Thanks for the the recipe and especially the tips which came in very handy. I am new to making canele but my first attempt yielded very good results. Looking forward to making more.
Victor @ Taste of Artisan says
You are welcome. Enjoy!
Michael says
Great recipe. The oven temp and not overfilling are crucial. Only thing I can add is that I found it much easier to melt the butter and beeswax together in a canning jar partially submerged in boiling water. My butter and beeswax combo exploded in the microwave, lol. Thanks!
Victor @ Taste of Artisan says
Interesting, thanks for the tip, Michael. I've never had a problem microwaving my beeswax/butter mix but I do it little by little though, in 10-20 second increments. Enjoy!
Carol Havins says
My 13 year old granddaughter, Keira, made these entirely on her own. They were FANTASTIC and even better than the ones we buy from a French baker in California!!
Victor @ Taste of Artisan says
Great to hear it, Carol. Enjoy!
Jen says
Hi there! I’ve had great success with your recipe in the past, but this time around, I encountered several issues, and hoped you could help answer some questions. 1) How long does the batter last in the fridge? I baked some 3 days after making it, and the canelés dome when cooking, vs climb straight up the sides of the mold. Is the batter too old? 2) Similarly, can the butter/beeswax mixture be reheated to use on multiple batches (on consecutive days), or should I make a smaller, fresh batch of it for each batch of canelés? 3) Any tips on reducing the smoke during the initial super hot oven phase of cooking? It’s set off our smoke alarm each time! 4) Beyond the great tips you have above, any additional tips on ensuring the right/ideal amount of butter/beeswax coating? 5) In the last two batches I’ve made, the canelés stuck in the molds. I haven’t washed them; I just wipe them with a paper towel between batches. Should I re-season them, or am I not getting the coating right?
Luckily, even the imperfect canelés are tasty! Just want to improve!
Thanks so much!
Victor @ Taste of Artisan says
I wait up to 48 hours but I don't think there would be a significant deterioration if you wanted 3 days. Doming, or mushrooming as they call it, can happen even to young bater and it's not affected by the age. You could try some tips that were mentioned in the comments. Caneles sticking to molds is probably caused by insufficient butter/wax or mold had residug from previous bakes that wasn't cleaned off. I would clean them and re-season, as you said. Excessive smoking - I normally don't have that problem, try filling the molds a little less and use a larger baking sheet to catch any spills. Keep them closer to the center so any droplets don't get on the sides of the oven. Hope this helps. Happy baking!
Catherine says
I have made this recipe several times and have had various success with the white butt problem, until I used a baking steel. I heat the steel up on the rack in the oven and then place the baking sheet with the canelés on the hot steel for baking. I get perfect canelés with this method, although the baking time is much reduced, due to the steel making it quite a bit hotter inside the oven. After the 10-minute high heat, I drop the temperature down to 375 and my canelés are done after 25-30 more minutes instead of 40-50. perfect expansion to the rim while baking and no white butts.
Victor @ Taste of Artisan says
Thank you for the tip, Catherine. A thick baking stone should provide a similar benefit. I use it to bake my Portuguese custard tarts. Happy baking!
Izzy says
Great recipe! In the past I’ve always made cannelés with the Serious Eats recipe, but it was such a pain I’d only do them once a year or so. This was so much more straightforward and the product was even better! I somehow lost my beeswax in the last year, did this batch with only butter, and they still developed that nice dark shell on the outside. The temperature trick was a winner! Will definitely be making these more often now.
Victor @ Taste of Artisan says
Glad I could help, Izzy. Enjoy!
Adam k says
Hi, on my first attempt everything was perfect. But they stuck to the moulds. I think because I didn’t use bees wax. I can’t seem to find bees wax. Where can I buy beeswax for cooking. All I found is for candles and make up. Any help would be greatly appreciated. Adam from uk
Victor @ Taste of Artisan says
Sorry to hear that. Already responded to your other comment, hope that helps.
Mikhail says
On amazon search for "food-grade beewax", they won't be labeled as "for cooking", just food-grade
Kate says
You are a wizard of research. Although I have not tried making them yet, this is on my list to surprise my husband. We have tried these delights during the corporate event and ate almost the entire plate they served. It was embarrassing but we could not help ourselves. I did not realize how much work goes into making these, but I love a good challenge.
Victor @ Taste of Artisan says
Good luck. I am sure they will be a success.
Adi says
This came out amazing first try. I followed almost the exact instructions (except I used regular sugar and honey) and it came out amazing!! I buy these at a French bakery and love it but mine were just as good if not better!! I baked after 24 hours and more after 48 hours and really didn’t notice the difference.
Victor @ Taste of Artisan says
Glad to hear it, Adi. Enjoy!
Tara says
I am so excited to try this recipe. What type of sugar do you use? Would Baker's ultra fine sugar work? I don't like using powered sugar.
Victor @ Taste of Artisan says
Tara, I use regular cane sugar. Ultra fine will work but it's not necessary to gine fine/ultrafine in this recipe.
Renée says
Hi! I am planning on trying this recipe since it looks delicious.
I am struggling to find beeswax, is there a substitute I can use in stead?
Kind regards
Renée
Victor @ Taste of Artisan says
Renée, if you search the comments, there have been quite a few comments on that. In short, there is a product called Slider, mainly used in France, it's a substitute for beeswax/butter. I had to order it from France to try but did not like the results. The only other option is to skip beeswax and use only butter. You won't have the same results but it's an option.
Adam says
Hi victor, i have tried butter only and it has not worked. Cant seem to find food grade beeswax in the UK and googled slider and cant find it anywhere. any chance you can post a link?
Victor @ Taste of Artisan says
Adam, here is the link to where I got my slider:
https://www.laboetgato.fr/en/agents-de-graissage/11076-slider-greasing-agent-200-g-3333333010024.html?search_query=slider&results=8
There's got to be a place that sells beeswax in the UK... here is one I found for you: https://localhoneyman.co.uk/product/beeswax-for-sale/
Pure beeswax is the one you want. I don't think it needs to state that it's food grade. As long as it's pure with no additives it's good to go. You can also try health food shops. Good luck.
T K says
Try Amazon
Marie France says
Followed exactly the recipe, worked wonders
Kai says
What temperature should the hot milk be in Step 4 when it was added to egg mixture to temper the eggs?
Victor @ Taste of Artisan says
As per the step 2, bring the milk to a gentle simmer. Don't know the exact temp but should be slightly below the boiling temp.
andy says
Baked at 450F 15mins then 350F 50mins with a Baking Stone. I used a carbon steel pan which couldn’t withstand higher temps as in recipe, but still achieved the dark glossy shell and custardy interior. I guess at lower temperatures the baking stone is key
Victor @ Taste of Artisan says
That's a good tip, Andy. thanks for sharing.
Heide says
Came out stunningly in my new pan.
Victor @ Taste of Artisan says
Enjoy!
Amy says
What is the serving size? 1 cannelle? More
Victor @ Taste of Artisan says
Serving size is whatever you want it to be;) Mine is way more than 1;) The calories are calculated per 1 pastry.
Lee says
HEi, I have an issue, my oven do not produce more than 230C 🙁 is it possible still to make canele?
Thx
Victor @ Taste of Artisan says
Try the highest setting that you have and see if you still get the mushrooming. If you do, try the tips that we discussed in the comment section. You will get perfect canele one way or another, I am sure of it. Good luck.
Lee says
I did it..! I got really nice Canelé, I need to practice more, but Now I know I can do it with 230C.
Ping says
Thank you for your wonderful recipes. My caneles have come out perfectly. After several trial and error I think the trick to avoid mushrooming is to have the batter reach room temperature before baking. I used 500F (highest my oven will go) for first 15 minutes followed by 43-45 minutes at 375.
We love this recipe so much, the canales are perfectly crispy on the outside and soft on the inside. Now that I've overcome the mushrooming problem, will definitely be making these on the regular!
Victor @ Taste of Artisan says
Glad to hear it, Ping. Thank you for your feedback. Happy baking!
Andrew B says
I have both Matfer and Mauviel molds. The Mauviel ones were the new ones I did this to. I was not able to get the tin to re-melt on smoothly. Best I can tell from some metallurgical googling is that they are still OK/safe. Once done, as long as you aren't scratching the surface, there is a thin permanent layer of tin doesn't melt off. It also seems like the actual toxicity of verdigris is in question. Regardless, after almost a year on a shelf since I melted the tin, there is no green to be seen.
Andrew B says
Some good ideas and info in this recipe/article. I would caution on the first seasoning directions quoted from Pierre Hermé. Putting empty tins in a 500* oven for 20 minutes will melt the tin off if there is no batter in them (ask me how I know....)
Victor @ Taste of Artisan says
Oh-oh... what happened? Did it really melt? Perhaps a 375F for 30 minutes or so would be a better way to season the molds?
Victor @ Taste of Artisan says
Mine are perfectly fine, all 20 of them. If this happens to some molds, there must be something else at play, I just don't know what yet. Most people have not had this problem though, only a small handful of reports like this.
Lisa says
Hi!
I have failed miserably with my caneles 🙁
Hoping you can help steer me in the right direction?
I'm using copper tins with a mixed beeswax and butter coating but my oven only goes up to 260c. When i bake the caneles at 260c for 10 mins then 190c for 50 mins, the caneles mushroom out of the tins then don't fall back into their molds. I'm left with really ugly mounds of delicious baked custard :/
I leave plenty of room and don't fill them too much and I do get some air bubbles in the centre. The colour on the outside also looks similar to yours. Could it be the oven temperature? Not sure what I'm doing wrong but I'm keen to try again.
Victor @ Taste of Artisan says
Hi Lisa, that sounds like what my first batches looked like. I too now bake in a gas oven and have made this recipe in it 4 times already. Mine too gets to just 500F or about 250C but I did not experience the mushrooming problem. I baked on the top shelf where it's hotter. I don't know, perhaps that helped.
That said, there are a few things you can try that are sure to help. One would be to bring the batter to room temp - see Colin's comment from January 02, 2021. As well, you can try substituting some of the egg white for egg yolk, which seemed to have helped a few people as well. Good luck!
Brian says
A local bakery has started to offer Canele's on Saturdays and I've fallen in love so have decided to try and make them myself. Your instructions are very detailed. Thank you.
I also had the tin/melting point question that I see several other people have mentioned. I have seen other recipes call to freeze the canele molds before filling. I suspect that step is to assist with that melting point risk. I think I'll try both freezing and not to see if there's any difference. Thanks again
Victor @ Taste of Artisan says
Thanks, Brian. I'd like to hear what you have to say on that. No issues on my end, 20 molds and dozens of batches. My thinking which I've shared below in the comments is that tin can't melt with the batter inside the mold, it won't let it reach the melting point until the batter boils off all the liquid and the temp starts to climb well above the boiling point and to the tin melting point. Simple physics.
Aaron says
Hi there! This recipe is amazing! Thank you for taking the time to put this out there.
My first batch got away from me a bit and I overcooked it. Second batch I went with 500 degrees for 10 minutes and 45 minutes at 375 and they were fantastic -- I could probably even cook them less. Also, I lowered the rack and took out my pizza stone because I figured the stone stays closer to 500+ even though I'm lowering the temp to 375.
With half your recipe I was able to make 12 so I'm wondering if our volumes are different which would explain me overcooking the first batch and making adjustments in the second. If you have a second, can you tell me the rough volume of your molds so I can compare?
Thank you!!!
Victor @ Taste of Artisan says
Aaron, they do come in three different and pretty similar sizes - 55mm, 45mm and 35mm (diameter and hight)... that's about 2.1", 1.8" and 1.4". Mine are 2.1" (these were sold as 2" x 2") and fit 80ml of liquid. Happy baking!
Naja says
Thank you so much for this perfect recepie! The last time I baked them I put my baking stone for making pizza in the oven when I turned it on. That reduced the baking time with ten minutes, made the shell more 'crispy' and prevented them from having the white butts - just a tip 🙂
Victor @ Taste of Artisan says
You are very welcome! Interesting, thank you for the tip Naja. It makes perfect sense.
Adi says
So interesting. I always have my pizza stone in the oven and these came out amazing first try. I wonder if it helped with the baking!
Victor @ Taste of Artisan says
I think it did. Stone stores a lot of heat which is transferred to caneles when you put them in the oven. This has a similar effect as starting baking at a high temperature.
Hilarie says
Hi- thanks for such detail! Im going to make this soon but have one question.
You say to pour the beeswax/butter mixture back into the original container. Doesn’t that then change the nature of the beeswax that you have for next time?
Or am I misreading that?
Thanks!!
Victor @ Taste of Artisan says
It will be perfectly fine.
Roseanna says
Hi there, is the oven temperature you say conventional or fan force?
Victor @ Taste of Artisan says
Conventional in this recipe, don't like fan forced as it tends to burn them.
Ironfingers80 says
Gonna try my hands at these for my wife’s birthday in a couple of days….fingers crossed! Is it ok to season the molds a couple of days in advance or should it be done the same day? This will be my first time using them. Thanks!
Victor @ Taste of Artisan says
You can season them once at any time, it can be days or months in advance. Each time you use them they will get seasoned again... don't wash them after using, just let them cool down a little and wipe with paper towels.
petra sunner says
in your reply from november 10 2021 you say "....You can season them once at any time, it can be days or months in advance. Each time you use them they will get seasoned again..."
Please let me know what you mean by 'they will get seasoned again'. From how i understand it is, that the butter / wax mix that one seasons (or lines) the molds with the first time, wears off.....and only when that lining is completely worn off would i re-season (re-line).
Victor @ Taste of Artisan says
What I meant there was that each time you use them (bake pastries) they get 'seasoned' again because of the butter/wax coating you put on them.
Please, stop worrying so much about that:) Just season them once, after you purchased them, then just follow the recipe. Don't overthink it and enjoy this amazing pastry.
Sarah Li says
I tried ur recipe easy enough to make. However I dnt have individual mould, instead I have a tray, and boy was the wax/butter mixture a mess... did anyone find the final product too waxey to the taste???
Jade says
Just like another person commented,
I am surprised I also had never heard of canales. I sure am glad I did tho! Better late than never! I splurged and bought the four copper molds off Amazon and I’m happy to report my canales came out perfectly. Thank you so much for taking the time to perfect this recipe and make all the mistakes I most definitely would have made had you not reported on them. So my thanks to you.
Victor @ Taste of Artisan says
YOu are very welcome. Enjoy!
Queenie says
I just discovered caneles?!! where have they been all my life... they look incredibly hard to make so I googled and confirmed that much. Came across your recipe. Any thoughts on carbon steel molds?
Victor @ Taste of Artisan says
Never tried them to make caneles so I can't comment on how well they cook but here is an interesting post of someone comparing copper to carbon steel canele molds. The verdict - they liked copper slightly more.
Phillip Blackburne says
Hi, I'm having great success with your recipe, there's just one thing, I'm never too sure how much to beat the eggs and sugar ? Until pale and fluffy? Just mixed together?
Victor @ Taste of Artisan says
Just whisking together will do, no beating.
Leo says
Excellent recipe and directions to avoid the pitfalls of an intricate bake. thankyou
Victor @ Taste of Artisan says
You are very welcome.
Arielle Schobel says
Used this recipe for my first time making Cannelés. I used a non-stick cannelé pan and they still turned out amazing.
Victor @ Taste of Artisan says
Glad to hear it. Enjoy! Soon, I will be posting another Bordeaux pastry recipe that I love, it's also custard-based, so be sure to subscribe if you haven't so you won't miss it.
Tim says
Can I use vanilla bean paste (I have Nielsen & Massey brand) instead of buying. Vanilla beans?
Victor @ Taste of Artisan says
For sure, vanilla bean paste will work just fine. I believe the substitution is 1-2 teaspoons of paste for 1 vanilla bean.
Susan Makings says
Thanks so much for your details. My caneles turned out fabulous the first time 👍
Victor @ Taste of Artisan says
You are very welcome, Susan. Enjoy!
Conny says
Hi, thanks for this really detailed recipe!
I bought copper moulds from DeBuyer and Mauviel in different sizes. Most copper moulds have an inside tin coating, so have these. However, your recipe asks for 270-290c for the first baking period. The problem I’m facing is that tin has a melting point at ~230c. I don’t understand how the temp can be that high even if using copper moulds, because if the tin comes off/melts then the copper can react and it can become toxic. I actually tried one bake with 230/240c for 10min and then lowered to 190c, the canneles came out great but I saw that some tin coating came off and i will need to retin them as the copper is now exposed inside. In future I will use max 220c
Victor @ Taste of Artisan says
Hi Conny,
I've never had that problem and I own 20 copper molds that I've used many dozens of times. I don't think I can see how it's even possible. You see, you bake at that high temperature of 550F for only 10 minutes all the while the inside of the mold is filled with batter. That batter will prevent the tin coating from heating up to beyond a couple of hundred of degrees. If the batter itself heated up to well above 213F (100C) it would vigorously boil out of the molds. That's not happening.
Now, that could happen when heating dry molds, but even still I doubt that that will happen so easily or so quickly. Pierre Hermé himself recommends that before you use your copper canele molds for the first time, you season them by "coating them with butter and placing them for 20 minutes in a hot oven - 250° C (500° F) or more". I've done the seasoning at this temp and my molds are fine.
So, I suspect that what you are experiencing is related to the temperature in the oven - the reported temperature may be lower than the actual (oven thermostats are notorious for not being correct) or the molds may be of poor quality.
Some ovens are better/more efficient and 500F is enough to prevent mushrooming. My new gas oven only goes to 500F and I don't experience mushrooming. My old electric oven needed 550F to prevent mushrooming and this was a solution to many people on a French forum where I learned this tip. Nobody there reported the issues that you are experiencing either.
That's said, sorry to hear about your issues. If you can get away with lower temps, by all means, do so. It's not about using high temps at the initial stage, it's about controlling mushrooming. If you can do it at 220C (425F), there is no need to go higher.
Good luck and happy baking!
Helen says
Caneles are my most favourite sweet meat. When in Bordeaux, we had one every day with our coffee. There is nothing quite like them………
I take my hat off to you for your perseverance to get a fabulous outcome. For me, I’ll just go & get one from Rustica in South Yarra. They are fantastic !
Victor @ Taste of Artisan says
That's a good option to have... enjoy!
Luze says
He intentado muchas recetas y no he logrado hacer un buen canel espero que esta sea la vencida.
Elena Ilioi says
They're still delicious but our first batch came out a bit too dark and too wet in the middle. Do you have any ideas for what to adjust?
Victor @ Taste of Artisan says
P. Herme says that canele are done when they are black so they should be quite dark on the outside. Too wet inside - it's hard to say without seeing them... it's custard after all, it should be moist. That said, to answer your question, I'd say start with a lower temperature and cook a little longer so as to cook them though inside without burning them on the outside.
toss says
I started when I bought a Mastrad silicon dish, for 24 mini cananeles. Would you suggest any modifications to your recipe using this?
Victor @ Taste of Artisan says
Sorry, never used it and, frankly, couldn't even find pictures of it. In general, the recipe won't need to change but the baking time may depending on the size of the cavities. You may way want to experiment with a very small batch first then make adjustments based on the results.
Xylv says
I tried this one when I was in Japan and it’s so delicious.. I wanted to try this recipe. But my question is, can I use vanilla extract instead of vanilla bean? Thanks!❤️
Victor @ Taste of Artisan says
Yes, you can. Sub 1 vanilla bean for 2 tsp vanilla extract.
Xylx says
Thanks! One more thing! Can I use butter alone since beeswax is hard to find in my place or is there any substitute for beeswax. Thanks and more power!🙏❤️
Victor @ Taste of Artisan says
No good sub for beeswax in this recipe, unfortunately. Beeswax is what gives caneles their unique sheen and that feel as you eat them. In France they sell a product called Slider, which some commercial bakeries use supposedly. It’s a more economical alternative to beeswax. I bought a can and tried with one batch and did not like the results. I am back to beeswax. Yes, you can use butter only or a sugar/butter mix which may give you acceptable results.
Blanca says
Delish, delicious, riquisimo. Best French dessert I ever tasted. I am baking them for the second time. They came out perfect the first time. I am so HAPPY BAKING. I am not looking for another cannele recipe. 5 stars
CSL says
This recipe is excellent! I kept reading recipes and coming back to this one. You have eliminated all the issues. My caneles came out beautiful.
Louise says
Hello - I only just discovered these delicious pastries by chance a month ago. Since then, I haven't been able to buy one again so I would like to try your recipe after reading it and the comments below. There's just one question I have and that is - "Do you use salted or unsalted butter?"
Thanks for posting all the tips
Victor @ Taste of Artisan says
I use only unsalted butter. Happy baking!
Ian says
I came back from a recent trip to Bordeaux and got myself a nice set of Baillardran molds. I was really expecting to experiment a lot and fail my first few time but I used your recipe & method and they came out PERFECT the very first time. Thank you so much.
Victor @ Taste of Artisan says
You are very welcome. Happy baking!
Aurélie says
This recipe is perfect thank you
Victor @ Taste of Artisan says
You are very welcome. Happy baking!
PuiYee says
Hello, I have a question about moulds. I'm still thinking about the copper ones, but if I get 6 and would like to make 12 caneles, how do I reuse the 6 moulds I have for the second batch? I can't afford 12 moulds as much as I want to.
Do I need to recoat them with the 50:50 beeswax/butter mixture?
I'm guessing it's a yes, cos some of the melted mixture should be on the canele when you unmould them.
Victor @ Taste of Artisan says
Hi, sorry for the late response. Yes, you will need to recoat them.
PuiYee says
Hey Victor,
Thank you for replying! Have a wonderful weekend.
Emily says
Thank you for this recipe ! It seems so terrifying to make but they turned out wonderfully even on the first time. 🤗🤗
Victor @ Taste of Artisan says
Happy to hear that, Emily. Happy baking!
Sandy says
Tried your recipe this morning. I followed your instructions to the letter. They came out perfect and taste wonderful! This is the first time I have had them since I was a child. My grandmother used to make them.
Thank you for putting this online for me to enjoy!
Victor @ Taste of Artisan says
You are very welcome. Happy baking!
Luz Elena says
Maravillosa explicación, espero tener suerte al hacerlos.
Victor @ Taste of Artisan says
Good luck!
kate says
Thank you for such a detailed and well-researched recipe. I just made these for the first time, after planning to make them for a year, and they are perfect. Just as a note for those who don't want to invest in the copper molds: I used a heavy steel chefmade brand 12-canele pan. I coated the molds with soft butter, then refrigerated until ready to fill. They came out beautifully with a crispy carmelized outer shell.
Victor @ Taste of Artisan says
Glad to hear about your success Kate. Enjoy this wonderful pastry.
Ami H. says
I made your recipe and it's perfect! Instead of rum I use brandy and really like it much better. I tried a dark rum once, and it was just okay. I use the bread flour and consistently get a great confection. Your timing is perfect and as long as I don't open the oven during the entire baking, all works out great, every time! The only thing is how is the Best way to re- crispen them ? Any tried znd true tips would greatly be appreciated. Thank you so much for all your dedicated trial and errors in making this treat just right!
Ami
Victor @ Taste of Artisan says
You are very welcome Ami. Re-crispening them is a challenge. I don't think I've heard/read of anyone successfully doing that and I haven't really found a way myself either. My solution is to make smaller batches if I don't entertain a larger party and enjoy them fresh. The batter will keep for additional few days in the fridge without any issues.
Happy baking!
Ami says
Thank you so much for your feedback. Much appreciated!
Amie says
Just made these last night and they were perfection! Used vanilla extract instead of the beans at the ratio that has been suggested in the comments and there were no problems. I don’t have the copper tins, but used a metal canelé pan I purchased on Amazon (for 12 canelé) and lightly brushed in butter. They were done after about 40 minutes and were absolutely perfect! I can’t believe they turned out! Thanks for a great recipe!
Victor @ Taste of Artisan says
You are welcome. Enjoy!
Judie says
Great read, now following!
Lisa elsis says
Out of curiosity, is it possible to make this batter without the addition of rum?
Victor @ Taste of Artisan says
Yes, you can omit the rum.
Carolina says
Hi Victor, I finished making the dough for the canellés last night and I am a bit worried I might have messed it up. I followed your instructions precisely but the consistency of the dough is not like a thick custard, it is quite liquid (like a pancake mix). Not sure if it is supposed to be like that? I was planning on leaving it in the fridge for 48 hours but now I am wondering whether I should start over?
Also, I have a gas oven without any indicator for temperature settings. Do you have any tips for how to create the temperature shift after 10 minutes?
Victor @ Taste of Artisan says
Hi Carolina,
my sincere apologies for the delay in responding, this message was lost in a pile of spam. I hope you've had good luck baking canele. The consistency of the liquid is fine based on your description.
I have recently upgraded to a gas oven, which is marked, thankfully. It only goes to 500F and I've heard from quite a few people that their also go up to 500F. So, if your's is like most other gas ovens, start on high then 10 minutes later drop the heat to 3/4 way which would be 375F relative to 500F. Hope this works, let me know.
Happy baking.
Nancy says
Thank you so much for doing a lot of research and trial and error. I am a baking and cooking novice but fell in love with these little guys. I was too intimidated to try to even attempt these but all your notes gave me hope 🙂
Victor @ Taste of Artisan says
You are very welcome. Happy baking!
ChaliCharo says
Hi Victor,
This recipe is the best. I have tried to bake it many times, the taste was great but the shell is uncontrollable. I have adjusted the temperature to suit my oven. I didn’t use convection oven and latest I preheated the 220c and baked 15 mins at this temp. Another 60 mins at 160c, it’s still not perfect.
Please give me some suggestions. Thanks in advance.
Victor @ Taste of Artisan says
Hi ChaliCharo, sorry for the delayed response. What do you mean by 'the shell is uncontrollable'? Mushrooming problem? Give me more details on what the problem is.
Melissa says
Hi Victor, I have just seasoned my newly bought copper molds, getting ready for the canele challenge. Just wonder if the mold will turn out to be same colour after seasoning or they will varies? Some of my molds turned out pale some still retained the copper colour.
Victor @ Taste of Artisan says
Hi Melissa, mine look quite rustic and nothing like they looked when they were new... I do see that some look a little different than others, it's normal.
Melissa says
Thanks very much for taking time to provide the confirmation Victor. I just did my very first bake, the canale turned out to be light brown soft and of course gluey, maybe because of the oven temp, the max it can go is 220°C, will try baking longer in my next attempt, I must get it right. But I am very happy to see the caneles flowed out from the mould smoothly, haha. Thanks again.
Victor @ Taste of Artisan says
You are welcome.
Mary says
This a wonderful expert recipe. Thank you. Am trying other flavoring as I don't want to constantly buy vanilla beans.... orange liqueur, cardamom,.. but always rum and some vanilla in the mix.
Colin says
Great stuff, your canelés look truly amazing.
I've had the mushrooming problem for years, no matter what temperature the oven was at or how careful I was when whisking the batter, and it was driving me crazy.
It never happens to me now, thanks to:
1. MOST IMPORTANTLY: I let the batter come to room temperature before baking. This seems to be absolutely crucial.
2. I use a cold baking tray (to be precise, a perforated aluminium baking tray but the important part is that it's cold when it goes into the oven with the filled molds)
3. I fine-tuned my recipe to not have too much egg white. The more egg white the more airy the crumb but it can lead to puffier canelés that rise too much.
I haven't tried every combination but I think n°1 is 90% of the solution so give it a try 🙂
Also, I noticed that for me the best taste and texture are achieved with 48 to 72h resting time before baking and another 8 to 18h after baking before eating. The longer the wait (before eating) the better the taste, but at the same time the crunchiness and interior creamy texture degrade so it's a tough compromise 🙂
Victor @ Taste of Artisan says
Hi Colin, those are very interesting tips. To honest, I suspected the temperature of the batter may be the culprit but I never got around to testing that bit. The egg white tip makes sense... I will definitely try without it. Thank you again for the great tips.
Heide Thompson says
Absolutely my experience to a T. I trained in Paris and it seemed so easy then. It took me years to work it out for a home oven.
Thank you for reassuring me of the technique.
Victor @ Taste of Artisan says
You are welcome. Enjoy!
CF says
Hi Victor — what a fantastic post. I have an odd question. The recipe works alright on my end but the cannelés ends end up being burned. The tops (the part inside the mold) are good and of the right color, but the other side (the one directly exposed to the heat) end up burnt. I’ll take any advice, I’ve considered « covering » the ends as they cook mid-way through the bake.
Victor @ Taste of Artisan says
Thanks for the compliment. Hm... that's an interesting challenge... What I would try is turn off convection if you are using it and/or move the baking tray lower. If those fail to produce the desired results, we can think of something else to try.
Karen says
I followed your recipe and tips to a T and they turned out perfect! I was shocked! Thank you!
Lyn says
Very good recipe, succeeded first time trying, I cut another 25g of sugar from this recipe and tasted the batter after mixing. They mushroomed a little but it was acceptable. Thank you for trying out so many times and willing to share your experience and result.
Victor @ Taste of Artisan says
You are very welcome, Lyn. Happy baking.
Elena says
Hi Victor
I followed the recipe exactly, but for some reason the exterior of the canneles comes out very hard, while inside is perfect. Any advice?
Thank you!
Victor @ Taste of Artisan says
Elena, try lowering the initial temperature until just before just start having a mushrooming problem. Perhaps shorten the overall baking time. Sometimes all it takes is a minor tweak or two.
Michela says
Love this recipe! The first time I made it however, I feel like I followed your recipe to an absolute T but my shell from the bottom of the canale came out too hard... The rest of the shell was perfect but the bottom part (bottom while baking, top of the canale when you take it out the mold) was almost like a hard candy and difficult to bite into.
Any tips to resolve this??
Victor @ Taste of Artisan says
You say you are using shell, do you meant copper molds? What did you bake on, a baking sheet? How high?
Adina says
Hi Victor, thank you very much for sharing your experience and this wonderful cannele recipe. I love canneles and decided to make them since they’re hard to find especially during lockdown with most of the places being shut down in London, where I live.
Would like your opinion on my 2 failed attempts. Tried the recipe 2 times and even though I adjusted the baking method the results were the same. My issue relates to the cannele’s interior. It’s tooo custardy, a bit sticky and seems uncooked to me. I’m using cooper molds . The crust and exterior are beautiful and perfect, deep brown and crunchy. Not sure what would’ve caused my bad results. My oven only has the fan option, so baked for 10-15 mins at 250C degrees and for another hour at 180C.
I’m hoping you might have had similar experiences during your trials and could share them with me?
Many thanks in advance. It bugs me a lot since you invest to much time and precious ingredients into them. I really want to get them right 🙂
Victor @ Taste of Artisan says
Hi Adina, too custardy meaning underbaked inside? If that's the case, it looks like something prevents the moisture inside from escaping out. You said that your oven has a fan, did you use it. If so, I wonder if convection may have caused a crust that prevented the moisture from escaping. Try without convection. If you didn't use convection, I would start lowering the initial temperature until you still have no mushrooming problem, then extend the second baking stage. Sometimes all it takes is a little tweak or two. When experimenting, don't use expensive ingredients, like vanilla bean. When I was experimenting, I quickly realized that I would go broke if I used vanilla bean on every batch. They still taste great without it...
Mary says
Happy to hear you are not "vanilla bean or die"🌞!
Victor @ Taste of Artisan says
Not with those prices on vanilla bean;)
Pauline says
I just made this in a baking tin, it came out really well. Great recipe. The only think I would add a sprinkle of salt in the recipe to enhance the sweet
Victor @ Taste of Artisan says
Glad it worked out for you using a baking tin. Happy baking!
Tatjana says
great recipe and most of all, very very useful tips and tricks without which I don't think I would have ever managed to do canele! thank you for the generous sharing of what must have been hours, days of trying out until figuring it out. thank you!
Victor @ Taste of Artisan says
You are very welcome!
Mavis says
Wow, thank you for the detailed explanation!
Sara H. says
Great recipe! Is there any way this can be made without alcohol, will it affect the texture?-I would like it to have that custard center.
Victor @ Taste of Artisan says
Sara, you can omit alcohol, the texture won't be affected, at least not in a noticeable way. Most of the alcohol will evaporate during cooking anyway...
Jeff says
I purchased about 10 of the copper molds years ago in France but didn’t have access to them. I recently purchased the tray mold that makes 12 at a time along with the beeswax from Amazon. After my purchase I read of the difficulty in coating the tray type mold because of there being 12 and it being difficult to get a thin coating inside all. I also read that the 4 molds in the center don’t receive as much heat as they are shielded. Sooo, I placed the tray in the oven as it preheated, heated my butter and wax in the microwave. I used a silicone brush and lightly coated the 2 outside rows. The wax mix pooled in the bottom of the molds but I continually dipped into that to fill the others. I followed the recipe baking them at 475 for 15 min ( the pan says it can be heated safely to 450 because it is coated, I went slightly over) and then reduced it to 375 for 45 more min. They easily came out of the molds. The outside was crisp and the inside custardy. I paid less for the tray mold than 1 copper mold and I was able to do 8 at once. They are a delicious pastry and I recommend trying them.
Victor @ Taste of Artisan says
Hi Jeff, thanks for your feedback on an alternative type of molds. Glad you had success with them.
Bea says
I've been using Pascal Rigo's recipe for almost 20 years with perfect . results. It's so easy & I've never heard of white butts or mushrooming at all , lol..I now know in case it happens. I do let my batter rest in fridge for 12 hours that's it. Let me know if you'd like the recipe. I bake at 425°f for 50 minutes.
Missy says
Thank you so much for such a thorough and thoughtful recipe! I have wanted to make these for years having tasted them in a bakery in Portland once upon a time. I bought the french copper mouldes when in Amsterdam 4 years ago. They and the beeswax the shop owner gifted me have been sitting in a drawer not touched all this time and this year for my birthday, it felt like time. I try to bake almost exclusively with Einkorn flour and I felt like this recipe would work well with the quirks of Einkorn because of the custard consistency and the 48+hour refrigeration. First batch mushroomed over a bit and then had lighter tops when turned out. Second batch, I switched from convection to regular oven and filled a little less and they came out perfectly! This recipe will be saved forever. Once again, thank you so much for experimenting and sharing your experiences-- it really made a difference in understanding how these work and what makes them so divine!
Victor @ Taste of Artisan says
Hi Missy, I am very happy to hear about your success. It must have been wonderful to re-discover some forgotten tools in your pantry and create something as wonderful as caneles with them. Happy baking!
Carole says
What is the best way to keep them, to last about 5 days?
Victor @ Taste of Artisan says
These are best consumed the day they are baked and, unfortunately, there isn't a good way to keep them as good as the time they come out of the oven for more than a few hours. I've tried cooling them down and storing and in an air-tight container as well as refrigerating them. Mine don't last more than 2 days so I can't commend on 5 days but I'd say refrigerating them would be a better method though you will lose more of that crunch.
Cactus GR says
Thank you for an excellent recipe and steps/tips. The Canneles came out so good. Chewy crispy outside and custard soft inside. I used copper moulds that I bought on France website https://www.laboetgato.fr. I also bought the slider greasing agent for canneles from the same website. It really save a lot of work instead of using new wax and butter. I wish I can upload some pictures and show you how beautiful these Canneles are. Thank you again!
Victor @ Taste of Artisan says
You are very welcome. Happy to hear about your success. I tried the slider grease from that place out of curiosity some time ago but did not like the results with it, at least not as much as I do with the beeswax/butter mix. Just my personal take on it. But I agree, it's easier to use.
Mahshid says
Can you use again leftover of beeswax and butter mixture?
I made canele for first time. It turned great👌🏼.
Victor @ Taste of Artisan says
I do it all the time. No problem with that. Keep refrigerated though. Happy to hear that your canele turned out great.
Hoyt Neumeister says
Awesome 🙂
Carol says
Hello again,
I tried your recipe today and I think for my first time they turned out great. ( even though I didn't see your reply about the seasoning till now.) I will wash the molds again and season them.
Thanks for a great recipe!
/Users/Carol/Desktop/115650298_2933008510160832_4084752230922784340_o.jpg
Victor @ Taste of Artisan says
You are very welcome, Carol. Glad to hear that your pastries turned out great. Seasoning can be done at any time, it's to prevent bits of pastry sticking to the molds. If you didn't have any sticking and the pastries came out fine, the molds have got seasoned during baking.
Carol says
I am excited to try your recipe and am going to bake them in the next day or two as I have already made the batter. I have my copper molds from France and I washed them with hot soapy water and was going to just coat them with the butter/beeswax combo but read below about someone needed to season them with vegetable oil. I'm now concerned that I would need to season them with oil before I use the beeswax/butter combo, is that correct?
Victor @ Taste of Artisan says
Hi Carol,
yes, you must season them before coating with wax/butter mix.
petra sunner says
oh dear :(. in your post from july 23 2020 you say seasoning must be done before coating with wax/butter. When i though i finally learnt that seasoning=lining=coating....:(
so, can you please tell me WHAT seasoning is, and HOW to season the molds (which i already coated/lined with butter/wax mix last night.....to be ready to roll in a couple of days - bake the cannelles.
Victor @ Taste of Artisan says
Petra, think of it as this: seasoning is creating a layer of hardened oil on the surface of cookware. When you initially get your canele molds, or cast iron pans, or a carbon steel frying pan - you clean them first, remove residual oils fom the manufacturing process, then you SEASON them by coating them with a thin layer of oil/butter and 'cooking' at a certain temperature in the oven. Follow your manufacturer's recommnedation on how to season your canele molds.
Once seasoned, cookware acquires non-stick properties. That's why you season canele molds. Or your cast iron pan.
From then on, every time you cook in that cookware with oil or butter, it gets seasoned more. As in, another layer(s) of hardened oil gets stuck to the cookware, creating a thicker, stronger non-stick layer. That's why you sholdn't wash your canele molds, as washing will remove the 'seasoning', or the hardened oil layer.
Hope this helps.
Liza Brickey says
You have put all that needs to be said very well..Thank you for sharing..
Elena says
Hi,
I think the batter turned out nice, but my oven is not good at all. Still learning how it works as it came with the kitchen and was left by the previous owners. So I ended up with canele mushrooms which are completely burnt((( Btw I used mini silicone molds and adjusted time accordingly, but the tops are burnt.
Victor @ Taste of Artisan says
Hi Elena, sorry to hear about your mushrooming problem. That's the battle I fought initially too. Burnt tops can be fixed by lowering the rack. Silicone molds are not ideal but I've seen people have success with those, though the color was always pale and spotty instead of uniformly dark, almost black. Those still taste pretty darn good though. My first batches were quite sad looking compared to what I get now but we still enjoyed them a lot.
Mink says
I haven't actually tried making the canelés yet, but am very impressed by your instructions and comments. I love your level of detail and explanation, of of which is beautifully clear, so thank you!!!)
I make lots of sourdough bread, and, admiring an excellent bought canelé recently, decided that they must be a yeasted product, because of their holeyness, but your explanation of the 48 hour+ rest, makes sense to me for that texture.
Very much looking forward to having a go, having first tracked down the moulds!
(We have our own bees, so am excited at the idea of using some of our own beeswax!)
(Also, seeing question re: an oven that doesn't go so high, neither does ours, but wondering if putting in pizza stones for a decent period of time might help increase temperature, as we find when making pizzas....)
Victor @ Taste of Artisan says
Thank you for the kind words, Mink. Own beeswax and honey... yum... To your question, yes, the stone may help. I use it to make Portuguese custard tarts. Stored heat of the stone(s) makes a difference for many baked goods.
Jenny says
Hi, thanks for the recipe! What would you suggest if my oven only goes up to 260c/500f and I only have a concoction oven? Is there anything I can do to prevent mushrooming? I noticed someone say cover it in foil, but when do you do this?
Thanks.
Victor @ Taste of Artisan says
Jenny, if your oven only goes to 500F than there isn't much you can do but try baking at that temp and see if that works. You may be surprised. Everyone's oven bakes differently. As far as covering with foil, I've never done that so I can't provide informed advice on this.
Diana says
Great!
How do you wax the base of the canele? This is the exposed part of the canele so how do you coat it throughly?
Victor @ Taste of Artisan says
Sorry, Diana, but I can't understand what you are asking. Perhaps you can ask your question differently. In general, you don't wax the pasty itself, you coat the inside of canele molds before pouring in batter.
Nicole says
I didn’t know beeswax is consumable ?? Do you get have to get a specific consumable version of it ? As here in France it’s impossible to find.
Victor @ Taste of Artisan says
Yes, it's consumable. I buy mine at a health food store. Amazon sells it too. Would have thought that it would be easily available in France...hm...
Denise says
Will the batter hold long enough to bake half the batch at a time?
Victor @ Taste of Artisan says
Sure, just put unsued one back in the fridge.
Anastasya Silvana says
Hi Victor, im from Indonesia and i tried to make the perfect canele for my bakery shop. And i already read all your tips and tricks. But, everytime i use beeswax or beeswax butter, the dough of the canele when i oven it, the top of it rise become like a dome, like a small muffin. Can you help me why is it like that?
Victor @ Taste of Artisan says
The only thing I know that could be causing it is low initial temperature. As you've already read in my post, I too had this problem initially and solved it by starting at a very high temperature.
Tim says
Hi Victor
I just did my first batch and the consistency was a bit wet and custard-like. My oven is a convection oven and the highest temp is 550F (285C). I followed your instructions and baked for 10 mins then dropped to 375 (190C) for 45 mins. The batter did not rise too much, certainly not above the rim of the mould. The outside did colour quite well with brown bottoms but the insides were not light and airy. Do you think using a pizza steel or stone under the tray might help?
TIm says
Update....I did it again using the baking steel and hey presto!! they worked. the outside was little overdone but I intend on fixing that which should be easy enough to pull them out a bit sooner, maybe only need 40 mins at 190C
Victor @ Taste of Artisan says
Hi Tim, thanks for the update. Steel has high heat capacity so that may have contributed to the outsides being overdone. Adjusting the time in the oven or the temperature should help.
Victor @ Taste of Artisan says
Sorry for the delay Tim. Been having issues with my computer. Looks like you've got it sorted out. As I mentioned in my other comment, reducing the temperature, or the time in the oven should help with the outsides coming out overdone. Steel/cast iron packs a lot of heat capacity so you have to be a little careful using those. For example, my bread baked at the same temperature (450F) in a cast iron combo cooker vs a clay cloche always has a slightly overdone (burnt) bottom.
TCN says
Any concern about the high temps and the tin lining of the copper molds? Tin melts at 450 degrees Fahrenheit. Perhaps the cooler batter keeps the tin temp lower?
Victor @ Taste of Artisan says
No concern and true, the batter keeps it cool. Good question. Someone asked me about it before, see my response on December 14, 2019.
TCN says
Thank you for the response. Wonderful article (and detective work!).
Victor @ Taste of Artisan says
You are welcome!
Tara says
I am so excited to try this recipe, it looks authentic so I know it will be deliciou. What type of sugar do you use? Can you use Bakers ultra fine sugar? Thanks so much for sharing!:-)
Victor @ Taste of Artisan says
Enjoy!
Selma says
Made this recipe a dozen times and couldn't be happier with the results.
Dee Dee says
I used a non-stick pan from CHEFMADE and these came out great! Did not stick, rose nicely and looked just like the pictures on this site. I was sure to let the batter rest a day or two in the fridge.
Melissa says
I just bought a chefmade non-stick pan, may I know how do you season it before use and do you use beewax and butter to coat the lining or just cold butter, thanks!
Victor @ Taste of Artisan says
Melissa, I don't use non-stick, I use tin-lined copper molds. I don't believe you need to season non-stick surfaces. I use a combination of beeswax and butter, warmed up, to coat the molds.
Melissa says
Thank you so much for the prompt reply and all the useful tips!
Laura says
Thank you for an amazing recipe!
The taste was divine, and the outer crust was perfect. However The insides of my canelé were a little wet and undone. There were excellent air pockets, just the very center was wet and mushy.
My oven only goes up to 500 degrees, so I tried to compensate with a longer time.
Any advice to getting the inside perfectly set?
Victor @ Taste of Artisan says
You are very welcome, Laura. The very high initial temperature helps with mushrooming. It's been the single biggest problem for many of us baking these pastries at home. If you'd like your canele to have firmer centers, the only thing I can suggest is trying to bake them a little longer at 375F. Pierre Herme says they are done when they are black so a few extra minutes of baking won't hurt.
Sarah says
Thank you so much for your recipe! I tried baking the caneles in a nonstick mini muffin pan because I wanted them to be bite sized. I tried baking them at a higher temperature and then lowering it down but have been unsuccessful. The caneles always seem to rise and mushroom so much. I was wondering if you have any tips for me?
Victor @ Taste of Artisan says
Sorry, I have no experience with baking canele in non-stick pans. I wouldn't advise using them either as at high temps they release toxic chemicals. The only thing I would advise is to invest in copper molds, they are worth it. They come in bite sizes too.
Anne says
Thank you for your canele recipe and useful tips.
I’ve made it several times. My family and friends love it.
For me, I use only the butter coating and nonstick moulds and it comes out fine.
I dream to have copper moulds some days. 😊
Victor @ Taste of Artisan says
Glad to hear it, Anne. Happy baking!
Dee Dee says
I tried this recipe, having never tasted a canele before - it just seemed so interesting. I bought a pan, a metal pan, not the lovely copper, and followed the directions exactly, (except that I didn't have vanilla beans so used 1 t vanilla paste) and had a wonderful surprise. Delicious. My only question was whether they were a little too browned. Difficult for me to know since I have't had them before, but they were really browned with a deep carmelized but not burnt taste. So, the next day, I used the leftover batter (had filled a 12 cake pan and had a couple of cups left over, so just refrigerated it) and decreased the 550 time down by 3 minutes. The 7 minutes on high, and 35-40 at 350 made perfect caneles today. My original batch stayed in the fridge for 48 hours. They popped out of the pan nicely - I just used spray oil before filling with the batter. Having to make the batter ahead makes the actual baking so easy. Just reach in the fridge and bake - the clean-up is already done. These are SO good, unlike any other dessert treat. The good/bad thing is that you can't impusle bake them since you have to plan ahead for these tasty treats, and have to wait a couple of days to gobble them up.
Victor @ Taste of Artisan says
Hi Dee Dee, I hear you about impulse baking... it IS good and bad at the same time;-) The dark color is a characteristic of canele. Pierre Herme says they are done when they are black.
Annie says
Hi again Victor, I baked off the canelés today and they are nearly perfect. I can't believe it. The only tweaks I will make next time is to reduce the rum to 3T as my rum was quite strong, and try baking on non-convection mode. Unfortunately I started these on convection mode and the top edges were looking nearly burnt in the early stages. I covered them partially with foil and switched to non-convection mode and that did the trick. Thank you so much for sharing this recipe and opening up this forum to collectively fawn over and geek out over this unicorn of the pastry realm!
Victor @ Taste of Artisan says
Hi Annie. Happy to hear about your results. Convection is a no-go then... thanks for sharing your experience and happy baking!
Jeannette says
Dear Victor,
Many thanks for this awesome and fabulous Canale receipe. The results are amazing!
Victor @ Taste of Artisan says
You are welcome, Jeannette. Happy to hear about your results.
Andrea says
Hello, hello!!!
I, like so many above me, have to give high praise to this post!! To have found so much information in one place, after reading countless others, i finally feel ready to take on this quizzing, non-convection oven project! 😀 Today is the day! The two copper molds I own have been seasoned with butter and beeswax. The vanilla-rum batter (I used 3 tsp vanilla extract- no beans or paste available) has been in the refridgerator for 48 hours. I am not going add any more rum ( I used Myer’s Dark Rum), as i can still taste it in the batter. I have put my two filled molds (sans approx. four teaspoons of batter- so about a quarter inch from the top) into a 550 degree electric oven. I will bake them for eleven minutes, because i live at 6,200’, i just thought one more minute would be okay! At eleven minutes, without opening the door, i shift the temp down to 375 degrees, for another 50 minutes. When the well-awaited timer goes off, we extract the canelé from the lowest rack, from the foil-covered baking stone, and invert them onto a cooling rack. They slide out effortlessly!!! Dark and shiny, i feel victorious! And finally, after about five minutes cooling, we cut in half, and spread it open to find a lovely airy baked custard! Definitely Victorious!!! Let’s make more!! Adjust the oven temp back up to 550 degrees, put the molds in the fridge to chill. Pull out the batter and molds. Fill and place back in the oven. At eleven minutes, again lower the temp to 375, for another 50 minutes. After timer rings, pull them out- they’ve puffed about a half inch above rim of mold (red flag??), but settled back down. Invert them, they’re a little less reluctant to release this time. But after a minute inverted, and a tiny bit of coaxing, they release on their own. Only this time, sadly, the bottoms are white and misshapen- as if the batter didn’t reach the bottom almost at all 🙁 The outsides are still dark, shiny, crisp; the inside still a lovely airy custard. Right now, i am on my third round...
Victor @ Taste of Artisan says
Hi Andrea, glad to see you back here. Happy to hear about your success making caneles. White butts seem to happen if you fill the molds a little too much, try a bit less next time, it should help.
Janet Levy says
The caneles came out with a beautifully browned exterior.
The instructions were perfect.
Next time, I may use a darker rum and less sugar..
>
https://tasteofartisan.com/wp-content/uploads/2020/04/IMG_0050.jpg
Victor @ Taste of Artisan says
Good to hear it, Janet. Your caneles look beautiful - I love that dark, even color.
Janet Levy says
Victor,
I’m baking my Caneles today. Should I turn on the convection setting? Also, should they bake in the center of the oven?
Victor @ Taste of Artisan says
Hi Janet,
I bake them without convection, in the upper part of the oven, like 2nd-3rd rack from the top. Make sure to space the molds out for more even cooking. Good luck. Let me know how they turn out. Take some pics.
Simon says
Thanks for this. Attempting now but I appreciate how you've addressed thr issues I've had! Have you considered using a chamber vacuum sealer to aggressively remove air from the mixture?
Victor @ Taste of Artisan says
I haven't considered that, but I have a chamber vacuum sealer. Thanks for the idea, I will try it.
Amy says
Hello! I followed your recipe and baked at 280C (highest degree for my oven) for the first 10 minutes and 190C afterwards. However, I realised that after 50mins, the centers of my canele sink back down and didn't set, as in the batter kept bubbling without solidifying. I took them out anyway after adding 10 minutes because the outer layer was burnt. May I know what should I do to prevent the center from sinking down and ensuring it will solidify? Thank you.
Victor @ Taste of Artisan says
Hi Amy, it's hard to say without knowing all the details along the way. Perhaps your oven is more efficient than mine and keeps the temperature better; I would try lowering the initial temperature to 250C and see if that works. If your canele don't mushroom and sink back in fine, then stick to that temp.
Janet Levy says
I finished making the batter and it is now refrigerated. I was surprised at how thin the batter was. Is this the way it should be?
Victor @ Taste of Artisan says
Yes, it's relatively thin but that's how it's supposed to be.
Greg says
Thanks I was just wondering this too, it seems so thin
Keiron from Gibraltar says
Wow, what an amazing detailed recipie. I have tried making these quite a few times with a 50/50 success rate. Dont feel as such a failure seeing as you have gone through similar issues yourself. I haven't done too badly considering I haven't yet invested on copper molds. I am very gratefull for this recipie. Sure it will help me perfect them. Funnily we share favourites.... the Portuguese custard tarts but also have had varying success. Look forwards to reading your recipie and experiences with these.
Thankyou very much
Victor @ Taste of Artisan says
Welcome to my blog, Keiron. I'd love to hear your feedback once you try it out. Happy baking!
Janet Levy says
Can these be frozen after they’re baked?
Victor @ Taste of Artisan says
Caneles are best fresh, consumed shortly after baking. They can, of course, be frozen and reheated but they won't be the same.
Avery Anne says
Really loving this recipe! I've made it three times now, changing a few things every time to see what works for me. A consistent issue I'm having is with the bake, though. I am getting a really beautiful, hard shell - perhaps even slightly too hard and thick for my liking - but the inside is just like pudding it's so raw. I'm not really getting that fluffy, just done interior I'd expect. I'm baking it at 550 for 10 minutes, then 375 for 50, though there's probably a difference with my oven. I don't have a lot of of experience baking so I was curious if you might be able to give me some recommendations on how to tweak the timing and temperature of the bake to figure out what will work best. Is it basically guess work or is there a systematic way of going about this? Thank you in advanced for your guidance!!
Victor @ Taste of Artisan says
Avery, try lowering the initial temperature, say to 450F for 10-15 min, then 375F. If you don't get mushrooming, then stick with that.
Avery Anne says
Hey there Victor! Thanks a ton for the advice, I'll try that next time. I think that might help with the thickness of the shell. I still do have an issue with the rawness of the interior, should I just cook it longer at 375?
Victor @ Taste of Artisan says
I would definitely experiment. It took me several dozen batches to nail this pastry, it's quite temperamental. Your oven plays a big role, how it bakes. So yeah, definitely experiment with temperatures and time until you find the perfect one for you.
Maggie says
After several times of baking the caneles. My caneles become stick to the mold. And it really difficult to unmold them. I do coat the beeswax-butter mixture in the mold. And I use the copper molds as you do. I never wash the mold with water, just wipe them with kitchen paper. What can I do with them? And how can I take care of these expensive canele molds? Thanks for your help.
Victor @ Taste of Artisan says
Maggie, it sounds to me as though your molds are not seasoned well enough. It's an easy fix. To season the molds, heat oven to 350F; wash the molds in soapy water, rinse and dry thoroughly. You may have to heat them slightly to soften the old wax layer and/or soak the molds in warm water to soften any pastry residue from previous cooking sessions. Then, heavily grease the insides of the molds with vegetable shortening or oil, place on a baking sheet and into the oven for 1 hour right side up, then flip the molds upside down and hold in the oven for another 15 minutes. Then turn off the oven and let the molds cool down inside the oven. Now they should be well-seasoned and not have that problem.
Sophie says
Thank you for posting this recipe, they were perfect on the first try! I have been hesitant to make these for years because they seemed so complicated but your recipe is so well researched and easy to follow that I decided to give it a try. They were a hit, I will be making these again very soon!
Jill says
Is it okay if I substitute the rum with a rum extract? If yes, I guess it should be around 1-1.5 teaspoon? Will that affect the liquid quantity of the batter? Thank you.
Victor @ Taste of Artisan says
I've never used rum extract in any recipe so I can't comment on how it will affect the flavor but the amounts you indicated seem fine to me. I don't think the consistency of the batter will be impacted as most of the alcohol evaporates during baking anyway.
Cecilia Gonzalez says
Hi.
Can I use vanilla bean paste instead of vanilla beans or vanilla extract? If yes how much would I use?
Victor @ Taste of Artisan says
Cecilia, vanilla bean paste is a mix of dried powdered vanilla beans and vanilla extract. One vanilla bean is equivalent to about 2 teaspoons of paste.
Miche says
Hi - I inherited a set of 12 copper canelés moules from a relative. I think they’ve been in storage for years. They are very grimy and covered in green spots. I was researching canelés and moules and came across your site. Would you happen to know the best way to get them back in useable condition? Thank you
Victor @ Taste of Artisan says
Congratulations! Canele molds are not washed, they are wiped after each use, so there is always some residue of wax/butter left on them. I suspect that the grime is just that residue mixed with dust and dirt. I would warm them up in the oven until hot enough for the grime to melt then wipe it off with paper towels, then wash with warm water and wipe dry.
>
Green spots are copper oxide, or corrosion. There are commercial solutions that you can purchase to remove them. Expensive. I prefer DIY. I restored an old copper jam pan that had a huge green spot on the bottom, alternating a salt/vinegar solution and plain lemon juice. I would wet the spot, let it soak for a few minutes, then rub with a soft sponge or a piece of paper towel. After several repetitions, the spot came off.
>
Once your molds are nice and clean, season them before the first use.
Miche says
Merci, thank you!! I’ll try this. I was so excited to receive these. I’d had these little treats years ago when I lived in France. They are amazing.
Summer says
I was in Bourdeaux a few years ago and had Canelés there from a food cart in an outdoor market and never forgot that experience. This is the only website where the Canelés look like what I remember having there. I made this recipe and they are very much like I remember them. I do have a question... do you use European style butter with a higher fat content or just regular American butter for you Canelés? Thanks for sharing this recipe for seasoning and coating the copper molds Just perfect! I will make them again following your recipe exactly
Victor @ Taste of Artisan says
Hi Summer, I use regular unsalted butter.
Jo says
These turned out great! I do have a question - when making my second batch, I did not fill the molds as high, (Used a mini pop over Bundt pan) as the first batch mushroomed. I did have difficulty then with coloring of the outside of the caneles being slightly burnt with the second batch. My question is - How do you adjust time and temperature to not burn the outside? Is there an internal temperature to know if the caneles is done?
Victor @ Taste of Artisan says
Hi Jo, good to hear that your canele turned out great. I can't really say as to why your second batch had the problem with burning on the outside but it may be because of using the bundt pan. Copper heats move evenly and I've never had the problems you are describing, not with burning. Keep in mind though, caneles are baked until very dark. To quote Pierre Herme, “When it's black, it's cooked". I don't know what the internal temperature should be when cooked, just never came across that information.
Ariel says
It was one of my goal to bake canele and I was so nervous since people were talking how hard it is to bake a perfect one! And it was a huge success on my first try. I'm going to make another batch today and just wanted to thank Victor for the recipe 🙂 it's a bit late but happy new year!
Victor @ Taste of Artisan says
Ariel, I am very happy to read about your success. For me, my first few batches brought a great deal of frustration. I am happy I could spare you all that. Happy New Year too!
Beth says
I’ve made this recipe so many times and they’ve always been perfect! I like them better than a lot of the canele I’ve had in Paris. I’ve recently moved, and I can’t seem to get them right with my new oven. I live in the UK, so I set my oven temp to 275c to start (the highest it goes) then drop to 190c afterwards (as I usually do). Initially they came out totally uneven, so I changed my oven setting from top and bottom to 4D. The next try came out even, but burnt on the outside, undercooked inside. I tried again this morning- but instead of turning the oven to 190c, I did 160c and added a couple minutes to the baking time. They should be crisp on the outside and spongey and soft inside- but instead they turn a lighter brown and are soft all around. What am i doing wrong?! Any advice. I love this recipe and I can’t find any canele at the shop as tasty as these...
Victor @ Taste of Artisan says
Hi Beth, it's hard for me to advise something when it concerns someone's oven (you provided a very good example of 'everyone's oven bakes differently'). I would continue experimenting and see how you canele turn out each time. Don't add any of that uber-expensive but so pleasantly smelling stuff while you are doing that;) 190 to 160 drop seems quite large. Perhaps you can try 180, 175... I would do that. Also, try moving them up or down in the oven, that could help. If the heating is coming from the bottom, the lower you bake the more the bottoms will brown and vice versa.
Mimi says
I am eager to try your recipe! Thank you for all of your wonderful notes. I was wondering, however, if I could replace the vanilla bean with vanilla extract? How much vanilla extract would I use as a substitute? Thank you in advance!
Victor @ Taste of Artisan says
Mimi, I totally hear you. With the current vanilla bean prices who can afford them? I still have a couple of dozen left that I purchased a few years ago, 100 beans for $49 or so. What a deal it was! Now I started using vanilla extract myself trying to save the remaining beans for when I really need them. One vanilla bean is equivalent to 2-3 teaspoons of extract.
Mark Warren says
Aaaaagh - so all was looking good with my next batch. Set my oven to as high as it will go Gas Mark 9 (240 degrees C)
Waxed the moulds - getting quite good at this now 🙂
Put the Canales in for 10 mins. Can to turn down to 375F and saw they had risen out of the moulds but were not mushrooming 🙂
Checked about 20 minutes later and they had risen even more out of the moulds - I would say about 2-3cm!! Thought I would leave them I. As it looked better than my first batch.
Came back 25 minutes later to utter devastation - they had collapsed. So I removed them and as with the first batch they were undercooked. Didn’t bother putting them back as they had collapsed so badly.
So on a positive - still has some nice crispy bits around the top so ate them 🙂
At a loss as to why they suddenly collapsed.
Victor @ Taste of Artisan says
Hm, I've never experienced what you described. Ideally, they would rise up a little, about a centimeter, then drop back down. When you say collapse, what exactly is happening? Do you have pictures?
Mark Warren says
OK so I attempted my first batch of these amazing taste sensations. One word - disaster!!!! OK so here is my experience.
Firstly, I don’t think microwaving the beeswax and bitter is a good idea. After about 40 seconds on high heat I heard a big pop. Looked into the microwave to see it had exploded all over the interior and the only thing I can say about beeswax that is repayable
Is that is is the WORST substance in the world to try and clean off. Absolute nightmare.
Anyway I made another batch of the beeswax butter combo but this time in a nine stick pan. Worked well and I coated my moulds.
Took the batter out of the fridge (48 hour wait). Have it a whisk, and poured into the moulds and then it o the preheated oven at Gas Mark 9. After 10 minutes turn down to Gas Mark 6 and cooked for 50 minutes.
The end result was not good. I did get some mushrooming but as it was my first attempt want too worried about this. The colour was a nice deep maple so I thought all was good. But when au turned the moulds upside down all I got were blobs of what looked to be undercooked Caneles :(.
However, on the positive side, the part of the Caneles that has cooked and was dark maple was both crispy and tasted just like a I had tasted in Paris.
So I have enough batter left to try a second batch. I think I suspect my oven as not being the temperature it should be so now have bough an oven thermometer to give me more accurate temperatures.
There can only be one way from here and that is upwards 🙂
Victor @ Taste of Artisan says
Mark, you guys use 220V appliances in the UK, I wonder if that has anything to do with your problem. I've microwaved mine dozens of times without an issue and haven't heard of similar to your problem from others. Well, glad to hear that you found a good method for yourself.
>
A gas oven is a mystery to me, never used one but dreaming of getting a gas stove. Wish I could help out with some advice but I am in the dark here. I hope your next batch turns out good, let me know how it goes. Happy baking!
PB, NJ says
I have found your canele recipe to the best on the web. Thanks so much!
I use wax/butter in a 30/70 ratio. Works great. I use my fingers to grease the moulds. It is quick, easy and way less messy. The melted butter and wax combo is not that hot.
Victor @ Taste of Artisan says
Thank you for your feedback, PB. When using fingers, does the mixture get into every crevice? How long does it take per mold?
PB, NJ says
I think it gets to every crevice since I have not seen any burning in the mould once I pop the canales out. I spend 15-20 second per mold and reheat the butter/wax mix in the microwave for 20 seconds every couple of minutes. The key is to keep the butter/wax mix runny.
I have seen some recipes call for up to 300g of flour. What is the trade off on more vs. less flour ?
Victor @ Taste of Artisan says
Hi PB,
thanks for the info. Interesting method. As far as the flour goes, I haven't experimented with increasing it so I can't say for sure what effect this will have on the custard structure or its baking behavior.
Ariel says
Hi Victor, thanks for amazing recipe! I’m planning to bake it tomorrow and am trying to prepare coating the molds today. I had one question about the beeswax + butter mixture. After coating all the molds, do you dispose the mixture or save it for later?
Victor @ Taste of Artisan says
Save it for later for sure. If cooking again soon - fridge, otherwise freeze.
Mark Warren says
Hi Victor.
What a great article thank you. I went to Paris on a business trip some months ago and bought some Caneles totally at random and I was hooked from the first taste. They only appear to be available in London and so I am about to make my first batch and will post my results!!
One quick question. I believe the copper moulds are lines with tin which has a melting point of around 232 degrees. How do you do such a high first bake without the mould’s lining melting!! I am sure I am missing something but would welcome your comments
Victor @ Taste of Artisan says
Hi Mark,
this is a very, very interesting question and I have to be honest, I've never given it the slightest thought. True, tin melting point is around 230C or 450F. But... and that's a big BUT... the tin lining inside those copper molds never gets even close to that temperature. I remember preheating my oven to 500F for 1 hour to bake bread and checking the surface temperature of my 3/4" baking stone with an IR thermometer - it was barely 380F. The batter inside the copper molds won't let the tin lining get to the melting point, not in the short time we bake at that temp. How can I be sure? Well, after taking 20 of my copper molds through dozens of batches, I have yet to see any deterioration of the lining. Don't worry about it, it's going to be just fine. Happy baking!
Julian Plyter says
Victor thanks for this terrific piece! That after almost five years of comments it's still getting getting fresh ones pretty much says it all - it's a great, definitive post. (And I"m a pastry chef!)
Your tip about the very hot initial bake was 100% perfect, and for the first time I have neither mushrooming nor any white butts! My oven only goes to 500, however it's a gas oven and I keep a stone on the floor of it - I tested with a thermometer there and boom, 550 exactly. Perfect! I just moved them from the floor up to a rack when I lowered the oven temp. I also really appreciated the tip you'd found and shared about the 2:3 ratio of wax:butter. One thing I found unappealing in my prior attempts was a waxy feel in eating them, and this helped with that quite a bit (as well as a couple other tricks I tried!).
I wanted to share a couple things I did that I found helped and haven't been addressed in the comments, that I could find (and I apologize if I'm repeating prior posts!).
- Rum flavor: I saw a few people posting that they did not have a pronounced rum flavor. Normally I would not add alcohol to a hot batter, especially if I wanted to retain the alcohol flavor, since the heat would hasten its evaporation. I also figured since I was going to store the batter for a few days, I didn't want to lose any to slower evaporation over that time period, either. I waited until just before my bake to add the rum, and I have to say I still have the taste of gentle, vanilla-rum in my mouth about 10 minutes after my last bite. (Another boon to this rum flavor was salt, which I note below.)
- Mold-greasing: Definitely agree with your technique here - one issue I had with too much wax in prior experiments was that the molds were too cool - in fact I'd used some recipes that suggested chilling them BEFORE greasing - that was WAY too much coating. I found that heating them until they were hot but manageable (I'd say around 130) resulted in the perfect thinness of coating, for me, and I did not chill them after coating. (After all, if the point is to get them hot, fast, to avoid mushrooming, this made sense to me.) I am still getting the teeniest bit of waxy texture in my mouth after eating, so I may play with the wax:butter ratio and use slightly more butter by proportion; will update on results if I do.
- Batter temp: I suspected that batter temperature might have been an issue for me in prior bakes, and I wanted to address it in this round. I baked a round with batter pretty much just 15 or 20 minutes out of the fridge, and still quite cold. I later baked a second round, this time with the same batter that was much closer to room temperature, having been out of the fridge for probably 2 hours. What I noted in the second batch was that the shell was much thinner, and didn't get TOO crunchy, like it did in the first round with chilled batter. I account for this difference by the logic that a warmer batter will set faster, and it will also need less time (indeed, 10 minutes, in my bakes) to finish baking. Whether that's physics or my imagination, it worked for me!
- Salt: I found that like all my pastries I just wanted a hint of salt. I think just under a teaspoon (kosher salt; I'd use half as much of a finer salt) in this recipe brought the flavors into relief - especially the rum - and made them all stand out just a bit more. It was exciting. What can I say, pastry is exciting 🙂
Again thanks for this awesome post!!!
Victor @ Taste of Artisan says
Hi Julian, thank you for your detailed feedback and tips. I am eager to try adding rum just before baking as what you are saying makes a perfect sense. The salt part, that's a very astute suggestion. Definitely a great idea. Don't know why it wasn't included from the start. Anyway, happy that my post helped and thanks for your insights. I am sure many will benefit from them. Happy baking!
Eric says
A note about copper molds: I got 8 copper molds (over $20 each) a few years ago and I bought 8 from Amazon at the cheaper price (around $6 each) a couple months ago. The cheaper molds seem very similar, but are definitely lighter and the metal itself is thinner than the more expensive ones. I'll report in a few days if they perform differently.
Caroline says
I love this recipe! What would you say is the difference in outcome with all purpose flour versus bread flour? Also, any tips on cleaning up the beeswax from the pan after! Always a nightmare.
Victor @ Taste of Artisan says
Thank you, Caroline. I don't think the difference between AP and bread flour is easily noticeable in this recipe, they are easily interchangeably here. The pan cleaning is easy - use foil. I always line my pan with foil, which is discarded after baking. No cleaning necessary.
Janet says
My oven doesn’t go up to 550° so I used the convection setting at 500° for tge sane amount of time.
I didn't have any dark rum, so I substituted 3 tablespoons of Grand Marnier. My husband thinks it’s the best batch of canelés yet.
Victor @ Taste of Artisan says
Good to hear that, Janet. What made you give this recipe 4 stars then?
Jeff says
Hey Victor,
This recipe looks amazing!
Do you use a oven with fan?
Victor @ Taste of Artisan says
Hi Jeff, no, I don't use convection for this recipe, but you may be onto something. It may be helpful if your oven doesn't get hot enough. Needs to be tested though.
petra sunner says
Victor, what setting of your oven do you use? and then which rack?
(i have 'surround mode'. 'convection' , 'bake'). frankly i am guessing that convection is the best, as you want an even result. But i am curious what you use...Thanks
Victor @ Taste of Artisan says
Petra, I use regular mode, without convection. I bake closer to the top of the oven. I think you may be right about convection, it's worth testing it out. In my old electric oven convection wasn't very good so I never relied on it.
kenny says
Hi victor,
I have a question. whats the purpose of chill the mold in freezer?
Victor @ Taste of Artisan says
My understanding is that it allows the coating set properly. I don't know the exact science behind this though.
Michael says
Thank you for the tips on starting on very high heat. This has solved my frustrating issue of having to monitor the bake, routinely pushing the stupid things down.
Victor @ Taste of Artisan says
Happy to hear that, Michael. At some point I remember doing that same thing myself. Sounds pretty comical in hindsight. It would look even more comical if someone at a patisserie was trying to push dozens or hundreds of those down and they just keep popping up like fishing bobbers.
Kristen says
Thank you so very much for sharing all of your experience with us! I'm sure this advice has saved others a lot of frustration and heartache. Secondly, thank you for a recipe using copper moulds! Mine arrived in the post yesterday and
I found (what I think is a good deal) on Etsy from seller ERDMHardware. I paid just over $150 for a set of 12 (including shipping from Bordeaux, France!). I've been saving up for these little treasures and was delighted to find such a (relatively) great price.
Very excited about this new adventure, I took to the internet to find a "perfect" and authentic recipe. I was a bit discouraged to see so many recipes using silicone, no mention of the beeswax, etc. - so I was very excited to have found this recipe!
I am going to make the batter this morning and bake in a couple of days. I do not have dark rum on hand, but I do have silver rum and hope that will still do the trick. Fingers crossed!
Victor @ Taste of Artisan says
You are very welcome! Good luck with your canele.
Said al Balushi says
Thank you for a great recipe and instructions
My problem is that the caneles outer layer becomes soft!
They lose the crunch within 2hours after being taken from the oven
Victor @ Taste of Artisan says
Not much you can do I suppose, they are to be eaten the same day, even within a few hours of baking. The only thing I would recommend is let them cool completely then place in an air tight container. That will help them retain the crunch for longer, especially if ambient RH is high.
ASMK says
HI Victor,
May i ask what is the purpose of adding rum in the recipe?
Does it affect the process or taste in any way if not added?
Victor @ Taste of Artisan says
My understanding is that there are two reasons for that. One is that not all rum is baked off so some flavor still remains. Some people are more sensitive to it can taste it, some can't. Another reason is that unlike water, alcohol does not contribute to the formation of gluten in dough/batter, keeping it wet and supple. When alcohol burns off quickly in the oven, it dries out the crust, which is what we want in canele.
Grant Shalks says
My issue is that canelés that I buy locally taste strongly of rum, which is very appealing. I have tried two ‘workarounds’:
- Injecting with rum syrup … it just runs straight out! 🥴
- Soaking in rum syrup … it softens the crust!😱
Any thoughts??
G.
Tulip says
Hi I bought some food grade bee wax in 2012 in Paris. Have not used them yet. Are they still edible now? How to see if the wax has gone bad? Thanks.
Victor @ Taste of Artisan says
I think you are in luck as pure beeswax doesn't spoil if stored in cool, dry environment. If it looks fine and smells fine it should be fine to use.
Tulip says
Hi Victor
I notice the beewax has become powdery over time. Does it behave like chocolate where it blooms?
Victor @ Taste of Artisan says
Yes, it does bloom if stored at lower temps than it likes. This is nothing to worry about.
Grant says
Hi all, I posted a few months ago and wondered if any of the new contributors on the forum had a suggestion for this problem:
I’m finding by the end of the bake that there is little flavour of rum left - it is as if it’s all been baked out. Any thoughts? Has anybody else experienced this ?
paula j oakes says
Victor - unfortunately I only have silicone molds. Have you tried them? Do you recommend any changes?
(Just got back from Bordeaux and I am hooked!)
Victor @ Taste of Artisan says
I know the feeling. My wife and I can't imagine living without them.
To answer your question, no, I haven't tried silicone molds. I jumped right into the realm of copper as was recommended by P. Herme and never looked back. I started with just a few and now have this:
https://tasteofartisan.com/best-canele-copper-molds-1/
Eric says
I first tried silicone molds and was very disappointed. I would not recommend them.
Corrine says
My oven only goes to 500, how much more time should I add on to the initial bake? Thanks!
Victor @ Taste of Artisan says
Corrine, that's unfortunate as the higher initial temp is what helped me eliminate mushrooming. I don't know if adding time at 500 would help without testing but I have a feeling that bumping it to 15 minutes would make sense.
Katie says
Do you let the batter come to room temperature before placing it into the oven, or just pour it in cold?
Victor @ Taste of Artisan says
Take out of the fridge, give it quick whisk to re-incorporate the foam cap, pour and bake.
AndiK says
I’m having a problem with my butter separating and forming a crust over my batter when it’s chilling in the fridge. Am I doing something wrong? Is this normal and just needs to be reincorporated? Any help would be very helpful, I have to make a very large batch this week >.<
Victor @ Taste of Artisan says
Hi Andi, to be honest, this is not normal. All you should be getting is a foam cap on top which you get rid of by whisking the batter before pouring into molds. I took a snapshot from my last batch a week ago, this is what it looks like:
https://tasteofartisan.com/wp-content/uploads/2019/03/canele.jpg
Butter separation is an indication that the custard was not stable which allowed fat molecules to come out of suspension. This can be caused by several things. For example, this can be caused by adding the butter too quickly, so the emulsifying agent (egg yolks) got overwhelmed and couldn’t keep linking the fat molecules to the liquid molecules. Or perhaps the butter was not hot enough to get proper emulsification. Perhaps not enough whisking. Perhaps the milk was not warm enough to make a stable custard. Also, let the batter come to room temperature before refrigerating. Sometimes butter can separate when hot custard is shocked by cold temperature.
Shalks Grant says
Hey All,
A major problem I have at present is that by the time I finish baking my canelés ... I can't taste any rum!
It's like it's all been 'baked out' or something ...
Any suggestions ...?!
Victor @ Taste of Artisan says
That's what happens to alcohol... I read somewhere that after 2 hours of baking only about 5% of alcohol remains. Have you thought about infusing canele with rum after baking? I think that is the best way to go about it. I make rum infused tiramisu (a 50/50 sugar and rum syrup) - people love it. To inject, I would use something like a marinade injector.
Grant Shalks says
Many thanks for replying Victor.
I have to confess to still being confused though: if the rum is inevitably going to be 'baked out', why is it always required to be added to the batter in all canelé recipes? Or to put it another way, do you professional chefs always have to infuse canelés after baking to get that wonderful rum flavour - it does seem like rather a 'hack' ...
Any advice would be gratefully received ..!
Victor @ Taste of Artisan says
I can't speak on behalf of professional chefs as I am not one myself, though I used to work in food industry a while ago. But here is my understanding. There are two reasons for that. One is that not all rum is baked off so some flavor still remains. Some people are more sensitive to it and some less. Another reason is that unlike water, alcohol does not contribute to the formation of gluten in dough/batter, keeping it wet and supple. When alcohol burns off quickly in the oven, it dries out the crust, which is what we want in canele.
Grant Shalks says
OK thanks Victor. 😉
Victor @ Taste of Artisan says
You are very welcome, Grant.
Grant Shalks says
Hey All,
A major problem I have at present is that by the time I finish baking my canelés ... I can't taste any rum!
It's like it's all been 'baked out' or something ...
Any suggestions ...?!
Kris says
Great recipe but the tops of my caneles were white. Everything else was perfect. Any tips?
victor says
Are you looking for more tips in addition to the one I mentioned in the post?
Kris says
Your tip has to do with high initial temp and not filling the mold up too high, correct?
victor says
That's correct. I can't say I can attribute this problem to anything else.
Sue says
My husband, who is half French, raised in the US, and I discovered caneles at a corner bakery on our first trip to Paris together. Since then, we have CRAVED them and tried them whenever/wherever we could, but always few and far between. Finally, I splurged on some of the copper mold for him for Christmas. Then we scoured the internet for recipes--and every recipe had a different technique for the molds, the crust, the baking...I came upon your amazing tutorial and thought "Ok, she has figured this out!" We followed your recipe and technique step by step and my husband made perfect Paris-style caneles on the first try! So now we are hooked. We only want to experiment a bit to get a stronger rum flavor--which we think is down to the rum we used, not the quantity--and then we'll never be chasing caneles again...outside our own kitchen, that is. Thank you for this really excellent, comprehensive post! He had already mastered Madalienes, so we figure if he can do a laminated dough next (Hello, Kouign Amann!), he'll basically be a real French pastry chef, lol! I urge everyone looking to make caneles to USE THIS RECIPE AND TECHNIQUE! Thank you again!
victor says
You are so welcome! Glad I could help. Making caneles was full of frustration for me before I 'got it'. Glad my post is saving frustration to my readers.
Jenn says
Can you post a picture of how much you filled the canele moulds?
victor says
There is one picture in the post with one mold filled... and here is another one with a few molds filled. Hope this helps.
Mike says
Mushroomed and never receded
Lanna Dickinson says
I have made these many times in the past but am only now attempting to convert to a Gluten Free version. My family has allergies thus requiring the change. I will try a basic, cup for cup, flour blend first. I am concerned the xantham gum used in GF baking will impede the custard texture, so I am going to omit it on first attempt. Any other tips you might offer?
victor says
Oh, I wish I could but have practically no experience with GF baking. I hope they turn out great. Please, post your results here, I am sure there are others here who would be very interested in a good GF version of canele.
Lanna Dickinson says
Ok! Got it...this was not an easy conversion:
Your recipe with these adaptions:
*100g simple GF flour blend
½ tsp fine salt
*makes 1C=140g (93 g superfine white rice flour, 32g potato starch, 15g tapioca starch/flour)
Changes to directions:
Resting is not necessary because there is no gluten. However, the batter tastes better after it rests.
Do not use a butter/beeswax blend in the molds, beeswax only. They will not rise with the butter. A thin layer worked best.
Do not chill the molds, let them come to a warm room temperature. fill them with chilled batter
Fill mold almost to the top
Bake on a cookie sheet
Bake at 500 for 15 minutes then reduce temperature to 375 for 55 more minutes. They must be very dark brown or the centers will be mushy (The 550 oven made the bottoms too crispy)
Let the finished Caneles rest for 2 minutes in the molds. Loosen the side with a knife gently. Flip on a cooling rack. They are very fragile. Must rest at least an hour to let the custard set.
Happy Baking!
victor says
Thank you, Lanna. I am surprised to learn that butter prevented canele from rising. Glad to see a successful GF version of the recipe.
Josh says
I wanted to say that this is the best cannele recipie I have found by far. I started out with the copper tins and beeswax after reading they’d provide the best results. However, I still went through so many bad batches with other recipes that I knew something must be off (especially after the one recipe I was using that didn’t say to rest the batter and had no high heat at the start).
Thanks for sharing all this info, it’s helped me make exactly the canneles I wanted and saved me from more bad batches!
victor says
Hi Josh, glad I could help. Thank you for the feedback.
Grace says
This absolutely amazing recipe enables us to reliably use our drunken purchase of 8 copper molds to make delicious french morsels. thank you
Victor @ Taste of Artisan says
You are very welcome.
Mattie says
I made these for the first time this week using your recipe and they were AMAZING. I honestly did not expect them to be as fabulous as they were. Thank you so much.
victor says
Fabulous they are;) And like nothing else.
Charles says
You did a fantastic job with this recipe. My first go was pretty good but by batch 5 I was really happy.
I like a more custardy texture to the interior so I'm experimenting right now with 1 less whole egg in favor of 2 more yolks. And I'm also experimenting with a rum + triple sec combo vs. just rum.
But your recipe was the starting point to give me the confidence to iterate from here.
Thank you!!
victor says
Happy to hear that, Charles. Glad I could help. Portuguese pastéis de nata and caneles I cannot live without. I had to learn to make them perfect.;)
Jane says
I just made my first batch and have another on the oven. Naughtily I tried one (I had never even eaten one before, let alone baked them!) even before it had totally cooled. Wow! It was everything I hoped and more. A crunchy toffee like shel and delicately scented custard centre. My husband was ridiculously impressed. What a bizarre little creature it is. I’ve never tasted anything quite like it. The process of making them was fascinating and a little strange to me. Thank you so much for your detailed description and photos. I’m sure it saved me a lot of heartache. Just for the record, I used a heavy, non stick Canele tray and they worked out well. I better go to the kitchen now and make sure the husband is not helping himself to more. These little lovelies will be shared with my French class.
victor says
I am very happy to hear that my post helped you, Jane. I share your fascination with canele, they are unique, adorable and have a long history. My copper molds got so rustic looking that every time I use them I feel like I am in a kitchen of some old French patisserie. A truly unique experience, both making them and enjoying.
Corrine says
These came out almost perfect! I think I need to work on getting a thinner coat of wax because it left a waxy mouthfeel that I've never had with other caneles but other than that my caneles were perfect! I used to make these daily in Manhattan about ten years ago and these were spot on! I'm bummed I lost the recipe for them because they were lemon lavender caneles and sooo good. This is the first time I've made them in my home and I'm glad I found your detailed page first before having to run through a bunch of other recipes. Thank you! I'll be scrolling through your blog quite often now as I really appreciate all the detailed explanations you give.
victor says
You are very welcome. To get a thin coating, keep the molds and the wax a little warmer than you did. Pour the wax/butter mixture in and pour out very quickly. Don't brush. That should do it.
James F. Waters, III says
In the past, I've used a silicone mold to make these. No real puffing issue but no crunchy exterior. So I invested in copper molds via the Amazon site.
I seasoned them as instructed. Coated them with the bee's wax/butter mixture.
Both times mine blew up and out of the molds. They didn't sink back in. I have a convection option on my stove so I'll give that a try next time. But, so far, this isn't working for me.
BUT, I did get the crunchy exterior and creamy interior. So, other than looks, this was the correct flavor and texture.
I'm not sure what I'm doing wrong with the rising batter.
Diana says
Your recipe was perfect! Thank you so much! On my first attempt at making these, and it worked!!!
victor says
So glad to hear that, Diana. My first few attempts were a disaster, but the again, I used a wrong technique at first. Glad my experience helped you.
Ann Damirez says
I have been thinking and searching and comparing cannele recipes, fortunately I chose yours and my instinct was right. I just made this today, at first I was kind of nervous with the thought that mine would not be successful but I have strong faith about it. And yes I did it and I was very happy with the result. They You were right, they did rise up and did fall back down slowly when I turned down the temperature, “no mushrooming”. I didn’t use the butter and beeswax mixture, I just used only butter and I didn’t have any problem about sticking on the molder. It was truly a big success for me as my first time baking Canneles. And oh! I love how it tastes, man, really love it. I have not baked them all. I just baked only two (24 hrs of chilling) as a trial : ) I would love to show you the photos of my Canneles : ) Thank you so much for your recipe and effort to write this recipe for us who wants to try Canneles. You know I am so proud of myself as a self-taught baker. Baking is my passion. I am happy and it makes me happy whenever I cook/bake something especially if they turns out perfect. Thank you again. God bless!!
victor says
I feel very happy when my posts help others. I am glad it helped you too. Thank you for posting a detailed feedback, Ann.
Margaret Chapman says
Just prepared batter. Started to season pan and read it’s only to be used to 230C! That’s 446F. I don’t want to waste batter but I’m concerned about baking at 550F - maybe I can get away with it for 10 minutes? Just couldn’t invest in copper at this time. Thank you.
victor says
This is not a good idea I am afraid. It's most likely coated with some sort of non-stick material that will start releasing harmful chemicals if heated over safe limit. That or it will start degrading at high temps. That said, I've done crazier things in my kitchen;-)
Kathy says
Victor, thanks for your informative post. Unfortunately I read it after my first dismal failure! I am going to try your techniques for my next batch. One question, my Canelés stuck to the molds terribly. The butter wax mix seemed to bubble out at the beginning, then the Canelés rose and sank back into the mold. The color looked pretty good at the end, but they were gooey on the inside and stuck so that I couldn’t get them out intact. Any thoughts on this problem? Thanks!
Kathy
victor says
Hm... it will sound like an obvious thing, but did you season your molds before using them? Once they dropped in, what temp did you use to finish them baking?
petra sunner says
your reply to kathy: she wrote about butter wax mix. So she must have put it into the molds. But you, Victor, wonder if she seasoned the molds....Can you explain what you mean by 'seasoning'. Thankyou
Victor @ Taste of Artisan says
Please, refer to Note #1 in the recipe above for P. Herme's seasoning instructions as an example. I recommend that you follow the instructions from the manufacturer of your molds.
Deborah Pearson says
I have both the copper molds and a silicone mold that holds 8. Do I need to do the wax/butter lining in the silicone pan? Do you have any tips for using the silicone molds?
victor says
Sorry, Deborah, I never tried silicone molds so I can't really answer. Perhaps someone who has can answer?
Atraidou Alexandra says
I ma pastry chef.
Thank you for your beautiful
Recipes.
victor says
You are very welcome.
Justin says
Thank you very much for your blog. Can you recommend some advice for an issue I am having? I am following standard recipe with 10min at 500F and then 50min at 375F...the exterior comes out great, but the interior seems too custardy, almost not fully cooked. To avoid burning the outside but yet cooking fully the inside, should I cook less at high temperature and longer at lower temperature? Thanks.
victor says
Justin,
It's hard to give a precise answer without knowing details and experimenting a little. Pierre Herme recommends 15 min at 450F and 60-75 min at 350F afterwards. That never worked for, period. You can try and see it works for you to get the desired results. My problems was that caneles would pop out and never settle back in. Only high initial temps would help. If you are having a similar problem you can try high temp initially than lower to 350F for 60 min and see if that works.
Also, check to how you oven bakes. Is it possible that it bakes cooler than it reports? Kitchen ovens are notorious for being off, hence the saying that 'everyone's oven bakes differently'. Do you have a baking stone? If so, try baking caneles on a baking sheet set on top of a baking stone. It should help cooking the pastries inside more efficiently.
Justin says
Great write up! Where did you buy the generic caneles mold from Bordeaux? Can it be order online?
Thanks!
victor says
Thanks! I am sure they can, though shipping from Europe can be a deal breaker. I got mine from some local store - a colleague of mine is from there and I asked him to buy a few molds for me when here was going there on vacation.
Shirley says
How did you clean the black spots off these molds?
victor says
Not sure which spots you are referring to. Are they on the inside or on the outside? All I do is wipe the molds with paper towels. I don't obsess with cleaning them spotless, it's not necessary. Occasionally, I get a few stubborn pieces stuck in the crevices at the bottom of the mold and I use a Q-tip to get them out.
Annie says
Hi Victor, a friend gifted me with some copper molds recently and after some extensive research I'm ready to make my first canelé batter with your recipe. Just curious, is it based on Pierre Hermes' recipe and if so, ia there a reason you switched out the confectioners sugar for granulated? Have you tried making canelés with confectioners sugarand if so, how did your results compare? Thanks, and wish me luck!
Victor @ Taste of Artisan says
Hi Annie, yes, the recipe originally started with the Herme's recipe... I tried confectioner's sugar vs granulated sugar but did not see any difference. I mean, the sugar gets dissolved in liquid ingredients in the end...
John says
This recipe works awesome! I used the recipe in the book sold on Amazon, and the inside was goopy, not a honey-combed custard. I had cooked those on convection, and think the outside crisped too early. I've been using a nonstick pan, but just recieved my tins, and plan on giving them a go. I've used bread flour, and cane and/or raw sugar in mine. I found that the batch that sat for 3 days, made with raw, stood up taller in the pan than one day rest batter. Probably due to the flour fully hydrating? I've also had fun interchanging the alcohol from 23 yr rum, to a whiskey/cointreau mix, Grand Marnier, and Rum/Chartuese. I live at 4000' elevation, and have been cooking at 550 for 10 and 375 for 50-53 minutes. I am now fully addicted to the point that I have the recipe memorized, and my neighbors have been getting them for christmas. Great Post!
victor says
Fantastic! Great to heat it. Thank you for stopping by and leaving feedback.
Nesa says
I've made this recipe several times and I think it's one of the best I've found so far! my family loves these and I never have enough 🙂 I do have one question however. I find personally that when I eat these, I'm left with the feeling the my mouth is coated in the beeswax. I used the amount you specified here but do you have any ideas on how to do away with this effect? It's a bit distracting. Thank you!
victor says
Hi Nesa, interesting observation. My ratios are very typical, no less no more than what they use in French bakeries based on my research, I try to be as authentic as possible with these. The wax never bothered me, I've always treated the waxy feeling in my mouth as part of the authentic canele eating experience. I like it. I've seen a French product called 'slider', I actually used it, it is less waxy but I did not like it at all.
If the wax bothers you, try coating the mold with a hotter mix, that will allow you to get a thinner coat. Alternatively, use less wax and more butter in you ratio, see if that helps. Without experimenting it's hard to say what you will find acceptable for your taste.
Nick says
So any worries about the tin lining melting at such high heat?
victor says
Never had any problem with that. The molds are designed to withstand high temps. My molds are holding up very well after several dozen bakes.
Jaqui McDonald says
Can't wait to try these! By chance do you know which brand of dark rum you used? Last time I tried cooking with that ingredient the entire cake I made just reeked and the taste was way too strong. Please advise!! Thanks!!
victor says
I typically bake with Bacardi rum, but also have been using Captain Morgan Jamaica dark rum that friends gave me as a gift. Never noticed that either was overpowering. Some people are more sensitive to certain smells/flavors. I'd say skip the rum and use the liquor that you like. If you like brandy or cognac, use those. If you don't like alcohol, I would skip it altogether.
Teji says
Thanks for sharing step by step process. If you're using a big commercial convection oven do you you have the fan on or off?
Are there any other alternative for beeswax? Can I use butter and sugar to coat the mold?
Thanks!
victor says
Hi! Typically convection is not used, but there is no harm in trying a small batch and see how it turns out.
An alternative to beeswax would be a challenge. Beeswax is what gives caneles their unique sheen and that feel as you eat them. In France they sell a product called Slider, which some commercial bakeries use supposedly. It's a more economical alternative to beeswax. I sourced a can and tried with one batch and did not like the results. I am back to beeswax. Now, if you don't care about that authentic look/taste, it's a different matter, and sugar/butter mix may give you acceptable results.
Marie Matthews says
Thank you so much, Victor, once again for your well thought out and detailed reply and suggestions. I will try coating the molds as thinly as possible with the bees wax next time and see if that improves the "white bottom" problem, and perhaps get less spillage out of the molds during bake-time. You are right, I suppose, no matter which technique you master making Caneles is not a fool proof endeavor. But we can come as close to perfection as possible if we keep experimenting; practice does make perfect!
Thank you, Marie
Marie says
Hello Victor,
It's Marie again! 🙂
I have made Canele de Bordeaux several times following your recipe and method to great success. Thank you!!! Seems my only challenge is that the bees wax/butter coating inside the copper molds melt when they hit the hot oven and spill onto the baking sheet and burn during baking time; leaving the batter inside the molds without much bees wax. I do as you instruct: I evenly coat the molds with the bees wax/butter mixture and put them in the freezer for 10 minutes, fill my batter almost to the top and bake at the temperatures you recommend. My batter does not rise and spill over, it remains in tact (thanks to your ingenuis temperature technique), so, the batter is not the problem. Some of my batches seem to have less bees wax spillage, resulting in much more evenly baked caramelized Caneles, whereas, with more bees wax spilling out the Caneles get that "white bottom" and lack caramelization. Any suggestions to prevent the beeswax from spilling out, or is this normal and expected? Thanks so much for your time!
victor says
Hi Marie,
I haven't been paying attention to the issue that you are describing, I sort of do it now and am happy with the results. I do get 'white bottoms' every now and again, but I don't worry about those, the caneles still taste awesome. Back in the day I've gone through dozens and dozens of canele pictures from famous French bakeries to see how theirs looked and I did see quite a few of those with 'white bottoms'. So, that is a common thing and nothing to worry about. I guess the process is not 100% fool-proof. One thing I would suggest is to try and make the bees wax coating as thin as possible. When you coat the mold, keep the molds and the wax sufficiently warm. I think 'white bottoms' are directly correlated with excess bees wax. The wax will always melt quickly in super hot oven and gather at the bottom, and some will spill over. I think if you have too much of it at the bottom, there will be much less contact with the metal and that's how you get poor caramelization. Let me know if your experiments prove this theory.
Marie says
Hello again Victor!
I'm writing to let you know I made my first Caneles using your recipe and I meticulously followed your instructions. Thank you so much for your post and tips that made if very helpful for me. My Caneles turned out perfect!
victor says
Hello, Marie. You are very welcome and I am glad to hear that you had success with making your caneles.
Marie says
Hello Victor!
I have been bitten by the canele bug and have been feverishly researching and reading to inform and prepare myself for my first attempt at making them. As aforementioned, I have perused many sites, and yours was the most informative,
detailed, and educational of them all. Thank you for going through the trouble to share your knowledge with us. How very helpful and much appreciated! I ordered my copper molds from Amazon; the same set of 4 in the link you included here (they are no longer $34.99 but still a good deal). I will season them upon arrival, and will venture my first attempt following your recipe. You have so many great tips here. Do you keep the battery cold in the fridge until ready to pour into the cold molds? I will let you know how mine turn out. Thanks so much again!
victor says
Hello Marie,
Thank you for taking time to post your feedback, glad you've found my information helpful. Yes, I do keep the batter in the fridge up until I use it. I never tested if that makes any difference though. The only thing that is critical is to mix the batter before pouring into molds. And yes, let me know how they turn out.
Sarah says
Hello! So looking forward to making these soon. How many caneles does your recipe make?
Thanks so much,
Sarah
victor says
14-16, depending on how much you fill the 2-inch molds.
Angelique says
Thanks so much for your amazing direction. My canneles looked perfect but were not that nice burnt look and they tasted more like a vanilla custard tart than the cake that I had at the bakery. Any ideas? I would love some help.
victor says
I am puzzled about your comment. Caneles taste nothing like a cake, and very much like custard. That's the idea - to get a soft, custardy inside and a dark, crunchy exterior. It looks like the bakery is doing something wrong. Perhaps they do it intentionally as a true canele takes effort, time and good ingredients to make. A local French bakery here makes them only twice a week. I think I know why.
Andrea says
YOU ARE MY HERO. I baked these, using your recipe and only yours, and they came out wonderful. Actually, correction: the first batch were just pretty good, the next batch (same batter, but around 22 hours had passed) were even better in texture and colour consistency and the third, almost perfect. There are a few bakeries that bake canneles in Melbourne now so my husband and I have had a few so we're quite discerning, and these came out almost as good as the number 1 canneles that we've tried. Eep!
So thanks for such an in-depth and considered recipe, and for all your trialling and testing. I only have three cannele moulds so I need to buy more - that's partly why I had to do so many batches throught the week - but I absolutely think it's important to use copper.
victor says
Andrea, thanks for sharing your success story with baking caneles. Glad my post was helpful.
Mel says
So I wanted to add an additional flavor to the caneles (specifically banana). Any advice on how I can go about doing that?
victor says
Never tried doing that. Incorporating banana pulp to the batter without any further modifications will change the integrity of the canele. You would need to experiment with the ratios. I think the simplest method would be to try filling the molds 2/3 - 3/4 of the way and dropping a few small banana pieces in each mold. This way the integrity of the batter will remain the same and you will get the banana flavor.
brad says
Hi Victor,
I notice that the molds pictured on your blog don't match the picture of the mold on the Mauviel website (https://www.mauvielusa.com/Copper-Tinned-Canele-Mold-plu4180.55.html). The sides on your molds are more vertical rather than tapered, the fluting on the sides is deeper, and the dimple on the bottom (top) is more recessed. Do you know, are your molds an accurate representation of what they actually sell, or is the picture on their website more correct?
victor says
Hi Brad,
I am not sure. Judging by the picture, mine do look slightly different from those on Mauviel's website. It's possible that the seller / Amazon I purchased from sent me Matfer Bourgeat instead of Mauviel. Upon closer look, mine do look more like Matfer.
That said, I now have 20 canele molds, with 12 coming directly from France. They were purchased and brought to me by my colleague who went to Bordeaux to visit family. They came in unbranded packaging, but they look nearly identical to the ones I purchased from Amazon. I can stack them and they fit into one another exactly the same.
Amy says
Thank you, Victor for your blog! Your recipe & method works super well.
No more mushrooming after following your recipe! My oven doesn't go as high as 550F. Luckily at 480F (maximum temperature) on convection setting for 10 mins, then reducing temperature to 375F on conventional setting works for me.
My caneles look good & taste yummy. I'll be trying your other recipes soon!
victor says
Good to hear, Amy. Sometimes little things like that make a world of a difference.
Michelle says
They look so good! How many does this recipe make?
victor says
Thank you, Michelle. This recipe is good for about 14-16 caneles if using standard 2-inch molds.
Ray Butarbutar says
loveeeeely. And such an informative writing. Thank you for sharing your process 🙂
Ray from San Francisco
victor says
Thank you for the kind words, Ray. Good luck making your caneles. They are worth the effort.
Wanghwa says
Your caneles look so beautiful. I, too, have had the same mushroom problem for the longest time. I've tried so many different things as you mentioned. I'm going to try the high temperature trick and see what happen.
Why do you call for bread flour? I read one recipe and thought pastry flour should be used? Any reason for the high protein flour?
Thank you for the post!
victor says
Very good question. I did a lot of experimenting with the flour as well, and tend to agree with the Chefsteps.com's findings that bread flour results in denser interior and crunchier shell, just how I like it. Now, if you go to pastry flour, you will get much less of that contrast between the interior and the shell. In the end it's all about personal preference.
Wanghwa says
Victor,
Thank you for the reply. I'm going to try all three types of flour and see what I like. I did see chef.com calling for bread flour. That's the first time I see someone use bread flour. Just like pate choux, some uses AP, some uses bread and some uses cake flour (a lot of Japanese recipes use cake flour).
Thank you again for your post!
victor says
You are very welcome. I think this is the best approach, to try all three and pick the one the you like the best. You may be surprised.
MitchB says
Thank you for this great expose'. Making these has been on my bucket list for quite a while now. Thanks for sharing your experiences.
victor says
You are welcome, Mitch. Glad you found my post informative. Good luck with your canneles. They are worth the effort.
Purabi Naha says
Wow, I must say, you are an amazing baker, coz Canele is not at all easy to make! You have mastered the process...Thanks for sharing your experience! We recently went to France on a holiday, and enjoyed the Caneles there.
victor says
After abut 20 botched batches I had better mastered the process 😉 Yes, it was a challenge but the feeling of great satisfaction and pride after I finally got it was well worth the effort.
Milene says
Hey Victor
Your Canele look amazing. Can’t wait to actually try your recipe. But I have a question. May I ask you, I followed your link and purchased the Matfer Bourgeat Canele Moulds and seasoned them as you recommended. Just wondering why they are no longer copper coloured, they’ve turned gold. Is this normal? Thank You. Milene
Victor @ Taste of Artisan says
Hi Milene, that's normal. Here is the picture of how mine look like now.
https://tasteofartisan.com/wp-content/uploads/2021/09/copper-canele0molds.jpg