How to Can Meat
Calories:
Instructions for making homemade canned meat.
Print Recipe
Equipment
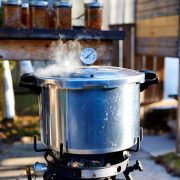
- A pressure canner
- Wide mouth canning jars
- A wide mouth funnel
- A jar lifter
Instructions
- Prepare the jars. They must be clean but don't have to be sterilized. Have all the necessary tools (pressure canner, funnel, jar lifter, paper towels) ready.
- Prepare the meat, either for raw-packing or cooked for hot-packing.
- Raw-pack or hot-pack the meat in the jars, leaving 1-inch headspace for hot-packed meat and up to 1-inch for raw-packed meat. Raw meat will shrink so you may fill up the jars all the way to the top. When raw-packing, add only meat and seasonings, don’t add liquid. The meat will release own juices during processing. Run a plastic utensil around the inside of the jar to free bubbles and remove excess air.
- Wipe off the rim of the jars and place the lid on top. Screw on the bands finger-tight.
- Put about 3 inches of water in the canner or as recommended in your pressure canner's manual. The temperature of the water should be similar to the temperature of the jar contents.
- Fasten the canner lid. Leave the weight off the vent pipe. Heat on high until steam flows freely from the vent pipe. This pushes the excess air out of the canner through the vent port. If the canner is not exhausted, the inside temperature may not correspond to the pressure on the gauge.
- Let the steam escape continuously for a minute, then place the weight on the vent pipe. Let the canner pressurize, which will take about 3 to 5 minutes. Turn the heat down a little and wait until the pressure dial indicates 11 PSI or the 10 pounds weighted gauge starts to jiggle. Stat the countdown from this point.
- Process meat at 10 pounds pressure, pints for 75 minutes, and quarts for 90 minutes. Keep an eye on the canner and regulate heat to maintain a steady pressure at or slightly above the set gauge pressure. (see note 1)
- Remove the canner from heat and let it depressurize naturally. (see note 2)This will take about 30 minutes on average. It may take less or more depending on the canner size.
- Slightly rock the weight, no steam should be released and no resistance should be felt. Remove the weight from the vent pipe. Wait a minute, then carefully unfasten and remove the lid (opening away from your face) from the pressure canner.
- Using a jar lifter, carefully remove the jars and place them on a towel or a cooling rack to cool down to room temperature, undisturbed and away from drafts. Allow at least 12 hours for this.
- Remove the bands. Wipe the jars with a damp towel or paper towels. Test the seals.
- Store in a cool, dry place for up to 2-3 years. The most optimal storage temperature is about 35F-59F (2C-15C).
Notes
Note 1 - if at any time pressure goes below the target level, bring the canner back to pressure and start the timing of the process over again, from the beginning.
Note 2 - Cooling the canner with cold running water or opening the vent port before the canner is fully depressurized will cause loss of liquid from jars and seal failures.